
Hour 17. Frame Animation Using a Sprite Sheet/Atlas
What You’ll Learn in This Hour
• Animating with a single strip
• Drawing frames from a strip image
• Animating with a sheet (atlas)
• Testing sprite animation
Animating with a Single Strip
There are many ways to do frame animation in a video game. Perhaps the simplest method is to load each frame from a series of bitmap files with one frame per file. Using this technique, an array or list stores the frames. Another technique might involve a custom database (random access file) containing frames stored as binary data. For instance, it is possible to store all the bitmap files for an animation in a ZIP archive and then read them using a ZIP library. (The Java Archive utility, called JAR, uses the ZIP format).
These are both valid means to store animation frames. However, experience shows that those two approaches become difficult to manage when a lot of animations are needed in a game. It becomes a logistical problem to manage all the files.
Tired of creating new projects in Eclipse? Try making a copy of your last project instead! Right-click a project name in your workspace (Package Explorer), and select Copy. Then open the Edit menu and choose Paste. A Copy Project dialog appears, allowing you to name the new project. Presto, a complete duplicate of the old project with a new name is ready for your new code!
Arranging Animation Frames
A better approach is to use a technique called tiling to store animation frames on a single image. The resulting image is called a sprite sheet. Another popular name for it is texture atlas, but they both refer to the same thing: an image with two or more frames of animation stored on it. Figure 17.1 shows an example of a simple sprite sheet or texture atlas. (Note: We will use the single term sprite sheet from now on).

Figure 17.1. A one-row sprite strip with six frames. (Image courtesy of Ari Feldman.)
You’ll see some distinct advantages to using a strip such as this to contain frames. One advantage is that only one bitmap file has to be opened (as an asset). Another advantage is that the image itself contains the frames in memory, so no other construct is needed (such as an array or list); the frames can be drawn directly from the strip to the screen.
This hour does not feature any new improvements to the game engine, but for the sake of consistency, a new project called H17 Game Engine Library can be used with the Animation Demo project this hour.
Drawing Frames from a Strip Image
All we need to know to animate a strip is the number of frames and the size of each frame (in pixels). Based on the width, you can calculate the X,Y position of any frame by multiplying the width by the frame number.
X = frame * width;
The Y position is always 0 because there is only one row in a strip. Figure 17.2 shows the dragon animation strip labeled with frame numbers for reference.
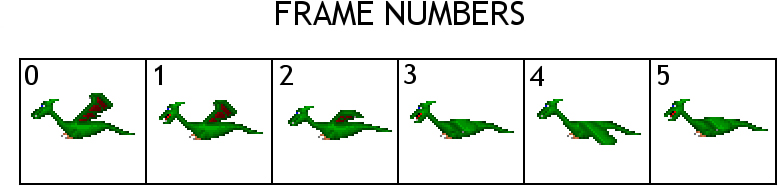
Figure 17.2. The frame numbering begins with 0.
To draw a frame out of the strip, you can use an overload of Canvas.drawBitmap() that accepts two Rect parameters—one for the source rect (the frame), and one for the destination rect (the output). You can change the destination to scale the sprite smaller or larger this way! See Figure 17.3.
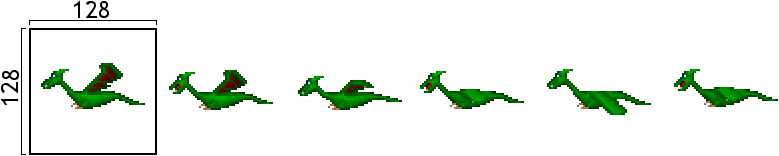
Figure 17.3. The width and height of each frame is important.
The drawStripFrame() method helps with animating a sprite strip. This is a standalone method that you can add to the game engine or to the Sprite class if you want.
public void drawStripFrame(Sprite sprite, int width, int height, int frame) {
//define the source rect representing one frame
Rect src = new Rect(frame*width,0,frame*width+width,height);
//define the destination location
int x = sprite.position.x;
int y = sprite.position.y;
Rect dst = new Rect(x,y,x+width,y+height);
//draw the frame
Paint paint = new Paint();
canvas.drawBitmap(sprite.getTexture().getBitmap(), src, dst, paint);
}
To add a bitmap file to an Android project, copy the file (Ctrl+C) as if you are going to copy and paste the file to a new location, such as another folder. Next, in the Package Explorer in Eclipse, locate the assets folder under your current project and select it. Then paste the file (Ctrl+V) into this location.
Animating with a Sprite Sheet (Texture Atlas)
Figure 17.4 shows a typical sheet with the columns and rows labeled for easy reference.
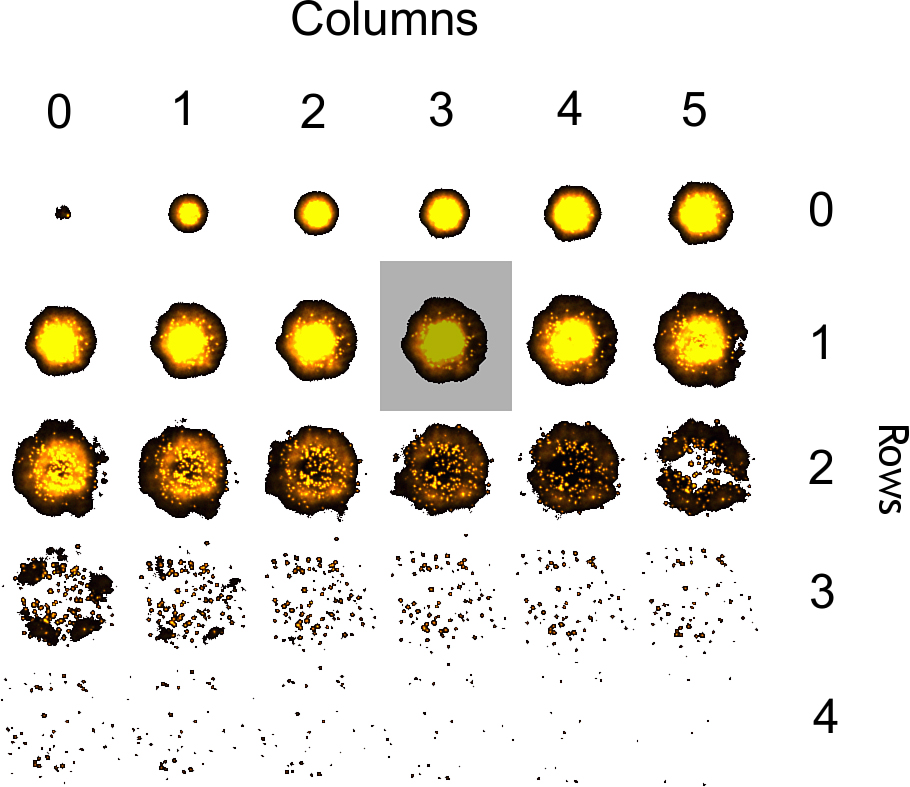
Figure 17.4. An animation sheet with 6 columns and 5 rows, for 30 total frames.
The more important of the row and column for animation purposes is the row calculation, so we’ll do that one first. To make this calculation, you need to know how many frames there are across from left to right. These are the columns. Here is the formula for calculating the row or Y position of a frame number on the sprite sheet:
Y = ( frame / columns ) * height;
To calculate the column or X position of a frame number on the sprite sheet, a similar-looking calculation is done, but the result is quite different:
X = ( frame % columns ) * width;
Note that the math operator is not division. The percent symbol (%) is the modulus operator in Java. Modulus is similar to division, but instead of returning the quotient (or answer), it returns the remainder!
Why do we care about the remainder? That represents the X position of the frame because X is the extra or leftover amount after the division. Recall that the formula for calculating Y gave us a distinct integer quotient. We want to use the same variables, but modulus gives us the partial column in the row, which represents the X value.
Here is a helper method called drawSheetFrame() that has no dependencies, so you can drop it into any game and use it (assuming you’re using game.engine.Engine due to the Sprite and Texture classes).
public void drawSheetFrame(Sprite sprite, int width, int height,
int columns, int frame) {
//define the source rect representing one frame
int u = (frame % columns) * width;
int v = (frame / columns) * height;
Rect src = new Rect(u,v,u+width,v+height);
//define the destination location
int x = sprite.position.x;
int y = sprite.position.y;
Rect dst = new Rect(x,y,x+width,y+height);
//draw the frame
Paint paint = new Paint();
canvas.drawBitmap(sprite.getTexture().getBitmap(), src, dst, paint);
}
The Animation Demo
To properly test both animation methods presented in this hour, use the source code that follows for a complete example called Animation Demo. This program animates three sprites on the screen, each with a different size and number of frames for illustration. Figure 17.5 shows the sprite sheet for an asteroid with 64 frames (each 60×60). Figure 17.6 shows the sprite sheet for a walking zombie with 64 frames (each 96×96).
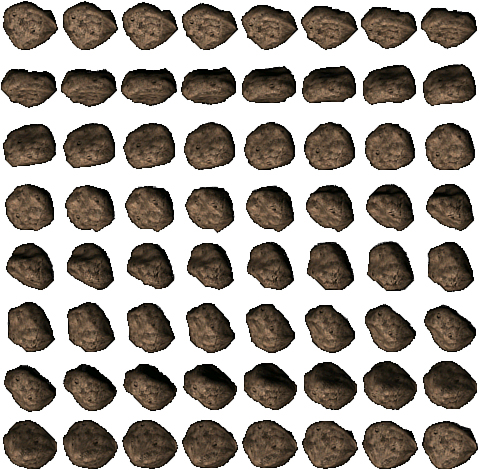
Figure 17.5. A sprite sheet for an asteroid animation.
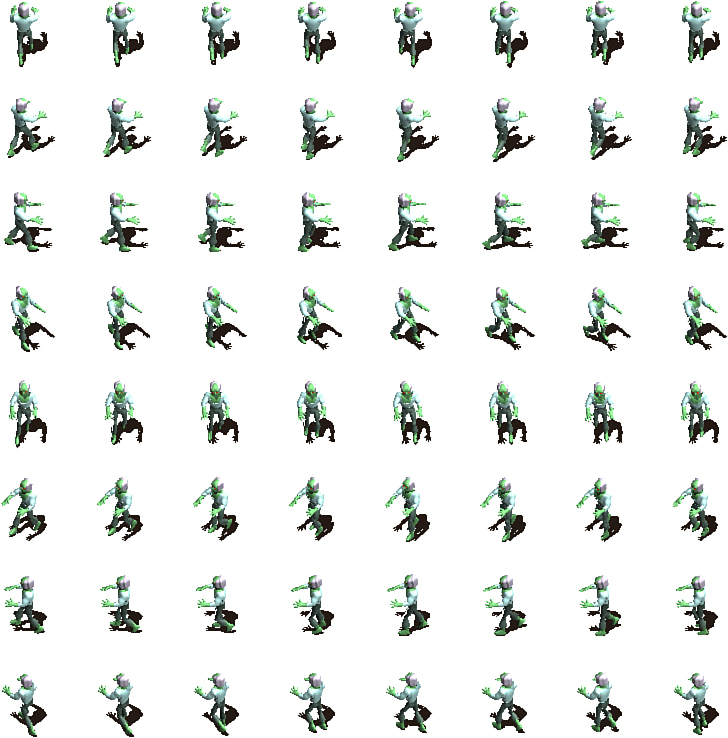
Figure 17.6. A sprite sheet for a zombie animation.
This hour has taken a minimalist approach to animation to show you the techniques without relying heavily on any engine or wrapper class code. This is helpful when learning a new technique, keeping the example simple so you can process it, so to speak.
The Animation Demo program is shown running in Figure 17.7. The frame number is shown below each animating sprite. This program does not move the sprites, but you could easily move them by setting the Sprite.position property for any of them.
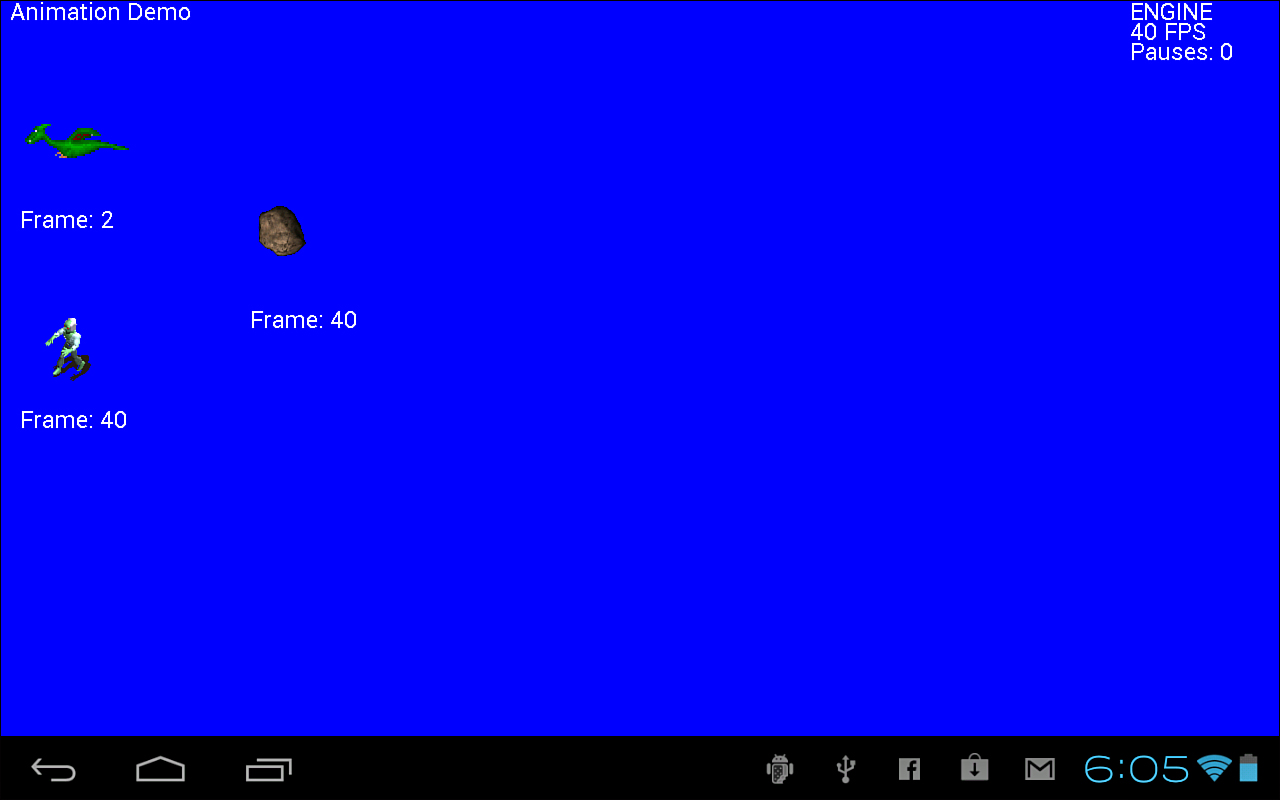
Figure 17.7. The Animation Demo program.
The source code for the Animation Demo is shown next. Many of the comments and all the log output code has been removed for the first time. By now you should be familiar with how the engine works, so these helper items should no longer be needed. If you skipped ahead, note that the engine calls several methods in this program, so you may want to refer back to the previous two hours for additional information on how it works.
package android.program;
import android.graphics.*;
import game.engine.*;
public class Game extends game.engine.Engine {
Canvas canvas;
Timer timer;
Sprite dragon;
Texture dragon_image;
int dragon_frame;
Sprite zombie;
Texture zombie_image;
int zombie_frame;
Sprite asteroid;
Texture asteroid_image;
int asteroid_frame;
public Game() {
canvas = null;
timer = new Timer();
dragon = null;
dragon_image = null;
dragon_frame = 0;
zombie = null;
zombie_image = null;
zombie_frame = 0;
asteroid = null;
asteroid_image = null;
asteroid_frame = 0;
}
public void init() {
setScreenOrientation(Engine.ScreenModes.LANDSCAPE);
}
public void load() {
//create and load dragon animation
dragon = new Sprite(this);
dragon_image = new Texture(this);
if (!dragon_image.loadFromAsset("dragon_strip.png")) {
fatalError("Error loading dragon_strip");
}
dragon.setTexture(dragon_image);
dragon.position = new Point(20,100);
//create and load zombie animation
zombie = new Sprite(this);
zombie_image = new Texture(this);
if (!zombie_image.loadFromAsset("zombie_walk.png")) {
fatalError("Error loading zombie_walk");
}
zombie.setTexture(zombie_image);
zombie.position = new Point(20,300);
//create and load asteroid animation
asteroid = new Sprite(this);
asteroid_image = new Texture(this);
if (!asteroid_image.loadFromAsset("asteroid_sheet.png")) {
fatalError("Error loading asteroid_sheet");
}
asteroid.setTexture(asteroid_image);
asteroid.position = new Point(250,200);
}
public void draw() {
canvas = getCanvas();
drawText("Animation Demo", 10, 20);
//draw the dragon
drawStripFrame(dragon, 128, 128, dragon_frame);
drawText("Frame: " + toString(dragon_frame), dragon.position.x,
dragon.position.y + 128);
//draw the zombie
drawSheetFrame(zombie, 96, 96, 8, zombie_frame);
drawText("Frame: " + toString(zombie_frame), zombie.position.x,
zombie.position.y + 128);
//draw the asteroid
drawSheetFrame(asteroid, 60, 60, 8, asteroid_frame);
drawText("Frame: " + toString(asteroid_frame), asteroid.position.x,
asteroid.position.y + 128);
}
public void drawStripFrame(Sprite sprite, int width, int height,
int frame) {
//define the source rect representing one frame
Rect src = new Rect(frame*width,0,frame*width+width,height);
//define the destination location
int x = sprite.position.x;
int y = sprite.position.y;
Rect dst = new Rect(x,y,x+width,y+height);
//draw the frame
Paint paint = new Paint();
canvas.drawBitmap(sprite.getTexture().getBitmap(), src, dst, paint);
}
public void drawSheetFrame(Sprite sprite, int width, int height,
int columns, int frame) {
//define the source rect representing one frame
int u = (frame % columns) * width;
int v = (frame / columns) * height;
Rect src = new Rect(u,v,u+width,v+height);
//define the destination location
int x = sprite.position.x;
int y = sprite.position.y;
Rect dst = new Rect(x,y,x+width,y+height);
//draw the frame
Paint paint = new Paint();
canvas.drawBitmap(sprite.getTexture().getBitmap(), src, dst, paint);
}
public void update() {
//set animation to 20 fps
if (timer.stopwatch(50)) {
//update dragon animation
dragon_frame++;
if (dragon_frame > 5)
dragon_frame = 0;
//update zombie animation
zombie_frame++;
if (zombie_frame > 63)
zombie_frame = 0;
//update asteroid animation
asteroid_frame++;
if (asteroid_frame > 63)
asteroid_frame = 0;
}
}
}
Summary
This has been a rather quick jaunt through the basic concepts and techniques used to do sprite animation the manual way. No additional Android SDK features were needed to get animation to work, which gives us control over how animation is handled by our own games. In the following hour, however, you will learn some advanced animation techniques and will add them to the engine for future use.
Q&A
Q. Why do you suppose the Android SDK doesn’t already handle strip and atlas frame animation, given it’s so useful?
A. Most SDKs are designed to give the programmer access to a hardware system, such as an Android device. Features such as frame animation involve gameplay code that is best left up to each programmer.
Q. What are some other techniques you can see as useful alternatives to doing animation without a strip or atlas image?
A. Answers will vary; open discussion.
Workshop
Quiz
1. What method draws one frame of animation onto the screen, assuming the parameters are set up correctly?
2. What helper class stores the image data used by Sprite to draw a sequence of animation?
3. What is the name of the helper method in this hour’s example that draws a frame from a sprite sheet/atlas to the screen?
Answers
1. Canvas.drawBitmap()
2. Texture
3. drawSheetFrame()
Activities
The strip and sheet images used in the example were already created in advance by the author. Try your hand at creating a strip or sheet yourself from either your own animation frames or from an animation found online (Reiner’s Tileset is a good source: www.reinerstileset.de). A useful tool for automatically converting individual bitmaps into a strip or sheet is available; it is called Pro Motion, and a trial version is available from Cosmigo (www.cosmigo.com). It takes a while to figure out how to use it, but when you do, it will greatly speed up your work with animation images.