
Displaying a List with the List Box
The list box is used to present a list of items to a user. You can add items to and remove items from the list at any time with very little C# code. In addition, you can set up a list box so that a user can select only a single item or multiple items. When a list box contains more items than it can show because of the size of the control, scrollbars are automatically displayed.
 | The cousin of the list box is the combo box, which looks like a text box with a down-arrow button at its right side. Clicking a combo box's button causes the control to display a drop-down list box. Working with the lists of a combo box is pretty much identical to working with a list box, so I'll discuss the details of list manipulation in this section. In the next section, I'll discuss features specific to the combo box. |
Create a new project titled Lists. Change the name of the default form to fclsLists and set its Text property to Lists Example. Next, change the entry point Main() to reference fclsLists instead of Form1. Set the form's Size property to 300,320. Add a new list box control to the form by double-clicking the ListBox item in the toolbox. Set the properties of the list box as follows:
| Property | Value |
|---|---|
| Name | lstPinkFloydAlbums |
| Location | 72,32 |
| Size | 160,121 |
Every item contained in a list box is a member of the list box's Items collection. Working with items, including adding and removing items, is performed using the Items collection. Most often, you'll manipulate the Items collection using code (which I'll show you a little bit later in this hour), but you can also work with the collection at design time using the Properties window.
Manipulating Items at Design Time
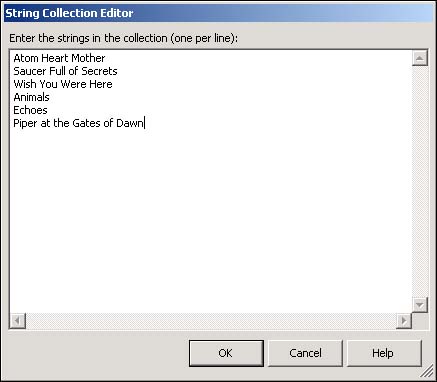
The Items collection is available as a property of the list box. Locate the Items property in the Properties window and click it to select it. The familiar button with three dots appears, indicating that you can do advanced things with this property. Click the button now to show the String Collection Editor. To add items to the collection, simply enter the items into the text box—one item to a line.
Enter the following items:
Atom Heart Mother
Saucer Full of Secrets
Wish You Were Here
Animals
Echoes
Piper at the Gates of Dawn
When you're finished, your screen should look like that shown in Figure 7.15. Click OK to commit your entries and close the window. Notice that the list box contains the items that you entered.
Figure 7.15. Use this dialog box to manipulate an Items collection at design time.
Manipulating Items at Runtime
In Hour 3, “Understanding Objects and Collections,” you learned all about objects, properties, methods, and collections. All this knowledge comes into play when manipulating lists at runtime. The Items property of a list box (and a combo box) is an object property that returns a collection (collections in many ways are like objects—they have properties and methods). To manipulate list items, you manipulate the Items collection.
 | Whether you choose to set values at design time or runtime depends on the situation. For example, if you don't know the values at design time, you'll have to set them at runtime. I recommend that you set values at design-time whenever possible. |
A list may contain duplicate values, as you'll see in this example. Because of this, C# needs another mechanism to treat each item in a list as a unique item. This is done by assigning each item in an Items collection a unique index. The first item in the list has an index of 0, the second an index of 1, and so on. The index is the ordinal position of an item relative to the first item in the Items collection, not the top item visible in the list.
Adding Items to a List
New items are added to the Items collection using the Add method of the collection. You're now going to create a button that adds an album to the list. Add a new button to the form and set its properties as follows:
| Property | Value |
|---|---|
| Name | btnAddItem |
| Location | 104,160 |
| Size | 96,23 |
| Text | Add an Item |
Double-click the button to access its Click event and add the following code:
lstPinkFloydAlbums.Items.Add("Dark Side of the Moon");
Notice that the Add method accepts a string argument—the text to add to the list.
 | Unlike items added at design time, items added through code aren't preserved when the program is ended. |
Press F5 to run the project now and click the button. When you do, the new album is added to the bottom of the list. Clicking the button a second time adds another item to the list with the same album name. The list box doesn't care whether the item already exists in the list; each call to the Add method of the Items collection adds a new item to the list. The Add method of the Items collection can be called as a function, in which case it returns the index (ordinal position of the newly added item in the underlying collection), as in the following:
int intIndex;
intIndex = lstPinkFloydAlbums.Items.Add("Dark Side of the Moon");
Stop the running project and save your work before continuing.
Removing Items from a List
Removing an individual item from a list is as easy as adding an item and requires only a single method call: a call to the Remove method of the Items collection. The Remove method accepts a string, which is the text of the item to remove. You're now going to create a button that will remove an item from the list. Create a new button and set its properties as follows:
| Property | Value |
|---|---|
| Name | btnRemoveItem |
| Location | 104,192 |
| Size | 96,23 |
| Text | Remove an Item |
Double-click the new button to access its Click event and enter the following statement:
lstPinkFloydAlbums.Items.Remove("Dark Side of the Moon");
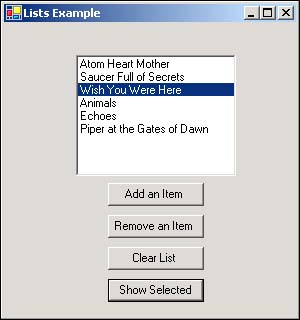
The Remove method tells C# to search the Items collection, starting at the first item (index = 0), and when an item is found that matches the specified text, to remove that item. As I stated earlier, you can have multiple items with the same text. The Remove method will remove only the first occurrence; after the text is found and removed, C# stops looking. Press F5 to run the project now. Click the Add an Item button a few times to add Dark Side of the Moon to the list (see Figure 7.16). Next, click the Remove an Item button and notice how C# finds and removes one instance of the item.
Figure 7.16. The list box may contain duplicate entries, but each entry is a unique item in the Items collection.

 | To remove an item at a specific index, use the RemoveAt method. For instance, to remove the first item in the list, you could use a statement such as lstPinkFloydAlbums.Items.RemoveAt(0);. |
Stop the running project and save your work.
Clearing a List
To completely clear the contents of a list box, use the Clear method. You are now going to add a button to the form that will clear the list when clicked. Add a new button to the form now and set the button's properties as follows:
| Property | Value |
|---|---|
| Name | btnClearList |
| Location | 104,224 |
| Size | 96,23 |
| Text | Clear List |
Double-click the new button to access its Click event and enter the following statement:
lstPinkFloydAlbums.Items.Clear();
Press F5 to run the project, and then click the Clear List button. The Clear method doesn't care if an item was added at design time or runtime; Clear() always removes all items from the list. Stop the project and again save your work.
Remember, the Add, Insert, Remove, RemoveAt, and Clear methods are all methods of the Items collection, not of the list box itself. If you forget that these are members of the Items collection, you might get confused when you don't find them when you enter a period after typing a list box's name in code. |
Retrieving Information About the Selected Item in a List
By default, a list box allows only a single item to be selected by the user at one time. Whether a list allows multiple selections is determined by the SelectionMode property of the list box. You will need to understand how to work with the selected item in a list box that allows only a single selection (list boxes that allow multiple selections are more complex and are beyond the scope of the book).
Two properties provide information about the selected item: SelectedItem and SelectedIndex. It's important to note that these are properties of the list box itself, not of the Items collection of a list box. The SelectedItem method returns the text of the currently selected item. If no item is selected, an empty string is returned. At times, it's desirable to know the index of the selected item. This is returned by the SelectedIndex property of the list box. As you know, the first item in a list has the index of 0. If no item is selected, SelectedIndex returns a –1, which is never a valid index for an item.
You're now going to add a button to the form that, when clicked, displays the selected item's text and index in the Output window. First, change the Height property of the form to 320 to accommodate one more button. As you build your interfaces, you'll often have to make small tweaks such as this because it's nearly impossible to anticipate everything ahead of time. Add a new button to the form and set its properties as follows:
| Property | Value |
|---|---|
| Name | btnShowItem |
| Location | 104,256 |
| Size | 96,23 |
| Text | Show Selected |
Double-click the new button to access its Click event and enter the following statements:
System.Diagnostics.Debug.WriteLine(lstPinkFloydAlbums.SelectedItem);
System.Diagnostics.Debug.WriteLine(lstPinkFloydAlbums.SelectedIndex);

Press F5 to run the project and click the Show Selected button. Take a look at the Output window. You'll see a blank line (the empty string returned by SelectedItem) and a –1, returned by SelectedIndex denoting that no item is selected. Click an item in the list to select it, and then click Show Selected again. This time, you'll see the text of the selected item and its index in the Output window (see Figure 7.17).
Figure 7.17. The SelectedItem and SelectedIndex properties make it easy to determine which item is selected.
Stop the running project and save your work.
Sorting a List
List boxes and combo boxes have a Sorted property. By default, this property is set to false. Changing this property value to true causes C# to sort the contents of the list alphabetically. When the contents of a list are sorted, the index of each item in the Items collection is changed; therefore, you can't use an index value obtained prior to setting Sorted to true. Sorted is a property, not a member. You don't have to call Sorted to sort the contents of a list. Instead, as long as the Sorted property is set to true, C# enforces a sort order. This means that all items added using the Add method are automatically inserted into the proper location, in contrast to being inserted at the end of the list, which is the behavior of an unsorted list.