
Agency Case Study
You will now add a simple servlet to the Agency case study. The servlet lists the contents of an agency database table for display by a browser. The rows of the table are formatted as an HTML table.
The servlet first outputs an HTML form on which the user selects the name of a table from a pull-down list (see Figure 12.19).
After the user clicks the Submit Query button, the servlet displays the contents of this table on the same page.
AgencyTable Servlet Code
The AgencyTable servlet overrides the init() method to obtain the servlet context along with the JNDI context for the Agency EJB. The Agency EJB select() method is used in the doGet() method to obtain the rows of table data from the Agency database.
public void init(){
  context = getServletContext();
  try {
    InitialContext ic = new InitialContext();
    Object lookup = ic.lookup("java:comp/env/ejb/Agency");
    AgencyHome home = (AgencyHome)PortableRemoteObject.narrow(lookup, AgencyHome.class);
    agency = home.create();
  }
....
}
The AgencyTable HTML page is generated in the following code.
private final String tables = "<OPTION>Applicant<OPTION>ApplicantSkill
<OPTION>Customer<OPTION>Job<OPTION>JobSkill
<OPTION>Location<OPTION>Matched<OPTION>Skill";
...

out.println ("<HTML>");
out.println ("<HEAD><TITLE>" + agencyName + " List Tables</TITLE></HEAD>");
out.println ("<BODY>");
out.println ("<H1>" + agencyName + " List Tables</H1>");
out.println ("<P>Select a table from the list to display the contents</P>");

out.println ("<FORM>");
out.println ("<SELECT NAME="tableList" SIZE="1">" + tables + "</SELECT>");
out.println ("<INPUT TYPE="submit">");
out.println ("</FORM>");
out.println ("</FONT></BODY>");
out.println ("</HTML>");
The String variable tables contains the names of the database tables encoded in a HTML <OPTION> list.
The <SELECT> tag defines a parameter called tableList. This parameter is used to pass the name of the selected table from the form to the servlet.
The following code checks to see if the parameter has been set. If it has, the outputTable() method is called.
tableName = req.getParameter("tableList");
if (tableName != null) {
  outputTable(out, tableName, res);
In the outputTable() method, it is the agency.select bean that actually does the work. It returns a list of all the rows in the table. Note how access to the servlet instance variable must be in a synchronized block to make the code multi-thread safe.
java.util.List query;  // list of String[], first row = column names
synchronized (agency) {
    query = agency.select(tableName);
}
The rows of the table are displayed as an HTML table so the columns line up correctly. The attributes to the HTML TABLE tag set the border and background colors, and the cell padding is increased to improve readability. Rows in a table are separated by <TR>...</TR> tags.
out.println ("<TABLE BORDER='1' BORDERCOLOR='SILVER' BGCOLOR='IVORY' CELLPADDING='5'>");
out.println("<TR>");
The first item in the list is an array containing the names of the columns in the table. This is output as HTML table header cells.
String[] headerRow = (String[])query.get(0);
for (int i = 0; i < headerRow.length; i++) {
  out.println ("<TH ALIGN='LEFT'>" + headerRow[i] + "</TH>");
}
out.println ("</TR>");
The remainder of the rows of the table are output as HTML table data cells.
for (int i = 1; i < query.size(); i++) {
  out.println ("<TR>");
  String[] row = (String[])query.get(i);
  for (int r = 0; r < row.length; r++) {
    out.println ("<TD>" + row[r] + "</TD>");
  }
  out.println ("</TR>");
}
out.println ("</TABLE>");
Deploying the AgencyTable Servlet
Use deploytool to create a new WAR file (the example on the accompanying Web site uses the name webagency.war), and add the webagency.AgencyTableServlet as a Web component. Set the Web context to be webagency and the servlet alias to be AgencyServlet then the example can be accessed using the URL
http://localhost:8000/webagency/AgencyTable
You can also use the supplied asant build files to build and deploy the agency example using
asant build deploy
You will need to separately deploy a version of the Agency case study EAR file developed in a previous day's work. You can use the simplest Agency application from Day 5 as your starting point, or any of the Agency applications you may have already deployed from days 6, 8, 10 or 11.
In your new Web Component you will need to add the following class files from the Agency EJB components:
agency/Agency.class

agency/AgencyHome.class

agency/DuplicateException.class

agency/NotFoundException.class
Add an EJB Reference for the agency EJB by selecting the examples Web Application JAR in the left hand pane and choosing the EJB Refs dialogue page. Figure 12.20 shows the EJB Reference page with the required settings. To add your EJB reference click on the add button and in the popup Add New EJB Reference dialogue box enter the coded Name ejb/Agency. Select the session bean and remote interface options and enter agency.AgencyHome and agency.Agency for the home and remote interfaces. When you have added the Agency EJB reference, select this reference and choose the JNDI option at the bottom of the page, then enter ejb/Agency as the EJB JNDI name.
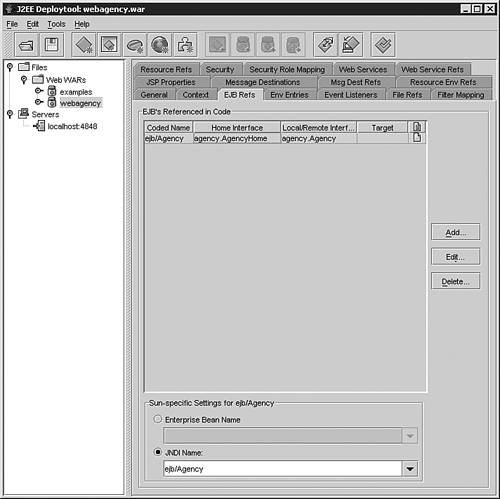
Figure 12.21 shows the output from the servlet example.

The complete listing of the AgencyTable servlet is provided in Listing 12.12.
Listing 12.12. AgencyTableServlet.java Servlet Code
Use a browser to access your servlet and check that you can retrieve the data from the database.
Listing 12.12 shows the main drawback to writing servlets: A lot of coding effort is devoted to writing HTML tag information to the response, which can be error prone and make the code logic difficult to follow. Tomorrow you will look at JavaServer Pages which embed Java code inside HTML pages, simplifying the process of writing complex HTML pages.