
Configuring a Session Bean Using J2EE RI deploytool
This section shows how to deploy the Day 5 version of the case study application to the J2EE RI. You will get the most out of this if you actually perform these steps (but if you're on a train or plane, just read the text and make do).
As usual, start up the PointBase database server and J2EE RI server before starting deploytool as shown yesterday.
By choosing File, Open, load up the Day05/examples/j2ee-ri/agency.ear enterprise application archive. This defines a single group of Session beans called Agency. Their contents have already been partially configured to contain the appropriate code. Highlight the Agency application in the explorer on the left side of the deploytool GUI and its contents will be shown on the right side, as shown in Figure 5.6.
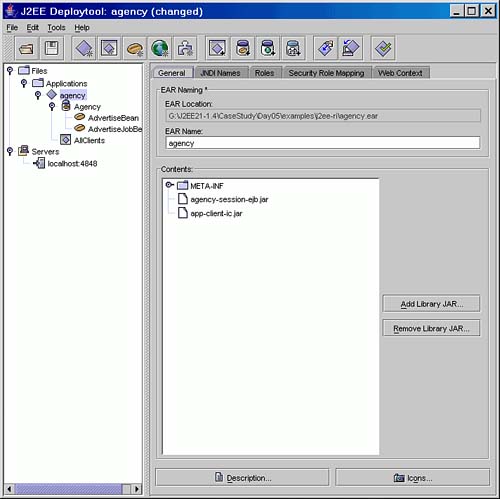
The agency.ear file you have just opened does not contain the Agency stateless Session bean.
NOTE
In the Day05/examples/j2ee-ri directory there is an agency.orig.ear file. This is a copy of the agency.ear file. Should you make a mistake in the following steps you can replace agency.ear with this file and start again.
You will now be guided through the process of creating this bean using the deploytool wizard. As each step is performed, you will be shown the component parts of the deployment descriptor that are being created. If you prefer to view the complete application, you can use the agency.ear file in the Day05/agency/j2ee-ri directory on the Web site.
Defining a New EJB Session bean
All EJBS must be placed in a JAR file, and an enterprise application (EAR) can contain one or more EJB JAR files. For your own custom applications, it really is up to you whether you choose to use one JAR file or several. In the case study example, many separate JARs have been used. Your first step in adding a new Session bean to the case study is to select the existing Agency JAR file in the right hand pane and then use the File, New, Enterprise Bean… menu option to start the EJB wizard.
You will be presented with an Introduction page describing the steps you are about to perform. You can check the Skip this Screen in Future checkbox on this page if you want to hide it for future EJBs. Click on Next.
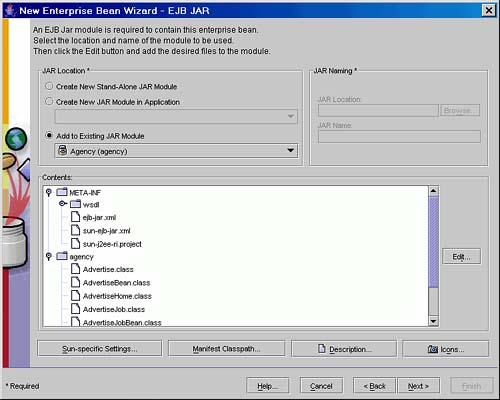
The first step in defining the Agency stateless Session bean is to add the required class files to the JAR file. The next screen displayed by the wizard asks you whether to add to an existing JAR or create a new JAR. Select Add to Existing JAR Module, select the Agency JAR. Figure 5.7 shows this dialogue page with the existing JAR file list expanded so you can see the files already included in the JAR file.
Click on the Edit button to add the Agency class files. In the popup dialog, select the following files from the Day05/examples/classes directory:
agency/Agency.class
agency/AgencyBean.class
agency/AgencyHome.class
You should have a screen similar to the one shown in Figure 5.8.
Figure 5.8. Adding EJB class files to an existing JAR file.

After selecting the Agency Session bean class files in the Edit Contents dialog, click on the Add button to add the files. Now click on OK to return to the wizard dialog and then click on Next to move to the dialog to define the Session bean and its interface classes.
Defining the Session Bean
The wizard General dialog screen shown in Figure 5.9 is used to define the Session bean.
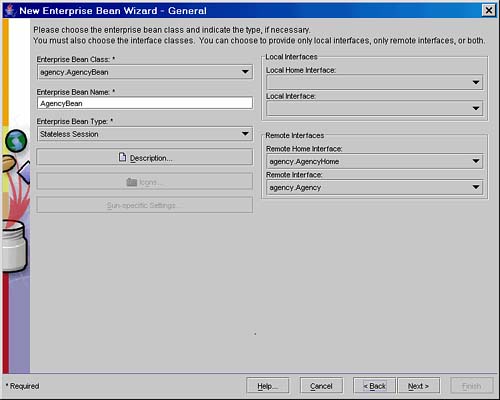
Figure 5.9 shows the Agency EJB configured as a stateless Session bean, the bean class set to agency.AgencyBean, and the Remote and Remote Home interfaces set to agency.Agency and agency.AgencyHome. The interfaces must be configured as Remote interfaces, and the Local interfaces must be left blank. (Local interfaces are discussed tomorrow when Entity beans are described.)
What you are doing using deploytool is building up the JAR file and deployment descriptor for the EJB. The selected class files will be added to the JAR file when you finish the wizard. As you step through each page of the wizard, you will define different parts of the deployment descriptor. To help you understand what information is being added to the deployment descriptor, each dialog step of the process will be related to the generated deployment descriptor.
The (fragment of the) underlying deployment descriptor for the Agency bean that is represented in Figure 5.9 is (new entry in bold):
<ejb-jar>
  <enterprise-beans>
...
    <session>
							<ejb-name>AgencyBean</ejb-name>
							<home>agency.AgencyHome</home>
							<remote>agency.Agency</remote>
							<ejb-class>agency.AgencyBean</ejb-class>
							<session-type>Stateless</session-type>
      ...
    </session>
...
  </enterprise-beans>
...
</ejb-jar>
The remaining items of the EJB deployment descriptor are optional and are configured by different pages of the deployment wizard. After you have selected the bean type and required classes, click on the Next button to display the Configuration Options screen. On this screen ensure the Expose Bean as Web Service Endpoint is set to No and click on next. Web service endpoints are discussed on Day 20, “Using RPC-Style Web Services with J2EE.”
The last page of the wizard prompts you with common steps needed to complete the EJB configuration. After reading this page you can click on Finish and your partially defined Agency stateless Session bean has been added to the JAR file.
To complete the Agency Session bean configuration you will need to perform the following steps, full details of which are included in subsequent sections:
- Define the Sun Specific JNDI name for the EJB
- Add an Environment Entry for the Job Agency name
- Add a Resource Reference for the Agency database
- Add transaction Management options
To define each of these parameters in deploytool you must select the AgencyBean EJB in the left pane and select an appropriate dialog page in the right pane.
NOTE
With the Agency JAR or any of its EJBs selected in the left pane you can use the View, Descriptor Viewer to study the portable deployment descriptor as you add information through the deploytool GUI interface. Similarly, the View, Descriptor Viewer, Application Server Descriptor can be used to view the Sun-specific deployment descriptor sun-ejb-jar.xml.
Defining the JNDI Name
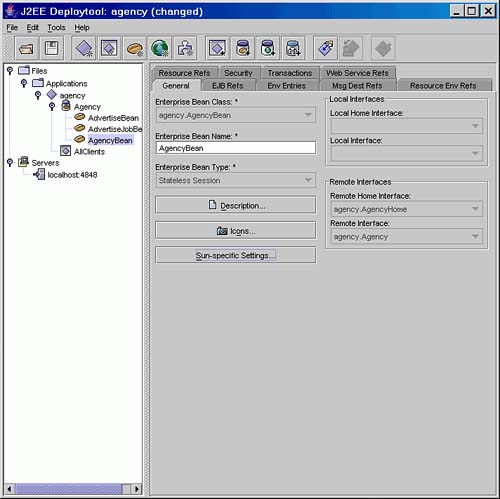
Select the AgencyBean and the General dialog tab as shown in Figure 5.10.
Click on the Sun-specific Settings… button and in the popup window change the JNDI name from AgencyBean to ejb/Agency as shown in Figure 5.11.
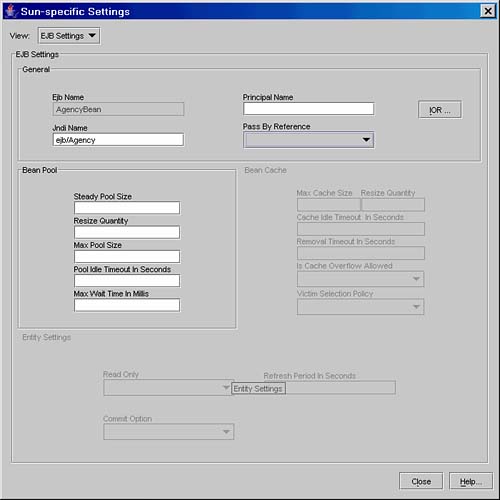
You do not need to provide values for the other fields because these are server administration settings for the EJB that we are not interested in at the moment. Click on Close to save your new JNDI name. This page has added the following entry to the sun-ejb-jar.xml deployment descriptor file (shown in bold):
<sun-ejb-jar>
  <enterprise-beans>
    <name>Agency</name>
...
     <ejb>
							<ejb-name>AgencyBean</ejb-name>
							<jndi-name>ejb/Agency</jndi-name>
							</ejb>
   </enterprise-beans>
</sun-ejb-jar>
Remember, you can use the View, Descriptor Viewer, Application Server Descriptor menu option to view the Sun-specific deployment descriptor.
Transaction Management
Continuing with setting the Session bean configuration, select the AgencyBean and the Transactions dialog tab to set the Transaction Management. There are two approaches to managing transactions:
Bean-managed, where you code up the transaction start and commit or rollback method calls explicitly
Container-managed, where you add <container-transaction> elements to the deployment descriptor to define transaction management
Transactions are described in detail on Day 8, but for now you should set your bean to be container-managed, as shown in Figure 5.12.
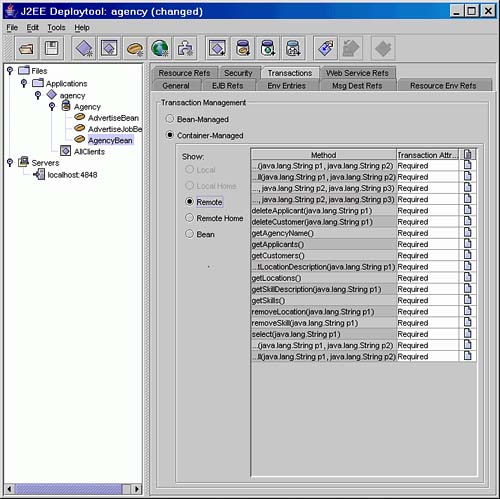
When you select container-managed transactions, each method in the interfaces and the bean must be given a transaction status. The default status is required transactions, meaning that each method will run within a transaction. This is exactly what the Agency EJB needs, so the default setting for all methods is appropriate. The deployment descriptor entries for transactions will be left until Day 8, when transactions are covered in detail.
Environment Entries
Now select the AgencyBean and the Env Entries dialog tab to add environment entries that support general EJB configuration information. Environment entries are strongly typed name/value objects.
The Agency bean uses an environment entry to look up its name as a String object. The relevant code is in the ejbCreate() method:
InitialContext ic = new InitialContext();
// code omitted
name = (String)ic.lookup("java:comp/env/AgencyName");
The EJB specification requires that the EJB container makes the environment entries available under the java component context of java:comp/env. Therefore, this is needed in the JNDI lookup. However, this prefix is not required in the deployment descriptor itself. Click on Add to create an entry for AgencyName as shown in Figure 5.13.
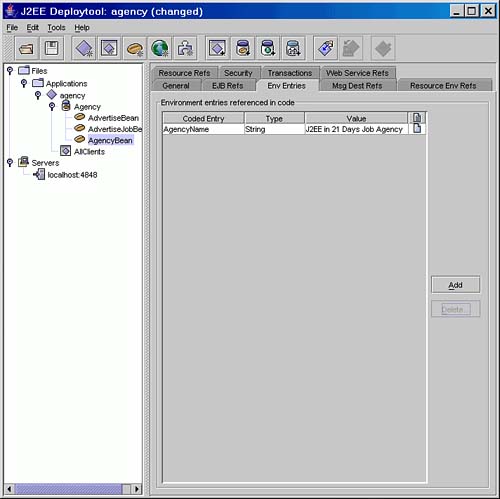
In the underlying deployment descriptor for the Agency bean, the entry shown in Figure 5.13 corresponds to (new entry in bold):
<ejb-jar>
  <enterprise-beans>
    <session>
      <ejb-name>AgencyBean</ejb-name>
...
      <env-entry>
							<env-entry-name>AgencyName</env-entry-name>
							<env-entry-type>java.lang.String</env-entry-type>
							<env-entry-value>J2EE in 21 Days Job
							Agency</env-entry-value>
							</env-entry>
...
    </session>
...
  </enterprise-beans>
</ejb-jar>
To re-emphasize, note that the entry name in the deployment descriptor is AgencyName, not java:comp/env/AgencyName.
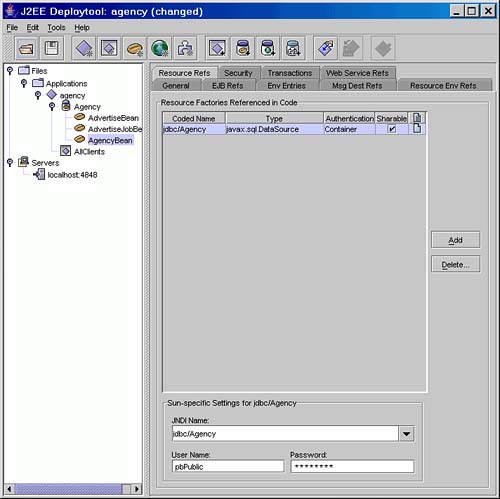
Resource References
Finally, select the AgencyBean and the Resource Refs dialog tab to add EJB resource references. These are external entities such as JDBC data sources, email sessions (Day 11, “JavaMail”), URLs, JMS connection factories (Day 10, “Message-Driven Beans”), or general resources as defined by the Connector architecture (Day 19, “Integrating with External Resources”).
The Agency bean has a dependency on a DataSource reference that it refers to as jdbc/Agency; this is the database you configured on Day 2. You can see this in the ejbCreate() method of the AgencyBean code:
InitialContext ic = new InitialContext();
dataSource = (DataSource)ic.lookup("java:comp/env/jdbc/Agency");
On the Resource Refs page click on Add to create a new resource reference and set the name to be jdbc/Agency, type to javx.sql.DataSource, Container authentication and sharable as shown in Figure 5.14.
In the deployment descriptor for the Agency bean, you have added the following (new entry in bold):
<ejb-jar>
  <enterprise-beans>
    <session>
      <ejb-name>AgencyBean</ejb-name>
...
      <resource-ref>
							<res-ref-name>jdbc/Agency</res-ref-name>
							<res-type>javax.sql.DataSource</res-type>
							<res-auth>Container</res-auth>
							<res-sharing-scope>Shareable</res-sharing-scope>
							</resource-ref>
...
    </session>
...
  </enterprise-beans>
</ejb-jar>
As with environment entries the resource reference name you specify to deploytool (and put in the deployment descriptor) does not include the java:comp/env prefix you use in the Java code to do the JNDI lookup.
You will also need to map the resource reference onto an actual resource provided by the J2EE container. In the Sun-specific Settings at the bottom of the Resource Ref dialog page enter the details for the actual datasource to be used. Make sure the entry for jdbc/Agency you have just created is selected and then provide a JNDI name of jdbc/Agency, username of pbPublic and password of pbPublic (as shown in Figure 5.14).
This has updated the Agency EJB entry in the sun-ejb-jar.xml file as follows (new entry in bold):
<sun-ejb-jar>
  <enterprise-beans>
    <name> Agency</name>
...
     <ejb>
       <ejb-name>AgencyBean</ejb-name>
       <jndi-name> ejb/Agency</jndi-name>
       <resource-ref>
							<res-ref-name>jdbc/Agency</res-ref-name>
							<jndi-name>jdbc/Agency</jndi-name>
							<default-resource-principal>
							<name>pbPublic</name>
							<password>pbPublic</password>
							</default-resource-principal>
							</resource-ref>
     </ejb>
...
   </enterprise-beans>
</sun-ejb-jar>
The Agency EJB configuration is now complete and you can run the verifier to validate the code. Save your changes and then use the Tools, Verify J2EE Compliance… menu option to start up the GUI verifier.
NOTE
The Nov 2003 release of the J2EE RI deploytool incorrectly reports errors for the Agency application. You will get three errors referring to a blank JNDI name for the jdbc/Agency references in each of the EJBs in the application (Agency, Advertise and AdvertiseJob). You can safely ignore these errors. For your peace of mind you can run the command line verifier on the EAR file you have just updated using the command:
asant verify-j2ee-ri
Run this command from the Day05/examples directory, and don't forget to save the changes you made with deploytool first.
At this point, if you were simply deploying EJBs, you could deploy the application, but the case study requires the client application to be updated to reference this new EJB. This is covered later in the section “Configuring J2EE RI Client Applications with deploytool.”
EJB Deployment Descriptor
Before leaving stateless Session beans, you should be aware that there are several aspects of the deployment descriptor that have not been shown in detail. In Figure 5.10, you saw a set of dialog tabs, only some of which are required for the Agency example. The following configuration options are discussed elsewhere:
EJB Refs on Day 6, “Entity EJBs”
EJB references indicate that the bean being deployed uses other EJBs, and the deployer must map the coded EJB name onto the deployed EJB (usually via a JNDI name).
Message Dest Refs on Day 10, “Message-Driven Beans”
Message Destination References are Message-Driven Beans that uses this EJB to send messages, and the deployer must link the coded message destination to the actual MDB.
Resource Env Refs on Day 9, “Java Message Service”
Resource environment references allow access to so-called “administered objects.” In J2EE RI, this includes JMS queues, JMS topics, and connection factories. The deployer must map the coded name onto the actual JNDI used to access the JMS entity.
Security on Day 15, “Security”
Security defines authorization requirements for accessing the EJB methods.
Web Service Refs on Day 20, “Using RPC-Style Web Services with J2EE”
Web Service references refer to Web Services used by this EJB and the deployer must map the coded Web Service URL onto the actual Web Service URL.
You will now consider client applications so you can complete this example. After this, today's lesson will be completed with a look at stateful Session beans.