
Adding ORM Facts to the Data Model
Now that you have a Visio ORM template and the Business Rules Editor open, you can start adding the facts that make up the model. To add facts, you can click the Edit button in the Facts list of the Business Rules window, you can just start typing on an empty row, or you can double-click on an empty row and the Fact Editor will pop up.
The facts you're going to add are for a customer and products. To start, click the Edit button on an empty row in the Facts list to bring up the Fact Editor, which is shown in Figure 21.3.
Figure 21.3. The Fact Editor.
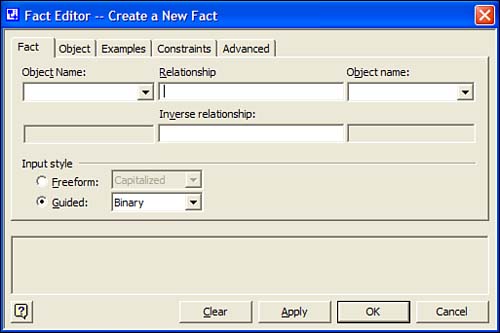
The Fact Editor is broken into five tabs. In each tab, you describe the fact that you are adding and how it relates to other facts. When you're done adding facts to the model, you take them into a database diagram and generate a table schema based on the facts. The following list describes each tab and its purpose when designing data models:
Fact— You specify objects, how they relate to each other, and optionally specify their inverse relationship. These relationships make up the entities and values for the fact. For example, two objects might be Employee and Department. The relationship between the objects is “works for” or “is in,” and the inverse relationship is “has.” Therefore, an Employee works for a Department and a Department has Employees. You have two options for adding your fact input: Free Form or Guided. In the Free Form method, you simply type in relationships in an ORM-specific format. The Guided method breaks down the objects and relationships into logical parts, and it's the method you use today.
Object— The Object tab enables you to define what the entity is, and what the values are for the objects you're adding. You can also specify entity attributes, such as a primary key.
Examples— The Examples tab enables you to enter manual data based on the object relationships you're adding for the fact. Using this data, Visio can analyze the usage and determine the best constraints for the objects. You don't have to enter sample data, but doing so is a good idea if you aren't sure about the relationships you're defining.
Constraints— The Constraints tab sets up the one-to-many, one-to-one, or many-to-one relationship between the objects. These constraints map directly to constraints in a database. For example, in a Customer and CustomerID relationship, you would say Each Customer has Exactly One CustomerID, and each CustomerID has Exactly One Customer. Your options for setting the relationships are Zero or One, Zero or More, One or More, and Exactly One. Based on how you added the fact, you can rephrase the facts on this tab to better determine what Visio thinks the relationship should look like.
Advanced— The Advanced tab enables you to add notes, define where a fact is derived from, and set a fact as an external fact, which will act as a proxy fact.
To better understand the facts you're going to add, they can be broken down into regular sentences. After you have the sentences figured out, adding the facts to the model is very easy. Using the e-commerce model we talked about earlier, the sentences for this model can be broken down as follows:
Each Customer has a FirstName
Each Customer has a LastName
Each Customer has a CustomerID
Customers purchase Products
Products are purchased by Customers
Products have a Name
Products have a ProductID
The next step is to start adding the facts. The best way to get the model up and running is to just add the basic facts on the first tab of the Fact Editor. Then set up the entity/object relationships on the Object tab and the constraints on the Constraints tab.
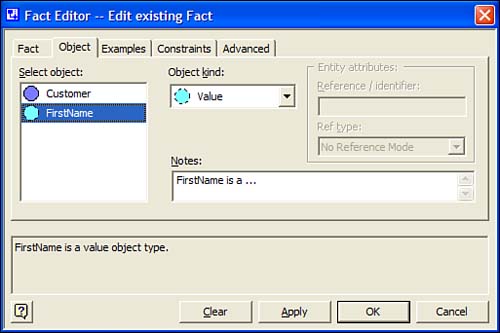
For the first fact, add The Customer Has a FirstName fact. Your Fact Editor should look like Figure 21.4.
Figure 21.4. Adding the Customer has a FirstName fact.

Because there's no inverse relationship between a Customer and its FirstName, you don't need to do anything further to set up this first fact. After you click the Apply button, the Fact Editor clears and you can add further facts.
Using the same model as adding the Customer has a FirstName fact demonstrated in Figure 21.4, add three more facts with no inverse relationships as follows:
Customer has LastName
Customer has CustomerID
Products have Name
Products have ProductID
You are probably starting to see that by stating the facts in sentences, you can easily define the model. Until now, you've two main objects, Customer and Products, and you've defined attributes that they have, such as FirstName, LastName, and Name.
The next step is to add a fact that relates the Customer to the Products. For this new fact, you're going to add an inverse relationship. Because each Customer purchases Products, it means that Products are purchased by Customers, so the relationships between the object are set. Add the new fact to resemble Figure 21.5, which maps the Customer and Products together.
Figure 21.5. Creating the Customer/Products fact.

As you add each fact, you can see that the free-form text is displayed in the lower part of the Fact Editor. For the Customer/Products fact, the free-form text is
[Customer] purchases [Products] / [Products] are purchased by [Customer]
When you get to be an ORM wizard, you can modify the default view for adding facts to the Free Form view and add facts simply by typing the sentence.
If you click the OK button on the Fact Editor, you should see the Facts list in the Business Rules pane is filled with your facts. Your screen should look exactly like Figure 21.6.
Figure 21.6. The Facts list in the Business Rules window after you add your facts.

Now that all the facts are added, the basic structure of the model is in place. The next step is to further define the facts by modifying their properties in the Object tab and Constraints tab in the Fact Editor.
The first fact to modify is Customer purchases Products. Click the Edit button on this fact in the Business Rules window to bring up the Fact Editor, and click the Object tab.
Because each Product and Customer must be uniquely identified, you need to add an identifier for the Customer object and the Products object. To do so, select the Customer object in the Select Object list. Make sure that the Object Kind is set to Entity, not Value. Type CustomerID In the Reference/Identifier box. You're telling the Fact Editor that the Customer object is an entity with an identifier of CustomerID. In a database, an entity would be the row of data, and the value would be an attribute of that row. Your Fact Editor should look like Figure 21.7 after adding the reference/identifier entity attribute.
Figure 21.7. Fact Editor after adding an entity attribute for Customer.
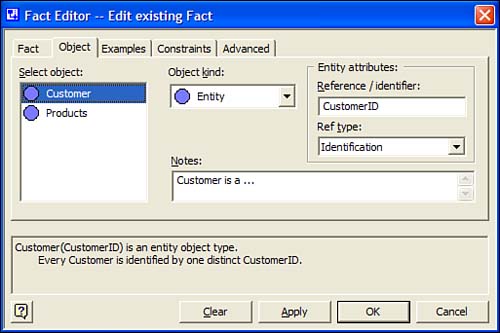
After you type in CustomerID for the Customer object, select the Products object from the Select Objects list, and type in ProductID for its reference/identifier. You've now defined the identifiers for the Customer and Product, so the two main tables in this conceptual model are starting to take shape.
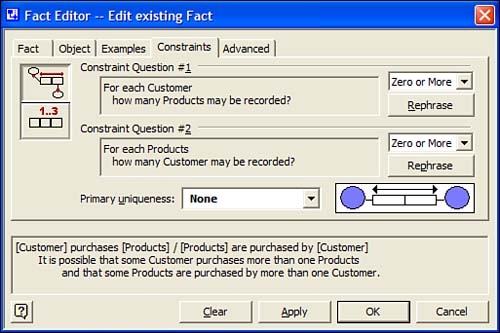
Next, you must add some constraints for the Customer and Products objects. If you click the Constraints tab, you can see that the following two constraint questions must be answered:
Each Customer purchases how many products?
Each Products are purchased by how many Customers?
For each question, you can select the relationship between the tables and the primary uniqueness of the objects between each other. For both constraint questions, the Zero or More constraint must be selected because each Customer can purchase Zero or More Products, and each Product can be purchased by Zero or More Customers.
The ORM text pane after setting up the Constraints should look like this:
[Customer] purchases [Products] / [Products] are purchased by [Customer]
        It is possible that some Customer purchases more than one Products
                and that some Products are purchased by more than one Customer.
In addition, your Fact Editor should look like Figure 21.8.
Figure 21.8. Fact Editor after adding Customer and Products constraints.
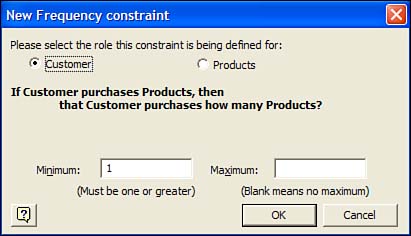
If the constraint must be defined further, you can click the Constraint Frequency button on the upper left of the Constraints tab to set maximum and minimum values for the constraints. Using this dialog box, it might be easier to set unique values for each object. Figure 21.9 shows what the Frequency Editor looks like, and how you might use it to define a One to Many relationship.
Figure 21.9. Using the Frequency Editor to define constraints.
For the model you're creating now, you don't need to set a constraint frequency because the Zero or More constraint you added adequately defines the relationship between the Customer and Products roles.
At this point, you can click the OK button to close the Fact Editor and return to the Facts list in the Business Rules window. The next step is to define the properties for the remaining facts. To do so, select the Customer has FirstName fact, and click the Edit button in the Facts list to bring up the Fact Editor. When the Fact Editor is open, click the Object tab, and select FirstName from the Select Object list. Because the FirstName is a value of the entity Customer, you must set the Object Kind to Value, as Figure 21.10 shows.
Figure 21.10. Setting the Object Kind for the FirstName object.
Next, you can set the constraints for the FirstName object. Click the Constraints tab; you'll see that Constraint Question #1 is “Each Customer has how many FirstName?”. Set the value to Exactly Once because there can only be one FirstName for each customer. Set Constraint Question #2, “How many Customer has each FirstName?” to Zero or More. The phrase you have just built is
[Customer] has [FirstName]
        Each Customer has some FirstName.
        Each Customer has at most one FirstName.
This makes perfect sense when you think about designing database tables, and you can see that the conceptual design can be easily turned into a physical data model by setting properties and constraints on the objects in the ORM model.
The next step is to set the remaining properties on the facts. The following list is what you must do to set the remaining object properties and constraints. You're repeating the same steps you did for the FirstName fact.
Customer has LastName: On the Object tab of the Fact Editor, set the LastName object as a value of the Customer object, and set the relationships on the Constraints tab to the following:
[Customer] has [LastName]
        Each Customer has some LastName.
        Each Customer has at most one LastName.
Customer has CustomerID: On the Object tab of the Fact Editor, set the CustomerID object as a value of the Customer object, and set the relationships on the Constraints tab to the following:
[Customer] has [CustomerID]
        Each Customer has some CustomerID.
        For each CustomerID c, some Customer has CustomerID c.
        For each CustomerID y, at most one Customer has CustomerID y.
        Each Customer has at most one CustomerID.
Products have Name: On the Object tab of the Fact Editor, set the Name object as a value of the Products object, and set the relationships on the Constraints tab to the following:
[Products] have [Name]
        Each Products have some Name.
        For each Name n, some Products have Name n.
        For each Name n, at most one Products have Name n.
        Each Products have at most one Name.
Products have ProductID: On the Object tab of the Fact Editor, set the ProductID object as a value of the Products object, and set the relationships on the Constraints tab to the following:
[Products] have [ProductID]
        Each Products have some ProductID.
        For each ProductID p, some Products have ProductID p.
        For each ProductID y, at most one Products have ProductID y.
        Each Products have at most one ProductID.
You've now successfully set up the ORM model for the conceptual design of your new data model. Because you created all the facts not actually knowing whether they're correct, the best thing to do is to check the ORM model for errors.
Validating the Data Model
To validate the data model, select the Model Error Check item from the Database main menu. The model is checked for consistency errors in your facts, and you get a list of errors and warnings that make up the validation of the model in Visio's Output window.
For the model you just created, there'll be three warnings and no errors when the validation is complete. The Output window will have something similar to the following message:
Drawing1.vsd : Starting Conceptual Validation... Drawing1.vsd : warning C1007: 'CustomerID' : Value object type playing mandatory role notrecommended. Drawing1.vsd : warning C1007: 'Name' : Value object type playing mandatory role not
Based on the constraints that were set up, the validation detected that although the model makes sense, there might be some problems with certain objects playing a mandatory role. In other words, the constraints were set to Exactly One or One or More. The CustomerID and ProductID facts are at fault because they were added as individual facts and as an identity reference for the Customer and Products facts. To fix these warnings, you can change the Constraint to Zero or More for the offending facts, but that isn't necessary to complete this exercise.
The next step is to move this conceptual model to a physical database. At this point, make sure that the drawing is saved, and remember its location; you'll need it in the next step.
Note
When working with ORM models and database models, Visio seems to churn and burn when opening and saving documents for the first time. This occurs only on the initial save, and subsequent saves are very fast. Don't end the Visio application prematurely if saving your model is taking a long time. It could take up to several minutes. Also, make sure that you've installed Visio Service Release 1 for Visio Enterprise Architects; it fixes many bugs in the ORM modeling feature.