
Exploring the Visual Studio .NET IDE
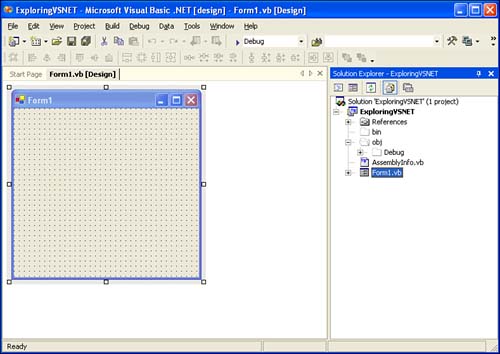
After the ExploringVSNET project is open, you're given the default Form1 in the main window. Figure 2.11 shows you not only the new project, but it also highlights some of the main features of Visual Studio .NET.
Figure 2.11. The ExploringVSNET project.

To maximize your development environment, the main windows in the IDE slide in and out if you hover the mouse over the tab on the right or left side of the screen.
If you want a window to be visible all the time, you can click the pushpin on the window's toolbar to pin it to the screen, and from that point on, it remains open. The horizontal or vertical position of the pushpin indicates whether the window will slide in or out. A vertical pin appears when the window is pinned; otherwise, a horizontal pin is visible.
There are two main window options in Visual Studio .NET: tabbed windows or multiple document interface (MDI) windows. The tabbed theme is new to Visual Studio .NET, and as Figure 2.11 shows, the Form1.vb [Design] caption is on the only visible tab. If you open more windows, more tabs are added to the screen. You can close the current window by clicking the X in the upper-right corner of the active window. If you prefer the MDI environment that was used in Visual Basic 6 and Visual InterDev, you can change the window setup in the Tools, Options dialog screen. You'll get used to tabbed windows very quickly; they're a nice feature.
If you pin all the hovering windows and then close the project, the settings are saved from the previous open instance, so you don't have to reset the windows each time you open Visual Studio .NET. As in previous Microsoft development environments, you can drag and drop windows wherever you want, and the default profile that you set up on the My Profile page defaults the windows to the environment you selected at that time.
I prefer the tabbed windows to be always pinned, so my IDE looks like Figure 2.12. It gets very difficult to work fast with windows constantly popping in and out of the screen, so by pinning everything, I have my Solution Explorer, Properties window, Toolbox, Server Explorer, and Dynamic Help always available.
Figure 2.12. Tabbed windows that are pinned.
Using the Solution Explorer
As you can see by Figure 2.12, the Solution Explorer has the hierarchical structure of your current project. The toolbar on the Solution Explorer window enables you to switch between Design view and Code view, refresh the files list in the Solution Explorer, and show or hide files that aren't part of your solution.
When Visual Studio .NET creates a project, the .SLN file contains the path to the actual location of the solution files. The files listed in the Solution Explorer are all the pertinent files in the directory of the solution. So, files that aren't pertinent to the project, such as the Bin and Obj directory, aren't included in the project—they're hidden. To include a file in the project, you can right-click on a file that's dimmed in the Solution Explorer and select Include in Project from the contextual menu. If you don't see the Bin and Obj folders, click the Show All Files button on the Solution Explorer toolbar.
Here are some tips for using the Solution Explorer:
The Solution Explorer is a representation of the solution's folder on the file system. If you add items to the folder outside of Visual Studio .NET, click the Refresh button, make sure that you're showing hidden files, and you'll see the files you added to the file system.
You can drag items from the Desktop, Windows Explorer, Web folders, or anywhere else, directly to the Solution Explorer. When working with Visual Basic .NET and C# projects, the files dragged into the Solution Explorer are physically copied to the source directory; they aren't shortcuts to the files added.
There is full cut, copy, and paste capability between files and folders in the Solution Explorer, and files and folders from the file system to the Solution Explorer.
You can right-click on a file or folder in the Solution Explorer and select Exclude From Project to make the file hidden to the solution, which means it won't be included in the compile.
Deleting a file from the Solution Explorer physically deletes the file from the file system and places the file in the Recycle Bin, so be careful when you delete. If you want to get rid of a file and not delete it, either remove or exclude the file.
The Solution Explorer can manage multiple projects. From the right-click contextual menu on the Solution Explorer, you can add new items such as forms or files to the project, or add new projects to the solution. The number of projects a solution can contain is unlimited, and the number or individual files that a project can contain is also unlimited.
Using the Properties Window
The Properties window enables you to set properties on items that you select on forms in the IDE. You can also right-click on items in the Solution Explorer and select Properties from the contextual menu to see the properties for the files, such as file location. You'll learn more about the Properties window over the next few days when you begin building applications.
Using the Toolbox
The Toolbox contains visual and nonvisual controls that can be added to Web Forms or Windows Forms in Design mode. By dragging items from the Toolbox to a form, you can set properties and write code that responds to events for the control you have added.
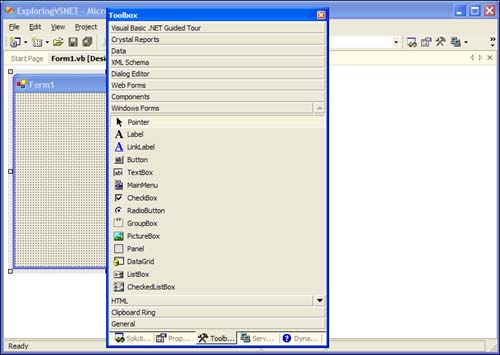
In Visual Studio .NET, the Toolbox is slightly different from Visual Basic 6, but similar to Visual InterDev. The Toolbox has multiple tabs that group items based on functionality. You can customize the tabs that are visible and create new tabs by right-clicking on the Toolbox and selecting Show All Tabs or Add New Tab, respectively. Figure 2.13 shows the Toolbox with the Show All Tabs option selected. You can see by the number of tabs that there are many new controls you can add to the designers and forms in your projects.
Figure 2.13. The Toolbox showing all tabs.
Another huge addition to the Toolbox is the ability to drag items from the Code Editor to the Toolbox. This feature enables you to save code items for later use. Every item added to the Toolbox is persisted with the IDE, so it remains there for all instances that you open. To use it effectively, you should create new tabs in the Toolbox to differentiate your code snippets from the controls. You can then drag items from the code window to the Toolbox, and right-click on the item to rename it to something meaningful.
The Clipboard Ring tabtab keeps track of all things copied to the Clipboard in Windows. So, if you're copying items from outside of the IDE, they'll appear in the Clipboard Ring tab. You can then either drag the items to a new tab or drag them directly to the Code Editor.
Caution
Visual Studio .NET saves the state of the last instance of Visual Studio .NET that you had open. So, if you have five instances of Visual Studio .NET open, and you're dragging items to new tabs and setting up your development environment, make sure that you close the “good” copy last. If you close it first, all your customization is lost.
Using the Server Explorer
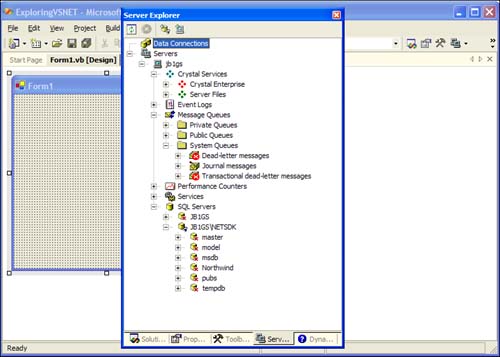
The Server Explorer is a window into the server resources on your computer or other computers on your network. From the Server Explorer, you can view OLE DB database connections, which can also be created in a number of ways using either the Server Explorer or tools from the Data tab in the Toolbox. You can also view event logs, message queues, performance counters, services, and SQL Servers installed on your computer. Figure 2.14 demonstrates some of the features available in the Server Explorer.
Figure 2.14. The Server Explorer.
To add new servers to the Server Explorer, you can right-click on the Servers node or click the Add Server button on the Server Explorer toolbar. You're prompted for the name of the server to connect to, and you can modify the security context under which you're logging in to the server.
On Day 11, “Understanding Visual Database Tools,” you make heavy use of the Server Explorer data access features.
Tip
There are many times when you need access to tables, views, and stored procedures in a SQL Server database, but don't have access to the Enterprise Manager for SQL Server or don't have the correct permissions to log in to the SQL Server through the SQL Servers node of the Server Explorer. To get around this, you can click the Connect to a Database button on the Server Explorer and create an OLE DB connection to the database using your credentials. This gives you almost the same functionality as using the SQL Servers node of the Server Explorer without the hassle of getting the correct permissions set up on the server that SQL Server is running on. After you have a database connection, you can create and alter tables, create and alter stored procedures, create and alter views, and create and alter functions as if you were using SQL Server's Enterprise Manager or the SQL Server node in the Solution Explorer. Best of all, this functionality is available to any OLE DB connection, such as Microsoft Access databases and Oracle databases.
Getting to the Other Windows
The Solution Explorer, Properties window, Toolbox, and Server Explorer are the most common windows that you'll use, but Visual Studio .NET has dozens of other useful windows that integrate directly with the IDE.
On the Standard toolbar, there are buttons to gain access to each window available in Visual Studio .NET, and they're also accessible by selecting the View option from the main menu.
Figure 2.15 shows the full list of windows available by selecting View from the main menu.
Figure 2.15. Selecting other windows from the View menu.
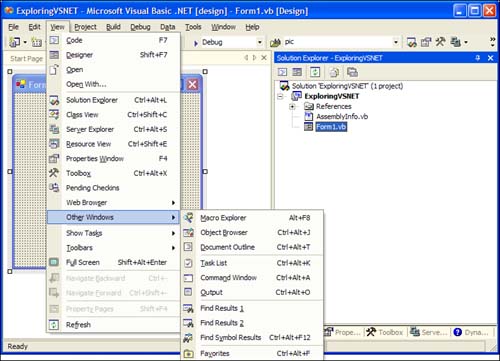
Depending on the menu item you select, the window could be pinned to the right, left, or bottom of your screen. Each window that opens in Visual Studio .NET has the ability to be pinned, docked, floating, or sliding.
Over the next three weeks, you'll learn about each of the windows in Figure 2.15 and the context in which each one is used.