Lesson 3. Creating Posts and Pages
In this lesson, you learn how to create and manage posts and pages. This lesson introduces you to the basics of content creation and then more advanced topics such as including images, audio, and video to enrich your readers’ experience.
Creating Posts
Posts are the lifeblood of any blog. They are the reason people come back to a blog or subscribe to an RSS feed. If a blog doesn’t have an influx of new content, most people have no desire to visit. As a result, creating and maintaining posts are some of the most common activities you will perform on your site. Posts don’t need to be fancy or laborious to create. The less time you spend thinking about how to operate the tool, the more time you can spend creating content. WordPress has provided several easy ways to create new posts.
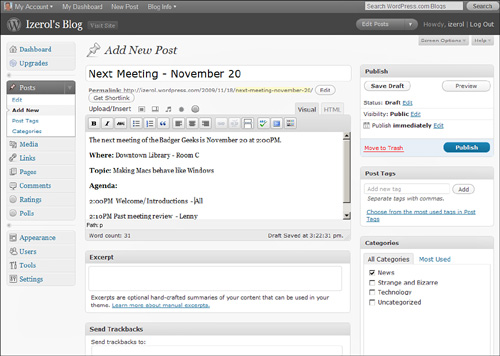
The easiest way to create a new post is to click the New Post button in the upper-right corner of the administrative screen. You can always create a new post from the side menu under Posts, Add New. See Figure 3.1.
Note: The New Post Button
The New Post button is context sensitive, so it may not always appear as New Post.
Figure 3.1. Adding a new post.
The first field at the top of the Add New Post page is the post title. This is the “headline” of your post. A good title is the key to a good post. It should grab the attention of your readers and draw them in. Often, it is the only part of your post some people will see, such as an RSS index listing.
After you finish entering your title and tab (or move your cursor) to the next field, a URL appears just below the title with the label Permalink. For now, this is the link to your post.
There are also two buttons below the title:
• Edit—This button allows you to modify the suffix of the URL. By default, WordPress creates the URL based on the date and the title words. Although you cannot change the date, you can change the part with the title words if you choose, as long as it remains unique. WordPress removes symbols such as $, &, and @ from the title to avoid confusion with special symbols used by web addresses. Use the Edit button next to the permalink to modify the URL. For example, add the word “percent” where WordPress removed the “%” symbol.
• Short Link—This button provides a quick way to take your long URL and collapse it down to something easier to reference in a short messaging system like a mobile text message or Twitter. For example, your default permalink is http://yourname.worpress.com/2009/11/27/funniest-bumper-stickers, and the short link is http://wp.me/pGy8H-k.
At a minimum, all you need for a basic post is a title and text in the message body. Then click Publish and you’ve created a post! Of course, there are many options to add more pizzazz to your posts. The following sections describe how to format and enhance your posts.
The Visual Editor
Just below the title is the body of the post. This is the place where you enter the text (and other items) of your post. This area operates much like a standard word processor offering indentation, bullet lists, bold, italic, centering, and other formatting options. More advanced content items are covered later in this lesson. You can find out what each icon does by passing your cursor over it.
Consider, for example, that you want to write a quick review of Sams Teach Yourself WordPress in 10 Minutes.
In the title area, enter Book Review: Sams Teach Yourself WordPress in 10 Minutes.
In the message body, begin typing some pertinent information, such as the following:
Author: Chuck Tomasi and Kreg Steppe
Pages: 208
ISBN: 0672331209
Comments: Two thumbs up. "STY WordPress in 10 min" covers the
necessary information to get me up and running on WordPress.com
quickly and easily without a lot of extra "fluff" to get in the
way. The authors know their topic and stay on track. The informa-
tion is presented in a clear and logical order. I am new to
WordPress and I don't know a lot about online services and social
media, I had no trouble getting started with WordPress. I will
continue to use this as a reference should I need to host my own
blog (and customize it) in the future.
That’s not too bad, but a little plain. Let’s take a look at the Visual Editor toolbar and see how it might help us enhance our post. Some of the icons are covered later in this lesson to demonstrate how to include more than text in your post.
• When you highlight the word Author and click the B icon on the toolbar, the word turns bold. By repeating this procedure for the words Pages, ISBN, and Comments, you can enhance the look of your post by making the headers stand out.
• You might also highlight the title of the book and click the I icon to make the title italic. Don’t go overboard with formatting, though.
• You can use the button that has the ABC with a line through to create “strikeout” text. Bloggers commonly use strikeout as a reminder to come back and update posts as new facts related to the topic emerge. By highlighting some text and clicking the strikeout icon, you leave the text in the post, but readers can see that it is obsolete.
• The icon to the right of strikeout lets you create a bulleted list. To create a new bulleted list, start with your cursor at the beginning of a new line and click the bullet list icon. A bullet appears, and you can begin typing your first list item. At the end of the first item, press Enter and a second bullet appears. Continue this process until you complete your list. When you are done, press Enter on a blank bullet (typically your last one), and your list is terminated. To create a bulleted list from existing text, highlight the lines where you want a bullet and click the bullet list icon.
• Numbered lists operate just like bullet lists. The icon for numbered lists is next to the bullet lists and has a 123 with lines next to it.
• The next three icons let you change the alignment of your text. For existing text, place the cursor on the line you want to align and click one of the icons to set it right-justified, centered, or left-justified. For new text, click the appropriate alignment icon first and then start typing. When you want to switch, choose a different icon and begin typing additional text.
• If you have a very long post, you might decide to use the More icon. This icon looks like a small white rectangle over a larger white rectangle with a dotted line between them. To use the More icon, place your cursor at a spot two or three lines into your post. For this example, place it right after “. . . get in the way.” Now click the More icon, and you see a dividing line appear in your text. When readers view your post in their web browser, they will see the first couple of lines and then a link labeled Read the Rest of This Entry>>. If readers click the link, they are taken to a page with the entire post. This feature provides a good way for you to get lots of posts in a small space but still have the ability to be verbose.
• The button with the ABC and the check mark lets you spell check your posting. If WordPress finds an error, it underlines the error in red. Click the underlined word and several options are presented to allow you to correct or ignore the word.
• The second icon from the right toggles full-screen mode. If you prefer to temporarily clear your screen of everything that is not part of your post, you can click this icon to focus on your writing. Clicking it again goes back to the default view.
• The rightmost icon is known as the Show/Hide the Kitchen Sink button, which displays or hides an entire second row of icons. This button lets you change the font size, style, and color, as well as insert symbols, change your indent level, undo changes, and redo changes.
Be choosy about using enhancements in your post. Using too many can detract from the message you are trying to convey.
Tip: Use Keyboard Shortcuts to Speed Up Your Work
As you move your cursor over the icons on the Visual Editor toolbar, make a note of the text that appears when you hover over each one for a second or two. WordPress lets you know what keyboard shortcuts you can use to accomplish the same task without using your mouse. For example, hovering over the Bold icon displays (Ctrl+B). This means you can press B while holding down the Ctrl key, represented as Ctrl+B (Windows) (or ![]() -B for the Mac). Different browsers use different keys to access the shortcuts. You might have to hold down Alt+Shift instead of Ctrl. Rather than moving to the icon, clicking B, then typing text, and clicking the icon again, you can press Ctrl+B (to turn on bold), type your text, and press Ctrl+B again (to turn off bold). The more your hands stay on the keyboard, the faster you will become.
-B for the Mac). Different browsers use different keys to access the shortcuts. You might have to hold down Alt+Shift instead of Ctrl. Rather than moving to the icon, clicking B, then typing text, and clicking the icon again, you can press Ctrl+B (to turn on bold), type your text, and press Ctrl+B again (to turn off bold). The more your hands stay on the keyboard, the faster you will become.
WYSIWYG Editing Versus HTML
To the right of the Visual Editor toolbar are two tabs labeled Visual and HTML:
• Visual—This is the default option when you’re creating posts. It allows you to create your post in a WYSIWYG (what you see is what you get) format common to most word processors today.
• HTML—Clicking this tab switches to show what is going on behind the scenes. It reveals the actual HTML codes necessary to display your text in a browser the way you intend (see Figure 3.2). Although you probably won’t use the HTML window to enter the text of your posts (unless you are skilled with HTML), you might use the window to embed HTML code that you get from a third party.
Figure 3.2. The HTML tab lets you view see HTML code and insert HTML code from a third party.

Using Excerpts, Trackbacks, and Discussion Options
Following the post message body on the screen is a text area labeled Excerpt. This optional bit of text gives a summary about your post. It is optional because it can be used to replace the full content in your RSS feed if you use the option to display summaries in Settings, Reading. And, depending on the WordPress theme used, you can use it where summaries are preferred to full content. These places include
• Search results
• Tag archives
• Category archives
• Monthly archives
• Author archives
The next section below Excerpt is Send Trackbacks. Trackbacks are a way to notify other blogs that you have linked to them, which is useful for getting not only your readers but also readers from another blog involved in the conversation. Trackbacks work like this:
• Person A writes something on her blog.
• Person B wants to comment on Person A’s blog, but wants her own readers to see what she had to say, and be able to comment on her own blog.
• Person B posts on her own blog and sends a trackback to Person A’s blog.
• Person A’s blog receives the trackback and displays it as a comment to the original post. This comment contains a link to Person B’s post.
If you link to other WordPress blogs, the trackback function is automatic, and you can leave it blank. For non-WordPress blogs, enter the URL of the other blog’s post in the space provided.
Finally, in the main column are the Discussion options. They allow you to enable or disable comments and trackbacks on a post-by-post basis (overriding the settings in the global discussion options in Settings, Discussion).
Publish Options
The options in the Publish section on the right allow you to manage when and how your post is released to your readers.
• Save Draft (button)—The Save Draft button allows you to save your work as you continue writing. Few things are more frustrating than writing for a long time and then losing your work. Saving as a draft simply keeps a recent backup of your article on WordPress. Your content is saved but not yet published.
• Preview (button)—If you want to see how your post will look before it is made public, click the Preview button. A preview is useful when you have embedded images, additional formatting, or something else besides simple text and you want to verify the layout appears as you would expect.
• Status (field)—The Status defaults to Draft to indicate the post is under construction. You can click the Edit link next to the word Draft and change it to Pending Review if you want to have an editor review it before it is posted.
• Visibility (field)—The Visibility option allows you to change who can see your post. By default, it is set to Public, but by clicking the Edit link, you get several options, including password protected and private. Another handy feature under Visibility is the check box labeled Stick This Post to the Front Page. Some people like to use this option for announcements or other information they want to make available all the time. For example, if our local radio-controlled airplane club is having a monthly meeting in three weeks, I want that meeting announcement to stay on the front page even if there are a dozen more postings between the time I post the announcement and the meeting. Of course, I will have to remember to edit the article and uncheck that option at some point in the future.
• Publish (field)—You also can change the time the article is published. This capability is useful for dated material. For example, our local radio-controlled airplane club just got a pre-release of a new model to write a review. As part of the agreement, the review must be posted on the first of next month to coincide with the product release. When I click the Edit link next to Publish: Immediately, a date and time appear. I can set the date to the first of next month, determine what time it will show up, and click OK. After reviewing and setting all my options, I can click the Publish button.
• Publish (button)—The simplest action in this section is the Publish button. When you click it, your content is online for the world to read.
Post Tags
Post tags provide a way to group similar post topics together in an informal way. When you create a post, you can add optional tags that work much like keywords. Posts with the same tags can be automatically linked together. Some WordPress themes display the tags to quickly access posts with the same tags. For example, my personal blog has a posting on it about my martial arts training. If I include tags such as karate, training, exercise, and bo staff, they are easily searchable among other WordPress.com blogs using the Dashboard, Tag Surfer feature. From an information organization standpoint, you should start getting in the habit of putting a few tags in each post. Post tags are managed from the side menu under Posts, Post Tags.
Categories
Categories are another way to organize your information. They are more structured than post tags in that they can be hierarchical (one category can have one or more subcategories). When you create your blog, have a good idea of what types of information you will be sharing and create categories around the major groupings. For example, in my personal blog, I write about personal and professional topics. I further break down the personal topics into family, exercise, personal development, and hobbies. I have created my categories around these major groupings. When I create a post, I know it generally fits at least one of these categories. Before I publish the post, I can check the appropriate category (or categories). Now if someone comes to my blog and wants to see what I’ve written regarding my personal development program, he can click a category link (typically displayed on the front page of my blog under a Categories heading) and see those posts grouped together. Try not to go overboard on categories. Again, some forethought is recommended here.
Note: Using Tag Surfer
If you select the Dashboard, Tag Surfer option from the side menu, any tags you put in that list are automatically available to your post categories.
Editing Existing Posts
Whether you’ve spotted a typo, need to make an update to a meeting agenda, or take something offline for legal reasons, you are going to need to make changes to your posts at some point. Editing existing posts is done by going to Posts, Edit in the side menu (see Figure 3.3).
Figure 3.3. A typical list of posts.

The Edit Posts list lets you see a number of properties about each post, including the author, any categories or tags applied, a quick link to statistics regarding your post, how many comments were made about it, and the date when it was last modified or published.
List Basics
WordPress displays the index of posts, pages, comments, links, and media files in a list. Most lists in WordPress have the same basic functionality. Following is an overview of basic list operations:
• The column titles are available at the top and bottom of the list of articles for convenience when you’re managing a long list of articles.
• Clicking Screen Options displays check boxes corresponding to the list column titles. Checking or unchecking turns on or off any of the columns in the listing after you click the Apply button.
• The Screen Options also allow you to control how many items are displayed in the list.
• Most lists have Add New near the top of the screen so that you can quickly add a new entry.
• Many lists have links that enable you to quickly view grouped items. For example, the Posts list has links labeled All, Published, Drafts, and Trash, enabling you to quickly view a subset of the entire list. The view for All items does not include those in the Trash.
• As you pass your cursor over any of the list items, notice the options that appear just under the title. They allow you to easily manage items. For example, on the Edit Posts list, placing the cursor anywhere on a row displays links labeled Edit, Quick Edit (see Figure 3.4), Trash, and View (or Preview for a draft).
Figure 3.4. Quick Edit allows you to edit nearly all post attributes from the edit list.

• When you use the Trash link on a post, page, comment, or upload from your blog, it is not removed immediately. The Trash option moves it to the Trash folder, where it is still available for up to 30 days. WordPress.org users can configure the retention period by modifying their wp-config.php file. When you trash an item, an Undo link appears at the top of the list, allowing you to recall your trashed item immediately in case of an accident. Posts, pages, comments, and media each have their own Trash folder. To see items in the Trash folder, click the Trash link at the top of the list. Items in the Trash folder can be restored easily by placing your cursor over the item you want to restore and clicking the Restore link. Inversely, you can remove the file permanently by clicking the Delete Permanently link. The Links list uses a standard Delete link. After a link is deleted, it is permanently and immediately removed from the system. Previous versions of WordPress had a simple Delete feature that immediately removed items from the system.
• On the left of each list is a series of check boxes. Whether you are managing posts, users, or other list items, use these check boxes to select one or more items to perform a “bulk action” on them. Check the check box on the top or bottom title row to select all list items currently displayed. An example is approving comments en masse. You can either select all the comments one at a time or use the topmost (or bottommost) check box to check them all and then use the Bulk Actions drop-down list and click the Apply button to approve them all at once.
Other list options vary depending on specific functions to that list, such as filtering posts by categories. Don’t be afraid to experiment with the list links.
Other tools, specific to the Edit Posts listing, can be used to filter and modify the way your posts are displayed in the list. If you are extremely prolific and have hundreds of posts to sort through, you can try to find your material by using the filters just above the list column headings. They let you filter by certain dates and/or categories. Alternatively, you can use the search box to search for text in any of your posts.
You can also make edits on multiple posts by checking each entry and then use the Bulk Edit menu to select Edit and click Apply. A set of options appears at the top of the list similar to those found in the Quick Edit option. Using these options allows you to set categories, tags, the author, and other attributes on multiple posts at once.
Two additional icons appear at the top right of the Edit list to change the view from List view to Excerpt view. List view provides you with a concise list displaying just the article title. When you change to Excerpt view, you get a preview of posts just below the title. Some people find this feature useful, whereas others think it makes the list too long. You can choose which option you prefer. A sample of the Edit list is shown in Figure 3.3.
Creating Pages
Pages contain static content that is quickly accessible from nearly anywhere on the blog, as opposed to a more dynamic influx of regular posts. As with posts, you can insert images, links, or any other type of information that the Visual Editor supports to create your page. One good example is the About page (created by default). The About page is a description of you or your organization. It gives readers a little more background about who you are and what you are doing. Most themes have a good way to display pages on the blog’s front page (see Figure 3.5). Most blogs have a few pages with key information about the person, organization, services, or the information it offers. You can arrange your pages hierarchically with a parent page having multiple pages under it. For example, your About page may also have pages with more detail on your work history or hobbies.
Figure 3.5. This theme displays pages as tabs across the top.
Creating Basic Pages
Creating a page is similar to creating a post. There are some differences that I will point out as we walk through the process. To create a new page:
- Click Pages from the side menu.
- Click Add New from the Pages section.
- Give your page a title. Keep your page title short (one or two words). Many themes display page titles horizontally. Short titles work much better in this situation.
- Add the content. Page editing uses the same Visual Editor as the post editor, so all the same formatting tips described in the “Creating Posts” section also apply to pages.
- Set the attributes. Unlike posts with tags and categories, pages have an Attributes section on the right. Defining the parent page allows you to arrange your pages hierarchically. For example, you may have a sporting goods products page that has “sub-pages” for hunting, fishing, tennis, and so on. All these pages would have the same parent page. The main page is the parent by default. The attributes section also has an option that allows you to define how your pages are ordered. If you leave all pages at 0, they are sorted alphabetically by title.
- Set the comments and trackback options. Again, like posts, pages can allow comments and trackbacks (references) if the appropriate check boxes under the page body are checked.
- Publish your post. The same options to publish your page (date, time, visibility, and so on) are also available.
Editing Pages
Managing pages is similar to managing posts. Begin by selecting the Pages section in the side menu. A list of pages is presented (see Figure 3.6). Refer to the “List Basics” sidebar earlier in this lesson for the fundamentals of managing WordPress lists.
Figure 3.6. A typical page listing.

You can edit any page by clicking on the page name or using the Edit link that appears just below the title when your mouse cursor passes over the row containing the page information.
When the editor appears, change the title, content, or other options to suit your needs. You can find more information on the editor’s features in the “Visual Editor” section earlier in this lesson. When you are done making changes, click Update.
Creating More Advanced Content
Creating basic text is nice, but WordPress is capable of so much more. What’s more, web users these days expect references, images, and even audio and video from your site. WordPress has a way to accomplish all this without requiring you to know any web programming language.
Adding Hyperlinks
Hyperlinks are references on a web page that, when clicked, take you to another location on the same page or to a different page altogether. Hyperlinks can either be text or an image. To place a hyperlink in your post or page (aka article), you first need to know the location of the other page. Follow these steps to add a text hyperlink:
- Edit your article.
- Open a second browser window or tab.
- Go to the page you want to link to.
- Select the text in the address bar. Be sure to get the entire address. Placing your cursor in the address bar usually highlights everything by default. However, if you don’t have everything selected, you can press Ctrl+A (Windows)/
 -A (Mac) to select all text.
- Right-click your mouse and select Copy or press Ctrl+C (Windows)/-C (Mac).
- Close the second browser window or tab.
- In the Visual Editor, use your cursor to select the text you want to use as your link.
- Click the icon that looks like two links of a chain.
- The Insert/Edit Link window displays with several fields (see Figure 3.7). Fill in the fields as follows:
• Link URL—This is the address you copied from the address bar in the other window. Type or paste the complete web address by pressing Ctrl+V (Windows)/
-V (Mac).• Target—This identifies where the new page will be displayed.
• Title—The text in the title is what pops up when you move your cursor over the link. Many times it is the same as the text of the link, but can be different. For example, the text might contain “Chuck Tomasi” and the title contains “Chuck’s home page.”
• Class—The class identifies the style in which the link is displayed. The values in this field refer to the cascading style sheet (CSS) values. CSS is beyond the scope of this book. It’s OK to leave the class with the default value “—Not Set—”.
Figure 3.7. You only need to know the URL to create a hyperlink.

- Click Insert.
Tip: Check All Your Links
Be sure to verify your links connect with the pages you intend by testing them. If you need to correct your link, place your cursor anywhere on the linked text and click the Link icon.
Adding Images
Adding images to your article communicates much more information than text alone. Inserting images into your article is available four ways:
- From your computer
- From a URL (another website)
- From the gallery (available after images are uploaded)
- From the media library
Begin any of these methods by placing your cursor in the body of your text where you want to insert the image and then click the Add an Image icon (see Figure 3.8). The Add an Image window opens (see Figure 3.9).
Figure 3.8. Use the Add an Image icon to include photos, icons, and other graphics.
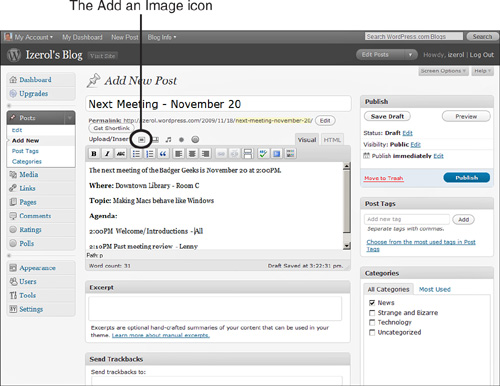
Figure 3.9. Images can be added to your article several ways.

Adding an Image From Your Computer
To add an image from your computer, follow these steps:
- Select the left option (From Computer) at the top of the Add an Image window. You can upload JPEG, GIF, or PNG image files by clicking the Select Files button.
- Use your computer’s browse feature to select the file(s) you want to upload.
- Click Open (Windows) or Select (Mac). Your file is uploaded, and a thumbnail of your image is displayed with various properties.
- Click the Insert Into Post button. Use the scroll bar on the Add an Image window to look further down if you don’t see the button displayed.
Your image is then inserted into your post. If you need to modify any of the image properties, such as alignment, size, caption, and so on, click your image and two icons appear in the upper-left corner of your image. Click the icon that looks like a mountain and sky to edit your image; click the red circle with a slash through it to delete your image.
Tip: Add Alternate Text for Accessibility
When you add images, consider using the Alternate Text field to describe your image. Alternate text can be used for visually impaired readers who use special software that scans for the text in Alternate Text fields and reads it audibly. When you upload an image, the Alternate Text field is listed below the Title. When you edit your image, the field is listed under the Advanced Settings tab.
Note: How Many Images Can I Use?
You can upload up to 3GB of files before requiring a storage upgrade.
Adding an Image From a URL
Another way to add an image to your article is to reference it from another location (someone else’s site) or add it by using the URL. Adding an image by using a URL saves you disk space and ensures changes to an image at the source are reflected on your site. The downside is that your site is generating traffic on the other server instead of your own server, which is sometimes frowned upon. Another disadvantage is the lack of control you have on the image you are using. If someone on the other site deletes the file, you will find yourself with a missing image. Before you use this option, be sure you have permission to include images through the URL. To add an image from a URL, do the following:
- Determine the URL to the image you want to use by going to that page and right-clicking on the image.
- Copy the URL. Depending on your browser:
• Firefox: Choose Copy Image Location.
• Internet Explorer: Choose Properties and copy the text from the Address (URL) field.
• Safari: Choose Copy Image Address.
- Click the Add an Image icon from the toolbar.
- In the Add an Image window (see Figure 3.10), click the From URL tab.
Figure 3.10. Referencing media from another site.

- Copy the the Image URL by placing your cursor in the Image URL field and typing Ctr+V (Windows), -V (Mac), or right-click and choose Paste.
- Add descriptive text to the Alternate Text field.
- Enter a caption (optional).
- Specify how you want the image aligned (optional).
- If you want the image to link to another site or page when the reader clicks on the image, enter the URL in the Link Image To field (this field is blank by default).
- Click the Insert Into Post button at the bottom.
Your image is now part of your article. To edit the image properties, click the image and then click the icon that looks like a mountain and sky that appears in the upper-left corner.
When the Add an Image window appears, notice that there is a second way to insert an image by using a URL (refer to Figure 3.10). The option at the top uses a protocol known as oEmbed. Without getting too technical, oEmbed is a new technology to address some problems discovered with referencing media from another site with a direct URL. The advantage of oEmbed is that it provides additional information about the media being requested so that the software (WordPress in this case) can be smarter about how it is embedded. The capability to embed an image is supported by many popular media sites such as YouTube, Flickr, and Hulu; more are being added all the time. For more information about oEmbed, visit www.oembed.com.
Adding an Image from the Gallery
Your gallery is a collection of images attached to a post or page. It is a subset of the media library (a collection of all images and media files uploaded to your blog). When you add another image to the same article, a fourth option labeled Gallery appears on the top of the Add an Image window (see Figure 3.11). This option enables you to view the images attached to that article and insert them as a collection in the post.
Figure 3.11. The Gallery tab lets you insert a collection of images.
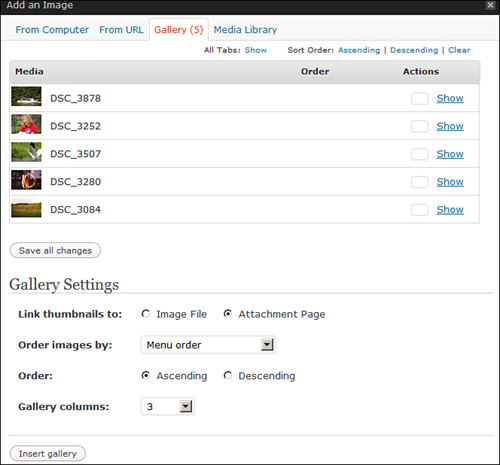
For example, let’s say I have several images from my summer vacation. Rather than inserting the images individually to the post or page, I can create a gallery using the following steps:
- Click the Add an Image icon.
- Click the From Computer tab to upload the images the same as you would to insert the images in to a post.
- Instead of clicking Insert into Post, click Save All Changes.
- Click the Insert Gallery button to add all four images at once.
Changing the settings of your gallery is similar to images. Click on the gallery after it is added to your post or page and use the upper-left icon to change where the image thumbnails link to, the order of the images, and how many columns to display. Click Update Gallery Settings to save your changes. You can find additional information about the Gallery at http://en.support.wordpress.com/images/gallery/.
Note: The Difference Between the Media Library and Gallery
The media library is a warehouse of images, audio, video, and other files you can include in any post or page. The gallery is a collection of images specific to the current post or page.
Adding an Image From The Media Library
The final way to add an image to your article is from your media library. After you load images into your media library, you can easily add images to an article:
- Click the cursor where you want to insert the graphic in your text.
- Click the Add an Image icon from the toolbar.
- When the Add an Image window appears, click Media Library at the top.
- Locate the image you want to include using the Search or Filter options.
- After you locate the image, click the Show link on the right side.
- Enter the title, alternate text, and other fields to format the image the way you like.
- Click the Insert Into Post button at the bottom
Your image is then included as part of your article. The benefit of using images from your library is they can be used multiple times from one copy. This capability can save you time if you use a logo in multiple places. Updating your logo in the library updates it everywhere automatically. Also, you control what is in your media library, unlike referencing an image from another site.
Note: Image Links
By default, images uploaded from your system and those from the media library link to a full-size image of the one displayed in your article. That is, when readers click the image in your post or page, they go to a full-size version of your image. To change this, edit the properties and set the Link URL field to the address you want to link to.
Adding Audio
Adding audio to your blog can turn your readers into listeners. There is something more intimate about hearing someone’s voice than reading her words. Some bloggers have combined blogging with audio production to create a new media form called podcasting. Podcasting is beyond the scope of this book, but you can learn more about it in Podcasting For Dummies, Second Edition, by Tee Morris, Chuck Tomasi, and Evo Terra.
There are three ways you can include audio in your blog. The first is to upload an MP3 file somewhere on the Internet and insert a “short code” to use the built-in audio player in WordPress to play the file. (Creating and uploading the MP3 file are beyond the scope of this book.) If you have a file you want to reference and know the URL, you can do the following:
- Edit your article.
- Switch the Visual Editor to HTML mode by clicking the HTML link above the text edit box.
- Enter the short code in the format:
[audio http://mydomain.com/audio/myfile.mp3], replacing the URL with your appropriate address. - Save your article.
Your article then has a simple embedded audio player that visitors to your site can click and hear.
The second way to include audio in an article is to buy the space upgrade from WordPress (available under Dashboard, Upgrades) to enable uploading of audio files to your media library. From the Visual Editor, you can also use the Add Audio icon (shaped like musical notes). Audio files supported are WAV, MP3, MP4, M4A, and OGG. After you purchase the upgrade, the process of uploading and managing audio files is similar to managing images.
The final way you can add audio to a post is to create a link that references your file elsewhere on the Internet. This requires your readers to download the file and play it on their machine.
Caution: Be Aware of Copyrights
Whenever you’re dealing with audio and video, be sure you understand and respect copyright laws associated with the material you are using. When in doubt, do not use other people’s work.
Adding Video
High-speed Internet access is becoming more common every day. People are turning to the Internet for video to satisfy their entertainment and educational desires.
The first way you can embed a video from another site is to use the same method as linking an image from a URL. As with images, you need to know the URL of the video you are linking to. Most YouTube videos display the URL on the right side of the screen when you play it, so adding them is simply a matter of copying and pasting the URL from one window to another.
- Open your article for editing.
- Click the Add Video icon (shaped like a frame of a movie reel, to the right of the Add Image icon).
- Click the From URL tab on the Add Video screen.
- Enter the video URL—for example, http://www.youtube.com/watch?v=sC0lO6_223I.
- Click Insert into Post.
The second way you can include video is to purchase the VideoPress upgrade from WordPress (available under Dashboard, Upgrades) to upload and host your own video files in the media library. Uploading files can be done either from Media, Add New, or using the Add Video icon above the Visual Editor when you edit your article. Uploading or selecting the video from the media library follows the same steps you use with images. After you upload or select from the media library, the screen to define the attributes is a bit different (see Figure 3.12), allowing you to set a title, description, and rating. The selection also shows a short code you can use to embed the video, or you can click the Insert into Post button to include the video.
Figure 3.12. Setting the options on an embedded video.

The advantage to putting your video on a site like YouTube is that it is free. The disadvantages are that videos are limited to 10 minutes or less, and if you ever want to produce content as part of a business, YouTube does not offer some of the controls and statistics you may need. To address those needs, you might want to consider the VideoPress upgrade.
Summary
Adding new content is a common activity for bloggers. WordPress makes it easy to access the buttons and links to create posts and pages. The less time you spend focusing on how to use the tool, the more time you can spend on creating the content. Finally, your content can be enhanced by using some formatting, images, audio, and video to provide richer content and attract more visitors to your site.