Lesson 4. Configuring Your Blog Settings
In this lesson, you learn the various options to configure the global settings on your blog to determine how people and other systems use it.
Before you start creating content, it pays to ensure you have your blog configured to best meet your needs and those of your visitors. The information you entered when you set up your account was a good start, but there is more. Many of the default settings work fine, but in some cases customizing settings can help you and your readers use the system more effectively. The system settings control how the system behaves for everyone who uses it—from the way the time and date are displayed to the way you are notified when a comment is made.
The Settings section on the side menu is your key to configuring your system and the way people interact with it. The system settings are subdivided into General, Writing, Reading, Discussion, Media, Privacy, Delete Blog, OpenID, and Domains. Each of these subpanels is described in greater detail in this lesson.
General
The General subpanel contains many of the settings related to the blog and some of the general interface properties (see Figure 4.1). The nine settings in the General subpanel are described in the following sections.
Figure 4.1. The General Settings screen.

Blog Title
The Blog Title setting shows the title of your blog as it appears to others who are searching for or subscribing to it. Examples include “Valley Fair Orchestra,” “Dean’s Car Blog,” and “Gmail Podcast.”
Tagline
The tagline is a short one-line description that lets people know what your blog is about. For example, one of my blogs is about Gmail and has the tagline “A collection of short hints, tips, and tricks to help you get more from your Gmail Account.”
Language
In the Language field, select the language the blog is written in. The default language is English. Note that this is different from the interface language readers may have set in their profiles.
E-mail Address
The email address listed in the General Settings subpanel is for administrative purposes only and is not visible to your visitors. For example, it is the email address to which notifications are sent when new comments need to be approved. When you change the email address, a verification message is sent to the new address to confirm it for security reasons. The new email address is not active until the verification is complete.
Timezone
The Timezone setting controls the display of times on the blog (such as when posts were made). The Timezone setting shows the current coordinated universal time, or UTC. You can change the Timezone setting to the offset of your timezone to UTC. Unfortunately, you have to manually adjust for daylight saving time. If you do not know the correct offset, you can use the UTC and sample current time to determine the proper value.
Date Format
The Date Format setting lets you choose how to display dates in your blog. Alternatively, you can create your own custom format using the WordPress defined date codes. Documentation on the date codes is available just below the custom date format option.
Time Format
The Time Format field allows you to choose how the time is displayed in your blog. You can choose 12-hour, 24-hour, or another variation with the custom setting.
Week Starts On
WordPress recognizes that not everyone considers Sunday the first day of the week, so it offers the Week Starts On option, which allows you to start your calendar on any day of the week. Typically, this is Sunday or Monday, but you can use any value if your situation requires it.
Blog Picture/Icon
The Blog Picture/Icon area shows the icon or the blavatar (short for blog avatar) of your blog. When people see references to your blog on WordPress.com, they see this image. To upload a new image, follow these steps:
- Click the Browse button.
- Select a JPG or PNG format image file from your system and click OK.
- Click Upload Image.
- Crop the image by resizing the dotted line cutout template and clicking Crop Image.
- Click Back to Blog Options.
Caution: Make Sure to Save
If you have changed any of the General settings, be sure to click Save Changes at the bottom of the screen to ensure your changes take effect.
Writing
The settings in the Writing subpanel apply to everyone who has permission to create content (posts and pages) on your system. These settings define how the authoring process actually works. See Figure 4.2 for the settings in the Writing subpanel.
Figure 4.2. The Writing Settings screen.

Size of the Post Box
When you create a new post or page, a text box with tool icons is used to compose your content. This is known as the Visual Editor. To control the number of rows the Visual Editor text area displays, you can change the Size of the Post Box setting on this screen. You are not limited to only the number of lines of text specified with this setting; instead, after you’ve exceeded the number of lines of text the text box can accommodate, a scroll bar appears on the side of the text box. If you use a Netbook (small form-factor laptop) with limited vertical resolution, you might want to set this value lower so the text box fits on the screen. If you have a higher-resolution screen, you may choose to increase this value so you can get a better idea of what your completed work looks like.
Caution: Be Aware of Coauthors’ Limitations
The Size of the Post Box setting is for all content contributors on the system. Even if you have a high-resolution screen and set the number of lines to 40, that may not work well if one of your editors uses a Netbook to create posts.
Formatting
The Formatting option currently has two settings to help automate some of the content you create. These settings are
• Convert Emoticons Like :-) and :-P to Graphics on Display—Many people like to express emotion in their posts with symbols such as :-). When these characters are viewed sideways, they represent a smile or happiness. These symbols are affectionately known as emoticons. There are many others that can be used to enhance a potentially sterile communication or clear up writing that might be interpreted incorrectly. When you enable this option in WordPress, the software automatically recognizes key symbol sequences and replaces them with an appropriate small graphics (turning the smile the right side up, for example), making it easier for the readers.
• WordPress Should Correct Invalidly Nested XHTML Automatically—This option is useful for people who create their posts and pages using the HTML tab on the Visual Editor instead of using the graphical interface. For example, rather than change a font size with the icon from the Visual Editor toolbar, they use XHTML code. If you use the graphical interface of the Visual Editor or are really good at writing XHTML, you can leave this option turned off. You might consider turning it on if you are a casual XHTML writer who could use some assistance to avoid some possible aesthetic, and potentially catastrophic, issues with your system.
Plain English: XHTML
XHTML stands for Extensible Hypertext Markup Language. This is the language web pages are written in and how WordPress ultimately presents content to your browser. It is possible to use WordPress to create XHTML directly, or flip between graphical and XHTML modes in the Visual Editor. In some cases, you may find it necessary to insert XHTML code directly in to your content.
Default Post Category
When you create a new post, you have the option of selecting one or more categories. The Default Post Category setting allows you to have one category automatically selected. By default, it is set to Uncategorized. More information on categories is presented later in this lesson.
Default Link Category
Links, typically displayed on a blog’s (front page) sidebar, can be categorized like posts. When you create a new link, the Default Link Category setting determines the default category, possibly saving you a mouse click. The default value is Blogroll.
Post by Email
It is possible to set up WordPress to allow content to be published simply by emailing it to a “secret” address. To set up Post by Email, refer to the section “Email Posting with WordPress.com” in Lesson 12.
Note: Post by Email Formatting
To use Post by Email, you need to use a mail client that supports rich text formatting or HTML content. Most desktop clients today have this capability.
When you use Post by Email, WordPress retains as much formatting as possible. Single images are placed inline with your text. For more information and details about formatting, visit http://en.support.wordpress.com/post-by-email/.
Caution: Make Sure to Save
If you have changed any of the Writing settings, be sure to click Save Changes at the bottom of the screen to ensure your changes take effect.
Reading
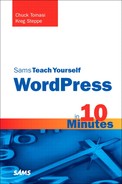
The Reading options control how your posts and pages are presented to readers who receive your content via a web page and through an RSS feed. See Figure 4.3.
Figure 4.3. The Reading Settings screen controls how posts are displayed on your web page and RSS feed.
Front Page Displays
The Front Page Displays setting determines what is displayed on the front page when people first visit your blog. By default, they see your latest posts. This is the default setting because most readers like to see the latest information when they come to visit.
Alternatively, you can configure WordPress to show a static page on the front screen. Selecting A Static Page option and defining a specific page gives your site a more commercial feel with information about you or your organization on the front page. The second option, Posts Page, lets you configure how people find your posts if you are using a static front page. Refer to Lesson 3, “Creating Posts and Pages,” for information on creating and maintaining pages. Here is an example of how the front page and posts pages are set up:
- Create a page about you or your organization. You can modify the default About page or create a new one by going to Pages, Add New. Fill in or modify the title and content to suit your needs.
- Create and save a second page with the title Latest News and leave the page body blank.
- Under Settings, Reading, change the Front Page Displays option to A Static Page.
- Set the Front Page to your About page.
- Set the Posts Page to your Latest News page.
- Click Save Changes.
Now when you view your site, your About information is displayed on the front, and a link to the Latest News containing all your posts is listed with the other pages.
Caution: Using the Front Page Option
If you set the Front Page option to one of your available pages and leave the Posts Page option as -Select-, readers might not be able to find your posts unless you have the Archives widget available. Refer to Lesson 6, “Personalizing the Appearance of Your Blog,” for more information about widgets.
Blog Pages Show at Most
As people are reading through your posts from your blog page or archives, you have the option to display as many or as few posts as you like. The default for the Blog Pages Show at Most option is 10. Depending on the average length of your posts, you might want to make this number higher if you have lots of short postings, or lower if your posts are more lengthy.
Syndication Feeds Show the Most Recent
Using the Syndication Feeds Show the Most Recent setting, similar to the preceding setting, you can control how many posts are available in your RSS feed. The more posts you send, the more people have to download and potentially catch up on reading.
For Each Article in a Feed, Show
For your RSS feed, you can send out a summary (the first 55 words) or the full text of your article by changing the For Each Article in a Feed, Show setting. Summaries are useful if readers have limited bandwidth. However, they force the readers to click something for the full content if they find your information useful. Some bloggers prefer to send the full text so the readers have the entire post at their fingertips.
For Each Article in an Enhanced Feed, Show
You can choose to enhance your feed by including categories, tags, comment count, and some social web links. You do so by altering the For Each Article in an Enhanced Feed, Show setting. These are all option fields, and they may generate interest if your readers want to inform others or interact with you a little easier.
Encoding for Pages and Feeds
Encoding lets you change the character encoding you write your blog in. There are many options to choose from. Unless you are certain you need to change the Encoding for Pages and Feeds setting, leave it at the default value (UTF-8).
Discussion
One of the advantages of blogging over traditional media (magazines, newspapers, and so on) is the ability to interact and provide instant feedback to what you read and see. On the Discussion subpanel (see Figure 4.4) of the Settings, you can configure how people and other blogs interact with you.
Figure 4.4. Part of the Discussion Settings options that determine how comments, notifications, and avatars are handled.

Default Article Settings
The three settings in Default Article Settings determine the default settings for new posts and pages. They can be overwritten individually per article. The first two options deal with communicating between blogs when one blog references another. Notification between sites is a great way to see who is talking about you and, in turn, letting other bloggers know you are talking about them.
Other Comment Settings
The Other Comment Settings section controls how visitors create comments and how comments are displayed. The settings include
• Comment Author Must Fill Out Name and E-mail—This setting determines if people leaving comments are required to leave their names and valid email addresses (the option is checked) or can leave anonymous comments (the option is unchecked).
• Users Must Be Registered and Logged In to Comment—You can limit your comments to only registered WordPress.com users by checking this option. If you leave it unchecked, any visitor is allowed to make a comment.
• Automatically Close Comments on Articles Older Than __ Days—This setting allows you limit the number of days you are willing to accept comments on an article after it is published. After the number of days has elapsed, comments are no longer accepted. This feature is useful to mitigate spam attacks. It is common for spammers to continue to attack an old post after they discover it.
• Enable Threaded (Nested) Comments __ Levels Deep—Turn on this option to allow visitors to reply to other comments inline/nested. When turned on, it can allow for better discussions and responses. Standard convention uses a maximum of three levels deep; anything higher and the theme layouts may not work as expected.
• Break Comments into Pages with __ Comments per Page and the __ Last Page Displayed by Default—If your posts/pages get a lot of comments, you may want to split the comments into pages. You can choose how many top-level comments to show for each page. You can also choose which page to show by default when a visitor first views the comments.
• Comments Should Be Displayed with the __ Comments at the Top of Each Page—This setting allows you to display your comments oldest to newest or put the newest at the top.
E-mail Me Whenever
The E-mail Me Whenever section contains two options. The first, Anyone Posts a Comment, notifies the author when comments are made to a post. If you check the second, A Comment Is Held for Moderation, an email is sent to the address you set in the General settings. If you leave this option unchecked, you can moderate your comments from the Dashboard or Comments.
Before a Comment Appears
The Before a Comment Appears settings control how comments appear on the blog. When checked, the first option requires all comments to be approved by an administrator. The second option allows people who have made previously approved comments to bypass any further approvals.
Comment Moderation
The Comment Moderation setting allows you to further refine moderated comments. You can opt to discard spam on old posts; hold comments if they contain a large number of links (a common spam characteristic); or identify key words, phrases, or addresses that might appear in a spam comment. This option does not mark the comment as spam, only that it needs to be moderated.
Comment Blacklist
Similar to the preceding option, the Comment Blacklist setting allows you to identify spam comments by key words, phrases, or addresses that appear in the contents.
Comment Reply via Email
The Comment Reply via Email option allows you to reply to comments right from the notification email. You need to enable Email Me Whenever: Anyone Posts a Comment to be able to reply to comments via email.
Subscribe to Comments
The label Subscribe to Comments has one option that reads Don’t Allow Visitors to Subscribe to the Comments Made on This Blog. When this option is unchecked, readers are provided a checkbox option at the bottom of the comment section marked Notify Me of Follow-up Comments via Email. If the reader checks this option, she is sent an email message whenever someone else makes a comment on the same blog item. The person commenting does not have to have a WordPress.com login to leave comments or receive notifications. The email address the reader provides is used to send the notifications. If Subscribe to Comments is checked, the option to receive follow-up notifications is not presented.
Avatars
Avatars are the icons that represent people in the virtual world. This section defines how you wish to display avatars on your blog.
• Avatar Display—This setting determines if avatars are displayed next to comments.
• Maximum Rating—When people create their avatars, they give ratings to them similar to movie ratings. This option allows you to filter avatars beyond a certain rating.
• Default Avatar—For users without a defined avatar, you can choose to display a default (static) avatar or a custom one generated based on their email address.
Caution: Make Sure to Save
If you have changed any of the Discussion settings, be sure to click Save Changes at the bottom of the screen to ensure your changes take effect.
Media
The Media settings allow you to override the default WordPress settings for image sizes in your blog (see Figure 4.5). This capability gives you some flexibility on the size of images to work better with your theme. All image sizes are specified in pixels and keep the dimension proportions (so they won’t look squashed) to the maximum height or width. For example, specifying 300×300 won’t force a 1600×1200 image to be square; it is converted to 300×225.
Figure 4.5. The Media Settings screen lets you control how embedded content is displayed.

Image Sizes
The following three settings indicate the maximum image size in pixels when you insert an image into a page or post.
• Thumbnail Size—This option specifies the size of the thumbnail images that are displayed as a preview of your images. Images are cropped and resized to fit the dimensions you set.
• Medium Size—This option sets the maximum size for an inline image in your post or gallery.
• Large Size—This option sets the maximum size of an image in your gallery, typically on its own page, free from the constraints your theme may impose.
Embeds
The following two Embed options enable you to control how embedded content (typically video) is displayed on your blog:
• Auto-Embeds—If this option is checked, WordPress attempts to convert plain URLs to embedded content. This makes it quite simple to place YouTube videos on your site, for example.
• Maximum Embed Size—This option lets you specify the maximum height and width of your embedded content. This capability helps keep the site clean when you have a theme with a narrow column for your posts and you try to embed a wide video. If you leave the width column blank, embedded content defaults to the width specified by your theme.
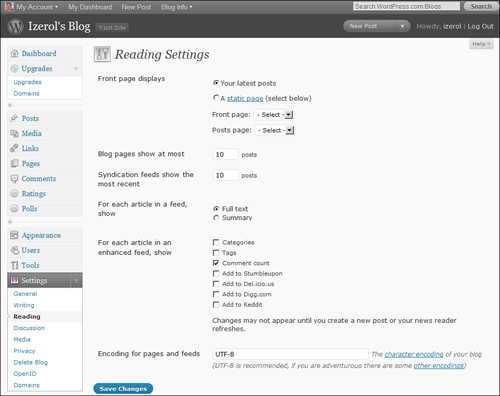
Privacy
Privacy settings control who can find and read your blog. They are accessed from the Privacy subpanel under Settings (see Figure 4.6). These settings are different from the privacy settings on individual posts discussed in Lesson 3. The three options for entire blog privacy are
• I Would Like My Blog to Be Visible to Everyone, Including Search Engines (Like Google, Sphere, Technorati) and Archivers—This is the default option. It indicates that your blog is open to the public.
• I Would Like to Block Search Engines, but Allow Normal Visitors—This option allows human visitors but prevents search engines from finding and indexing your information.
• I Would Like My Blog to Be Visible Only to Users I Choose—Using this option, you can add and remove up to 35 users who have access to your blog. Users must have registered WordPress.com accounts. Upgrades are available if you require more than 35 private users on your blog.
Figure 4.6. The Privacy Settings screen.
Note: Privacy Is Not Absolute
WordPress.com employees can read any blog regardless of privacy settings.
Delete Blog
The Delete Blog option lets you delete your blog from WordPress.com. Blog deletion requires confirmation. When you delete a blog, it is gone forever. There may be a time when you no longer maintain your blog or have so many that one becomes obsolete, and this is your option to remove it. Even after you delete a blog, that WordPress domain name can no longer be used.
OpenID
OpenID is an open standard that allows you to sign in to sites using your WordPress.com account. Your OpenID is your blog URL (for example, http://myblog.wordpress.com). You can maintain the list of blogs that you trust and can use your OpenID as a login by adding it to the list in the OpenID section under Settings.
Caution: OpenID Is Specific to a Site, Not a Person
Anyone with an administrator account on your blog has access to your OpenID. Granted, you should already trust your administrators.
Other sites that use OpenID can be found at www.myopenid.com/directory.
Domains
The Settings, Domains page is identical to the Upgrades, Domains page. On this page you can make changes to any mapped domain you own. You can map your WordPress.com domain (for example, example.wordpress.com) to any domain you own (such as example.com) so users think they are going to your domain and end up at your blog. If you ever plan to host your own WordPress blog at some point in the future, you should consider paying for the domain mapping service.
Summary
The general settings control the global behaviors of your blog. How people and other blogs interact with your system is up to you to control.