
Lesson 5. Managing Comments
In this lesson, you learn what comments are, whether to allow them, and if you allow them, some best practices for managing your feedback.
Understanding Comments
One of the most exciting aspects of blogging is receiving comments. Comments are a way for your readers to interact with you, the author. They give your readers a way to provide feedback to you. Comments also allow readers to interact with each other.
When you first publish an article (a post or a page), it might have a 0 Comments or Leave a Comment link at the top or bottom of the post (depending on your theme). See Figure 5.1.
Figure 5.1. WordPress makes it easy for readers to leave comments for you.

To leave a comment, the reader simply clicks the Leave a Comment link. The page of multiple posts is replaced with a page displaying the entire content of the specific post about which the reader is commenting. Text input boxes for the reader to leave a comment are at the bottom of the page. If you have comments enabled, one of two different options is displayed.
If readers are not already logged in to WordPress (which most won’t be), several fields appear requesting the following information (see Figure 5.2):
• Name (required)—This is the reader’s name. Readers can use real names, nicknames, or handles to identify themselves.
• Email (required)—Readers need to identify themselves to WordPress in the event that they need to be notified later. Email addresses are not displayed publicly.
• Website (optional)—If readers have websites and want to enter the addresses, their names are displayed as hyperlinks so anyone clicking on their name is directed to their site.
• Comment text area—This is the place where readers leave their feedback to you, the author.
Figure 5.2. Readers need to leave their name and email if they are not already logged in.

Some blogs may have a Notify Me of Follow Up Comments via Email check box. This option allows readers to be notified when responses are made to their comments. This feature allows them to follow the discussion more easily without having to return to the article periodically.
After readers complete the information and click the Submit Comment button, the comment is recorded.
For cases in which a reader is already logged in to WordPress (that is, they operate their own blog on WordPress.com), they are not prompted for name, email, or website and can leave the comments by filling in the comments text area and clicking the Submit Comment button.
Note: Finding Other Blogs
You can find other blogs on WordPress.com by entering text in the search box in the upper right. You can also log in to WordPress.com and click either the Freshly Pressed or Tags tab just below the WordPress.com logo.
Allowing or Denying Comments
You decide whether you want to allow or deny comments on an article. When you allow comments, it shows that you are open to feedback and encourages discussion. Discussions build author-to-reader and reader-to-reader relationships that build loyalty. Most sites, even some of the really big news sites, enable their readers to leave comments.
There is nothing wrong with denying the use of comments in your blog, but you must recognize that denying comments sends a much different message to your readers. Human beings are social creatures and like interaction; that is why social media sites are growing so fast. Blogging is just one form of social media. By choosing to disallow comments, your readers are likely to perceive you as closed off and aloof. This is generally a bad thing on the Internet today. Whether you receive one comment a year or 1,000 a day, WordPress makes it easy to manage your comment traffic.
Reviewing the Discussion Settings
We covered many of the settings that control the default behavior for comments in Lesson 4, “Configuring Your Blog Settings.” You can find the settings for comments on the side menu under Settings, Discussion. These settings control whether your readers can leave comments, how long comments are available for an article, how much information readers need to provide when leaving comments, and so on. You should review all these settings as you develop a comment management strategy.
The three check boxes at the top of the Discussion Settings screen (see Figure 5.3) are of particular interest because they can be overridden by settings on each article. The first two deal with interaction between WordPress blogs, and the last one is between your reader and your blog. The first three settings are as follows:
• Attempt to Notify Any Blogs Linked To from the Article—Notice this setting says “attempt.” It does not ensure that you will be successful when you reference other blog addresses in your post. Your success depends on how their settings are configured.
• Allow Link Notifications from Other Blogs (Pingbacks and Trackbacks)—This setting controls whether your blog accepts pingbacks and trackbacks from other blogs. It is the other half of the equation to the first setting.
• Allow People to Post Comments on New Articles—Use this check box to establish whether you allow readers to make comments. If this setting is checked, the check box at the bottom of the New Page or New Post page is also checked. If it is unchecked, the default on those pages is off also. Depending on the theme, readers may still see a prompt to leave a comment even if this setting has been disabled.
Figure 5.3. The first three Discussion Settings control the default for an individual article but can be overridden by settings on each individual page or post.

Plain English: Pingbacks and Trackbacks
Pingbacks and trackbacks are electronic “tips of the hat” to let others know you mentioned them. They are a way for blogs to communicate with each other. For example, if I leave a link in one of my articles to an article in Kreg’s WordPress blog and configure my blog to send notifications, he gets an email with a link to my reference as long as his blog is set up to receive these notifications. It’s not a bad idea to know what people are saying about you. It is best practice to leave these incoming notices turned on.
There are differences between trackbacks and pingbacks. For more information, visit http://codex.wordpress.org/Introduction_to_Blogging and review “Managing Comments” within the “Things Bloggers Need to Know” section.
Changing the Setting for Individual Articles
As you create or edit an article, look near the bottom of the screen for a section labeled Discussion (see Figure 5.4). You might have to scroll to find it. If you do not see it, check your Screen Options to ensure it has not been turned off.
Figure 5.4. The Discussion Settings on an individual article override the global Discussion Settings.

The first setting allows or disallows readers to leave comments. Just because someone can leave a comment does not mean the comment is automatically displayed to the public. Refer to “Managing Comments” in this lesson for more information.
The second setting allows or disallows other blogs to notify you of a reference to your article. These blogs may still create a link from their site to yours, but you won’t be notified if this setting is not turned on.
Dealing with Comment Spam
All this communication between people and blogs sounds wonderful. It is easy for people to leave comments, and because the process is so easy and open, some people try to exploit it by sending you unwanted comments known as spam. For the first couple of years of WordPress’s life, spam was not a major issue. As WordPress grew, so did the target.
To be fair, you are not likely to get too many comments (good or bad) when you first get set up. Unless you are a national TV or radio personality, or you are in a band with 100,000 fans, your site will not be of much interest to comment spammers right away. Comment spammers often target high-profile sites or sites that have been around for some time. When you are just starting out, the spammers won’t know you exist. As your blog is linked to, and mentioned by, others, your profile will grow.
Typically, comment spammers find an old post, perhaps a year or two old and start adding their unwanted comments there. One way to limit this practice is to turn off the ability for readers to make comments after a certain amount of time. Refer to the section about Discussion Settings in Lesson 4 or more information on this feature.
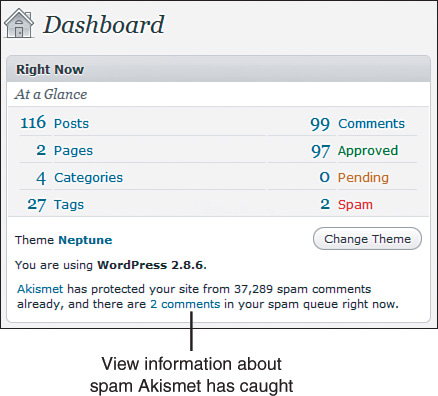
WordPress deals with comment spam with a software extension (or plug-in) called Akismet. Like email spam filters, Akismet uses a complex formula of words and phrases to identify legitimate and unwanted comments. If a spam message passes through Akismet’s filter, you can identify the comment as spam (see “Managing Comments” in this lesson), and Akismet will learn from its error to capture similar messages in the future. The learning process is not limited to only your input. Akismet’s database of comment spam is a collection of all WordPress blogs, which increases the power of the software. This feature is enabled automatically and is not configurable if you are using WordPress.com. However, WordPress.org administrators need to configure it manually. Refer to Lesson 11, “Customizing Your Site with Plug-ins,” for more information about plug-ins and Akismet. Whether you are using WordPress.com or hosting your own site using the software from WordPress.org, you can quickly see how effective Akismet is by viewing the information at the bottom of the Right Now Dashboard widget (see Figure 5.5). Akismet does not delete any comment spam in the event that it gets a false positive. Click the Comments link in the Akismet information to see a list of comments that Akismet suspects are spam. From this list, you can review the comments and determine whether they are valid spam or should be approved and visible to the public. See “Using the Comments List” in this lesson for more information.
Figure 5.5. Akismet’s stats are available from the Right Now Dashboard widget.
Don’t let comment spam deter you from blogging. By using a few good practices, such as using Akismet and limiting the time an article is available for comment, you can minimize the impact of spam.
Managing Comments
Managing comments allows you to control whether you review and approve each comment before it is made available to the public. For the new blogger, this is not a big time investment. If you allow all comments to be available to the public immediately, you could subject yourself to possible legal consequences if one of your readers makes a comment about another person or organization and the target of the comment feels he has been portrayed inaccurately. The legal ramifications of allowing and disallowing comments are beyond the scope of this book. The best way to protect yourself against being a part of a legal dispute is for you to moderate comments (using your best judgment).
You can enable comment moderation from Settings, Discussion. Check the Before a Comment appears: An Administrator Must Always Approve the Comment option. Although this option says “administrator,” it refers to any person who has comment moderation capabilities for the blog. By default, this is anyone on your system with an administrator or editor role.
When you first start your blog, moderating your comments is not likely to take much time. The process is similar to the way you got started with email. You likely did not have a lot of contacts at first. You had to send mail to get mail. Your blog will grow in a similar way, and with it, the comments will grow.
If you are lucky and your blog starts to get a lot of activity, you might find yourself with a lot of incoming comments to review and approve. One option in this situation is to ask for help. Ask regular commenters if they are willing to help moderate. If you already have regular contributors, ask them if they would like to be editors to assist with comment management.
There are several ways to access comments and manage them from the Administrative Dashboard. They include
• The shortcut button at the top right. Using the drop-down arrow, select Comments (see Figure 5.6).
Figure 5.6. Accessing comments from the shortcuts menu in the upper right.

• The Recent Comments widget on the Administrative Dashboard.
• The Comments subpanel on the side menu.
Tip: Quickly Spot Outstanding Comment Approvals
A number listed on the comments subpanel indicates the number of comments pending approval. No number indicates all comments have been approved.
The Recent Comments Dashboard Widget
One way to manage the incoming comments is to use the Recent Comments widget on the Administrative Dashboard (see Figure 5.7). If the widget is not displayed, check the Screen Options in the upper right to ensure it has not been unchecked (turned off) at some point.
Figure 5.7. The Recent Comments Dashboard widget makes it easy to quickly approve, trash, edit, reply to, or mark as spam incoming comments.

By default, this widget shows the five most recent comments to your system. New comments awaiting moderation are highlighted in yellow. As you pass your cursor over each comment, several options appear just below the text of the comment. They include
• Approve (or Unapprove)—If a new comment is awaiting approval, click the Approve link to have it show up in your blog. If the comment has already been approved, the link reads Unapprove. Clicking Unapprove removes the comment from your blog but does not delete it from your system.
• Reply—Using the Reply link is a convenient way to respond to comments without ever leaving the Dashboard.
• Edit—Use the Edit link to bring up the editor; change the name, email address, or URL; fix typos in a comment; or change the status or the date the comment was posted. Click the Update Comment button to apply your changes.
• Spam—If you encounter an unwanted comment and believe it to be spam, click Spam and it is removed immediately.
• Trash—Clicking the Trash link moves a comment to the comment Trash folder. Refer to the “List Basics” sidebar in Lesson 3, “Creating Posts and Pages,” for more information on managing your trash.
Additionally, clicking the View All button takes you to the Comments List to see and manage more comments. This button performs the same action as the Comments subpanel on the side menu or choosing Comments from the shortcuts menu.
Using the Comments List
The comments list gives you access to multiple comments at one time (see Figure 5.8). The function and layout are similar to that of other lists discussed in earlier lessons.
Figure 5.8. The comments list displays many features to help manage comments.
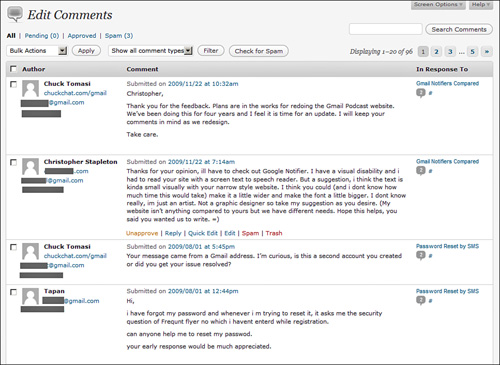
Currently, three columns display for comments—Author, Comment, and In Response To. The Screen Options drop-down in the top right of the screen enables you to control the display of two of the following two columns:
• Author—This setting displays who wrote the comment, her email address, website (if entered), and the Internet address from which she entered this information. Clicking the web address brings you to that page. Clicking the email address composes an email using whatever client you have set up on your computer (Outlook, Outlook Express, Mac Mail, and so on). Clicking the IP address filters the comment list to comments made from the same IP address as the one listed.
• In Response To—This column displays the title of the article the comment is related to, the number of comments made on the same article, and a hash sign (#). Clicking the article title brings you to the editor. Clicking on the number of comments brings you to a filtered list of comments that are all related to the same article. Clicking on the hash sign brings you to the article as it is displayed to the public in your blog.
The only column that cannot be disabled is the Comment column. It displays the date the comment was submitted and the text of the comment. The date is a link to the blog article as it is displayed to the public in your blog. As you move your cursor over each row of the comment listing, several options appear just below the comment text. These options enable you to modify an individual comment quickly. The following options are displayed:
• Approve (or Unapprove)—If a new comment is awaiting approval, click the Approve link to have it show up in your blog. If it has already been approved, the link reads Unapprove. Clicking Unapprove removes the comment from your blog but does not delete it from your system.
• Spam—If you encounter an unwanted comment and believe it to be spam, click Spam and it is removed immediately.
• Trash—The Trash link moves a comment to the Trash folder. Refer to the “List Basics” sidebar in Lesson 3 for more information on managing your trash items.
• Trash—The Trash link moves a comment to the Trash folder. Refer to the “List Basics” sidebar in Lesson 3 for more information on managing your trash items.
• Edit—The Edit link brings you to the comment editor (see Figure 5.9). The comment editor lets you update the various fields associated with the comment including the commenter’s name, comment text, and so on. Click the Update Comment button to apply your changes.
Figure 5.9. The comment editor lets you change any comment attribute.

• Quick Edit—The Quick Edit link is similar to the Edit link with the exception that you do not go to a separate screen to make the edits. The name, email, URL, and comment text are available to edit directly in the list. Click the Update Comment button to apply your changes or use Cancel to abort.
• Reply—Clicking the Reply link is a convenient way to respond to comments without leaving the comment list.
Above the comment listing are several additional options to help you find comments (see Figure 5.10). They include
• A search box—The search box provides you with a simple method to find words or phrases in your comments. Simply enter the text you want to locate in the text box and click Search Comments. Your results are displayed in the comment listing.
• All, Pending, Approved, Spam, and Trash—The links just below the title Edit Comments provide a quick way to filter your comments based on the current status. With a single click, you can locate all comments classified as Pending (unapproved), Approved, Spam, Trash, or All (approved and unapproved) comments.
• Bulk Actions—The Bulk Actions drop-down list is used together with the check boxes on the side of each comment in the list. For example, say you want to approve all eight comments that have not yet been approved and they appear in various places in the listing (perhaps on different pages). You could locate each one, hover over the entry, and click Approve. That approach takes at least eight clicks and possibly some scrolling. Using a combination of the status features described in the preceding bullet and Bulk Actions, you could click Pending to display all the unapproved comments and then click the check box in the first column header. This approach selects all the entries displayed with one click. Finally, choose Approve from the Bulk Actions and click the Apply button. That’s a total of four clicks. The Bulk Actions list also appears at the bottom of the comment listing (see Figure 5.10). The list contains the following options:
• Unapprove—Unapprove all selected comments. This changes the status of the selected comments to Pending and removes them from the public view.
• Approve—Approve all selected comments.
• Mark as Spam—Identify all selected comments as Spam and remove them from the system.
• Move to Trash—Move all selected comments to the Trash folder.
• Comment Type Filter—Displayed next to the Bulk Actions list with a default value of Show All Comment Types, this filter lets you display all types of comments, normal comments from readers, or pingbacks/trackbacks from other systems. After you select the type of comment to display, click the Filter button.
• Check for Spam button—This button runs all your comments through the spam filter (Akismet) again. This capability is useful if the service has learned a new spam technique and you have comments that are pending approval. This option also appears at the bottom of the comment listing.
• Page index—The page index appears on the right side just below the search box when you have more than 20 comments in your listing. You can use the page numbers to go directly to the displayed number or use the forward and backward arrows to advance one page in either direction. This option also appears at the bottom of the page listing.
Figure 5.10. Using bulk actions can save you time when managing multiple comments.

Receiving Email Notifications
It is possible to have WordPress notify you when comments are made to your blog. This capability can improve the time it takes to moderate and respond to comments because most people are in the habit of checking their email more than their blog comments. There are two options related to receiving email notifications. They are found in Settings, Discussion on the side menu. Both options use the email address found in Settings, General to send notifications. These Discussion options are found under the heading Email Me Whenever:
• Anyone Posts a Comment—When this option is checked, all comments generate an email notification whether they require approval or not.
• A Comment Is Held for Moderation—When this option is checked, an email is generated any time a comment requires approval. Note that this may not generate an email for all comments if the comment author has previously submitted comments that have been approved and the Comment Author Must Have Previously Approved Comment option is enabled.
Best Practices
There are several guidelines for managing your comments effectively. These are by no means required rules; they are simply ideas that bloggers have found to work well.
- Check your comments regularly. If you are using email notifications, you will be notified moments after a comment has been made (depending on the way your Discussion Settings are configured). If you are not using email notifications, make it a practice to check your comments at least twice as often as you post. If you post once a week, check for comments twice a week. If you post daily, check multiple times a day. In reality, you are likely to get comments half as often as you post, but checking more frequently gives better customer service to your readers.
- Respond to all (nonspam) comments. Treat each comment as an invitation to a conversation. Someone has a question or feedback for you. Respond to them as you would in person. Remember that the conversation is public.
- Use an email alias. If possible, set your General Settings email with an email alias. An email alias points to your proper address without revealing your usual address. When mail is sent to the alias, it is redirected to your mailbox. This allows you to filter incoming comment notifications and act on them based on the alias address. It also allows you to change the alias without modifying your WordPress configuration should you decide to use a distribution list or transfer responsibility of comment management to another person. Suggestions of email aliases include [email protected], [email protected], or [email protected]. Check with your mail service provider or administrator to see if you can set up an email alias for your name.
Note: What Kinds of Comments Will I Get?
If you write a post in which you express a strong opinion or evoke an emotional response, you should expect to get some strong comments. If you write something technically incorrect, your readers are likely to correct you. If you ask a probing question, you are likely to get answers.
Summary
Comments are the primary means by which your readers and other bloggers interact with you. After you have configured your comments the way you like, management of new comments is relatively easy with the exception of an occasional spam comment.