
4
Understanding M365 Groups as the Foundation of Collaboration
From a humble home to the mightiest castle, a structure is only as solid as its foundation. For homes, that may be stone, concrete, or the like. For collaboration in Microsoft 365, the foundation is the cloud-only concept of groups. These groups contain individuals who need to work together and own content together that may span multiple tools and systems.
Microsoft 365 groups are the glue and connective tissue to bring these multiple components into a single ecosystem, including SharePoint, Teams, Planner, Stream, Outlook, and connections to external data and software as well. While our goal in the next chapter is to look at what these other tools provide, in this chapter, we will explore the simple but powerful concept of M365 groups:
- The role of M365 groups in collaboration
- The provisioning and life cycle of groups
- Making good connections – Office 365 connectors
- Security and sensitivity
This chapter will help us to better understand the role of M365 groups as the underpinning for collaboration. We’ll look at how to provision, manage, and maintain these groups as well as some options for securing them for the organization and guests.
The role of M365 groups in collaboration
In its purest form, an M365 group is similar to other groups in Azure AD. It is a set of people that can be attached to a set of resources. It provides a permission boundary that can determine access to our collaboration tools and data. Let’s compare the different types of groups that we might find in the M365 admin center and what makes M365 groups unique:
- Distribution groups: A way to send email to multiple users at once. In SharePoint, we’ve been able to use distribution lists for audience targeting, but this has nothing to do with security.
- Security groups: The traditional Active Directory (AD) group, which may be synced to on-premises AD or exist in Azure AD. This is solely concerned with granting access to resources.
- Mail-enabled security groups: A mix of granting access and sending email to users.
- M365 groups: People who are identified as owners, members, or guests that are connected to the suite of resources provisioned when the group is created.
So, Office 365 groups are unique in that they serve a permission purpose, a communication purpose (as each group gets an email address), and can be used to connect to data and systems within Office 365 (such as Planner, Teams, and SharePoint) and outside of the M365 stack, such as connecting to an RSS feed in Teams or connecting a SharePoint team site to Trello to view tasks on a page.
Let’s look at the composition of a group, including whether it is private or public, and whether it needs to be dynamic versus manually maintained.
Who’s in the group?
An M365 group can only contain individuals, not other groups. Many organizations moving to the cloud have already spent a great deal of time configuring and maintaining security groups. The desire is to connect these security groups to resources such as Teams, only to find that M365 Groups is the only option. A distribution group can be upgraded to an M365 group, but in general, one group can’t contain another group, so we often end up with duplication since different groups serve different purposes.
People in your organization who become part of an M365 group either become an owner or a member. Owners are not IT admins and don’t automatically get access to an admin center, but they do have full control of the group itself and the resources it connects. You can have up to 100 owners per group, though the person who creates the group is the default owner.
Public or private
An M365 group can either be public or private. It is possible to start with one and then change to the other as needed. A private group is by invitation only. Owners can add members to the group from within the organization or invite guests from outside it with an email if the tenant is configured to allow it. More on that later. Members can essentially request for other people to join the group, but the owner is the gatekeeper, either allowing or denying those requests.
A public group is open for the entire organization to join, though no one is automatically added. Each user would have to opt in or join the group, but there are no locks on the door or guards to keep people away. Public groups are discoverable, and a person can be a member of up to 7,000 groups within a single tenant.
Dynamic groups
Some special cases for groups require an ever-changing assignment to better manage them as people come and go in the organization or move into or out of departments or roles. In Teams, we have the concept of an org-wide team that grabs all users in the Azure AD (even service accounts and guests). In Yammer, we have an All Company team that automatically contains all licensed users. For groups that need to have an automatically maintained member list, we can leverage dynamic groups. You can change a group’s membership from static to dynamic (or vice versa) in Azure AD.
Dynamic membership for M365 Groups is based on rules with one or more expressions that essentially query users and add them to the group if they match, or remove them if they no longer fit the criteria. The properties that we can use to build the expressions include things such as departments, location data, and job titles. We can either use an exact match or a wildcard expression to build our groups and maintain them dynamically as well. This allows us to put marketing people in the marketing group or executives in a leadership group. This keeps us from having to entirely rebuild duplicates from all of our security groups. We can’t, however, have dynamic groups built from the presence of a user in a pre-existing security group.
Congratulations! It’s a group!
So, what exactly happens when a new group is born? A new group can be created in the M365 admin center, the Azure AD admin center, or in the applications that support and utilize them. By default, every licensed user can create a group on-demand to serve their needs. So, if a user gets a gleam in their eye thinking about bringing a new group into the world, they can go into Outlook and create a group. They can go into Teams and create a new team (which creates a new group first). They can create a new SharePoint team site or Planner plan or Yammer community.
Where we start from makes all the difference in which specific artifacts get created for that group, but there is always a common set that gets provisioned automatically when a new M365 group is created. The following visual shows the linked resources that are generated:
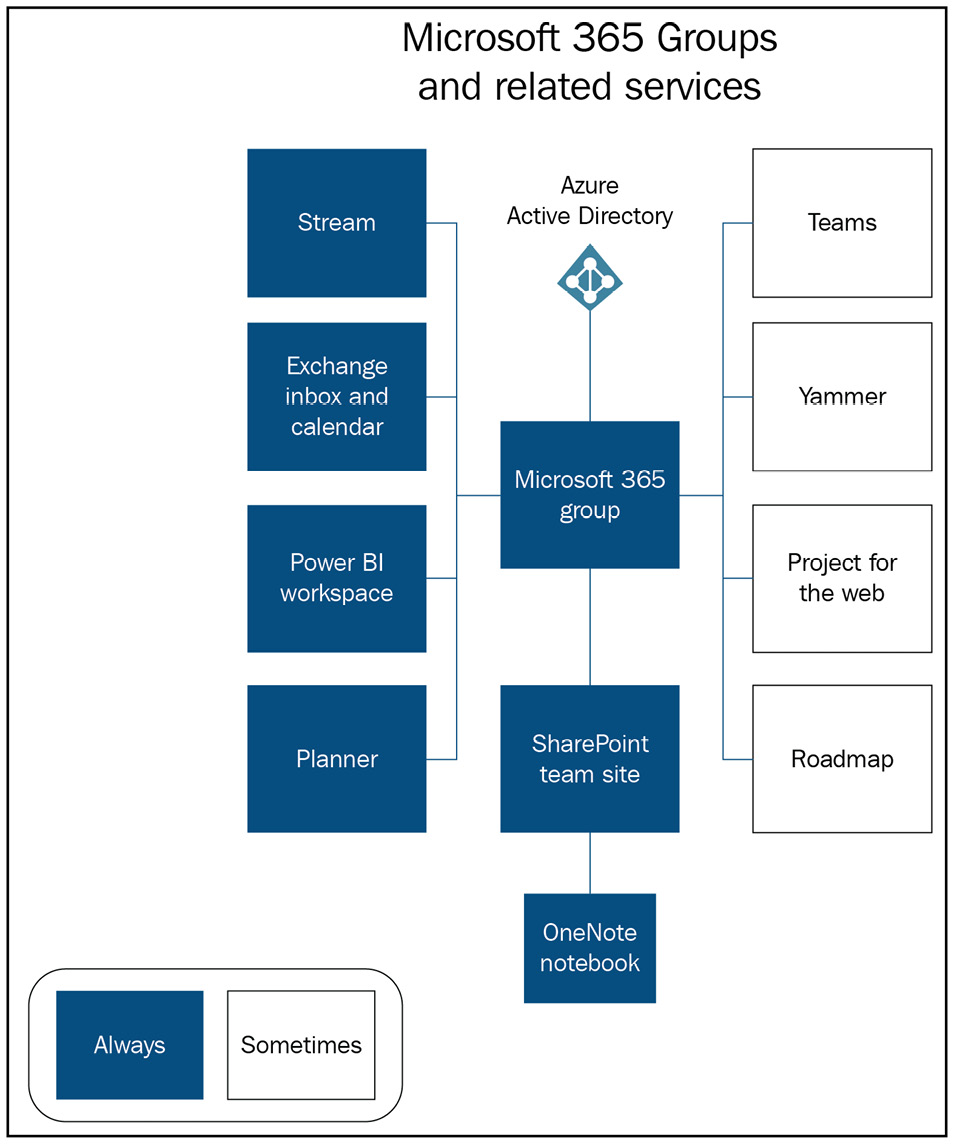
Figure 4.1 – Groups connected resources
The blue squares represent the gifts that are presented to our new group as soon as it enters the world. Groups always include a SharePoint site, Planner, a Power BI workspace, a OneNote notebook, plus an Exchange Online (EXO) mailbox and calendar. This is true regardless of where the group takes its first steps in life. Teams and Yammer are unique in that they rely on the basic set of resources but add their own features as well. Creating a team always means I get a group, but there are things such as chats and tabs that only live inside the Teams application. In Yammer, there are discussions, questions, and announcements that only live in Yammer, though a group is still created.
If a group is created without an attached Microsoft team, one can be added by one of the group owners from the lower left on the home page of the Team site, from the Microsoft Teams application, from the M365 admin center, or by an admin via PowerShell. The default in the M365 admin center is to create a team when creating a group.
If the group has over 10,000 members (first of all, yikes!), this can’t be done. The following figure shows what an owner would see in Teams when creating a team from a group they already own. This is a process called teamifying your group, which is just fun to say, even if you don’t need to do it:

Figure 4.2 – A screenshot from Teams when connecting to an existing M365 group
We see a clear picture that the group needs to always store files. It uses SharePoint for that. The group must rely on a way to communicate, which is with the EXO mailbox. The group may need to track assigned tasks, so there is always a Planner plan. Even if we don’t think a component is necessary, we get it anyway. A past customer once told me that they wanted a group for task management only, not for files, so they deleted the SharePoint site. This promptly deleted the entire group. These resources are being provisioned because they’re required for the group to do its job.
The Team site
The site that gets created to support any M365 group is a fully functional, modern site. The owners of the group are automatically added to the site owners SharePoint group with full control. The members are automatically in the site members SharePoint group with limited control, which equates to viewing and editing (the Edit permission level in SharePoint). This shows up as a single token in the members group, rather than an enumeration of each person.
Since there is no such thing as a visitor, or read-only user, in M365 Groups, we do have the option to just share the site with someone rather than adding them to the group (depicted in the following figure). Doing so would allow non-group members to interact with the site only, but nothing else that’s attached to the group. We see that option in the UI as well as the option to add new people to the group via the site here:
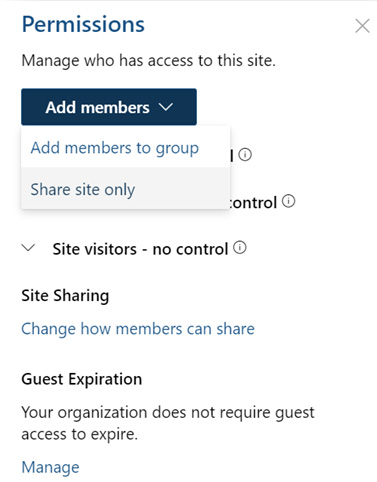
Figure 4.3 – A screenshot of the Permissions panel on a team site
Team sites that are groups-connected provide us with some context about the underlying group itself in the UI. Hovering over or clicking on the site title provides us with lots of information. We can view the group membership, which apps are connected to the group, the mailbox for the group, the option to invite or add others, leave the group, or opt in to follow the group by getting copied on emails it receives. The following figure shows us that UI:
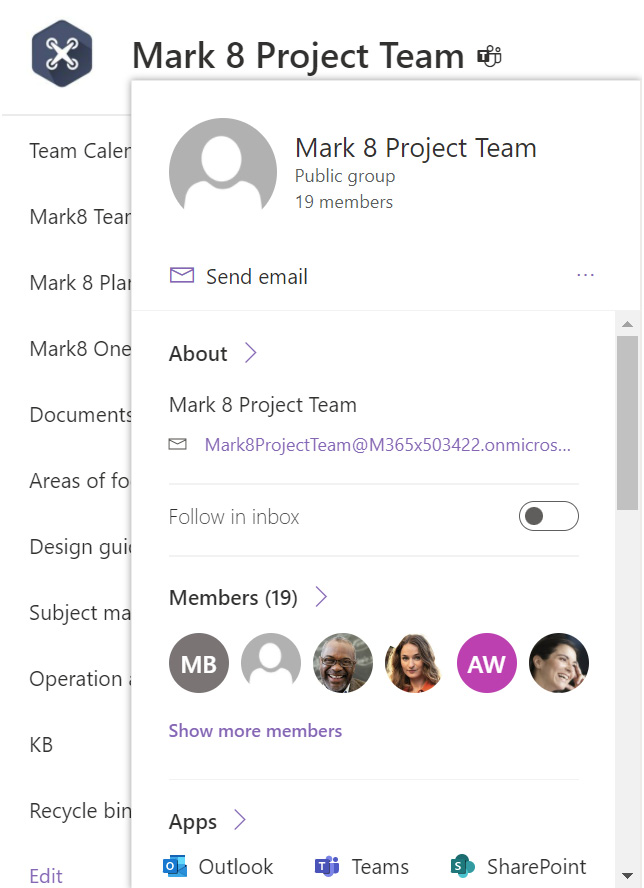
Figure 4.4 – A view of M365 group properties from a SharePoint site
This is a great way to see the little universe that is built on top of the group. It’s a reminder that the SharePoint site doesn’t stand on its own anymore. It is built on the foundation of the group, but it is also a resource of the group. It’s a place to store pages and documents, but also just one piece.
The mailbox and calendar
As we’ve noted, the group always gets some EXO resources as well. Each mailbox must have a unique address. Even if the title of the group is the same as another, a string of letters and/or numbers is added to the email address. So, we might have a dozen groups whose title is HR, but only one mailbox with [email protected] as the address. The group mailbox is more like a shared mailbox than a distribution list. The mailbox, however, only allows email to be received. Neither owners nor members of the group have permission to send from the group mailbox. Being a part of the group will not automatically send you emails as well. You can either opt in to be copied in received messages or check the group’s mailbox directly.
Having these resources seems to make perfect sense if we go into Outlook to create the group. Since we are already using a tool with emails as its currency, having this way to connect to the group is natural. The calendar is also a natural extension of the group. We’re used to seeing calendars in Outlook that are stored in Exchange.
It’s certainly possible that a user comfortable with and primarily working in Outlook could spend the bulk of their time interacting with the group from that application, rarely crossing into the others. At the top of the interface in Outlook for groups, we find buttons to link us to all the assets – email, calendar, files (which opens a SharePoint link), the notebook, and the settings menu for group management. There are also links to Planner and the SharePoint site itself rather than the document library opened by the files link. These links open a new browser tab and take the user out of the group interface itself.
For other groups-connected apps such as Teams and Yammer, having the email inbox makes much less sense. We have chats and discussions in those tools that are supposed to drive the interaction. As a result, the mailbox and calendar are essentially hidden. They certainly still exist, but there is no handy hyperlink waiting for us in the UI that takes us to the mailbox or displays the calendar. In fact, adding these can be more difficult than expected.
The Calendar icon in Teams shows us nothing about the group calendar. There is a channel calendar tab, but none for the group itself. The email is not automatically connected to a channel either. On the SharePoint site, we do have a group calendar web part but no way to view the inbox unless we click the link to Outlook under Connected apps and view the messages there. So, from a planning perspective, it may be safest to assume that the mailbox or calendar are not the best ways for a group to organize their communications or work.
Next, let’s take a look at controlling the creation and life cycle of groups.
Provisioning and life cycle
Since groups are the foundation for all our collaboration tools and practices in M365, a question that quickly arises is who should be able to create them? Who should be responsible for making sure they are being created purposefully, managed well, and going away when their need has been fulfilled?
By default, all licensed M365 users can create a new group. This means that every person in your organization can create a group from Outlook, by creating a SharePoint site, spinning up a new plan in Planner, and all the other ways we’ve mentioned in this chapter. The default assumption from Microsoft is that adoption is strongest when people can get the collaboration spaces they need when they need them. It is the democratization of collaboration.
Everyone can create groups, but should they? Let’s look at options for balancing adoption and strict governance. We’ll see that good naming and expiration policies can make that job simpler as well.
Chaos and control
Good governance is all about balance – the balance between chaos and control. When it comes to M365 Groups, we can keep the Microsoft default and let people create whatever they want, or we can swing to the complete opposite side and lock things down tightly to IT only. A balance between the two hopefully drives both adoption and cohesion. While corporate culture factors in, I would dare say that the option that is favored often depends on the perspective someone represents – end user or IT admin.
Let’s consider some positives associated with users being able to create whatever they need:
- I don’t have to wait for IT to create something for me
- I can be responsive to the business needs of my area or department
- I can have a greater sense of ownership of my data and the tools that support it
Of course, there are some negatives as well, as follows:
- Sprawl and duplication of groups that represent the same or similar business needs
- Inconsistency with naming
- Some groups may be orphaned but not deleted
Too much control makes adoption suffer. Too much chaos and groups become a nightmare to manage. The balance between chaos and control needs to represent the best of both worlds. So, what options do we have to strike that balance?
Controlling chaos
The balanced approach to controlled chaos requires a solution that provides the following:
- Provisioning that is quick, but not wide open
- Naming that is consistent, but doesn’t require manual compliance
- Life cycles that are consistent, but flexible
Let’s assume that we don’t want to leave group creation wide open. We could take the complete opposite approach and lock down group creation to only IT admins or other selected users that get added to a security group. To make that happen, we need to run some PowerShell, which can be found here: https://docs.microsoft.com/en-us/microsoft-365/solutions/manage-creation-of-groups?view=o365-worldwide. The script takes an Azure AD security group and sets that only included users can create M365 Groups through the applications directly.
An administrator going through the admin center will still be able to create as many groups as they need. If the admin wants to create groups in the applications as well (for example, creating a team from Microsoft Teams), they will need to be added to the group. Any user not in an admin role must be in the security group, or else the option will either disappear (as in Teams) or break (as in Planner) if M365 Groups creation is attempted.
We don’t want to leave things wide open. We don’t want to shut things completely down. This leads us to a menu of options to implement a governance approach to group creation and management that takes a middle ground.
Option 1 – The manual approach
We can leverage the PowerShell lockdown approach we just described and manually add more and more people over time. This is an option that allows us to slowly build adoption and self-service. Perhaps it makes sense to ask potential groups creators to take some owner training since they will be the owner of the group, the site, the team, and other resources. There would still be a burden on IT to manage the membership of the security group, but it would allow users in the business to own the creation and curation of the groups themselves.
Option 2 – The low-code approach
A more automated option would be to leverage Power Apps and Power Automate to build a low-code solution for requesting and approving the creation of M365 groups. This assumes that the work of option 1 has already been implemented, but we may want an easier way for users to make provisioning requests for new M365 groups or related artifacts.
We’ll explore the tremendous potential of these tools in Chapter 6, Making SharePoint More POWERful. Suffice it to say for now that Power Apps could provide the frontend to make the request for a new group and Power Automate could control the approval and provisioning of the group. Any flow that is triggered from Power Apps runs in the context of the user. So, that user would need to have permission to create the group. This can be achieved by recording the request in a data source and having an event trigger the flow.
Since this could also be the case for the services that are built from M365 groups, we can also use this approach to help users avoid the what to use when problem. Rather than having a separate form for all the group-connected services, we could ask a couple of guiding questions and create the right artifacts on the backend. Do you need to store files? Do you prefer to work in Outlook? Would you like to have an ongoing chat as part of your collaboration? These questions could abstract things a bit from users and end up amplifying adoption in the process.
Option 3 – Open source solution
If we don’t have the time or expertise to build our own low-code solution using the Power Platform, we can leverage one of the free solutions found on the web to do the job instead. I would recommend one of the following two, for their trustworthiness and functionality:
- First, we have what I’m calling a training-based solution. It’s open source but curated by multiple Microsoft MVPs. It is built on the Power Platform, which leverages a chatbot, Power Automate flow, adaptive cards, and a SharePoint list to contain the data all packaged up to be added as an app in Teams. The goal is to add people to the security group allowed to create teams, but only after they have taken sufficient training to equip them to become a group/team owner (and by virtue of the SharePoint site’s connect, a site owner as well). The solution is detailed here: https://docs.microsoft.com/en-us/microsoft-365/community/should-everyone-create-teams.
- Second, we can leverage a low-code solution from the Office Developer GitHub repository. The Request a Team app template may be deployed, once again as a Teams app, to automate the provisioning of groups by creating a new Microsoft team. It likely goes without saying, but if you don’t want a team associated with your group, this is not the option for you. This app will provide users with a way to build a new team from scratch or from a predefined template. Some basic validation checks the name and creates an approval task via an adaptive card. Once approved, the team is provisioned automatically. The solution is detailed here: https://github.com/OfficeDev/microsoft-teams-apps-requestateam.
Option 4 – A third-party solution
If our desire is to do more than simply build in some governance when a new group is created, we can leverage more robust, paid, third-party tools to assist us. There are two heavy hitters (at the time of this writing) that provide options for exactly that – Orchestry and ShareGate Apricot:
- Orchestry is a deployable Teams app that provides full life cycle management of Teams and SharePoint sites. The provisioning module abstracts some details from the user, referring to these as workspaces to ease the which tool when conversation. The workspaces can be customized and based on either a live template or one that is configured in the tool directly. Approvals, metadata, naming, and expiration may be applied. SharePoint components and features, including the provided custom web parts, can be added easily. The life cycle management tools identify unused workspaces, manage permissions, check guest access, and help with archival of sites and teams.
- ShareGate Apricot is a standalone tool that is bundled with ShareGate Desktop, which is primarily a migration tool. Apricot is geared toward automating, managing, and monitoring Teams. A daily scan produces reporting to identify inactive or orphaned teams, unknown guest access, or other issues. The option to keep or archive/delete teams, and apply custom metadata and information protection labels help govern teams. With the migration component available as well, we can move or relocate teams and channels to keep our groups-connected artifacts scalable and pliable for changing business needs.
Naming and expiration
Regardless of which tool or approach we take, we can rely on two features available in Azure AD Premium P1 or P2 to assist us with our groups’ governance. A naming policy allows us to enforce a naming strategy for groups that are created by users from the workloads or applications directly. In other words, if a user creates a group by going into Microsoft Teams and creating a new team, the naming policy will automatically apply on the backend if we’ve defined it. Groups created from the admin centers would not have the policy applied.
Our naming policy may include prefixes or suffixes attached to group names. This could contain a string that is consistent, such as user-created group (UCG), or be based on a user attribute that is populated in Azure AD. Since the user who initiates the creation process is the owner, the data would be pulled from that user’s properties. We could leverage this to include data such as department or location in the group name. Just make sure not to have a group name that is longer than 264 characters. Also, keep in mind that this naming is most beneficial when viewing groups in the Global Address List (GAL) or in the admin centers. The group alias, site title, and team title can be changed after the fact. This means that the title displayed in the UI may be different than the actual underlying globally unique name for the group.
A list of blocked words may be defined as well, which would prevent users from creating groups that contain those words. There are two use cases for this really. One is to prevent inappropriate words from being added to workplace artifacts. The other is to protect against the use of meaningful organizational terms such as department names, project or initiative keywords, a group for the CEO, and the like.
An expiration policy helps to prevent the limitless growth and sprawl of groups over time. This policy gives a chance to pester group owners on a regular basis if their group is unused. If someone visits a channel, interacts with a SharePoint document, or interacts with the group in Outlook, that is considered enough activity to keep the group going automatically. This comes in especially handy for users trying on groups, teams, or sites for size for the first time or for demo purposes – so lots of Test1, Test2, and Test3 groups that were never intended to be kept.
Group owners are given the option to renew their group or to allow it to be deleted. Emails are sent to owners 30 days, 15 days, and 1 day prior to group expiration. Deletions are soft deletes that can be recovered within 30 days. Groups with no valid owners can get forwarded to a specific email address for review. This is usually a distribution list for the IT or governance teams to review. We can set the policy for all groups or for a selection of groups (up to 500). Unfortunately, we can’t have multiple policies each applied to a different set of groups. If a retention policy is in place that would impact the group, the contents are stored in the retention container once the group is deleted and kept for the number of days defined in the retention policy.
Groups on their own are powerful, but we have a mechanism at the ready for extending them and allowing them to connect our group to data outside of its borders.
Making good connections – Office 365 connectors
Just as much as groups are the foundational elements underneath all our collaboration tools in M365, they are also the glue that connects groups to data and services. To borrow another building metaphor, groups are like the mortar that connects each brick. We’ve already started to see this with how a site, team, plan, email, OneNote notebook, and calendar are all joined together by the group and in support of the group. This is also true for how the group (and the people it represents) can connect to other data, apps, and services within and outside of the Microsoft cloud.
Connectors may be added through the tools that leverage them. Connectors are one way to connect our group to the world – either to bring data in or send data out. We can find a comprehensive list of these connectors, filterable by where we want to use them, in the AppSource site depicted in the following figure (https://appsource.microsoft.com/en-us/marketplace/apps):
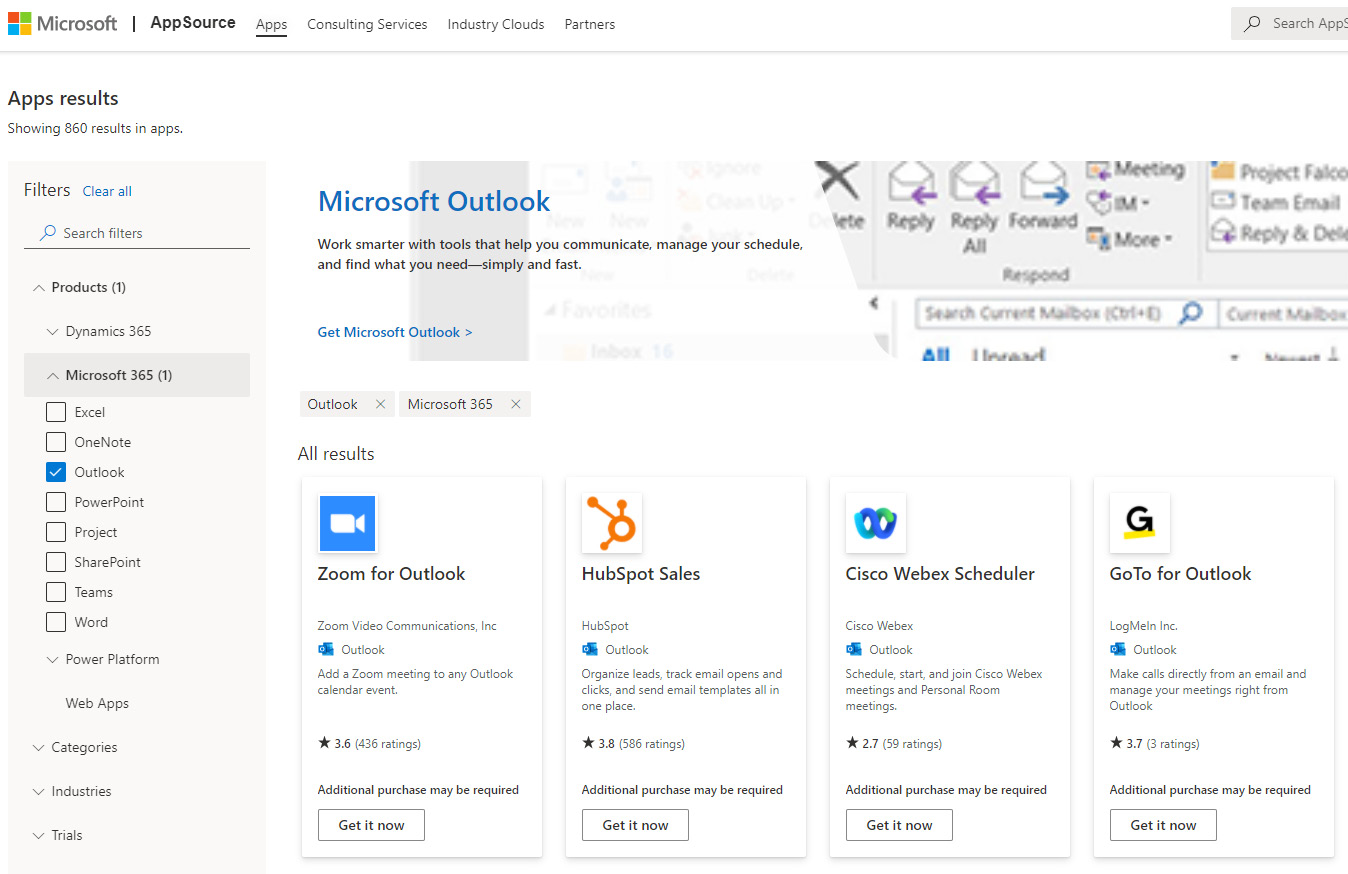
Figure 4.5 – A view of the AppSource site with Outlook selected as the product
Let’s take a look at a couple of examples.
In Outlook desktop or the web, we can select a group and choose to add a connector from the store. The experience of the store is depicted here:
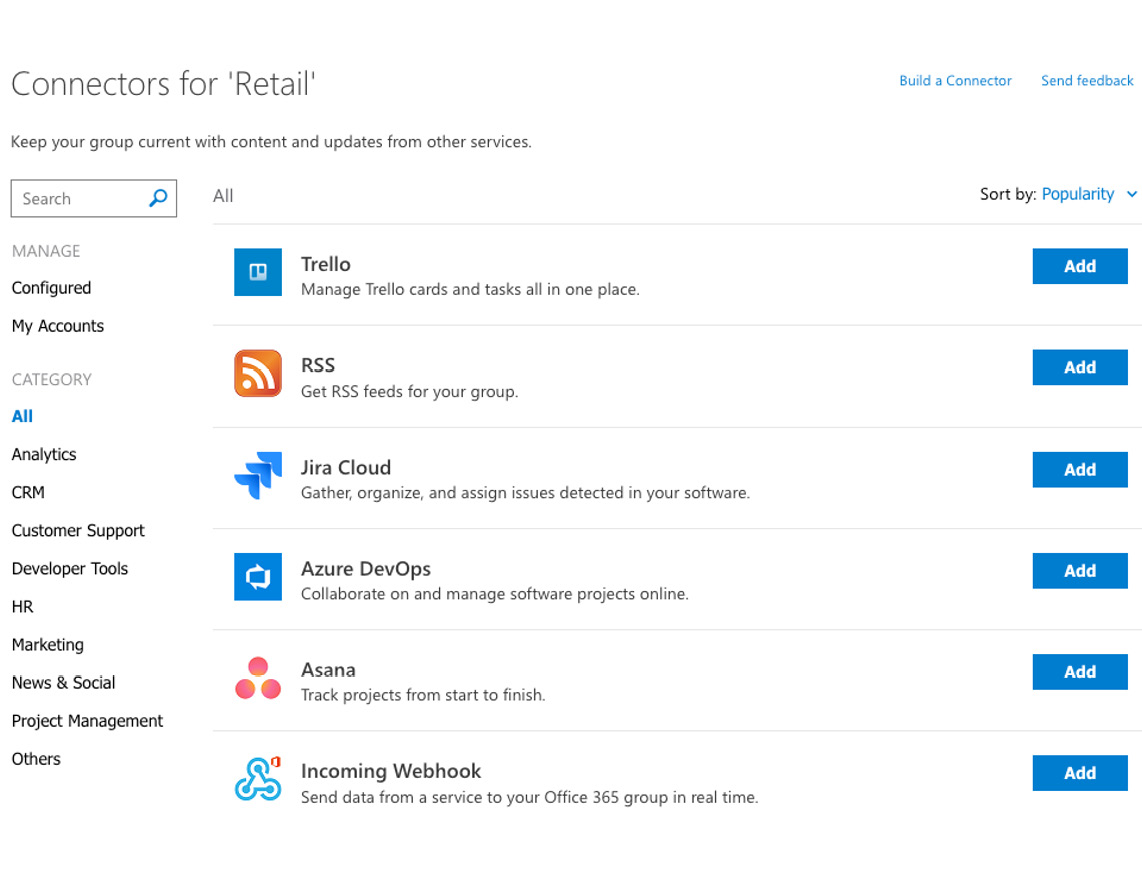
Figure 4.6 – Adding connectors from an Outlook group
We could add a Zoom connector to allow us to include a Zoom link directly in our meeting invitations. We could add a Slack connector to send email messages into a Slack channel. In Teams, we could add a connector for Trello as a tab to view our task board or add actionable chat messages that can build items directly from Teams. Additional information can be found here: https://support.microsoft.com/en-us/office/connect-apps-to-your-groups-in-outlook-ed0ce547-038f-4902-b9b3-9e518ae6fbab.
Connectors are also available for Power Apps and Power Automate. Each groups-connected tool can use connectors in ways that are a natural part of that tool’s user interface. For SharePoint pages, these connectors can become part of the UI with a web part. Let’s look at that in some additional detail.
The connector web part
For SharePoint sites, there are hundreds of connectors allowing us to connect to other services – some free and some subscription-based. The SharePoint UI is largely composed of web parts, however, so it makes sense that these connectors could be embedded on our modern pages. For team sites that are connected to an M365 group, we can use a single connector web part to bring in messages, visualizations, alerts, and other data.
By default, when we add the Office 365 Connectors web part, we get a single add button that opens the available list. Once the other service is selected, the web part property pane on the right will change to show the necessary configuration elements for that service. The following figure is an example of configuring the BingNews connector to deliver a digest of articles on the web related to change management directly on our SharePoint home page:
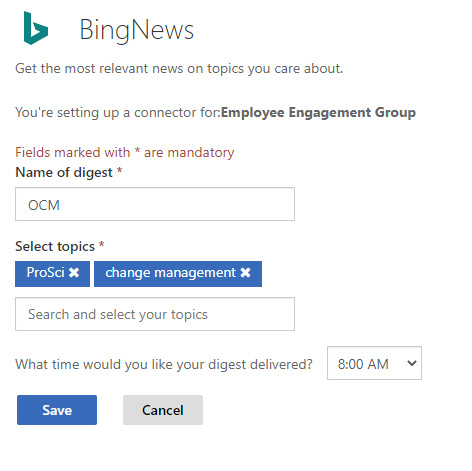
Figure 4.7 – The connector web part properties for BingNews
One of the most flexible connectors is the Incoming Webhook. Using this connector allows us to send data to our SharePoint site from web services that we develop or that are exposed from other systems that may not have a formal connector available. These messages are constructed with the same adaptive card JSON format that works in Teams, Outlook, and the Power Platform as well.
Security and sensitivity
M365 groups inherently give us a security boundary and a way to apply permissions for a set of users to a set of content items. In SharePoint, the members of an M365 group will always have Edit permission to the SharePoint site. That can’t be changed. For anyone who isn’t in our organization, planning for how those guests get access is crucial to maintaining the integrity of our data.
Guest access
Throughout this chapter, we’ve mentioned the possibility of inviting users from outside the organization into a group, site, or team. A guest is a type of user that doesn’t have a licensed, regular account in your Azure AD. They will get an Azure business-to-business (B2B) or business-to-consumer (B2C) account, but won’t consume a license with associated costs.
This is great for sharing content with external partners, vendors, and the like without having to pay to add them to your tenant. A guest can be added by an administrator in advance or in an ad hoc fashion by sharing content with them directly from SharePoint libraries. Owners of groups may add guests to their group by supplying their email from Outlook, SharePoint, or Teams. Members of groups may invite guests in Teams, but owners must approve the addition. Access requests may be enabled in SharePoint to accomplish the same. Guests access resources by clicking the link in the email they receive and creating the guest in Azure AD.
The problem with guest accounts in your tenant is the same problem you have with giving too many people the keys to your home. You’re never quite sure when they’re coming over, what closets and cabinets they’re snooping in, or whether they’ve copied the key and given it to someone else. Once a guest is added in Azure AD, there is no great way to ensure we get their key back when their need for access is complete.
It’s important to note that where we share things makes a big difference. Sharing a site or a document with someone would generate an email with a link, but they would only have access to the specific items shared. This would be like giving someone a code to enter your garage but not a key to get further inside. When a guest is added to a group or a team, they have access to almost all the content the group shares – chat messages in Teams and all pages or documents in SharePoint. This access would include read and write capabilities. The group calendar and email inbox would be off-limits, however.
Guest access can be disabled for groups altogether if desired by going to the global admin center and going to Show all | Settings | Org settings and selecting Microsoft Groups on the services tab. Additionally, we can decide to allow groups to have guests, but turn that feature off for Teams. This makes sense because of how easy it is for an owner to add a guest to a team and share so much with them automatically. It’s also possible to block guests from specific groups.
We can limit how guests are added to the tenant. As noted earlier, admins may add guests directly to the tenant in the Azure AD admin center using Azure B2B. This allows the guest to be added with their name and email address along with a personal message and assignment to specific desired groups, as seen in the following figure. We can choose how much of the Azure AD resources a guest can see (such as other users or group membership) with options ranging from the same as a licensed user to nothing but their own profile:
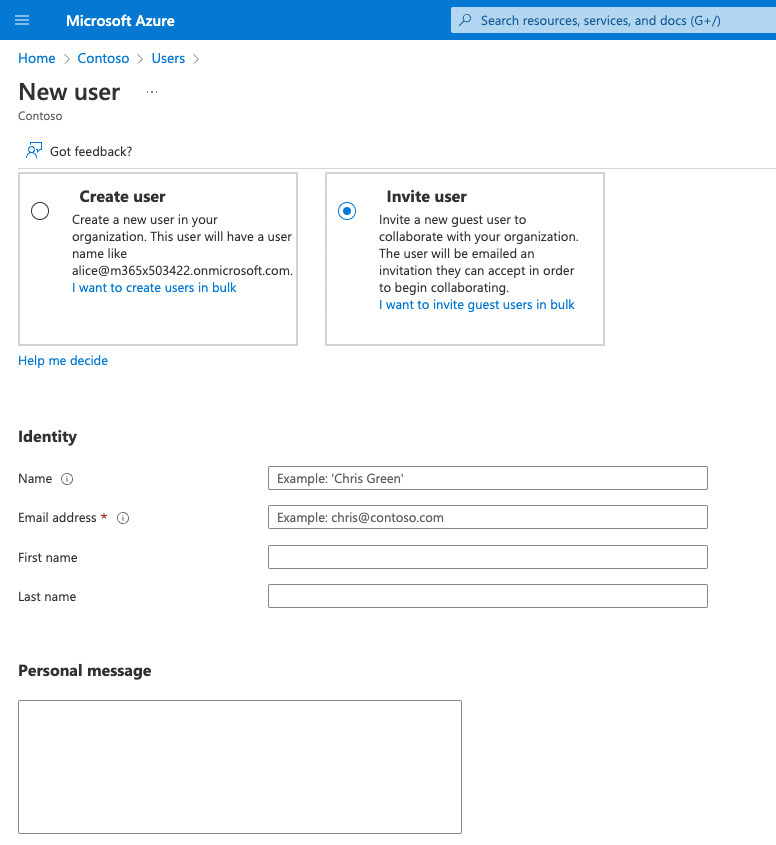
This is the next step after choosing to add a guest:
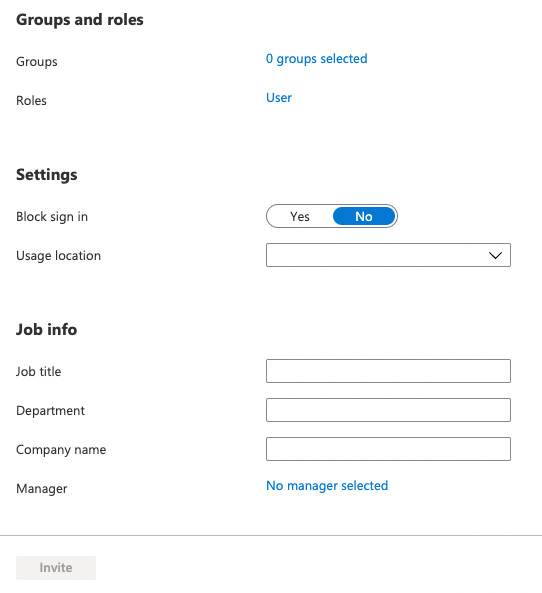
Figure 4.8 – The admin center UI to invite a new guest
If we exclusively want to add guests in this way (and prevent them from being added by users), we need to log in to the Azure AD admin center as a global or security administrator and change the guest invite settings. There are four options:
- Anyone in the organization including guests: This is the default and means that your guests can invite other guests, so you’re going to have a house full before you know it.
- Member users and specific admins: With this setting, a licensed user could add guests if they are a group owner, but guests could not add other guests.
- Only users assigned to specific admin roles: This is our option for preventing anyone other than admins from adding guests, either through the workloads or the admin centers.
- No one can invite guests: Shut the door, turn off the lights, and pretend that nobody’s home. No external sharing at all.
The third option, Only users assigned to specific admin roles, does have a unique caveat. We can add users to a guest inviter role, which essentially makes them an admin for purposes of adding guests without giving them access to any other administrator content or sites. We also have the option to set collaboration restrictions that will either allow or deny guest invitations to specific domains. So, if we’re working with a vendor on a project, we can make sure they can be invited to join us, but no one else.
Labeling our groups
Not all groups are designed to serve the same purpose. We’ve already seen how a group is a glue for our collaboration apps in M365. Some of those groups may be more sensitive than others. We must talk sweetly to them, avoid harsh chemicals, and turn the lights down low. Just kidding! The chats and files employed by the group may contain information that is sensitive such as proprietary business information, personally identifiable information (PII), or other data that needs special treatment.
We can use Azure Information Protection and Microsoft 365 Compliance Center to create and apply labels to content that identifies as a sensitive piece of content. Labels can be whatever makes sense for your organization, but are commonly something such as Public, Confidential, Internal Only, or Top Secret. When the label is applied, its configured protection settings are automatically applied to do things such as the following:
- Restrict content to users within the organization
- Decide who can read or who can print
- Dictate whether a message may be forwarded
- Set an expiration date on how long a document can be opened
- Define a custom header, footer, or watermark on a protected file
While the label may be applied by a user directly or automatically applied based on rules that we define (with an E5 license) to documents directly, we can also apply labels to the container itself. We can classify entire groups, sites, and teams. This only impacts the container, which means that it doesn’t cascade down to the individual content items, though a single label could be applied to a site and a document within a library of that site.
Applied to a site or team, the label may help you to prevent external sharing for a site marked Top Secret or prevent guests from being added to a team marked Sensitive. Labels can be configured to work with Conditional Access policies to block site access from unmanaged devices. We can also use these labels to set the default sharing scope and link permissions when sharing content within a SharePoint site. The classification label for the container will display on a team or site and may be selected when that container is provisioned.
Summary and planning document
In this chapter, we’ve established the crucial, core nature of M365 groups. It gives us the connectivity and permission structure for sites, teams, communities, and more. Groups can be made with names of individuals added manually or dynamically. Since M365 groups can be created by any licensed user by default, we also explored the concept of governance. Provisioning, naming, expiration, and sensitivity labeling help our groups to work effectively and avoid redundancy.
At the close of each chapter, I want to summarize the information we’ve covered while also giving you a template to create your own SharePoint architect’s planning and governance guide. This chapter has shown the importance of understanding M365 groups as the foundation for teams and sites as well as other tools in the M365 toolbox. Planning for group provisioning, governance, and life cycle will ensure a good balance between adoption and successful maintenance. Using groups as a means of connecting to data outside the Microsoft cloud allows all of our collaboration tools to be extended and to leverage other business-critical apps and data without leaving our M365 home.
Our planning document should include the following based on what we’ve discussed in this chapter:
- Planning for groups:
- Purpose:
- What do I intend to accomplish with the creation of a group? Email, permissions, or connectivity?
- Are there already Azure AD security groups that may need to be duplicated or recreated?
- Will the membership of my group be dynamic and automatically managed or static and manually managed?
- Which tool when?
- Do I need a group just to create an access control list?
- Do I want to add real-time chat to my group that would require creating a team?
- How frequently will my users need to interact with the shared email or calendar which may lead me to Outlook?
- Purpose:
- Governance:
- Provisioning:
- Should we keep the Microsoft default of allowing all licensed users to create groups?
- Does that decision apply to teams, communities, sites, and plans as well?
- What naming strategy should we create for groups?
- What is the minimum number of owners we should expect to have for each group?
- What tools, solutions, or products should I use to assist me with automating provisioning?
- Life cycle:
- What is our expiration policy? How long should a group be dormant before it is marked for deletion?
- What should happen to the contents of a group if it is marked for deletion? Do we archive it?
- Who will get notified if a group no longer has a valid owner?
- Security and compliance:
- Should this group allow guests?
- Should external sharing of content be allowed?
- Will I need to use sensitivity labels for the group or its contents?
- Provisioning:
In the next chapter, we’ll continue to explore the collaboration tools in more detail. If collaboration were a windmill, we’ve been focusing on the gear at the center with M365 groups. The arms of the windmill that really give it strength and purpose are the tools that connect the core of groups and SharePoint to power teams, communities, lists, forms, Stream, and task plans. The world of SharePoint just keeps getting bigger.