Chapter 7
Keeping Your Model Organized
IN THIS CHAPTER
![]() Taking stock of your model with the Outliner
Taking stock of your model with the Outliner
![]() Avoiding problems by using tags the right way
Avoiding problems by using tags the right way
![]() Looking at how everything works together
Looking at how everything works together
Living life can be a messy ordeal, and modeling in SketchUp is no exception. As you crank away at whatever it is you’re modeling, you’ll reach a time when you stop, orbit around, and wonder how your model got to be such a pigsty. It’s inevitable.
Big, unwieldy, disorganized models are a pain. They can slow your computer or even cause SketchUp to crash. Luckily, SketchUp includes a bunch of different ways to keep your geometry — edges and faces — from getting out of control. This chapter presents SketchUp’s two main tools for organizing your model: the Outliner and Tags. After we introduce each tool, we explain how to use it and how not to use it (are you listening, Tags?). This chapter ends with a detailed example of how you can use the tools together to make modeling easier.
 For a long time, SketchUp tags were called layers. So if you are using this book with an earlier version of SketchUp, everything that we describe about Tags applies to the old Layers framework.
Taking Stock of Your Tools
When sorting out the thousands of edges and faces in your model, it’s all about lumping things together into useful sets. After you organize geometry into sets, you can name them, hide them, and even lock them so that you (or somebody else) can’t mess them up.
 The primary way to organize geometry into sets is to create groups or components. If you haven’t read about groups and components yet, now would be a good time to take a look at Chapter 5; the stuff in this chapter is best understood if you have a firm grasp on the stuff in that one.
You have two organizational methods at your disposal in SketchUp:
- Outliner: The Outliner is a fancy list of all the groups and components in your SketchUp model. In the Outliner, you can see which groups and components are nested inside other ones, assign names to and search for objects, and easily hide parts of your model that you don’t want to see. If you use a lot of components (and you should), the Outliner may well become your new best friend.
-
Tags: For people who are used to organizing content in other software programs, layers are usually where it’s at; you put different kinds of things on different layers, name the layers, and turn them on and off when you need to. It’s a pretty simple concept. In SketchUp, tags are a similar convention, but the ways in which SketchUp tags work differently from traditional design layers are important for modelers to know.
In SketchUp, using tags the wrong way can seriously mess up your model. We’re not kidding. If you plan to use tags, read “Discovering the Ins and Outs of Tags” later in this chapter. Not doing so can result in serious injury or even death — depending on how upset you get when your 50-hour model gets ruined.
This section begins by explaining how Tags and the Outliner work, and some of the amazing things that you can do with them. Later on it will get into how to actually tag and organize components in your model.
Seeing the Big Picture: The Outliner
Many people love to make lists. Not only that, but they also love to look at lists; information arranged neatly into collapsible rows is the kind of thing that comforts their hearts and brings a tear to their eyes.
Now, before you decide that they’re so boring that they add zest to their lives by color-coding spreadsheets, consider this: Most halfway-complicated SketchUp models consist of dozens, if not hundreds, of groups and components. These groups and components are nested inside one another like Russian dolls, and many are heavy, computer-killing behemoths like 3D trees and shrubs.
SketchUp Pro includes a lovely list functionality called the Outliner, also available with Shop subscriptions. The Outliner helps you keep track of all your groups and components, hide what you don’t want to see, and (more important) unhide what you do. Ready to dive in? We thought so!
Taking a good look at the Outliner
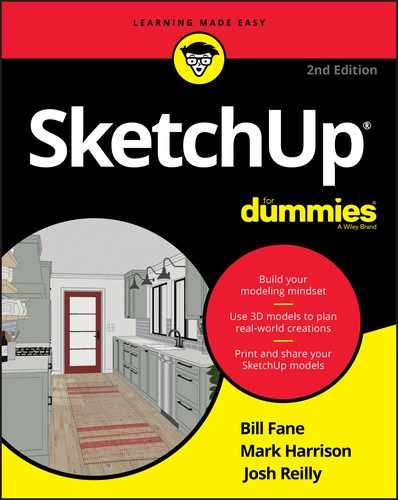
You can open the Outliner panel on the right side of the screen by choosing Window ⇒ Default Tray ⇒ Outliner (Mac: Window ⇒ Outliner). Figure 7-1 shows what the Outliner looks like in the desktop and web versions when a model consists of a simple room with some furniture in it. Each piece of furniture is a separate component from the SketchUp 3D Warehouse.
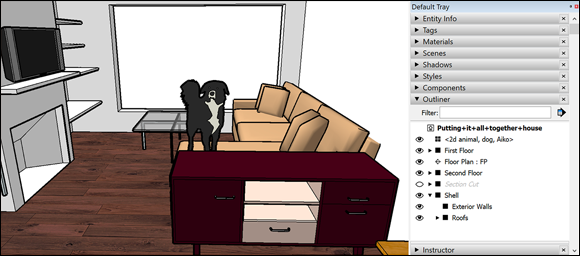
FIGURE 7-1: The Outliner lists the components in a model.
The Outliner panel has the following features:
- Search filter box: If you type a word or phrase in this box, the Outliner shows only the items in your model that include that word or phrase in their names. Type coffee, for example, and only the coffee table component is visible.
- Right-clickability: Right-click any object (a group or component) in the Outliner to reveal the same options that are available when you pick a component with the Select tool.
- Outliner Options flyout menu: In the desktop version, this handy little menu contains three options:
-
Expand All: Choose this option to have the Outliner show all the nested groups and components in your model — every last one of them (provided that they’re attached to visible tags).
The Outliner shows only groups and components that exist with visible tags in your model. In other words, anything with a hidden tag doesn’t appear in the Outliner, so be extra-careful if you’re using both the Outliner and tags to organize your model. You can read all about tags in the “Discovering the Ins and Outs of Tags” section later in this chapter. - Collapse All: This option collapses your Outliner view so that you see only top-level groups and components — ones that aren’t nested inside other groups and components.
- Sort by Name: Select this option to make the Outliner list the groups and components in your model alphabetically.
-

 Outliner List window: All the groups and components in your model are listed here. An icon with four little boxes indicates a component, whereas an icon that’s a bigger solid box indicates a group. An Expand/Collapse toggle arrow appears next to a group or component that holds nested groups or components. (You see an example of a group with nested components in Figure 7-1.) You can keep the nested list closed or expand it so that the constituent groups and components appear in the list.
Making good use of the Outliner
If you use lots of groups and components (and you should), having the Outliner open onscreen is one of the best things you can do to model efficiently.
Here’s why:
- Use the Outliner to control object visibility. Instead of right-clicking groups and components in your model to hide them, use the Outliner instead. Just click the eyeball icon next to the name of any element in the Outliner. When you do, the object is hidden in your modeling window, and its name is dimmed and italicized in the Outliner. To unhide it, just click its eyeball in the Outliner. We know — it’s a little bit gooey, but it’s effective.
- Drag and drop elements in the Outliner to change their nesting order. Don’t like having the component you just created nested inside another component? Simply drag its name in the Outliner to the top of the list. This step moves the component to the top level, meaning that it’s not embedded in anything. You can also use the Outliner to drag groups and components into other ones.
- Find and select things with the Outliner. Selecting something in the Outliner highlights that something’s name and selects it in your modeling window. With this technique, selecting nested groups and components is easy, especially if you’re working with a complex model. Click any element (even hidden ones) to reveal it in the modeler. Similarly, double-clicking deeply nested groups or components opens them for editing, potentially saving you dozens of clicks.
 You have multiple ways to tell what is hidden in your SketchUp model. Outliner will tell you what groups and components are hidden by their list styling, but you can also choose View ⇒ Show Hidden Objects to visualize hidden groups and components in the modeling window. (In the Web version, this feature is a toggle switch near the top of the Display panel.) These objects are still technically hidden, but now they’re visible for you to select and operate on without having to change their visibility status.
Discovering the Ins and Outs of Tags
Tags are a very useful part of SketchUp, and they can make your life a lot easier. Tags can also be a major source of heartache because they can really mess up your model if you’re not careful. This section can set you on the right track.
What Tags are — and what they’re not
In a 2D program like Adobe Photoshop or Illustrator, the concept of layers makes a lot of sense: You can have content on any number of layers, sort of like a stack of transparencies. You find a distinct order to your layers, so anything on the top layer is visually in front of everything on all the other layers, as shown in Figure 7-2.
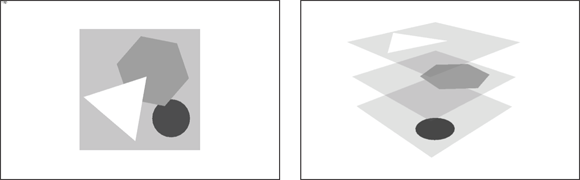
FIGURE 7-2: In 2D software, layers are pretty straightforward.
But SketchUp isn’t a 2D program; it’s a 3D program. So how can it have layers? How can objects in 3D space be layered on top of one another so that things on higher layers appear in front of things on lower ones? They can’t; it’s impossible. Tags in SketchUp are different from layers in most other graphics programs, and that’s confusing for lots of people who use those other programs.
 Earlier releases of SketchUp had a layers system because some of the very first SketchUp users were architects, and many, many architects use AutoCAD drawing software. Because AutoCAD uses layers extensively, layers were incorporated into SketchUp to maximize compatibility between the two products. Some confusion began to creep in, however, because SketchUp layers weren’t exactly identical to other software layers, so SketchUp renamed them Tags. When you import a layered AutoCAD file into SketchUp, its layers show up as SketchUp Tags, which is pretty convenient. For more information about importing CAD files into SketchUp Pro, take a gander at the last part of Chapter 8.
So what are SketchUp Tags for? Tags control visibility. Use them to gather particular kinds of geometry so that you can easily turn it on (make it visible) and turn it off (make it invisible) when you need to. That said, tags don’t work the same way as groups and components; your edges and faces aren’t isolated from other parts of your model, which can cause major confusion if you’re not careful. To find out more, take a look at “Staying out of trouble” later in this chapter.
Navigating the Tags panel
The Tags panel, shown in Figure 7-3, is a pretty simple piece of machinery. You open it by choosing Window ⇒ Default Tray ⇒ Tags (Mac: Window ⇒ Tags). (Web: The Tags panel is near the middle of the right-side utility tray.) Here’s a quick introduction to the panel features:
- Add Tag: Clicking this button (the plus sign) adds a new tag to your SketchUp file.
- Delete Tag: Click this button (the minus sign) to delete the selected tag. If the tag you’re trying to delete contains anything, SketchUp asks what you want to do with it; choose an option, and click Delete.
- Set Current Tag: Click the far-right end of a tag name to make it current. A pencil icon appears. Any geometry you create inherits this current tag. As we discuss shortly, we highly advise not messing with this option. It’s way safer for your model to simply add tags after creating geometry.
- Tag Options flyout menu: This menu offers the following useful options:
- Purge: When you choose Purge, SketchUp deletes all the tags that don’t contain geometry. This is a handy way to keep your file neat and tidy.
- Color by Tag: Notice how each tag in the list has a little material swatch next to it? Choosing Color by Tag temporarily changes all the colors in your SketchUp model to match the colors (or textures) assigned to each tag. To see what’s on each tag, go straight to this option.
- Tags list: This list contains all the tags in your SketchUp file. You need to know about these three columns:
- Name: Double-click a tag’s name to edit it. Giving your tags meaningful names is a good way to find what you want quickly.
- Visible: This eyeball icon is the heart and soul of the tags panel. When it’s selected, the geometry on that tag is visible; when the eyeball isn’t selected, the tag’s geometry isn’t visible. This feature works just like it does in the Outliner.
- Color: You can choose to view your model using Color by tag, described earlier in the list. You can choose which material (color or texture) to assign to each tag by clicking the Color swatch.
FIGURE 7-3: The tags panel.
Tag, you’re it!
Now that you know how and why to use and manipulate tags, it’s time to see how to create and attach them. As previously indicated, all new entities are automatically assigned to the current tag, so usually, all you have to know is how to move them. Moving things from one tag to another is a simple three-step process:
-
Select the entity or entities to which you want to apply a tag.
Move only groups and components to other tags; the next section, “Staying out of trouble,” explains why. -
Open the Entity Info panel in the Default Tray.
(Mac: Window ⇒ Entity Info; Web: top of the right panel tray.)
-
In the Entity Info panel, choose a tag from the Tags drop-down list.
Your selected entities are tagged per your selection.
Staying out of trouble
Tags can be really helpful, but you need to know how to use them; if you don’t, bad things can happen. Check out the following do’s and don’ts before you start working with tags:
-
Do all your modeling on Untagged. Always make sure that the default Untagged is your current tag when you’re working. (Earlier releases called it Layer0 as part of its CAD heritage.) Keeping all your loose geometry (that’s not part of a group or component) together in one place is the only way to make sure that you don’t end up with edges and faces all over the place. SketchUp lets you put geometry on whatever tag you want, which means that you can end up with a face on one tag and one or more of the edges that define it on another. When that happens, working out where everything belongs is next to impossible; you’ll spend hours trying to straighten out your model.
This property of SketchUp’s Tags system can be a major stumbling point for new SketchUp users; knowing to keep everything on Untagged can save you a lot of anguish.
- Don’t move anything but groups and components to other tags. If you’re going to use tags, follow this rule: Never put anything on a tag other than Untagged unless it’s already a group or a component. Doing so ensures that stray edges and faces don’t end up on separate tags.
- Use tags to organize big groups of similar things. More complicated SketchUp models often include things like trees, furniture, cars, and people. These things are almost always already components, so they’re perfect for organizing on separate tags. You can make a Trees tag and put all your tree components on it, for example. Because trees are usually big, complicated components with lots of faces, hiding all your trees at the same time with the Tags feature is a handy way to improve your computer’s modeling performance.
- Don’t use tags to organize interconnected geometry; use the Outliner instead. By interconnected geometry, we mean things like building floor levels and staircases. These model parts aren’t meant to be physically separate from other parts in the way that vehicles and people are. When you put Level 1 on one tag and Level 2 on another, more often than not, you become confused about what belongs where. Is the staircase part of Level 1 or Level 2? Instead, make a group for Level 1, a group for Level 2, and a group for the staircase; you’ll need less headache medicine at the end of the day.
-
Feel free to use tags to iterate. Iteration is the process of doing multiple versions of the same thing. Lots of designers work this way to figure out problems and present different options to their clients. Using tags is a great way to iterate: You can move each version of the thing you’re working on to a different tag, and then turn the tags on and off to show each in turn. Just remember to follow the rule about using groups and components only on separate tags (mentioned previously in this chapter), and you’ll be fine.
Check out the sidebar “Using scenes to control tags” later in this chapter for a nifty way to flip through tags that represent design iterations in your model.
Putting It All Together
In this chapter (and in Chapter 5), we talk about each of SketchUp’s organizational methods in isolation: discussing how they work, why they’re special, and when to use them. When you’re actually working in SketchUp, you probably use a combination of them all, so we thought you’d find an example of all the organizational tools in action especially helpful.
Figure 7-4 shows a model of a house. Here’s how all the organizational tools are working together to keep the model organized:
-
Each floor level is a group. Organizing each floor into a group enables you to hide whichever one you’re not working on, so you can see what you’re doing and SketchUp runs a little faster. The house’s only staircase was included in the first-floor group, because that turned out to be the easiest thing to do, but you might keep the staircase as a separate group.
The interior walls on each level were also included in that level’s group. For most buildings, you can probably do the same unless you plan to study different floor plans with different interior wall arrangements. -
The roof and exterior walls are groups inside another group. To remove the roof or the exterior walls separately, each needs to be a group. To hide and unhide them both at the same time, create a Shell group to include them both. With this setup, you can selectively show or hide just the geometry you want to see. See Figure 7-5.
The floor levels, roof, and exterior walls are groups instead of components because they’re unique. A house has only one first floor, so that floor doesn’t need to be a component. -
All the furniture and plumbing fixtures are components. To furnish the house, furniture components were created or components from the Components panel and 3D Warehouse were used.
When you have only one couch, why make it a component instead of a group? By making every piece of furniture in a model a component, you can see the furniture listed in the In Model collection of the Components panel. You can also save your furniture as a separate component collection on your computer. The next time you move, you have all your furniture in a single place, ready to drop into a model of your new house. -
All the furniture has a separate tag. Furniture components can be a little heavy — that is, they tax your computer system. With the furniture having a tag, you can easily hide it all. This setup also enables you to see your space without furniture. Remember that the visibility of a tag can be controlled with a single click.
But why not just create a group from all the furniture components and use the Outliner to hide and unhide them all, instead of bothering with tags? Good question. Changing a component’s tag is easier than adding a component to an existing group. To add something to a group, you need to use the Outliner to drag and drop that something in the proper place. With complex models, this task can be a hassle. Changing a component’s tag is a matter of using the Entity Info panel to choose a new tag from a list.
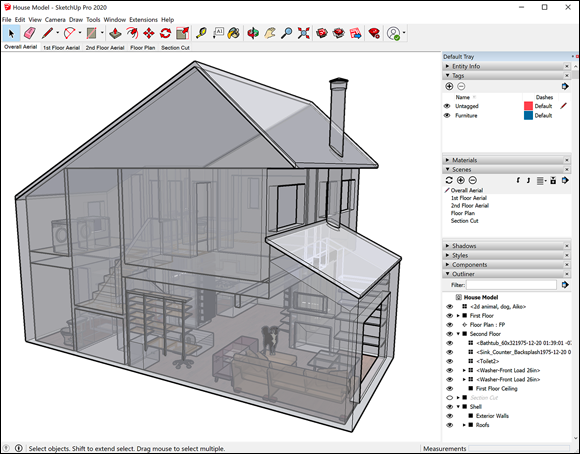
FIGURE 7-4: All of SketchUp’s organizational tools were used to build this model.
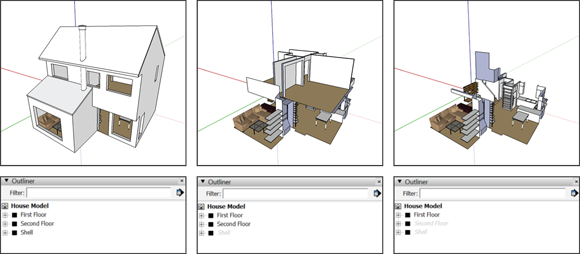
FIGURE 7-5: Each floor of the house, as well as the roof and the exterior walls, is a separate group.