Chapter 8
Modeling with Textures, Photographs, and CAD Files
IN THIS CHAPTER
![]() Applying textures and photos to a model’s faces
Applying textures and photos to a model’s faces
![]() Building a model from scratch with SketchUp’s photo-matching tools
Building a model from scratch with SketchUp’s photo-matching tools
![]() Giving your model a geographic location
Giving your model a geographic location
![]() Starting out with a 2D CAD file in SketchUp Pro
Starting out with a 2D CAD file in SketchUp Pro
No matter how complex your models are, there is no doubt that they will be more interesting if you use textures — 2D image files — to paint faces in the model.
In concert with 3D geometry, textures provide visual cues that help people understand your designs more quickly. Modeling a face with a transparent material instantly conveys that it is probably made of glass. The same is true for using textures to paint faces that resemble wood, brick, or tile.
But textured models aren’t just more useful. Textures make your model look more attractive or realistic. If you are using 3D modeling to compel and convince someone about your great idea, mastering the texturing techniques in the first part of this chapter will give you an edge.
Real-world photographs are particularly useful textures. Not only can they inject materiality into your model, but also, they can be used as references while modeling or as an alternative to modeling.
While we’re on the subject of importing things into SketchUp, we wrap this chapter with a closer look at how to bring in geographic and CAD data.
Painting Faces with Image Files
Technically, painting surfaces with pictures using 3D software is called mapping, as in “I mapped a photo of your face to the underside of the pile-driver model I’m building.” Different software programs have different methods for mapping pictures to faces. Luckily, in SketchUp, the process is pretty straightforward.
The following sections deal with mapping textures to two kinds of faces: flat and curved. The tools are similar, but the methods aren’t. We explain both because you never know what you’re going to run into.
Applying textures to flat faces
Although SketchUp has a default palette of textures, we think it’s a good idea to know how to bring in your own image files as textures. You’ll find broader and higher-quality collections of textures in the wild of the Internet than you will in SketchUp’s sampler library. (Read more about sources for textures later in this chapter in “Where to find good textures.”)
For now, let’s say you found a good texture image of hardwood flooring. Here’s how you would apply it to the floor in your model.
-
 Using the Select tool, click the face you want to texture.
If the face to which you want to add texture is within a group or component, first double-click to edit an object, and then click once to see if you need to go deeper into the object to select a face.
-
Choose File ⇒ Import (web: Insert).
The Import dialog box opens.
-
Select the image file you want to use as a texture.
You can use JPEGs, TIFFs, and PNGs as textures in SketchUp; all these are common image file formats.
-
In the Use Image As menu, select the Texture option.
Figure 8-1 shows the options that appear at the bottom of the Import dialog box.
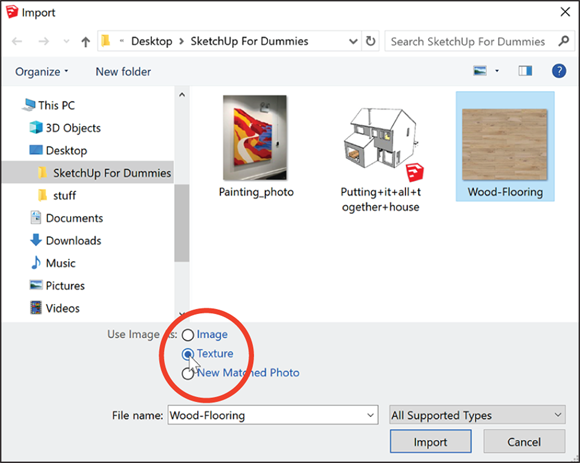
FIGURE 8-1: Tell SketchUp you want to use the image as a texture.
-
Click the Import button.
The Import dialog box closes, Paint Bucket becomes your active tool, and its cursor is loaded with the image you chose to import.
-
 Click once near a corner of the face you want to paint (see Figure 8-2).
Your first click tells SketchUp where to position one corner of the image you’re using as a texture.
-
Click somewhere else on the face you’re painting (see Figure 8-2).
Unless the proportions of your image perfectly match the face onto which it was mapped, your image repeats. Don’t worry — that’s normal. SketchUp automatically tiles your image to fill the whole face. If you want to edit your new texture, skip to the later section “Moving, scaling, rotating, shearing, and distorting your texture.” You can scale, rotate, or even stretch your texture to make it look however you want. See the nearby sidebar “When is an image a texture?” to find out more about what happens to your image when you apply a texture.

FIGURE 8-2: Click once to locate one corner of the image you’re using as a texture. Click again to locate the other corner. (You can scale the texture up or down after it’s applied.)
Moving, scaling, rotating, shearing, and distorting your texture
The title of this section pretty much says it all. Doing the aforementioned things to your texture involves Texture Edit mode, which is a little bit hidden, unfortunately. Follow these steps to move, scale, rotate, or skew your texture:
 With the Select tool, click the face with the texture you want to edit.
-
Choose Edit ⇒ Face ⇒ Texture ⇒ Position.
This command enables (deep breath) the Move/Scale/Rotate/Shear/Distort Texture mode. You see a transparent version of your image, along with four pins, each a different color, as shown in Figure 8-3. If all your pins are white, you’re in Stretch Texture mode. Right-click your textured face and select Fixed Pins to switch to the desired Fixed Pin mode.
 A quicker way to get to Texture Edit mode is to right-click the textured face and then choose Texture ⇒ Position from the shortcut menu.
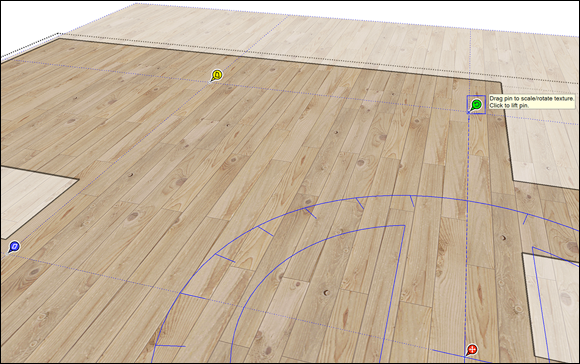
FIGURE 8-3: Use the green pin (only) to realistically orient and scale textures.
-
Edit your texture.
At this point, you can edit your texture in two ways: by using the options on a shortcut menu or by dragging the colored pins.
Right-clicking your texture opens a shortcut menu with the following options:
- Done: Tells SketchUp you’re finished editing your texture.
- Reset: Undoes all the changes you’ve made to your texture.
- Flip: Flips your texture left to right or up and down, depending on which suboption you choose.
- Rotate: Rotates your texture 90, 180, or 270 degrees, depending on the suboption you choose.
- Fixed Pins: When this option is selected, you’re in Move/Scale/Rotate/Shear/Distort Texture mode (Fixed Pin mode). Deselecting it switches you over to Stretch Texture mode, discussed in the upcoming section “Stretching a photo over a face.”
- Undo/Redo: Goes back or forward a step in your working process.
While you are in Fixed Pin mode, dragging each of the colored pins has a different effect (refer to Figure 8-3):
- Scale/Shear (Blue) pin: Scales and shears your texture while you drag it. Shearing keeps the top and bottom edges parallel while making the image “lean” to the left or right.
- Distort (Yellow) pin: Distorts your texture while you drag it; in this case, the distortion looks kind of like a perspective effect.
- Scale/Rotate (Green) pin: Scales and rotates your texture while you drag it.
- Move (Red) pin: Moves your texture around while you drag it. Of all four colored pins, this one is the most useful. It’s great for precisely positioning brick, shingle, and other building material textures in a model.
-
In your modeling window, click anywhere outside your texture to exit Texture Edit mode.
You can also press Enter or right-click and choose Done from the shortcut menu.
For instance, let’s say that you want to scale your hardwood texture image to make the board width proportionate to the model. First, you’d draw out a guideline in the model to define the width of the slat. Then you’d use only the green pin in Position Texture mode (refer to Figure 8-3) to scale the texture up or down to that guide. The green pin won’t snap to the guide, but you can get close.
Stretching a photo over a face
For many flat objects like rugs, paintings, fences, and windows, an image texture can stand in for 3D geometry. The trick is stretching the image to fit a face in your model.
Imagine a photograph printed on a piece of rubber that you can stretch until the photo looks the way you want and that you hold in place with pins. That’s basically how Stretch Texture mode (also known as Free Pin mode) works.
Follow these steps to stretch your texture using the Position Texture tool’s Stretch Texture mode:
-
 Right-click the face whose texture you want to edit and choose Texture ⇒ Position (top-left image in Figure 8-4).
As long as you are in the same shortcut of the face (and not outside its group or component), this is a quick way to edit a texture.
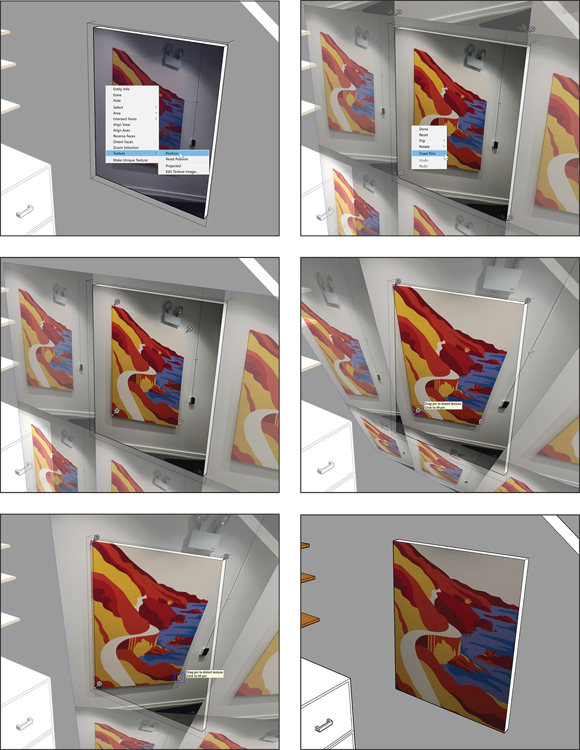
FIGURE 8-4: Use Fixed Pin mode to stretch four parts of an image to four endpoints of geometry.
-
Right-click your texture again and clear the check mark next to the Fixed Pins option.
You switch to Stretch Texture mode. Instead of four different-colored pins with little symbols next to them, you see four white pins. (See the top-right image in Figure 8-4.)
-
Click and release each pin to pick it up and then relocate it to a spot on the image where you want to stretch to the corner of your geometry.
In the left image of the middle row of Figure 8-4, the white pins have been carefully placed at the corners of the painting.
-
Once you’ve placed the white pins where you want them, click and drag each pin to reposition it until your photo stretches over the face in a way you like.
In the right image of the middle row of Figure 8-4, the white pins are stretched to snap to the corners of the geometry.
 If you need to, feel free to orbit, zoom, and pan around your model to get the best view of what you’re doing; just use the scroll wheel on your mouse to navigate without switching tools.
 - Press Enter to save your changes and exit Texture Edit mode.
If you don’t like what you see, go back and edit the texture again; you can muck around as many times as you like.
Editing a texture image
Perhaps there’s something in a photograph you’re using, and you don’t want it to be there. Using SketchUp Pro, you can use Edit Texture Image to open the texture you’ve selected in an image-editing program, where you can edit the texture directly.
Follow these steps to use Edit Texture Image:
- Right-click the texture in your model you want to edit and choose Texture ⇒ Edit Texture Image.
-
In the program that opens, make whatever changes you need to make.
The editing program that opens will be whatever your operating system defaults to for the file format of the image that you have selected. Be sure not to change the proportions of the image; that can really mess things up. If you’d like to maintain the original version of the image, save a copy of it before you start editing it for use in SketchUp.
- Save (don’t Save As and change the filename) the image you’re editing and close it if you like.
- Back in SketchUp, check to make sure your edits have been applied.
Which image-editing program actually opens depends on what you have installed on your computer; you specify which one to use in the Applications panel of the Preferences dialog box. For what it’s worth, most designers use Adobe Photoshop, but you can use whatever you have.
Why is this important? Just because you can’t see part of an image doesn’t mean it’s not there; SketchUp saves the whole image with the model, even if you use only a little bit of it. In a complex model with dozens of photo textures, all that invisible extra photo data adds up. Making your textures unique can make your models much, much smaller.
Controlling color and transparency
Part of making your model look just right with textures is a process called colorizing. You can control the colors associated with your texture to make bricks look more brown and less red, to make leaves on trees change from spring to fall conditions, or to change the transparency of glass.
The best part of tweaking colors in your textures is that you can get real-time feedback in the modeling window. Colorizing is available in SketchUp for Web but only with a paid subscription. Here’s how to edit the color properties underlying any texture in your model:
-
 Activate Paint Bucket (B), and then press and hold the Alt key (Mac: ⌘ ) to activate the Eye Dropper.
When the Eye Dropper is active, any texture you select in the model will become active with the Paint Bucket tool, and it will also become selected in the Materials Panel. To edit a texture, the first thing you have to do is select it.
-
Using the Eye Dropper, click the texture you want to colorize.
Notice that it will become selected in the Materials panel.
If you don’t see the selected texture highlighted in the Materials panel, make sure you are in the In Model category of the panel, where all the textures stored in your model file are listed.
-
Double-click the selected texture in the Materials panel (see Figure 8-5; web: Click the pencil icon next to the Material name at the top of the panel).
A new mode of the Materials panel becomes available where you can edit several properties associated with the selected texture.
-
In the Edit tab of the Materials panel, use the color picker (Mac: icons at top of Materials panel) and opacity slider to colorize your texture or to increase or decrease its transparency.
You should see your changes reflected (as you make them) in the modeling window (see Figure 8-5).
As you start working more with Styles and Shadows (see Chapter 10), think of colorization as the last step in your process of getting models to look just so.
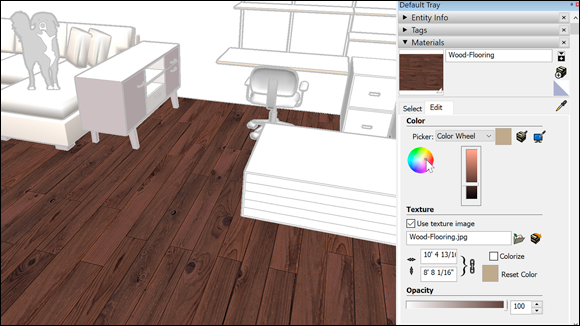
FIGURE 8-5: Manipulate colors and see the impact in your model.
Applying textures to curved surfaces
Notice how the title of this section ends with surfaces and not with faces? That’s because (as you know by now) individual faces in SketchUp are always flat — no exceptions. When you see a non-flat surface, it’s actually made up of multiple faces. You can’t see the edges between them because they’ve been smoothed. Choosing View ⇒ Hidden Geometry reveals dashed lines that expose all curved surfaces for what they really are. See Chapter 3.
How you go about mapping an image to a curved surface in SketchUp depends on what type of curved surface you have. With that in mind, curved surfaces fall into two general categories (see Figure 8-6):
-
Single-direction curves: A cylinder is a classic example of a surface that curves only in one direction. In SketchUp, a cylinder is basically a series of rectangles set side by side. Most curved walls you see on buildings are the same way; they don’t taper in or out as they rise.
 Another way to think about single-direction curves is to consider how they might have been made. If the curved surface you’re staring at could be the result of a single push/pull operation (such as turning a circle into a cylinder), there’s an excellent chance it’s single-direction.
For mapping an image to a single-curve surface, you can use the Adjacent Faces method; it works well and doesn’t stretch your image.
-
Multidirection curves: Terrain objects, saddles, and curtains are all prime examples of surfaces that curve in more than one direction at a time. They’re always composed of triangles — never basic rectangles.
To map an image to this type of curved surface, you must use the Projected Texture method. Skip to “The Projected Texture method” to read all about it.
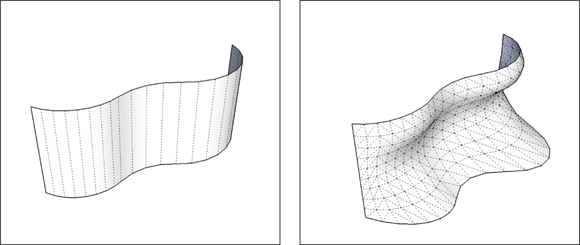
FIGURE 8-6: All curved surfaces are either single-direction (left) or multidirection (right).
The Adjacent Faces method
If you need to paint an image onto a surface that curves only in a single direction (such as a cylinder), you can use this technique. Follow these steps to find out how and take a look at Figure 8-7 to see the process in action:
- Choose View ⇒ Hidden Geometry to turn on Hidden Geometry so you can see the individual faces in your model.
-
“Load” your cursor with an imported image.
Follow steps 1–4 in “Applying textures to flat faces” (earlier in this chapter) to import an image as a texture.
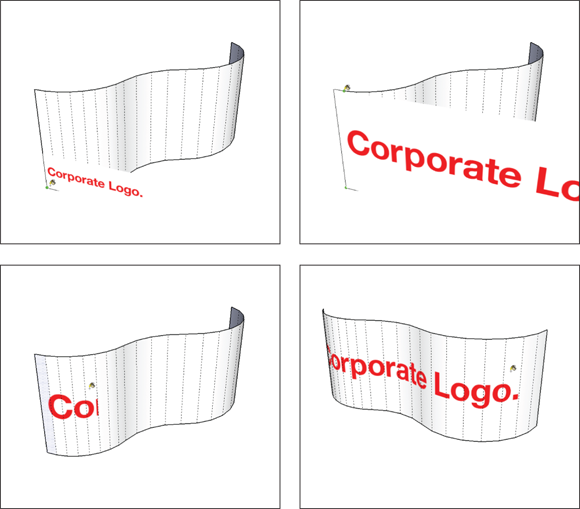
FIGURE 8-7: The Adjacent Faces method lets you map images to simple curved surfaces.
-
Paint the leftmost subface entirely with the image.
Your curved surface is composed of subfaces. Here’s how to paint the correct one:
- Hover your loaded cursor over the lower-left corner of the subface farthest to the left. Don’t click yet.
- When the image is oriented in the right direction, click once.
-
Click again on the upper-right corner of the same subface.
This places the image; it should be cropped on the right near the next hidden geometry line segment (dashed line).
-
 Select the Paint Bucket tool, hold down the Alt key (Mac: ⌘ ), and click the first subface to sample the texture (image) you just placed.
This “loads” your Paint Bucket tool with the texture.
-
Release the Alt key (Mac: ⌘ ), and click once on the face immediately to the right of the face you painted in step 3.
If everything’s working correctly, the image you placed appears on the face you just clicked.
-
Keep painting subfaces until you’re done.
Remember to work your way from left to right; skipping a subface messes up things. To fix a problem, just use Undo and keep going.
The Projected Texture method
For painting an image onto a complex curved surface, there’s no substitute for this method. Chunks of terrain are good examples of complex curved surfaces — bumpy, twisted, rippled, and multi directional. If the curve you’re dealing with is more complicated than a simple extrusion, you need to use this image-mapping technique.
The key is to line up a flat face with the curved surface to which you want to apply the texture. You then “paint” the flat face with the texture, make it projected, sample it, and finally, paint the curved surface with the projected, sampled texture. Whew.
Follow these steps to get the basic idea (see Figure 8-8):
-
Create a flat face that lines up with your curved surface.
 You can use the Line tool and SketchUp’s inferencing system to draw a flat face that lines up with (and is the same size as) your curved surface.
 -
Apply a texture to your flat face and make sure that it’s positioned correctly.
For help, see “Applying textures to flat faces” earlier in this chapter.
-
Right-click the textured face and choose Texture ⇒ Projected.
This ensures that the texture is projected, which is the key to this whole operation.
-
 Select the Paint Bucket tool, hold down the Alt key (Mac: ⌘ ), and click the projected texture to sample it.
This “loads” your Paint Bucket tool with the projected texture.
-
Release the Alt key (Mac: ⌘ ), and click the curved surface to paint it with the projected texture.
The pixels in the image likely look stretched in some places.
-
Delete the flat face that you originally mapped the image to; you don’t need it anymore.
Alternatively, you could group that flat face, apply a tag to it, and toggle that tag’s visibility off. This way, you can easily turn that tag back on if you need to make changes to your projected texture in the future. Learn more about Tags in Chapter 7.
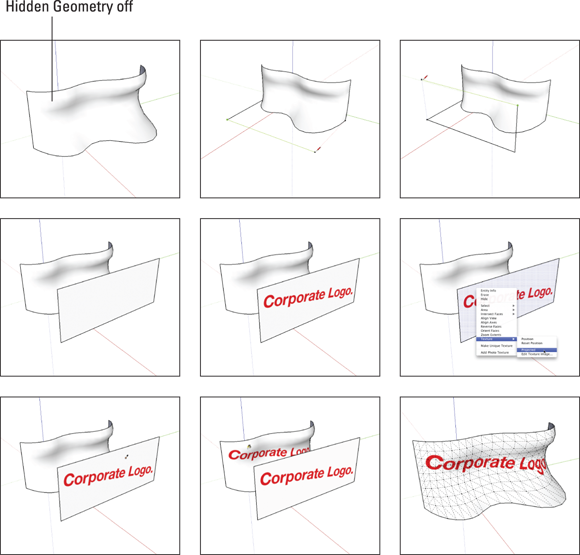
FIGURE 8-8: Mapping projected textures; you’ll know when you get it right.
Modeling Directly from a Photo: Introducing Photo-Matching
The first time we saw SketchUp’s photo-matching feature (called Match Photo) in action, we giggled and clapped our hands like toddlers at a petting zoo. We’re not ashamed of it, either. Sometimes technology that’s so useful, so unexpectedly satisfying, comes along, and you just can’t help yourself. On the other hand, Match Photo modeling is only available in SketchUp Pro, which means you’ll have to pay for this feeling.
So what does photo-matching do? If you have a good photograph (or multiple photographs) of the thing you want to model, SketchUp’s photo-matching feature can help you create your model. This application is how 99 percent of modelers use the photo-matching feature, and the technique we focus on in the next section. It is also possible to match an existing model to a photo.
Choosing a Match Photo–friendly image
Photo-matching works only on photographs of objects with at least one pair of surfaces that are at right angles to each other. Luckily, this includes millions of things you may want to build. But still, if the thing you want to photo-match is entirely round, or wavy, or even triangular, this method won’t work.
Here are tips for choosing a photo for this process:
- Watch out for lens distortion. When you take a picture with a wide-angle lens, some straight lines in the image bow a little bit, depending on where they are in the frame. Try to use photos taken with a normal or telephoto lens: 50mm to 100mm is a good bet.
- Make sure that the edges of two perpendicular surfaces are visible in the shot. You need to see planes that are at right angles to each other in order to use photo-matching properly.
- Shoot at a 45-degree angle if you can. Because of the way perspective works, your results are more accurate if you use a photograph in which you can see both perpendicular surfaces clearly; if one of them is sharply distorted, you’ll have a harder time.
The following types of photos, illustrated in Figure 8-9, work especially well with SketchUp’s Match Photo feature:
- An interior view of a room in which a corner meets at a right angle
- An aerial shot
- An exterior view taken from a human vantage point and in which a corner (or corners) meet at a right angle
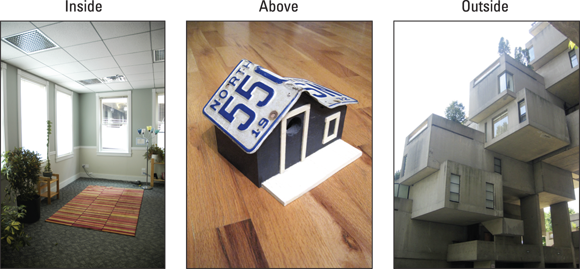
FIGURE 8-9: Choose the style that best describes your photograph’s camera position.
Modeling by photo-matching
The Match Photo feature helps you build a model based on a photograph. Here are two basic concepts:
- The process is iterative, not linear. Building a model using a matched photo entails going between drawing edges, orbiting around, drawing more edges, going back to your matched photo scene, and drawing yet more edges. Every photo is different, so the ones you work with will present unique challenges that you’ll (hopefully) have fun figuring out.
- Don’t forget the photo textures. By far one of the coolest features of photo-matching is the ability to automatically photo-texture your model’s faces by using your photograph as “paint.” It’s a one-button operation, and it’s guaranteed to make you smile.
Follow these steps to start building a model from a photo:
-
Choose Camera ⇒ Match New Photo.
A dialog box opens.
-
Select the image on your computer that you want to use and click the Open button.
The dialog box closes, and you see the image you chose in your modeling window. You also see a jumble of colorful techno-spaghetti, as shown in Figure 8-10. Don’t worry — it’s all part of the photo-matching interface.
-
In the Match Photo panel, choose the style that matches your photograph.
Reading from left to right, the three “grid” buttons beside the Style label are Inside, Above (for an aerial view), and Outside (for an outdoor view taken at ground level).
For the barn shown in Figure 8-10, we selected Outside.

FIGURE 8-10: The photo-matching interface includes your picture, plus lots of other things.
-
Click and drag the end points of the green perspective bars so that each bar lines up with edges in the photo that should be parallel to the model’s green axis.
 The perspective bars are the dashed lines with a small square at each end, and not the solid-color axes lines. There are two perspective bars of each color. They need to be aligned with two different features in the image that are parallel, and the farther apart the better.
The tops and bottoms of windows are good candidates, as are rooflines, tabletops, and ceiling tiles. In our example, we align the green perspective bars with the barn’s roofline.
 The following tips can help you position the bars correctly:
 - Zoom in and out (using the scroll wheel on your mouse) to better view your photograph while you place your perspective bars. The more accurately you place the bars, the better things will turn out.
- Match your perspective bars to nice long edges in your photograph; you get better results that way.
-
Click and drag the endpoints of the red perspective bars so that they line up with edges in the photo that should be parallel to the model’s red axis.
 The edges must be perpendicular to the first set of edges, or photo-matching doesn’t work. In our example, we align the red perspective bars to edges on the barn’s siding that are also perpendicular to the green perspective bars. You can see the result in Figure 8-11.
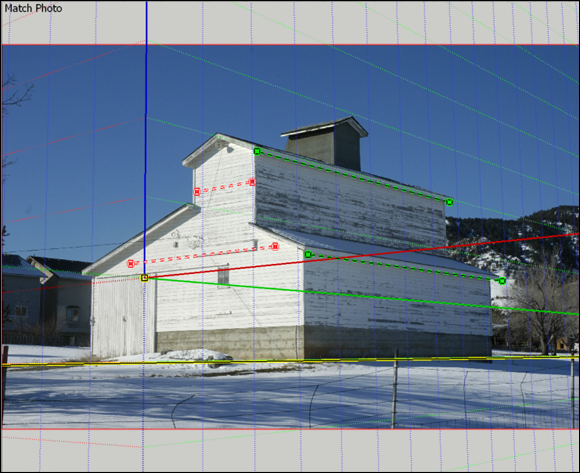
FIGURE 8-11: The perspective bars are aligned with the roofline and siding.
-
Drag the axis origin (the little yellow square where the axes come together) to a place where your building touches the ground and right at the intersection of two perpendicular edges, as shown in Figure 8-12.
Setting the axis origin is how you tell SketchUp where the ground plane is. After you set the axis origin in the right place, notice that the horizon line, which is the horizontal yellow bar, lines up with the horizon in your photo.
As long as you place the perspective bars correctly, the horizon line bar typically takes care of itself. However, now you know what the yellow horizon line bar does in case you need it.
 Occasionally, as you are working to properly set up a matched photo image, you will click outside the photo and all the guides will disappear. In the Match Photo panel, click the gear icon to jump back in and continue working.
FIGURE 8-12: The axis origin is on a corner that touches the ground.
-
(Optional) In the Match Photo panel, set the grid spacing so that you can roughly scale your model to your photo.
In our example, we leave the Spacing option set to the default of 5 feet. We know the barn is about 20 feet tall. Four gridlines are all we need to scale the model to the photo (because 4 × 5 = 20).
If you’re photo-matching an arena or a skyscraper, you probably need to adjust the grid spacing so that the grid can scale to such a large width or height.
-
Click the Done button in the Match Photo panel.
When you click the Done button, you stop editing your matched photo. All the colorful lines and grips disappear, and you’re left with the photo you brought in, your model axes, and your thoughts. It may have seemed like a lot of magic, but what you did was pretty simple: You used photo-matching to create a scene (explained in Chapter 11) with a camera position and lens settings that match the ones used to take the picture that’s on your screen. In effect, you’re now “standing” exactly where the photographer was standing when the photograph was taken.
-
 Select the Line tool and, starting at the axis origin, trace one of the edges in your photograph.
Make sure that you’re drawing in one of the three main directions: red, green, or blue. If you accidentally orbit so that your photo disappears, click the scene tab to see the photo again. (We talk a little more about orbiting as you draw in the tips that follow step 11.)
-
Keep tracing with the Line tool until you have a rectangular face, watching the color of your edges as you draw.
 You always want your lines to turn red, green, or blue when you’re starting.
 -
Use SketchUp’s drawing tools to continue to trace the photograph in three dimensions.
In Figure 8-13, you see two rectangular faces, one drawn on the green axis and the other drawn along the red axis.

FIGURE 8-13: As you begin tracing your model, align your edges with the drawing axes to create basic shapes.
 Here are pointers for successfully tracing your photo with SketchUp’s drawing tools:
 - Always start an edge at the end of an edge you’ve already drawn. Doing so helps to assure that your results are what you expect.
- Never draw an edge in midair. Okay — this is the same as the last one, but it bears repeating: When you draw edges based on other edges, you get the best results.
- To start, be careful not to orbit while you draw. You can zoom and pan all you want, though. If you orbit away from the vantage point you set up, your photograph will disappear, and you see only the geometry you’ve drawn, as shown in Figure 8-14. You can easily get back by clicking the scene tab for your matched photo. The tab is labeled with the name of your photo at the top of your modeling window.
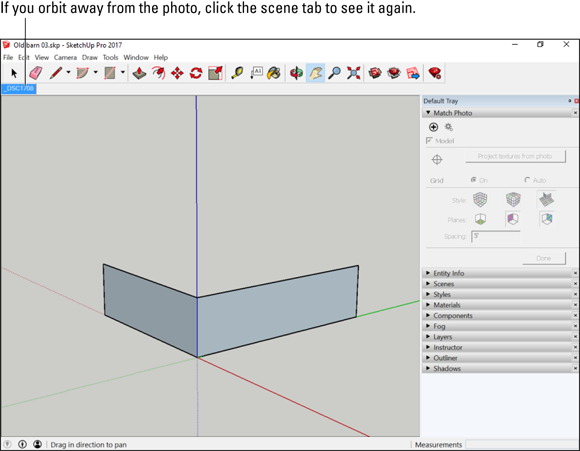
FIGURE 8-14: When you orbit, your photo disappears. Click the scene tab to see the image again.
- After your model begins to take shape, orbit frequently to see what’s going on. You’ll be surprised what you have sometimes — tracing a 2D image in 3D is tricky business. Get in the habit of orbiting around to check on the results and draw certain edges. Click the matched photo scene tab to return to the proper view.
- Use other tools (such as Push/Pull and Offset) when appropriate. Nothing prevents you from using the full complement of SketchUp’s modeling tools. However, tracing the basic skeleton of a model with the Line and Eraser tools keeps the process simple.
- Pay attention to the colors. With a color photograph as an overlay, seeing what you’re doing can be tricky. Watch to make sure that you’re drawing the edge you intend to draw.
- Draw angles by connecting the dots. If you need to trace an edge in your photo that doesn’t line up with any of the colored axes (an angled roofline, for example), figure out where the endpoints are by drawing perpendicular edges and connecting them with an angled line, as shown in Figure 8-15. You can delete the line or lines that you don’t need later.
- Show or hide your photograph. Doing so sometimes helps you see your work. The next section explains where to find the controls on the Styles panel.

FIGURE 8-15: Draw a temporary line to create an edge for a roofline or other edge that doesn't align with a colored axis.
After you finish drawing your model, you can scale it precisely by using the Tape Measure tool. (Chapter 3 explains how.) And finally, when you are done modeling, you can return to your Match Photo scene, and then click Project Textures from Photo. This last step burns the photo textures onto the individual faces, as shown in your Match Photo scene.
Making your matched photo reappear (or disappear)
After you match a photo to your model, the following tips are handy to know:
- Click the matched photo scene tab: When you create a new matched photo, you create a new scene. (You can read all about scenes in Chapter 11.) Clicking a matched photo scene tab at the top of the modeling window returns your view to the one you set up when you created (or edited) that matched photo. It also makes the associated photograph reappear — handy if you’ve orbited into another view.
- Manage photo visibility settings in the Styles panel: Deep, deep down in the bowels of the Styles panel, on the Edit tab, in the Modeling Settings section, you can control the visibility of your matched photo. Chapter 10 is where you find out about Styles.
Adding Geographic Data
If you are modeling a building or location, the most useful kind of photograph to add to your model is probably an aerial satellite image: a map that you can reference and model into 3D. This satellite data is another modeling resource that is only available in the desktop version, SketchUp Pro.
When you add geographic data to your model (also called geolocating your model), you give it a specific latitude, longitude, and cardinal orientation based on an address, cross streets, or other information. That doesn’t sound like much at first, but here are two really useful things geolocation enables you to do:
- Perform accurate shadow studies. For most designer-types, this is probably the biggest benefit of geolocating a model. With a latitude, a longitude, and a cardinal orientation, SketchUp’s shadow engine can display crazy-accurate shadows for any time of day, any day of the year, anywhere on Earth. You can find all the juicy details in the second half of Chapter 10.
- Build site shortcut models. If you’re designing a building, it’s probably surrounded by other buildings, and those other buildings are probably major influences on the design of your building, no? Wouldn’t it be nice to have them in your model? You can combine high-res, color, aerial (taken by airplanes or satellites) imagery with your own street-level photography to build the most useful shortcut models you’ve ever had. Even faster, use the PlaceMaker for SketchUp extension to pull in all sorts of shortcut data relevant to the location of your model. (Check out Chapter 15 for more info about extensions.)
Follow these steps to add a geolocation snapshot to your SketchUp file:
-
Make sure you’re online.
All geodata is stored on far-flung servers; if you don’t have an Internet connection, you can’t use the geodata.
-
Open the SketchUp file you want to geolocate.
You can add a geolocation snapshot to your model anytime as you work on it. If you haven’t started modeling yet, it’s perfectly okay to add a geolocation to an empty file.
-
Choose File ⇒ Geolocation ⇒ Add Location from the menu bar.
A new window opens displaying a satellite map with a search bar at the top. (See Figure 8-16.)
-
Find the area where you want your model to be located.
You can type an address into the search bar in the upper-left corner if you like. You can also just use your mouse or the controls on the left side of the window to navigate. Scroll your mouse wheel to zoom; click and drag to pan.
When you’re zoomed in close enough, you see a white square: This is the largest snapshot you can import all at once. That’s still a very big area, so you probably want to keep zooming.
- Click the Select Region button to display a cropping rectangle.
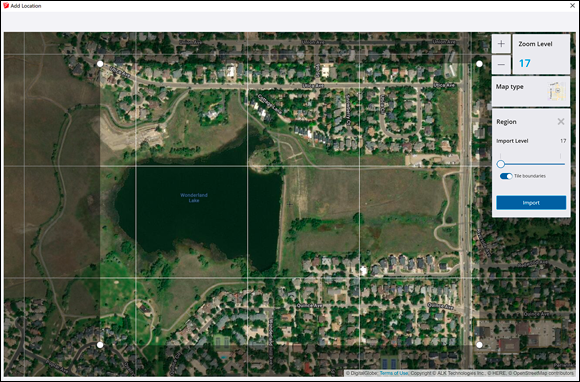
FIGURE 8-16: Use Add Location to add a satellite image to your SketchUp model.
-
Drag the pins to specify the precise corners of your geolocation snapshot, as shown in Figure 8-16.
Try to frame an area that’s just big enough to provide a base for your model. Importing too much terrain data can bog down your computer. You can always bring in more terrain data later.
-
Click the Import button to add a geolocation to your SketchUp file.
The separate window closes, and a big, colorful rectangle appears in the middle of your model. That’s your new geolocation snapshot.
-
If you’re geolocating a model you’ve built already, move it into position on the snapshot.
 Use the Move tool (and maybe the Rotate tool) to pick up your model and place it where it belongs. You’re not done yet, though — you still need to make sure your model is vertically situated on the terrain. Follow these steps to do just that:
 - Choose File ⇒ Geolocation ⇒ Show Terrain to switch to the 3D version of your geolocation snapshot.
- Select everything you want to move and use the Move tool to start moving; tap the up-arrow key to constrain your move to the blue axis.
- Sink your model into the terrain until it sits properly. Avoid the dreaded floating model syndrome at all costs.
Working with Imported CAD files
On the SketchUp Spectrum of Fun, importing and preparing CAD files is located right between latrine digging and cat milking; it’s not something many folks look forward to doing. This section is a collection of tips and tricks that have been developed in many years of dealing with other people’s CAD files.
Importing a CAD file into SketchUp Pro
This would probably be a great time to let you know (just in case you missed the heading right above this paragraph) that only SketchUp Pro can import CAD files in DWG and DXF format.
Your CAD file may be one you made yourself, but more likely you’ve received one from someone else. In that case, the absolute best thing to do is to open it in the same software that created it. If you have an AutoCAD file, open it in AutoCAD and take a look at it.
Other good news is that AutoCAD files can hold several different types of 3D objects, ranging from a simple line that has vertical thickness to full 3D solid models.
And the best news is that SketchUp will import any and all AutoCAD 3D objects, turning them into anatomically correct SketchUp components.
So far so good, but what if you don’t have AutoCAD? That’s okay; most SketchUp users don’t. You’ll have a fair amount of cleanup work to do in SketchUp after you’ve imported the CAD data, but it’s manageable. The section after this one describes a series of things you can do to wrangle the drawing into shape before you start modeling.
Actually importing CAD data into SketchUp Pro isn’t very complicated. Follow these steps, and you’ll do just fine:
-
Open a fresh new SketchUp file.
You can’t just open a DWG or DXF file in SketchUp Pro; you have to import the data into an existing model. We strongly recommend starting with a new SketchUp file because most CAD files are super complex. Bringing all that complexity — thousands of edges and tons of layers — into an already-complex SketchUp model is just asking for trouble. Keep things separate and stay sane.
-
Choose File ⇒ Import.
The File Import dialog box opens.
-
Choose AutoCAD Files (*.dwg, *.dxf) from the Format drop-down list.
As with most applications that can open or insert several different file formats, you have to tell SketchUp what kinds of files you want to import before it will let you select them on your file system. This potentially saves you the effort of scrolling through a long list of file types that aren’t your current target.
-
Locate the CAD file (DWG or DXF) that you want to import and select it.
Don’t click Import just yet.
-
Click Options.
The DWG Import Options dialog box opens.
-
Set the Units to match the default measurement units of the CAD file you’re about to import.
If the CAD file is from someone in the United States, there’s a good chance the units are Inches or Feet. Other countries (wisely) use the metric system. If you have no idea what units to choose here, then start with Inches and see whether that works.
- Decide what to do about the other three options in the dialog box:
- Merge Coplanar Faces tells SketchUp to automatically combine adjacent faces that are coplanar into a single face. This can save you cleanup time if the CAD file you’re importing actually has faces in it, but CAD files rarely do unless they specifically contain a 3D model or models. If you select this check box and your import fails (it happens), try deselecting it the next time.
- Orient Faces Consistently instructs SketchUp to do its best to make sure that the faces in your imported data (if there are any) are all facing the same way. Again, this might save you some cleanup time, but it also might throw a wrench into your import process.
- Preserve Drawing Origin is useful if you’ll be importing more than one CAD file into the same SketchUp model. You might do this if you’re importing multiple floor plans of the same building and you want them to line up.
- Click OK to close the DWG Import Options dialog box.
-
Click Import.
And cross your fingers. With a few tries, you’re usually able to import the CAD data. If you get a failure message, try again with a different Units setting in the Import Options dialog box (step 6). If that doesn’t work, the file might have been saved in a CAD format that’s newer than the ones that your version of SketchUp Pro can import. Contact the person who sent you the file and ask them to save another copy for you in an older CAD format.
-
Take a look at the Import Results dialog box to see where you stand.
If, after the import progress bar goes all the way to the right and the import itself is successful, SketchUp Pro will present a dialog box with statistics about what it imported and what it ignored. The simple version is that CAD layers, blocks (which translate to components in SketchUp), and edges of all sorts are importable. Text objects, dimensions, and hatches (of the sort that denote different materials) aren’t. When you’re satisfied, click OK and breathe a sigh of relief.
Cleaning up imported CAD data
Most of the time, your imported CAD file looks something like the mess shown in the top image of Figure 8-17. Walls, grid lines, some symbols, and other stuff are all jumbled up, and it seems like you’re going to have to spend the rest of the week deleting edges. Probably not, actually — the following sections explain improvements you can make.
Switch to a style that’s easier to read
If you’re using a display style that includes lots of edge embellishments (such as Profiles, Extensions, and Endpoints), dense geometry of the sort in most CAD drawings looks like your model received an unwelcome visit from the Mascara Fairy. Yuck. Use the Styles panel to apply a style that’s plain and simple. We recommend either Shaded or Shaded with Textures, both of which you can find in the Default Styles collection. You can read all about styles in Chapter 10. Figure 8-17 shows what a difference a style can make.
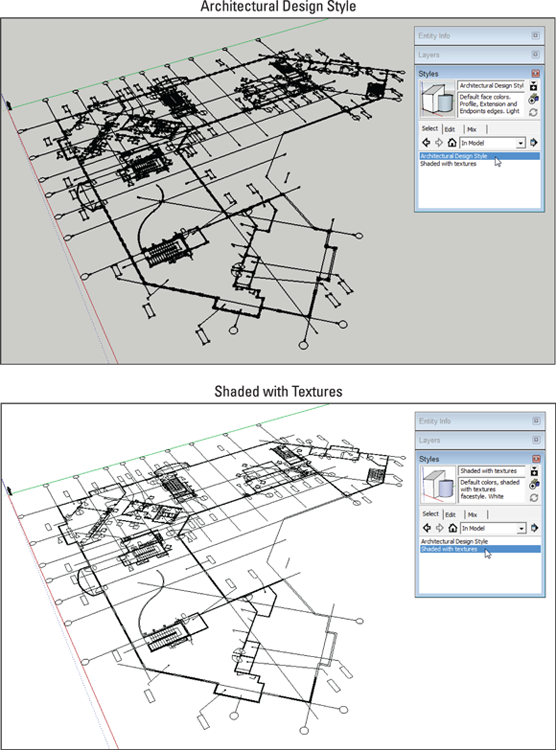
FIGURE 8-17: Applying a simple display style to a model with imported CAD data makes it a lot easier to work with.
Turn off tags you don’t need
Most of the drawing symbols and other annotations you brought into SketchUp aren’t things you need, at least right away. The simplest and safest way to get rid of them is to turn off their tags. Remember that SketchUp Pro also imports all of the layer information associated with the CAD data you brought in; now’s the time to use all of that complexity to your advantage.
Follow these steps to identify and hide the stuff you don’t need:
-
Open the Tags panel.
CAD files usually come with dozens of layers. Make the Tags panel nice and big so you can see more of them.
-
Open the Entity Info panel.
The Entity Info panel tells you which tag a selected entity is on.
-
Right-click any part of the imported CAD drawing and choose Edit Component.
As long as your model contains at least one entity when you do a CAD data import, SketchUp Pro automatically puts all the imported geometry into a single component. Whatever you do, try not to explode this component; you find out why later on in this chapter.
-
Select an entity that you don’t want to see right now.
In Figure 8-18, a grid line that we don’t think we’ll need for a while (or at all) is selected.
-
Look at Entity Info to see what tag contains your selected entity.
In this case, the selected grid line is on the A-GRID tag. Okay, maybe we didn’t need Entity Info to tell us that.
-
Find the offending tag in the Tags panel and turn it off.
In the second part of Figure 8-18, switching off the A-GRID Tag temporarily hides all the entities on that Tag. Better already! If you’re positive you won’t need the contents on a particular Tag, you can delete it altogether. Some people love holding onto stuff, digital or otherwise (and have the basement and hard drive to prove it), whereas others immediately throw out unneeded stuff, often finding that they need it an hour later.

FIGURE 8-18: Select things you don’t need and hide their tags.
-
Repeat steps 4–6 for all of the entity types you want to hide.
This part of the cleanup process is pure SketchUp catharsis. It takes time, but the results are immediately visible. The last part of Figure 8-18 shows the result of hiding a bunch of tags.
Modeling on top of imported CAD data
So you’ve successfully imported a CAD drawing and stripped down its style and visible tags to make it more manageable. Kudos — it’s time to start having some fun. Building a 3D model based on underlying (literally) CAD linework can be a surprisingly Zen experience if you follow one simple rule:
Here are three reasons why:
- CAD data is almost always full of gaps. Lines that should extend all the way to their neighbors are sometimes short by tiny, invisible amounts, meaning you’ll spend hours drawing edges and trying to figure out why faces won’t appear where you want them to.
- CAD lines that should be parallel to one of the colored axes often aren’t. Think that edge is parallel to the red axis just because it looks like it might be? Not necessarily. Blithely turning imported edges into faces and then pushing/pulling them into 3D geometry is like building a house on quicksand; things get wonky quickly.
- Imported CAD drawings aren’t always flat. Sometimes different parts of your imported linework are located at slightly, maddeningly different heights. We’re talking thousandths of an inch — not enough to notice initially but certainly enough to mess up your work.
The main reason that CAD drawings contain the foregoing problems is because the creator of the file didn’t learn AutoCAD from AutoCAD For Dummies. These problems wouldn’t exist if the creator of the file had followed good CAD practices.
Instead of trying to use the imported edges as part of your 3D model, use them as references for new geometry that you draw on top of them. Tracing the imported geometry doesn’t take as much time as you’d think, and the result is a model whose geometry is far more accurate and predictable. The following two sections talk about strategies for “tracing” imported CAD content.
Modeling straight vertical walls based on imported CAD edges
There’s a technique for modeling simple walls and other straight elements on top of imported CAD linework that’s so simple and enjoyable that audiences regularly applaud when it is shown in a live demonstration. The credit for this method goes to our friend (and colleague) Mike Tadros.
The Push/Pull tool is the hero of this method. Follow these steps (see Figure 8-19) to model a straight wall based on edges in an imported CAD drawing:
-
Use the Axes tool to line up the colored modeling axes with the wall you’re about to model.
If the axes are already parallel to the wall, you can skip this step. If not, just choose Tools ⇒ Axes and line up the modeling axes with an edge in the CAD drawing that represents the wall you’re working on.
-
 Draw a rectangle next to the wall.
It doesn’t matter how big it is; you’ll see why in a moment.
-
 Use the Push/Pull tool to extrude the rectangle up to the height of the wall you’re modeling.
If you don’t know it just yet, just guess. It’s easy to change this later.
-
Use the Push/Pull tool to extrude the box you just made so that it’s flush with one side of the wall.
If you drew the rectangle in step 2 to the outside of the wall, push/pull the face so it’s flush with the inside of the wall. (See Figure 8-19.)
The key to this step is pure SketchUp Inferencing 101: Click to start pushing/pulling, hover your pointer over the edge (or its endpoint) that you’re aiming for, and then click again to stop pushing/pulling. You’re using the imported CAD edge as an inferencing reference for your tool. It’s a piece of cake after you’ve done it once or twice.

FIGURE 8-19: Modeling a simple wall based on a couple of edges in an imported CAD drawing.
-
Use the Push/Pull tool to make the opposite face of the box flush with the other side of the wall.
See what’s happening? You’re using the Push/Pull tool and carefully chosen inferences to turn the box into the wall.
-
Push/pull the ends of the 3D wall so they match the underlying drawing.
We told you this was fun.
What happens when walls meet up at corners? Well, that can happen at right angles (which is common) or at other angles (which isn’t uncommon).
MODELING RIGHT-ANGLED WALLS
For 90-degree corners, all you have to do is draw a rectangle on the inside face of your wall and use the Push/Pull tool to extrude it out. After that, use the same tool to make it flush with the edges in the CAD drawing. Figure 8-20 provides a visual.

FIGURE 8-20: Use the Rectangle and Push/Pull tools to model walls that meet at right angles.
MODELING WALLS THAT MEET AT NON-RIGHT ANGLES
If you’re dealing with a corner that isn’t 90 degrees, you can proceed in a few different ways; using the Intersect Faces tool is a great place to start. The following steps (and Figure 8-21) elaborate on the technique:
-
Model each straight wall segment independently but don’t overlap their ends just yet.
Follow the steps in the section “Modeling straight vertical walls based on imported CAD edges,” a few pages earlier, to build each wall so it’s parallel with the CAD edges to which it corresponds. Don’t worry about the two wall ends that will eventually meet; keep them apart for now.
-
 Use the Push/Pull tool to extend each wall well past the point at which it should meet the other.
You’re modeling something that looks like an X from above.
-
 Select the inside and outside faces of each wall (using the Select Tool + Shift key).
You should have a total of four faces selected.
-
Right-click your selection and choose Intersect Faces ⇒ With Selection.
This action tells SketchUp to draw an edge wherever two faces intersect. If you had four faces selected, you should now have two new edges.
-
Use Push/Pull to push away the wall segments you don’t need.
Pushing their top faces all the way down to their bottom faces makes them disappear.
 Use the Eraser tool to get rid of any extra edges.
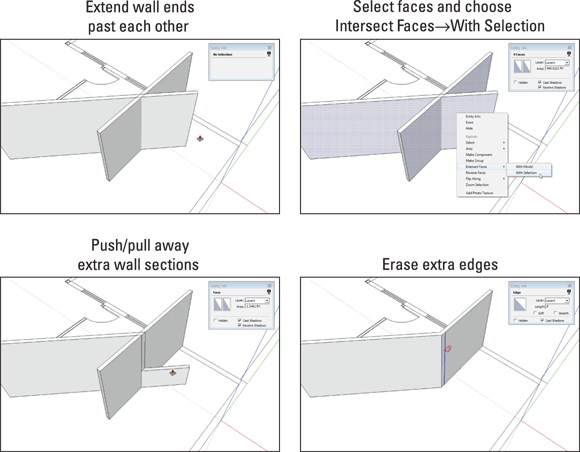
FIGURE 8-21: Use Intersect Faces to model walls that form non-90-degree corners.
Modeling curved and irregular forms from CAD data
For rectilinear walls, stairs, and other shapes, SketchUp’s Rectangle and Push/Pull tools are rock stars. Rounded forms (such as concrete patios and castle turrets) and irregular lines (such as riverbeds and Frank Gehry buildings) call for other, more drastic measures.
The following steps give a general example dealing with features in your CAD file that aren’t worth painstakingly tracing with the Line tool but which need to appear in your SketchUp model. In these situations, you can rely on the handy Paste in Place command:
-
 Dive into the component that contains the imported CAD linework.
By “dive into,” we mean edit it, which you can do by double-clicking it with the Select tool.
- Select the edges you want to reuse.
-
Make a group out of the edges.
Right-click and choose Make Group. Grouping your selection accomplishes two things: Grouping makes reselecting it easier (in case things go awry), and it keeps things nice and separate for the next couple of steps.
- Choose Edit ⇒ Copy.
-
Stop editing the CAD linework component.
You can exit a component (or a group) by clicking with the Select tool somewhere outside its bounding box.
-
Choose Edit ⇒ Paste in Place.
Voilà! The edges in question are now a part of your model, and (thanks to step 3) are quarantined from the rest of your geometry by means of a group.
For shapes that are made up of simple arcs (segments of circles), your best bet is to try to re-create them by using SketchUp’s Arc tools. Why not just use the Paste in Place method (described in the preceding steps) to copy them? For arcs, it’s nice to have control over their number of sides, and drawing them from scratch is the only way to do that.
Follow these steps to accurately trace an arc from underlying CAD linework (see Figure 8-22):
-
 Draw an edge that’s perpendicular to one of the arc’s line segments, heading in the direction of the arc’s center point.
You can use SketchUp’s Perpendicular linear inference to help you draw a perpendicular edge. This is the first step in figuring out the precise location of the arc’s center point.
-
Repeat step 1 for another of the arc’s line segments, crossing your new edge over the one you just drew.
The point at which these two edges intersect is the center point.
-
 Erase two of the edges that you just drew, leaving a small V that points to the arc’s center point.
Look at the third image in Figure 8-22 to see which two edges are being referred to.

FIGURE 8-22: The Arc tool lets you easily draw arcs with a given radius.
-
 Choose Draw ⇒ Arcs ⇒ Arc to activate the Arc tool.
What is now called 2 Point Arc used to be SketchUp’s only Arc tool; it works by first setting endpoints and then setting a bulge. The new(ish) Arc tool, which is called simply Arc, lets you start by defining a center point; this is much more useful for situations like the one you’re in now.
-
Click once to set the center point of your new arc.
This is, of course, at the tip of the V you drew in step 3.
- Complete the arc by clicking to set each of its endpoints.
-
(Optional) Change the number of edge segments in your new arc.
Before you move onto anything else, type the number of segments you want, followed by the letter s, and then press Enter. Most likely, you want more than the default 12 segments on arcs that represent major features in your design.
 AutoCAD files can contain a huge list of different object types, including but not limited to lines, arcs, circles, rectangles, ellipses, text, all of the preceding but with Z-direction thickness, the previous items but with Z-direction elevation above the X-Y plane, 3D surface models, 3D solid models, dimensions, leaders, hatches, text objects, dimensions, and hatches (of the sort that denote different materials), and several types of text. Also, any type of object can exist on more than one layer, and any one layer can hold more than one object type. (Does your brain hurt yet?) The good news is that SketchUp ignores text objects, dimensions, and hatches.
 If you are working from the AutoCAD drawing that shows an existing building, be aware of the fact that it may not always accurately depict the “as-built” structure. In the days of paper-and-pencil drawings, a drawing got flipped over during the blueprinting process. The as-built structure was a mirror image of the original drawing.