
Chapter 2. RUNNING AND CONFIGURING WINDOWS USING BOOT CAMP
After you’ve installed Windows XP on your Mac via Boot Camp, you can start up under Windows and your Mac will behave (mostly) just like a PC designed to run Windows. In this chapter, you’ll learn how to choose which OS you want to use during the startup process and how to set a default OS. You’ll also learn how to perform some basic Windows XP configuration tasks. This chapter also includes some information about how running Windows on a Mac is different from running Windows on a PC designed to run it.
note
This chapter is based on Windows XP Home Edition. There are some slight differences between that version and the Professional version. Fortunately, for the topics of this chapter, these differences aren’t significant and you don’t need to worry if you see a slightly different screen than those in this chapter’s figures.
Starting Up in Windows XP
Starting a Mac up in Windows XP is straightforward, as the following steps show:
- Restart your Mac if it is running or power it up if it is shut down.
- When it begins to restart, hold the Option key down until the startup volumes available are shown. The current startup volume will be highlighted and will have an arrow pointing to it.
- Select the Windows volume and press the Return key. (If you still have the Windows Installation CD installed in your Mac, it will appear as a startup option. You should choose that only if you need to repair or reinstall Windows.) Windows will launch and you’ll see its splash screen.
If you configured more than one Windows user account during the installation process, you’ll see the Login screen. If you configured only one user account, you’ll be logged in to that account automatically.
- Click the user account under which you want to log in. The settings for that account will be loaded, and you’ll see the Windows desktop (see Figure 2.1). The Start menu will be opened automatically. Welcome to Windows….
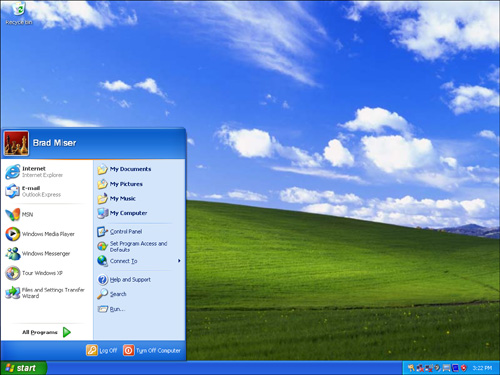
Figure 2.1 Is this a Mac or a Windows PC? (It’s a MacBook.)
note
Soon after the Windows desktop appears, you’ll see a warning that the computer isn’t protected from viruses. Click the x to close the warning for now; you’ll learn how to protect Windows later. You’ll also be prompted to take a tour of Windows XP. If you’ve not used Windows XP before, this can be helpful, although you’ll also get a mini-tour of Windows a little later in this chapter.
Installing Mac Drivers in Windows XP
As soon as you start using Windows, you’ll want to install the Mac drivers from the CD you created during the setup process you ran using the Boot Camp Assistant. These drivers will make Mac hardware more compatible with the Windows OS. Install these drivers with the following steps:
- Double-click the My Computer icon on the Windows desktop or choose Start menu, My Computer. The My Computer window will open (see Figure 2.2).

Figure 2.2 Use the My Computer window to access the drives and other devices available to Windows.
- Select the Windows Installation CD and click the Eject This Disk link in the System Tasks pane located in the upper-left corner of the screen. (Skip this step if the Windows Installation CD isn’t in your Mac.) The XP disc will be ejected from your Mac.
- Insert the Mac Drivers CD you created during the Boot Camp Assistant installation process. After it is mounted, you’ll see the Choose Setup Language dialog box.
- Select your language and click OK. You’ll see the InstallShield Wizard dialog box that will show you the progress of the installation process. After that part of the process is complete, you’ll see the Macintosh Drivers for Windows XP dialog box.
- Click Next.
- Click Yes on the License Agreement screen. You’ll see additional progress screens as installation continues.
- When Hardware Installation or Software Installation dialogs appear, click Continue Anyway in each one to clear them. These dialogs indicate that Windows has found hardware or software that hasn’t passed Windows logo testing, which means that Microsoft hasn’t officially certified what it found. This doesn’t mean that the hardware or software won’t work; just that Microsoft hasn’t certified it.
The Windows Found New Hardware Wizard dialog box might also appear at various times during the process. Complete steps 8–11 to work through all Windows Found New Hardware Wizard dialog boxes that appear.
- Click the Yes, Now and Every Time I Connect a Device radio button.
- Click Next.
- Choose the Install the Software Automatically [Recommended] option and click Next. The wizard will search for the correct driver and will attempt to install it. When it does, you’ll see a screen telling you that the software was found and installed successfully. (Because you are installing the drivers from the Macintosh Drivers CD, the software should be found.)
- Click Finish.
- Repeat step 7 as many times as it takes to reach the InstallShield Wizard Complete dialog box.
- Click the Yes, I Want to Restart My Computer Now radio button and then click Finish.
- As the Mac restarts, hold the Option key down.
- Choose the Windows startup disk and press the Return key. After Windows starts up, you’ll return to the Windows Login screen. (If you only have one user account, you’ll move to the Windows desktop.)
- Select the user account under which you want to log in to Windows. The Windows desktop will appear. You might notice that it has a better resolution now because drivers for the display have been installed.
- Eject the Macintosh Drivers CD and keep it with your Windows Installation CD in case you ever need to reinstall Windows on the Mac.
note
As mentioned in the introduction, this book won’t teach you how to use Windows. I’ve assumed that you’ve used Windows to some extent, or have at least seen it a couple of times, and know something about it. Although the steps I provide for specific tasks will work whether or not you understand Windows, I don’t attempt to explain how Windows is organized, the differences between it and Mac OS X, and so on. If you’ve never seen or used Windows before, you should consider taking the Windows XP tour or getting a book on the Windows OS. Although it works similarly to Mac OS X, there are many differences, too. If you have at least a passing familiarity with Windows XP, you’ll find the information you need to get it running on your Mac.
Configuring Windows XP
Just like Mac OS X, Windows XP enables you to configure many different aspects of the operating system to suit your preferences. In this section, you’ll learn how to perform some basic configuration tasks to tweak Windows on your Mac.
If you used versions of Mac OS prior to Mac OS X, you might recall the control panels that you used to configure the operating system. Windows adopted and still uses that model, so if you can remember that far back, working with the Windows Control Panel will come easily. If you’ve used Mac OS X’s System Preferences application, the Windows Control Panel will also seem familiar.
To open and configure the Control Panel, do the following:
- Choose Start menu, Control Panel. The Control Panel will open in the default Category view.
- Click the Switch to Classic View link in the Control Panel pane located in the upper-left corner of the window. You’ll see the control panels shown individually instead of grouped into categories (see Figure 2.3). Many Windows users (myself included) prefer this view because it makes getting to individual control panels faster and easier.
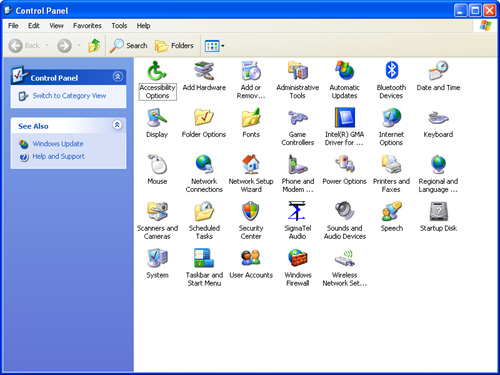
Figure 2.3 The Windows Control Panel (shown here in Classic view) provides access to tools you can use to configure Windows XP.
- To open a control panel, double-click its icon. The panel will open and you’ll be able to use its controls (see Figure 2.4).
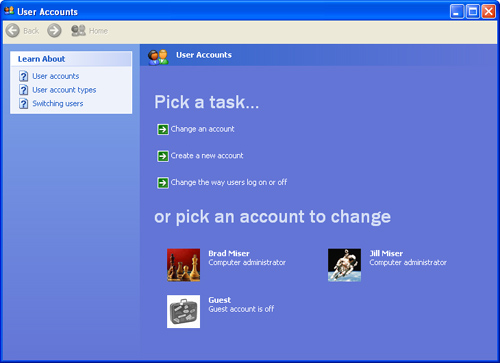
Figure 2.4 Here is the User Accounts control panel that enables you to configure Windows XP user accounts.
In the following sections, you’ll learn about some of the more important control panels that you are likely to need to use. These sections don’t cover all the Windows control panels, and some control panels are covered in other chapters. (For example, the Internet Properties control panel is covered in Chapter 3, “Networking and Connecting to the Internet Using Windows”).
Adding and Removing Software
Despite its name, the Add or Remove Programs control panel is typically used more frequently to remove applications installed under Windows than it is to install them. That’s because most Windows applications come with an installer application that installs the application for you so that you don’t need to use the control panel to do so. However, you should always use this control panel to remove applications from Windows. When most Windows applications are installed, multiple files are installed in various locations and changes to the underlying operating system code are made. Using the remove function of this control panel will give you the best chance for uninstalling an application, removing its associated files, and undoing system changes that were made when the application was installed.
When you open the Add or Remove Programs control panel, it will generate a list of all the applications installed under Windows and present them in the Currently Installed Programs section of the panel (see Figure 2.5).
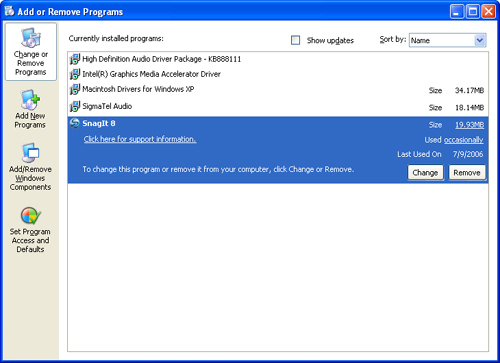
Figure 2.5 There aren’t too many Windows applications installed on this Mac yet.
Along the left side of the panel are buttons that change the mode in which the panel is operating. These are as follows:
- Change or Remove Programs This option is the default and enables you to remove or change installed applications.
- Add New Programs You aren’t likely to use this option very much, but if you select it, you can choose to install applications from a disc or file. You can also install new Windows features, drivers, and such by clicking the Windows Update button.
- Add/Remove Windows Components This button will open the Windows Components Wizard. This wizard enables you to configure various Windows components, such as default applications (for example, Outlook Express, which is Windows’ default email application), system components, and so on.
- Set Program Access and Defaults This function enables you to configure the default applications for a specific task, such as browsing the Internet or working with email. When you select this option, you’ll see three radio buttons. If you choose the Microsoft button, standard Microsoft applications will be used as the defaults. If you choose Non-Microsoft button, applications from companies other than Microsoft can be used. If you choose the Custom button, you can set specific default applications, whether or not they came from Microsoft (see Figure 2.6).

Figure 2.6 The Custom option enables you to customize your default Windows applications.
To remove an application, select the Change or Remove Programs button in the left side of the Add or Remove Programs window. Then select the application you want to remove. Information about your usage of that application will appear on the right side of the window along with the date on which you installed it. To remove it, click Remove. The appropriate uninstaller will launch and, hopefully, will remove the application and all of its components.
As you explore Windows, you’ll probably add quite a few applications to it. Remember to periodically visit this control panel and remove any applications that you don’t use. It’s likely that your Windows disk partition will be relatively small and removing applications you don’t use will help you avoid running out of room.
Configuring Automatic Updates
Windows is subject to constant attacks of various kinds. Microsoft regularly releases updates to Windows, most of which are to correct a security problem. Use the Automatic Updates control panel to configure how you want to handle these updates. When you open the Automatic Updates control panel, you’ll see the following choices (see Figure 2.7):

Figure 2.7 You should use one of the automatic update options to keep your Windows software current.
- Automatic With this option, Windows will automatically check for updates and then download and install any that it finds. You can choose the timing of these checks using the two drop-down lists. You should use this option so that you don’t have to worry about updates; Windows will handle them for you automatically.
- Download Updates for Me, but Let Me Choose When to Install Them The difference between this option and Automatic is that Windows will download updates automatically, but will prompt you for permission to install them.
- Notify Me but Don’t Automatically Download or Install Them I don’t recommend this option because all it does is tell you when updates are available. You’ll have to choose to download and install them manually.
- Turn Off Automatic Updates I definitely don’t recommend this option. This disables any automatic update functions, so you’ll have to manually check for, download, and install updates. Because you aren’t likely to do this regularly, you’d probably be leaving your Windows system more vulnerable than necessary.
For any of the automatic options to work, your Windows system must be able to connect to the Internet. I recommend you not set that up until you’ve configured appropriate protection for it, which is explained in the next chapter.
Setting the Windows Date and Time
Like the Mac, Windows has a date and time function that enables you to manually set the date and time or configure Windows to use a network time server. When you open the control panel, you’ll see three tabs (see Figure 2.8).

Figure 2.8 Use the Date and Time Properties control panel to set your Windows’ calendar and clock.
Use the Date & Time tab to manually configure the Windows date and time settings; the controls on this tab are straightforward.
Use the Time Zone tab to select your time zone by choosing it on the drop-down list; you can use the check box to turn off Daylight Saving Time if your location doesn’t use it.
Tip
If you switch between the Mac OS and Windows frequently, you’ll definitely want to use the time server option. Each time you switch the OS, Windows will lose its time and date setting. If you use the time server option, it should correct its time and date for you automatically each time you move back into Windows.
Use the Internet Time tab to configure Windows to use an Internet time server. Check the Automatically Synchronize with an Internet Time Server check box. Then choose a time server on the drop-down list (the time.windows.com server is selected by default and will work for most people). Click the Update Now button to set the current date and time based on the server you selected. Of course, Windows must be able to connect to the Internet for this to work. You can configure this now and after you’ve connected your Windows system to the Internet, the date and time will be set for you.
After you made your changes, click OK to save them and close the control panel.
note
Many control panels have Apply and OK buttons. Apply saves any changes you have made and immediately applies them. OK does those things too, but it also closes the control panel. So, click Apply when you want to make changes immediately, but also want to continue working with the control panel. Click OK if you are done working in the panel and are ready to close it.
Configuring the Windows Display
The Windows Display Properties control panel enables you to configure various display settings, including resolution, desktop picture, and so on (see Figure 2.9).

Figure 2.9 The Settings tab of the Display Properties control panel enables you configure the display’s resolution.
The Display control panel has the following tabs:
- Themes Use this tab to choose the theme Windows is using; themes include a desktop picture, title bar and other colors, icons, sounds, and other customizable elements of the Windows interface.
- Desktop The Desktop tab enables you to choose and configure a desktop picture. You can use one of the Windows default images or you can choose your own. You can also position the image and choose a color for the border around it when the image doesn’t fill the entire desktop.
- Screen Saver Use this tab to set the screen saver. You can choose from the default Windows screen savers and then configure various options for them. Depending on the specific hardware (such as the graphics card in your Mac) you are using, the screen saver might or might not work according to its settings.
If the screen saver doesn’t work with the hardware you are using, be careful if you leave Windows running for long periods of time. Leaving a static image displayed for a long time can damage some kinds of displays. Also, if you are using a MacBook or MacBook Pro, leaving the display active at all times can consume lots of power. If you are using a mobile Mac, you can close the lid to put the system to sleep when you aren’t using it. If you are using a desktop Mac, you might need to manually activate the screen saver by clicking the Preview button on the Screen Saver tab.
- Appearance With the Appearance tab, you can change the colors and style of windows and buttons, choose a color scheme, and default font size.
- Settings This tab configures the monitors you use. To configure a display, select its icon (click the Identify button to view each display’s number) and use the Screen Resolution slider to configure the resolution for that display. Use the Color Quality drop-down list to set the number of colors used; however, this should almost always be left at the maximum, which is 32-bit. If you have more than one display available, check the Use This Device as the Primary Monitor check box for the display on which you want the Windows taskbar to appear. Check the Extend My Windows Desktop onto This Monitor check box to enable a display. The panel’s Advanced button provides access to a number of advanced settings that are beyond the scope of this chapter (and that you aren’t likely to need to use anyway).
note
The Settings tab will often display a “mystery” display that isn’t connected to your computer (for example, Figure 2.10 was taken on a MacBook using only its built-in display). This can occur when there is more than one driver for the same display or video card and for other, less sensible reasons. You can safely ignore these phantom displays, although they can make working with multiple displays under Windows more difficult than it should be.
Configuring the Keyboard in Windows
The Keyboard Properties control panel enables you to set basic properties of the keyboard you are using, such as repeat delay, repeat rate, and the cursor blink rate. Use the respective sliders to configure these properties of the keyboard you are using.
Configuring the Mouse/Trackpad in Windows
The Mouse Properties control panel also has a number of tabs, which are as follows (see Figure 2.10):

Figure 2.10 Does configuring a mouse really need to be this complicated?
- Buttons This tab configures the buttons on a mouse. You can set the primary (left by default) and secondary (right by default) buttons, configure the double-click speed, and enable ClickLock (you can drag things without holding a mouse button down).
Tip
Windows is designed to use a two- (or more) button mouse, so you should definitely use one when you work with it. Of course, you get the most from Mac OS X with at least two buttons on a mouse, but many Mac fans aren’t big fans of Apple’s Mighty Mouse. If you use a MacBook or MacBook Pro, you’ll also want to have a mouse handy most of the time because their trackpads have limited functionality under Windows.
- Pointers This tab enables you to change all sorts of things about the pointer, including the type of pointer that Windows uses. You can choose from among many schemes Windows includes and you can customize schemes if you want to.
- Pointer Options These settings are more practical than those on the Pointers tab and include pointer speed, snapping, and visibility settings. (If you want to be mesmerized, turn the pointer trails option on and move your mouse around.)
- Wheel Use this tab to set the speed at which the scroll wheel on a mouse moves, either based on number of lines or by one screen per roll.
- Hardware You probably won’t need to use this tab, which enables you to view the properties of the mice connected to your Mac and to open the Windows troubleshooter should you ever have trouble with a mouse.
note
The trackpads on MacBooks and MacBook Pros don’t have the “extra” functionality under Windows that they do under Mac OS X. Although you can move the pointer and click the button, you can’t do the other functions you might be used to, such as double-clicking the trackpad, scrolling with it, and so on.
Configuring Energy Settings
The Power Options Properties control panel enables you to configure the energy settings for Windows, such as when the display shuts down, when hard disks power down, and when the system goes into standby. However, because these functions are so closely tied to the hardware on which Windows is running, whether or not these functions work depends on the Mac you are using and the version of Boot Camp you are running.
To experiment with these settings, open the Power Schemes tab and use the drop-down lists to configure the times at which you want the monitor to turn off, the hard disks to shut down, and the system to go into standby (called sleep on the Mac).
Let the system sit idle for the shortest time you configured. If the appropriate action occurs, such as the display shutting down, you can configure the rest of the settings. If it doesn’t occur, you’ll probably have to manage power manually.
Tip
You can put a MacBook or MacBook Pro to sleep by closing its lid. When you open the lid and the system wakes up, you’ll need to log in to Windows again, but when you do, you’ll be back where you left off. Depending on how you are using Windows, such as being connected to network drives, unexpected results can occur when you shut your Mac’s lid. It’s a good idea to save all your open files before you do so.
Configuring Sounds in Windows
The Sounds and Audio Devices Properties control panel enables you to configure various audio settings (see Figure 2.11).

Figure 2.11 The Volume tab of the Sounds and Audio Devices Properties control panel enables you to set the current volume level and to choose a speaker configuration.
The tabs of this control panel are as follows:
- Volume Use the slider on this tab to set your system’s volume level using the slider. You can mute the sound output with the Mute check box. Click the Advanced button in the Device Volume section to set the relative volume levels for CDs, general system sounds, and so on. Use the Speaker Volume button to set the balance between left and right channel volume. Use the Advanced button in the Speaker Settings section to choose a sound profile for the speaker system you are using.
- Sounds This tab enables you to set the sounds that are associated with specific events. You can use the Sound Scheme drop-down list to choose an overall scheme. In the lower part of the window, you can then select specific events and choose the sound associated with them to customize the current scheme.
- Audio, Voice, and Hardware These tabs are used to configure specific audio devices. Because you are using a Mac to run Windows, it’s likely that you’ll just want to leave these settings at their defaults.
Configuring the Taskbar and Start Menu
The Windows taskbar is a very important element of the OS because it provides information to you as well as enabling you to control the system by choosing files or applications to open, managing open applications, and so on. The Start menu is also important because you can use it to quickly navigate to just about anything on the Windows partition of the computer. You can configure various properties of these elements with the Taskbar and Start Menu Properties control panel (see Figure 2.12).
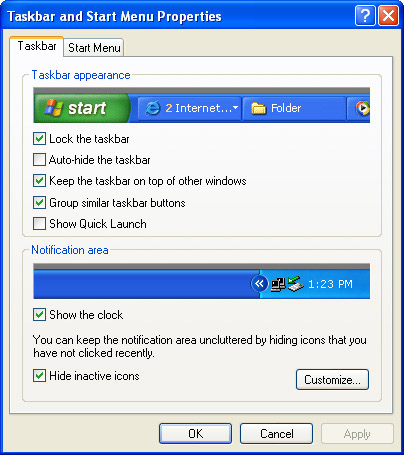
Figure 2.12 Use the Taskbar tab of the Taskbar and Start Menu Properties control panel to determine how your Windows taskbar looks and works.
The Windows taskbar is similar to Mac OS X’s Dock in some ways, such as being able to use it to manage open applications, launch applications and documents quickly, and so on.
On the Taskbar tab, you’ll find the following options:
- Lock the Taskbar With this enabled, the taskbar will be locked in its current location and at its current size. If this check box is unchecked, you can move the taskbar and resize it with the mouse.
- Auto-Hide the Taskbar When you enable this, the taskbar will disappear when you aren’t pointing to it.
- Keep the Taskbar on Top of Other Windows With this active, the taskbar always stays on top of any windows open on the desktop so that you can use it regardless of the windows you have open.
- Group Similar Taskbar Buttons When you open applications and windows within applications, each will be shown as a button on the taskbar. When this option is selected, similar windows are grouped together. For example, if you have multiple Internet Explorer windows open, each of their buttons will be next to each other on the taskbar.
- Show Quick Launch The Quick Launch section appears just to the right of the Start menu. You can drag icons to this area so that you can launch items by clicking their icons. If this check box is checked, you’ll see the Quick Launch area and you can add icons to it.
- Show the Clock With this checked, the time is displayed on one end of the taskbar (the right end with the taskbar at the bottom of the desktop).
- Hide Inactive Icons By default, the Windows System Tray appears on the right side of the taskbar. The System Tray presents application and other icons that you can click to open specific controls or to perform actions. If you check the Hide Inactive Icons check box, icons that aren’t actively in use (perhaps the related application is not running) aren’t shown in the System Tray. You can click the Customize button to configure specific icons in the System Tray. For example, you might want most inactive icons to be hidden, but want a specific icon to be available whether the associated application is running or not.
Use the Start Menu tab to customize your Start menu. There are two basic options. Click the Start Menu radio button to use the standard XP Start menu. Click the Classic Start Menu radio button to use the Start menu from older versions of Windows. After you’ve selected a Start menu configuration, use the Customize button to configure it. For example, you can choose specific applications (such as your web browser) and folders to include on the menu.
Configuring Windows User Accounts
Like Mac OS X, Windows XP supports multiple user accounts. When you installed Windows, you created at least one user account. Access the User Accounts control panel to set up more user accounts and to configure the user accounts that have been created (see Figure 2.13). For example, you can click the Create a New Account link to create new user accounts. Or, you can click the Change an Account link to reconfigure an existing account. Most user account tasks are accomplished by clicking the link for the action you want to complete and then filling in any required information.

Figure 2.13 If you’ll be sharing Windows on your Mac, you can create multiple user accounts for others to use.
Activating Windows XP
Like most software companies, Microsoft is very concerned with piracy and has taken steps to try to prevent people who haven’t obtained Windows legitimately from using it. One of the steps that Microsoft has implemented in Windows is activation. During activation, a unique identifier is created for your Windows installation based on your Windows product key and the hardware you are using. This identifier is required to run Windows after it has been installed on a computer for 30 days. When you activate a computer, this identifier is transmitted to Microsoft. Should this same identifier be provided during a different activation session, the activation would be denied and the copy of Windows could not be used.
As you work with a new Windows installation, you’ll be prompted to activate it. You’ll also see a countdown toward the 30-day activation deadline. Until you reach 30 days after the installation date, activation won’t affect your use of Windows except for the regular prompts you’ll see. After 30 days, you’ll have to activate Windows to be able to use it.
After you’ve activated Windows on a specific computer, you won’t be able to use it on a different computer (which is the whole point). To do so, you’ll probably have to call Microsoft to have the original activation disabled (which means you won’t be able to use Windows on the original computer on which you installed it).
note
Because activation is based on a specific piece of hardware, you don’t need to worry about it preventing you from reinstalling Windows on the same computer. You can reinstall Windows on the same Mac as many times as you’d like. Activation will affect only the installation of Windows on a different computer on which a specific copy was activated.
Because of this, I recommend that you don’t activate Windows until you must to keep it running. This will give you 30 days to use it and make sure that you’ve set it up on the Mac on which you’ll want to run it over the long run.
When the 30-day grace period is close to expiring, the easiest way to activate Windows is via the Internet (you shouldn’t enable an Internet connection until you’ve followed the security measures explained in the next chapter).
note
If you are going to try the virtualization option explained in Part II, “Running Windows on a Mac Using a Virtual Machine,” which you should try, don’t activate Windows until you’re sure which method you’ll end up using. The activation process treats each Windows environment as unique, so you can only activate one of them: either the Boot Camp environment or the virtual Windows environment. If you want to activate both, you’ll need to purchase a second license for Windows.
After you’ve protected your Windows installation and established a connection to the Internet, you can activate your copy of Windows by choosing Start menu, All Programs, Activate Windows. The Activation Wizard will appear. Choose the Yes, Let’s Activate Windows over the Internet Now radio button and click Next. Follow the onscreen instructions to complete the activation process.
Understanding Differences Between Running Windows on a Mac Versus a PC
Although running a Windows on a Mac via Boot Camp enables you to run most of the Windows applications you’ll want to use, there are some differences between running Windows on a Mac and on a PC designed for Windows. These differences include the following:
- Some Mac hardware won’t work under Windows Even though a lot of the hardware you use with your Mac while running Mac OS X will work when you are running Windows (you might need to install drivers under Windows as you’ll learn in Chapter 5, “Running Windows on a Mac Using Boot Camp”), some of it won’t. There are several known examples of this, including Apple Remote Controls, Apple Bluetooth keyboards, and so on.
note
Interestingly, Windows does recognize a built-in iSight camera as a device. You will only be able to use it after you’ve installed the drivers on the CD you created. If your Mac has one of these, you’ll see it in the My Computer window; open to use it.
- Some Windows hardware won’t work under Windows on the Mac Because Mac hardware is different than the standard Windows PC, some hardware devices won’t work on the Mac even if you are running the required version of Windows. If there is specific hardware you want, you should contact the manufacturer to see whether there are any issues related to using that hardware with a Mac running Windows. (The manufacturer might not be able to tell you, but it’s probably worth a shot.) If you can’t find any specific information about this, you can always try it with the risk that you might have to return the device if you can’t get it to work. The most likely hardware to be incompatible are advanced audio or video devices. (Of course, the Mac’s audio and video software is so good. I don’t know why you’d want to use Windows for audio or video tasks anyway.)
- Some Windows software might not work under Windows on a Mac Windows software that interacts with specific hardware elements might not work under Windows on a Mac. The most likely culprits here are high-end games that are often tweaked to work with very specific Windows video cards.
- Windows command keys are different than Mac command keys Windows has a different set of command keys than does the Mac.
The Mac’s Option key is roughly the same as the Windows Alt key. For example, you can activate most Windows menu commands by pressing the Alt key and then the first letter of the menu name. The menu will open and you can press the activation key which is underlined in the command’s name (usually the first letter of a command’s name) to select it. This works for Windows on a Mac, but you press the Option key which is also labeled as the Alt key.
The Mac’s
 key is analogous to the Windows key on a PC. When you press it, the Start menu will open when you are viewing the Windows desktop and you can use the Arrow and Return key to make selections.
The Mac’s Ctrl key mostly maps to the Windows Ctrl key. However, the Windows Ctrl key is analogous to the Mac’s
key. For example, to save a document in an application under Windows, you’d press Ctrl+S instead of +S as you do under Mac OS X. - Some Mac keys won’t work under Windows Some keys on a Mac’s keyboard won’t function under Windows. These include Volume, Brightness, Eject, and other specialized keys.
- Ctrl+click doesn’t open contextual menus Under both operating systems, it’s important to be able “right click” on objects to open their contextual menus. If you use a two-button mouse, this is easy. If you use a one-button mouse or a MacBook or MacBook Pro with only the trackpad, you won’t be able to right-click on something using the Mac’s Ctrl+click option because it doesn’t work under Windows. Instead, use Shift+F10. (You can also try the right key on Apple keyboards to open a contextual menu; this doesn’t always work.)
- Some Windows configuration settings don’t work As you learned earlier, some Windows configuration settings don’t work when you run Windows on a Mac. These can include energy settings, screen savers, and so on.
Returning to Mac OS X
Being able to run Windows on a Mac is great, but the reason we have Macs is to run the Mac OS. To get back to where you belong, do the following steps:
- Choose Start menu, Turn Off Computer. The Turn Off Computer dialog box will appear.
Press the
key, and then Up arrow key, and then the Return key to get to the Turn Off Computer dialog box using only keys. - Click Restart.
- As your Mac restarts, hold the Option key down until you see the startup volume selection screen.
- Choose your Mac startup volume and press the Return key. You’ll be back where you belong (see Figure 2.14).
Figure 2.14 Ah, back home again.
Setting the Default OS
You’re probably going to prefer one operating system over the other. And because you’re reading this, I’m guessing that will be the Mac OS. But, you might need to run Windows more frequently for one reason or another. In any case, you can set the default OS that you want your Mac to use. (You can always override this setting by holding the Option key down when your Mac is starting up and choosing a different system.)
Setting the Default OS Under Mac OS X
Use the Startup Disk pane of the System Preferences application to configure your default OS:
- Open the Startup Disk pane of the System Preferences application (see Figure 2.15).
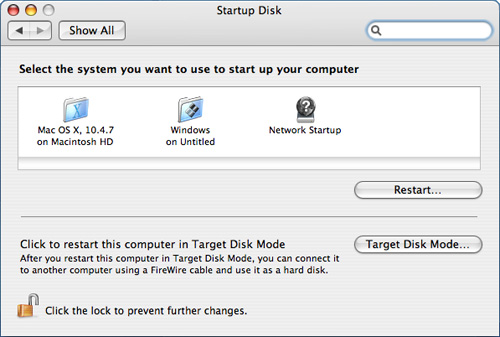
Figure 2.15 Mac OS X or Windows as the default OS—you make the call.
- Click on the startup volume containing the OS that you want to be your default.
- Click Restart.
- At the prompt, click Restart again. Your Mac will restart using the OS you selected and will restart in that OS each time you start it up (unless you override the default by using the Option key).
Setting the Default OS Under Windows XP
When you install Windows on a Mac, one control panel is added to Windows that isn’t there when you install Windows on a Windows PC. This is the Startup Disk control panel, which is the equivalent of the Startup Disk pane of the Mac’s System Preferences application.
To select a default OS under Windows, perform the following steps:
- Open the Startup Disk control panel.
- Select the volume you want to use as the default OS when you start your Mac. For example, if your Mac startup disk is called Macintosh HD, select that to start up in Mac OS by default.
- Click Restart and then confirm this is what you want to do at the prompt. Your Mac will restart using the OS you selected and will restart in that OS each time you start it up (unless you override the default by using the Option key).