
Chapter 4. PROTECTING YOUR WINDOWS ENVIRONMENT FROM INTERNET ATTACKS
Unless you’ve been living in a cave somewhere, you’ve no doubt heard of viruses, Trojan horses, worms, spyware, and other computer security issues. Although the Mac platform has been subjected to such attacks, they are far less frequent than they are in the Windows world. When you use a Mac—even if you use it heavily—you might run into these threats occasionally or never if you are particularly careful. On a Windows machine, you will run into them constantly no matter how careful you are. After you’ve connected your Windows environment to the Internet, you should immediately protect your computer from these threats.
Although the specifics of the threats you face from Internet attacks are numerous and complicated, they are of the following three general types:
- Hacks A hack is someone attempting to use your computer for some purpose, usually to use it to compromise some other computer, such as getting information from the hacked computer, using it to attack other computers, and so on.
- Viruses For simplicity’s sake, I’ve grouped a number of kinds of malicious programs as viruses. Although there are numerous specific kinds such as Trojan horses, worms, and so on, they all are similar in that they are programs that are installed and run on your computer without you knowing about them and for a purpose that, in almost all cases, won’t be good for you or for other people.
- Adware/spyware Like viruses, these programs are installed on your computer without your permission, usually as you browse the web. Their purpose is typically to gather information about you and report that information back to the organization that “provided” the program. They can also present advertising to you, again without your consent.
As soon as you connect your Windows environment to your network or to the Internet, you need to defend it against these kinds of threats. In this chapter, you’ll learn how to do this.
Protecting Your Windows Environment from Hacks
A very good defense against hacking is to shield the network through which you connect a Windows computer to the Internet using a router/hub that has NAT (Network Address Translation). In a nutshell, this enables the router/hub to shield the computers connected to it from the Internet. Outside devices can see the router/hub’s Internet address, but can’t see the address of any computers connected to it. What can’t be seen can’t be attacked.
In the previous chapter, I assumed that the Mac on which you are running Windows was connected to a network and to the Internet. In this chapter, I’m going to assume that you’ve connected that Mac to the Internet via a hub or router that uses NAT to protect it and other devices on your network from attacks. For example, if you use an Apple AirPort Base Station to create your network, it is protected by NAT. (If you need more information about this topic, see my book Special Edition Using Mac OS X Tiger.)
You can also use a firewall, which controls the traffic that is allowed to reach a computer. (Technically speaking, NAT is a form of firewall.) The firewall blocks the kinds of network traffic that are most likely to be attacks.
There are also hubs/routers designed for home use that include firewalls, but home hubs/routers more commonly use NAT. Using a hardware firewall is beyond the scope of this book because it’s unlikely you’ll use a hardware firewall unless you are managing a corporation’s or other organization’s network.
Both Mac OS X and Windows XP include a software firewall that you can configure to protect the computer from hacks. To configure the Windows Firewall, perform the following steps:
- Start up the Mac in Windows.
- Choose Start menu, Control Panel.
- Open the Windows Firewall control panel (see Figure 4.1).
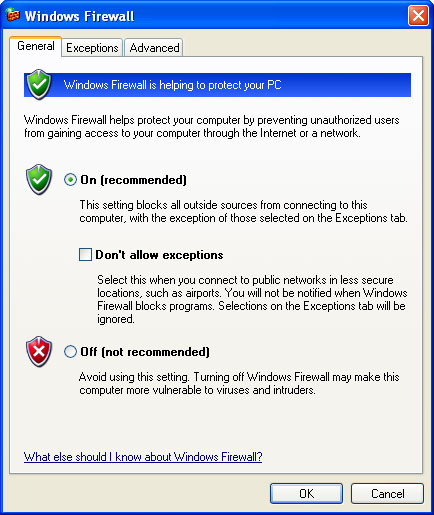
Figure 4.1 Turning the Windows Firewall on will lessen the chance that your Windows environment will be compromised by an Internet attack.
5. Click OK. The firewall will become active.
In most cases, the default firewall settings will be fine. However, you can configure the firewall in more detail by using the more advanced options in the control panel. These are beyond the scope of this chapter, but the following list provides a quick overview:
- Exceptions You can allow specific programs and services that might otherwise be blocked by the firewall to be allowed. To do this, use the Exceptions tab of the Windows Firewall control panel. You can add specific programs and network ports to the list of exceptions and then enable or disable those exceptions. When an exception is allowed, that service or port will be able to be used through the firewall.
- Advanced Settings The Advanced tab of the Windows Firewall control panel enables you to configure a number of different aspects of the firewall. These include configuring the firewall for specific kinds of connections, managing a log of firewall activity, and configuring ICMP (Internet Control Message Protocol).
Protecting Your Windows Environment from Viruses
The Windows world is packed full of viruses. There are constant attacks of viruses that come in many forms. Although many Mac users can get by with only “common sense” virus protection, it is not optional in the Windows world. You simply must protect your Windows environment from viruses by obtaining and using antivirus software.
There are many kinds of antivirus software applications available for Windows; you’ll need to purchase and install one of these in your Windows environment. Most of the antivirus applications offer a similar feature set, such as periodic virus definition updates, watched folders, and so on. It’s likely that any of the popular Windows antivirus applications will work fine for you.
note
There are also lots of free tools available, but personally, I prefer the commercial tools. Some free applications are Avent and AVGFree. Search the Internet if you want to try one of these.
I recommend and use Norton AntiVirus by Symantec because it includes the basic features required and has proven to be effective protection from most virus threats. Symantec regularly updates its virus definitions so your computer will be protected from the latest virus threats.
note
Obtaining and installing an antivirus application should be the first thing you do after you’ve connected the Windows environment to the Internet. Or, you can purchase an application via a retail source on disc if you don’t want to get it online as described here.
Downloading and Installing Norton AntiVirus
The following steps provide an example of downloading and installing Norton AntiVirus:
- Open a Windows web browser, such as Internet Explorer, and move to www.symantec.com.
- Use the website’s links to move to the Virus Protection page (when I wrote this, the current version was Norton AntiVirus 2006).
- Purchase Norton AntiVirus 20006. You’ll be prompted to download the application you just bought by the ActiveX install bar that appears at the top of the Internet Explorer screen (see Figure 4.2).

Figure 4.2 After you’ve purchased it, download Norton AntiVirus 2006.
4. Click the bar and c]hoose Install ActiveX Control from the resulting menu. You’ll see the Security Warning dialog box (see Figure 4.3).
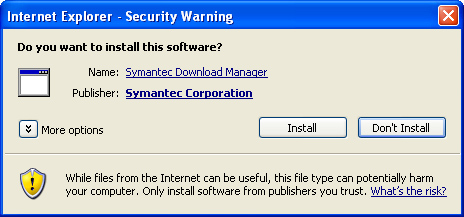
Figure 4.3 This dialog warns you that you’re about to install an application.
5. Click Install. The download process will start and you can monitor it in the web windows. When the download is complete, you’ll be prompted to install the application.
6. Click Install. After the installation process starts, you’ll see the Norton Welcome screen.
7. Follow the onscreen instructions to complete the installation process.
Tip
During the installation process, you’ll have a chance to perform a scan of your system. You should allow that scan even though it will add a few minutes to the installation process.
8. Restart your computer at the prompt.
Configuring and Using Norton AntiVirus
The first time you move back into Windows after installing Norton AntiVirus, you’ll be prompted to configure it with a wizard (see Figure 4.4).
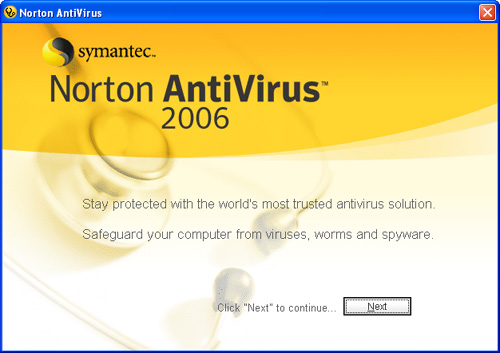
Figure 4.4 The wizard will guide you though configuring AntiVirus for the first time.
Click Next and follow the onscreen instructions to work through the wizard. The last step in the process will be to run LiveUpdate to make sure all the application’s files, especially the virus definitions, are current.
note
During the configuration process, the default settings will turn off the Windows Firewall because you’ll use Norton AntiVirus’ protection instead. That’s fine because when you have Norton AntiVirus installed and configured, you don’t really need the Windows Firewall any more. Other antivirus applications might or might not perform this step too.
After LiveUpdate is complete, you’ll usually need to restart your computer. Do so. Then complete your configuration of Norton AntiVirus. Choose Start menu, All Programs, Norton AntiVirus, Norton AntiVirus to launch the application (or use the desktop icon that was created during the installation process). You’ll see the program’s home page that provides the current status of its various options (see Figure 4.5).
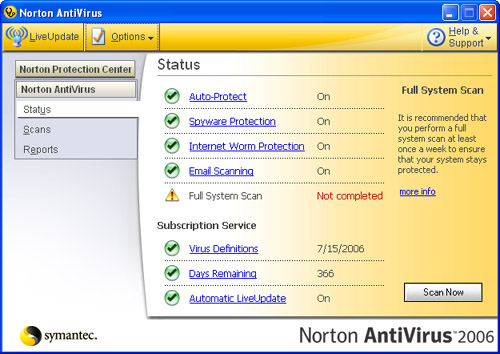
Figure 4.5 The Norton AntiVirus home page provides information about the various components of the protection it provides.
Tip
If you run Windows only occasionally, you should launch AntiVirus and run the LiveUpdate to make sure your virus definitions are current in case you don’t use Windows long enough for it to run automatically.
In most cases, the defaults will be what you should use. These are to provide maximum protection of your Windows system by enabling all the Norton AntiVirus components, which are the following:
- Auto-Protect
- Spyware Protection
- Internet Worm Protection
- Email Scanning
- Full System Scan
At the bottom of the home page, you’ll see information about your current subscription. When you purchase Norton AntiVirus, your subscription provides access to the current virus definitions and other files. You should keep your subscription current to make sure your system is as protected as possible.
If you have a lot of interest in each AntiVirus component, you can use the application’s Options and other commands to configure them in detail. Refer to the application’s Help system for more information.
As Norton monitors your Windows environment, it will notify you when something needs your attention, such as your system needing to be scanned. These prompts include the links you need to follow to execute the needed tasks so you can easily defend your Windows environment (see Figure 4.6).

Figure 4.6 Here Norton prompted me to allow it to run a full system scan because it hadn’t been done before.
Tip
By default, Norton AntiVirus installs additional access points, which include the desktop icon, an icon in the System Tray, a Norton button just to the left of the System Tray, and a Symantec LiveUpdate control panel. You can access the application and check your system’s protection status with any of these tools.
Protecting Your Windows Environment from Adware and Spyware
There are thousands of adware/spyware programs that attempt to install themselves on a Windows computer while you use that computer on the Internet. After they are installed, these applications can do many different things, from sending data about the activities for which you use your computer back to the Internet to providing your sensitive personal data to organizations that are unknown to you. You should install anti-spyware/adware software in your Windows environment to protect it from spyware/adware threats.
note
Some antivirus applications, such as Norton AntiVirus, also protect your system from spyware/adware. Even if you have one that does, it isn’t a bad idea to install a free application also. Each application catches a different set of spyware/adware programs, so it doesn’t hurt to have and use multiple programs to keep your Windows environment spyware/adware free.
There are many kinds of anti-spyware/adware software available to you. Some of these are free, whereas some require a license fee. Covering the available applications is beyond the scope of this chapter, but you will see an example of the available free applications that will provide you with a reasonable level of protection from spyware/adware.
note
Microsoft provides the free Windows Defender application that will attempt to protect your system from spyware. To download it, go to www.microsoft.com/athome/security/spyware/software/default.mspx (or just go to www.microsoft.com and search for “Defender”).
Another free spyware application is Spybot-S&D available at www.safer-networking.org. Go to this website and use the links to download and install Spybot. These steps will be similar to other applications that you download and install. After you’ve installed the application, launch it. Use its home page to check your system for spyware and to configure the program’s options (see Figure 4.7). If it detects spyware/adware, you’ll be prompted to allow the application to remove the problems that are found.
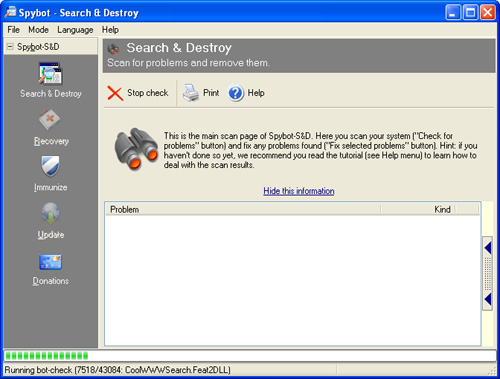
Figure 4.7 Spybot is a good example of anti-spyware/adware applications available on the Internet (no problems had been found on this machine to this point in the scan).
note
You can download and use Spybot for free. However, if you use it regularly, you use the donation tools available on its website and on the application’s home page to donate to support it.
If the applications you use allow for automatic checks, you should enable them. You should also run checks manually in case you miss an automatic check or if the applications you use don’t provide automatic checks.
Tip
Just because an anti-spyware/adware application identifies a problem, that doesn’t mean the problem is definitely spyware/adware. You should take a close look at problems before allowing the application to correct to make sure the issue isn’t actually from an application you intended to install. Most of the time, if you don’t recognize the source of a problem, you should allow it to be fixed.
Keeping Windows Current
Microsoft regularly provides updates to Windows that address security issues. You should make sure your Windows system is current to provide additional protection. You learned about allowing Windows to perform automatic updates earlier in this book. Because this is a very important task, following are the steps you need to use to make sure you’ve allowed this:
- Open the Control Panel.
- Open the Automatic Updates control panel (see Figure 4.8).

Figure 4.8 You should enable Windows to check for, download, and install updates automatically.
3. Check the Automatic radio button.
4. Choose the frequency and time at which update checks will be performed using the drop-down menus.
5. Click OK.
If you don’t run Windows regularly, it’s possible you’ll miss the automatic updates. You can also check for and install Windows updates manually by performing the following steps:
- Open Internet Explorer and navigate to update.microsoft.com (see Figure 4.9).
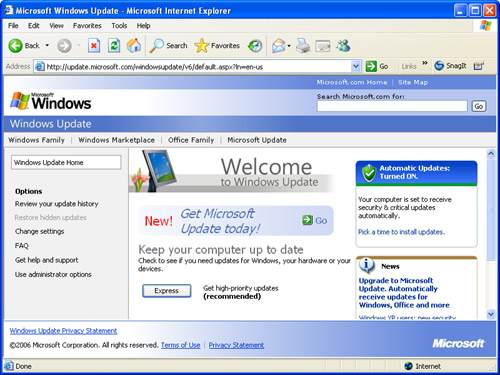
Figure 4.9 Use update.microsoft.com to update Windows manually.
2. Click Express. Your Windows system will be checked and compared to the updates that are available.
3. Follow the onscreen prompts to download and install available updates.