
Chapter 3. NETWORKING AND CONNECTING TO THE INTERNET USING WINDOWS
You’ll probably want to connect your Windows environment to the Internet to run Internet applications that are available only in Windows, such as Internet Explorer (which is required to access some web-based software). Because of space limitations, I’ve assumed that the Mac you are using to run Windows is already connected to and configured for your local network and the Internet via a router/hub and broadband connection, such as cable or DSL.
Because you’ve already connected your Mac to a local network and the Internet via a router/hub, you don’t need to do anything with hardware or your Internet account; the Windows environment will use the same connection to the Internet that your Mac does. If your Mac is connected to a wireless network, getting Windows to connect to the same network is straightforward. Likewise, if your Mac is connected to a network and the Internet via an ethernet connection, the Windows environment can use that same connection. All you need to do is configure the Windows OS to recognize and connect to the network you’ve already established. After you’ve done that, Windows will be able to communicate with other devices on the local network and have access to the Internet.
note
If you need help connecting and configuring a Mac to local networks and the Internet, see my book Special Edition Using Mac OS X Tiger.
Connecting to and Managing a Wireless Network
Most Intel Macs have AirPort wireless hardware built-in so that you can connect to your local network and to the Internet wirelessly. Connecting to and managing a wireless connection under Windows is fairly straightforward, as you’ll learn in this section.
Connecting to a Wireless Network Under Windows
To configure Windows to connect to a wireless network, perform the following steps:
- Open the My Computer window.
- In the Other Places panel, click the My Network Places link. You’ll see the My Network Places window, which will be empty before you connect Windows to a network.
- Click View Network Connections in the Network Tasks panel. You’ll see the Network Connections folder (see Figure 3.1). This folder shows all the network connections that exist for the Windows environment. Before you’ve connected to a network through one of the options shown, it will have a red x through it to show that it isn’t connected yet.

Figure 3.1 The Network Connections folder shows you all the network connections that Windows is using, or in this case, not using.
Tip
If Windows detects a wireless network available when it starts up, you’ll see a prompt above the System Tray located in the lower-right corner of the desktop. Click the link in this prompt and follow the onscreen instructions to connect to the wireless network that Windows automatically detected.
- Double-click the Wireless Network Connection icon. The Wireless Network Connection tool will appear (see Figure 3.2). In the right of this tool, you’ll see each wireless network Windows finds. You’ll also see whether or not the network is secured. If it is secured, you’ll need to enter a password to connect to it.

Figure 3.2 Windows has identified one available wireless network.
note
Passwords used to secure wireless networks for Windows machines are more specific than those for Macs. If you created a secured network using AirPort but did not define a password that is compatible with Windows, you’ll need to reconfigure your wireless network to use a Windows-compatible password before you can connect the Mac running Windows to the network. For example, if the network uses 128-bit WEP security, the password must be exactly 13 characters. For more information, see AirPort Help system or the documentation that came with your wireless base station.
- Select the network to which you want to connect.
- Click Connect. Windows will attempt to connect to the network. If it is secured, the key (a key is basically the same thing as a password) prompt will appear.
- Enter the network’s password in the Network Key field and again in the Confirm Network Key field.
- Click Connect. Windows will attempt to connect to the network. When it does, you’ll see the Connected status in the Wireless Connection dialog box (see Figure 3.3). You’ll be able to access the network’s resources, such as its Internet connection.
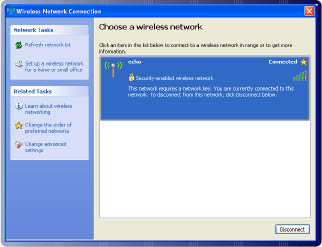
Figure 3.3 Windows is now connected to the wireless network called echo.
- Close the Wireless Network Connection dialog box.
As soon as you’ve successfully connected your Windows environment to the Internet, you should protect it from Internet attacks, which are inevitable. See Chapter 4, “Protecting Your Windows Environment from Internet Attacks,” for the steps you need to take to safeguard your computer while you are running Windows.
Managing Wireless Connections Using Windows
As you are accustomed to doing with the Mac OS, you use Windows tools to manage the wireless networks to which you have access. Some pointers follow:
- After you’ve connected to at least one wireless network once, Windows will attempt to connect to a wireless network automatically each time it starts. It will try the most recent network first; if that network isn’t available, it will try the next one on the list until it connects successfully. So, you don’t need to manually connect and disconnect unless you want to choose a specific network.
- To view information about your current wireless connection, click the Wireless Connection icon in the Windows System Tray and the Wireless Network Connection Status dialog box will appear (see Figure 3.4). On the General tab, you’ll see the status of the network connection, its name, how long you’ve been connected, the speed at which you are connected, and the signal strength. You’ll also see the current activity across the connection.

Figure 3.4 The Wireless Network Connection Status dialog box enables you to view information about your current connection.
- The Properties button will take you to the Wireless Network Connection Properties dialog box. There you can perform detailed configuration of the connection, including selection of the specific protocols and ports. You aren’t likely to need to use this tool, but it’s there if you need it.
- Click View Wireless Networks; the Wireless Network Connection window will appear (see Figure 3.5). This window will show all the wireless networks available to you. For each network, you’ll see the network name, status (Connected or not), the security settings, and the signal strength (if connected).

Figure 3.5 This Windows environment currently has access to only one wireless network; if more were available, each would be shown on the list.
Tip
If you’re connected to a network, but you see Limited or No Connectivity instead of Connected, this means Windows is not able to access a Domain Name Sever (DNS) and other resources it needs to connect to the Internet; you’ll need to switch networks or troubleshoot the current network to be able to connect to the Web.
- To disconnect from a wireless network, select it and click Disconnect; in the resulting prompt, click Yes to complete the disconnection process. After you’ve disconnected from a network, Windows will no longer connect to it automatically. You’ll need to manually connect to the network again; Windows will connect to it automatically the next time it starts up.
Tip
To see the wireless networks currently available, click the Refresh Network List link in the Network Tasks section of the Wireless Network Connection window. Windows will search for all the wireless networks in range and display them on the list of networks.
- To connect to a network, select it and click Connect. If the network is secured, enter its password (key) if needed (Windows might remember it for you) and click OK. Windows will connect to the network and update the status information shown.
- Click the Disable button to disable the current network.
- You can close the Wireless Network Connection window; whether or not it is open has no impact on the status of the connection.
- To view the current IP address, open the Wireless Network Connection Status dialog box and click the Support tab (see Figure 3.6). Click the Details button to get even more detailed information about the connection, such as the machine’s physical address, when the current DNS lease was obtained, and so on. If the connection has problems at some point, you can click the Repair button to have Windows attempt to repair the connection.

Figure 3.6 Use the Support tab to get detailed information about a wireless connection.
Connecting to and Managing a Wired Network Connection
You can also connect the Windows environment to a local network and an Internet connection via ethernet. Once connected, you can manage the connection.
Connecting Windows to a Wired Network
If your Mac is already connected to a wired network, use the following steps to ensure that the network is recognized under Windows:
- Open the My Computer folder.
- In the Other Places panel, click the My Network Places link. You’ll see the My Network Places folder.
- Click View Network Connections in the Network Tasks panel.
You’ll see the Network Connections folder (see Figure 3.7). This folder shows all the network connections that exist for the Windows environment. Before you’ve connected to a network through one of the options shown, it will have a red x through it to show it isn’t connected yet. Because your Mac is connected to a wired network, Windows will recognize a local area connection and will have connected to it automatically. Windows will be able to access other devices on the local network as well as the Internet.

Figure 3.7 Because this Mac is connected to an ethernet network, Windows has recognized that it has a local area connection and connected to it automatically.
note
As soon as you’ve successfully connected your Windows environment to the Internet, you should protect it from Internet attacks, which are inevitable. See Chapter 4, for the steps you need to take to safeguard your computer while you are running Windows.
Managing a Wired Network Connection
See the following list for some tasks you might want to do to manage your wired network:
- Each time you connect an ethernet cable to your Mac, Windows will connect to the related network automatically.
- To view the status of an ethernet connection, open the Network Connections folder and double-click the icon for the active network connection.
note
When you view the status of an ethernet connection, you might see more than one local connection. One might be called 1394 Connection; if you see that one, you can ignore it. Because you’re running Windows on a Mac, you need to work with the connection that was created to access the Mac’s hardware. This will be the one that shows specific hardware under its icon (refer to the connection labeled Local Network Connection 2 in Figure 3.7).
The Connection Status dialog box will appear for that connection (see Figure 3.8). In the top area, you’ll see the status of the connection, how long it has been connected, and the speed at which it is connected. In the lower section, you’ll see the current activity over the connection.
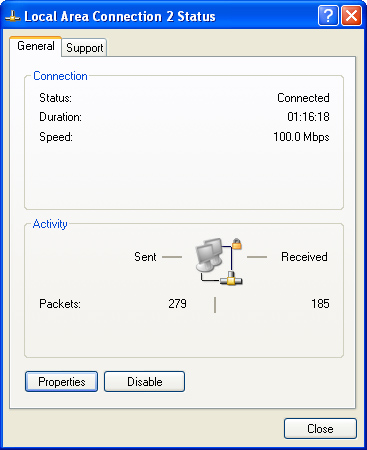
Figure 3.8 The Connection Status dialog box provides information about and controls for a network connection.
- Click the Properties button to view and configure more detailed information for the connection (you aren’t likely to need to do this).
- To prevent Windows from connecting to the network, click the Disable button. Windows will disconnect from the network until you connect to it again manually. To do that, double-click the connection’s icon in the Network Connections folder. Windows will re-enable the connection and connect to it again.
- For more detailed information about the connection, click the Support tab of the Status dialog box. You’ll see the connection’s IP address. You can click the Details button for more information about the connection. You can also click the Repair button if you are having problems with the connection.