
Chapter 7. CONTROLLING AND CONFIGURING A WINDOWS VIRTUAL MACHINE
After you’ve installed Parallels Desktop for Mac, created a virtual machine, and installed Windows on that virtual machine, you’ll be ready to use that virtual machine (VM) to run Windows right on your Mac’s desktop. In this chapter, you’ll learn how to control a virtual machine and perform some additional configuration. From there, you’ll start working with the virtual Windows environment itself.
Controlling a Virtual Machine
When you want to work with Windows, you first launch Parallels Desktop for Mac and then open the virtual machine containing Windows. After the virtual machine is open, you can control it using the Parallels Desktop for Mac controls.
To get started, launch Parallels Desktop for Mac just as you would any other application. By default, the virtual machine you used most recently will open (see Figure 7.1). If you want to work with a different virtual machine, click the Open button. In the resulting sheet, move to the VM you want to use (the filename extension will be .pvs as in winxp.pvs), select it, and click Open. That virtual machine will open in the Parallels Desktop for Mac window and you’ll be able to start using it.

Figure 7.1 Because the virtual machine called Microsoft Windows XP is the one I used most recently, it’s opened automatically when I launch Parallels Desktop for Mac.
Running a Virtual Machine
When a virtual machine is first opened, it will appear in the Page Properties view, which you use to view or change configuration information for the VM. This view is organized in several sections. The Configuration section provides information about the current VM’s configuration, including the path to the machine’s file, acceleration settings, and so on. In the Resources section, you’ll see information about hardware devices (some are virtual) available to the VM, such as the hard disk image file size and location, CD/DVD drive, and so on. At the bottom of the window are some basic controls for managing the VM, such as New VM, Open, Edit, and Save. Along the right side of the window are the controls you use to control the virtual machine.
note
A virtual machine’s “hard drive” is actually a disk image file. This disk image file contains all of the information stored under the guest OS, including the operating system itself, applications you install, and documents you create. Like any other file, if something happens to this disk image file, all the information it contains might be lost. If you store important information in the virtual OS, you should back it up.
A VM can be in one of several states. When the machine is not running, its state is Stopped. In this state, you work with the virtual machine itself. When the virtual operating system is being used, the virtual machine’s state will be Running. A VM can also be in the Paused or Suspended states, which are somewhat analogous to a DVD player being paused in that the virtual machine is currently not doing anything.
When a VM is running, the Parallels Desktop for Mac window switches to the Console view, which displays the operating system that is installed in the virtual machine (see Figure 7.2).

Figure 7.2 Control a virtual machine using the buttons located in the Parallels Desktop for Mac toolbar.
You can control a VM using the buttons that are located along the right side of the window (refer to Figure 7.1). (You can set the location of these buttons using the Parallels Desktop for Mac preferences that you’ll learn about later.) A virtual machine’s basic controls are the following:
- Stop This shuts the VM down. You can stop a virtual machine before changing its configuration or when you quit Parallels Desktop for Mac. When you are done with a VM for an extended period of time, you can stop it and then quit Parallels Desktop for Mac. However, you should shut down the virtual OS using its normal commands, not the Stop button. For example, before stopping a Windows XP virtual OS, choose Start menu, Turn Off Computer, and click Turn Off. Use the Stop button only when the virtual machine is not responding to commands.
- Suspend When you suspend a VM, its current state is saved, all processes are stopped, and the Parallels Desktop for Mac window will return to the Page Properties view (see Figure 7.3). You can resume working with the virtual operating system where you left off by powering it on again by clicking the Power On button. The saved state will be reloaded and you can start using the OS again.

Figure 7.3 Notice that the state of this virtual machine is Suspended.
- Power On When you use this control, the virtual operating system starts up and you can work with it. You can use this command when the VM is in the Stopped, Paused, or Suspended state to start using the virtual OS. The amount of time it takes to become available will depend on the current state. For example, it’s faster to power up a VM in the Paused state than it is if the VM is Stopped.
note
Virtual machine commands are enabled only as appropriate for their context. For example, when the VM is Suspended, only the Stop and Power On commands are active.
- Reset This command shuts the VM and then restarts it again. Like the Stop command, you should only use this if the virtual machine stops responding to commands.
- Fullscreen mode When you use this command, the virtual machine will take up the entire desktop so that it has the maximum display area. To return to the window mode again, press the Option+Return keys.
- Property Page view This command changes the Parallels Desktop for Mac window to the Property Page view.
- Console view This command changes the view back to the Console view that displays the OS being run in the VM.
- Pause This causes the VM’s processes to temporarily stop, but unlike the Suspend command, its data is not saved and the window remains in the Console view. Use Pause when you want to stop the VM very momentarily while you do something else and then come right back to it. When paused, the Console view will be grayed out to indicate it is the Paused state.
note
Like any other application, running a virtual machine consumes a Mac’s resources. There are many variables that determine how much a Mac’s performance will be affected by a virtual machine, including what you are doing in the Mac OS, what is happening in the Windows OS, how much RAM a Mac has, how much RAM has been allocated to Parallels Desktop for Mac, and so on. If you notice a performance hit when you are using Mac applications, suspend the virtual machine when you aren’t actively using Windows. That should free up resources for Mac applications. If you use Windows infrequently, quit Parallels Desktop for Mac when you don’t need to use Windows.
All of these commands can be activated by using the buttons in the Parallels Desktop for Mac toolbar or via the VM menu. The exception to this is the Pause command, which can be activated only on the VM menu.
Choosing the Operating System to Control
As you learned in Chapter 6, “Installing Windows XP in a Virtual Machine,” when you are running Windows in a VM, you must indicate when you want to control Windows compared to when you want to control Mac OS X. You do this by capturing the mouse and keyboard; whichever OS has these captured is the one that will be controlled when you use the mouse or press a key. When you power on Windows, it will capture the mouse and keyboard automatically. You can tell that Windows has captured these peripherals because the cursor will be the standard Windows pointer, which is the arrow filled with white. When you move the pointer outside of the Parallels Desktop for Mac window, it will change back to the Mac’s black arrow, which indicates that Mac OS has captured the mouse and keyboard so that you can again use them to control Mac OS X. This behavior occurs only if you have installed Parallels Tools as described in the previous chapter. If you haven’t, you have to manually determine which OS has captured the mouse and keyboard.
To work with Windows, perform the following general steps:
- Launch Parallels Desktop for Mac and open the virtual machine containing the OS you want to use.
- Click the Power On button or choose VM, Power On. The OS will start up.
- Work with the OS. If you want to view it in Fullscreen mode, click the Fullscreen Mode button. To return to the Windowed mode, press Alt+Ctrl.
note
You can’t control the VM in Fullscreen mode. You must return to the Windowed mode before you can control the VM’s state.
4. If you want to temporarily return to Mac OS X, choose VM, Pause. The operating system’s screen will become disabled. To resume using it, click the Power On button.
Tip
You can leave the VM in the Powered On state to work with Mac OS X by clicking outside the Parallels Desktop for Mac window. You need to pause or suspend the VM only if leaving it powered on slows down what you are doing in Mac OS X because of your Mac’s resource limitations.
5. If you want to stop using the OS for a longer period of time, click the Suspend button. Parallels Desktop for Mac will save your data and return the window to the Page Properties view. To resume using the OS, click the Power On button. After the OS is reloaded, you can resume using it where you left off.
6. When you are finished using Windows, choose Start menu, Turn Off Computer, and click Turn Off. Windows will save your settings and shut down. You’ll return to the Page Properties view. If you’re done using Windows for a while, quit Parallels Desktop for Mac as well.
As you work with the guest OS, you can monitor its access to system resources using the icons located in the bottom-right corner of the Parallels Desktop for Mac window when it is in Windowed mode (see Figure 7.4). Some of these resources are physical and some are virtual. For example, the hard disk access icon represents the disk image that the guest operating system is using, whereas the CD/DVD icon represents your Mac’s CD/DVD drive. The status of the icons changes to reflect activity; for example, the hard disk icon will flash when there is disk activity.
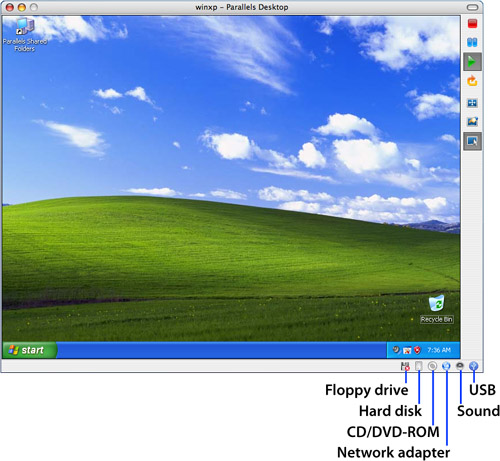
Figure 7.4 The icons in the lower-right corner of the Parallels Desktop for Mac window display status information for various system resources—some real, some virtual.
Configuring Options for a Virtual Machine
You can start up and use Parallels Desktop for Mac without doing much detailed configuration. However, that doesn’t mean that there aren’t lots of options that you can control to fine-tune the environment to your preferences—there are plenty of ways to configure the system. The good news is that you don’t have to set all the configuration options initially, and you might not ever need to change many of them. In this section, you’ll learn about many of the available configuration settings and how to use them should you choose to do so.
There are three basic ways you can configure how a VM works. You can configure the virtual machine itself. You can also configure Parallels Desktop for Mac by using its preferences and other settings. Thirdly, you can configure the Parallels Tools software.
Configuring a Virtual Machine
There are many aspects of a VM that you can configure to simulate various hardware and software components of the system. You start this process from the Property Page view with the VM in the Stopped state (see Figure 7.5).
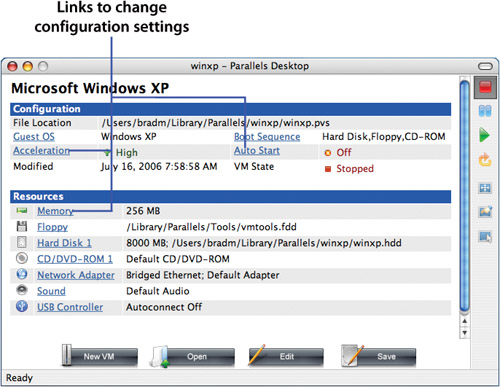
Figure 7.5 The Property Page view provides access to configuration information for a VM.
The general steps to change a specific setting are the following:
- Move the cursor over the property you want to change and click its link. The window will change into the Configuration Editor mode and the specific option for the link you clicked will be selected (see Figure 7.6).
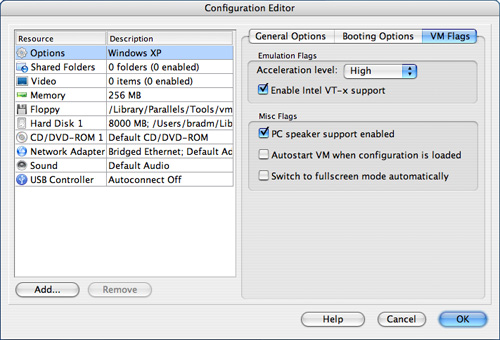
Figure 7.6 I clicked the Auto Start link that opened the Configuration Editor with the Autostart option exposed so I could activate it.
The Configuration Editor mode has two panes. In the left pane, you choose the configuration property (called a resource) that you want to set. In the right pane, you’ll see the controls for the property you selected. For example, when you select the Memory property, the Memory Options controls become available in the right page (see Figure 7.7).

Figure 7.7 Here I’ve selected the Memory option in the left pane causing the Memory Options controls to appear in the right pane.
2. Use the controls in the right pane to make configuration changes.
3. Click OK to save the changes you’ve made. When you return to the Property Page view, you’ll see the new configuration setting (see Figure 7.8).

Figure 7.8 The Auto Start property is now On, which means that Windows will start automatically when the VM is opened.
4. When you’ve finished making configuration changes, click Save to save the virtual machine’s new settings.
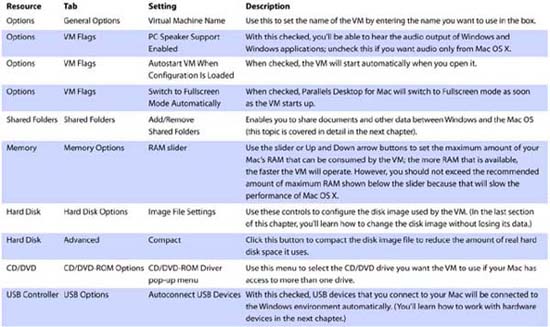
There are many configuration options you can set, and covering all of these is beyond the scope of this book. In Table 7.1, you’ll see a description of some of the resources (configuration settings) that you are likely to use.
Table 7.1 Useful VM Resource Settings for Windows Virtual Machines
You can add new resources to a VM. For example, you might want to add additional disk images as hard drives to make more than one drive available in the virtual machine. Following are the steps to add a disk image as an example of how this process works (you can use similar steps to add other kinds of resources to a VM):
- Open the Configuration Editor.
- Click the Add button at the bottom of the Resource list. The Add Hardware Wizard will appear.
- Click Next.
- Choose the type of hardware you want to add, such as Hard Disk (see Figure 7.9).

Figure 7.9 Use this screen to choose the type of hardware device you want to create.
4. Click Next.
5. Select Create a New Virtual Hard Disk and click Next. You see the screen that enables you to choose the options for the hard drive you are creating (see Figure 7.10).

Figure 7.10 When you create a new virtual hard disk, you can choose its size and format.
7. Choose the preferred size of the disk you are creating by entering the size or using the Up and Down Arrow buttons to select it. If you choose the expanding type (see the next step), this value doesn’t matter very much.
8. Choose the disk format. Choose Expanding to allow the disk size to grow as data is added to it. Choose Plain to set a fixed size for the disk. The option that will work best for you depends on the amount of disk space available to you and how much data you’ll store in the Windows environment. In most cases, you’ll want to use the Expanding option. But if you are sure about how much space you’ll need, choose the Plain option and enter the maximum size for the disk because this will make Windows perform better.
9. Click Next. The screen that enables you to name the disk image file is displayed. Choose a location for it.
10. If the default name and location aren’t what you want (perhaps you want to save the disk image file in a different location), click the ellipsis button and use the resulting sheet to name the file and choose its location.
11. When the file’s name and location are what you want, click Finish. The disk will be created and you’ll see it on the Resource list (see Figure 7.11). The next time you use Windows, the resource you added will be available to it.
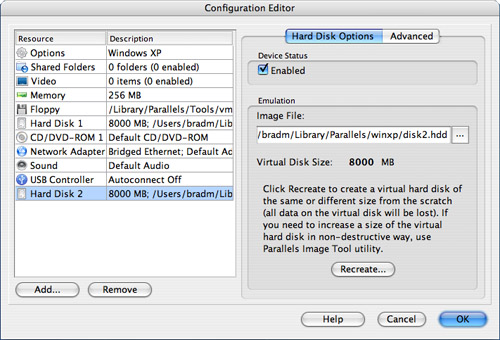
Figure 7.11 This VM now has two hard disks available to it.
Setting Parallels Desktop for Mac Preferences
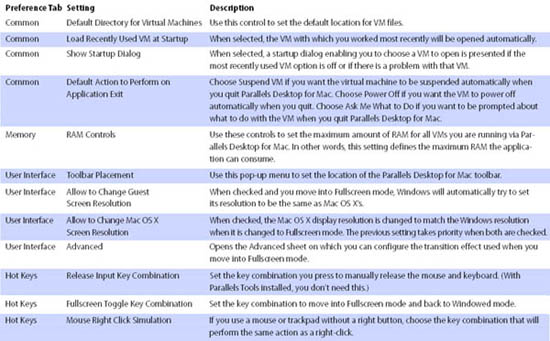
Like all applications, Parallels Desktop for Mac has preferences you can set to control general aspects of how it works. Access these via the Preferences command on the Parallels Desktop menu. The Preferences window has five tabs. Some of the more useful options on each tab are explained in Table 7.2.
Table 7.2. Useful Parallels Desktop for Mac Preferences
Configuring Parallels Tools
The Parallels Tools software adds capabilities to the Windows environment in a VM. If you haven’t already installed Tools, go back to Chapter 6, to learn how to do so. When the Tools application is installed, you can change its configuration by performing the following steps:
- Power on the Windows environment and log in.
- Double-click the Parallels Tools Center icon in the Windows System Tray (see Figure 7.12). The Parallels Tools Center will open. In the left pane, you’ll see a list of all the tools. Information about and controls you use to configure the selected tool will appear in the right pane.

Figure 7.12 Click the Parallels Tools Center icon to open the Parallels Tools Center to configure options for each of the tools.
3. In the left pane, click the tool you want to configure. The tools for Windows XP are the following:
note
All the tools are enabled by default when you install the Tools application.
- Clipboard Synchronization Enable this to allow the Windows Clipboard and the Mac Clipboard to share the same data so that you can copy from one environment and paste into the other.
- Time Synchronization Use this option to keep the Windows clock in synch with the Mac clock.
- Video Driver This allows additional graphic modes in Windows. You won’t be able to disable (not that you’d want to anyway) unless you also disable Mouse Synchronization.
- Mouse Synchronization With this enabled, when you move the pointer from the VM to Mac OS X or vice versa, control is seamlessly changed to the appropriate environment so you don’t have to press the manual release key combination.
- Network Driver Enable this to improve the network performance of the Windows environment.
- Disk Compacting Tool This tool compacts disk images of the expanding type to minimize the physical disk space they consume.
- Shared Folders Tool You can use this tool to configure and use folders to share files between the Mac OS and the virtual Windows environments. More on this topic is in the next chapter.
4. Use the controls in the right pane to configure the tool (see Figure 7.13).
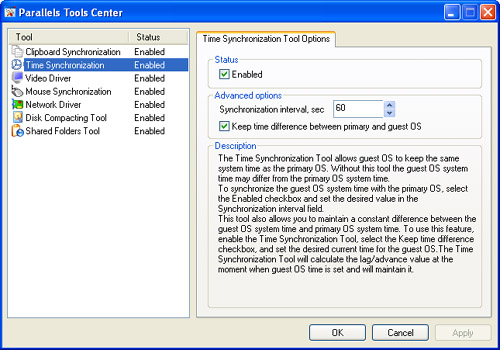
Figure 7.13 Here the Time Synchronization tool is selected and can be configured using the controls in the right pane of the window.
5. Select and configure the other tools as needed.
6. Click OK to save your changes and close the Parallels Tools Center.
Maintaining Parallels Desktop for Mac
Just like most developers, Parallels updates Parallels Desktop for Mac to add features, fix bugs, and so on. You should periodically check for updates to the application and then download and install any that become available. Fortunately, Parallels Desktop for Mac makes this a simple task. Choose Help, Check for Updates. Use the resulting sheet to check for updates (click Check Now) and set the application to check for updates automatically (see Figure 7.14). When an update is found, follow the onscreen instructions to download and install it on your Mac.
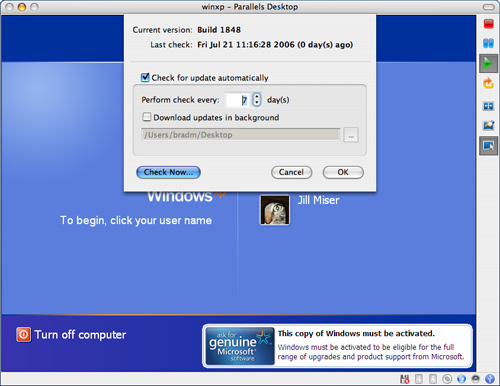
Figure 7.14 Use this sheet to keep Parallels Desktop for Mac current.
Using a Single Windows Virtual Machine with Multiple Mac User Accounts
Because being able to run Windows is so useful, you’ll probably want to allow everyone who uses your Mac to do so. There are two basic approaches to doing this.
You could create a VM under each Mac user account, install Windows on it, and then each user would have a separate VM under which they can run Windows. However, there are a number of problems with this approach. One is that each disk image will consume large amounts of disk space. Another is that you will have a separate Windows environment for each user, which means you have to install applications in each environment, perform updates to each, and so on. This would be a pain and could be expensive if you have license applications for each environment.
However, the biggest problem is that you will also have to activate Windows in each environment, which means that you’ll have to pay for a Windows license for each Mac user account.
A better way to do this is to store the disk image for your Windows virtual machine in a location where all the people who use your Mac will be able to access it and thus everyone can run the same Windows environment. You can create Windows user accounts to provide each user with his own Windows account. This saves disk space, but more importantly, you’ll only have to work with a single Windows environment.
By default, Parallels Desktop for Mac stores the disk image file in your Library folder within your Home folder. This means that the file is not accessible from other Mac user accounts and so other people who use your Mac with their own user accounts can’t use the virtual machine you created.
To allow this, you’ll need to move your disk image files to a public location and make sure the files’ permissions allow everyone who uses your Mac to change them. Then, under each Mac user account, point Parallels Desktop for Mac to the virtual machine you want to use. Finally, create a Windows user account for each user.
First, move the disk image and point the VM to its new location:
- If it’s running, quit Parallels Desktop for Mac.
- Move to the location in which you saved the disk image file for your VM. By default, this will be Home folder/Library/Parallels/winxp (see Figure 7.15).

Figure 7.15 By default, your VM files are stored in your Library folder.
3. Move the winxp folder to a location on your Mac that is accessible by everyone who uses it. The obvious choice is the Public folder in your Home folder that is shared with all user accounts. You could also move the folder to a different disk, such as an external hard drive (the environment’s performance might be slower).
4. Launch Parallels Desktop for Mac. You should see a sheet ask you to select the VM you want to use.
5. Click Browse.
6. Use the resulting Open dialog box to move to the winxp folder and then select the .pvs file it contains and click Open. You’ll return to the previous sheet and will see the path to the VM in the VM Path box (see Figure 7.16).

Figure 7.16 Here, I’ve selected the .pvs file that I moved to my Public folder.
7. Click Open. The VM will be loaded and you can work with the OS.
8. Quit Parallels Desktop for Mac (save changes if you are prompted to do so).
Tip
When you quit Parallels Desktop for Mac, choose the Power Off option in the close sheet to make sure all the files open in the Windows are properly closed before Parallels Desktop for Mac quits.
Now, you have to make sure everyone who uses your Mac can read and write to the VM files:
- In the Finder, move to the winxp folder.
- Select the .pvs file and press
 +I. The Info window will open.
 - Expand the Ownership & Permissions section.
- Set all the permissions to Read & Write.
- Close the Info window.
- Repeat steps 1–5 for each file in the winxp folder. At the least, you’ll have one .hdd file. If you’ve added more disk images, there might be more than one.
- Switch another user account on your Mac.
- Launch Parallels Desktop for Mac. You’ll see the sheet shown in Figure 7.16 except there will be no previous VMs shown.
- Navigate to the location in which you stored the files for your VM. If you’ve stored them in your Public folder, the path will be Users/youruseraccountname/public/winxp.
- Select the .pvs file and click Open. You’ll see a warning explaining the configuration can’t be locked out. What this means is that there is no way Parallels Desktop for Mac can prevent another user from accessing the same file while you are using it. That would be bad because only one version of the file can be saved at a time and so changes that each user makes could be lost.
note
Make sure that you always quit Parallels Desktop for Mac when you aren’t using it or when someone else is going to use your Mac. That will ensure changes you make to the VM files aren’t overwritten by changes another user makes to the same files.
11. Click OK to clear the warning.
12. Power up the virtual environment. Windows will start up just as it did under your Mac user account.
13. Quit Parallels Desktop for Mac.
14. Repeat steps 7–14 for each Mac user account that you want to be able to access the same VM.
If one user tries to open a VM that is already opened by another user, a warning dialog will appear (see Figure 7.17). If that happens, the user should choose not to open the VM by clicking No to make sure that the other users don’t lose data. Move back into the user account that has the VM open and shut it down before using it under another user account.
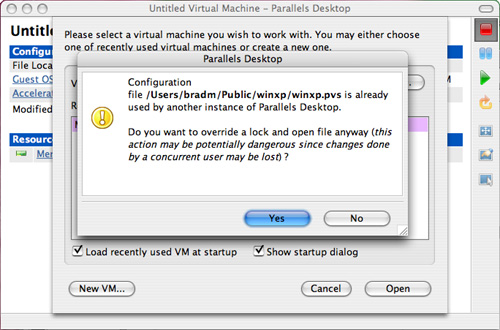
Figure 7.17 When someone else is already using a VM, this warning sheet will appear when another user tries to open it.
After you’ve enabled access to each user, you can create a Windows user account for each person. This will keep each Windows environment within the VM personalized for everyone with whom you share the VM. You’ll learn how to set up Windows user accounts in Chapter 8, “Running Windows in a Virtual Machine.”