
Chapter 6. INSTALLING WINDOWS XP IN A VIRTUAL MACHINE
For many Mac users, running Windows via a virtual machine is the preferred option because doing so enables you to access Windows without restarting your Mac, selecting Windows, waiting for it to start, doing what you need to, and then restarting your Mac in Mac OS X. Instead, you can simply open a new Finder window and run Windows inside that window. You can easily switch between the environments as needed. You can also more easily move data between Mac OS X and Windows.
Although there are several virtualization options available, my preference is Parallels Desktop for Mac, which is the focus of this book. This application provides all the features you need to run Windows on a Mac in a virtual machine efficiently and effectively. Running Windows through Parallels Desktop for Mac also provides amazingly good performance.
Understanding Virtual Machines
Virtual machine refers to a software application that simulates a hardware device. In the context of this chapter, the device being simulated happens to be a computer capable of running Windows. What this means is that the application creates a software environment that simulates a Windows PC. After you install Windows XP in this environment, it will behave just like a PC on which Windows is installed. Outside this environment, you’ll have Mac OS X. Inside the environment, you’ll have Windows. You can literally run Windows inside a Finder window on the Mac desktop.
Virtual machines have been available for the Mac before, and you could even install and run Windows in those environments. However, because the Mac used a different processor than Windows was designed for, the performance was slow. I mean really slow. Even with the fastest Macs, using Windows in these environments was almost unbearable.
With the rise of the Intel Macs and newer, better virtual machines, that has all changed. Now, you can run Windows inside a virtual machine with excellent performance. For many common tasks, such as browsing the Web, using email, and running standard applications, the performance you’ll experience with a virtual machine will be the same as using a Windows PC (in fact, depending on the Windows hardware you are used to, your virtual machine’s performance might even be better).
To run Windows in a virtual environment, you’ll need the following:
- An Intel Mac running Mac OS X, version 10.4.6 or higher.
- A copy of a virtualization application. In this part of the book, you’ll learn about Parallels Desktop for Mac. There are other applications available, but I think you’ll be very happy with Parallels Desktop for Mac. You can try this application for free.
- A full copy of Windows (not an upgrade). You’ll need to install Windows in the virtual environment, just as if you were installing it on a PC. You must have a full version of a Windows installer to do this.
note
You can install just about any version of Windows on a Mac using Parallels Desktop for Mac. This part of the book focuses on Windows XP Home Edition, but you can use other versions, such as XP Professional, Windows 2000, and so on. If you use a full package of an older version of Windows and install that in a virtual environment, you can use an upgrade disc to upgrade that version to a later version of Windows.
Following are the general steps you’ll follow to create a virtual version of Windows:
- Download and install the software that enables you to create a virtual machine. In this chapter, this is Parallels Desktop for Mac.
- Create a virtual machine. You’ll need a virtual machine for each operating system you want to run. In fact, you can even run multiple versions of the same operating system by creating a virtual machine for each.
- Install the operating system you want to run in the virtual machine.
note
A virtual machine isn’t just for running Windows either. You can install almost any OS inside its own Parallels Desktop for Mac virtual machine. For example, you can run Linux on a Mac by creating a virtual environment and installing Linux in it. Using Parallels Desktop for Mac, you can run just about any OS on a Mac.
You’ll work through each of these steps in detail in the remainder of this chapter.
Downloading Parallels Desktop for Mac
To download Parallels Desktop for Mac, perform the following steps:
- Navigate to www.parallels.com in your web browser.
- In the Parallels Desktop for Mac section, click Download Trial (see Figure 6.1).
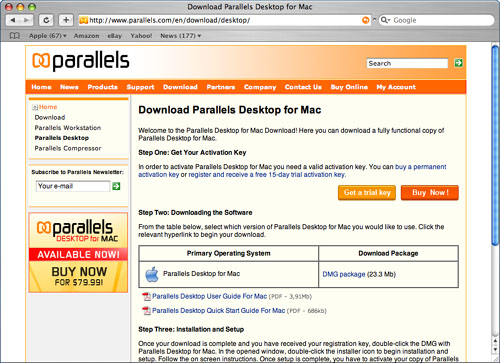
Figure 6.1 Downloading Parallels Desktop for Mac won’t be a challenge for you.
- Click the link to download the application. The download process will start. When you’re done downloading the application, you’ll see the Parallels-Desktop installer.
To use the application, you’ll need to obtain an activation key. You can choose to use Parallels Desktop for Mac for a 15-day period for free by obtaining a trial key. I recommend that you do so to make sure Parallels Desktop for Mac meets your needs. After you’ve used it for this period, you’ll need to purchase a permanent activation key; the good news is that because you have purchased this book, you get a discount on this (see the last section of this chapter for details).
- Move back to the Parallels Desktop for Mac download page.
- Click the Get a Trial Key button.
- Follow the onscreen instructions to obtain your trial key. You’ll need to create an account. When you’ve done so, you’ll move to the My Account page.
- Click the Send button for Parallels Desktop for Mac. The activation key will be sent to the email address you provided during registration. After you’ve received the email with your key, you’ll be ready to install Parallels Desktop for Mac.
Installing Parallels Desktop for Mac
After you’ve download Parallels Desktop for Mac and received an activation key, perform the following steps to install it and create a virtual machine:
- Launch the Parallels-Desktop installer. The Welcome screen will appear.
- Click Continue. The License Agreement screen will appear.
- Read the license, click Continue, and click Agree. The Select Destination screen will appear.
- Choose the disk on which you want to install Parallels Desktop for Mac and click Continue.
- Click Install. The installer will install the software on the selected disk. When the process is complete, you’ll see the software successfully installed message (see Figure 6.2). You’ll be ready to create a virtual machine.

Figure 6.2 The Parallels Desktop for Mac installer does most of the hard work for you.
Creating and Activating a Virtual Machine
After you’ve installed Parallels Desktop for Mac, you’ll be ready to create a virtual machine on which you will install Windows.
- Launch Parallels Desktop for Mac by opening the Parallels folder in the Applications folder and double-clicking the Parallels icon. You’ll see the screen that enables you to choose an existing virtual machine or to create a new one (see Figure 6.3).
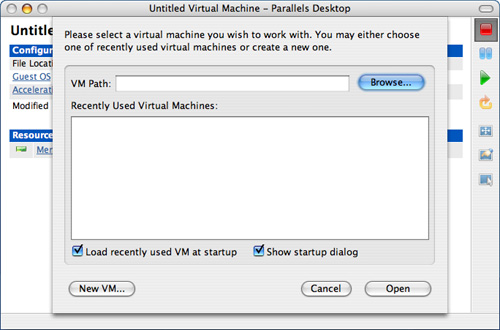
Figure 6.3 You can create multiple virtual machines and use this screen to choose one to work with; for now, create a new one.
- Click New VM. The New Virtual Machine Wizard will open.
- Click Next. You’ll be prompted to select the configuration of the virtual machine you are creating. The options are to create a typical virtual machine, which contains the default options; to create a custom configuration, for which you’ll set the configuration during the creation process; or to create a blank configuration, which you can configure later. In most cases, you’ll want to use the typical option.
- Click Create a Typical VM and then click Next. You’ll be prompted to select the OS that you’ll be installing in the virtual machine and the version of the OS you’ll be using.
- Select Windows on the Guest OS Type pop-up menu and Windows XP on the Guest OS Version pop-up menu; then click Next. You’ll be prompted to name the virtual machine and choose its configuration file.
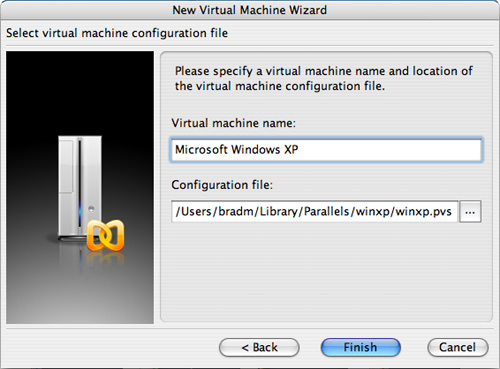
- Name the virtual machine; by default, the name is the name of the operating system you selected, but you can make the name whatever you want it to be (see Figure 6.4). If you’ll be installing multiple versions of the same operating system, you’ll want to give each a distinct name. If not, the default name will probably work fine.
Figure 6.4 I’ve left the name of this virtual machine to be the name of the OS I’ll be installing in it.
- If you want to install the machine’s configuration file in a location other than the default, click the ellipsis button and in the resulting sheet, name the file, choose its location, and click Save. Most of the time, the default location will be fine.
- Click Finish.
- Click Yes in the resulting sheet to allow the configuration file to be created. The virtual machine will be created and you’ll see its configuration screen (see Figure 6.5).

Figure 6.5 The virtual machine has been created; you need to activate Parallels Desktop for Mac to use it.
- Choose Help, Activate Product.
- In the resulting sheet, enter the activation key you received from Parallels.
- Enter your name and company name, and then click Activate.
- In the confirmation dialog box that will appear, click OK. The virtual machine will be ready for you to install an operating system.
Installing Windows XP in a Virtual Machine
After you’ve created a virtual machine, install Windows XP on it by performing the following steps:
- If the virtual machine is already open, proceed to the next step. If not, launch Parallels, select the virtual machine you want to install the operating system on, and open it.
note
These steps assume that you are installing Windows XP from an installation CD. If you are installing an OS from some other source, such as a disk image, the steps to connect the installation file to the virtual machine are slightly different. See the Parallels Desktop for Mac guides for this information.
- Click the CD/DVD-ROM 1 link. You’ll see the Configuration Editor screen (see Figure 6.6).
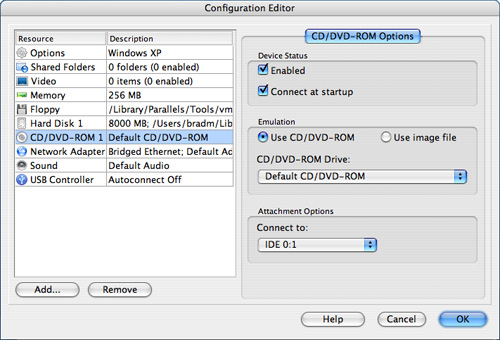
Figure 6.6 This screen enables you to change various aspects of a virtual machine; the CD/DVD-ROM 1 option is selected in the left pane so its options appear in the right pane.
- Click the Use CD/DVD-ROM radio button (it should be selected by default).
- On the CD/DVD-ROM Drive pop-up menu, choose the drive you want to use to install the operating system (if your Mac has only one drive available, this choice will be easy).
- On the Connect to pop-up menu, choose IDE 0:1 to enable the application to install an OS from the selected drive.
- Click OK to close the Configuration Editor screen.
- Click the Save button to save the changes you made to the virtual machine.
- Insert the Windows XP Installation CD into your Mac’s drive.
- Turn the virtual machine on by clicking the Power On Virtual Machine button, which is the green arrow in the toolbar on the right side of the Parallels Desktop screen. The installation process will start. After it has installed the initial files, you’ll see the Windows Setup screen (see Figure 6.7).
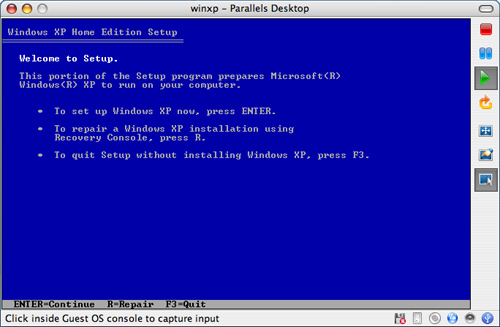
Figure 6.7 As soon as you start up the virtual machine with the Windows Install CD installed in your Mac, the Windows XP Installer will launch.
- Move your mouse over the Parallels Desktop window and click the mouse button; this captures the cursor so that Parallels knows that the subsequent keyboard commands are for the virtual machine. At the bottom of the window, you’ll see the Press Ctrl+Alt to Release Keyboard and Mouse Button message. This tells you that the commands you enter with the keyboard will affect the virtual machine instead of Mac OS X.
note
Windows computers have an Enter key instead of the Mac’s Return key. When the Windows Installer refers to the Enter key, press Return on the Mac’s keyboard.
- Press Return to start the installation process. You’ll see the License Agreement screen.
- Press F8 to agree to the license. You’ll see the disk partition creation screen. Because you are installing Windows in a virtual machine, you’ll want to leave the selected disk at the default value.
- Press Return to select the default disk. You’ll see the partition format screen.
- Leave the default NTFS option selected and press Return. The partition will be formatted in NTFS. The progress will be displayed in the virtual machine window. This process will likely take a few minutes to finish. After this process is complete, the virtual machine will restart and you’ll see the Windows XP Installer window (see Figure 6.8). The Installer will start and you can monitor its progress in the window.

Figure 6.8 The Windows partition in the virtual machine has been created and the Windows Installer is running.
note
While the mouse and keyboard are captured by the virtual machine, you can’t work in Mac OS until you release them be pressing the Ctrl+Alt keys. While the installer is running, you can release the mouse and keyboard and then work in the Mac OS while the installation process continues to run. When you are ready to work in the virtual machine again, click inside its window to capture the mouse and keyboard.
You’ll eventually see the Regional and Language Options dialog box.
- On the Regional and Language Options screen, look for the default Standards and Formats setting, such as English (United States), and the default text input and language and method, such as US keyboard layout.
- If the default options are correct, click Next and skip to step 26. If you want to change these settings, move to step 17. (You can always change them later while you are running Windows if you need to.)
- Click Customize. You’ll see the Regional and Language Options control panel.
- On the Formats drop-down list at the top of the panel, choose the format option you want to use. Samples of the format will be shown below the drop-down list.
- On the Location drop-down list, choose your location.
- Click the Languages tab.
- Click Details. You’ll see the Default Input Language drop-down list.
- Choose your default input language on the drop-down list.
- Click OK.
- Click OK again to save your changes and close the Regional and Language Options control panel.
- Click Next.
- Enter your name and company (if applicable) in the appropriate boxes and click Next. You’ll see the Your Product Key screen.
- Enter the product key provided with your Windows installation disc and click Next. You’ll see the What’s Your Computer Name? screen.
- Create the name by which you’ll recognize your Mac when it is running Windows by typing a name in the name box. Your Windows name must be 15 or fewer characters and can’t contain special characters or spaces. You’ll see this name when you are working with the virtual OS, so choose a name you’ll recognize.
- Click Next. You’ll see the Date and Time Settings screen.
- Set the current time and date using the time and date controls; then choose your time zone and indicate whether or not you use Daylight Saving Time. These settings should be taken from your Mac, so you probably won’t need to make any changes.
- Click Next. The installation process will resume with network installation. The installation progress information will appear again and you’ll see the Networking Settings screen.
- For the time being, leave the Typical Settings radio button selected and click Next. You’ll learn how to configure the virtual Windows environment to access your network in a later chapter.
The installation process will continue and you can monitor it with the progress information displayed. You won’t need to make any other inputs during the process. An estimate of the time to complete the installation will be provided in the window.
Again, you can release the keyboard and mouse and let the installer run in the background while you do something else in Mac OS X if you want to. If you do this, you’ll need to capture the keyboard and mouse again by clicking in the virtual machine window when you want to rejoin the Windows Installer.
Depending on how your Mac’s screen resolution was set, you might see the Display Settings prompt. If you do, click OK to clear the prompt and then click OK in the resulting dialog. This enables Windows to choose the resolution it thinks is best (you can always change it later).
You’ll see the Welcome to Microsoft Windows screen (see Figure 6.9). You’ll do some additional configuration in the next couple of screens.

Figure 6.9 Windows has been installed in the virtual machine; some basic configuration is required to complete the installation process.
- Click Next. You’ll see the Help Protect your PC screen. Here, you choose whether or not you want Windows updates installed automatically. In most cases, you should enable automatic updates of your Windows environment.
- Click the Help Protect My PC by Turning On Automatic Updates Now radio button and click Next. You’ll see the network configuration screen.
- Assuming that your Mac connects to the Internet through a network, leave the default Yes radio button checked and click Next. You’ll see the Windows Activation screen. For the time being, leave your copy of Windows inactive. You’ll learn about activation later.
- Click the No radio button and then click Next. You’ll see the Who Will Use This Computer? screen.
- Enter the name you want to use for your Windows user account in the Your Name box.
- If you want to create additional user accounts, enter a name in each user box until you’ve added a name for each user account.
- Click Next. You’ll see the Thank you! screen.
- Click Finish. The installation process will be complete and your Mac will be running Windows in the virtual machine. You’ll see the Windows XP startup screen on which you can choose the user account under which you want to log in (see Figure 6.10). (If you have only one Windows user account, you’ll move directly to the Windows desktop.)This means the virtual machine is set up and is ready to run Windows.

Figure 6.10 Windows is running inside a Finder window; cool isn’t it!
note
Because most Mac users will want to run Windows, that is the focus of this chapter. However, you can install many other operating systems just as easily, with each running in its own virtual machine. For example, you can create a virtual machine and install Linux in it if you want to be able to run Linux applications on your Mac.
Installing Parallels Tools
Parallels Tools is an additional installation that improves some hardware’s performance in Parallels Desktop for Mac and provides some additional functionality. For example, after you’ve installed Tools, you can share data on the Windows Clipboard with the Mac OS, you will have more control over the display resolution and color depth, and your network connections and sound quality will be improved. To install Tools, perform the following steps:
- With Windows running in the virtual machine, choose VM, Install Parallels Tools. You’ll see a sheet explaining what installing Tools does for you.
- Click OK to clear the prompt and start the installation. You’ll see the Parallels Tools Setup Wizard (see Figure 6.11).
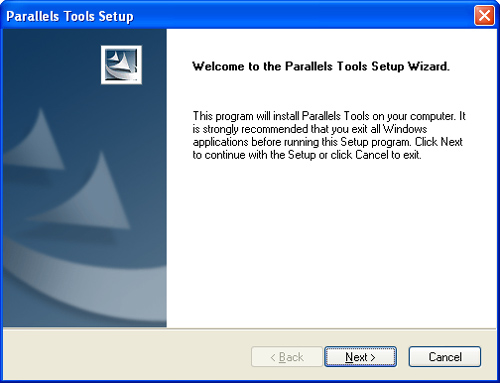
Figure 6.11 The Parallels Tools Setup Wizard will guide you through the installation of the Tools software.
- Click Next. You’ll see the Choose Destination Location screen.
- Accept the default location by clicking Next.
- Choose the Complete option and click Next.
- Click Install. The installation process will start. You’ll see a warning prompt explaining that Tools installs unsigned drivers, which means that they won’t be recognized by Windows and you’ll see warning prompts when they are installed.
- Click OK to temporarily disable the unsigned driver warnings. The installation process will finish; when it does, you’ll see the Installation Complete screen.
- Leave the Yes radio button selected and click Finish. The Windows environment will restart and you’ll move back to the Windows Login screen.
After you’ve installed Tools, your Windows installation in a virtual machine is complete and you can move to the next chapter to learn how to control the machine and run Windows in it.
Making Parallels Desktop for Mac Permanent
After you’ve used Parallels Desktop for Mac for a while, you’ll likely come to depend on it if you need to run Windows regularly as I do. To be able to do so, you’ll need to purchase a permanent activation key for the application. At press time, the cost of this key was $79.99 direct from Parallels. However, because you’ve purchased this book, Parallels has provided a $10 discount for you. To take advantage of this offer, which expires 10/30/06, click here.
After you’ve obtained the permanent key, update your Parallels Desktop for Mac by performing the following steps:
- While running Parallels Desktop for Mac, choose Help, Activate Product.
- In the resulting sheet, enter the activation key you purchased.
- Click Activate. You’ll see a prompt telling you that your activation was successful.
- Click OK to clear the prompt. Your copy of Parallels Desktop for Mac is now permanent.
note
If you decide that you no longer want to use Parallels Desktop for Mac, you can remove it using the uninstall application that was installed on your Mac when you installed Parallels Desktop for Mac.