
Chapter 8. RUNNING WINDOWS IN A VIRTUAL MACHINE
After you’ve created and configured a Windows virtual machine, you’ll be ready to use it to run Windows. In this chapter, you’ll learn how to accomplish the following:
- Configuring Windows
- Connecting to a Local Network and the Internet
- Protecting the Windows VM from attack
- Installing software
- Installing printers
- Moving data between Windows and Mac OS X
Performing Basic Windows Configuration
Just like Mac OS X, Windows XP enables you to configure many different aspects of the operating system to suit your preferences. However, because you are running Windows in a virtual machine, a number of the configuration options simply don’t apply because they are controlled by the Mac OS. That’s because Windows is really running as just another application under the control of Mac OS X.
Prime examples of this are the energy-saving options available under Windows. Because you are running Windows as a Mac application, the energy-saving settings of Mac OS apply because they control the Mac hardware.
Still, there are a number of configuration options you’ll want to set in the virtual Windows environment. Windows uses the Control Panel to perform system configuration. To open and configure the Control Panel, do the following:
- Choose Start menu, Control Panel. The Control Panel will open in the default Category view.
- Click the Switch to Classic View link in the Control Panel pane located in the upper-left corner of the window. You’ll see the control panels shown individually instead of grouped into categories (see Figure 8.1). Many Windows users (myself included) prefer this view because it makes getting to individual control panels faster and easier.
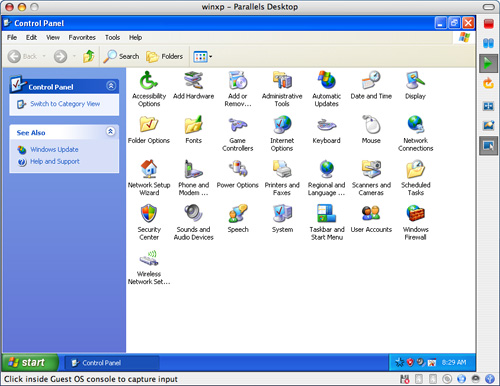
Figure 8.1 The Windows Control Panel (shown here in Classic view) provides access to tools you can use to configure your virtual Windows XP environment.
3. To open a control panel, double-click its icon. The panel will open and you’ll be able to use its controls (see Figure 8.2).

Figure 8.2 Here is the Display Properties control panel that enables you to configure the Windows XP display.
In the following sections, you’ll learn about some of the more important control panels that you are likely to need to use.
Adding and Removing Software
Despite its name, the Add or Remove Programs control panel is typically used more frequently to remove applications installed under Windows than it is to install them. That’s because most Windows applications come with an installer application that installs the application for you so you don’t need to use the control panel to do so (you’ll see an example of this a little later in this chapter). However, you should always use this control panel to remove applications from Windows. When most Windows applications are installed, multiple files are installed in various locations and the core OS is often changed. Using the remove function of this control panel will give you the best chance to uninstall an application, removing its associated files, and undoing system changes that were made when the application was installed.
When you open the Add or Remove Programs control panel, it will generate a list of all the applications installed under Windows and present them in the right part of the panel (see Figure 8.3).

Figure 8.3 There aren’t many Windows applications installed in this virtual environment yet.
Along the left side of the panel are buttons that change the mode in which the panel is operating. These are as follows:
- Change or Remove Programs This option is the default and enables you to remove or change installed applications.
- Add New Programs You aren’t likely to use this option very much, but if you select it, you can choose to install applications from a disc. You can also use new Windows features, drivers, and such by clicking the Windows Update button.
- Add/Remove Windows Components This button will open the Windows Components Wizard. This wizard enables you configure various Windows components, such as default applications (for example, Outlook Express, which is the default email application for Windows), system components, and so on.
- Set Program Access and Defaults This function enables you to configure the default applications for a specific task, such as browsing the Internet or working with email. When you select this option, you’ll see three radio buttons. If you choose Microsoft, standard Microsoft applications will be used as the defaults. If you choose Non-Microsoft, applications from other than Microsoft can be used. If you choose the Custom option, you can set specific default applications, whether or not they came from Microsoft.
To remove an application from Windows, select the Change or Remove Programs option. Then select the application you want to remove. Information about your usage of the application will appear on the right side of the window along with the date on which you installed it (see Figure 8.4). To remove the application, click Remove. The appropriate uninstaller application will launch and, hopefully, will remove the application and all of its components.
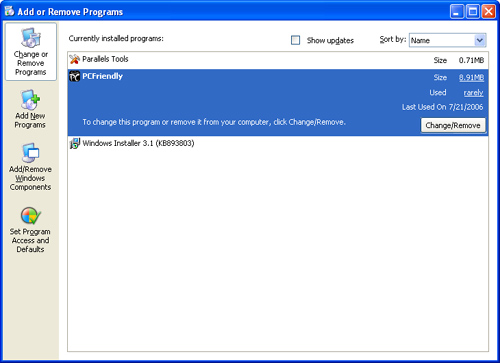
Figure 8.4 I use the Mac to watch DVDs, so there’s no need to keep the PCFriendly application; clicking the Change/Remove button will get rid of it.
As you explore Windows, you’ll probably add quite a few applications to it. Remember to periodically visit this control panel and remove any applications that you don’t use to keep the size of the Windows disk image file down.
Configuring Automatic Updates
Windows is subject to constant attacks of various kinds. Microsoft regularly releases updates to Windows, most of which are to correct a security problem. Use the Automatic Updates control panel to configure how you want these updates to be handled. When you open the Automatic Updates control panel, you’ll see the following choices:
- Automatic With this option, Windows will automatically check for updates and then download and install any that it finds. You can choose the timing of these checks using the two drop-down lists. You should use this option so you don’t have to worry about updates; Windows will handle them for you automatically.
- Download Updates for Me, but Let Me Choose When to Install Them The difference between this option and Automatic is that Windows will download updates automatically, but will prompt you for permission to install them.
- Notify Me but Don’t Automatically Download or Install Them I don’t recommend this option because all it does is tell you when updates are available. You’ll have to choose to download and install them manually.
- Turn Off Automatic Updates I definitely don’t recommend this option. This disables any automatic update functions so you’ll have to manually check for, download, and install updates. Because you aren’t likely to do this regularly, you’d probably be leaving your Windows system more vulnerable than necessary.
For any of the automatic options to work, your Windows system must be running and be able to connect to the Internet. Because you are running Windows as a Mac application, you’ll probably not have it running all the time. So, if you run Windows infrequently, you’ll also want to check for updates manually. You can do this by clicking the Windows Update website link on the Automatic Updates control panel.
Setting the Windows Date and Time
If you’ve installed Parallels Tools and enabled the Time Synchronization function, you don’t need to worry about the date and time settings because the Windows environment will take these settings from the Mac OS. If you haven’t done this, you definitely should (refer to the two previous chapters for information about the Parallels Tools software).
Configuring the Windows Display
The Windows Display Properties control panel enables you to configure various display settings, including resolution, desktop picture, and so on (see Figure 8.5).
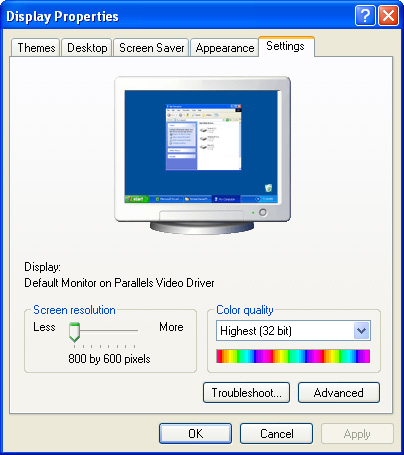
Figure 8.5 The Settings tab of the Display Properties control panel enables you configure the display’s resolution.
The Display Properties control panel has the following tabs:
- Themes Use this tab to choose the theme Windows is using; themes include a desktop picture, title bar and other colors, icons, sounds, and other customizable elements of the Windows interface.
- Desktop The Desktop tab enables you to choose and configure a desktop picture. You can use one of the Windows default images or you can choose your own. You can also position the image and choose a color for the border around it when the image doesn’t fill the entire desktop.
- Screen Saver You don’t need to use this tab because the Mac OS screen saver will be used (remember that from Mac OS X’s perspective, Windows is just an application).
- Appearance With the Appearance tab, you can change the colors and style of windows and buttons, choose a color scheme, and default font size.
- Settings This tab configures the displays Windows uses. This area is a bit different than it would be running Windows on a Windows PC. Because of this, it’s covered in more detail in the following text.
Windows running in a VM uses the Mac’s display settings and when you open the Settings tab of the Display Properties control panel, you’ll see that the selected display is called “Default Monitor on Parallels Video Driver” (refer to Figure 8.5). The display Windows is using is a virtual display (the hardware display is whatever your Mac is using).
How the screen resolution setting affects your Windows view depends on the mode in which you are operating: Windowed or Fullscreen. When you are operating in Windowed mode, the Screen Resolution setting controls the size of the VM’s window. If you increase the resolution beyond what can be displayed on your Mac’s desktop, you’ll lose access to the toolbar and other window controls (see Figure 8.6). If this happens, just open the Settings tab and move the slider to the left to reduce the size of the Parallels Desktop for Mac window until it fits on the desktop again.

Figure 8.6 If this Mac is using a 1024x768 resolution or less, the full parallels desktop for Mac wouldn’t be visible.
note
Many Windows control panels have OK and Apply buttons. OK saves your changes and closes the control panel. Apply saves your changes, but leaves the control panel open.
When you are in Fullscreen mode, the Screen Resolution slider controls the resolution of the Windows desktop as it would were you running Windows on a Windows PC.
Be aware that the screen resolution you set will be in effect in both modes. So, if you set the resolution to be fairly small, when you move to Fullscreen mode, the Windows environment might not even fill the desktop. You can use the Desktop Properties control panel to increase its resolution until it does.
You’re likely to use Windows in one mode or the other more frequently. Set the resolution for that mode and you’ll be able to work around it or change the display resolution as needed.
There are also two Parallels Desktop for Mac preferences that affect how the two resolutions (Mac OS X and Windows) influence each other when you work with the Fullscreen mode (see “Setting Parallels Desktop for Mac Preferences” in Chapter 7, “Controlling and Configuring a Windows Virtual Machine,” for the details).
Most Intel Macs support dual monitor display. If you have two displays connected to your Mac, you can display the Windows environment in Fullscreen mode on one display and Mac OS X on the other. This is an ideal situation because you basically are running each OS on its own display. Move the Parallels Desktop for Mac to one of your displays and then enter the Fullscreen mode. You’ll have Windows on one display and Mac OS X on the other. This makes it really easy to use both operating systems at the same time.
Configuring the Keyboard for a Windows VM
The Keyboard Properties control panel enables you to set basic properties of the keyboard you are using, such as repeat delay, repeat rate, and the cursor blink rate. Use the respective sliders to configure these properties of the keyboard you are using.
Configuring the Mouse/Trackpad for a Windows VM
The Mouse Properties control panel also has a number of tabs, which are as follows:
- Buttons This tab configures the buttons on a mouse. You can set the primary (left by default) and secondary (right by default) buttons, configure the double-click speed, and enable ClickLock (you can drag things without holding a mouse button down).
- Pointers This tab enables you to change all sorts of things about the pointer, including the type of pointer that Windows uses. You can choose from among many schemes Windows includes and you can customize schemes if you want to.
- Pointer Options These settings are more practical than those on the Pointers tab and include pointer speed, snapping, and visibility settings. (If you want to be mesmerized, turn the pointer trails option on and move your mouse around.)
- Wheel Use this tab to set the speed at which the scroll wheel on a mouse moves, either based on number of lines or by one screen per roll.
- Hardware You probably won’t need to use this tab, which enables you to view the properties of the mice connected to your Mac and to open the Windows troubleshooter should you ever have trouble with a mouse.
Configuring Sounds Under a Windows VM
The Sounds and Audio Devices Properties control panel enables you to configure various audio settings (see Figure 8.7).
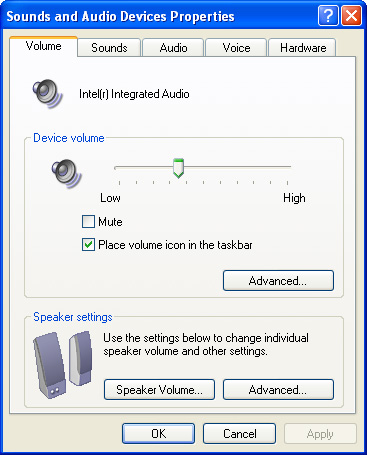
Figure 8.7 The Volume tab of the Sounds and Audio Devices Properties control panel enables you to set the current volume level and to choose a speaker configuration.
The tabs of this control panel are as follows:
- Volume Use the slider on this tab to set your system’s volume level using the slider. You can mute the sound output with the Mute check box. Click the Advanced button in the Device volume section to set the relative volume levels for CDs, general system sounds, and so on. Use the Speaker Volume button to set the balance between left and right channel volume. Use the Advanced button in the Speaker Settings section to choose a sound profile for the speaker system you are using.
- Sounds This tab enables you to set the sounds that are associated with specific events. You can use the Sound Scheme drop-down list to choose an overall scheme. In the lower part of the window, you can then select specific events and choose the sound associated with them to customize the current scheme.
- Audio, Voice, and Hardware These tabs are used to configure specific audio devices. Because you are using a Mac to run Windows, it’s likely that you’ll just want to leave these settings at their defaults.
Tip
You can mute the sound from the Windows environment by clicking the Speaker icon located in the Status bar in the bottom-right corner of the Parallels Desktop for Mac window and choosing Mute.
Configuring the Taskbar and Start Menu
The Windows taskbar is a very important element of the OS because it provides information to you and enables you to control the system by choosing files or applications to open, managing open applications, and so on. The Start menu is also important because you can use it to quickly navigate to just about anything on the Windows partition of the computer. You can configure various properties of these elements with the Taskbar and Start Menu Properties control panel (see Figure 8.8).

Figure 8.8 Use the Taskbar tab of the Taskbar and Start Menu Properties control panel to determine how your Windows taskbar looks and works.
On the Taskbar tab, you’ll find the following options:
- Lock the Taskbar With this enabled, the taskbar will be locked in its current location and at its current size. If this check box is unchecked, you can move the taskbar and resize it with the mouse.
- Auto-Hide the Taskbar When you enable this, the taskbar will disappear when you aren’t pointing to it.
- Keep the Taskbar on Top of Other Windows With this active, the taskbar always stays on top of any windows open on the desktop so that you can use it regardless of the windows you have open.
- Group Similar Taskbar Buttons When you open applications and windows within applications, each will be shown as a button on the taskbar. When this option is selected, similar windows are grouped together. For example, if you have multiple Internet Explorer windows open, each of their buttons will be next to each other on the taskbar.
- Show Quick Launch The Quick Launch section appears just to the right of the Start menu. You can drag icons to this area so that you can launch items by clicking their icons. If this check box is checked, you’ll see the Quick Launch area and you can add icons to it.
- Show the Clock With this checked, the time is displayed on one end the taskbar (the right end with the taskbar at the bottom of the desktop).
- Hide Inactive Icons By default, the Windows System Tray appears on the right side of the taskbar. The System Tray presents application and other icons that you can click to open specific controls or to perform actions. If you check the Hide Inactive Icons check box, icons that aren’t actively in use (perhaps the related application is not running) aren’t shown in the System Tray. You can click the Customize button to configure specific icons in the System Tray. For example, you might want most inactive icons to be hidden, but want a specific icon to be available whether or not the associated application is running.
Use the Start menu tab to customize your Start menu. There are two basic options. Click the Start Menu radio button to use the standard XP Start menu. Click the Classic Start Menu radio button to use the Start menu from older versions of Windows. After you’ve selected a Start menu configuration, use the Customize button to configure it. For example, you can choose specific applications (such as your web browser) and folders to include on the menu.
Configuring Windows User Accounts
Like Mac OS X, Windows XP supports multiple user accounts. When you installed Windows, you created at least one user account, and might have created more than one. Access the User Accounts Properties control panel to set up more user accounts and to configure the user accounts that have been created (see Figure 8.9). For example, you can click the Create a New Account link to create new user accounts. Or, you can click the Change an Account link to reconfigure an existing account. Most user account tasks are accomplished by clicking the link for the action you want to complete and then filling in any required information.
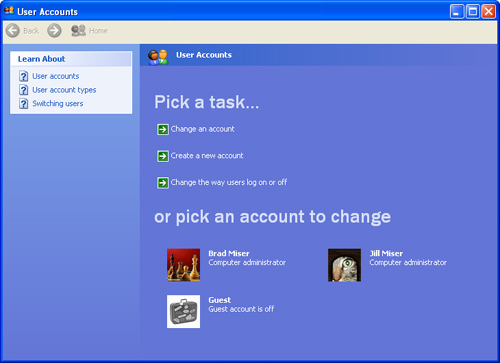
Figure 8.9 If you’ll be sharing a virtual Windows on your Mac, you can create multiple user accounts for others to use.
Activating Windows XP
Like most software companies, Microsoft is very concerned with piracy and has taken steps to try to prevent people who haven’t obtained Windows legitimately from using it. One of the steps that Microsoft has implemented in Windows is activation. During activation, a unique identifier is created for your Windows installation based on your Windows product key and the hardware you are using. This identifier is required to run Windows after it has been installed on a computer for 30 days. When you activate a computer, this identifier is transmitted to Microsoft. Should this same identifier be provided during a different activation session, the activation would be denied and the copy of Windows could not be used.
As you work with a new Windows installation, you’ll be prompted to activate it. You’ll also see a count down toward the 30-day activation deadline. Until you reach 30 days after the installation date, activation won’t affect your use of Windows except for the regular prompts you’ll see. After 30 days, you’ll have to activate Windows to be able to use it.
After you’ve activated Windows on a specific computer, you won’t be able to use that copy of Windows on a different computer (which is the whole point). To do so, you’ll probably have to call Microsoft to have the original activation disabled (which means you won’t be able to use Windows on the original computer on which you installed it).
note
Because activation is based on a specific piece of hardware, you don’t need to worry about it preventing you from reinstalling Windows on the same computer. You can reinstall Windows on the same Mac as many times as you’d like. Activation will only affect the installation of Windows on a different computer on which a specific copy was activated.
Because of this, I recommend that you don’t activate Windows until you must to keep it running. This will give you 30 days to use it and make sure you’ve set it up on the Mac on which you’ll want to run it over the long run.
When the 30-day grace period is close to expiring, the easiest way to activate Windows is via the Internet. After you’ve protected your Windows installation and established a connection to the Internet, you can activate your copy of Windows by choosing Start menu, All Programs, Activate Windows. The Activation Wizard will appear. Choose the Yes, Let’s Activate Windows over the Internet Now radio button and click Next. Follow the onscreen instructions to complete the activation process.
You can only activate one copy of Windows on the same computer, too. This means that you can activate Windows under a virtual machine or under Boot Camp, but not both (without buying two Windows licenses anyway). If you want to try both options, you can do so for up to 30 days without activating Windows. When you decide which option works better for you, activate Windows in that environment.
Connecting a Windows Virtual Machine to a Network and the Internet
It’s very likely that you’ll want to connect your virtual Windows to a local network and to the Internet. The good news is that because your Windows installation is actually running within an application, namely Parallels Desktop for Mac, it takes its network and Internet connections from the Mac on which it is running. So, as long as your Mac is connected to a network and the Internet, you don’t need to do anything else to be able to access network and Internet resources from the Windows environment. The Parallels Desktop for Mac application will take care of all the details for you. You’ll be ready to run Internet applications and access network resources as soon as you run Windows in a VM.
note
If you haven’t set your Mac up for network or Internet access, see my book Special Edition Using Mac OS X Tiger for help.
Although your Windows environment gets its connection from the Mac, from the network’s perspective, it is a separate environment. For example, the virtual Windows environment will have its own IP address just as it would if that copy of Windows were running on a separate PC. This enables you to do some useful things, such as using standard network file-sharing tools to share files between environments on the same Mac and with the Windows environment and different computers on the same network (you’ll learn about this in the last section of this chapter).
Protecting the Windows Virtual Machine
The Windows world is a dangerous place. There are millions of viruses waiting to attack your Windows environment and not many fewer hackers who would love to access your Windows environment to accomplish their dirty deeds. As soon as you connect your Windows environment to a network and the Internet, you need to protect it as much as you can. Protecting the Windows environment is also important because you’ll need to do that to protect your Mac OS X environment, too.
Because this is such an important topic and is done the same way whether you run Windows via Boot Camp or via Parallels Desktop for Mac, I’ve devoted Chapter 4, “Protecting Your Windows Environment from Internet Attacks,” to this topic. Read that chapter and accomplish the tasks recommended there to protect your virtual Windows environment from attacks. At the least, you need to install an antivirus application. You should also protect your virtual machine from hacking and spyware/adware as well.
Installing Software in a Windows Virtual Machine
Installing software in a virtual Windows environment isn’t all that different from installing software on a Mac. One difference is that almost all Windows applications are installed with an installer application, whereas many Mac applications are installed by dragging a file or folder into the Applications folder. But, many Mac applications are installed with an installer application too, so running an installer application on Windows won’t be hard if you have used one on the Mac. (And because you’ve installed Parallels Desktop for Mac, you have used at least one installer application.)
There are two primary sources of applications: Internet downloads and software on a disc. Installing applications from either source is similar. Refer to Chapter 4 for an example of installing an application from an Internet download (the example is Norton AntiVirus). To install an application from a CD or DVD, simply insert the disc into your Mac; the installer will run under the Windows environment. From there on, just follow the onscreen instructions to complete the installation.
Installing Printers in a Windows Virtual Machine
You can work with various kinds of hardware in the Windows environment. A lot of standard Windows hardware will work fine under the Windows VM. In this section, you’ll see examples of the most common kind of hardware devices you might want to use with your Windows VM: printers.
To use USB hardware devices with your Windows environment, make sure the USB Autoconnect property is turned on for that environment. Open the Property Page view (the Windows environment must be turned off) and click Edit. Choose USB Controller and make sure the Enabled and Autoconnect USB devices check boxes are checked. Click OK and save your changes.
When I was writing this, Parallels Desktop for Mac supported only USB 1.1 in the Windows environment. Although this will work for many USB devices, it doesn’t offer the performance of USB 2, especially for devices that move lots of data, such as hard drives. If a hardware device requires USB 2 support, you’ll have to run it under the Mac OS or under Windows running via Boot Camp. Hopefully, Parallels will soon add support for USB 2 to Parallels Desktop for Mac.
Adding a USB Printer to the Windows VM
To configure a printer in the Windows environment that is connected to a USB port on your Mac, perform the following steps:
- Disconnect the printer from your Mac.
- In the Windows environment, download and install the Windows printer software for the printer you are configuring.
- Start the installation process.
- Connect the printer to the computer (some installers will prompt you to do this). The Windows Hardware Wizard should detect the printer and display a prompt in the System Tray (see Figure 8.10).
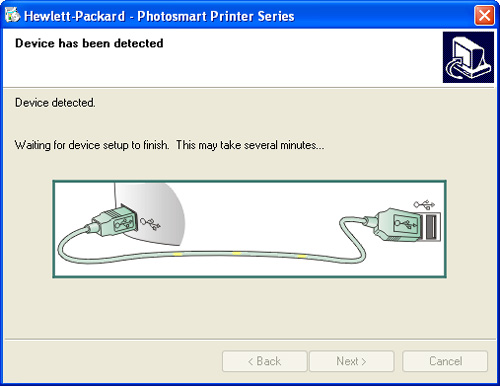
Figure 8.10 Windows has detected the USB printer connected to the Mac’s USB port.
5. Follow the onscreen instructions to complete the printer installation. The printer will be available from the Windows environment.
Adding a Shared Printer to the Windows VM
You can also share one or more printers connected to the Mac on which you’re running Windows, to other Macs on a network, or to AirPort Base Stations on a network to which your Mac is connected with the Windows environment. Configure one or more Macs to share their printers or configure an AirPort Base Station to share the printer connected to them. (For help with these tasks, see my book Special Edition Using Mac OS X Tiger.)
After you’ve enabled printer sharing on the Mac to which the printer you want to use in Windows is connected, download and install the Windows Bonjour for Windows software from Apple’s website. This will enhance Windows’ capability to easily find and connect to resources on your network, including printers. Follow these steps to download and install Bonjour for Windows:
- Navigate to www.apple.com/support in your web browser.
- Search for “bonjour for windows.”
- Open the Bonjour for Windows webpage.
- Click the link to download it to your Windows environment.
- Follow the onscreen instructions to install the Bonjour for Windows software on your computer. By default, a Bonjour Printer Wizard shortcut will be created on the Windows desktop.
To share a printer connected to a Mac or AirPort Base Station, its driver must first be installed in the Windows environment. Support for many kinds of printers is built into Windows, such as most of HP’s Laserjet printers. You can also download a Windows driver from the manufacturer’s website. You can try to run the Bonjour Printer Wizard first and if it can’t find the appropriate driver, you can download and install the driver you need and then come back to the wizard.
In some cases, you may have to physically connect the printer to the computer to get the Windows driver installed even if you’re going to share the printer from a Mac or AirPort Base Station. For example, to get an HP Photosmart 7760 driver installed, I had to download and run the installation software, connect the printer directly to a Mac running Windows, and complete the installer. After that, the correct driver was available in the Bonjour Printer Wizard so that I could connect the printer to an AirPort Base Station to share it with the Windows environment using the wizard.
Use the Bonjour Printer Wizard to configure a printer in Windows by performing the following steps:
- Launch the Bonjour Printer Wizard. You’ll see the first screen of the wizard.
- Click Next. You’ll see a list of the printers being shared (see Figure 8.11).

Figure 8.11 The Bonjour Printer Wizard makes it simple to add a printer to the Windows environment.
3. Select the printer you want to use and click Next. You’ll see the printer driver selection screen. The wizard will attempt to locate the appropriate driver for the printer you’ve selected.
4. Accept the default selection or browse for the correct printer driver and when it is selected, click Next. A summary of the printer’s information will appear. (If you can’t find the correct driver, you can try a generic one, but that might or might not work. You’ll have better results if you install and choose the correct driver for the printer.)
5. Click Finish. The printer will be installed and configured in the Windows environment. When the process is complete, the wizard will close.
6. Repeat steps 1–5 for each printer you want to use from Windows.
To see the printers configured in your Windows environment, open the Printers and Faxes control panel (see Figure 8.12). Each printer will be shown; these printers will also be available in the Print dialog box that appears when you print a document. The printer marked with a check mark is the default printer.

Figure 8.12 This Windows environment has access to two shared printers and one printer connected to the Mac’s USB port.
Moving Data Between a Windows Virtual Machine and Mac OS X
As you use Windows, you’ll likely want to move data between that environment and your Mac OS X environment or even to other computers. There are several ways to do this, which is where this section comes in.
note
Before you share data between your Windows environment and the Mac, you should make sure the Windows environment is as protected from viruses and other threats as much as it can be. See Chapter 4 for the details about protecting Windows.
Copying and Pasting Data from Windows to Mac (or Mac to Windows)
Installing Parallels Tools and enabling the Clipboard Synchronization tool (it’s enabled by default) allows the Windows and Mac environments to share data on their Clipboards. To see how this works, do the following:
note
To be able to copy and paste data between the Mac and Windows, you must enable the Clipboard Synchronization tool. Refer to “Configuring Parallels Tools” in Chapter 7 to learn how to configure this setting.
- In a Windows application, copy the data you want to paste into a Mac document.
Tip
To see the current contents of the Clipboard, open the Parallels Tools Center by double-clicking its icon in the System Tray. Select the Clipboard Synchronization tool and you’ll see the Clipboard’s content in the right pane of the window.
2. Click on the Mac desktop to move into the Mac OS X.
3. Open the document into which you want to paste the data.
4. Paste the data (see Figure 8.13).

Figure 8.13 Here you can see a TextEdit doc containing text copied from the Windows Notepad application in the Windows VM.
Using File Sharing to Share Data
Mac OS X has long been able to share files with Windows computers. A Mac running a Windows VM is still running Windows so you can use the same steps to share files from a Windows VM that you can with a PC running Windows.
note
Part of the Parallels Tools default installation is the creation of a Parallels shared folder that you can use to share files. However, you can use standard file sharing to share files from the Windows environment with the Mac OS X on the same Mac or other computers on the network. The Parallels Tools tool configures the same properties, but it’s better to learn how to share any folder you choose.
First, enable and configure file sharing in the Windows environment. Then, connect to the shared folder from the Mac OS.
To enable file sharing from the Windows VM, do the following (you have to do these steps only once):
- Open the Control Panel and then open the Network Setup Wizard control panel.
- Click Next.
- Click Next again.
- Select the middle radio button (This Computer Is Connected Through a Router…) and click Next.
- Enter a description and name for the Windows VM and click Next.
- Leave the default workgroup name in the next window and click Next.
- Check the Turn on File and Printer Sharing radio button and click Next.
- Click Next on the Ready to Apply Network Settings window.
- In the next window, choose the Just Finish the Wizard radio button and click Next.
- Click Finish.
- If prompted to restart Windows, do so. File sharing will be started in the Windows VM and you’ll be ready to share files.
To configure a folder to share from the Windows environment, perform the following steps:
- Select the folder you want to share.
- Right-click on it and choose Properties from the contextual menu. The Properties dialog box will appear.
- Click the Sharing tab.
- Check the Share This Folder on the Network check box.
- Enter the name of the folder as you want it to be when you access it from other environments (you can leave the default name).
- If you want people who access the files in the shared folder to be able to change them, check the Allow Network Users to Change My Files radio button (see Figure 8.14).
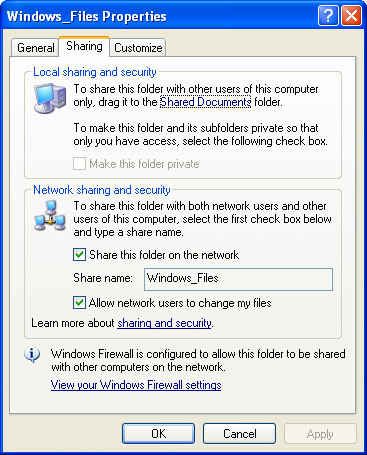
Figure 8.14 Use the Windows_Files Properties dialog box to configure sharing for a folder that you want to access from Mac OS X.
7. Click OK. The folder will be shared and you’ll see the “hand” under its icon to indicate that it’s a shared folder (see Figure 8.15).
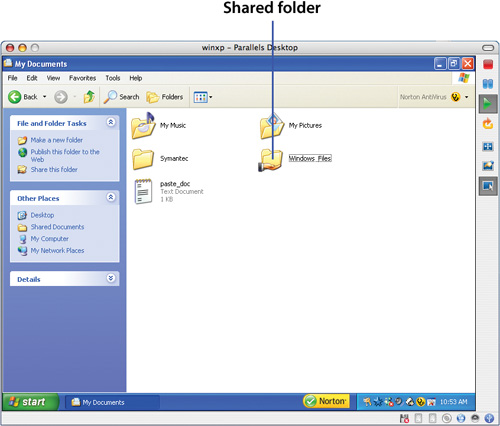
Figure 8.15 Use the Windows Properties dialog box to configure sharing for a folder that you want to access from Mac OS X.
To access a shared folder from Mac OS X, do the following:
- Open a Finder window and select the Network icon.
- Open the folder with the name of the workgroup you created (the default is mshome).
- Select the icon with the name of the Windows VM that you entered when you enabled file sharing. You’ll see the Connect button (see Figure 8.16).

Figure 8.16 When you’ve selected a Windows environment that is sharing files, you can connect to it.
4. Click Connect. You’ll see the File System Authentication dialog box (see Figure 8.17).
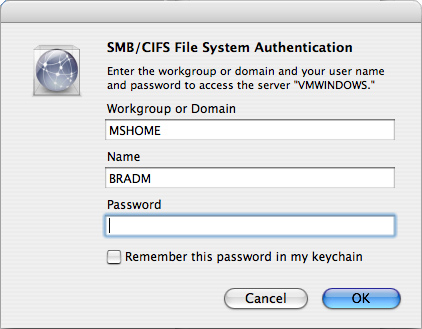
Figure 8.17 Use this dialog box to log in to the shared Windows environment.
5. Enter the workgroup name and the username and password for your Windows account (if you don’t use a password to log in to Windows, leave the Password field empty).
6. Click OK. You’ll see the selection volume dialog box (see Figure 8.18).

Figure 8.18 Use this dialog box to select the folder you want to access.
7. Choose the folder you want to access and click OK. The shared folder will be mounted on the Mac OS X desktop and you can use it just like a folder under Mac OS X (see Figure 8.19).

Figure 8.19 The Windows_Files folder is a Windows folder being shared with Mac OS X.
You can store files you want to use in both environments in a shared Windows folder just as you store them under Mac OS X. For example, to make a file you’ve created using a Mac application, place it in the shared Windows folder and it will appear in the folder under Windows. Or, place a Windows file in that folder and you’ll be able to access it from Mac OS X.
You can use the same steps to access shared Windows files from any Mac on your network.
Living in both worlds—Mac and Windows? Here are some books to help you do it better
Special Edition Using Microsoft Office 2003
0-7897-2955-5
If you are looking for hands-on guidance and unbelievably useful reference material, this is the book that shows you how to really use Microsoft Office. It also shows you the best way to solve problems—the authors actually point out what works and what doesn’t with a no holds barred approach. Written by the Office Dream Team, the most well recognized and respected authoring team in the business, Ed Bott and Woody Leonhard.
Click here for your special low price with free shipping!
Special Edition Using Microsoft Windows XP
0-7897-3279-3
And want “from the trenches” advice that covers everything you need to know about using Windows XP? Well, this is the book for you. It covers it all—from networking, internet connectivity, sharing between applications and much more!
Click here for your special low price with free shipping.

Special Edition Using Mac OS X Tiger
0-7897-3391-9
As a Mac User, you probably feel you know Mac OS X Tiger like the back of your hand. But there are many unknown features that will help you make OS X Tiger work the way you want it to. This comprehensive guide to the operating system shows you how to get the most out of the OS and all its tools. It is the only Mac OS X Tiger book you need!
Click here for your special low price with free shipping!
![]()
Visit us at www.quepublishing.com for more great titles!