
Creating the Activity Tab
Before you can add any social functionality, you need to create the tab in the app from which people will access Twitter, which is also where they will see information about wines added to the cellar.
Writing the query
The Activity tab is where everything begins for the user. It displays all the recent wines added to the cellar. Because jQuery Mobile handles page navigations via hashChange events, you create a small function to handle the generation of Google Maps for the Find tab. You expand that build in some queries that will be fired when the Activity tab is active. To start, follow these steps:
1. In global.js, after the existing variables (i.e. after the line beginning var infowindow), add the following code:
$(window).bind(‘hashchange’, function(e){
e.preventDefault();
newHash = window.location.hash.substring(1);
if (newHash == “find”) {
if ($.trim($(“#map”).html()) == “”) {
navigator.geolocation.getCurrentPosition(successPosition,
errorPosition);
}
}
});
2. Because you need to capture when the app first loads (which is an automatic indication that the Activity is active since that is the opening view), you need to add some code to the script to handle that situation. To do this, change the if statement to the following:
if (newHash) {
if (newHash == “find”) {
if ($.trim($(“#map”).html()) == “”) {
navigator.geolocation.getCurrentPosition(successPosition,
errorPosition);
}
}
else if (newHash == “activity”) {
grabActivity();
}
}
else {
// the app just loaded, activity
grabActivity();
}
This script checks to see if the URL has a hash. If so, it runs through the same loop you used for the Find tab. However, this time you are checking to see if the newHash variable matches the activity, which indicates that the user is on the Activity tab. If this occurs, you want to fire a new function called grabActivity, for which you write scripts to pull from your database of Wine Cellar Activity.
3. Next, you build the grabActivity function that connects the database to pull in the activity:
function grabActivity () {
db.transaction(function (tx) {
tx.executeSql(“SELECT wine_name, wine_description, activity_note, activity_quantity, activity_id from activity INNER JOIN wines on activity.wine_id= wine.wine_id order by created_at desc LIMIT 25”, null,
function(tx, res) {
if (res.rows.length == 0) {
// there are no results
}
else
{
//results go here
}
})
});
}
This code runs a query to extract the following data from the Activity table, sorted in descending order based on the Created At field:
• Name of the wine (wine_name)
• Description (wine_description)
• Notes on activity relating to the wine (activity_note)
• Quality of wine in the cellar (activity_quantity)
• The ID of any activities relating to the wine (activity_id). This lets you join the wines to activities that relate to each wine and to grab some of the wine detail. This join enables you to pull everything that has been added and in the correct order.
Working with templates
Now that you have written the query, you can start playing with the results. Similar to the way you dealt with data coming out of the Color table, you tackle the same thing with your Activity feed.
Before you start collecting and manipulating data for the activity feed, you need to understand some additional ways to create HTML with data that is returned via your HTML database. As discussed previously, you can simply create a JavaScript string variable and append data to the end of it like so:
var code = “”;
for (var i = 0; i < 10; i++){
code += “<p>Hi!</p>”
}
Although this works, it’s not the best practice for outputting complex HTML markup. It also can be very hard to update and make changes, because making a small mistake can mess up your HTML structure. An alternative solution is called templating. Using a template can help you reuse HTML structures very easily throughout your projects.
There are several template libraries that can be used in JavaScript. However, the one that we recommend is called HandlebarsJS. Handlebars uses regular HTML, but with special Handlebars expressions that are embedded and that return values from Handlebars templates which you write. To find out more about Handlebars and how to use it, see http://handlebarsjs.com.
To use Handlebars, you must add the library in the <head> section. Follow these steps:
1. Add the following code to the end of the <head> section in index.html:
<script src=”http://cloud.github.com/downloads/wycats/handlebars.js/handlebars-
1.0.0.beta.6.js”></script>
For this example, use the content delivery network (CDN) from GitHub to obtain the cached JavaScript file. For a production-ready application, you might want to copy the source locally to increase performance.
2. Define your template structure. To use Handlebars, you must create a template in a script tag with the desired HTML. Add this code before the closing </body> tag in index.html:
<script id=”activity-template” type=”text/x-handlebars-template”>
....
</script>
This allows you to create a re-usable template that you can reference in future versions of the activity feed. If you want to change the structure of the feed, you just edit the contents.
Handlebars uses {{ }} to define areas of the HTML that should be switched with their JSON counterparts. However, it also has built-in functions to help you iterate through loops. For example, if you want to loop through objects, you could do so by using the following code:
{{#each object}}
<p>{{object.name}}</p>
{{/each}}
In this example, the code loops over entry in the object and outputs the property of name. You open the loop by using #each and close the loop by adding /each. While this may seem confusing, this code is conceptually no different than the simple for loops that you have been working with:
for (i = 0; i < object.length; i++) {
code += ‘<p>’+object[i].name+’</p>’;
}
Using this method when writing your Handlebars templates, you should better make use of the #each and /each statements.
Additional functionality of HandlebarsJS
While using templates is a great way to simplify the creation of HTML markup, sometimes you may want to add some logic. For example, you may want to add a new class to an element depending on the contents. While traditional template libraries do not have support for logic, HandlebarsJS has helper files that serve logic functions within your application. To start creating helpers, follow these steps:
1. Create a new file in your assets/js directory called helpers.js and add it inside your <head> area as you have done previously with new JavaScript files.
2. Add the following code, which acts as a boilerplate for creating helper functions.
Handlebars.registerHelper(helperName, function(x) {
…
});
In the previous function, you are registering a new helper with Handlebars called helperName, which can be changed to anything you want during your creation. The variable x is the data passed to the function. Inside the function you can perform any functions that you want based on the logic you need to perform.
On the template side, you only need to add the following code to invoke the helper.
{{#each object}}
{{helperName object}}
{{/each}}
This code sends the object data to the helperName function to output a result. It’s that simple to do!
Using templates to build the activity feed
Since you have an understanding of templates through Handlebars, you can start to build the template to generate the activity feed.
1. First, you need to build the template for your data, which you can place in the <script id=”activity-template” type=”text/x-handlebars-template”> element you added earlier:
<script id=”activity-template” type=”text/x-handlebars-template”>
<li>
<a href=’#wineDetail’ onclick=’viewWine({{activity_id}}’>
<h2>{{wine_name}}<h2>
<p>Added {{activity_quantity}} to My Cellar</p>
<p class=”pad”>{{timeDiffActivity created_at}}</p>
</a>
</li>
</script>
2. After you have added this code, place the Handlebars.compile script in the grabActivity function.
var len = res.rows.length;
var code = “”;
var obj = {};
for (var i = 0; i < len; i++) {
var source = $(“#activity-template”).html();
var template = Handlebars.compile(source);
code += template(data);
}
$(“#my-activity-list”).html(code);
$(‘#my-activity-list’).listview(‘refresh’);
Several things are happening in this template and code block:
• It calculates the number of rows that are available by using the res.rows.length, which you assign the len variable.
• It creates a variable code that will store the string of the HTML being created from our template.
• It calculates the relative time from when you posted the wine and the current time using the timeDiffActivity function (through the helper function called timeDiffActivity), which is discussed later in this chapter.
• It assigns an onclick method called viewWine. (Later in this chapter, you define methods to interact with an individual activity item.)
• You use the Handlebars function to compile the data based on the template that you created and passed the variable of res.rows.item(i). This passes the row of data to your template. Once you get that HTML back from the template, you append the string to the variable code
• It uses the html() function from jQuery to insert the HTML into the my-activity-list element.
3. You want to be able to attach the code HTML string in the HTML elements inside the Activity tab, so you need to give the content area of that tab an ID to reference. You also want to add a Refresh button to the feed to enable the user to refresh the feed. Do that by adding a couple of lines of code to the activity tab in index.html.
First, after the <h1>, you add:
<a href=”javascript:void(0);” data-role=”button” onclick=”grabActivities();”
class=”ui-btn-right” data-icon=”refresh”>Refresh</a>
4. Next, inside <div id=”my-activity”> add:
<ul data-role=”list-view id=”my-activity-list”></ul>
This code adds the Refresh button, which fires the grabActivities function on click and creates a new jQuery Mobile List View, where you will place the elements for your feed. A List View is a special data role from jQuery that enables you to create lists that display dynamic and static data and is commonly used in web and native applications.
5. The next step is to write a helper function called timeDiffActivity. This will take the current timestamp and subtract it for the timestamp of the post, to generate something to the effect of X minutes ago. This is a very common pattern in activity-based applications because it provides more insight than just saying June 5, 2012 does. It helps users see how recently a wine was added and makes the experience of using the app feel more immediate and immersive. You are probably familiar with this way of displaying time from Twitter.
You add it to the file helpers.js.
Handlebars.registerHelper(‘timeDiffActivity’, function(string) {
var system_date = string;
var user_date = new Date().getTime();
var diff = Math.floor((user_date - system_date) / 1000);
if (diff <= 1) {return “just now”;}
if (diff < 20) {return diff + “ seconds ago”;}
if (diff < 40) {return “half a minute ago”;}
if (diff < 60) {return “less than a minute ago”;}
if (diff <= 90) {return “one minute ago”;}
if (diff <= 3540) {return Math.round(diff / 60) + “ minutes ago”;}
if (diff <= 5400) {return “1 hour ago”;}
if (diff <= 86400) {return Math.round(diff / 3600) + “ hours ago”;}
if (diff <= 129600) {return “1 day ago”;}
if (diff < 604800) {return Math.round(diff / 86400) + “ days ago”;}
if (diff <= 777600) {return “1 week ago”;}
return “on “ + system_date;
});
The script takes in two timestamps and then calculates the number of seconds, minutes, and so on in milliseconds. Then after subtracting the start and end values, it performs if/then statements to determine the bucket that best defines the situation. These if/then statements enable you to define the timestamp as X minutes ago. When it’s larger than the diff variable, it moves up 2 hours.
Running your script and displaying the results correctly
Now that you have your structure, logic, and templates, you can start to run your script:
1. Save the index.html file and refresh the page. You won’t see anything at first load because you have not added anything to your cellar yet.
2. Click the Manage tab and add a couple of wines to your cellar, and then head back over to the Activity tab. Click the Refresh button, and you will see a screen like the one in Figure 9-1.
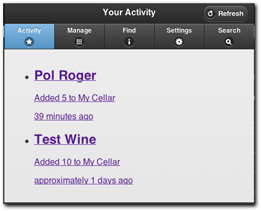
Figure 9-1: That doesn’t look very sharp!
At the moment, the CSS isn’t being applied to the content. Your lists are supposed to look like the one in Figure 9-2, but don’t. You fix this by telling jQuery Mobile that this element should be displayed as a list.
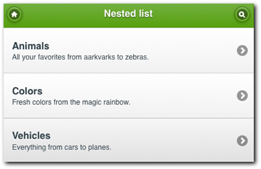
Figure 9-2: Your lists should look like this.
3. So how can you fix your lists? jQuery Mobile has a special method for defining dynamic content that is added to List Views after the initial DOM is loaded. To change this, you need to allow jQuery Mobile to know that you want to use this element as a list view. To enable the list view, add the following code in the grabActivity function:
$(‘#my-activity-list’).listview();
var len = res.rows.length;
...
This tells jQuery Mobile to add special classes to the elements to make sure that they are affected by the CSS. However, because jQuery Mobile adds most of the classes to the elements after the DOM has loaded, you need a way to refresh the list view after the content has been displayed. Do this by adding the following code at the end of the for loop:
....
$(“#my-activity-list”).html(code);
}
$(‘#my-activity-list’).listview(‘refresh’);
Now after saving and refreshing the page, you should see something like Figure 9-3.
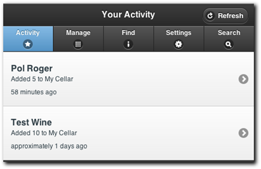
Figure 9-3: Now your lists have a nice clean look.
That’s it for the Activity tab. You touch bases with this tab again when you build the Wine Detail page—which you tackle next!