
Connecting to External Sites
When dealing with AJAX in JavaScript, you can connect to a wide range of free APIs to pull in data. In the previous chapter, you used foursquare to connect to local places. In this example, you will use the Twitter API to search for mentions of the wine that you are looking for and display the results below the wine details.
Building the template
Because Twitter’s data is returned in JSON, you can use Handlebars to help build the HTML template that each tweet will display. If you followed the steps previously for the activity feed, you should have added HandlebarsJS to your project already, otherwise you can refer back to get it set up within your project.
1. Define your template structure. To use Handlebars, you must create a template in a script tag with the desired HTML. Add this code before the closing </body> tag in index.html:
<script id=”social-template” type=”text/x-handlebars-template”>
....
</script>
When you compile your template, Handlebars takes the contents of this script file and combines it with the JSON object to produce the desired result.
2. Build the script to pull in the tweets based on the wine name. Add this script right after you insert the wine data into the detail element.
$(“#detail”).html(code);
$.getJSON(“http://search.twitter.com/search.json?q=”+res.rows.item(0).wine_name, function(data) {
console.log(data);
});
As of March 15, 2013, Twitter will be rolling out a new version of their API that requires all API requests to be authenticated, meaning that you must provide additional parameters to your call. To learn more about these changes, refer to this link: https://dev.twitter.com/docs/api/1.1/overview.
What this does is:
• Use the getJSON method to query the Twitter API to return search results for the current selected wine.
• Use the res.rows object to grab the wine_name that the SQL command just generated.
3. Save this file and refresh the page. Then select an item in your Activity tab. Your screen should look like Figure 9-7.

Figure 9-7: The generated code in your Activity tab
This view reveals that you want to pull the following four attributes out of the results object:
• created_at
• from_user_name
• text
• profile_image_url
Handlebars functions for compiling the template
Now that you know what data you want, you can start to build your Handlebars template. As discussed before, you now can add these elements in the format that is required for Handlebars.
For this situation, you want to do the same thing, but with the results object:
<script id=”social-template” type=”text/x-handlebars-template”>
{{#each result}}
<p>{{ result.from_user_name}}</p>
{{/each}}
</script>
Integrating functions into your app
Now back in your getJSON function, you want to use Handlebars to compile the template you just created and generate the new template with the data from Twitter. To accomplish this, do the following:
1. Insert the following code:
$.getJSON(“http://search.twitter.com/search.json?q=”+res.rows.item(0).wine_name
, function(data) {
var source = $(“#social-template”).html();
var template = Handlebars.compile(source);
var html = template(data);
$(“#social”).html(html);
});
Using Handlebars, you obtain the inner HTML from your template, then compile the template into a new variable. Once you have completed that, you pass the data from Twitter into a new variable called html. At this point, the data has been collected and parsed through so the results should show a paragraph tag for every user who talked about your wine name.
2. Save the file, reload the page, and navigate to an activity item. You should see a screen similar to the one in Figure 9-8.

Figure 9-8: All the usernames from Twitter are placed in a paragraph tag.
Creating the list view
Now that you understand how template engines work, you can build a more functional model of this list so you can see more detail of tweets about the wine — the tweets themselves, the username of people posting them, and their Twitter profile images.
1. To create a new list view of the content, amend the social-template script you added to index.html, so it reads:
<script id=”social-template” type=”text/x-handlebars-template”>
<ul data=role=”list-view” id=”my-social-list”>
<li data-role=”list-divider” role=”heading”>Twitter Search Results</li>
{{#each results}}
<p>{{this. from_user_name}}</p>
{{/each}}
</ul>
</script>
Adding the UL of the list view enables you to create a list view that you used on the Activity tab. You also added a new UI element called a list-divider. This enables you to create a divider for your content.
2. Save the page and reload the wine detail section. You should see something like Figure 9-9.

Figure 9-9: Usernames are now displayed within one list item
The usernames are all appearing within a single <li> element, with no <p> tags applied. What did you miss? If you remember what you did when building your Activity tab, you need to create a list view and use the refresh method when new content is added:
1. Add this simple code to the getJSON function in social.js:
$.getJSON(“http://search.twitter.com/search.json?q=”+res.rows.item(0).wine_name
, function(data) {
var source = $(“#social-template-test”).html();
var template = Handlebars.compile(source);
var html = template(data);
$(“#social”).html(html);
$(‘#my-social-list’).listview();
$(‘#my-social-list’).listview(‘refresh’);
});
Once you add the HTML to the social element, you grab the ID of the <ul>, create a new instance of a list view and then implement the refresh method to recycle the styles.
2. Save your work. You should see a screen like the one in Figure 9-10.

Figure 9-10: Usernames are now correctly displayed in <p> tags.
Building the template for your tweets
Now that you have the correct data being pulled in from Twitter, you can move on to build a template for displaying the tweets.
1. First add a profile picture of the user on the far right. You can do that by adding the following to your template:
<ul data=role=”list-view” id=”my-social-list”>
<li data-role=”list-divider” role=”heading”>Twitter Search Results</li>
{{#each results}}
<li>
<a href=””>
<img class=”ui-li-thumb” src=”{{this.profile_image_url}}”>
</a>
</li>
{{/each}}
</ul>
2. Save the file. You should start seeing some Twitter profile images on the left side of the list view, as shown in Figure 9-11:
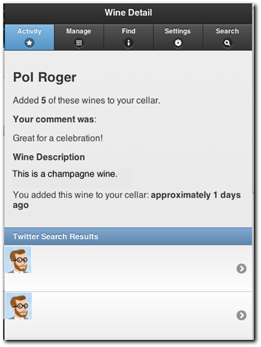
Figure 9-11: Now your page displays Twitter profile images.
3. Next, add the username, text, and timestamp for the tweet. If you follow the same schema, you only need to add the following to the inner HTML of the <li> element:
<li>
<a href=””>
<img class=”ui-li-thumb” src=”{{this.profile_image_url}}”>
<h2>{{this.from_user_name}}</h2>
<p>{{this.text}}</p>
<p>{{ this.created_at}}</p>
</a>
</li>
4. Save your work. You should see a nice clean tweet template like the one in Figure 9-12.
Even though your Twitter stream looks professional, one thing stands out: the timestamp. Although it’s readable as is, you can also make it consistent with the other parts of the app with the more user-friendly “X minutes ago.”

Figure 9-12: Your users will like this familiar look.
Defining a custom function for relative timestamps
Since you are using Handlebars to deliver the content in a template, how can you dynamically deliver fields that need to be calculated or changed? Luckily, Handlebars has a built-in function called registerHelper, which enables you to define a custom function to perform on an attribute. The syntax is below:
Handlebars. registerHelper(‘name_of_function’, function(variables) {
// do what you want here!
});
To show an example of how to use this function, create a new helper called userFull in helper.js:
1. Enter this function. It takes the user’s screen name and full name on Twitter and combines them into one result.
Handlebars. registerHelper(‘userFull’, function(tweets) {
return tweets.from_user_name + “ (“+tweets.from_user+”)”;
});
This function takes the object tweets and returns the from_user_name and the from_user attributes with a little bit of formatting. Place this JavaScript code before the helper.js file.
2. To call this function in Handlebars, just use the name you created (userFull) followed by the variable you want to pass through, like this:
<h2>{{userFull this}}</h2>
3. Save the file. You should see a screen like Figure 9-13.

Figure 9-13: Example of Twitter feed with username and full name
Tweaking the timestamp
Now that you know how to write custom helpers, you can write a function that will handle the timestamp section to turn it into relative time format.
1. If you remember from before, you created a helper function to handle timestamps in your Handlebars templates. You reuse that functionality to tweak the timestamps for your Twitter feed. You make one tweak to accept various date input. Create a helper for Handlebars called timeDiff and have it pass a string. In the helper.js file, add the following code:
Handlebars.registerHelper(‘timeDiff’, function(string) {
…
});
2. After you have the structure, you need to tweak the functionality of the date input. You want to copy the timeDiffActivity function you created earlier and insert into the newly created ‘timeDiff’ function.
Handlebars.registerHelper(‘timeDiff’, function(string) {
var system_date = new Date(Date.parse(string));
var user_date = new Date();
var diff = Math.floor((user_date - system_date) / 1000);
if (diff <= 1) {return “just now”;}
if (diff < 20) {return diff + “ seconds ago”;}
if (diff < 40) {return “half a minute ago”;}
if (diff < 60) {return “less than a minute ago”;}
if (diff <= 90) {return “one minute ago”;}
if (diff <= 3540) {return Math.round(diff / 60) + “ minutes ago”;}
if (diff <= 5400) {return “1 hour ago”;}
if (diff <= 86400) {return Math.round(diff / 3600) + “ hours ago”;}
if (diff <= 129600) {return “1 day ago”;}
if (diff < 604800) {return Math.round(diff / 86400) + “ days ago”;}
if (diff <= 777600) {return “1 week ago”;}
return “on “ + system_date;
});
Notice that you changed only the first two lines of the function to represent the date input from Twitter. Your function in the activity feed accepts Unix Timestamps (12343225), whereas Twitter accepts a different timestamp, which is the reason for the switch.
Putting the whole template together, including the existing helpers, it looks like this:
<script id=”social-template-test” type=”text/x-handlebars-template”>
<ul data=role=”list-view” id=”my-social-list”>
<li data-role=”list-divider” role=”heading”>Twitter Search Results</li>
{{#each results}}
<li>
<a href=””>
<img class=”ui-li-thumb” src=”{{this.profile_image_url}}”>
<h2>{{userFull this}}</h2>
<p>{{this.text}}</p>
<p>{{timeDiff this.created_at}}</p>
</a>
</li>
{{/each}}
</ul>
</script>
3. Save your work. Refresh your screen and you will see something like Figure 9-14:

Figure 9-14: Your timestamp entry is now in relative time, which is more user-friendly.
Changing the tweet in the list view
Finally, it would be great to have the user touch the list element and be directed to Twitter to view the whole tweet because jQuery Mobile cuts off the text if it goes beyond the list view area. Because jQuery Mobile handles every link as if it’s a hashchange event or tries to perform an AJAX on the href attribute, you need to tell jQuery Mobile that each link in this list is external.
1. Do that by adding a rel attribute to the link:
<a href=”#” rel=”external”>Content</a>
This will help jQuery Mobile to redirect the link to another browser window instead of trying to load the content via AJAX.
2. To send the user the correct page from the tweet, you need to build the link to direct users. Using the existing data, you can create a new registerHelper to help you with the legwork:
Handlebars.registerHelper(‘generateURL’, function(tweet) {
return “http://twitter.com/”+tweet.from_user +”/statuses/”+tweet.id_str;
});
3. Finally, you put the entire template together:
{{#each results}}
<li>
<a rel=”external” target=”_blank” href=”{{generateURL
this}}”>
<img class=”ui-li-thumb”
src=”{{this.profile_image_url}}”>
<h2>{{userFull this}}</h2>
<p>{{this.text}}</p>
<p>{{timeDiff this.created_at}}</p>
</a>
</li>
{{/each}}
4. Save and refresh. You should be able to click through the tweets and get directed to Twitter’s mobile website, as shown in the Figures 9-15.

Figure 9-15: The view for an individual tweet
Sharing on Twitter and Facebook
While searching using the Twitter API shows a lot of interesting detail, it would be nice to share content about the wine to Twitter or Facebook. This is easy using the Intent functionality of the two social networks. It allows you to create a link with all the relevant information to be included in your post.
1. To get started, create an additional template called share-template and place it in the bottom of the <body> tag in the index.html file:
<script id=”share-template” type=”text/x-handlebars-template”>
....
</script>
2. Now create the content, which will be a link that the user will click to share to Twitter and Facebook.
You can find out more about Twitter Intent Links here: https://dev.twitter.com/docs/intents#tweet-intent.
<script id=”share-template” type=”text/x-handlebars-template”>
<h3><a rel=”external-link”
href=”https://twitter.com/intent/tweet?text=I+just+added+{{wine_name}}+to+my+cellar+using+Corks!”>Tweet</a></h3>
<h3><a rel=”external-link”
href=http://facebok.com/sharer.php?u=http://example.com&title=I+just+added+{{wine_name}}+to+my+cellar+using+Corks!>
Share on Facebook</a></h3>
</script>
This script creates two links with the parameters specific from the provider. In the Twitter example, the text parameter is where the text of the tweet goes, and in the Facebook example, you use the u parameter to specify what link you want to share. You can also add the title parameter, which will give your post a title.
1. In your viewWine function, add the following code right before $(“#detail”).html(code) section:
var source = $(“#share-template”).html();
var template = Handlebars.compile(source);
code += template(res.rows.item(0));
This code grabs the share template that you created, compiles it using Handlebars, and then passes in the data you received from the database query. That will help you generate the URL to pass to Facebook and Twitter.
2. Save and reload the application. After navigating back to your Wine Detail page, you should see a screen like Figure 9-16.

Figure 9-16: Wine Detail page showing Share on Facebook and Tweet links
Once you click on them, you will be directed to Twitter and Facebook to add additional comments to your tweet or share, like in Figure 9-17:
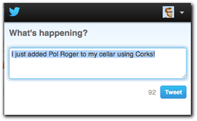
Figure 9-17: Example of sharing on Twitter using the Web Intent Link