
Elements to Build
Local storage is the main focal point in this chapter, so start by caching some of the data that you receive from external services. Before you start caching, you need to build a function that you can reference through this exercise to make interacting with local storage easier. Here you’ll write a function called myStorage, which includes the functionality you need to store data locally. You can then use this function every time you need to do this in your app.
Creating the myStorage function
When developing features that you will use all the time, sometimes it helps to write a basic function that you can call and iterate through your code.
1. In the index.html file, create a new variable called myStorage, which will contain a few methods:
var myStorage = {
set: function(a,b) {
},
remove: function(a) {
},
get: function(a) {
},
clear: function() {
}
}
While these functions may mimic the syntax of localStorage.setItem and localStorage.getItem, it’s nice to incorporate these methods in a function that you can change later. Say, for example, that you wanted to perform one action before saving something as a local storage element. You could just edit the code for the set function of myStorage once instead of scanning the whole file looking for instances of localStorage.setItem().
2. For the set method of myStorage, you pass two variables, a and b. In this case, a represents the index, or the key, while b represents the value.
..
set: function(a,b) {
var val = “”;
if (typeof b==”object”) {
val = JSON.stringify(b);
}
else {
val = b;
}
localStorage.setItem(a,val);
}
...
The preceding code uses the typeof method to determine the data type of the variable b. If the variable is an object, which is the type that will be returned from Twitter and foursquare, you want to save the result as a string, to variable val. Remember, local storage cannot save objects or arrays, so you must convert them. JSON.stringify is a function that is built into most modern web browsers; however, to be on the safe side, add the following script tag in your <head> section:
<script src=” https://raw.github.com/douglascrockford/JSON-js/master/json2.js” /><script>
Alternatively, you could always download the JSON.js file separately and apply it locally. Adding this script tag ensures you have support for Windows Phone and other WebKit devices that may not have local support.
3. Now add the remove and get methods. They are similar to the local storage methods:
...
remove: function(a) {
localStorage.setItem(a, “”);
},
get: function(a,b) {
if (b == “JSON”) {
return JSON.parse(localStorage.getItem(a));
}
else {
return localStorage.getItem(a);
}
}
...
For the remove function, you are simply using the local storage method to set the variable a (which is your index or key) to an empty string. On the get function, you take in two variables: a, which is your index, and b, which is a string that you use to test if you want to return the results as an object or just plain text. This enables you to define what type of data you want to receive.
Finally, you add the clear function, which is the same as localStorage.clear(). This wipes out all your local storage elements on this domain. Sometimes it’s good for testing or debugging. In a production app, use this only if you want your users to remove all their data. Note that this doesn’t affect WebSQL, which you use for your database.
...
clear: function() {
locationStorage.clear();
}
...
That’s all there is to the myStorage function! You now can use the function within your code to retain and serve data easily whenever you need to.
Caching geolocation and venues
One of the problems with caching users’ latitude and longitude is that if they physically move their location, you need to update your information. You could use watchPosition; however, that quickly drains battery life on a mobile device. The solution is to keep track of the timestamp of the last geolocation success. If a user requests the location again and the difference is minimal, you serve that user the cached latitude and longitude.
1. Refer to the successPosition function that you created in Chapter 8, and then add the following line of code:
...
var currentTime = new Date().getTime()
myStorage.set(“lastGeo”, currentTime);
...
This piece of code stores the current timestamp into a local storage object called lastGeo. You use this later to detect the time difference between the two dates.
2. In the onHashChange function where you call the getCurrentPosition, add some code to detect whether the last known location is old enough to require a refresh:
...
if ($(“#map”).html() == “”) {
var lastTime = myStorage.get(“lastGeo”)
if (lastTime) {
var currentTime = new Date.getTime();
var subtract = parseInt(currentTime) - parseInt(lastTime);
// if difference is greater than 250 seconds or 4 minutes, refresh the location
if (parseInt(subtract) >250) {
getCurrentPosition();
}
else {
navigator.geolocation.getCurrentPosition(successPosition, errorPosition);
}
}
else {
navigator.geolocation.getCurrentPosition(successPosition, errorPosition);
}
}
...
While the preceding function looks complex, it’s actually pretty simple. You are just amending the previous function to first check to see if the lastGeo key has been set in local storage. If it is, then you take the current time and subtract it from the last known location. If the difference is greater than 250 seconds, which is around 4 minutes, the user might have moved locations and you should refresh by calling nagivator.geolocation.getCurrentPosition again. Otherwise, just call successPosition.
3. Now you are probably wondering how you can get the latitude and longitude, if you don’t pass the position object to the successPosition function. The answer is simple: Because you stored the latitude and longitude in variable form, you easily call them within the successPosition function, as the following code shows:
function successPosition(position) {
if (position) {
lat = position.coords.latitude;
lng = position.coords.longitude;
var currentTime = new Date().getTime()
myStorage.set(“lastGeo”, currentTime);
drawMap();
}
else {
drawMap();
}
}
The additional methods that you are calling enable you to call the drawMap function, recognizing that you already stored the latitude and longitude in variables. Caching the location uses less battery power and provides quicker response time.
4. Because you now are caching the location, it’s time to store the venue objects in your local storage object for lightning fast results. First, you need to change the way your findPlaces function works.
Here is the old function:
function findPlaces() {
$.getJSON(“https://api.foursquare.com/v2/venues/search?client_id=YOURCLIENTID &client_secret=YOURSECRET&ll=”+lat+”,”+lng+”&query=wine store&limit=25”, function(data) {
...
Change it to the following:
function findPlaces() {
var venue_data = myStorage.get(“foursquareVenues”)
var lastTime = myStorage.get(“lastVenuePull”)
if (lastTime) {
var currentTime = new Date.getTime();
var subtract = parseInt(currentTime) - parseInt(lastTime);
if (parseInt(subtract) >= 250) {
$.getJSON(“https://api.foursquare.com/v2/venues/search?client_id=CLIENTID &client_secret=CLIENTSECRET&ll=”+lat+”,”+lng+”&query=wine store&limit=25”, function(data) {
parseMap(data, “store”);
});
}
else {
parseData(venue_data);
}
}
else {
$.getJSON(“https://api.foursquare.com/v2/venues/search?client_id=CLIENTD&client_secret=CLIENTSECRET&ll=”+lat+”,”+lng+”&query=wine store&limit=25”, function(data) {
parseMap(data, “store”);
});
}
You’ve done a few things to your existing function, findPlaces:
• You’ve removed the logic that parses the points on the map and will replace it in a new function called parseMap.
• You’re checking to see if the cached time of the Local Storage object is greater than 5 minutes. If it is, you need to pull fresh data. Otherwise, use the cached information to pass along to the parseMap function.
• If everything else pans out, you pass either the cached venue object or the new venue object to the parseMap method. In addition, you pass a second variable if the venue needs to be stored.
5. You are rewriting the logic for placing the markers on the map, so you need to take into account the second parameter of the parseMap, like so:
function parseMap(data, store) {
if (data.meta.code == 200) {
if (store) {
myStorage.set(“foursquareVenues”, data);
var currentTime = new Date.getTime();
myStorage.set(“lastVenuePull”, currentTime);
}
While the ... piece extends the logic that you used to add the markers to the map earlier, the new piece checks to see if you want to store the venue data in local storage. If you are pulling the information from cache (local storage), you don’t want to restore and reset the counter. However, if the data is fresh, you want to capture the last timestamp from which you received the information.
6. Finally, at the end of the loop where you place the marker on the map, you need to add a new Google Map command called resize to enhance your map. This command enables the map to resize to fit your page and display all of the content; without it, some of the map might be missing.
google.maps.event.trigger(map, ‘resize’);
7. Now refresh the website and go to the Find tab. You won’t find anything new in appearance, but it will be faster on your mobile device. You added some console.log statements to show the caching versus a live pull, as shown in Figure 10-1 and 10-2.

Figure 10-1: The generated code shows that data has been stored locally.
map data 2012 © Google
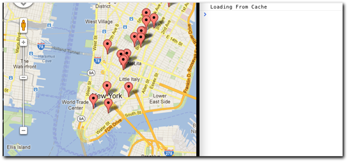
Figure 10-2: The data is being retrieved from the local cache, not from foursquare.
map data 2012 © Google
Caching tweets
Because you have a great function to use to cache data using local storage, do the same thing for Twitter. Here’s how to start:
1. Just like the foursquare parse function, you will create a new function called parseTweets, as shown in the following code example:
function parseTweets(wine_id, data, store) {
if (store)
{
myStorage.set(“tweetWine_”+wine_id, data);
var currentTime = new Date().getTime();
myStorage.set(“lasttwitterPull”, currentTime);
}
var source = $(“#social-template-test”).html();
var template = Handlebars.compile(source);
var html = template(data);
$(“#social”).html(html);
$(‘#my-social-list’).listview();
$(‘#my-social-list’).listview(‘refresh’);
}
There are some differences between this function and the previous function that you wrote for parseData for the foursquare venues:
• You are taking three variables, with one being the wine_id.
• You use the wine_id to set the index of the local storage object (for example, naming the index name to tweetWine_1).
2. You need to change the function that pulls in the wine detail, so add the following code:
....
$(“#detail”).html(code);
var twitter = myStorage.get(“tweetWineName_”+res.rows.item(0).wine_id, “JSON”);
var lastTime = myStorage.get(“lasttwitterPull”);
if (lastTime)
{
var currentTime = new Date().getTime();
var subtract = parseInt(currentTime) - parseInt(lastTime);
if (parseInt(subtract) >= 1500)
{
$.getJSON(“http://search.twitter.com/search.json?q=”+res.rows.item(0).wine_id, function(data) {
parseTweets(res.rows.item(0).wine_name, data, “store”);
});
}
else
{
parseTweets(res.rows.item(0).wine_name, data);
}
else
{
$.getJSON(“http://search.twitter.com/search.json?q=”+res.rows.item(0).wine_id, function(data) {
parseTweets(res.rows.item(0).wine_name, data, “store”);
});
}
Just like the venue caching, you’re setting the time of the most current data pull, checking to see if the time difference is greater than your limiter (in this case, 1,500 ms) and then displaying the cached results. It’s that simple!
Saving details in the settings tab
With local storage, you not only can save data from external social services, but you also can save settings and user preferences. In this example, you add another page for the Settings tab, which will save the user’s name.
1. First, build out the Settings tab. You need to add markup similar to the HTML you have used to build the other pages within jQuery Mobile. Add the following code to index.html, below the rest of the HTML but above the scripts you’ve added:
<div id=”settings” data-role=”page”>
<div data-role=”header” data-position=”inline”>
<h1>Settings</h1>
<div data-role=”navbar” data-iconpos=”bottom”>
<ul>
<li><a data-icon=”star” href=”#activity”>Activity</a></li>
<li><a data-icon=”grid” href=”#manage”>Manage</a></li>
<li><a data-icon=”info” href=”#find”>Find</a></li>
<li><a data-icon=”gear” class=”ui-btn-active” href=”#settings”>Settings</a></li>
<li><a data-icon=”search” href=”#search”>Search</a></li>
</ul>
</div><!-- /navbar -->
</div><!-- /header -->
<div data-role=”content”>
<div class=”success” id=”success-msg-user” style=”display: none;”>Awesome, your name is saved!</div>
<label for=”user_name”>Your name:</label>
<input type=”text” class=”required” name=”user_name” id=”user_name_save” data-mini=”true” />
<button onclick=”saveUser();”>Save User</button>
</div>
</div>
This adds a simple form in your page containing an input box and a submit button. The button, upon click, fires a function called saveUser. Notice that you defined the ID as user_name_save.
2. Now build out of the saveUser function, which enables you to take the contents of the input box and apply it to a local storage element.
function saveUser() {
$(“#success-msg-user”).hide();
myStorage.set(“userName”, $(“#user_name_save”).val());
$(“#success-msg-user”).show();
}
The function is very simple and just uses the hide and show methods to toggle the results message from being shown to the user. In between, you are saving the value of the user_name_save element to the userName local storage index.
3. One of the most important things is to make sure you set the input box to the correct value from local storage, if it is set. You need to add the following code to the $(document).ready function, like so:
$(document).ready(function(){
var user = myStorage.get(“userName”);
if (user) {
$(“#user_name_save”).val(user);
}
...
This script fires upon load of the application and checks whether there is a value set for the index of userName. If so, it grabs the value and inserts it into the value attribute of the input box. After you refresh your index.html file, navigate to the Settings tab. After entering your name and saving, your screen should look like Figure 10-3:

Figure 10-3: The app tells the user that his or her name has been saved.
After this, close your browser and reopen it. Navigate to the Settings tab. You should see what is shown in Figure 10-4, which confirms that your name has been saved:

Figure 10-4: After entering your name, it will appear when you navigate to the Settings tab.
Searching your history
After entering several wines in your cellar, the best way to check to see if it contains a specific wine is by searching. With the final tab, Search, you will enable users to search their Activity tab by wine name and display the results. Follow these steps:
1. As you did with the Settings tab, you need to create a basic template for the page. Add the following immediately before the markup for the Settings tab that you just added:
<div id=”search” data-role=”page”>
<div data-role=”header” data-position=”inline”>
<h1>Search</h1>
<div data-role=”navbar” data-iconpos=”bottom”>
<ul>
<li><a data-icon=”star” href=”#activity”>Activity</a></li>
<li><a data-icon=”grid” href=”#manage”>Manage</a></li>
<li><a data-icon=”info” href=”#find”>Find</a></li>
<li><a data-icon=”gear” href=”#settings”>Settings</a></li>
<li><a data-icon=”search” class=”ui-btn-active” href=”#search”>Search</a></li>
</ul>
</div><!-- /navbar -->
</div><!-- /footer -->
<div id=”my-search” data-role=”content”>
<form id=”search-form” data-ajax=”false” onsubmit=”SearchWines(); return false;”>
<label for=”search-basic”>Search Input:</label>
<input type=”search” name=”search” id=”search-basic” value=”” />
</form>
<ul data=role=”list-view” id=”my-search-list”></ul>
</div>
</div>
Although this is a standard page implementation, note that you added a new input value called search, which will give you a standard search bar in which users can enter text. It’s already themed and looks like Figure 10-5 when you refresh your index.html file:
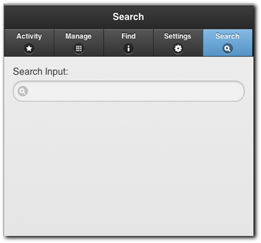
Figure 10-5: You now have an input box for searching.
2. Now that you have the structure laid out, it’s time to build the function that enables you to search your wines from your activity list. As you can see from the content of the <form> element, in the HTML you’ve just added, you will name your function SearchWines:
function SearchWines() {
var search_term = $(“#search-basic”).val();
db.transaction(function (tx) {
tx.executeSql(“SELECT wine_name, wine_description, activity_note, activity_quantity, activity_id, activity.wine_id, activity.created_at from activity INNER JOIN wines on activity.wine_id= wines.wine_id where wine_name LIKE ?”, [“%”+search_term+”%”],
function(tx, res) {
if (res.rows.length == 0)
{
console.log(“seriously”);
}
else
{
var len = res.rows.length;
var code = “”;
for (var i = 0; i < len; i++){
var start = new Date().getTime();
diff = timeDifference(start, res.rows.item(i).created_at)
code += “<li>
<a href=’#wineDetail’
onclick=’grabActivity(“+res.rows.item(i).activity_id+”);’>
<h2>”+res.rows.item(i).wine_name+”</h2>
<p>Added “ + res.rows.item(i).activity_quantity + “ to My Cellar</p>
<p style=’margin-top: 10px;’>” + diff + “</p>
</li>”;
}
$(“#my-search-list”).html(code);
$(‘#my-search-list’).listview();
$(‘#my-search-list’).listview(‘refresh’);
}
},
);
});
}
This function is similar to the grabActivity function; however, because you want this to be a search query, you are using the DB query type as a LIKE, which will match all cases of the word that you search. After you grab the results, you format them in a similar way to the Activity tab, inject them into the <ul>, and then refresh the list view.
After saving the page, use your Search tab to look for a specific wine. Upon searching, you see something interesting, as shown in Figure 10-6:

Figure 10-6: The app is finding the wine you’re searching for, but it doesn’t quite look right
This is strange! It appears that when the List View is rendered, it pushes the <ul> up and overlaps the form. This problem can be solved in a couple of ways, but the easiest solution is to add some padding to the <form> element by creating a new class called pad:
In your <head> tags add the following script:
...
<style type=”css/text”>
.pad {
padding-bottom: 25px
}
</style>
...
Then add the following class to the <form> element:
...
<form id=”search-form” data-ajax=”false” onsubmit=”SearchWines(); return false;” class=”pad”>
...
Of course you could always add the .pad class to a new style sheet file, however we just added this for our demonstration. It’s best practice to include all your styles in a separate file to allow for updating and maintenance easier.
Upon saving and refreshing, the screen shot looks much better, as shown in Figure 10-7:

Figure 10-7: That looks better!
You can always tweak the query to select any field you would like to search. For example, say you want to search only the activity_note field. In that case, you would just make the change shown here:
...
tx.executeSql(“SELECT wine_name, wine_description, activity_note,
activity_quantity, activity_id, activity.wine_id, activity.created_at from
activity INNER JOIN wines on activity.wine_id= wines.wine_id where
activity_note LIKE ?”, [“%”+search_term+”%”],
...
In the previous query, you use a SQL technique called INNER JOIN, which allows you to take two tables in your database schema and join them on a common field. In this case, the common field wine_id joins both the wines and activity tables. By doing this, you now can get information about both the activity and the wine with having too many separate queries.
Great! You now have added an Activity search to the application!