
Chapter 2. Before You Start: Protect Your Data
In This Chapter
![]() Potential Problems: What Can Go Wrong When Speeding Up Your PC
Potential Problems: What Can Go Wrong When Speeding Up Your PC
![]() Backing Up and Restoring Your Valuable Data
Backing Up and Restoring Your Valuable Data
Before we get into speeding up your computer, some preliminary activities are in order. Because some of these speedups involve editing critical system files or installing new pieces of hardware, you need to protect your programs and files in case something goes wrong.
That’s right, if you make a big enough mistake trying to speed up your computer, you could lose all your data!
I know that sounds frightening and might scare off some of you from performing some necessary speedups. So I want to soften the scary language and assure you that most speedups are completely harmless; they’ll either speed up your system or they won’t, and won’t cause any new problems either way. But there are some things you can do that could cause your system to stop working, and you need to take precautions just in case something bad does happen.
Okay, so what can you do to speed up your PC that will cause your system to crash or lose data?
Don’t get all freaked out about this, but a few speedups you can perform on your PC can potentially have undesirable side effects. Fortunately, the side effects are rare (especially if you follow directions well) and can be protected against.
One way to speed up your system is to delete unwanted or unnecessary programs from your computer’s hard disk, to free up more valuable hard disk space. If you delete truly unused programs, this poses no problems. However, if you accidentally delete a program that a favorite application or even Microsoft Windows needs to operate, you might find that application no long runs—or that Windows no longer starts. This is not a good situation.
Note
Learn more about deleting files and programs in Chapter 4, “Cleaning Out Unnecessary Programs.”
Similarly, you can often speed up a computer by making sure that unnecessary programs or utilities aren’t automatically launched when your system starts up. Again, if you remove truly unnecessary utilities from the startup process, no harm ensues. But if you keep a key process from loading automatically, you might find that Windows or a key application has trouble running.
Along the same lines, one way to free up valuable hard disk space is by deleting files that you no longer use. No problem there, unless you get carried away and accidentally delete data files that you still need—or might need in the future.
Note
Not to confuse the issue, but most files when deleted go into the Windows Recycle Bin, which temporarily holds “deleted” files until it fills up. (This enables you to recover some deleted files, if absolutely necessary.) It’s at that point that the files are permanently wiped from your hard drive. The point remains that when a file is deleted from your hard drive, it’s gone.
The way it works, when you delete a file it’s gone—you can’t get it back. This may not be a big deal if you delete a Christmas card list from 1997, but it’s a much bigger deal if you erase all the digital photos from your last family vacation.
Another way to speed up your computer’s operation is to edit some of the configuration settings found in the Windows Registry. The Windows Registry holds all the configuration settings for your PC; it tells your computer which devices and processes to load, where important files are located, and how to configure your system.
If you edit the wrong setting in the Registry or enter an incorrect value for a particular setting, you have no idea as to what effect that mistake may have. Some Registry errors can cause your entire system to crash or shut down; it’s that big a deal. Being able to recover from a misedited Registry is paramount.
This is kind of a last-chance speedup: You wipe your hard drive clean and reinstall the Windows operating system and all your software programs. As you can probably figure out on your own, wiping your hard drive clean means deleting everything stored on it, including all your valuable data files, digital photos, downloaded music, and the like.
While this is often an effective way to speed up your system, it’s the computer equivalent of setting off a nuclear bomb. Everything on your hard disk is nuked, and you get start over on fresh terrain. But before you nuke your hard drive, you need to back up all your data files so that you can later restore them to the newly reformatted hard drive. If you don’t back up your data, it’s gone forever.
Note
Learn more about the nuclear option in Chapter 8, “When All Else Fails: Reinstalling Windows from Scratch.”
Some speed can be restored to your system by working with your PC’s hard disk, where all your programs and data (and the Windows operating system) are stored. A fragmented or damaged hard drive can cause a system to run sluggishly. Defragmenting or repairing the hard disk can restore your system to previous performance levels.
That said, not all hard disk maintenance goes the way it should. It’s possible—although not very likely, admittedly—for a disk to end up more fragmented than before, or for a repair to shut off access to hard disk sectors on which critical system files are stored, or for a repair to go horribly wrong if power is lost mid-procedure. It doesn’t happen often, but when hard disk maintenance goes bad, it’s not a pretty sight.
Finally, you may have to revert to hardware-oriented solutions to your computer’s speed problem. That might mean adding more memory to your system, upgrading to a larger hard drive, or even replacing your system’s graphics board. Any time you muck about inside your computer, there’s the chance that your computer won’t recognize the new component, or that you damage something else in the process. I don’t mean to scare off anyone from performing these types of speedups, but the potential downsides need to be presented, in the interest of full disclosure.
Okay, let’s assume that you’ve taken my warnings to heart and resigned yourself to the fact that you need to back up your data before you attempt any of the riskier speedups we discuss later in this book. Just how do you make backup copies of everything that’s important to you—including your work documents, music files, digital photos, and the like?
Caution
For many users, the most important data files stored on your PC are your digital photographs and music. If you don’t have backups of these important files, you could lose several years’ worth of photos and music if a speedup procedure goes south.
The first thing to consider when planning data backup is to choose a backup device. That is, where should you store the backup copies of all your data files?
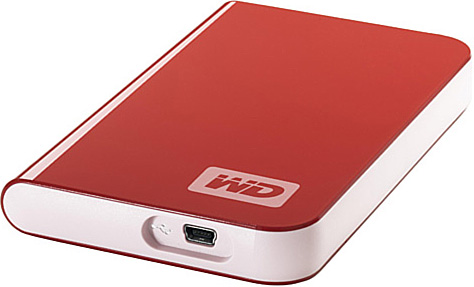
I won’t pretend to present all the possible backup options, because there’s one primary method I recommend. Put simply, the easiest way to back up your data files is to use an external hard disk. These days a fairly large external hard drive can be had for as little as $100. (For example, as I write this book in October 2008, Best Buy is selling a 250GB Western Digital drive, like the one in Figure 2.1, for just $95; obviously, larger drives are a tad more expensive.) At these prices, it’s foolish not to purchase a hard drive for backup purposes.
How big a backup drive do you need? Obviously, you should have an external hard disk that’s big enough to hold all your digital data files—Word documents, Excel spreadsheets, PowerPoint presentations, downloaded or ripped music tracks, digital photos, home videos, and the like. The easy way to do this is to get an external drive that’s about the same size as the hard disk on your PC. For example, if you have a 200GB hard drive on your PC, get a 200GB external hard disk.
Most external hard drives connect to your PC via USB. Some bigger disks use the faster FireWire connection. Either type of connection is fine, and both are easy enough to connect and install.
Once the external hard drive is connected, you need to run a software program that automates the backup process. Most external hard drives come with their own proprietary backup programs. These are typically easy to use, and get the job done. You can also use one of the many third-party backup programs sold at your local computer or electronics store, such as Acronis True Image Home (www.acronis.com/homecomputing/products/trueimage/) or CMS Bounceback Express (www.cmsproducts.com/product_bounceback_professional.htm). You’ll typically pay less than $50 for one of these programs.
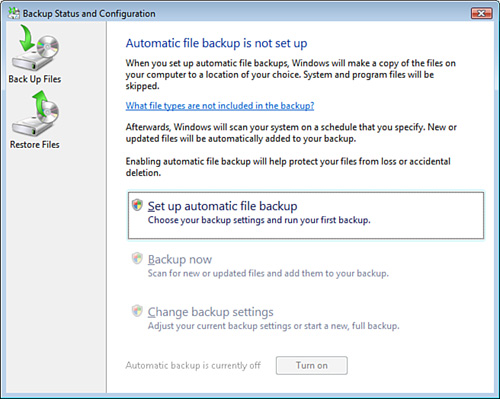
You may not have to purchase a backup program, however. If your PC is running Windows Vista, you have a backup program built in to the operating system. Windows Backup (included with all but the Vista Home Basic edition) enables you to schedule automatic backups of your key data. You launch Windows Backup by clicking the Start button and then selecting All Programs, Accessories, System Tools, Backup Status and Configuration.
Tip
In addition to standard Windows Backup utility, the Business, Enterprise, and Ultimate versions of Vista come with an enhanced type of backup, dubbed CompletePC, that creates an exact image of all the files on your system—including program and system files. Most backups only copy data files; a system image backup copies every single file on your hard drive. When you recover from a system failure, CompletePC lets you restore your complete system exactly the way it was before the crash.
When the window shown in Figure 2.2 appears, click the Back Up Files button (in the left panel), and then click the Set Up Automatic Backup option. Windows will now scan your system for a backup device (typically an external hard disk) and ask you to select that device for your backup.
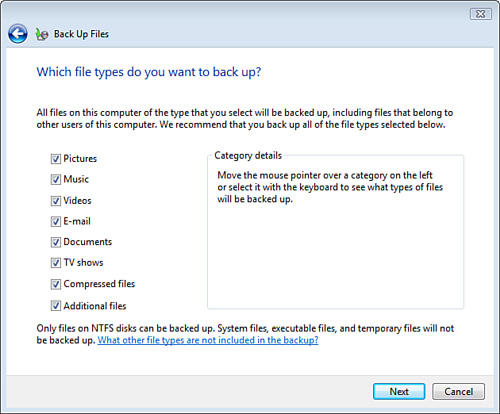
The next screen, shown in Figure 2.3, asks you what types of files you want to back up. You can choose from picture, music, video, email, and other common types of files.
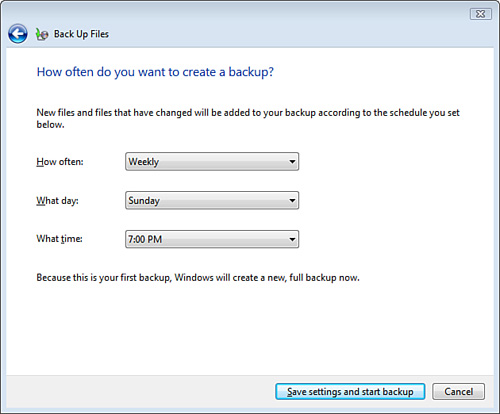
Click Next and you now get to select how often (and when) you want to back up your files. As you can see in Figure 2.4, you can choose to back up daily, weekly, or monthly. The more often you back up, the better. When have finished, click the Save Settings and Start Backup button, and Vista starts your first disk backup.
Caution
Windows Backup, like most backup programs, only backs up data files—not program or operating system files. If your hard disk is damaged or reformatted, you need to first reinstall the Windows operating system, and then reinstall all the software programs previously installed. (This argues for keeping the original installation discs for all the software programs you purchase.) Then you can restore your data files from their backup copies.
Okay, you’ve been diligent and created regular backup copies of all your important data. How do you restore those backup copies if you lose the originals from your hard drive?
In Windows Vista, it’s a matter of starting up Windows Backup (after you’ve reinstalled or repaired Windows itself, of course) and using that program’s Restore Files function. From the main Windows Backup window, click the Restore Files button (in the left panel), and then select the Restore Files option.
You’re now asked what files you want to restore—files from your latest backup or files from an older backup. Let’s assume that your most recent backup includes the most recent copies of your files, as it should, and select the first option.
Windows now presents you with a list of folders and files included in the most recent backup. Click the Select All button to select all of these files, and then click the Next button. In the next window, choose to restore these files to their original locations, and then click the Start Restore button. Your backup files will now be restored to your hard drive, in their original locations.
As you can see, Windows Vista makes it easy to back up and restore files from and to your hard drive. But what do you do if you’re running the older Windows XP operating system?
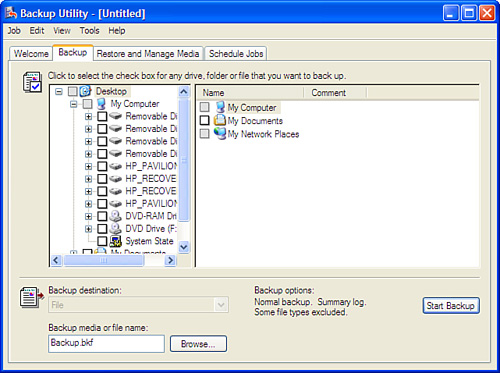
The sad reality is that Windows XP Home Edition does not automatically install a backup utility. Windows XP Professional does include the Microsoft Backup program, shown in Figure 2.5, but it’s not really that good a program; it’s old and outdated and not that well suited to today’s extra-large hard drives. (Plus it’s very, very slow compared to third-party backup programs.) It’s certainly not as easy to use as Vista’s Windows Backup utility.
So if you’re running Windows XP (Home Edition or Professional), I recommend that you use the backup program that came with your external hard disk drive—or invest in a third-party program like the ones I discussed previously.
If you try to perform a speedup procedure that results in a system crash, all is not lost. That’s because both Windows XP and Windows Vista include Microsoft’s System Restore utility. This utility can automatically restore your system to the state it was in before the crash occurred—and save you the trouble of reinstalling any damaged software programs.
Caution
Because System Restore monitors only system files and Registry settings, you can’t use it to restore damaged or deleted data files. For complete protection, you still need to back up your important data files manually.
System Restore is probably the most useful utility for users who screw up their systems or otherwise experience major system problems. (I’m almost ashamed to admit how many times I’ve used it to restore my system after botching some upgrade or another.) Prior to System Restore, it wasn’t uncommon to run into problems that required you to reinstall your entire operating system. With System Restore, reinstallations are a thing of the past—because it can automatically restore your system to a prior working state.
You should think of System Restore as a safety net for your essential system files. It isn’t a backup program per se, because it doesn’t make copies of your personal files. (You still need a separate backup program—and external hard drive—for that.) It simply keeps track of all the system-level changes that are made to your computer, and (when activated) reverses those changes.
How does System Restore work?
It’s quite simple, actually. System Restore actively monitors your system and notes any changes that are made when you install new applications. Each time it notes a change, it automatically creates what it calls a restore point. A restore point is a “snapshot” of the Windows Registry and selected system files just before the new application is installed.
Just to be safe, System Restore also creates a new restore point after every 10 hours of system use. You can also choose to manually create a new restore point at any moment in time. It’s a good idea to do this whenever you make any major change to your system, such as installing a new piece of hardware or editing the Windows Registry.
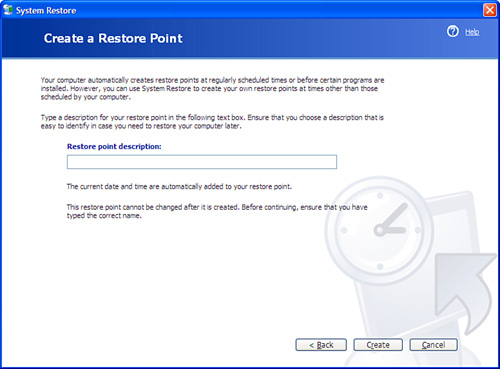
To set a manual restore point in Windows XP, follow these steps:
1. Click the Start button and select All Programs, Accessories, System Tools, System Restore.
2. When the System Restore window opens, select Create a Restore Point and click Next.
3. When the Create a Restore point screen appears, as shown in Figure 2.6, enter a name for the restore point, and then click the Create button.
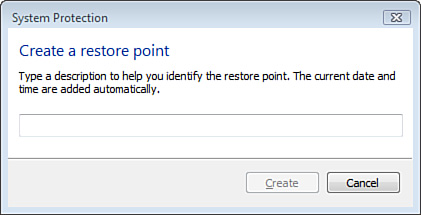
To set a manual restore point in Windows Vista, the process is subtly different:
1. Click the Start button and select All Programs, Accessories, System Tools, System Restore.
2. When the System Restore window opens, click the Open System Protection link.
3. When the System Properties dialog box appears, make sure the System Protection tab is selected, and then click the Create button.
4. When the Create a Restore Point window appears, as shown in Figure 2.7, enter a description for the restore point, and then click the Create button.
And that’s all you have to do. Windows notes the appropriate system settings and stores them in its System Restore database.
If something in your system goes bad when you’re trying to speed up your PC, you can run System Restore to set things right. Pick a restore point before the problem occurred (such as right before a new hardware upgrade or Registry edit), and System Restore will then undo any changes made to monitored files since the restore point was created. This restores your system to its pre-problem condition.
To restore your system from a restore point in Windows XP, follow these steps:
1. Click the Start button and select All Programs, Accessories, System Tools, System Restore.
2. When the System Restore window opens, check the Restore My Computer to an Earlier Time option, and then click Next.
3. When the Select a Restore Point screen appears, as shown in Figure 2.8, you’ll see a calendar showing the current month. (You can move backward and forward through the months by clicking the left and right arrows.) Any date highlighted in bold contains a restore point. Select a restore point, and then click the Next button.

4. When the confirmation screen appears, click Next.
To restore your system in Windows Vista, follow these steps:
1. Click the Start button and select All Programs, Accessories, System Tools, System Restore.
2. When the System Restore window appears, click Next.
3. When the Choose a Restore Point window appears, as shown in Figure 2.9, select a restore point from the list. (To display older restore points, check the Show Restore Points Older Than 5 Days option.) Make your choice and click Next.
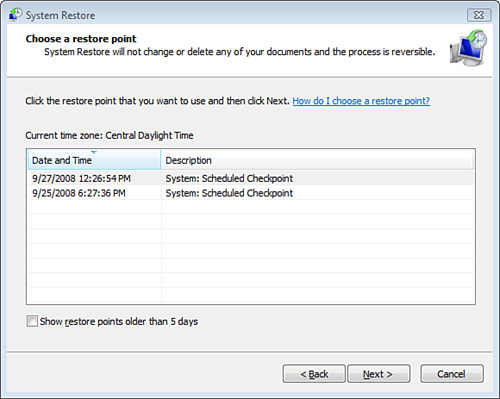
4. When the confirmation screen appears, click the Finish button.
Windows now starts to restore your system. Because Windows will need to be restarted during this process, you should make sure that all open programs are closed.
Caution
Make sure you pick a restore point well before you started experiencing problems. If you pick a more recent restore point that reflects the status of your system with a problem or virus infection, you’ll just restore the problem or virus.
When the process is complete, your system should be back in tip-top shape. Note, however, that it might take half an hour or more to complete a system restore—so you’ll have time to order a pizza and eat dinner before the operation is done!
How do you protect your valuable data files if you screw something up while trying to speed up your PC? Here’s the bottom line:
![]() You should back up all your data files—including digital photos and music—before attempting any major speedup procedure.
You should back up all your data files—including digital photos and music—before attempting any major speedup procedure.
![]() The easiest way to back up your data is to purchase and install an external hard disk drive. Most external hard disks come with their own backup software. If not, you can purchase third-party backup programs for less than $50.
The easiest way to back up your data is to purchase and install an external hard disk drive. Most external hard disks come with their own backup software. If not, you can purchase third-party backup programs for less than $50.
![]() If you’re running Windows Vista, you have the Windows Backup program included free of charge. If you’re running Windows XP, go with a third-party backup program, instead.
If you’re running Windows Vista, you have the Windows Backup program included free of charge. If you’re running Windows XP, go with a third-party backup program, instead.
![]() The backup process only backs up your data files, not your program or operating system files. To protect these files, use the System Restore utility, which can restore your system files to their condition prior to whatever it was that you did to screw them up.
The backup process only backs up your data files, not your program or operating system files. To protect these files, use the System Restore utility, which can restore your system files to their condition prior to whatever it was that you did to screw them up.