Chapter 8. When All Else Fails: Reinstalling Windows from Scratch
In This Chapter
![]() When Extreme Measures Are Called For
When Extreme Measures Are Called For
![]() What’s Involved in a Clean Install
What’s Involved in a Clean Install
![]() Performing a Clean Install of Windows XP
Performing a Clean Install of Windows XP
![]() Performing a Clean Install of Windows Vista
Performing a Clean Install of Windows Vista
Let’s face it. Over time, your computer system gets “gunked up.” That is, you get so many programs and utilities and such loaded onto your hard disk and into system memory that the whole shebang starts running slower and slower and slower. Too much gunk in your system and things slow to a crawl.
Now, you can try to remove some of that gunk manually—which is what we’ve discussed in several of the previous chapters. But sometimes there’s just too much gunk and you can’t get rid of it all. That’s when you need to do something more extreme.
What’s the most extreme thing you can to do clean out a gunked up system? How about wiping your hard drive clean and reinstalling Windows from scratch? I know, it sounds extreme—and it is—but this last-ditch approach can work wonders for cleaning up a bloated system, or one unduly infected by viruses and spyware.
When Extreme Measures Are Called For
The solution proposed in this chapter is a rather extreme one. Instead of taking a scalpel to your performance issues, this is more of a blunt axe approach. You don’t carefully excise a handful of programs and files, but instead get rid of everything that’s installed on your hard drive by doing what’s called a clean install of the Windows operating system.
The advantage of this approach is that you start with a completely clean system—no gunk. The disadvantage, of course, is that a clean system doesn’t have all your favorite stuff on it, so you’ll have to do a lot of reinstalling and reconfiguring after the fact. But a clean system should run faster than a gunked-up one, and that’s what you’re looking for.
Given the extreme nature of this particular speedup, when should you consider reinstalling Windows from scratch? Here are some common scenarios that might warrant this approach:
![]() Your system is recovering from a computer virus infection—or you can’t seem to recover from said infection. Computer viruses are tough. Although most antivirus programs do a good job of disinfecting your system, some of the nastier viruses are quite difficult to get rid of. If you’ve tried cleaning your system but still have symptoms of infection, the only solution may be to wipe your hard disk clean and start over from scratch—virus free, of course.
Your system is recovering from a computer virus infection—or you can’t seem to recover from said infection. Computer viruses are tough. Although most antivirus programs do a good job of disinfecting your system, some of the nastier viruses are quite difficult to get rid of. If you’ve tried cleaning your system but still have symptoms of infection, the only solution may be to wipe your hard disk clean and start over from scratch—virus free, of course.
![]() Your system has been frequently and severely hit by spyware intrusions—and you can’t get rid of them. Spyware is sometimes more difficult to get rid of than viruses. Some spyware programs do an excellent job of hiding from antispyware programs, and of replicating themselves when you think you’ve deleted them. If spyware consistently recurs after you’ve scrubbed your system with one or more antispyware programs, starting with a clean hard disk may be your only solution.
Your system has been frequently and severely hit by spyware intrusions—and you can’t get rid of them. Spyware is sometimes more difficult to get rid of than viruses. Some spyware programs do an excellent job of hiding from antispyware programs, and of replicating themselves when you think you’ve deleted them. If spyware consistently recurs after you’ve scrubbed your system with one or more antispyware programs, starting with a clean hard disk may be your only solution.
Caution
Don’t confuse hard-to-remove spyware with a new spyware intrusion. If spyware recurs after you’ve visited a file-sharing site, it’s more likely that you’ve downloaded new spyware rather than that the old spyware has come back to life.
![]() You’ve tried to clear unwanted startup programs from your system, but they keep popping up again. Cleaning unwanted startup programs from your system is often difficult; these programs can hide in the most unlikely places. If you can’t find all these startup programs, or if deactivating them doesn’t seem to work (that is, they keep coming back after you’ve turned them off or deleted them), the only way to get rid of them may be to wipe them off in the process of a clean install of Windows.
You’ve tried to clear unwanted startup programs from your system, but they keep popping up again. Cleaning unwanted startup programs from your system is often difficult; these programs can hide in the most unlikely places. If you can’t find all these startup programs, or if deactivating them doesn’t seem to work (that is, they keep coming back after you’ve turned them off or deleted them), the only way to get rid of them may be to wipe them off in the process of a clean install of Windows.
![]() You’ve tried all the other speedups suggested so far, and your system is still running sluggish. Yeah, that’s why this is called a “last-ditch” approach. Everything else you’ve tried to this point doesn’t work, and you’re at wit’s end. Well, performing a clean install is kind of a “drop back 10 and punt” solution, but when you don’t know what’s slowing down your system, sometimes punting is just the thing that’s called for.
You’ve tried all the other speedups suggested so far, and your system is still running sluggish. Yeah, that’s why this is called a “last-ditch” approach. Everything else you’ve tried to this point doesn’t work, and you’re at wit’s end. Well, performing a clean install is kind of a “drop back 10 and punt” solution, but when you don’t know what’s slowing down your system, sometimes punting is just the thing that’s called for.
While this is a radical solution to performance problems, it’s not all that rare. Believe it or not, some users do a clean install of Windows on brand-new PCs, in order to remove all the bundleware that comes preinstalled on new systems. A clean installation gives you a copy of Windows unencumbered by unwanted programs, utilities, and trialware. It also removes all the unnecessary stuff that you accumulate in months and years of computer use. In short, reformatting your hard drive and reinstalling Windows is an effective way of hitting the reset button and letting you start over with a clean—and fast—system.
So what’s involved in this so-called radical solution? Although it’s not that hard to do (even non-technical users can perform a clean install), what happens is a bit drastic.
In short, your hard drive is wiped clean by reformatting. Everything on the disk—programs, data files, and the Windows operating system itself—is effectively deleted, and you’re left with a blank, like-new hard disk. Like I said, it’s an extreme solution.
Onto that newly blank hard drive, then, is placed a clean installation of the Windows operating system. By clean, I mean an installation that includes only those elements you need and excludes all the excess garbage that your computer manufacturer may have included when you first purchased the system. You end up with Windows and Windows only installed on your hard drive.
But what about all your programs and documents? Like I said, they’re wiped off the hard drive during the clean install process. This is why you need to back up all your document files before you reformat, typically to an external hard disk. You can then reinstall your programs from their original installation disks (assuming you have them) and restore your documents from the backup drive. You reinstall only those programs you want and restore only those documents you need—which means you should end up using less hard disk space than you did previously.
Caution
Don’t confuse a manufacturer’s “restore” CD with the official Microsoft Windows installation disc. The restore CD restores your computer’s hard disk to the way it shipped from the factory—complete with all that unwanted bundleware that was installed when you first purchased your PC. It does not create a clean installation of Windows on your hard drive.
Before you perform a clean installation of Windows, you need to do a few things. Here’s what I recommend.
First, make sure you have your Windows installation CD or DVD. This might sound easier than it actually is, because not all computer manufacturers supply you with the official Microsoft installation media. (It saves them a few bucks to leave this out of the box.)
If your computer manufacturer supplied the Windows installation disc, great. If not, you might try calling or emailing to see whether they’ll ship you one. If not, you’ll need to purchase a new copy of Windows—presumably Windows Vista—for the new installation.
Next, you want to locate all the installation discs for the programs you want to reinstall on your system. (Remember, all your existing programs will be deleted when you reformat the hard drive; to use those programs again, you have to reinstall them from scratch.) Likewise, if you originally downloaded the programs, you’ll need to redownload them to your reformatted hard drive.
Caution
Before you upgrade from Windows XP to Windows Vista, make sure your computer hardware meets Vista’s more restrictive specifications, detailed at www.microsoft.com/windows/windows-vista/get/system-requirements.aspx. Not all older PCs can run Windows Vista.
Worse comes to worst, you may have to repurchase one or more programs for which you can’t find the installation discs. This may not be all bad, especially if you have an older version of the program; a newer, upgraded version of the program might be available that may run faster on your system.
Finally, you need to back up all your data and configuration files from your hard drive to some sort of backup devise. I recommend purchasing an external hard drive equal to or larger in size than your computer’s internal hard drive just for this purpose. You can move all these files to the external hard drive and then back to the reformatted internal drive when you’re done with this process.
What’s the best way to copy all you files to the backup drive? I recommend using the File and Transfer Settings Wizard in Windows XP, or Windows Vista’s similar Easy Transfer utility. Both of these programs work in a similar fashion, letting you copy all important data files, user files, and configuration settings to a backup disk, and then restoring them to the reformatted disk when you’re ready.
To use Windows XP’s File and Transfer Settings Wizard, follow these steps:
Caution
If you’ve made a backup of a file that has been infected with a computer virus or spyware, restoring that backup file will infect your newly clean system. Make sure to run anti-spyware and anti-virus utilities on your backup media before you perform any restoration.
1. Click the Start button, and then select All Programs, Accessories, System Tools, Files and Settings Transfer Wizard.
2. When the wizard launches, click the Next button.
3. When the Which Computer Is This? screen appears, check the Old Computer option, and then click Next.
4. When the Select a Transfer Method window appears, as shown in Figure 8.1, select how you want to transfer the files. If you’re copying files to an external hard disk, select that disk, and then click Next.

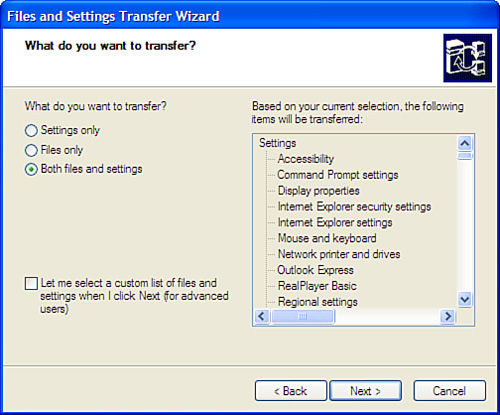
5. When the What Do You Want to Transfer? screen appears (as shown in Figure 8.2), select Both Files and Settings, and then click Next.
6. The wizard now collects everything it needs to copy to the new PC. This takes several minutes, after which you’ll be prompted to begin the transfer. Follow the onscreen instructions to complete the procedure.
To use Windows Vista’s Easy Transfer utility, follow these steps:
1. Click the Start button and select All Programs, Accessories, System Tools, Windows Easy Transfer.
2. When the Easy Transfer welcome screen appears, click the Next button to proceed.
3. If you have any programs currently running on your PC, you’ll be prompted to close them. Click the Close All button to proceed.
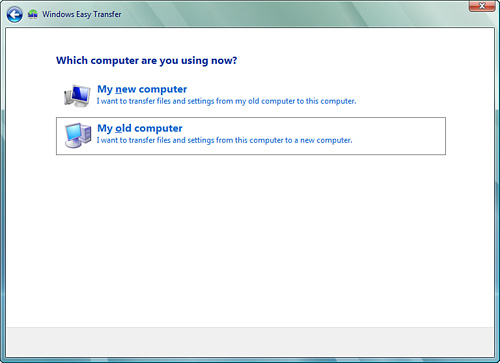
4. When the Which Computer Are You Using Now? screen appears, as shown in Figure 8.3, click My Old Computer.
5. You’re now asked if you’re using an Easy Transfer Cable. Click No.
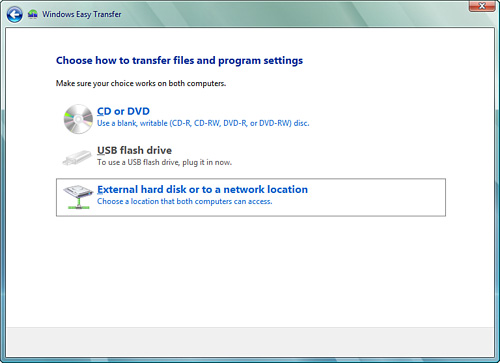
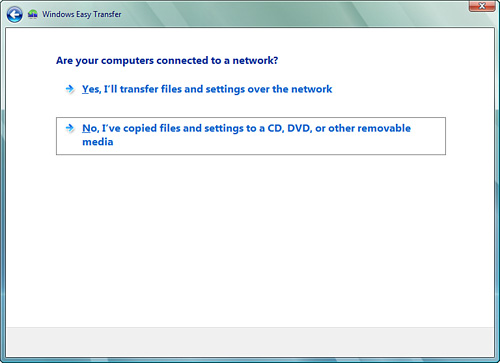
6. Next, the screen in Figure 8.4 asks you how you want to transfer your files—over your network or via CD, DVD, or other removable media. Click the appropriate option to proceed.
7. If prompted to select a location to save your files and settings, make the selection.
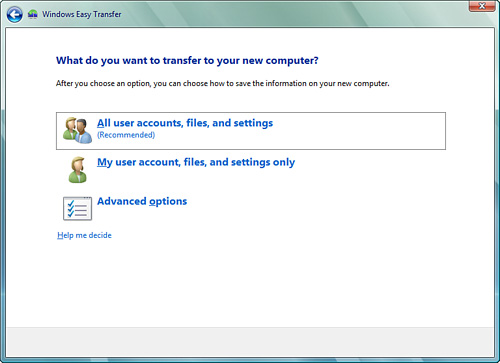
8. When the screen shown in Figure 8.5 appears, select the All User Accounts, Files, and Settings option. This transfers everything that can be transferred, for all users of your PC.
9. Easy Transfer now prompts you for your user account, on both computers. Enter your account name and click Next.
Note
How long it takes to copy your files and settings depends on how many files you’re copying. Generally speaking, the more files you have to transfer, the more time it takes. Whether you’re using the Transfer Files and Settings Wizard or Easy Transfer, you’re probably talking anywhere from half an hour to several hours to complete the process.
Easy Transfer estimates the transfer size and begins copying the files and settings you specified from your computer to your external hard drive. You’ll then be prompted to move the hard drive to your new PC and then copy the files from that device or media to your new PC. Obviously, you hold off on this until after you perform the clean install.
Windows XP and Windows Vista each handle clean installations in their own unique fashions. We’ll start with the Windows XP clean install, and then discuss the Windows Vista operation.
If you’re running Windows XP on your computer and have a Windows installation CD, make sure you’ve backed up all your data, and then follow these instructions:
Caution
If you can’t boot your system from the Windows XP CD, you need to reconfigure your CMOS BIOS so that your CD drive is the boot path. You do this by rebooting your PC, pressing the correct key to enter the CMOS configuration utility, finding the boot sequence setting, and adding your CD drive to the boot sequence before the hard disk. With this reconfigured, you should now be able to boot from the Windows XP CD.
1. Close Windows and turn off your PC.
2. Insert the Windows XP CD into your CD-ROM drive and restart your PC.
3. When you see the onscreen message Press Any Key to Boot from CD, press any key on your keyboard.
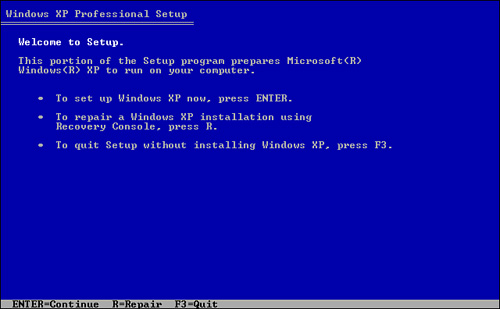
4. After a minute, you’ll see the Welcome to Setup screen, shown in Figure 8.6. Press Enter to set up Windows XP now.
5. When the License Agreement appears, read it (if you want), and then press F8 to proceed.
6. The next screen, shown in Figure 8.7, tells you that you already have a version of Windows installed on your system. Press the Esc key to continue with the clean install.

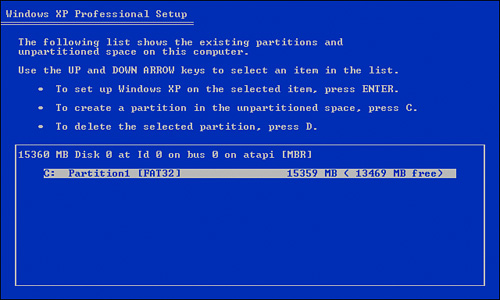
7. The next screen, shown in Figure 8.8, shows you the existing partitions on your hard drive. Select the drive where you want to install Windows (typically drive C:) and press Enter.
8. The following screen, shown in Figure 8.9, again warns you that you already have Windows installed on this partition. Press C to continue.

9. Next, you’re prompted to format the Windows XP partition, as shown in Figure 8.10. Select the Format the Partition Using the NTFS File System option and press Enter.

10. You’re now prompted to begin the reformatting. Press F to continue.
The installation program now begins to format your hard disk and then install the Windows XP operating system. At some point you’ll need to make some configuration choices and input a variety of information—including that long product key located on the back of the Windows XP CD. Just follow the onscreen instructions and be sure you have a few thick magazines to read while the installation program does its thing.
When the installation is complete, you’ll need to reinstall your favorite programs and copy all your files and settings from your external backup disk. Read on to the “After the Clean Install: Reinstalling Programs and Data” section, later in this chapter, to learn more.
Performing a clean install of Windows Vista is similar but different than with Windows XP. Make sure you’ve backed up your files and settings and that you have your Vista installation DVD in hand, and then follow these instructions:
Caution
Microsoft won’t let you perform a clean install from an upgrade version of Windows Vista. You can do a clean install only from a full version of the installation DVD.
1. Close Windows and turn off your PC.
2. Insert the Windows Vista DVD into your CD/DVD drive and restart your PC.
3. If prompted to press a key to boot from the DVD, do so.
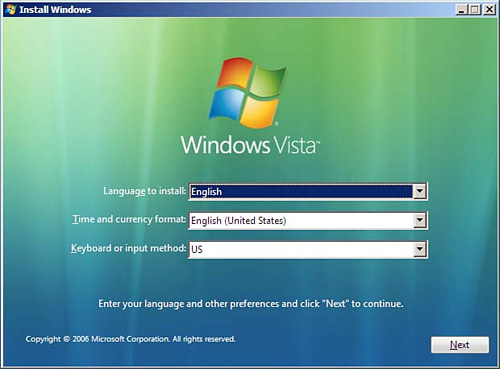
4. As shown in Figure 8.11, you’re now prompted to confirm the installation language, time and currency format, and keyboard or input method. Do so, and then click the Next button.
5. When the screen shown in Figure 8.12 appears, click Install Now.

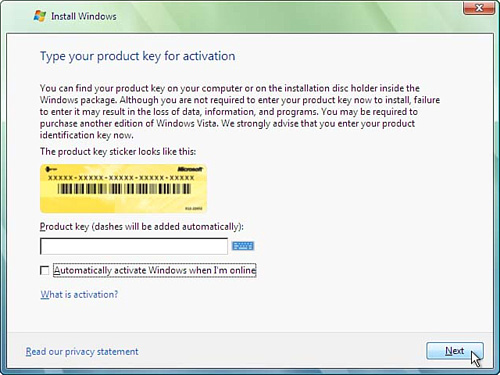
6. As shown in Figure 8.13, you’re now prompted to enter the Windows product key, which is found on the installation disc package. Enter the key, check the Automatically Activate Windows When I’m Online option, and then click Next.
7. You’re now asked to select which version of Windows you’re installing. Make your choice, and then click Next.
8. Windows now displays the end user agreement. Read if you like, check the I Accept the License Terms options, and then click Next.
9. As you can see in Figure 8.14, you’re now prompted to select what type of installation you’re making. Select Custom to proceed.

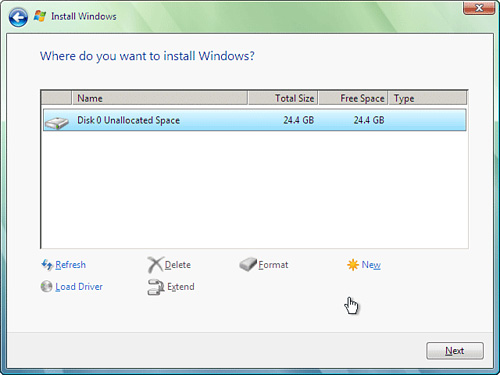
10. You’re now prompted to select where you want to install Windows. Don’t select a drive just yet. Instead, click the Drive Options (Advanced) option.
11. The screen changes to that shown in Figure 8.15. Select your primary hard drive (typically drive C:), click the Format option, and then click Next.
The installation program now begins to format your hard disk and then install the Windows Vista operating system. When all the files are copied, you’ll be prompted to make the usual configuration choices. Just follow the onscreen instructions to finalize the installation.
When the installation is complete, you’ll need to reinstall your favorite programs and copy all your files and settings from your external backup disk. Read on to learn how.
While the clean install process is a little time consuming, it’s pretty simple. What you receive in its wake is a clean hard drive with an ungunked copy of Windows installed. That’s it; there are no programs or data files cluttering things up—yet.
The next step in this process is to restore to your clean hard drive all the files and settings you previously backed up, and then reinstall copies of your favorite programs—and only those programs. (That’s right, here’s where you keep things clean by not installing those unnecessary programs that only served to take up disk space before.)
On a Windows XP machine, you use the File and Settings Transfer Wizard to restore your data files and settings from your external hard disk back to your main reformatted hard drive. Here’s how to do it:
1. Click the Start button and select All Programs, Accessories, System Tools, Files and Settings Transfer Wizard.
2. When the wizard launches, click the Next button.
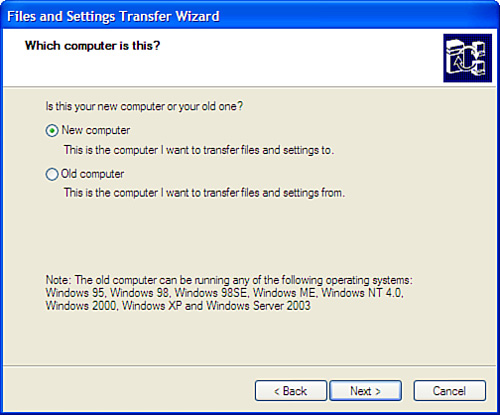
3. When the Which Computer Is This? screen appears, as shown in Figure 8.16, check the New Computer option, and then click Next.
4. When the next screen appears, asking whether you have a Windows XP CD, select I Don’t Need the Wizard Disk option, and then click Next.
5. When the Where Are the Files and Settings? screen appears, select how you’ve stored the files, and then click Next.
That’s it. The wizard now automatically transfers the files and settings to your new computer. All you have to do is sit back and wait for the whole thing to finish. When it’s done you might have to reboot your computer, but then it will be up and running—and looking and acting just like you’re used to!
On a Windows Vista PC, you use the Easy Transfer utility to copy your data files and settings from your external backup drive back to your reformatted internal hard disk. Here’s how to do it:
1. Click the Start button and select All Programs, Accessories, System Tools, Windows Easy Transfer.
2. When the Easy Transfer welcome screen appears, click the Next button to proceed.
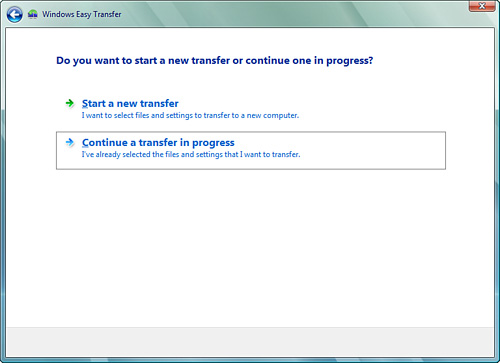
3. When the next screen appears, as shown in Figure 8.17, click Continue a Transfer in Progress.
4. When the Where Did You Copy Your Files? screen appears, as shown in Figure 8.18, select Removable Media.
5. When the Locate Your Saved Files screen appears, select the external drive where your data files and settings are stored.
6. When prompted, select the usernames you want to use for your new Windows installation.
7. On the next screen, select the destination drive for these files and settings, (typically drive C:).
8. When the final screen appears, click Start to begin the transfer.
The restoration process now begins. When it’s done, your computer should be up and running with all your old data files and Windows settings.
The last thing you need to do is reinstall those programs you want to continue using. Obviously, you’ll need each program’s installation discs—or, in the case of downloaded programs, the download URL and (if required) a download activation key. If you don’t have the original discs or if the software publisher doesn’t let you perform multiple downloads of the same program, you may need to purchase a new version of that program. In any case, do whatever you need to do to reinstall the programs you’re likely to use on a daily basis—but not those you’ll never use going forward.
If your system is severely gunked up and still slow after trying the other solutions presented in this book, you can de-gunk it and likely speed it up by performing a clean install of the Windows operating system. Here’s the bottom line:
![]() A clean installation of Windows reformats your hard drive, deletes all existing data and programs, and reinstalls Windows without any bundleware.
A clean installation of Windows reformats your hard drive, deletes all existing data and programs, and reinstalls Windows without any bundleware.
![]() Before you do a clean install, make sure you back up all your data files and settings by using either the Files and Settings Transfer Wizard (Windows XP) or the Easy Transfer utility (Windows Vista). It’s best to make this backup to an external hard disk.
Before you do a clean install, make sure you back up all your data files and settings by using either the Files and Settings Transfer Wizard (Windows XP) or the Easy Transfer utility (Windows Vista). It’s best to make this backup to an external hard disk.
![]() To perform a clean install, you need a full (not upgrade) copy of the Windows installation CD or DVD.
To perform a clean install, you need a full (not upgrade) copy of the Windows installation CD or DVD.
![]() After the clean install, you’ll need to reinstall your favorite software programs and restore your files and settings from your backup hard disk to your PC’s main hard drive.
After the clean install, you’ll need to reinstall your favorite software programs and restore your files and settings from your backup hard disk to your PC’s main hard drive.