
Chapter 7. Cleaning Up the Windows Registry
In the previous section of this book, we discussed some relatively non-technical ways to speed up your PC. In this section, we get slightly more technical—stuff that regular folks can still do to increase performance, but that requires a bit more technical confidence to achieve.
First up are a bunch of speedups that involve something called the Windows Registry. Don’t worry, no screwdrivers or wrenches are required yet; the Registry is nothing more than a big file that you can edit with relatively easy-to-use software tools.
Here’s something that’s pretty obvious to any computer user: Windows is a complex and sophisticated piece of computer software. The operating system itself encompasses literally tens of thousands of individual system files—all of which have to be managed and monitored, as do all the devices that Windows is tasked with managing. It’s a lot of information to manage.
Windows tracks all these thousands of individual configuration settings via a big database file called the Windows Registry. The Registry is where Windows turns to when it needs to find out anything about any part of the system. The Registry houses all manner of settings for everything from window color and translucency to the brand and model number of printer you’re using. This type of centralized configuration storage makes it easy for Windows to find precise settings when necessary.
The Registry also has a big impact on your PC’s speed. It all comes down to what is stored in the Registry and how the Registry is configured. An overly cluttered Registry can slow down performance, while tweaking certain Registry settings can speed up performance. For that reason, learning how to clean up and tweak the Registry is an essential skill for anyone trying to speed up a Windows XP or Vista computer.
Every time you make a configuration change, that information is automatically written to the Registry. Change the system time, and the Registry is updated; change your desktop wallpaper, the Registry is updated; change the home page in Internet Explorer, the Registry is updated. The Registry is also updated whenever you install a new software program or hardware device. And it all happens automatically, in the background.
When Windows needs to do anything—open a program, display a dialog box, you name it—it accesses the Registry to obtain the proper configuration information. In this sense, the Registry functions like a control center for your entire computer system; it defines how every part of your system looks and works.
The Registry is organized into five major sections, called hives. Each hive is stored in its own system file on your PC’s hard disk.
These hives include the following:
![]() HKEY_CLASSES_ROOT: Contains information about registered applications, including file associations and OLE object classes. (This hive displays the same settings as the HKEY_LOCAL_MACHINESoftwareClasses key.)
HKEY_CLASSES_ROOT: Contains information about registered applications, including file associations and OLE object classes. (This hive displays the same settings as the HKEY_LOCAL_MACHINESoftwareClasses key.)
![]() HKEY_CURRENT_USER: This hive is a subset of the HKEY_USERS hive, pertaining to the current user of the PC. It contains all attributes for the desktop environment and network connections.
HKEY_CURRENT_USER: This hive is a subset of the HKEY_USERS hive, pertaining to the current user of the PC. It contains all attributes for the desktop environment and network connections.
![]() HKEY_LOCAL_MACHINE: Contains most of the settings for your PC’s hardware, system software, and individual applications.
HKEY_LOCAL_MACHINE: Contains most of the settings for your PC’s hardware, system software, and individual applications.
![]() HKEY_USERS: Contains subkeys corresponding to the HKEY_CURRENT_USER hives for all users of the PC, not just the current user.
HKEY_USERS: Contains subkeys corresponding to the HKEY_CURRENT_USER hives for all users of the PC, not just the current user.
![]() HKEY_CURRENT_CONFIG: Contains information gathered when Windows first launches, such as settings pertaining to your PC’s display and printers. The data stored in this hive is not permanently stored on disk, but rather is regenerated each time your PC boots.
HKEY_CURRENT_CONFIG: Contains information gathered when Windows first launches, such as settings pertaining to your PC’s display and printers. The data stored in this hive is not permanently stored on disk, but rather is regenerated each time your PC boots.
Each hive is further organized into a variety of keys and subkeys that can be represented by a series of folders and subfolders. For example, if you want to find configuration information for which programs Windows loads at launch, you would look in the following key: HKEY_LOCAL_MACHINESOFTWAREMicrosoftWindowsCurrentVersionRun.
The settings or data for each individual key or subkey is called the value. Each value in the Registry is defined by a value name (often called just the value), the type of data used for that entry, and the value of that data.
Note
The Windows Registry was first introduced in Windows 95. Before that particular version of Windows, two system files kept track of much of the same information—win.ini and system.ini. As more objects became installed in the operating system, however, these files became huge and unwieldy—and contributed significantly to the slowing of Windows. Starting with Windows 95, therefore, all the information formerly stored in these two files (and more) was moved to the Registry, which is much more organized and easier to manage than the previous files.
Tip
Most experts recommend that you make a backup of the Registry before you make any changes to it. Fortunately, backing up the Registry is as simple as setting a System Restore point before you make an edit. The System Restore point contains a back up of the Registry; if you have problems following a Registry edit, you can simply restore the Registry to its preedit state using the System Restore utility. (Learn how to use System Restore in Chapter 2, “Before You Start: Protect Your Data.”
Most of the time you won’t need to bother with the Registry—it operates in the background, automatically updated whenever you change a Windows setting or install a new piece of software or hardware.
However, there will come the occasion when you experience a particularly vexing system problem that can be fixed only by editing a particular value in the Registry.
You edit the Registry with a built-in utility imaginatively called the Registry Editor. To launch Registry Editor, follow these steps:
1. Click the Start button and click Run.
2. When the Run window appears, enter regedit in the Open box.
3. Click OK.
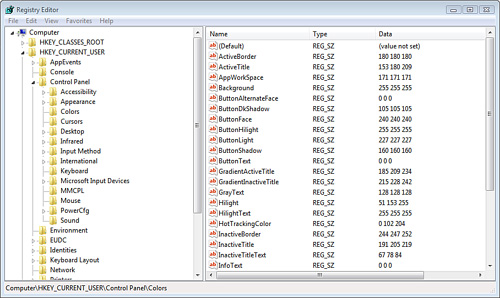
As you can see in Figure 7.1, the Registry Editor window has two panes. The left pane displays all the Registry’s hives and keys. All keys have numerous subkeys. The right pane displays the values, or configuration information, for each key or subkey. You display the different levels of subkeys by clicking on the + next to a specific item.
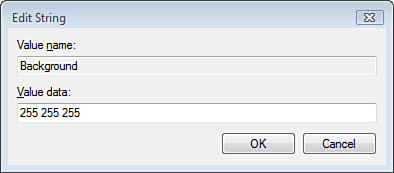
You edit a particular value by highlighting the subkey in the left pane and then double-clicking the value in the right pane. This displays the Edit Value (or Edit String) window, like the one shown in Figure 7.2. Enter a new value in the Value Data box, and then click OK.
Caution
Registry settings are changed as you make the changes. There is no “save” command in the Registry Editor. There is also no “undo” command. So be very careful about the changes you make—they’re final!
To add a new value to a subkey, right-click the subkey and select one of the New, Value options from the pop-up menu. Type a name for the new value, and then double-click the value to display the Edit Value (or Edit String) window. Enter the new value in the Value Data box, and then click OK.
You also can add new subkeys to the Registry. Just right-click the key where you want to add the subkey, and then select New, Key from the pop-up menu. A new subkey (with a temporary name) appears. Type a name for the new subkey, and then press Enter.
To delete a subkey or value, right-click the item and select Delete. Remember, however, that all changes are final. Once a subkey is deleted, it’s gone!
When it comes to the Windows Registry, here’s what slows down your system. Over time, all the different programs you install and settings you configure create lots and lots and lots of entries in the Registry—even after you uninstall the programs or no longer need the settings. That contributes to Registry “bloat” with lots of unnecessary or orphaned entries. And the larger the Registry is, in terms of both file size and number of entries, the longer it takes for Windows to load it on startup—which slows down your system.
The fix for this problem is deceptively simple: Delete all the orphaned and unnecessary Registry entries. That’s easier to say than to do, however. How do you know which entries are necessary and which aren’t? Plus, do you really want to do all that work by hand, using the Registry Editor?
Fortunately, various third parties have recognized this issue and come up with their own solutions, in the form of Registry cleaner utilities. These programs automatically scour your Registry for redundant, invalid, or orphaned entries, and delete them. The process is easy as pie.
What kind of impact does a Registry cleaner actually have? It depends, to some degree, on how “clean” your Registry was to begin with. If a cleaner finds only a dozen or so entries to delete (out of the thousands of valid entries), the performance impact is minimal. But if you have a greater number of useless entries (or a smaller number of total entries), a Registry cleaner will have a larger percentage impact on your system’s performance. So you might notice a very small change in speed or a very large one, depending.
Caution
There is the slight chance that a poor-quality Registry cleaner program may incorrectly identify a working entry as an unnecessary one, and thus delete a setting that Windows needs to run. For that reason, you should set a restore point (using System Restore) before cleaning your registry. You can always go back to that precleaner restore point if your system has problems after the cleaning.
A large number of Registry cleaners are available today. The best of these include the following:
Tip
I recommend you choose a cleaner with backup and restore functions. This lets you undo any changes made by the cleaner, in case the program accidentally deletes something it shouldn’t.
![]() CCleaner (www.ccleaner.com), a free utility that offers various system maintenance operations, including deleting temporary files and log files in addition to cleaning the Registry
CCleaner (www.ccleaner.com), a free utility that offers various system maintenance operations, including deleting temporary files and log files in addition to cleaning the Registry
![]() EasyCleaner (personal.inet.fi/business/toniarts/ecleane.htm), a free dedicated Registry cleaner
EasyCleaner (personal.inet.fi/business/toniarts/ecleane.htm), a free dedicated Registry cleaner
![]() Registry Healer (www.zoneutils.com/regheal/), a shareware Registry cleaner with optional $19.95 registration fee
Registry Healer (www.zoneutils.com/regheal/), a shareware Registry cleaner with optional $19.95 registration fee
![]() Registry Mechanic (www.pctools.com/registry-mechanic/), one of the most popular Registry cleaners, costing $29.95 for a three-computer license
Registry Mechanic (www.pctools.com/registry-mechanic/), one of the most popular Registry cleaners, costing $29.95 for a three-computer license
![]() RegSeeker (www.hoverdesk.net/freeware.htm), another free dedicated Registry cleaner
RegSeeker (www.hoverdesk.net/freeware.htm), another free dedicated Registry cleaner
![]() Tuneup Utilities (www.tune-up.com/products/tuneup-utilities/), a $49.95 suite of tune-up utilities that include disk defragmenting, file cleanup, and Registry cleaner
Tuneup Utilities (www.tune-up.com/products/tuneup-utilities/), a $49.95 suite of tune-up utilities that include disk defragmenting, file cleanup, and Registry cleaner
![]() Uniblue RegistryBooster (www.liutilities.com/products/registrybooster/), a $29.95 dedicated Registry cleaner
Uniblue RegistryBooster (www.liutilities.com/products/registrybooster/), a $29.95 dedicated Registry cleaner
![]() WinCleaner (www.wincleaner.com), another dedicated Registry cleaner that sells for $29.95
WinCleaner (www.wincleaner.com), another dedicated Registry cleaner that sells for $29.95
Caution
Beware of so-called Trojan applications that masquerade as legitimate Registry cleaners. These malware programs typically are pushed via pop-up windows that purport to alert you of Registry problems and urge an immediate download. Once installed, they operate as spyware or adware on your system. No legitimate Registry cleaner promotes itself in this fashion.
Most Registry cleaners work in a similar fashion, scanning your Registry for entries that don’t lead anywhere. This can be done automatically (the cleaner deletes every bad entry it encounters) or manually (you’re asked whether you want to delete each individual entry it finds). Because most users don’t know what’s good and what’s bad, the automatic operation is generally recommended.
Caution
In some rare instances, Registry cleaners can accidentally delete entries and DLLs that are used (if infrequently) by some programs. For this reason, make sure you create a System Restore point before running the cleaner utility; you can always restore your system to that point if any problems occur after cleaning.
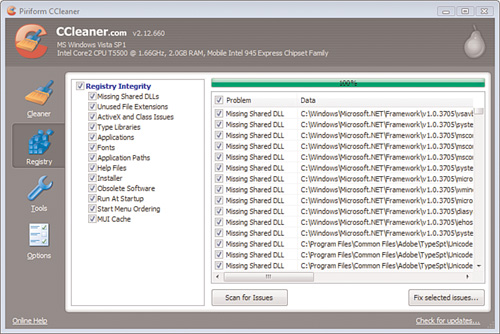
Figure 7.3 shows one of the more popular cleaners, CCleaner, in action. You start the scan by clicking the Scan for Issues button. Problem entries are then listed in the rightmost pane. To delete all identified entries, leave everything checked and click the Fix Selected Issues button. Alternatively, you can manually examine all the entries and uncheck those you don’t want to remove.
Now that you know how to clean and edit the Windows Registry, let’s examine a handful of Registry tweaks that can speed up your PC. They’re easy to do—as long as you’re comfortable using the Registry Editor.
Caution
Just another reminder that editing Registry settings can result in unexpected system behavior. Make sure you set a System Restore point before attempting any of these Registry tweaks!
Want to make Windows’ menus display more quickly? That’s what you get when you enable this Registry tweak that removes the slight delay that is normally present between clicking a menu and Windows displaying that menu.
To perform this tweak, follow these steps:
2. Navigate to the HKEY_CURRENT_USERControl PanelDesktop key.
3. Right-click the MenuShowDelay item and select Modify.
4. In the Edit String dialog box, change the current value (typically 400) to something a bit lower—something around 100 typically works well.
5. Click OK.
You can now close the Registry Editor and see how fast your menus open.
Tired of waiting... and waiting... and waiting while your computer shuts down or reboots? Part of that time is spent waiting on Windows to automatically close any programs you have open. Fortunately, you can reduce that waiting time, by tweaking the Windows Registry. Just follow these steps:
1. Open the Registry Editor.
2. Navigate to the HKEY_CURRENT_USERControl PanelDesktop key.
3. Right-click the WaitToKillAppTimeout item and select Modify.
4. In the Edit String dialog box, change the value to 1000.
5. Click OK.
6. Now right-click the HungAppTimeout item and select Modify.
7. In the Edit String dialog box, change the value to 1000.
8. Click OK.
9. Now navigate to the HKEY_USERS.DEFAULTControl PanelDesktop key.
10. Right-click the WaitToKillAppTimeout item and select modify.
11. In the Edit String dialog box, change the value to 1000.
12. Click OK.
13. Navigate to the HKEY_LOCAL_MACHINESystemCurrentControlSetControl key.
14. Right-click the WaitToKillServiceTimeout item and select Modify.
15. In the Edit String dialog box, change the value to 1000.
16. Click OK.
The next time you shut down your system, it shouldn’t take quite so long.
Windows constantly checks to see whether there’s enough free space on your hard drive. If there isn’t, it displays a low disk space warning. The problem is, all this disk space checking uses up system resources, and you probably know if your disk space is low, anyway.
You can speed up your PC by turning off this low disk space checking. Here’s how to do it:
1. Open the Registry Editor.
2. Navigate to the HKEY_CURRENT_USERSoftwareMicrosoftWindowsCurrentVersionPolicies key.
3. If the Explorer key exists, select it. If not, right-click in the rightmost pane and select New, Key. Name this new key Explorer, and then select it.
4. Right-click in the rightmost pane and select New, DWORD (32-bit) Value.
5. Name the new DWORD NoLowDiskSpaceChecks.
6. Right-click the new NoLowDiskSpaceChecks item and select Modify.
7. In the Edit DWORD dialog box, change the value to 1.
8. Click OK.
Anything that runs in system memory runs faster than if it runs from your hard disk. To that end, you can speed up Windows itself by moving the Windows kernel into RAM, by executing this Registry tweak:
Caution
You should only move the Windows kernel into RAM if your PC has 256MB or more of system memory.
1. Open the Registry Editor.
2. Navigate to the HKEY_LOCAL_MACHINESYSTEMCurrentControlSetControlSession ManagerMemory Management or HKEY_LOCAL_MACHINESYSTEMCurrentControlSetSession ManagerMemory Management key.
3. Right-click the DisablePagingExecutive item and select Modify.
4. In the Edit DWORD dialog box, change the value to 1.
5. Click OK.
You must reboot your system for this tweak to take effect.
The Windows Registry contains thousands of configuration settings that enable Windows to run properly. It’s no surprise that tweaking and cleaning the Registry can have a big impact on your PC’s performance. Here’s the bottom line:
![]() Because the Registry is a large file that must be loaded whenever Windows launches, any way to reduce the size of that file can speed up your PC.
Because the Registry is a large file that must be loaded whenever Windows launches, any way to reduce the size of that file can speed up your PC.
![]() The quickest way to speed up Registry performance is to use a Registry cleaner program that identifies and deletes unnecessary entries from the Registry.
The quickest way to speed up Registry performance is to use a Registry cleaner program that identifies and deletes unnecessary entries from the Registry.
![]() Additional performance gains can come from tweaking individual Registry entries, using the Registry Editor utility.
Additional performance gains can come from tweaking individual Registry entries, using the Registry Editor utility.