Chapter 11. Adding More Disk Space
In This Chapter
![]() How Hard Disk Storage Affects Your PC’s Speed
How Hard Disk Storage Affects Your PC’s Speed
![]() Understanding Hard Drive Capacity
Understanding Hard Drive Capacity
![]() Adding a New External Hard Drive
Adding a New External Hard Drive
![]() Upgrading an Existing Internal Hard Drive
Upgrading an Existing Internal Hard Drive
In the preceding chapter, you learned how adding more random access memory (RAM) can speed up your PC. You also learned how your computer sometimes uses your hard disk as virtual memory, to supplement your system’s main memory.
If you don’t have enough free space on your hard drive, you might not have enough virtual memory to ensure speedy operation. In addition, an overly stuffed hard drive takes longer to open and close the programs and documents you use every day.
Because your computer’s original internal hard disk will tend to fill up over time, you may want to consider adding a second hard drive to your system—or replacing the original hard drive with a bigger one. Not only will more hard disk space speed up your system, however slightly, it will also give you more valuable storage space for your programs and files. And, given the low price of hard drives today, it’s not a big investment!
Before you grab your screwdriver and start poking around inside your PC’s system unit, let’s stop for a second and examine just how it is that your hard disk affects the performance of your entire computer system. Because it does, you know.
The first way your hard disk affects system performance revolves around the topic of virtual memory. As you’ve learned previously in this book, virtual memory is hard disk space used as overflow or supplemental memory to your computer’s main electronic memory. Virtual memory compensates, in a way, for having too little RAM on your system; data and instructions that might otherwise be temporarily written to RAM are instead written to your PC’s hard drive.
For virtual memory to be effective, you must have enough free hard disk space. (It also helps if your hard disk is fully defragmented and free from errors.) If your hard disk space is running low, that means that there’s less space to devote to virtual memory—and the less total memory (main plus virtual) you have, the slower your computer will run.
The other way that your hard drive can adversely affect system performance concerns all the programs and documents that are read from and written to your hard disk in the course of a computing day. It’s a simple math problem: The faster your system can move this data to and from your hard drive, the speedier your PC will be.
The challenge comes when your hard disk becomes too full. A full hard disk has to spread the bits and pieces of each file in different sectors of the drives, because there typically aren’t enough free sectors all together to allow contiguous storage. This results in disk fragmentation, which as you recall can really slow down hard disk performance; it takes longer to retrieve and reassemble a file from all across your hard disk than it does from a contiguous area.
The goal, therefore, is to have a big enough hard drive so that there’s enough space both for virtual memory and for storing your documents and programs in contiguous sectors, thus avoiding disk defragmentation. But how do you know how much free space you have on your hard disk—and how much capacity do you need?
The answer to the first question is easy. To view the overall and used capacity of your hard drive, just follow these steps:
1. Click the Start button and select either Computer (Windows Vista) or My Computer (Windows XP).
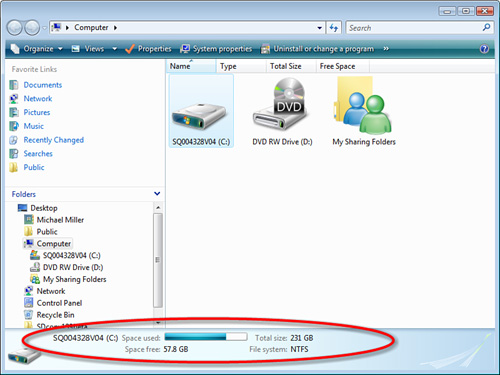
2. In Windows Vista, you can view the capacity of a drive by clicking that hard drive’s icon. As you can see in Figure 11.1, the space used is shown graphically at the bottom of the window, with space free and total size also displayed.
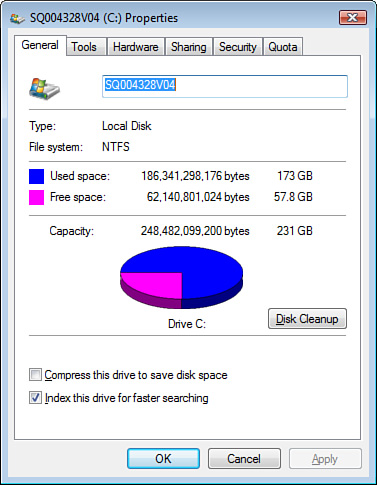
3. In both Windows XP and Vista, you can see more detail by right-clicking the hard drive icon and selecting Properties from the pop-up menu. When the Properties dialog box appears, make sure the General tab is selected. As you can see in Figure 11.2, this displays a pie chart of your drive’s used and free space, along with details as to capacity (in gigabytes).
As to the question of how much free space is enough, you should leave at least 20% of your total space free for use as virtual memory and other essential operations. So if you have an 80GB hard drive, you need to leave 16GB free.
That said, the total amount of hard disk space you need depends on how much stuff you need to store on it. If all you do is browse the Web and read email, you can make due with a relatively small hard drive. On the other hand, if you store a ton of digital photos or music, or run some very large programs, you need more hard disk space. How much is something you have to determine based on your own specific needs.
If you don’t have enough hard disk space on your computer, you can make more space by deleting programs and files you don’t use or by purchasing a new hard drive. You can go with an external hard drive to supplement your main internal hard drive, or you can replace your existing internal drive with a larger capacity model. (We examine all these options later in this section.)
Of course, it pays to do your research before you buy any type of new hard drive. You need to understand the relevant specifications to make an informed buying decision—and to get the right hard drive for your system. This information, typically available somewhere on the drive’s packaging, tells you how much data the disk can hold, how fast it can access that data, and the type of interface the drive uses. (Faster is better, of course—and more expensive.)
Of these specs, you’ll want to focus your attention on form factor, size, speed, and price. Given the low prices of hard drives today, you’ll probably want to spend a few extra bucks to get a larger-capacity drive. If you’re using disk-intensive applications (such as PC games or audio/video-editing programs), you’ll also want to spring for the faster 7,200 RPM models. And, of course, price is always a factor; make sure you make the price/performance compromise that works best for your specific needs.
The first question to answer is whether you want an external or internal hard drive. Naturally, if you want to replace your existing hard drive, you’re talking an internal model. But if you want to supplement your existing drive rather than replace it, an external drive is probably the best way to go; all you have to do is connect said external drive to a free USB or FireWire port on your PC, it’s that easy.
Replacing an existing drive has its advantages, however. Although it’s a bit more work (and involves digging around inside your PC’s system unit), it results in simpler operation. That’s because you only have to deal with a single drive when installing programs, opening and saving files, and the like. Get a big enough C: and you don’t need to bother with a D: drive as well.
That, of course, is the drawback of adding a supplemental external drive. You now have to split your programs and files between two drives (C: and D:); you may also have to move some of your existing files from your original drive to the new one. It can get a bit confusing if you’re not well organized, even if the initial installation is much simpler.
So which is best for you? If you don’t mind getting your hands dirty, technically speaking, and don’t want to bother with moving files from one disk to another, go with a replacement internal drive. If you want a simple installation, however, and don’t mind dealing with two drives in day-to-day operation, add an external drive instead.
Caution
Another drawback to adding a second hard drive is that you still have to deal with any issues regarding your current internal drive. If your current drive is slow, fragmented, or damaged, or has a spyware/virus infection, those problems remain even if you supplement your capacity with an external hard drive.
Now let’s get down to specifications, starting with capacity. Disk drive size is typically measured in gigabytes (GB) and terabytes (TB). A terabyte is equal to 1,000 gigabytes.
The bigger the drive, of course, the higher the price. As of fall 2008, you can purchase new drives ranging in capacity from 80GB to 2TB. Prices run from less than $100 to more than $500. For example, as I write this book, Best Buy is selling a 500GB Western Digital external drive for $99 and a 1TB Seagate drive for $299. Expect prices to be similar or even lower by the time you read this.
Caution
It’s actually possible to buy too big a hard drive—on older PCs, anyway. If you’re running Windows 95 or earlier, your operating system will only support drives up to 32GB in size. If you’re running Windows 98 or any later operating system (including Windows XP and Windows Vista), you can use drives that exceed the 32GB limit.
Spin rate measures the speed at which the platters spin, in revolutions per minute (RPM). Faster-spinning drives result in faster data transfer rates (discussed next); most drives today spin at either 5,400 RPM or 7,200 RPM, and some high-performance drives reach 10,000 RPM. The slower speed is acceptable for traditional office use, but you’ll want a faster drive if you’re doing a lot of audio- or video-related tasks.
The data transfer rate is the speed at which the system copies data from the hard drive to your computer (and vice versa). This spec is typically measured in megabits per second (Mbps). As with most of these specs, faster is better.
The next spec to consider is access time or seek time, which is the amount of time it takes for the heads to locate a specific piece of data on the hard drive. Manufacturers typically specify the “average access time,” because the actual seek time varies depending on the location of the heads and where the next bit of data is stored. A faster access time (smaller number) is better, naturally.
When you’re looking at an external drive, you can typically choose between USB and FireWire connections. Most low-priced external drives today feature USB connections. Some higher-end drives have both USB and FireWire.
Tip
For most purposes, either USB or FireWire will do a good job on the average system. However, if you’re using your hard disk for video editing or similar high-demand tasks, the faster FireWire 800 connection might be necessary.
Today’s USB connections adhere to the USB 2.0 specification, which promises a 480Mbps transfer speed. Note the word promises; USB connections rarely exceed 280Mbps sustained speeds.
There are actually two different types of FireWire connections in use today. The older (and more common) FireWire 400 has a maximum transfer speed of 400Mbps, whereas the newer FireWire 800 doubles that to nearly 800Mbps.
Table 11.1 compares the specs of these interfaces, in terms of data transfer rates—faster is always better.

When you’re looking at an internal drive, there are several different interfaces available that control the communication between your hard drive to your PC:
![]() ATA (Advanced Technology Attachment). An ATA drive uses a parallel connection with a 40-pin connection. These drives are quite common and easy to install and configure. Standard ATA drives transfer data at 16.6Mbps; variations of the ATA standard include ATA-100 (also known as Ultra ATA), which has a data transfer rate of 100Mbps, and ATA-133, which has a data transfer rate of 133Mbps.
ATA (Advanced Technology Attachment). An ATA drive uses a parallel connection with a 40-pin connection. These drives are quite common and easy to install and configure. Standard ATA drives transfer data at 16.6Mbps; variations of the ATA standard include ATA-100 (also known as Ultra ATA), which has a data transfer rate of 100Mbps, and ATA-133, which has a data transfer rate of 133Mbps.
Note
Some vendors use the terms PATA (parallel ATA), IDE (Integrated Drive Electronics), or IDE/ATA to describe ATA drives.
![]() SATA (Serial ATA). This is a more advanced version of ATA, using a serial connector rather than a parallel one. The parallel connector enables faster data transfer rates, in theory up to 300Mbps.
SATA (Serial ATA). This is a more advanced version of ATA, using a serial connector rather than a parallel one. The parallel connector enables faster data transfer rates, in theory up to 300Mbps.
Tip
If you’re working with an older PC, you might encounter some additional, now-obsolete interfaces, such as ST-506, ESDI, and MCA-IDE. If your system uses any of these interfaces, it’s an antique; junk the thing and buy a new PC!
![]() SCSI (Small Computer System Interface). This is a more expensive, difficult-to-configure interface primarily used in systems designed for high-end audio/video editing.
SCSI (Small Computer System Interface). This is a more expensive, difficult-to-configure interface primarily used in systems designed for high-end audio/video editing.
In most instances, you’ll replace your existing drive with a drive that uses the same interface. So if your PC has an ATA drive, you should buy a new ATA drive. If it has an SATA drive, you should replace it with another SATA drive.
If you want to get really fancy, you can install multiple hard disks on your system in what is called a RAID—a redundant array of independent disks. RAID technology lets you use two or more hard disk drives simultaneously; your data is divided and replicated between the multiple disks for increased reliability and input/output performance.
Some manufacturers sell high-end external drives that contain multiple disks configured in a RAID array. For internal drives, you have to install the multiple disks yourself and then configure them in the RAID array.
I won’t go into RAID arrays in depth here; they’re mainly for higher-end, higher-capacity systems, such as network storage servers. However, if you have extreme data storage needs (say, for a home media server), you should consider a RAID array for both safety and performance reasons.
When you’re looking for a new hard disk, it pays to stick to the major manufacturers. Here are some of the companies that specialize in magnetic storage media:
![]() Iomega (www.iomega.com)
Iomega (www.iomega.com)
![]() LaCie (www.lacie.com)
LaCie (www.lacie.com)
![]() Maxtor (www.maxtor.com)
Maxtor (www.maxtor.com)
![]() Seagate (www.seagate.com)
Seagate (www.seagate.com)
![]() Western Digital (www.westerndigital.com)
Western Digital (www.westerndigital.com)
Both external and internal hard drives can be found at most computer and consumer electronics stores, including Best Buy and Circuit City.
The easiest type of hard drive to install is the external variety. These drives typically install via either USB or FireWire, and supplement the storage space on your main internal hard drive.
Installation of an external hard drive is relatively simple. Just follow these steps:
1. Plug the new drive into a live electrical outlet.
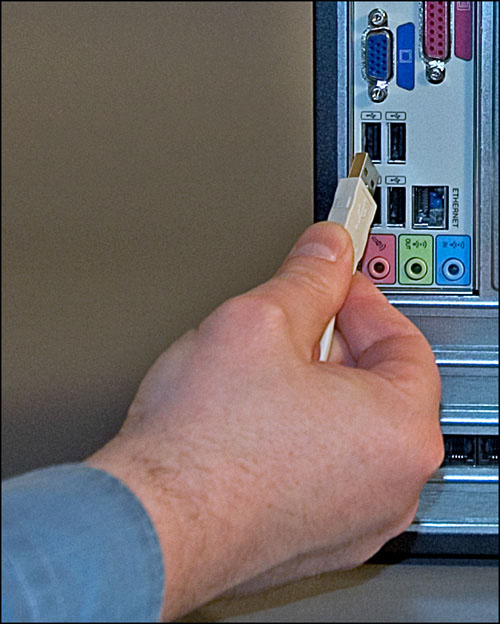
2. Connect the drive to an open USB or FireWire port on your PC, as shown in Figure 11.3.
3. If your new drive came with an installation CD (and it probably did), insert the CD into your CD-ROM drive and run the installation program. (Sometimes the installation program is actually on the hard drive itself, and will automatically run when you connect the drive.) Otherwise, Windows should recognize the new drive and automatically install the proper device drivers.
Your new external drive assumes the next highest available drive letter on your system. So, for example, if your current hard drive is the C: drive, the new external drive will be the D: drive. (If your CD-ROM drive was formerly the D: drive, it will now become the E: drive. When it comes to letters, your system likes to group similar types of drives together.)
Once you have the new external hard drive connected, you can install any new programs to that drive, as well as save new documents to that drive. But that doesn’t make your existing internal disk any less congested.
What you have to do now is free up some disk space on your internal drive by moving files from there to your new external hard disk. The best candidates for relocation are data files—Word documents, Excel spreadsheets, digital photographs, music tracks, and the like. It’s relatively easy to open up two Computer or My Computer windows and drag and drop entire document folders from the old drive to the new one. The more files you move, the more disk space you free up and the faster your computer should run.
You can also relocate software programs from the old drive to the new one, but this is a bit more work. If you want to move a software program, you have to uninstall the program from the current hard drive and reinstall it on the external drive. This is a good idea only if you have the original software installation discs—and if you don’t have to reregister a program when you reinstall it.
The one thing you definitely can’t move to your new external drive is the Windows operating system. Windows has to be located on your computer’s first (internal) hard drive, so don’t even think about moving it.
It’s one thing to add an external hard drive to your system. It’s quite another to replace your existing hard drive; not only do you have to deal with opening up your PC’s system unit and making a lot of connection, you also have to somehow transfer your existing data and software programs (and the Windows operating system) from the old drive to the new.
Physically, replacing the drive is as simple as taking the old one out of your system unit and plugging the new one into the same spot. The big challenge in replacing a hard drive is how to transfer your existing stuff from the old drive to the new one.
One approach is to back up all your data and programs from your old drive, and then restore them to your new drive after it has been installed. This is a big pain in the rear, but it works.
A better approach is to install the new hard drive in your system unit as your master drive, but keep the old drive installed as your second, or slave, drive. When you do this, you can then copy all the data and programs from the old (now slave) drive to your new (master) drive. Plus, you get the benefit of having two hard drives on your system—and every little bit of storage space helps!
If you take this approach, I recommend purchasing a software program to help you with the disk-copying chores. The best of these programs are Acronis True Image (www.acronis.com), Symantec’s Norton Ghost (www.symantec.com/norton/ghost), and Paragon’s Drive Copy (www.paragon-software.com/home/dc-personal/). These programs automate the process of creating an exact mirror of your old drive on your new drive, including the operating system and all your data and applications.
It helps to know what you’re dealing with before you get inside the case, so open up your new hard drive and take a look at it.
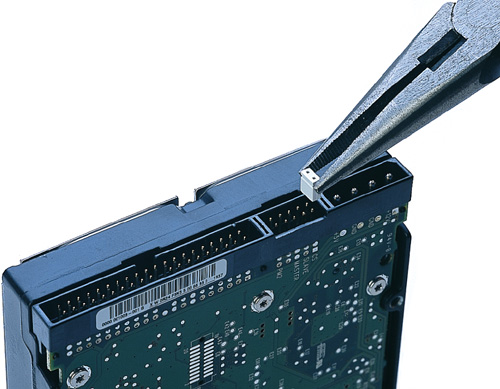
The back of the drive unit is where you make all your connections. As you can see in Figure 11.4, most internal hard disk drives include power and data connectors, as well as a set of jumpers that determine how the drive will be used in your system. Familiarize yourself with these connectors before you perform the upgrade.

If you want to replace your old internal hard drive with a newer, bigger model, make sure you have a Philips screwdriver handy and that your system unit is in a comfortable workspace. You might even want to grab a small flashlight to help you see into all the nooks and crannies inside your PC.
Caution
Static electricity can zap critical components when you’re working inside the system unit. Use an anti-static wrist strap or similar device to protect against static discharge when touching anything inside your PC.
The following instructions assume you install the new hard drive alongside the old one, to make it easier to transfer data from the old drive to the new one. Follow these steps:
1. Close Windows and power off your PC.
2. Disconnect your PC from its power source.
3. Open the system unit case as per the manufacturer instructions.
4. Set the drive selection jumper on the new hard drive as per Figure 11.5. You typically have three options: master, slave, and cable select. Because this will be your second hard drive (initially), you’ll probably select slave—unless, that is, your system is set up to automatically determine which drive is which, in which case you’ll select the cable select setting. You’ll have to consult the hard drive’s instructions to determine where the drive selection jumper is located, and how to position it. (It’s different with every manufacturer.) Often, the jumper settings are silk-screened on the drive itself, so be sure to check it first!
Tip
Cable select is the preferred setting for most newer PCs, especially those capable of running ATA-100 and faster modes. You can also check the jumper setting on your existing hard drive. If it’s set for cable select, use this setting for your new drive, too. Otherwise, use the slave setting.
5. Locate an empty drive bay in your system unit and position the drive next to the bay. Don’t slide the drive into the bay just yet.
6. Connect the internal power cable to your new hard drive, as shown in Figure 11.6.
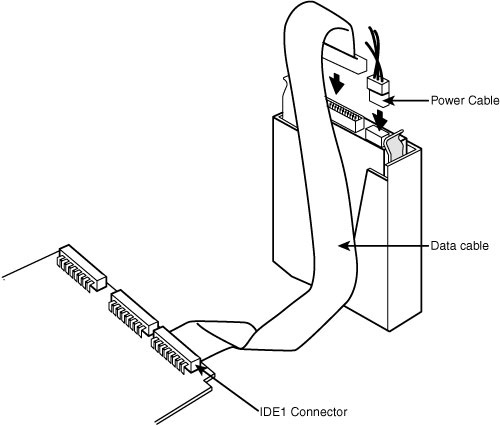
7. Connect the internal data cable to the hard drive. (You use the same cable to connect the slave drive and the master drive; the slave connector is typically color-coded gray, where the master connector is color-coded black.) Make sure you line up the colored stripe on the data cable with pin 1 on the drive’s data connector.
8. Slide the new drive into the drive bay. If necessary, fasten the drive into the bay with the supplied screws; most newer drives should just snap into place.
9. Reinstall the system unit cover and reconnect the PC to its power source.
10. Power on your PC. When your system starts up, press the correct key to enter the BIOS setup utility.
11. Use the arrow keys to move to the section of the utility that holds the hard disk configuration information and select the Auto Detect or Auto Detect Drives option.
12. Save your configuration changes, exit the BIOS setup utility, and allow your computer to continue the startup process.
Caution
If your drive bays are enclosed in a metal cage, you’ll need to remove the cage before inserting the new drive. In addition, if you’re trying to fit a 3.5-inch drive into a 5.25-inch bay on an older PC, you’ll need to use a frame adapter to make the thing fit. (If your new drive didn’t come with a frame adapter—actually a set of rails—you can buy it separately.)
13. If your hard drive came with its own installation program, run it now to prepare your hard drive for use. If it didn’t, you may need to partition and format the drive before you can use it. If this is the case, read on to the next section.
14. When the new drive is up and running, run the drive-copy software to copy the contents of your old drive to your new drive. (You may first need to reinstall Windows from the original installation CD or DVD.)
15. Get back inside your system unit and change the jumper settings on your old drive to the slave setting, and then change the jumper settings on your new drive to the master setting.
16. Assuming that your new hard drive is working fine as your main C: drive, reformat your old hard drive (which should now be your D: drive) to wipe off all the old data, applications, and operating system.
Caution
You might want to wait a few days or weeks before reformatting your old drive, just to make sure that all your programs and data have been successfully transferred to the new drive.
Your new hard drive should now mirror the operation of your old drive, but with more free space. You can now use your old hard drive for additional data storage.
The preceding section described how to upgrade the hard disk on a desktop PC. You can also upgrade the hard drive on many (but not all) notebook PCs. It isn’t easy, but it is possible.
Tip
As with desktop PCs, the easier approach is to connect a supplemental external hard drive to your notebook, typically via USB.
Caution
When you replace a computer’s main hard drive, you lose access to all programs and data on the old hard disk. You’ll need to reinstall Windows and all your programs onto the new hard drive. You should also back up all your documents and files from the old hard drive, if you can, and then restore them to the new drive.
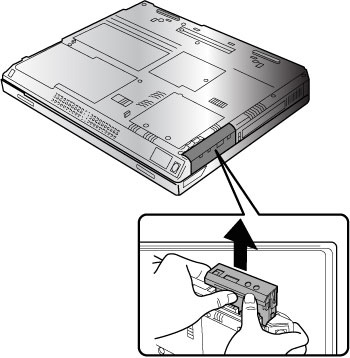
If you’re lucky, your notebook’s hard drive slides into a modular bay on the side or bottom of your notebook, as shown in Figure 11.7. If this describes your notebook, replacing the hard disk is as easy as following these steps:
1. Completely power off your PC.
2. Unplug the notebook from the electrical outlet and remove the internal battery.
3. Slide out the old hard drive.
4. Slide in the new hard drive.
Tip
Not sure how to get to your notebook’s hard drive? Consult your notebook’s instruction manual or technical information on the manufacturer’s website.
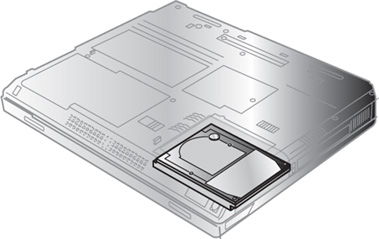
Some notebooks let you access the hard drive via a panel on the bottom of the machine, as shown in Figure 11.8. This type of arrangement makes replacing the hard drive quite similar to replacing system memory. After you’ve powered off the PC and removed the battery, remove the cover to the hard drive compartment and then disconnect and remove the old drive. Connect the new hard drive inside the compartment, and then refasten the door to the compartment.
If you’re not so lucky, and some of us aren’t, replacing your notebook’s hard drive is an internal procedure. If you’re technically adept, you’ll need to disassemble your notebook’s case to gain access to the motherboard, which is directly underneath the keyboard assembly. Locate the hard drive and remove any screws connecting the hard drive to its mounting cage. Remove the ribbon cable that connects to the hard drive, and then carefully slide the drive out of the notebook. To install the new hard drive, simply reverse this procedure.
Although it’s true that system memory has the biggest impact on your computer’s performance, an overworked hard drive can also slow things down to some degree. Here’s the bottom line:
![]() Your hard drive not only has to access programs and data, it also serves as virtual memory to supplement your system’s main memory. If your hard drive is too full, it will slow down your system’s performance.
Your hard drive not only has to access programs and data, it also serves as virtual memory to supplement your system’s main memory. If your hard drive is too full, it will slow down your system’s performance.
![]() The easiest way to add hard disk storage is to connect an external hard drive via USB.
The easiest way to add hard disk storage is to connect an external hard drive via USB.
![]() You can also replace your system’s internal hard drive with a larger model, although this involves some technical work inside your PC’s system unit.
You can also replace your system’s internal hard drive with a larger model, although this involves some technical work inside your PC’s system unit.
![]() If you have a notebook PC, it’s possible that it can be replaced with a larger model, by sliding it out of a compartment in the notebook case.
If you have a notebook PC, it’s possible that it can be replaced with a larger model, by sliding it out of a compartment in the notebook case.