
Chapter 14. Cleaning Up Your Web Browser
In This Chapter
![]() How to Slow Down a Web Browser
How to Slow Down a Web Browser
![]() Cleaning Up Your Cache and Cookies
Cleaning Up Your Cache and Cookies
![]() Uninstalling Unnecessary Add-Ons
Uninstalling Unnecessary Add-Ons
![]() Browsing Faster with an Alternate DNS Service
Browsing Faster with an Alternate DNS Service
![]() Increasing the Size of Your DNS Cache
Increasing the Size of Your DNS Cache
So far in this book, we’ve covered various solutions to a sluggish PC. But not all computer slowness is the fault of your computer hardware and software. Sometimes it’s what you’re doing with your PC that’s slow.
Case in point: web browsing. Your computer might be fast as greased lightning when you’re doing word processing or photo editing or whatever, but when you head out to the Web, everything slows down to a snail’s pace. You might think it’s your PC that’s slow, but really it’s your web browser.
Of course, slow web browsing can also be caused by a slow Internet connection, and we’ll get to that in the next chapter. But for now let’s focus on the web browser itself, and the many ways it can slow down your browsing experience.
Your web browser is what you use to surf pages on the World Wide Web. It’s a software program, not much different from a word processor or spreadsheet application, designed specifically to display HTML pages on the Web. Like any software program, it contains numerous configuration settings—some of which affect the speed at which web pages are displayed.
A typical HTML web page contains a mix of text, graphics, and other elements. Text is easiest to display; not a whole lot involved with that. Graphics, however, can take longer to display, primarily because image files can be quite large. These large files take longer to download and thus longer to display in your web browser.
Note
Microsoft’s Internet Explorer is the web browser of choice for most Windows users, and that’s what we focus on in this chapter—in particular, Internet Explorer version 7. If you use another browser, such as Firefox, Safari, or Google Chrome, many of the same speedups also apply, although the specific instructions will differ somewhat.
Other page elements can include audio and video files, along with bits of JavaScript code. JavaScript is typically used to insert “applets” (small applications) into a web page; these applets often contain elements hosted on other websites. For example, a page might display a clock created with JavaScript; the code for the clock is on the web page itself, while the engine and graphics for the clock are hosted on another site. Because of this dual-hosting nature of some JavaScript code, these applets can often take longer to display than elements hosted natively.
Tip
Some web browsers are faster than others—and Internet Explorer is probably the slowest of all, in terms of how long it takes to load web pages. If you think IE is slow on your system, you might want to try a faster browser, such as Mozilla Firefox (www.mozilla.com/firefox/) or Google Chrome (www.google.com/chrome/).
Naturally, the more elements on a web page, the longer it will take your browser to display them. It’s not just a matter of download size; all those elements must be rendered for display by the browser, and this rendering takes computing horsepower and time. It’s no surprise that bigger web pages can really slow down some browsers.
Here’s something else that can slow down your browser: having multiple tabs open at the same time. Yes, most modern browsers are designed with a tabbed interface, the better to load multiple web pages simultaneously. But all those web pages have to be downloaded, rendered, and stored in memory. It’s just more work for the browser—and an overworked browser can be quite sluggish.
Note
Not all sluggish web browsing is caused by the web browser. If you also have problems downloading files or retrieving your email, you could be plagued by a slow Internet connection. Learn more in Chapter 15, “Reconfiguring Your Internet Connection.”
Fortunately, many of these issues can be overcome by some simple configuration changes—or, in the most extreme case, a tweak to the Windows Registry. Read on to learn how to speed up your browser—and make surfing the Web go a lot smoother!
We’ll start with the easy speedups first—and the easiest of them all concern your browser’s temporary cache and cookies.
You might not know this, but your web browser stores a temporary copy of each web page you visit. This is called a cache, and it takes up space on your hard disk. Although the cache is designed to speed up browsing (your browser simply accesses the local cache when you want to revisit a recent page), too big of a cache can slow your browser to a crawl.
You see, over time your browser keeps adding web pages to the cache file—and these pages aren’t deleted automatically. So the more web pages you visit, the bigger the cache on your hard disk. And too large a cache file puts a drain on your web browser, because your browser has to sort through the cache every time you load a web page, looking for a cached version of that page. A bigger cache takes longer to reference.
The solution to cache-based sluggishness is to clean out the cache. In essence, what you do is delete the cache file; this “empties” the cache, frees up valuable hard disk space, and makes it much easier for your browser to search for previously cached pages. Fortunately, this is easy to do—even if it must be done manually.
Here’s how you clean out the cache in Internet Explorer 7:
1. Click the Tools button and select Delete Browsing History.
2. When the Delete Browsing History dialog box appears, as shown in Figure 14.1, click the Delete Files button.
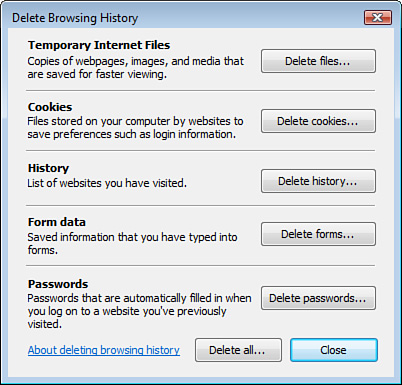
3. When prompted for confirmation, click Yes.
This deletes the temporary cache file on your computer and should speed up browser performance.
If you don’t want to delete the cache on a regular basis, Internet Explorer can automate the process for you. All you have to do is enable the option that automatically clears the cache when you close the browser.
Follow these steps:
You can also change the size of the Internet Explorer cache. The smaller the cache, the speedier Internet Explorer will be.
Here’s how to change the cache size in Internet Explorer 7:
1. Click the Tools button and select Internet Options.
2. When the Internet Options dialog box appears, select the General tab.
3. Click the Settings button in the Browsing History section.
4. When the Temporary Internet Files and History Settings dialog box appears, as shown in Figure 14.2, set the Disk Space setting to the desired number.
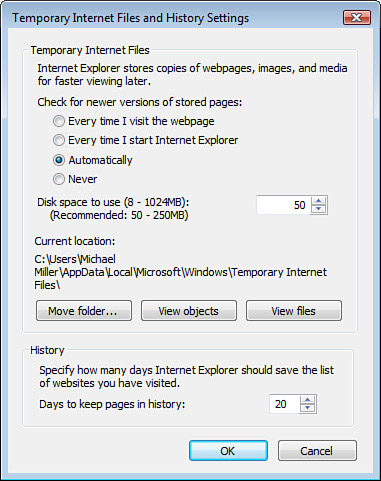
What’s the right size? While you can set a cache as small as 8MB, I recommend something in the 50MB range. Anything much smaller is less than useful, and anything much larger just takes up disk space and slows down your browser.
Just as your browser stores a temporary copy of each web page you visit, it also stores information about those pages, in the form of cookies. A cookie is a small file, created by a website but stored on your PC, which contains information about you and your activities on that website. For example, a cookie file for a particular site might contain your username, password, credit card information, and the most recent pages you visited on that site. The cookie file created by a site is accessed by that site each time you visit in the future, and the information used appropriately.
Aside from the privacy concerns of all these websites tracking your activities, cookies can also slow down your web browser. That’s because, over time, you accumulate a lot of cookies. These files, although small, can take up significant amounts of hard disk space; in addition, your browser must sort through them all to find the cookies it needs when accessing a specific site. The more cookie files on your hard drive, the harder your browser has to work.
As with your browser’s cache file, the solution to cookie-induced sluggishness is to delete all your cookies. It’s quite easy to do in Internet Explorer:
You can also configure Internet Explorer not to store some or all types of cookies, by adjusting the browser’s privacy level. Here’s how you do it:
1. Click the Tools button and select Internet Options.
2. When the Internet Options dialog box appears, as shown in Figure 14.3, select the Privacy tab.
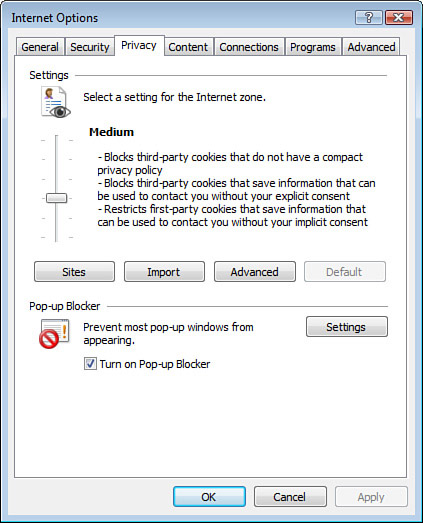
3. Adjust the slider to the privacy level you want, and then click OK.
Internet Explorer 7 has six levels of cookie management, ranging from accepting all cookies to declining all cookies. At one extreme is the Accept All Cookies option, which does what it says it does—it stores all cookies from all websites. At the other extreme is the Block All Cookies option, which doesn’t store a single cookie. In between are four other levels that store specific types of cookies; the default level is Medium, which pretty much blocks all advertising-related cookies and deletes any cookies that contain personal information when you close Internet Explorer.
Internet Explorer is a web browser that has lots of built-in features, some of which can slow down the display of web pages. Given that you may or may not need all of these features, turning a few of them off can speed up your web browsing. We’ll look at those features that most affect your browsing experience next.
Here’s a big one that may or may not appeal to you. Many web pages are overloaded with photos and other images; these images are big files that can take a long time to download and display, especially if you have a slow web connection. You can speed up the loading graphics-intensive pages by simply turning off the graphics. That leaves you with a text-only web page, of course—but that page will load a lot faster than it did with all the images intact.
To turn off the display of images in Internet Explorer, follow these steps:

Internet Explorer 7 uses Windows’ ClearType technology to smoothly render type at all sizes. Some users have reported that ClearType has slowed down the performance of Internet Explorer on their systems. To disable ClearType, follow these steps:
Internet Explorer 7 includes a security feature called the Phishing Filter. This feature is designed to identify and warn you about so-called phishing websites—sites that pretend to be official sites but actually exist solely to steal your personal information. Unfortunately, the Phishing Filter can sometimes slow down web browsing, as it takes a bit of time to search the list of known phishing websites. You can speed up your browsing by turning off the Phishing Filter.
Here’s how to do it:
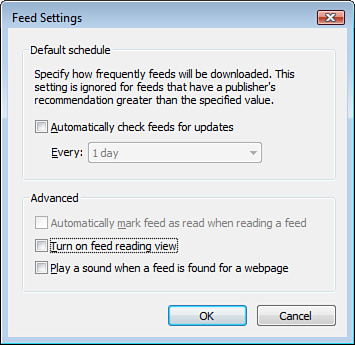
Here’s a feature of Internet Explorer 7 that few people use yet slows down everyone’s browsing. I’m talking about IE7’s RSS feeds feature, which enables you to subscribe to RSS feeds from blogs and news sites and automatically display new postings and updates in the browser.
If you don’t use the RSS feeds feature (and you probably don’t), you can disable it and speed up your normal web browsing. Follow these steps:
Some of what slows down Internet Explorer are add-ons to the main program. These auxiliary programs require more computing power than the browser does by itself, and sometimes access third-party websites that require additional downloads. You can speed up your browsing by disabling the least essential of these add-ons.
Many websites like to install their own toolbars for Internet Explorer. While these toolbars—especially from sites such as Google and Yahoo!—make using those sites easier (a one-button affair, in many cases), they also put an extra load on Internet Explorer, which can make your browsing seem sluggish.
Caution
Although Google and Yahoo! toolbars are legitimate, some toolbars are actually a form of spyware, designed to report your browsing activity back to some mothership on the Web. Therefore, you might need to run an antispyware program to completely get rid of these malware toolbars.
To remove unwanted toolbars from Internet Explorer 7, follow these steps:
You may also be able to remove some toolbars using Windows’ Add/Remove Programs features. To do this, open Control Panel and select either Add/Remove Programs (Windows XP) or Programs and Features (Windows Vista); select the toolbar program from the list and click the Remove or Uninstall button.
Here’s a somewhat esoteric plug-in that has been known to slow down IE’s browsing performance. The SSVHelper Class plug-in is a nonessential part of the Java plug-in (which itself is fairly necessary). To display this plug-in, follow these steps:
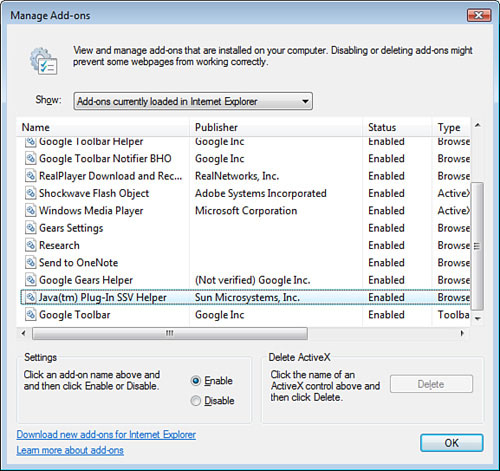
When you open the Manage Add-Ons dialog box, you see a full listing of all the add-ons currently running in Internet Explorer. You may need all of these add-ons, you may not. For example, you might find that a particular website has installed an add-on to view content on its site, but that add-on is not necessary when visiting other sites; that add-on is a prime candidate for removal.
Determining which add-ons to keep and which to disable is mainly a matter of trial and error; there are no universal recommendations. I might be perfectly happy disabling the Shockwave Flash add-on (I hate unwanted Flash animations!), but other users might balk at not having any Flash animations display in their browsers. The key is whether you frequently visit sites that use a particular add-on; if not, you might as well disable it—and help speed up your browsing!
Even the fastest broadband connection can feel slow if it takes a long time to pull up each website you want to visit. This problem is due to something called the Domain Name System (DNS) and slowness in your ISP’s DNS server—and can be corrected.
Every website is hosted on a web server, which is a fancy type of computer connected to the Internet. To identify the millions of such servers, each server has its own unique address, called an IP address, which looks something like this: 192.111.222.333.
Of course, you don’t type this address into your web browser when you want to visit a website. What you type is the URL or website address, which looks something like this: www.websiteaddress.com. The URL, then, is an alias for the site’s true address.
What a DNS server does is link the site’s easy-to-remember URL with its hard-to-remember IP address. For example, www.google.com is the URL for the server located at the 209.85.153.104 IP address. When you enter the URL www.google.com in your web browser, that URL request is sent to a DNS server that looks up that URL’s IP address and then routes the request to the server located at 209.85.153.104. (You can test this by entering the IP address directly into your browser; it should take you directly to the associated website.)
When you connect to the Internet via your Internet service provider (ISP), your URL requests are sent to that ISP’s DNS server. That’s a simple enough process—until your ISP’s DNS server starts to get bogged down. When that happens, it takes longer for the DNS server to look up the IP addresses for the URLs you enter.
Unfortunately, many ISP DNS servers are notoriously slow. The result is that it takes longer to load any web page you want to visit. It’s not the connection that’s slow, it’s the ability of your ISP to look up the web pages you want to view.
You can work around this issue by directing your URL requests to a different DNS server. To that end, several sites offer alternative DNS services, promising faster lookups and thus faster web browsing.
Note
Some third-party DNS services offer additional features, such as parental controls, phishing protection, and more-reliable DNS lookup services.
To use a third-party DNS service, you have to configure your web browser to route your URL requests to the new server. We’ll get to that in a moment. First, let’s look at some of the third-party DNS services available. Table 14.1 provides the detail, including the information you’ll need to reconfigure Windows for that service. All of these services are free, although you may have to subscribe to gain full access.

To use an alternate DNS service, you have to reconfigure Windows to send all URL requests to the new DNS server. It’s a network-related procedure, and works slightly differently in Windows XP than in Windows Vista.
Here’s how you reconfigure Windows XP to use an alternate DNS service:
1. Click the Start button and click Control Panel.
2. When the Control Panel opens, click Network Connections.
3. When the Network Connections window opens, right-click the icon for your connection and select Properties.
4. When the Properties dialog box appears, select Internet Protocol (TCP/IP) and click the Properties button.
5. Select the Use the Following DNS Server Addresses option.
6. Enter the DNS service’s preferred DNS server address into the Preferred DNS Server box.
7. Enter the DNS service’s alternate DNS server address into the Alternate DNS Server box.
8. Click OK.
To reconfigure Windows Vista for an alternative DNS service, follow these steps:
1. Click the Start button and click Control Panel.
2. When the Control Panel opens, click Network and Sharing Center.
3. When the Network and Sharing Center opens, click Manage Network Connections (in the Tasks list).
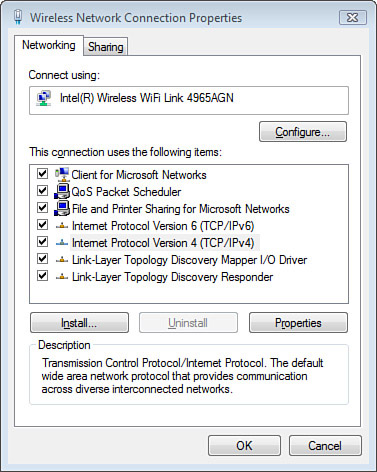
4. When the Network Connections window opens, right-click the icon for your connection and select Properties.
5. When the Properties dialog box appears, as shown in Figure 14.7, select Internet Protocol Version 4 (TCP/IPv4) and click the Properties button.
6. When the next Properties dialog box appears, as shown in Figure 14.8, select the Use the Following DNS Server Addresses option.
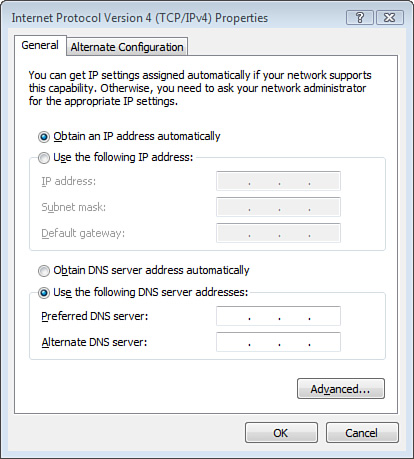
7. Enter the DNS service’s preferred DNS server address into the Preferred DNS Server box.
8. Enter the DNS service’s alternate DNS server address into the Alternate DNS Server box.
With Windows thus reconfigured, you’ll now access the third-party DNS server whenever you’re web browsing—which should be slightly faster than what you’re used to with your ISP’s DNS server.
Still on the subject of DNS lookup, Windows stores your most recently visited website addresses in a special DNS cache on your hard drive. Your web browser accesses this cache of known addresses before it goes out to the Internet to send a URL request to an external DNS server. If the web address you’re looking for is in the cache, it gets used by your browser, saving valuable browsing time.
You can speed up your browsing by increasing the size of this DNS cache. A bigger DNS cache enables addresses for more websites to be stored locally, which means fewer external DNS lookups.
To increase the size of your computer’s DNS cache, you have to edit the Windows Registry, which is the large database where all the configuration settings for your system are stored. You edit the Registry using the Registry Editor utility. Here’s what you need to do:
1. Open the Registry Editor.
2. Navigate to the HKEY_LOCAL_MACHINESYSTEMCurrentControlSet ServicesDnscacheParameters key.
3. Select Edit, New, DWORD (32-bit) Value.
4. Name this new item CacheHashTableBucketSize.
5. Right-click this new item and select Modify.
6. In the Value Data dialog box, change the value to 1.
7. Select Edit, New, DWORD (32-bit) Value.
8. Name this new item CacheHashTableSize.
9. Right-click this new item and select Modify.
10. In the Value Data dialog box, change the value to 180.
11. Select Edit, New, DWORD (32-bit) Value.
12. Name this new item MaxCacheEntryTtlLimit.
13. Right-click this new item and select Modify.
14. In the Value Data dialog box, change the value to ff00.
15. Select Edit, New, DWORD (32-bit) Value.
16. Name this new item MaxSOACacheEntryTtlLimit.
17. Right-click this new item and select Modify.
18. In the Value Data dialog box, change the value to 12d.
For these changes to take effect, you need to close the Registry Editor and restart Windows. You should notice a slight speedup when next you browse the Web.
We’ll end this chapter with another little Registry tweak that can speed up web browsing for many users. This tweak has to do with how many files you can download at the same time from a web server.
By default, Internet Explorer is configured to enable just two simultaneous connections to a server. The problem comes when you visit a web page that contains lots of images and JavaScript content, all of which has to download to your browser. With just two simultaneous connections enabled, it can take awhile to download multiple images and such.
Here are the facts. Your browser has to make more than 40 requests to the server before it can assemble a typical web page. Requesting all those files 2 at a time is going to take longer than requesting 10 (or more) files at a time. If you can download more connections, you can significantly speed up the display of all web pages.
To enable more simultaneous connections from a single web server, you have to edit the Windows Registry, using the Registry Editor. Here’s how to enable 10 simultaneous connections to a server:
1. Open the Registry Editor.
2. Navigate to the HKEY_CURRENT_USERSoftwareMicrosoftWindows CurrentVersionInternet Settings key.
3. Select Edit, New, DWORD (32-bit) Value.
4. Name this new item MaxConnectionsPer1_0Server.
5. Right-click this new item and select Modify.
6. In the Value Data dialog box, change the value to 10.
7. Click OK.
8. Select Edit, New, DWORD (32-bit) Value.
9. Name this new item MaxConnectionsPerServer.
10. Right-click this new item and select Modify.
11. In the Value Data dialog box, change the value to 10.
12. Click OK.
13. Close the Registry Editor.
When you edit the Registry Editor, close Internet Explorer. When you restart your browser, the new value will be in effect—and your web browsing should be a little speedier!
If your web browsing is slower than everything else you do on your PC, you need to speed up your web browser. Here’s the bottom line:
![]() One way to speed up browsing performance is to periodically clear out your browser’s cache and cookies.
One way to speed up browsing performance is to periodically clear out your browser’s cache and cookies.
![]() Disabling various browser settings, such as image display and the Phishing Filter, can also speed up browser performance.
Disabling various browser settings, such as image display and the Phishing Filter, can also speed up browser performance.
![]() You can use the Manage Add-Ons dialog box to disable unnecessary add-ons that can slow down browser performance. You should also remove any unnecessary toolbars from the browser.
You can use the Manage Add-Ons dialog box to disable unnecessary add-ons that can slow down browser performance. You should also remove any unnecessary toolbars from the browser.
![]() By configuring Windows to use an alternate DNS server, you can speed up the time required to look up website addresses.
By configuring Windows to use an alternate DNS server, you can speed up the time required to look up website addresses.
![]() If you’re comfortable editing the Registry, you can increase the size of your local DNS cache—and increase the number of simultaneous connections used to download web page elements.
If you’re comfortable editing the Registry, you can increase the size of your local DNS cache—and increase the number of simultaneous connections used to download web page elements.