
Chapter 4. Running batch jobs
- Running jobs from the command line
- Scheduling jobs
- Embedding Spring Batch in a web application
- Stopping job executions
If you’ve been reading this book from page one, you know the basics of Spring Batch, and you know about jobs, steps, and chunks. You must be eager to get your jobs up and running. Launching a Spring Batch job is easy because the framework provides a Java-based API for this purpose. However, how you call this API is another matter and depends on your system. Perhaps you’ll use something simple like the cron scheduler to launch a Java program. Alternatively, you may want to trigger your jobs manually from a web application. Either way, we have you covered because this chapter discusses both scenarios.
This chapter covers many launching scenarios, so you may not want to read it from beginning to end, especially if you’re in a hurry. You may read this chapter à la carte: think about your scenario and read only what you need. Nevertheless, you should read section 4.1 covering the concepts of launching Spring Batch jobs, and especially section 4.1.3 that guides you through the chapter to pick up the launching solution that best suits your needs.
4.1. Launching concepts
It’s time to launch your Spring Batch job! You’re about to see that launching a Spring Batch job is quite simple thanks to the Spring Batch launcher API. But how you end up launching your batch jobs depends on many parameters, so we provide you with basic concepts and some guidelines. By the end of this section, you’ll know where to look in this chapter to set up a launching environment for your jobs.
4.1.1. Introducing the Spring Batch launcher API
The heart of the Spring Batch launcher API is the JobLauncher interface. Here’s a shortened version of this interface (we removed the exceptions for brevity):
public interface JobLauncher {
  public JobExecution run(Job job, JobParameters jobParameters) throws (...);
}
The JobLauncher and the Job you pass to the run method are Spring beans. The call site typically builds the JobParameters argument on the fly. The following snippet shows how to use the job launcher to start a job execution with two parameters:
ApplicationContext context = (...)
JobLauncher jobLauncher = context.getBean(JobLauncher.class);
Job job = context.getBean(Job.class);
jobLauncher.run(
  job,
  new JobParametersBuilder()
    .addString("inputFile", "file:./products.txt")
    .addDate("date", new Date())
    .toJobParameters()
);
Note the use of a JobParametersBuilder to create a JobParameters instance. The JobParametersBuilder class provides a fluent-style API to construct job parameters. A job parameter consists of a key and a value. Spring Batch supports four types for job parameters: string, long, double, and date.
Job Parameters and Job Instance
Remember that job parameters define the instance of a job and that a job instance can have one or more corresponding executions. You can view an execution as an attempt to run a batch process. If the notions of job, job instance, and job execution aren’t clear to you, please refer to chapter 2, which covers these concepts.
Spring Batch provides an implementation of JobLauncher, whose only mandatory dependency is a job repository. The following snippet shows how to declare a job launcher with a persistent job repository:
<batch:job-repository id="jobRepository" /> <bean id="jobLauncher" class="org.springframework.batch.core.launch.support.SimpleJobLauncher"> <property name="jobRepository" ref="jobRepository" /> </bean>
That’s it; you know everything about the Spring Batch launcher API! Okay, not everything—we didn’t describe the JobExecution object returned by the run method. As you can guess, this object represents the execution coming out of the run method. The JobExecution interface provides the API to query the status of an execution: if it’s running, if it has finished, or if it has failed. Because batch processes are often quite long to execute, Spring Batch offers both synchronous and asynchronous ways to launch jobs.
4.1.2. Synchronous vs. asynchronous launches
By default, the JobLauncher run method is synchronous: the caller waits until the job execution ends (successfully or not). Figure 4.1 illustrates a synchronous launch.
Figure 4.1. The job launcher is synchronous by default. The client waits until the job execution ends (successfully or not) before the job launcher returns the corresponding job execution object. Synchronous execution can be problematic, for example, when the client is a controller from a web application.

Synchronous launching is good in some cases: if you write a Java main program that a system scheduler like cron launches periodically, you want to exit the program only when the execution ends. But imagine that an HTTP request triggers the launching of a job. Writing a web controller that uses the job launcher to start Spring Batch jobs on HTTP requests is a handy way to integrate with external triggering systems. What happens if the launch is synchronous? The batch process executes in the calling thread, monopolizing web container resources. Submit many batch processes in this way and they’ll use up all the threads of the web container, making it unable to process any other requests.
The solution is to make the job launcher asynchronous. Figure 4.2 shows how launching behaves when the job launcher is asynchronous.
Figure 4.2. The job launcher can use a task executor to launch job executions asynchronously. The task executor handles the threading strategy, and the client has immediate access to the job execution object.

To make the job launcher asynchronous, just provide it with an appropriate TaskExecutor, as shown in the following snippet:
<task:executor id="executor" pool-size="10" /> <bean id="jobLauncher" class="org.springframework.
In this example, we use a task executor with a thread pool of size 10. The executor reuses threads from its pool to launch job executions asynchronously. Note the use of the executor XML element from the task namespace. This is a shortcut provided in Spring 3.0, but you can also define a task executor like any other bean (by using an implementation like ThreadPoolTaskExecutor).
It’s now time to guide you through the launching solutions that this chapter covers.
4.1.3. Overview of launching solutions
This chapter covers many solutions to launch your Spring Batch jobs, and you’re unlikely to use them all in one project. Many factors can lead you to choose a specific launching solution: launching frequency, number of jobs to launch, nature of the triggering event, type of job, duration of the job execution, and so on. Let’s explore some cases and present some guidelines.
Launching from the Command Line
A straightforward way to launch a Spring Batch job is to use the command line, which spawns a new Java Virtual Machine (JVM) process for the execution, as figure 4.3 illustrates.
Figure 4.3. You can launch a Spring Batch job as a plain JVM process. The triggering system can be a scheduler or a human operator. This solution is simple but implies initializing the batch environment for each run.
![]()
The triggering event can be a system scheduler like cron or even a human operator who knows when to launch the job. If you’re interested in launching jobs this way, read section 4.2 on command-line launching. You’ll see that Spring Batch provides a generic command-line launcher that you can use to launch any job from the command line. If you choose the scheduler option, you should also look at section 4.3.1, which covers cron.
Embedding Spring Batch and a Scheduler in a Container
Spawning a JVM process for each execution can be costly, especially if it opens new connections to a database or creates object-relational mapping contexts. Such initializations are resource intensive, and you probably don’t want the associated costs if your jobs run every minute. Another option is to embed Spring Batch into a container such that your Spring Batch environment is ready to run at any time and there’s no need to set up Spring Batch for each job execution. You can also choose to embed a Java-based scheduler to start your jobs. Figure 4.4 illustrates this solution.
Figure 4.4. You can embed Spring Batch in a container along with a Java scheduler. A web container is a good candidate because Spring integrates easily in web applications.

A web container is a popular way to embed a Spring Batch environment. Remember that Spring Batch runs everywhere the Spring Framework runs. If you want to learn how to deploy Spring Batch in a web application, read section 4.4.1. Java-based schedulers also run in Spring, so read section 4.3.2 to learn about Spring scheduling support.
Embedding Spring Batch and Triggering Jobs by an External Event
You can also have a mix of solutions: use cron because it’s a popular solution in your company and embed Spring Batch in a web application because it avoids costly recurring initializations. The challenge here is to give cron access to the Spring Batch environment. Figure 4.5 illustrates this deployment.
Figure 4.5. An external system submits a job request to the container where the Spring Batch environment is deployed. An example is a cron scheduler submitting an HTTP request to a web controller. The web controller would use the job launcher API to start the job execution.

To see how the Spring Batch job launcher works with HTTP, please see section 4.4.2, which covers Spring MVC (Model-View-Controller).
The list of launching solutions this chapter covers is by no means exhaustive. The Spring Batch launcher API is simple to use, so you can imagine building other types of solutions—for example, event-driven with JMS or remote with Java Management Extension (JMX). And don’t forget to read section 4.5 on stopping job executions when you’re done launching all these jobs!
4.2. Launching from the command line
Using the command line is perhaps the most common way to launch a batch process. Triggering the process can be done manually (by a human), but most of the time you’ll be using a system scheduler (cron on UNIX systems, for example) to trigger the launch. Why? Because batch processes are launched at specific times (at night, on the last Sunday of the month, and so on). We cover schedulers later; in this section, we focus on how to launch a batch process through the command line.
Because Spring Batch is a Java-based framework, launching a Spring Batch process means spawning a new JVM process for a class and using the Spring Batch launcher API in that class’s main method.
The Spring Batch launcher API is straightforward; the JobLauncher has one method—run—that takes a Job and a JobParameters argument, so writing a main method to launch a job is quick and easy. We won’t bother writing such a class because Spring Batch already provides one: the CommandLineJobRunner!
4.2.1. Using Spring Batch’s command-line job runner
Spring Batch provides the CommandLineJobRunner class to launch jobs. This launcher should remove any need for custom command-line launchers because of its flexibility. Table 4.1 lists the CommandLineJobRunner settings.
Table 4.1. Settings for the generic command-line launcher
|
Setting |
Description |
|---|---|
| Spring configuration file | The file used to start the Spring application context; the file configures the Spring Batch infrastructure, jobs, and necessary components (data source, readers, writers, and so forth) |
| Job | The name of the job to execute (refers to a Spring bean name) |
| Job parameters | The job parameters to pass to the job launcher |
| Exit code mapping | A strategy to map the executed job exit status to a system exit status |
To cover the different uses of the CommandLineJobRunner, imagine you have an importProductsJob job defined in an import-products-job.xml file located at the root of the classpath.
The CommandLineJobRunner is a simple Java class with a main method. The first step to use it is to package everything in a Java Archive (JAR) file: all application classes—the launcher class itself but also custom item readers, writers, processors, data access objects, and so on—as well as resources, like the import-products-job.xml file. We can do all of this with a tool like Maven to end up with an import-products.jar file. The second step is to create a neat layout on the file system such that the JVM can locate all the necessary Java classes and resources on the classpath. What should be on the classpath? The import-products.jar file, of course, but also all the dependencies of your batch: Spring Batch, the corresponding dependencies from the Spring Framework, and any other dependencies for your application (XML, persistence, and database connection pooling libraries, for example). We assume a lib directory contains all of these JAR files. We refer to this directory with the classpath argument of the java program.
But how to gather these JAR files? The easiest way is to use a dependency manager, like Maven. If you’re using Maven, the mvn package command packages your project as a JAR file in the target directory of your project. To get all the dependencies, launch the mvn dependency:copy-dependencies command. This command copies all the dependencies you need in the target/dependency directory. You can then gather all your JAR files in a common directory (the snippets of this chapter use a lib directory) to launch the job from the command line.
Launching Without Job Parameters
The simplest use of the CommandLineJobRunner is to launch a job that doesn’t require any parameters. You launch the importProductsJob job this way:
java -classpath "./lib/*"
The first parameter to the CommandLineJobRunner is the location of the Spring configuration file, and the second parameter is the name of the Job (the name of the corresponding Spring bean).
Note
The CommandLineJobRunner uses a ClassPathXmlApplicationContext, which means it locates the configuration file on the classpath by default. You can use Spring’s resource abstraction prefixes to override this default—for example, file:./import-products-job.xml, if your configuration file is on the file system in the current directory.
There’s little chance that your jobs won’t need any job parameters, especially if the job instance identity is relevant (to benefit from Spring Batch’s restart features, for instance), so let’s see how to specify job parameters to the command line job runner.
Launching with Job Parameters
Recall that the import products job needs two parameters: the location of the input file and the current date. The following snippet shows how to specify those parameters from the command line:
java -classpath "./lib/*"
The syntax is simple: you specify job parameters after the name of the job, using the name=value syntax. Remember that a job parameter can have a data type in Spring Batch. The way parameters are defined in the previous snippet creates String–typed parameters. What if the parameter type is relevant? Spring Batch offers a way to specify the type of a parameter by using the syntax name(type)=value, where type can be a string, date, long, or double (string is the default). Let’s now launch our job by passing in the date parameter as a real Date object:
java -classpath "./lib/*"
Note the format of the date: yyyy/mm/dd. Table 4.2 lists the different types of job parameters along with examples.
Table 4.2. Job parameters types for CommandLineJobRunner
|
Type |
Java type |
Example |
|---|---|---|
| String | java.lang.String | inputFile(string)=products.txt |
| Date | java.util.Date | date(date)=2010/12/08 |
| Long | Long | timeout(long)=1000 |
| Double | Double | delta(double)=20.1 |
This completes our tour of the CommandLineJobRunner class. This command-line launcher is handy because it allows you to specify a Spring configuration file, the name of the job you want to start, and job parameters (with some advanced type conversion).
Let’s now see an advanced feature of the runner that you use when you need to set the system exit code returned by the launcher. Use this feature if you want to run a series of jobs and choose precisely which job should follow a previous job.
Handling Exit Codes
The CommandLineJobRunner lets you set the exit code to return when the job execution ends. The triggering system (a system scheduler, for example) can use this exit code to decide what to do next (see the sidebar on the use of exit codes). For example, after the execution of job A, you want to run either job B or job C. The scheduler decides on the basis of the exit code returned by job A.
If you use the CommandLineJobRunner but don’t care about exit codes, because you don’t execute sequences of jobs or you organize all the sequencing of your batch processes as Spring Batch steps, you can skip this subsection. But if your batch system relies on exit codes to organize the sequencing of your jobs, you’ll learn here how Spring Batch lets you easily choose which exit code to return from a job execution.
A system process always returns an integer exit code when it terminates. As previously mentioned, system schedulers commonly trigger batch processes launched from the command line, and these schedulers can be interested in the exit code of the batch process. Why? To determine the course of action. An exit code of 0 could mean that everything went okay, 1 could mean that a fatal error occurred, and 2 could mean that the job must be restarted. That’s why the Spring Batch command-line launcher provides advanced support to map job exit statuses (string) with system exit codes (integer).
The CommandLineJobRunner uses an exit code mapper to map a job’s exit status (a string) with a system exit code (an integer). Figure 4.6 illustrates this mapping.
Figure 4.6. The command-line job runner uses an exit code mapper to translate the string exit status of a Spring Batch job into an integer system exit code. The triggering system—a system scheduler here—can then use this system exit code to decide what to do next.
![]()
What is the exit code for a Spring Batch job? A job’s exit code is a property of the job’s exit status, which is itself part of the job execution returned by the job launcher. Spring Batch provides an ExitStatus class, which includes an exit code typed as a String. Don’t confuse BatchStatus (an enumeration) and ExitStatus (a simple string)! These are different concepts, even if, in most cases, the exit status is directly determined from the batch status. Chapter 10 provides in-depth coverage of the batch status and exit status. For now, just remember that, by default, Spring Batch gets the exit status from the batch status (either COMPLETED or FAILED) and that you can override this default behavior if you want to return a specific exit status.
Table 4.3 explains the CommandLineJobRunner default behavior for exit code mappings (the SimpleJvmExitCodeMapper class implements this behavior).
Table 4.3. Default exit code mappings
|
System exit code |
Job’s exit status |
|---|---|
| 0 | The job completed successfully (COMPLETED). |
| 1 | The job failed (FAILED). |
| 2 | Used for errors from the command-line job runner—for example, the runner couldn’t find the job in the Spring application context. |
You can override the defaults listed in table 4.3 if they don’t suit your needs. How do you do that? Write an implementation of the ExitCodeMapper interface and declare a Spring bean of the corresponding type in the job’s Spring application context. There’s nothing more to do, because the CommandLineJobRunner automatically uses the ExitCodeMapper.
Let’s look at an example to illustrate overriding the default exit code mapper. Remember, the goal is to use the exit code returned by a job to decide what to do next. Imagine that this job (call it job A) deals with importing items from a file into a database. The system scheduler you’re using runs job A and behaves as follows depending on the exit code returned by job A:
- 0—Starts job B (job A completed)
- 1—Does nothing (job A failed)
- 2—Does nothing (job A exited with an unknown job exit status)
- 3—Starts job C (job A completed but skipped some items during processing)
Your job as the developer of job A is to return the correct exit code such that the system scheduler uses it to decide what to do next. To do so, you write an implementation of ExitCodeMapper to handle the exit code strategy and install it in job A. The following listing shows the implementation of an ExitCodeMapper that honors this contract.
Listing 4.1. Writing an ExitCodeMapper to map job and system exit codes
package com.manning.sbia.ch04;

import org.springframework.batch.core.ExitStatus;
import org.springframework.batch.core.launch.support.ExitCodeMapper;

public class SkippedAwareExitCodeMapper implements ExitCodeMapper {

  @Override
  public int intValue(String exitCode) {
    if(ExitStatus.COMPLETED.getExitCode().equals(exitCode)) {
      return 0;
    } else if(ExitStatus.FAILED.getExitCode().equals(exitCode)) {
      return 1;
    } else if("COMPLETED WITH SKIPS".equals(exitCode)) {
      return 3;
    } else {
      return 2;
    }
  }

}
Note that the exitCode argument of the intValue method comes from the ExitStatus object of the job, which has a getExitCode() method. Implementing an exit code mapper is straightforward: you get a String and return a matching integer. But how can the job’s exit code (the String argument of the exitCode method) get values like COMPLETED WITH SKIPS? This isn’t magic: you set the value at the step level (chapter 10 teaches you how to do that). Let’s assume here that you configured your job correctly to receive the appropriate exit status if the job skipped some items.
Now that the exit code mapper is implemented, you must declare it in the Spring configuration, as shown in the following snippet:
<bean class="com.manning.sbia.ch04.SkippedAwareExitCodeMapper" />

<job id="importProductsJob"
     xmlns="http://www.springframework.org/schema/batch">
  (...)
</job>
(...)
That’s it; you map exactly what Spring Batch exit code maps to what system exit code! All you do is declare an exit code mapper bean alongside your job configuration, and the CommandLineJobRunner detects and uses the mapper automatically.
You now know how to launch Spring Batch jobs from the command line. When using the command line to launch a batch job, you need someone or something to trigger this command line. There are many ways to trigger batch jobs, and job schedulers are great tools to trigger jobs at specific times or periodically. This is the topic of our next section.
4.3. Job schedulers
A job scheduler is a program in charge of periodically launching other programs, in our case, batch processes. Imagine that you have a time frame between 2 a.m. and 4 a.m. to re-index your product catalog (because there are few users connected to the online application at that time) or that you want to scan a directory every minute between 6 a.m. and 8 p.m. for new files to import. How would you do that? You can implement a solution yourself using a programming language like Java, but this is time consuming and error prone, and system utilities probably aren’t the focus of your business. Alternatively, job schedulers are perfect for this work: triggering a program at a specific time, periodically or not.
Warning
Don’t confuse job scheduling with process scheduling, which is about assigning processes to CPUs at the operating system level.
Our goal here is to use several job schedulers to launch Spring Batch jobs. We don’t cover these job schedulers just for fun. We picked popular, mainstream, and free job schedulers to provide you with guidelines for choosing one over another, depending on the context of your applications. Before we dive into the descriptions of each solution, table 4.4 lists the job schedulers we cover and their main characteristics.
Table 4.4. Overview of the job schedulers covered in this section
|
Job scheduler |
Description |
|---|---|
| Cron | A job scheduler available on UNIX-like systems; uses cron expressions to periodically launch commands or shell scripts |
| Spring scheduler | The Spring framework scheduler; configurable with XML or annotations, it supports cron expressions; available in Spring 3.0 and later |
The descriptions in table 4.4 might already have helped you make up your mind: if your application doesn’t run on a UNIX-like system, you won’t be using cron! Note that you can use cron expressions outside of cron: Spring supports cron expressions.
4.3.1. Using cron
The cron program is the de facto job scheduler on UNIX-like systems. The name cron comes from the Greek chronos (time). Cron enables launching commands or shell scripts periodically, using cron expressions. Configuring cron is simple: you set up commands to launch and when to launch them in the crontab file.
Configuring Cron with Crontab
The systemwide crontab file is stored in the /etc/ directory. Figure 4.7 shows the structure of a line of the crontab file.
Figure 4.7. An entry in the crontab file has three parts: (1) the cron expression, which schedules the job execution; (2) the user who runs the command; and (3) the command to execute. Some cron implementations don’t have the user option.

The command can be anything; in our case, it can be something we covered in section 4.2. The following snippet shows an entry to launch a job with Spring Batch’s command-line job launcher with the acogoluegnes user:
0 4 * * ? acogoluegnes java -classpath "/usr/local/bin/sb/lib/*"
From the preceding snippet, you should recognize the structure of a cron entry (cron expression, user, and command). The command is long: it must set the classpath, the Java class to launch, the Spring configuration file to use, the name of the job to launch, and the job parameters. You can use any command in a crontab entry: Spring Batch’s command-line launcher or any other command to launch a job process. Next is choosing when to trigger the command, which is where you use a cron expression.
If you’re new to cron, the start of the entry in the previous snippet must be puzzling: this is a cron expression, which says to launch the job every day at 4 a.m. Cron expressions are to scheduling what regular expressions are to string matching. Depending on your background with regular expressions, this assertion can be appealing or scary!
Note
Cron expressions are beyond the scope of this book. If you want a good introduction to cron expressions, take a look at this web page: www.quartz-scheduler.org/docs/tutorials/crontrigger.html.
Now that you know how to trigger Spring Batch jobs periodically with cron, let’s see some recommendations about the use of cron.
Cron for My Spring Batch Jobs?
Is cron suited to launch your Spring Batch job? Remember, cron is a system scheduler: it spawns a new JVM process for each Spring Batch command-line launcher. Imagine that you need to launch a job every night. Cron triggers the command-line launcher, which creates a Spring application context before launching the job itself. Everything is fine. But imagine now that you need to launch another job that scans a directory for new files to import. You set up cron to trigger this job every minute. If bootstrapping the Spring application context is CPU intensive—because it initializes a Hibernate SessionFactory or a Java Persistence API context, for example—the job execution will perhaps be faster than the creation of the Spring application context! In this second case, you prefer to have your Spring application context already running and then simply launch the job from the existing JobLauncher. You can’t easily achieve this from the command line (hence with cron), but a Java scheduler like the Spring scheduler will do the trick.
4.3.2. Using the Spring scheduler
Let’s now look at the second scheduling option from table 4.4: the Spring scheduler. Do you want to schedule a job with a simple-to-deploy and yet powerful solution? Good news: Spring includes such a feature. As of version 3.0, the Spring Framework offers a declarative way to schedule jobs without requiring extra dependencies for your Spring Batch jobs, because Spring Batch sits on top of Spring.
Spring’s lightweight scheduling provides features like cron expressions, customization of threading policy, and declarative configuration with XML or annotations. For XML configuration, Spring provides the task XML vocabulary (under the namespace www.springframework.org/schema/task), which comes in handy to configure and schedule tasks. The Spring scheduler needs a running Spring application context to work, so you typically embed it in a web application, but you can use any other managed environment, like an Open Services Gateway initiative (OSGi) container. We cover how to embed Spring Batch in a web application in section 4.4.1.
Note
The cron system scheduler doesn’t support seconds in cron expression, but Spring’s scheduler does.
Follow these steps to use the Spring scheduler:
- Set up the scheduler. This is where you decide whether or not to use a thread pool. This setup is optional, and Spring uses a single-threaded scheduler by default.
- Set up the Java methods to launch periodically. You can use XML or annotations on the target methods. In our case, those methods use the Spring Batch API to launch jobs.
The next sections cover these steps, but let’s first see what kind of scheduling configuration Spring supports.
Scheduling Options
Your scheduling requirements can be as simple as “every minute” or as complex as “the last weekday of the month at 23:00.” Section 4.3.1 shows that cron expressions meet both requirements, but do you really need to unleash the big guns for “every minute”? Could you use something simple for simple requirements and fall back to cron expressions only when necessary? Spring allows you to do that by supporting cron expressions—with its own engine—but also lets you trigger a job at a fixed rate without resorting to cron expressions. Table 4.5 lists the scheduling options that Spring offers.
Table 4.5. Spring scheduling options
|
Scheduling option |
XML attribute |
Annotation attribute |
Description |
|---|---|---|---|
| Fixed rate | fixed-rate | fixedRate | Launches periodically, using the start time of the previous task to measure the interval |
| Fixed delay | fixed-delay | fixedDelay | Launches periodically, using the completion time of the previous task to measure the interval |
| Cron | cron | cron | Launches using a cron expression |
The fixed-rate and fixed-delay options are the simple options, depending on whether you want to launch job executions independently (fixed rate) or depending on the completion time of the previous execution (fixed delay). For more complex cases, use cron expressions. The next sections show you the use of the fixed-rate option with both XML and annotations; remember that you can use the attributes in table 4.5 for fixed rate or cron.
Scheduler Setup
Spring uses a dedicated bean to schedule jobs. You can declare this bean using the task namespace prefix:
<task:scheduler id="scheduler" />
Note
Remember that declaring a scheduler is optional. Spring uses the default single-threaded scheduler as soon as you declare scheduled tasks.
Even though Spring uses reasonable defaults, declaring a scheduler explicitly is good practice because it reminds you that an infrastructure bean takes care of the actual scheduling. It also serves as a reminder that you can tweak this scheduler to use a thread pool:
<task:scheduler id="scheduler" pool-size="10" />
Multiple threads are useful when you need to schedule multiple jobs and their launch times overlap. You don’t want some jobs to wait because the single thread of your scheduler is busy launching another job.
Now that the scheduler’s ready, let’s schedule a job using XML.
Scheduling with XML
Imagine you have the following Java code that launches your Spring Batch job, and you want Spring to execute this code periodically:
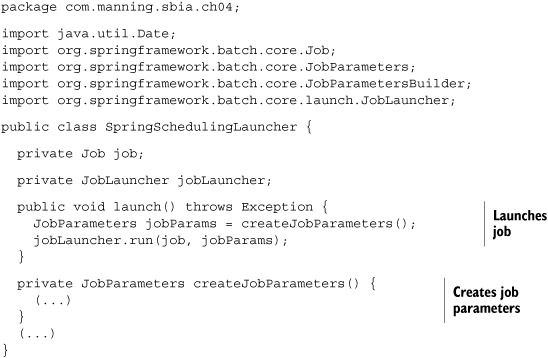
This snippet elides setter methods for brevity. It also elides the creation of job parameters, as job parameters are job specific. Most of the time, you’ll be using a timestamp or a sequence to change the job identity for each run. Finally, exception handling is up to you: here, the launch method just propagates any exception that the job launcher throws. You could also catch the exception and log it.
You now need to tell Spring to call this code periodically. Fortunately, you inherit from all of Spring’s configuration features: dependency injection and the task namespace to configure the scheduling. The following listing shows a scheduling configuration using XML.
Listing 4.2. Scheduling with Spring and XML
<bean id="springSchedulingLauncher"
      class="com.manning.sbia.ch04.SpringSchedulingLauncher">
  <property name="job" ref="job" />
  <property name="jobLauncher" ref="jobLauncher" />
</bean>

<task:scheduler id="scheduler" />

<task:scheduled-tasks scheduler="scheduler">

  <task:scheduled ref="springSchedulingLauncher"
                  method="launch"
                  fixed-rate="1000" />
</task:scheduled-tasks>
You first declare the bean that launches the Spring Batch job. The task:scheduled-tasks element contains the tasks to schedule. For each task you schedule, you use the task:scheduled element and refer to the bean and the method to call, using the ref and method attributes, respectively. This listing uses a fixed rate, but remember that you can also schedule with a fixed delay or a cron expression.
An XML configuration has many advantages: it doesn’t affect your Java code—making it easier to reuse—and it’s flexible because you can externalize part of your configuration in a property file, using a Spring property placeholder. This allows switching the scheduling configuration between the development and production environments, for example. The XML configuration is external to your code: when you look at your Java code, you have no idea a scheduler launches it periodically. If you change the name of the Java method to launch periodically, you need to reflect this change in the XML configuration. If you want the scheduling configuration to be closer to your code than in a separate XML file, then annotations are the way to go.
Scheduling with Annotations
Spring lets you schedule your jobs by annotating Java methods. The following snippet shows how to schedule a job with the Spring @Scheduled annotation:

Note
Don’t forget: you can use the fixedDelay or cron annotation attributes instead of fixedRate.
When using the @Scheduled annotation, the Java class does part of the configuration itself. The XML configuration is shorter, but you need to tell Spring to look for @Scheduled annotations with the task:annotation-driven element, as shown in the following snippet:

Using the @Scheduled annotation is straightforward: you activate its support with the task:annotation-driven element, and you add new tasks directly in Java without going back to the XML configuration. The annotation solution is less flexible, though: the scheduling configuration is hardcoded and it works only on that code (you can’t annotate code you don’t control).
Quartz is a Java-based job scheduler that you can integrate in any Java environment (standalone or Java Enterprise Edition). We chose not to cover Quartz here because you can do pretty much the same thing with the built-in scheduling support in Spring. Spring provides some support to integrate with Quartz. You can refer to Spring reference documentation for more information.
This ends the coverage of schedulers used to launch Spring Batch jobs. You can use a system scheduler like cron to launch Spring Batch jobs, which spawns a plain Java process for each job. But cron isn’t suited for all cases, especially if bootstrapping the Spring application context is resource intensive and the job is triggered every second, for example. In such cases, use a Java-based scheduler, like Spring scheduler.
Remember, when using a Java scheduler, you already have a Spring Batch environment ready; you don’t need to spawn a new JVM process for every job (as you do with cron, for example). You now have everything ready, assuming you found a container to run your application. A popular way to embed a Spring Batch environment and a scheduler is to use a web application. This is the second scenario presented in section 4.1.3. In the next section, we see how to embed Spring Batch in a web application.
4.4. Launching from a web application
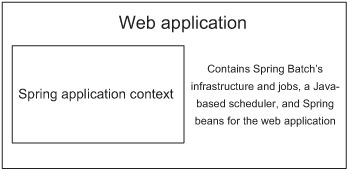
Spring Batch is a lightweight framework that can live in a simple Spring application context. Here, we look at configuring a Spring Batch environment in a web application. This makes Spring Batch available at any time; there’s no need to spawn a dedicated Java process to launch a job. We can also embed a Java scheduler in the same web application context and become independent of any system schedulers. Figure 4.8 illustrates that a Spring application context can be contained in a web application. Note that the job beans can also use any available services, like data sources, data access objects, and business services.
Figure 4.8. A web application can contain a Spring application context. This Spring application context can host Spring Batch’s infrastructure (job launcher, job repository) and jobs. The context can also host a Java-based scheduler (like Spring scheduler or Quartz) and any Spring beans related to the web application (data access objects, business services).
Hosting Spring Batch in a web application is convenient, but what about pushing this architecture further and triggering jobs through HTTP requests? This is useful when an external system triggers jobs and that system cannot easily communicate with the Spring Batch environment. But before we study how to use HTTP to trigger jobs, let’s see how to configure Spring Batch in a web application.
4.4.1. Embedding Spring Batch in a web application
The Spring Framework provides a servlet listener class, the ContextLoaderListener, that manages the application context’s lifecycle according to the web application lifecycle. The application context is called the root application context of the web application. You configure the servlet listener in the web.xml file of the web application, as shown in the following listing.
Listing 4.3. Configuring Spring in a web application
<?xml version="1.0" encoding="UTF-8"?>
<web-app xmlns="http://java.sun.com/xml/ns/javaee"
    xmlns:xsi="http://www.w3.org/2001/XMLSchema-instance"
    xsi:schemaLocation="http://java.sun.com/xml/ns/javaee
    http://java.sun.com/xml/ns/javaee/web-app_2_5.xsd"
    version="2.5">
  <display-name>Spring Batch in a web application</display-name>

  <listener>
    <listener-class>
    org.springframework.web.context.ContextLoaderListener
    </listener-class>
  </listener>

</web-app>
By default, the ContextLoaderListener class uses an applicationContext.xml file in the WEB-INF directory of the web application to create the application context. This file should contain the configuration of the Spring Batch infrastructure, the jobs, the scheduler (if any), and application services. A best practice is to split up this configuration into multiple files. This avoids having a large and monolithic configuration file and encourages reuse of configuration files. Should you redefine all your jobs for integration testing? No, so define the jobs in a dedicated file and import this file from a master Spring file. The following snippet shows how the default applicationContext.xml imports other files to create a more maintainable and reusable configuration:
<?xml version="1.0" encoding="UTF-8"?>
<beans xmlns="http://www.springframework.org/schema/beans"
  xmlns:xsi="http://www.w3.org/2001/XMLSchema-instance"
  xsi:schemaLocation="http://www.springframework.org/schema/beans
  http://www.springframework.org/schema/beans/spring-beans-3.0.xsd">

  <import resource="batch-infrastructure.xml"/>
  <import resource="batch-jobs.xml"/>
  <import resource="scheduling.xml"/>

</beans>
If you follow the configuration of the previous snippet, the structure of the web application on disk should be as follows:
web application root directory/
  WEB-INF/
    applicationContext.xml
    batch-infrastructure.xml
    batch-jobs.xml
    scheduling.xml
    web.xml
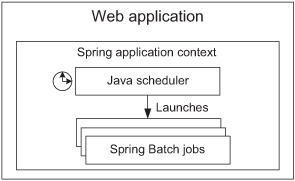
What’s next? If you use the Spring scheduler to start your jobs, the scheduling.xml file contains the corresponding configuration, and you’re done! You can deploy the web application in your favorite web container, and the embedded Java scheduler will trigger jobs according to the configuration. Figure 4.9 shows this configuration.
Figure 4.9. Once Spring Batch is in a web application, you can use an embedded Java scheduler such as Spring scheduler to launch jobs periodically.
In many cases, this configuration is fine. In others, the triggering event doesn’t come from an embedded scheduler but from an external system. Next, we use HTTP to let this external system get access to our Spring Batch environment.
4.4.2. Launching a job with an HTTP request
Imagine that you deployed your Spring Batch environment in a web application, but a system scheduler is in charge of triggering your Spring Batch jobs. A system scheduler like cron is easy to configure, and that might be what your administration team prefers to use. But how can cron get access to Spring Batch, which is now in a web application? You can use a command that performs an HTTP request and schedule that command in the crontab! Here’s how to perform an HTTP request with a command-line tool like wget:
wget "http://localhost:8080/sbia/joblauncher?job=importProductsJob&
Figure 4.10 illustrates launching a Spring Batch job with an HTTP request.
Figure 4.10. Once Spring Batch is in a web application, you can add a web layer to launch Spring Batch jobs on incoming HTTP requests. This solution is convenient when the triggering system is external to Spring Batch (like cron).

To implement this architecture, you need a web controller that analyzes the HTTP parameters and triggers the corresponding job with its parameters. We use Spring MVC to do that, but we could have used any other web framework. We chose Spring MVC because it’s part of the Spring Framework, so it’s free to our Spring Batch application.
Implementing a Spring MVC Controller to Launch Jobs
Spring MVC is part of the Spring Framework and provides a simple yet powerful way to write web applications or Representational State Transfer (REST) web services. In Spring MVC, controllers are plain Java classes with some annotations. The following listing shows the job launcher controller.
Listing 4.4. A Spring MVC controller job launcher
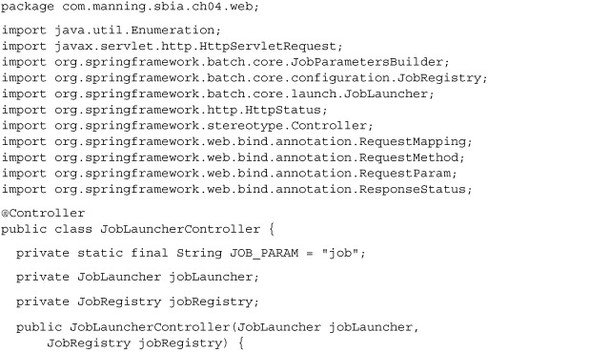
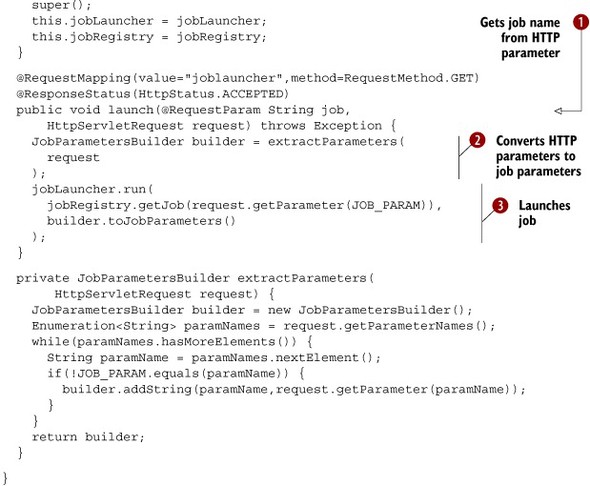
The @RequestMapping annotation tells Spring MVC which URL and which HTTP operation to bind to the launch method. With the @RequestParam annotation on the job parameter ![]() , you tell Spring MVC to pass the value of the job HTTP parameter to the method. As you probably guessed, this parameter is
the name of the job you want to launch. At
, you tell Spring MVC to pass the value of the job HTTP parameter to the method. As you probably guessed, this parameter is
the name of the job you want to launch. At ![]() , you extract HTTP parameters and convert them to job parameters. At
, you extract HTTP parameters and convert them to job parameters. At ![]() , you use the job launcher to launch the job. You use the @ResponseStatus annotation to return an empty HTTP response, with a 202 (ACCEPTED) status code.
, you use the job launcher to launch the job. You use the @ResponseStatus annotation to return an empty HTTP response, with a 202 (ACCEPTED) status code.
Note
When using an HTTP request to start jobs, you should consider making the Spring Batch job launcher asynchronous; otherwise, the job execution will monopolize the web container’s thread.
The launching request URL path should follow this syntax:
/launcher?job=importProductsJob¶m1=value1¶m2=value2
Finally, you may have noticed the jobRegistry property in the web controller in listing 4.4. The JobRegistry is a Spring Batch interface used to look up Job beans configured in the Spring application context. This is exactly what the launching controller does: from the job name passed in the request, it retrieves the corresponding Job bean. You need to declare the job registry in the Spring application context, typically where you declare the Spring Batch infrastructure. Following the structure previously listed, you add the following code in the /WEB-INF/batch-infrastructure.xml file to declare the job registry:
<bean id="jobRegistry"
      class="org.springframework.batch.core.configuration.support.
   MapJobRegistry" />
<bean class="org.springframework.batch.core.configuration.support.
   JobRegistryBeanPostProcessor">
  <property name="jobRegistry" ref="jobRegistry" />
</bean>
Now the controller is ready—let’s configure Spring MVC!
Configuring Spring MVC
At the heart of Spring MVC is a servlet class, DispatcherServlet, which you declare in the web.xml file of your web application, as shown in the following listing.
Listing 4.5. Declaring Spring MVC’s servlet in web.xml

A Spring MVC servlet creates its own Spring application context. By default, its configuration file is [servlet-name]-servlet.xml. In this case, you create an sbia-servlet.xml file in the WEB-INF directory of the web application. You must declare the web controller in this file, as shown in the following snippet:

In this configuration, you declare the controller and inject some dependencies, but where do these dependencies come from? From the root application context configured with the ContextLoaderListener. The Spring application context of the Spring MVC servlet can see the beans from the root application context because they share a parent-child relationship, as figure 4.11 shows.
Figure 4.11. The web controller is defined in the servlet’s application context. The root application context defines the job registry and the job launcher. Because the two application contexts share a parent-child relationship, you can inject beans from the root application context into the web controller.

You can now launch your Spring Batch jobs with a simple HTTP request! You should use this launching mechanism when an external system triggers your jobs and that system doesn’t have direct access to your Spring Batch environment. Otherwise, you can just deploy your Spring Batch environment in a web application and use an embedded Java-based scheduler to trigger your jobs. Remember, you can use Spring Batch wherever you can use the Spring Framework, and web applications are no exception.
We covered a lot of information on triggering and launching Spring Batch jobs. By now, you should know which solution to adopt for your batch system. Next, we learn how to stop all of these jobs.
4.5. Stopping jobs gracefully
We started many jobs in this chapter, but how do we stop them? Stopping a job is unfortunate because it means that something went wrong. If everything is okay, a job execution ends by itself without any external intervention. When it comes to stopping job executions, we distinguish two points of view. The first is the operator’s point of view. The operator monitors batch processes but doesn’t know much about Spring Batch. When something goes wrong, the operator receives an alert and stops a job execution, by using a JMX console, for example.
The second is the developer’s point of view. The developer writes Spring Batch jobs and knows that under certain circumstances, a job should be stopped. What are these certain circumstances? They are any business decision that should prevent the job from going any further: for example, the job shouldn’t import more than 1000 products a day, so the code should count the imported items and stop the execution just after the 1000th item.
Spring Batch provides techniques to stop a job for both the operator and the developer.
4.5.1. Stopping a job for the operator
Imagine that the import job has been running for two hours when you receive the following phone call: “The import file contains bad data—there’s no use letting the import run!” Obviously, you want the import to stop as soon as possible to avoid wasting system resources on your server. Spring Batch provides the JobOperator interface to perform such an operation. The following snippet shows how to stop a job execution through a JobOperator:
Set<Long> runningExecs = jobOperator.getRunningExecutions("importJob");
Long executionId = runningExecs.iterator().next();
boolean stopMessageSent = jobOperator.stop(executionId);
Note
Chapter 12 covers the JobOperator thoroughly. We focus here on the way to use JobOperator for stopping job executions.
The steps are simple: the job operator returns the identifiers of the running job executions for a given job name. You then ask the job operator to send a stop message to an execution using an execution ID. We discuss the notion of sending a stop message in the section, “Understanding the stop message.”
Invoking the Job Operator
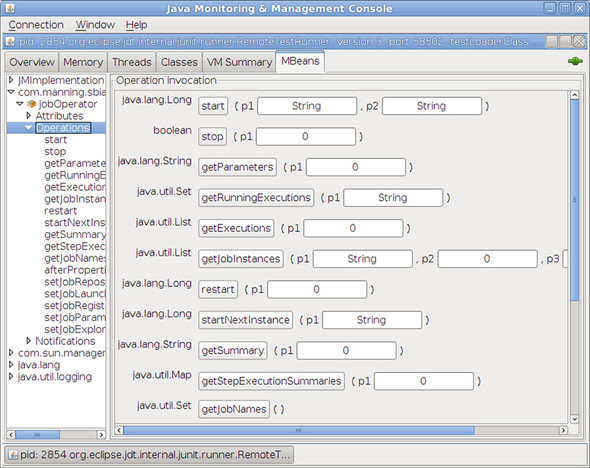
The next question is, how do you invoke this code? The most common way is to expose the job operator to JMX and call its method from a JMX console, as figure 4.12 illustrates using JConsole.
Figure 4.12. You can expose the job operator bean to JMX and then call its methods remotely from a JMX client like JConsole. An operator can learn about the Spring Batch runtime and stop or restart jobs.
Another way to call job operator methods is to provide a user interface in your application that lets an administrator stop any job execution. You can create this user interface yourself, or you can use Spring Batch Admin, the web administration application introduced in chapter 2.
Note
Chapter 12 covers how to expose a Spring bean to JMX as well as how to monitor Spring Batch with the Spring Batch Admin application.
Now that you know how to use the job operator, let’s see how to configure it.
Configuring the Job Operator
The job operator isn’t automatically available; you need to declare it in your Spring configuration. The following listing shows the Spring configuration required to declare the job operator.
Listing 4.6. Configuring the job operator in Spring
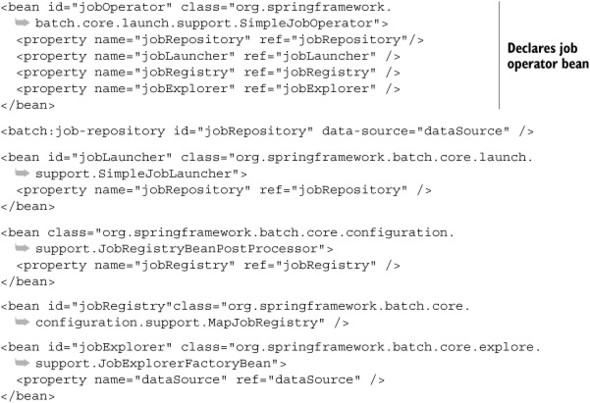
The job operator has four dependencies: the job repository, job launcher, job registry, and job explorer. By now, you’re used to seeing the job repository and the job launcher, as they’re essential parts of the Spring Batch infrastructure. You need to declare the job registry and the job explorer only for specific tasks, and configuring the job operator is one.
As a bonus, the following configuration exposes the job operator to JMX. This saves you a round trip to chapter 12.
<bean class="org.springframework.jmx.export.MBeanExporter">
  <property name="beans">
    <map>
      <entry key="com.manning.sbia:name=jobOperator"
             value-ref="jobOperator" />
    </map>
  </property>
</bean>
You can now explain to your administration team how to stop a job execution. But a member of the administration team might tell you that a job execution doesn’t stop. The next subsection explains what happens when you request to stop a job execution.
Understanding the Stop Message
When we showed the job operator in action, you may have found this line intriguing:
boolean stopMessageSent = jobOperator.stop(executionId);
The job operator returns a Boolean when you request to stop a job execution. This Boolean value tells you whether the stop message was sent successfully. A stop message? When you call the stop method on a job operator, there’s no guarantee that the execution immediately stops after the call. Why? In Java, you can’t stop code from executing immediately.
When does job execution stop after you request it? Let’s imagine some business code is executing when you send the stop message. There are two possibilities:
- The business code takes into account that the thread can be interrupted by checking Thread.currentThread().isInterrupted(). If the code detects the thread interruption, it can choose to end processing by throwing an exception or returning immediately. This means that the execution will stop almost immediately.
- The business code doesn’t deal with thread interruption. As soon as the business code finishes and Spring Batch gets control again, the framework stops the job execution. This means that the execution will stop only after the code finishes. If the code is in the middle of a long processing sequence, the execution can take a long time to stop.
Stopping in the middle of a chunk-oriented step shouldn’t be a problem: Spring Batch drives all the processing in this case, so the execution should stop quickly (unless some custom reader, processor, or writer takes a long time to execute). But if you write a custom tasklet whose processing is long, you should consider checking for thread interruption.
Understanding the stop message is a first step toward the developer’s point of view, so let’s now see how to stop a job execution from application code.
4.5.2. Stopping a job for the application developer
We saw that an administrator can use the job operator to stop a job execution, but sometimes stopping the execution from within the job itself is necessary. Imagine you’re indexing your product catalog with a Spring Batch job. The online store application can work with some unindexed products, but the job execution shouldn’t overlap with periods of high activity, so it shouldn’t run after 8 a.m. You can check the time in various places in the job and decide to stop the execution after 8 a.m.
The first way to stop execution is to throw an exception. This works all the time, unless you configured the job to skip some exceptions in a chunk-oriented step!
The second and preferred way to stop execution is to set a stop flag in the step execution object. To set this stop flag, call the method StepExecution.setTerminateOnly(), which is equivalent to sending a stop message. As soon as Spring Batch gets control of the processing, it stops the job execution. The next topic to cover is how to get access to the StepExecution object from a job. Getting access to the StepExecution depends on whether you’re working directly with a tasklet or in a chunk-oriented step. Let’s study both cases now.
Stopping from a Tasklet
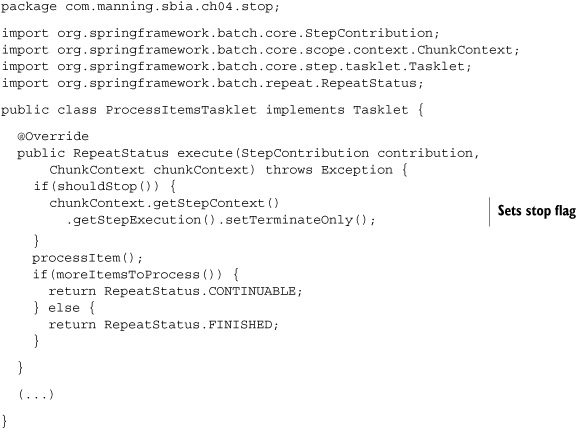
A tasklet has direct access to the StepExecution through the step context, itself in the chunk context. The following listing shows a tasklet that processes items, checks a stop condition, and sets the stop flag accordingly. The stop condition could be any business decision, such as the time restriction mentioned previously.
Listing 4.7. Setting the stop flag from a tasklet
Setting the stop flag in a tasklet is straightforward; let’s now see how to do this in a chunk-oriented step.
Stopping from a Chunk-Oriented Step
Remember how a chunk-oriented step works: Spring Batch drives the flow and lets you plug in your business logic or reuse off-the-shelf components to read, process, or write items. If you look at the ItemReader, ItemProcessor, and ItemWriter interfaces, you won’t see a StepExecution. You access the StepExecution to stop the execution using listeners.
Note
Not dealing with stopping a job in item readers, processors, and writers is a good thing. These components should focus on their processing to enforce separation of concerns.
Chapter 3 covers the configuration of listeners, but we give you enough background here to use them for stopping jobs. The idea of a listener is to react to the lifecycle events of a step. You register a listener on a step by using annotations or implementing interfaces, and Spring Batch calls corresponding methods throughout the lifecycle of that step. What lifecycle events can you listen for? A lot of them: step start; after each read, processed, or written item; step end, and so on. The following listing shows a listener that keeps a reference to the StepExecution and checks a stopping condition after each read item. This listener uses annotations.
Listing 4.8. An annotated listener to stop a job execution

The real work is to implement the stopping condition, which is a business decision (the body of the stopConditionsMet method in our example). The following listing shows how to register the listener on the chunk-oriented step.
Listing 4.9. Registering the stop listener on the step

Note how the listener mechanism makes the stopping decision a crosscutting concern: no component in the step—only the dedicated listener—knows about stopping.
Scheduling isn’t only for starting jobs; you can also schedule stopping your jobs. If a job runs at night but must stop at 6 a.m., you can schedule a task to send a stop signal. By doing so, you won’t embed the stop logic in your job.
This concludes the coverage of stopping a Spring Batch job. You saw how to stop a job execution from the operator’s point of view. You configure a job operator bean that you can expose to JMX and call the appropriate sequence of methods to stop a specific job execution. Don’t forget that stopping an execution is only a request message: your code must be aware of this message if you want the execution to stop quickly. As soon as Spring Batch gets control of the processing, it does its best to stop the execution gracefully. Finally, remember that you can choose to stop the execution from within your business code.
4.6. Summary
Launching Spring Batch jobs is easy, and we covered the most common scenarios you’re likely to encounter in batch systems. With Spring Batch, you can stick to the popular cron-plus-command-line scenario by using either your own Java program or Spring Batch’s generic command-line runner. You can also choose to embed Spring Batch in a web application combined with a Java scheduler. Spring provides lightweight support for scheduling.
We provided you with the following guidelines:
- The generic command-line launcher-plus-cron solution is good for jobs that don’t run with a high frequency. For example, you shouldn’t use this solution when the batch environment initialization is costly and the batch job runs every 30 seconds.
- If you want your batch environment ready all the time, embed your Spring Batch environment in a web application.
- Once your batch environment is in a web application, also embed a Java scheduler to start your jobs. If the triggering event comes from an external system that doesn’t have direct access to Spring Batch, use an HTTP request to trigger the execution.
- Imagine any launching system that suits your needs—the Spring Batch launching API is in Java, so you’re limited only by the Java language and your imagination!
- Stopping a job execution uses a stop message. You should take this message into account in your code, but you can also count on Spring Batch to stop gracefully when it retakes control of the flow.
It’s now time to go back to the heart of Spring Batch: chunk-oriented processing. The next three chapters cover the three corresponding phases of chunk processing: reading, writing, and processing.