
Chapter 6. Writing data
- Introducing item-writing concepts
- Writing to files, databases, and JMS
- Sending emails
- Implementing custom writers
- Implementing advanced writers
In chapter 5, we learned how to read data with Spring Batch. In this chapter, we focus on another core feature of the batch process: writing.
Reading input items takes place at the beginning of a chunk-oriented step and writing items takes place at the end. In Spring Batch, a writer is responsible for data persistence.
We start by looking at data-writing concepts. We use our case study to illustrate how to write data into flat files, XML files, and relational databases using both JDBC and ORM (Object Relational Mapping). Spring Batch provides various implementations out of the box for these targets, but it may be necessary to create your own writer implementations, which we demonstrate. If you already have legacy services that produce or save data, Spring Batch can delegate to and reuse these services. We also learn how to write to a Java Message Service (JMS) queue and send emails. Finally, we discuss some advanced writing techniques.
6.1. Data-writing concepts
Here we look at core concepts of writing with Spring Batch, particularly writing in a chunk-oriented tasklet. Figure 6.1 shows what we already know from chapter 5, but we focus now on writing data.
Figure 6.1. A chunk-oriented tasklet implements the chunk-oriented processing pattern in Spring Batch. This chapter focuses on the writing phase.

In a chunk-oriented tasklet, an ItemReader reads input data, an ItemProcessor (optionally) processes it, and an ItemWriter writes it. Spring Batch provides the plumbing to aggregate reading and passing the data to the writer. The interface ItemWriter represents the writer, which is the counterpart to the ItemReader interface. The following snippet lists the ItemWriter interface:
public interface ItemWriter<T> {
  void write(List<? extends T> items) throws Exception;
}
The ItemWriter interface defines a single method called write, which saves output data. Most writers have the ability to write a set of items all at once, which is why the writer takes a list of items as a parameter. After writing items, the writer can flush before the process continues. For files, writers flush the underlying stream to guarantee that it passes all bytes to the operating system. It’s the same with Hibernate: the HibernateItemWriter flushes the Hibernate session after saving or updating objects at the end of a chunk, by default. It’s the responsibility of each writer implementation to deal with flushing if applicable. After all items are processed, Spring Batch commits the current transaction. With built-in JDBC writers, Spring Batch uses batch updates to send all SQL statements in one operation to get the best performance. The following snippet shows you how to configure the number of items to write for a transaction; Spring Batch commits the transaction for each chunk:
<tasklet>
  <chunk reader="itemReader" writer="itemWriter" commit-interval="100"/>
</tasklet>
The commit-interval attribute on the chunk element defines the chunk size. Spring Batch is smart enough to avoid loading all data in memory. It treats items in chunks to lower memory consumption.
As you’ll see later, you can also create your own ItemWriter implementations. Now that the concepts are clear, let’s start writing.
Batch updates are good: they make insert and update statements execute efficiently. Instead of sending SQL statements one after another—and making a round-trip to the database each time—batch updates send SQL statements in groups. The database can even perform optimizations of its own. By providing a list of items to the item writer, Spring Batch facilitates batch updates, but that’s not enough: you need to send the batch updates correctly. How do you do that? The Spring Framework provides everything you need: look at the batchUpdate method in the JdbcTemplate and the BatchSqlUpdate class.
6.2. Writing files
Spring Batch provides item writers that write files in various formats: delimited text, fixed-field widths, and XML. We discuss these formats using our case study as an example. Figure 6.2 displays these formats.
Figure 6.2. Spring Batch supports writing to multiple file formats thanks to the various item writer implementations it provides.
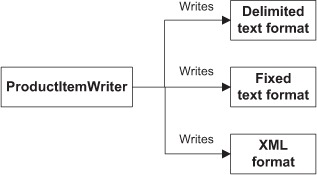
In our application, an item reader first reads Products from a flat file. We can then use different writers to produce output files in different formats. Spring Batch supports flat files and XML files. Let’s start with flat files.
6.2.1. Writing flat files
The flat file format is one of the earliest formats used to store information. A flat file is a plain text file that holds records, usually one per line. Fields compose a record, and a separator, usually a comma or tab character, may delimit each field. Alternatively, each field can be of a predetermined fixed length, where spaces pad values to get each field to its desired length. Additionally, a flat file may include an optional header and footer line, which can define additional metadata or add comments.
The following snippet shows a comma-delimited flat file for two product records with fields for ID, name, description, and price:
PR....210,BlackBerry 8100 Pearl,RIM phone,124.60
PR....211,Sony Ericsson W810i,Sony phone,139.45
In the next fixed-length flat file example, each field has a fixed length with no separator; it also has footer and header lines. The field lengths are 9 characters for the ID, 26 for the name, 15 for the description, and 6 for the price.
My header
PR....210BlackBerry 8100 Pearl     RIM phone       124.60
PR....211Sony Ericsson W810i       Sony phone      139.45
My footer
Spring Batch writes a flat file in the following steps:
- Writes the header (optional)
- Extracts fields for each item and aggregates them to produce a line
- Writes the footer (optional)
Figure 6.3 shows the process of writing a flat file.
Figure 6.3. Spring Batch extracts and aggregates fields for each item when writing to a flat file. The framework also handles writing a header and footer to the file (both are optional).

We use the FlatFileItemWriter class to write flat files. The FlatFileItemWriter implements the ItemWriter interface and additional interfaces to do its job. Figure 6.4 shows the interfaces and classes involved to support the features in figure 6.3.
Figure 6.4. The interfaces and classes involved in writing items to a flat file with the FlatFileItemReader. The FlatFileItemWriter also provides optional callbacks for the header and the footer of a flat file. The LineAggregator transforms an item into a string. The ExtractorLineAggregator implementation uses a FieldExtractor to “split” an item into an array of objects and calls business logic to render the array as a string.
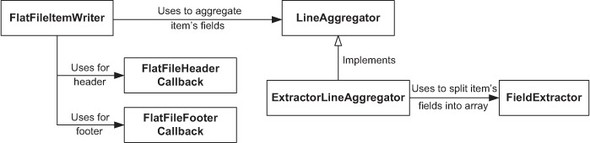
A FlatFileItemWriter implements the ItemStream interface and follows the stream lifecycle. When Spring Batch calls the open stream method, the FlatFileItemWriter writes the header through a FlatFileHeaderCallback. When Spring Batch calls the close stream method, the FlatFileItemWriter writes the footer through a FlatFileFooterCallback. Both the header and footer are optional in flat files.
A FlatFileItemWriter uses a LineAggregator to transform each item into a String. The most basic implementation of the LineAggregator interface is the PassThroughLineAggregator class, which calls toString() on each item object. If you use domain-specific classes, you may need to convert each object into a more complex String. For this case, Spring Batch defines an abstract class called ExtractorLineAggregator, where subclasses extract fields from a given item into an array using a FieldExtractor and then aggregate them for the given file format.
Table 6.1 describes the classes and interfaces from figure 6.4.
Table 6.1. Interfaces and classes used with a FlatFileItemWriter
|
Type |
Description |
|---|---|
| LineAggregator | Creates a String representation of an object |
| ExtractorLineAggregator | Implements LineAggregator to extract field data from a domain object |
| FieldExtractor | Creates an array containing item parts |
| FlatFileHeaderCallback | Callback interface to write a header |
| FlatFileFooterCallback | Callback interface to write a footer |
These interfaces and classes all play a part in writing flat files, whatever the format. But how does Spring Batch know how and what to write in a flat file? We start to answer this question next, with the configuration of a FlatFileItemWriter.
Configuring a Flatfileitemwriter
The FlatFileItemWriter class is the starting point for writing flat files. You define a FlatFileItemWriter as a bean in an XML Spring context. Table 6.2 describes the FlatFileItemWriter properties.
Table 6.2. FlatFileItemWriter properties
|
Property |
Type |
Description |
|---|---|---|
| appendAllowed | boolean | Whether to append to the target file if it exists; default is false |
| encoding | String | Character encoding for writing to a file; defaults to UTF-8 |
| footerCallback | FlatFileFooterCallback | Callback class used to write a footer |
| headerCallback | FlatFileHeaderCallback | Callback class used to write a header |
| lineAggregator | LineAggregator<T> | Convert an item into a line; required property |
| lineSeparator | String | Line separator; defaults to the system property line.separator |
| resource | Resource | Location of resource to write |
| saveState | boolean | Whether to save the state in the execution context; defaults to true |
| shouldDeleteIfEmpty | boolean | Whether to delete the target file if the writer doesn’t write any lines; defaults to false |
| shoudDeleteIfExists | boolean | Whether to delete the target file if it already exists; default is true |
| transactional | boolean | Whether an active transaction delays writing to the file buffer; default is true |
The following listing shows a minimal FlatFileItemWriter configuration with lineAggregator and resource properties.
Listing 6.1. A minimal FlatFileItemWriter configuration
<bean id="productItemWriter"
      class="org.springframework.batch.item.file.FlatFileItemWriter">
  <property name="resource"
      value="file:target/outputs/passthrough.txt"/>
  <property name="lineAggregator">
    <bean
      class="org.springframework.batch.item.file.transform.
   PassThroughLineAggregator" />
  </property>
</bean>
PassThroughLineAggregator" />
</property>
</bean>
The resource property contains a URL pointing to the file to write. The FlatFileItemWriter class inherits the setResource method from its superclass, ResourceAwareItemWriterItemStream, which implements the ItemStream and ItemWriter interfaces. The FlatFileItemWriter class also has a required property named LineAggregator. The purpose of the LineAggregator interface is to create the String representation of an item.
Spring Batch provides the LineAggregator implementations listed in table 6.3.
Table 6.3. Spring Batch LineAggregator implementations
|
Class |
Description |
|---|---|
| PassThroughLineAggregator | A simple implementation that calls toString(). |
| ExtractorLineAggregator | An abstract implementation that uses a FieldExtractor to extracts item fields as an array. Subclasses decide how to aggregate the array elements. |
| DelimitedLineAggregator | An ExtractorLineAggregator subclass that produces a delimited string. The default delimiter is the comma character. |
| FormatterLineAggregator | An ExtractorLineAggregator subclass that formats each element with a java.util.Formatter. |
In more advanced use cases, the FlatFileItemWriter class uses an ExtractorLineAggregator and a FieldExtractor to format data and write the file.
Introducing the LineAggregator Interface
We introduced the LineAggregator interface in the previous section, but here we look at it in more detail:
public interface LineAggregator<T> {
  String aggregate(T item);
}
The interface is simple and focuses on converting an object to a String. The PassThroughLineAggregator implementation calls toString() on each item. The ExtractorLineAggregator implementation is more interesting because it serves as a base class for more elaborate aggregation algorithms. The aggregate method extracts fields from the given item using a FieldExtractor and then aggregates them into a String. The FieldExtractor’s only job is to convert an object into an array of its parts. Finally, the FlatFileItemWriter writes the String to a file. Let’s see how a FieldExtractor works. To see an illustration of these objects, see figure 6.4.
Introducing the Fieldextractor Class
An ExtractorLineAggregator uses a FieldExtractor to create an array of item values that an item writer writes to a file. Implementers of the FieldExtractor interface extract the bean information you want to write to a file:
public interface FieldExtractor<T> {
  Object[] extract(T item);
}
Listing 6.2 writes to a delimited file to demonstrate the use of a FieldExtractor, but don’t worry about the details; we get to that in the next section. The PassThroughFieldExtractor class implements the FieldExtractor interface to return an array of fields as close as possible to the input item. The extractor returns the input if it’s a FieldSet, the result of toArray() on a Collection, or the result (as an array) of values() on a Map, and wraps other types of objects in a one-element array.
Listing 6.2. A delimited pass-through field extractor
<bean id="productItemWriter"
      class="org.springframework.batch.item.file.FlatFileItemWriter">
  <property name="resource"
    value="file:target/outputs/delimited-passthroughextractor.txt"/>
  <property name="lineAggregator">
      <bean
        class="org.springframework.batch.item.file.transform.
   DelimitedLineAggregator">
        <property name="fieldExtractor">
          <bean
            class="org.springframework.batch.item.file.transform.
   PassThroughFieldExtractor" />
      </property>
    </bean>
  </property>
</bean>
This listing configures a flat file item writer with a LineAggregator, which contains a PassThroughFieldExtractor. All classes in this example are stock Spring Batch.
The following snippet shows the result of running this example:
Product [id=PR....210, name=BlackBerry 8100 Pearl]
Product [id=PR....211, name=Sony Ericsson W810i]
Product [id=PR....212, name=Samsung MM-A900M Ace]
Product [id=PR....213, name=Toshiba M285-E 14]
The output file contains one line per product and is the result of calling toString() on each Product object. It’s not sexy, but it’s efficient, even if you don’t have access to all the object properties or if you can’t control the column order or formatting.
For more control over the output, you can select which properties to write with the BeanWrapperFieldExtractor class. This extractor takes an array of property names, reflectively calls the getters on a source item object, and returns an array of values. The following listing configures a BeanWrapperFieldExtractor for our use case.
Listing 6.3. Configuring a BeanWrapperFieldExtractor
<bean
  id="productItemWriter"
  class="org.springframework.batch.item.file.FlatFileItemWriter">
  <property name="resource" value="file:target/outputs/delimited-
     beanwrapperhextractor.txt"/>
  <property name="lineAggregator">
    <bean class="org.springframework.batch.item.file.transform.
   DelimitedLineAggregator">
      <property name="fieldExtractor">
          <bean class="org.springframework.batch.item.file.transform.
   BeanWrapperFieldExtractor">
          <property name="names"
             value="id,price,name" />
        </bean>
      </property>
    </bean>
   </property>
</bean>
You configure a BeanWrapperFieldExtractor with the list of property names that you want to output. For each product, the field extractor calls the getter (via reflection) of each property in the list and creates a new value array. A DelimitedLineAggregator aggregates this array, which we see in the next section.
The following snippet shows that you control the properties and their order:
PR....210,124.60,BlackBerry 8100 Pearl
PR....211,139.45,Sony Ericsson W810i
PR....212,97.80,Samsung MM-A900M Ace
PR....213,166.20,Toshiba M285-E 14
Next, you get even more control over the output by adding computed fields.
Writing Computed Fields
To add computed fields to the output, you create a FieldExtractor implementation named ProductFieldExtractor to add and compute additional fields. Here, you add BEGIN and END at the beginning and the end of each array and compute a tax field. Because you configure the ProductFieldExtractor in a Spring context, you can also inject/wire existing beans to create other FieldExtractors. The following listing implements the ProductFieldExtractor.
Listing 6.4. Computing fields in a FieldExtractor
public class ProductFieldExtractor implements FieldExtractor<Product> {
  public Object[] extract(Product item) {
    return new Object [] {
      "BEGIN",
      item.getId(),
      item.getPrice(),
      item.getPrice().multiply(new BigDecimal("0.15")),
      item.getName(),
      "END"};
  }
}
The next listing configures the ProductFieldExtractor as a property of the item writer’s LineAggregator.
Listing 6.5. Configuring a FieldExtractor
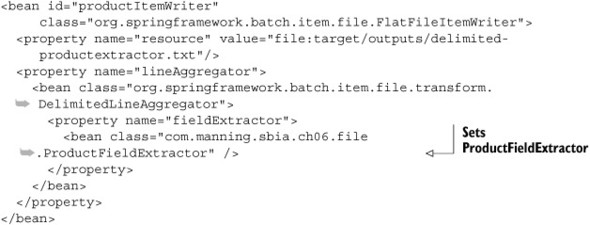
The following snippet shows the result of using the product field extractor:
BEGIN,PR....210,124.60,18.6900,BlackBerry 8100 Pearl,END
BEGIN,PR....211,139.45,20.9175,Sony Ericsson W810i,END
BEGIN,PR....212,97.80,14.6700,Samsung MM-A900M Ace,END
BEGIN,PR....213,166.20,24.9300,Toshiba M285-E 14,END
Remember to use a FieldExtractor to control exactly what you want to write to a file. The following sections explore how to write delimited and fixed-length fields and how to add headers and footers.
Writing Delimited Files
The DelimitedLineAggregator class implements the LineAggregator interface to create delimited files. A character, typically a comma or a tab, separates each field value from the next. The DelimitedLineAggregator class is responsible for transforming an item into a String. The following listing configures a DelimitedLineAggregator bean in a Spring context. Note that the default delimiter is a comma.
Listing 6.6. Configuring writing to a delimited file
<bean id="productItemWriter" class="org.springframework.batch.item.file.FlatFileItemWriter"> (...) <property name="lineAggregator"> <bean class="org.springframework.batch.item.file.transform.
You set a DelimitedLineAggregator as the LineAggregator to indicate that you want a delimited file as the output format. You also set the delimiter attribute to separate each field with the given string, which by default is the comma character.
The following snippet shows the result of running this example:
PR....210|124.60|BlackBerry 8100 Pearl
PR....211|139.45|Sony Ericsson W810i
PR....212|97.80|Samsung MM-A900M Ace
PR....213|166.20|Toshiba M285-E 14
Now that you know how to use Spring Batch to write a delimited file, let’s see how to write a fixed-width file.
Writing Fixed-Width Files
In a fixed-width file, fixed-length fields make up each record. Spaces may pad each field value to get to the desired field length. The FormatterLineAggregator class implements the LineAggregator interface to format fields and uses the format syntax of the java.util.Formatter class. The Formatter class, inspired by C’s printf function, allows developers to specify text representations of data for strings, numbers, dates, and time. This formatter is used by PrintStream’s printf (String format, Object ... args), and String.format(String format, Object ... args). The first parameter is the format string, and the other values are data to format with java.util.Locale support.
In brief, a FormatterLineAggregator produces Strings by aggregating fields with a Formatter. The following listing configures a FormatterLineAggregator in a Spring context.
Listing 6.7. Configuring a FormatterLineAggregator
<bean id="productItemWriter"
      class="org.springframework.batch.item.file.FlatFileItemWriter">
  <property name="resource"
    value="file:target/outputs/fixedwidth-beanwrapperextractor.txt"/>
  <property name="lineAggregator">
    <bean class="org.springframework.batch.item.file.transform.
   FormatterLineAggregator">
      <property name="fieldExtractor">
        <bean class="org.springframework.batch.item.file.transform.
   BeanWrapperFieldExtractor">
          <property name="names" value="id,price,name" />
        </bean>
      </property>
      <property name="format" value="%-9s%6.2f%-30s" />
    </bean>
  </property>
</bean>
You configure a FormatterLineAggregator with a fieldExtractor to build arrays of fields from items. You use a BeanWrapperFieldExtractor to extract the id, price, and name fields from Product objects. To format these fields, you set the format property to %-9s%6.2f%-30s. The format string looks complicated, so let’s take a closer look:
- id output is 9 characters and padded to the left
- price output is 6 characters as a float with 2 precision characters
- name output is 30 characters and padded to the left
Figure 6.5 shows the mapping between bean property, format expression, and output line.
Figure 6.5. Mapping between bean property, format expression, and output line

The following snippet shows the result of running this example:
PR....210124.60BlackBerry 8100 Pearl
PR....211139.45Sony Ericsson W810i
PR....212 97.80Samsung MM-A900M Ace
PR....213166.20Toshiba M285-E 14
The Javadoc for the Formatter class tells us that the general form of a format string is %[argument_index$][flags][width][.precision]conversion. Let’s pick this one apart too:
- The optional argument_index field is a decimal integer indicating the position of the argument in the argument list.
- The optional flags field is a set of characters that modify the output format. The set of valid flags depends on the conversion. For example, the dash (-) flag creates left-justified output.
- The optional width field is a nonnegative decimal integer indicating the minimum number of characters to write.
- The optional precision field is a nonnegative decimal integer normally used to restrict the number of characters.
- The required conversion field is a character indicating how to format the argument. The set of valid conversions for a given argument depends on the argument’s data type.
Table 6.4 shows the different conversion values.
Table 6.4. Formatter conversions
|
Character |
Description |
|---|---|
| b | Converts a boolean to the String true or false |
| h | A hexadecimal hash code string, the result of Integer.toHexString(arg.hashCode()) |
| s | The result of arg.toString() or, if arg implements Formattable, arg.formatTo() |
| c | A Unicode character |
| d | A decimal integer |
| c | An octal integer |
| x | A hexadecimal integer |
| e | A decimal integer in scientific notation |
| f | A decimal number |
| g | A decimal integer in scientific notation or decimal format, depending on the precision and the value after rounding |
| a | A hexadecimal floating-point number with a significant and an exponent |
| t | Prefix for date and time conversion characters |
| % | The % character |
| n | The platform line separator |
Table 6.5 lists examples of using a Formatter through System.printf().
Table 6.5. Examples of using a Formatter through System.printf()
|
Code |
Output |
|---|---|
| System.printf("Spring Batch in Action has %d co-authors", 4) | Spring Batch in Action has 4 co-authors |
| System.printf("Chapter %d is "%s"", 6, "Writing data") | Chapter 6 is " Writing data" |
| System.printf("Chapter %d is "%15s"", 6, "Writing data") | Chapter 6 is "Writing data " |
| System.printf("Chapter %d is "%-15s"", 6, "Writing data"); | Chapter 6 is "Writing data " |
| System.printf("MEAP + Ebook only: $%f", 44.99) | MEAP + Ebook only: $44.990000 |
| System.printf("MEAP + Ebook only: $%5.2f", 44.99) | MEAP + Ebook only: $44.99 |
| System.printf("MEAP + Ebook only: $%6.2f", 44.99) | MEAP + Ebook only: $ 44.99 |
| System.printf("%s !", "MEAP is available"); | MEAP is available ! |
| System.printf("%20s !", "MEAP is available") | MEAP is available ! |
| System.printf("%-20s !", "MEAP is available"); | MEAP is available ! |
Spring Batch lets you easily create files with fixed-length columns by using the java.util.Formatter class. You only need to think about the format pattern.
Next, let’s see how to deal with heterogeneous items before moving on to adding headers and footers.
Matching Classes to LineAggregators
In chapter 5, you saw how to read a flat file containing a mix of different product types. Here, you learn how to do the same thing for writing. First, you write a flat file with a LineAggregator based on the product type. Figure 6.6 shows the product hierarchy.
Figure 6.6. The domain model of the batch application uses several classes. The flat file item writer can use a custom LineAggregator to delegate aggregation to dedicated LineAggregators (one for each product subclass).

When the import job reads a product file, you create a MobilePhoneProduct or a BookProduct depending on the prefix of the product ID. If a product ID begins with PRM, you create a MobilePhoneProduct; if it begins with PRB, you create a BookProduct.
To write products to a file, the writer receives these same two types of products. A FlatFileItemWriter uses a LineAggregator to get a String representation of each item. The following listing shows the ProductsLineAggregator class, which chooses the right LineAggregator depending on the Class of the Product.
Listing 6.8. Choosing a LineAggregator
public class ProductsLineAggregator implements LineAggregator<Product> {
    private Map<Class<LineAggregator<Product>>,
                LineAggregator<Object>> aggregators;

  @Override
  public String aggregate(Product product) {
    return aggregators.get(product.getClass()).aggregate(product);
  }

  public void setAggregators(Map<Class<LineAggregator<Product>>,
                             LineAggregator<Object>> aggregators) {
    this.aggregators = aggregators;
  }
}
To configure multiple LineAggregators, you inject a Map whose key is the Product’s Class and the value an instance of LineAggregator. The aggregate method uses this Map to find the right LineAggregator and then calls its aggregate method. The following listing shows how to configure multiple LineAggregators with a Map.
Listing 6.9. Configuring multiple LineAggregators with a Map


You start by configuring a FlatFileItemWriter with the ProductLineAggregator as its line aggregator ![]() . You inject your ProductLineAggregator with a Map of LineAggregators
. You inject your ProductLineAggregator with a Map of LineAggregators ![]() . The Map keys are Product subclass names, and the values are LineAggregator references to bean configurations of bookProductLineAggregator
. The Map keys are Product subclass names, and the values are LineAggregator references to bean configurations of bookProductLineAggregator ![]() and mobileProductLineAggregator
and mobileProductLineAggregator ![]() .
.
The following snippet shows the result of running this example:
PRM....210124.60BlackBerry 8100 Pearl          BlackBerry
PRM....211139.45Sony Ericsson W810i            Sony Ericson
PRB....734 34.95Spring Batch in action         Manning
PRB....736 44.95Spring in action               Manning
PRM....214145.50Nokia 2610 Phone               Nokia
Depending of the type of Product, the last column is either a publisher or manufacturer, each using a dedicated formatter.
You can see how Spring Batch gives you the ability to customize a writer’s output. Another common feature is to add a footer and a header to a flat file, which is what you do in the next section.
Adding a Footer and a Header
A header is a text record that Spring Batch inserts before item processing. A footer is a text record added at the end of the file after item processing. Spring Batch provides the single method interfaces FlatFileHeaderCallback and FlatFileFooterCallback to implement these features, shown in the following listing. In this example, you write a simple description in the header, and you write the item count and the Step execution time in the footer.
Listing 6.10. Implementing a flat file footer and header

Spring Batch passes a Writer to the writeHeader method ![]() to output the header, in this case, a simple description. The ProductFooterCallback class extends StepExecutionListenerSupport to get access to the item count and start and end times from the writeFooter method
to output the header, in this case, a simple description. The ProductFooterCallback class extends StepExecutionListenerSupport to get access to the item count and start and end times from the writeFooter method ![]() .
.
In the next listing, you configure the header and footer of a FlatFileItemWriter.
Listing 6.11. Configuring header and footer callbacks for a flat file
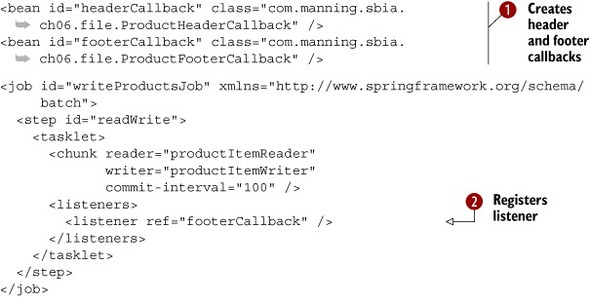

To configure your footer and header, you create header and footer callback beans ![]() . The important point here is to configure the footer as a step listener
. The important point here is to configure the footer as a step listener ![]() , which implements StepExecutionListenerSupport in order to access the StepExecution. You set the footer
, which implements StepExecutionListenerSupport in order to access the StepExecution. You set the footer ![]() and the header
and the header ![]() as properties of the FlatFileItemWriter.
as properties of the FlatFileItemWriter.
The following snippet shows the result of running this example:
# Generated by FlatFileHeaderCallback
PR....210124.60BlackBerry 8100 Pearl
PR....211139.45Sony Ericsson W810i
 (...)
PR....217 13.70Canon Digital Rebel XT 8MP
# Write count: 8
# Done in: 12 ms
The first line is the header, which tells who generated the file. The last two lines make up the footer, which includes the number of items written and how long the operation took.
This section ends our discussion on writing flat files. We saw Spring Batch write different types of flat file formats: delimited and fixed width. Next, we work with a different type of file, XML.
6.2.2. Writing XML files
Spring Batch includes an implementation of ItemWriter for XML files called StaxEventItemWriter. This writer uses a marshaller to write XML files. A Marshaller is a generic interface provided by the Spring Object/XML Mapping[1] module to convert objects to XML, and vice versa. Spring OXM supports Java Architecture for XML Binding (JAXB) 1.0 and 2.0, Castor XML, XMLBeans, JiBX, and XStream.
1 Spring OXM: http://static.springsource.org/spring/docs/3.0.x/spring-framework-reference/html/oxm.html
The following listing shows the XML output for our case study.
Listing 6.12. Example of XML file output
<?xml version="1.0" encoding="UTF-8"?>
<products>
  <header>(...)</header>
  <product>
    <id>PR....210</id>
    <name>BlackBerry 8100 Pearl</name>
    <description></description>
    <price>124.60</price>
  </product>
  <product>
  (...)
  </product>
  (...)
  <footer>(...)</footer>
</products>
This XML document has a root element named products followed by a header child element. A sequence of product elements defines each product. After all the products, the document has a footer and ends by closing the root element.
The StaxEventItemWriter class implements the ItemWriter interface. This writer uses a Marshaller to convert each item to XML and then writes them to an XML file using StAX (Streaming API for XML). In this example, you use the XStreamMarshaller class because it’s simple to configure. Table 6.6 lists the StaxEventItemWriter properties.
Table 6.6. StaxEventItemWriter properties
|
Property |
Type |
Description |
|---|---|---|
| encoding | String | Encoding for writing the file; defaults to UTF-8 |
| footerCallback | StaxWriterCallback | Callback class used to write the footer |
| headerCallback | StaxWriterCallback | Callback class used to write the header |
| marshaller | Marshaller | Spring OXM marshaller used to convert objects to XML |
| overwriteOutput | boolean | Whether to overwrite the output file; defaults to true |
| resource | Resource | Output resource |
| rootElementAttributes | Map<String,String> | Adds root element attributes; if a key name begins with xmlns, it’s an XML namespace declaration |
| rootTagName | String | Tag name of root element; defaults to root |
| saveState | Boolean | Whether to save state in the execution context; defaults to true |
| transactional | Boolean | Whether to delay writing to the buffer if a transaction is active; default value is true |
| version | String | XML version; default value is 1.0 |
You now know all you need to implement this use case. You’ve already chosen a Marshaller class, and you know how to set the root tag element with the rootTagName property.
To write the header and footer, you implement the StaxWriterCallback interface and its write method. For the header element, you want to create an attribute called generated, as illustrated by the following snippet:
(...)
<header generated="Jan 27, 2011 5:30:16 PM"></header>
(...)
Because you’re now in the StAX world, you create an XMLEvent object using the XMLEventFactory class. The following listing shows the ProductHeaderStaxCallback implementation.
Listing 6.13. Implementing an XML header callback
public class ProductHeaderStaxCallback implements StaxWriterCallback {

  @Override
  public void write(XMLEventWriter writer) throws IOException {
    try {
      XMLEventFactory eventFactory = XMLEventFactory.newInstance();
      XMLEvent event = eventFactory.createStartElement("", "", "header");
      writer.add(event);
      event = eventFactory.createAttribute(
                  "generated",
                  DateFormat.getInstance().format(new Date()));
      writer.add(event);
      event = eventFactory.createEndElement("", "", "header");
      writer.add(event);
    } catch (XMLStreamException e) {
    }
  }
}
The write method starts by creating an instance of XMLEventFactory to help you create an element and an attribute with the current date.
The footer is like the header, and you implement the same interface. Here, you want to create an element named writeCount. The following listing shows the ProductFooterStaxCallback class that implements StaxWriterCallback and extends StepExecutionListenerSupport to access the StepExecution.
Listing 6.14. Implementing an XML footer callback

With the XMLEventFactory class, you create an XML character for the writeCount element ![]() . Spring Batch injects the StepExecution
. Spring Batch injects the StepExecution ![]() to give you access to the writeCount value.
to give you access to the writeCount value.
This configuration is almost complete; your last task is to configure a StaxEventItemWriter to write the XML file, as shown in the following listing.
Listing 6.15. Configuring a StaxEventItemWriter


This Spring context contains a job definition with a special listener, the footer callback, which Spring Batch injects with
a StepExecution. You configure a StaxEventItemWriter with an output resource ![]() and footer and header callbacks. Finally, you define an XStream Marshaller
and footer and header callbacks. Finally, you define an XStream Marshaller ![]() with an alias map to serialize Product objects to XML product elements.
with an alias map to serialize Product objects to XML product elements.
The following listing shows the XML output of this StaxEventItemWriter example.
Listing 6.16. StaxEventItemWriter output
<?xml version="1.0" encoding="UTF-8"?>
<products>
  <header generated="Jan 28, 2011 5:30:16 PM"></header>
  <product>
    <id>PR....210</id>
    <name>BlackBerry 8100 Pearl</name>
    <description></description>
    <price>124.60</price>
  </product>
  <product>
  (...)
  </product>
  <footer>
    <writeCount>8</writeCount>
  </footer>
</products>
This XML products document contains elements for a footer, a header, and for each product.
In the next section, you discover how to “roll over” XML files depending on the number of items you want in a file, creating a set of files instead of a single file.
6.2.3. Writing file sets
Spring Batch provides a mechanism to write file sets instead of a single file (see figure 6.7). It’s useful if you want to create files with a maximum number of items.
Figure 6.7. The multiresource item writer rolls over files after writing a given number of items. This creates multiple small files instead a single large file.

The MultiResourceItemWriter class is an ItemWriter implementation for multiple output files. The following listing shows how to configure this writer.
Listing 6.17. Configuring multiple output files
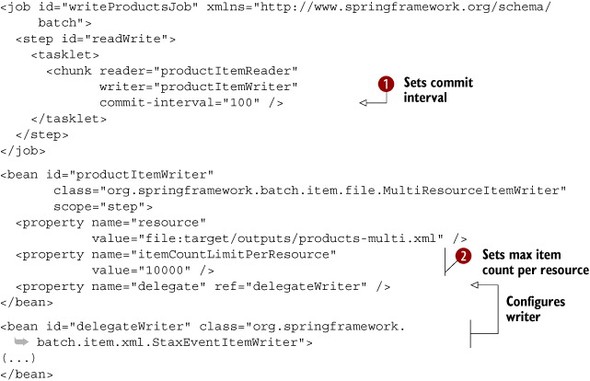
We set the commit interval to 100 ![]() (the commit interval can impact the number of items in a file; more on this later!). If you have 40,100 products and an itemCountLimitPerResource of 10,000
(the commit interval can impact the number of items in a file; more on this later!). If you have 40,100 products and an itemCountLimitPerResource of 10,000 ![]() , the MultiResourceItemWriter will create five files, the first four with 10,000 records, and the last with 100. The MultiResourceItemWriter also sets the resource for the writer. In this case, the writer is a StaxEventItemWriter, working with the file writer. By default, a multiresource writer suffixes the output filenames with an index. For example:
, the MultiResourceItemWriter will create five files, the first four with 10,000 records, and the last with 100. The MultiResourceItemWriter also sets the resource for the writer. In this case, the writer is a StaxEventItemWriter, working with the file writer. By default, a multiresource writer suffixes the output filenames with an index. For example:
products-multi.xml.1
products-multi.xml.2
products-multi.xml.3
You can create your own suffix policy by implementing the ResourceSuffixCreator interface:
public interface ResourceSuffixCreator {
  String getSuffix(int index);
}
Be aware that the MultiResourceItemWriter creates a new resource after the commit interval if it reaches the count specified in the itemCountLimitPerResource property. Otherwise, the MultiResourceItemWriter creates a new resource the next time around.
Note
The MultiResourceItemWriter works also for flat files, not only for XML files. It can roll over any writer that implements ResourceAwareItemWriterItemStream.
This section ends our discussion on writing flat files and XML files. We saw how to write delimited and fixed-width flat files. We also discussed how to write XML files using the Spring OXM Marshaller interface. The next section focuses on how to write items into a relational database.
6.3. Writing to databases
In the Java world, you access relational databases with JDBC or an ORM tool. Spring Batch provides writers for both. Our use case for this section is to write Product objects into a relational database. We first look at the JDBC item writer.
6.3.1. Writing with JDBC
The JdbcBatchItemWriter class is an implementation of the ItemWriter interface for JDBC that sits on top of the Spring JDBC layer, which itself hides the complexities of using the JDBC API directly. The JdbcBatchItemWriter class uses JDBC’s batch features to execute a group of SQL statements all at once for an item set, as illustrated in figure 6.8.
Figure 6.8. Sending a batch of SQL statements to a relational database is more efficient than sending one query at a time.

The SQL batch size is equal to the commit interval configured in the chunk-oriented tasklet. Sending SQL statements to a database in a SQL batch is faster than sending them one at a time. Table 6.7 lists the properties of the JdbcBatchItemWriter class.
Table 6.7. JdbcBatchItemWriter properties
|
Property |
Type |
Description |
|---|---|---|
| assertUpdates | boolean | Whether to throw an exception if at least one item doesn’t update or delete a row; defaults to true |
| itemPreparedStatementSetter | ItemPreparedStatementSetter<T> | SQL statement parameter values from ? positional parameter markers |
| ItemSqlParameterSource Provider | ItemSqlParameterSourceProvider<T> | SQL statement parameter values from named parameters |
| sql | String | SQL statement to execute |
The main JdbcBatchItemWriter properties are sql and your choice of itemPreparedStatementSetter or itemSqlParameterSourceProvider. The ItemPreparedStatementSetter class executes SQL with ? parameter markers. The ItemSqlParameterSourceProvider class executes SQL statements with named parameters.
The following listing configures a JdbcBatchItemWriter to use a SQL statement with named parameters.
Listing 6.18. Configuring a JdbcBatchItemWriter with named parameters
<bean id="productItemWriter"
      class="org.springframework.batch.item.database.
   JdbcBatchItemWriter">
  <property name="assertUpdates" value="true" />
  <property name="itemSqlParameterSourceProvider">
    <bean class="org.springframework.batch.item.database.
   BeanPropertyItemSqlParameterSourceProvider" />
  </property>
  <property name="sql"
    value="INSERT INTO PRODUCT (ID, NAME, PRICE)
           VALUES(:id, :name, :price)" />
  <property name="dataSource" ref="dataSource" />
</bean>
You configure the JdbcBatchItemWriter with assertUpdates set to true, such that if a statement execution doesn’t update a row, Spring Batch throws an EmptyResultDataAccessException. The key point in a JdbcBatchItemWriter configuration is to set itemSqlParameterSourceProvider to a BeanPropertySqlParameterSource to bind item properties to SQL parameter names from JavaBeans properties. At runtime, the SQL parameter name called name (defined with :name in the SQL statement) is set to the Product name property. This is the best and fastest way to insert data in a relational database.
Another way to execute a SQL statement in Spring Batch is to use a JdbcBatchItemWriter with an ItemPreparedStatementSetter. The ItemPreparedStatementSetter interface lets you implement how a JDBC PreparedStatement matches your bean to tables and columns.
The following listing shows you how to implement an ItemPreparedStatementSetter.
Listing 6.19. Implementing an ItemPreparedStatementSetter
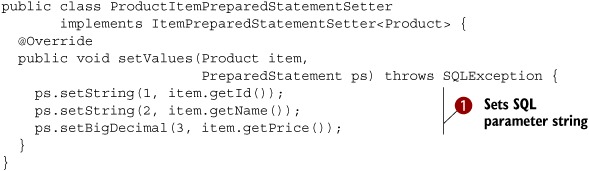
In this listing, you set a value for each SQL parameter ![]() from bean properties. Here, you use the JDBC API directly to set each SQL statement parameter. JDBC provides different methods
for different data types and can perform some conversions between data types on your behalf.
from bean properties. Here, you use the JDBC API directly to set each SQL statement parameter. JDBC provides different methods
for different data types and can perform some conversions between data types on your behalf.
Finally, you configure a JdbcBatchItemWriter with SQL ? positional parameter markers, as in the following listing.
Listing 6.20. Configuring a SQL statement with ? parameter markers
<bean id="productItemWriter" class="org.springframework.batch.item.
You set your ItemPreparedStatementSetter implementation, which binds SQL parameters with your custom code. Note that this statement uses ? positional parameter markers instead of named parameters.
You can configure a JdbcBatchItemWriter in two ways: with named and positional parameters, depending on your beans and database tables. The next section explores ORM tools, another way to interact with a relational database.
6.3.2. Writing with ORM
ORM provides a data persistence bridge between an object-oriented system and a database. ORM manages data I/O between objects and a database, and in Spring Batch, hides the data access layer, in this case, the JDBC layer. Spring Batch supports several ORMs with ItemWriter implementations: Hibernate, the Java Persistence API (JPA), and iBATIS.
In our case study, you use Hibernate to persist the Product objects to a table in the database. You first annotate the Product domain class with database mapping annotations, as described in the following listing.
Listing 6.21. Annotating a domain class for ORM
@Entity("product")
public class Product {
  @Id("id")
  private String id;
  @Column("label")
  private String label;
  @Column("description")
  private String description;
  @Column("price")
  private float price;
  (...)
}
The Entity annotation on the Product class specifies that the class maps to the product table in the database. The Id and Column annotations map instance variables to table columns using the database column name in the annotation values.
You must configure a HibernateItemWriter with a HibernateTemplate or a SessionFactory, as shown the following fragment:
<bean id="productItemWriter"
      class="org.springframework.batch.item.database.HibernateItemWriter">
  <property name="hibernateTemplate" ref="hibernateTemplate" />
</bean>
The following Spring Batch code fragment shows the core of the HibernateItemWriter class, which uses a Spring HibernateTemplate.
Listing 6.22. HibernateItemWriter implementation
(...)
protected void doWrite(HibernateOperations hibernateTemplate,
                       List<? extends T> items) {
  if (!items.isEmpty()) {
  for (T item : items) {
    if (!hibernateTemplate.contains(item)) {
      hibernateTemplate.saveOrUpdate(item);
    }
  }
}
@Override
public final void write(List<? extends T> items) {
  doWrite(hibernateTemplate, items);
  hibernateTemplate.flush();
}
(...)
In this implementation, Spring Batch checks if each item is a Hibernate entity and calls saveOrUpdate. The writer flushes the Hibernate session to synchronize the object model with the database.
If a Hibernate entity calls saveOrUpdate and isn’t already in the session, Hibernate executes a SQL SELECT to find the object in the database. If Hibernate finds the object, it executes a SQL UPDATE; if not, it executes a SQL INSERT.
Hibernate uses fetch strategies to determine how and when to retrieve objects. It uses fetch modes to fetch associations with an outer join, a SELECT or sub-SELECT, and for lazy or eager loading. This may create overhead compared to JDBC where you can control SQL statements directly.
Spring Batch also provides a JPA writer named JpaItemWriter that takes an EntityManagerFactory as a parameter, as described in the following configuration fragment:
<bean id="productItemWriter"
      class="org.springframework.batch.item.database.JpaItemWriter">
  <property name="entityManagerFactory" ref="entityManagerFactory" />
</bean>
You also need to configure the entity managed by JPA in META-INF/persistence.xml:
<persistence-unit name="product" transaction-type="RESOURCE_LOCAL">
  <class>com.manning.sbia.ch06.Product</class>
  <exclude-unlisted-classes>true</exclude-unlisted-classes>
</persistence-unit>
Spring Batch provides another ItemWriter based on iBATIS, the IbatisBatchItemWriter.
This section covered database item writers. We saw the Spring Batch implementations for JDBC, the JdbcBatchItemWriter, and one ORM implementation, the HibernateItemWriter. In the next sections, we focus on other targets like JMS and email senders.
6.4. Adapting existing services for reuse
Spring Batch supports other writers for other targets such as existing business services and JMS and email senders. To avoid reinventing the wheel, it’s a good idea to reuse existing business services. After discussing reuse, we see how to send an item in a JMS message and via email.
If you want to reuse existing services to implement an ItemWriter, Spring Batch provides helper classes.
The first helper class is the ItemWriterAdapter class used to delegate writing to another service. Let’s say you have an existing ProductService bean, which has a write(Product) method:
public class ProductService {
  public void write(Product product) {
    (...)
  }
}
You can reuse this class from an ItemWriterAdapter. The first step is to wire the existing bean to the adapter:
<bean id="productItemWriter"
      class="org.springframework.batch.item.
   adapter.ItemWriterAdapter">
  <property name="targetObject" ref="productService" />
  <property name="targetMethod" value="write" />
</bean>
<bean id="productService"
      class="com.manning.sbia.ch06.service.
   ProductService" />
You configure an ItemWriterAdapter with a targetObject, the service, and a targetMethod, the target method of the service.
If the service method is more complex, Spring Batch provides another ItemWriter to extract properties from an item bean. Let’s imagine another ProductService class with a write method that takes multiple arguments:
public class ProductService {
  public void write(String id, String name,
                    String description, BigDecimal price) {
(...)
  }
}
The PropertyExtractingDelegatingItemWriter class extracts data from an item and calls the target method with the extracted values. The following listing shows how to configure a PropertyExtractingDelegatingItemWriter.
Listing 6.23. Configuring a PropertyExtractingDelegatingItemWriter

You first define a productWriter bean ![]() using a PropertyExtractingDelegatingItemWriter. The property fieldsUsedAsTargetMethodArguments defines the item properties to use as arguments when calling the target method
using a PropertyExtractingDelegatingItemWriter. The property fieldsUsedAsTargetMethodArguments defines the item properties to use as arguments when calling the target method ![]() .
.
The ItemWriterAdapter and PropertyExtractingDelegatingItemWriter help reuse existing services. If this isn’t enough for your use cases, you can create more solutions by reusing existing services, as discussed in section 5.6.1, “Services as input.”
Before describing custom writer implementations, we implement and configure writing data using a message-oriented middleware (MOM) broker like JMS. We also see how to send emails for items.
6.5. Writing to JMS
A MOM broker allows you to send messages asynchronously to other applications (see figure 6.9). For example, a writer can send products to a billing information system.
Figure 6.9. An application puts messages on a JMS queue with a JMS item writer. Applications often use JMS to communicate with each other in a decoupled and asynchronous way.

Spring Batch includes the JmsItemWriter class, which you can use without writing any Java code, only XML configuration, as shown in the following listing.
Listing 6.24. Configuring a JmsItemWriter
<amq:connectionFactory id="jmsFactory"
     brokerURL="tcp://localhost:61616"/>
<amq:queue id="productDestination"
           physicalName="destination.product" />

<bean id="jmsTemplate" class="org.springframework.jms.
   core.JmsTemplate">
  <property name="connectionFactory" ref="jmsFactory" />
  <property name="defaultDestination" ref="productDestination" />
  <property name="receiveTimeout" value="500" />
  <property name="sessionTransacted" value="true" />
</bean>

<bean id="productItemWriter" class="org.
   springframework.batch.item.jms.JmsItemWriter">
  <property name="jmsTemplate" ref="jmsTemplate" />
</bean>
You first configure the connection parameters to the JMS Server and set the JMS queue name where the application will send JMS messages. You also create a Spring JmsTemplate to create JMS messages more easily. Finally, you configure an ItemJmsWriter with the JmsTemplate.
Spring Batch makes it easy to send items to other applications through a MOM broker. Before implementing a custom writer, we see how an item writer sends email messages.
6.6. Sending email messages
Spring Batch provides an ItemWriter to send emails, the SimpleMailMessageItemWriter. For this use case, you have a file (it could also be a database table) containing information about new users, and you want to send each a welcome email message. The following snippet lists the content of the customer flat file:
CLIENT_ID,NAME,EMAIL
1,Mr. White,[email protected]
2,Mr. Orange,[email protected]
3,Mr. Pink,[email protected]
4,Mr. Blue,[email protected]
5,Mr. Brown,[email protected]
Figure 6.10 illustrates a Spring Batch application that sends an email message for each customer in the input file.
Figure 6.10. Sending an email message for each customer in an input file. Because Spring Batch’s email item writer only takes care of sending email, it’s common practice to use an item processor to convert read items into ready-to-be-sent SimpleMailMessage or MimeMessage objects.

The job reads the flat file and creates a Customer object for each input line. After that, you use an ItemProcessor to convert each Customer to a SimpleMailMessage (a Spring support class,) as described in the following listing.
Listing 6.25. Converting a Customer to SimpleMailMessage

You implement an ItemProcessor to create new SimpleMailMessage objects from Customer objects ![]() . The process method takes a Customer item, creates a new email message, and sets the message fields From, To, Subject, and Body.
. The process method takes a Customer item, creates a new email message, and sets the message fields From, To, Subject, and Body.
The following listing configures a SimpleMailMessageItemWriter.
Listing 6.26. Configuring a SimpleMailMessageItemWriter

First, you create a JavaMailSenderImpl ![]() , a bean to send mail required for the writer. You configure a chunk with a processor to convert Customer items to SimpleMailMessage objects
, a bean to send mail required for the writer. You configure a chunk with a processor to convert Customer items to SimpleMailMessage objects ![]() . Finally, you configure the SimpleMailMessageItemWriter and its mailSender property
. Finally, you configure the SimpleMailMessageItemWriter and its mailSender property ![]() .
.
In this section, we saw how to send messages to a mail server. The next section focuses on implementing your own item writers.
6.7. Implementing custom item writers
If none of the built-in Spring Batch ItemWriters matches your requirements, you can create your own. For example, you may want to create your own JDBC item writer. The following listing shows an example implementation.
Listing 6.27. Creating a custom JDBC ItemWriter
public class JdbcProductItemWriter implements ItemWriter<Product> {
  String INSERT_PRODUCT =
        "INSERT INTO PRODUCT (ID,NAME,DESCRIPTION,PRICE) VALUES(?,?,?,?)";
  String UPDATE_PRODUCT =
        "UPDATE PRODUCT SET NAME=?, DESCRIPTION=?, PRICE=? WHERE ID = ?";
  private JdbcTemplate jdbcTemplate;

  public void setJdbcTemplate(JdbcTemplate jdbcTemplate) {
    this.jdbcTemplate = jdbcTemplate;
  }

  @Override
  public void write(List<? extends Product> items) throws Exception {
    for (Product item : items) {
      int updated = jdbcTemplate.update(
                        UPDATE_PRODUCT,
                        item.getName(),
                        item.getDescription(),
                        item.getPrice(),
                        item.getId());
      if (updated == 0) {
        jdbcTemplate.update(
                        INSERT_PRODUCT,
                        item.getId(),
                        item.getName(),
                        item.getDescription(),
                        item.getPrice());
      }
    }
  }
}
This JDBC example class implements the ItemWriter interface. The configuration injects a JdbcTemplate to take advantage of Spring JDBC. The write method updates or inserts a row in the product table. If the UPDATE statement returns zero rows affected, then you insert a new row in the table.
To be complete, the item writer should be restartable. Imagine the system crashes when a job is writing to a file. On a restart, if the reader can start reading where it left off, the writer should also be able to resume its writing exactly where it was interrupted. You should care about restartability on the writer side mainly for file-based writers (good news: the implementations Spring Batch provides are restartable). Database-based writers are usually automatically restartable: they just write the items the reader pushes. So restartability is a reader concern in this case.
This section completes our presentation of custom writers. The next section discusses advanced writing techniques.
6.8. Advanced writing techniques
You’ve seen how to use the item writers provided by Spring Batch and how to implement your own item writer. In this section, you learn more about Spring Batch item writers. To implement a complex job, it may be necessary to create something more complex than a custom item writer. You may need to chain writers to write to different targets. You may also need to choose between several writers, depending on the item.
6.8.1. Composing item writers
Spring Batch can configure only a single item writer for a chunk-oriented tasklet, and sometimes you need multiple writers for the same chunk. The classic Composite pattern provides this functionality. A composite wraps a set of objects and presents them as a single object. Figure 6.11 illustrates a CompositeItemWriter containing a set of item writers.
Figure 6.11. A composite item writer delegates writing to a list of item writers. Use this pattern to send items to several targets, like a database and a file.

The following listing configures a CompositeItemWriter with two delegate item writers.
Listing 6.28. Configuring a CompositeItemWriter
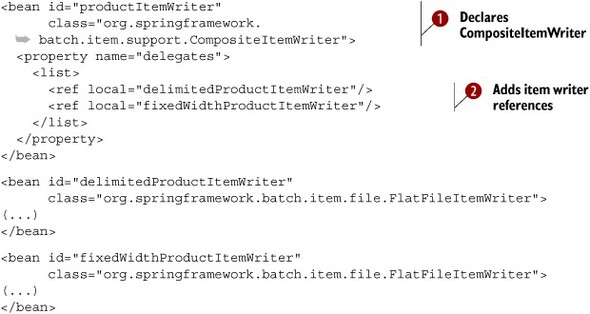
You first create a CompositeItemWriter ![]() with its delegates property set to a list of a item writers
with its delegates property set to a list of a item writers ![]() . This composite calls each item writer in the configured order. This technique allows the job to write items to multiple
files in different formats. This technique also allows the job to write items in both files and relational databases, all
from one composite item writer. The next section discusses a more complex topic: how to route an item to a specific item writer.
. This composite calls each item writer in the configured order. This technique allows the job to write items to multiple
files in different formats. This technique also allows the job to write items in both files and relational databases, all
from one composite item writer. The next section discusses a more complex topic: how to route an item to a specific item writer.
6.8.2. Routing items to specific item writers
In this section, we discuss a more complex use case: how to route items to specific item writers on the basis of some criteria. In the following input file, the column called OPERATION represents an operation to execute: C to create, U to update, and D to delete:
PRODUCT_ID,NAME,DESCRIPTION,PRICE,OPERATION
PR....210,BlackBerry 8100 Pearl,,124.60,C
PR....211,Sony Ericsson W810i,,139.45,D
PR....212,Samsung MM-A900M Ace,,97.80,U
PR....213,Toshiba M285-E 14,,166.20,C
For this use case, you want to route each product item to an item writer, depending on the value of a Product’s operation. The operation determines whether to create, update, or delete a product in a relational database. Figure 6.12 shows this use case.
Figure 6.12. Routing a Product item to a specific writer
One of the building blocks Spring Batch provides to implement this type of use case is an interface called Classifier. You implement a Classifier to map an input object of type C to another object of type T:
public interface Classifier<C, T> {
  T classify(C classifiable);
}
The ClassifierCompositeItemWriter class is an ItemWriter implementation that wraps a Classifier. This Classifier takes an object and returns an ItemWriter for objects of the same type.
The BackToBackPatternClassifier class is a Classifier implementation for mapping arbitrary objects to other objects using pattern matchers. We call this type of classifier a router.
Now that you have some good building blocks, let’s see how to use these types for our use case. First, you create the router, which is a Classifier, to return the operation value for a given Product:
public class ProductRouterClassifier {
  @Classifier
  public String classify(Product classifiable) {
    return classifiable.getOperation();
  }
}
You can create a class that implements the Classifier interface or use the @Classifier annotation to return the product operation value. This example uses the @Classifier annotation.
You now have all the pieces needed to configure a BackToBackPatternClassifier to get an item writer for a given product operation:
<bean class="org.springframework.batch.classify.
The BackToBackPatternClassifier uses a router to get a key value to get the matching item writer.
The following listing shows the complete configuration for your BackToBackPatternClassifier routing use case.
Listing 6.29. Configuring a routing BackToBackPatternClassifier
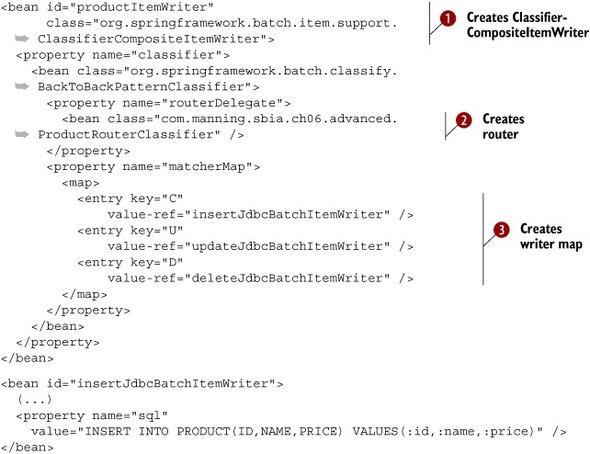
This configuration defines a productItemWriter bean as a ClassifierCompositeItemWriter ![]() . This item writer sets its classifier property to a BackToBackPatternClassifier, which delegates to the router in the routerDelegate property defined as a custom ProductRouterClassifier
. This item writer sets its classifier property to a BackToBackPatternClassifier, which delegates to the router in the routerDelegate property defined as a custom ProductRouterClassifier ![]() . This router maps Product operations to an item writer that does the work
. This router maps Product operations to an item writer that does the work ![]() . Phew!
. Phew!
This section completes our presentation of advanced writing techniques. You can now use and implement your own ItemWriters. You can also route domain objects to specific item writers. Spring Batch can indeed deal with some complex writing use cases.
6.9. Summary
Writing data is the last step in a chunk-oriented tasklet. Spring Batch offers a simple interface, the ItemWriter, to implement this task and provides implementations for different delimited and fixed-width flat files, XML files, JDBC, and ORM. For ORM, we saw how to write to Hibernate.
We studied how to write items reusing legacy services, how to write items to a JMS queue, and how to send emails for items. We also saw how to implement a custom item writer. Finally, we discussed advanced writing techniques, the use of the composite pattern, and how to route a domain object to an item writer on the basis of various criteria.
In chapter 7, you learn how to process data, the middle section of a chunk-oriented step.