
Chapter 21. Licensing Your Application
Proper .NET content licensing can mean the difference between marketplace dominance and financial bankruptcy. And I’m just talking about trying to understand the license agreement that comes with Visual Studio. You still have to figure out a licensing method for your own application before you send it to your customers.
Licensing and license agreements are an essential means of protecting the intellectual property you’ve worked so hard to develop. How does licensing work? The key is found in the roots of the word itself: “license” comes from “li-” (to tell a lie) and “-cense” (from “cents” as in “pennies”). Together, these roots mean “to tell lies about small units of currency.” The confusion brought about in trying to figure out what this means keeps the bad guys confused and occupied long enough so that they don’t steal your application.
If this method doesn’t work, there are software solutions, some of which we examine in this chapter. Part of the discussion focuses on designing a licensing system that we will add to the Library Project. The .NET Framework does include classes for component licensing, but they are primarily used for designers of controls used by other programmers within the Visual Studio IDE, and not for end-user applications. We will not be covering these licensing features in this chapter. If you’re curious about such features, start by reading about the License Compiler (lc.exe) in the Visual Studio online help.
Software Licensing Options
Back in the early days of software, licensing wasn’t an issue: If you could get to the computer, it was because you were authorized. All user interaction with the system was through the programmers and technicians. If some user wanted to steal something, it would be in the form of 20 tons of steel, wires, and vacuum tubes. Fun? Yes. Easy? No.
Today, it’s a different story. Most users are non-technical, and some are unethical. So now we have licensing agreements and teams of lawyers to back it all up. But we also have software, software that can delicately enforce some of the rules. For a particular piece of software, there is still the question of, “How much licensing enforcement code do I add to my application?” The amount of software control you include will fall somewhere in the “freedom-security” continuum shown in Figure 21-1.
Figure 21-1. The licensing enforcement continuum: where are you on it?

If you go for the Freedom end of the spectrum (convenient for users and hackers), you will have to go on the trustworthiness of your users, and any armed guards you have dispatched to their offices, to keep the program in compliance. At the Security end of the scale (secure for programmers and highly paid law firms), the software implements practices and policies that ensure only licensed users of the application ever use or install it; no armed guards needed.
The rest of this section discusses some possible options you could choose within the Freedom-Security range.
License Agreement Only
The license-agreement-only method clearly opts for freedom over security. When you supply the user with software, it comes with a carefully crafted license agreement that lays out the terms of use for both the user and the software supplier. It generally gives the user certain rights as to installation, use, and distribution of the software.
When you write an application for use only within a specific organization or by a small group of users whom you will have regular contact with, the license-agreement-only method may be just what you need. In fact, I would bet that the majority of Visual Basic applications are in this vein. Microsoft has announced over the years that the vast majority of Visual Basic programmers target their applications for use in a specific business organization, tied to a specific custom database. Such systems often require very little in the way of license enforcement, because the application is useless when carried outside the building where it was meant to reside.
Even if your software achieves widespread distribution, this licensing scheme may still be the way to go. Many shareware applications, including a major operating system that rhymes with “Plinux,” use the Free Software Foundation’s GNU General Public License (http://www.fsf.org/licensing/licenses/gpl.html) as their primary licensing and distribution policy.
Generated General License Key
If you need a bit more control over the distribution, installation, and use of an application, you can impose a generated general license key—basically a password that allows the application to be installed or used. Such keys are often entered at the start of the installation process, with the user prompted for a specific key. Without the key, it’s goodbye installation.
The software vendor will need a way to generate a good set of unique installation keys. There are a few options.
- Just generate a sequential serial number, and mix into it a product ID and version number. The great thing about such a key is that it is easy to generate. The installation program doesn’t need to perform any complex verification logic on the key. It only needs to ensure that the general format is correct. One of the products I used to develop online help documentation for my older Visual Basic 6.0 applications used such a license key. In a way, it’s not much more secure than using just a license agreement, because anyone who knows the general format can make up their own key.
- Use a hashed or scrambled key, based on some original serial number or formula that can be verified by the installation program. A well-crafted hashing algorithm can generate a wide range of keys, but make it difficult for others who don’t know the formula to generate their own fake keys. Although I am not privy to Microsoft’s internal processes, this appears to be the method they use for their 25-character “CD Keys,” including the one supplied with Visual Studio. Although it is difficult for keys to be invented out of whole cloth, the public nature of the keys makes them subject to sharing. For some of its products, Microsoft combines a CD key with an online or phone-based registration process to enhance security.
- Supply a hashed or encrypted key based on a serial number that is (secretly) supplied with the installation program or distribution media. When the user enters the key, it is unencrypted or otherwise prepared, and then compared with the serial number. Only if it matches will the software installation complete properly.
Generated Custom License Key
A custom-generated license key is similar to a general generated key, but uses personal information supplied by the user as part of the generation process. Such a key is more interactive, and requires that the end user specifically communicate with the software vendor (or an application on its web site) to complete the installation process.
During the purchase or installation process, the user makes specific information (such as the owner’s name and the date of purchase) available to the software vendor. The vendor then uses public-private key encryption (asymmetric cryptography) to either fully encrypt or digitally sign the relevant information. The encrypted signature is then returned to the end user for installation. The installation process uses the public portion of the key pair to ensure that the signature is valid.
We will use this license key method in the Library Project, so I’ll have more to say about it a little later.
License Key with Hardware Identity or Lock
For paranoid software vendors, or for those who have a legitimate need to keep a tight rein on their installation base, there are solutions that involve regular access to hardware or services to confirm that previously installed software is legal and valid. One popular method uses a “dongle,” typically a USB port-based device that the software must have access to each time it runs. The software vendor supplies a dongle with the licensed software, and may encode it with date-based or use-based limits.
With the prevalence of the Internet, software vendors also have the option of real-time verification over the Web. Each time the program runs, it could access a known vendor site, and use XML Web Services or a similar method to engage in a usage verification process. Such a system allows for ongoing monitoring of the software by vendors who may have a business or governmental reason to limit use of the software.
For one of my customer projects, I must access a third-party web site on a monthly basis and download proprietary data for use with that vendor’s software. The vendor requires that I always access their web site from a specific machine with a specific IP address. It will refuse to supply the data if I attempt to connect from any other machine. If I have a real need to use a fresh IP address (if, for example, I change Internet Service Providers), I must submit paperwork to the vendor informing them of the new IP address. It seems pesky, and it is an irritation. But the data they supply is unique and valuable, and they feel they have a business need to protect that investment. Because my customer requires the data, I have no choice but to comply with the monthly verification procedures.
Controlled Access
The highest level of security requires a blatant distrust of the user, although there may be good reason for this. For highly sensitive applications, the software vendor may make their product available to only a limited number of customers, and then only on a lease basis. As part of the lease agreement, the customer agrees to have a trained staff member of the software vendor on-site, running and maintaining the application for the customer. At the very least, the vendor will require that one of its employees be immediately available to the customer whenever the application is used.
In a world of off-the-shelf software applications, it seems unconscionable that such a system could exist. But in high-risk situations, security concerns are raised to such a level that neither party is willing to fully assume the risks of installing and using the application apart from the other.
Although I was tempted to use this system for the Library Project, I think we’ll stick with our original plan of employing a custom-generated license key.
License Agreements
A license agreement is a document wherein the party of the first part hereby and does amicably render to the party of the second part certain rights, quid pro quos, treasury bonds, and other benefits; in exchange, the party of the second part will do the same for the party of the first part without respect for any other party or festival.
Let’s try that again. A license agreement tells a user, “go ahead, install and use the software, but you have to follow these rules.” Although they are often written in legalese, they can also appear in a real language, such as English. They also range in granted rights, from “you can use this, but when you’re finished, you must destroy all copies” to “use it, and feel free to pass a copy of the program and its source code to your friends and relations.”
The Library software provided with this book comes with a license agreement. (I’ve included it in Appendix B, “Software License Agreement.”) When you installed the sample code, you agreed to the terms of the license agreement, including the part about supporting my family financially well into my retirement years. But enough about me; let’s talk about license agreements you may want to use for your applications.
If you’re developing a DVD catalog program for your cousin Fred, you can probably skip the license agreement part. But any software you craft in a business capacity for use outside of your own company should include some sort of agreement between you (or your company) and the user of the software. This agreement could be defined as part of the contract that established the software development project (this is typical for software consulting), or you could include the agreement as a component of the software (common for off-the-shelf programs).
Whichever method you choose, it is important that you state it in written form, because it can save you grief down the road. I once had a customer who insisted that I fork over a copy of the source code for an application I wrote for them, so that they could enhance it and sell the new version to other businesses (the nerve!). Fortunately, we had a written contract that stated the rules of engagement. They were entitled to a copy of the source code for archive purposes, but they could not use it or derive products from it without written consent from me. This granted a level of safety for them while still providing the means for me to provide the best support possible for their organization. Fortunately, it all came to a happy conclusion, and because that Visual Basic 3.0 code doesn’t even run anymore, it’s a moot point.
A license agreement usually exists to protect the rights of the software vendor, but it would be useless if it didn’t also grant meaningful rights to the user—and some of the rights can be rather generous. Did you know that the standard consumer licensing agreement for Microsoft Office allows you to install the product on two different systems using a single licensed copy of the program? It’s not a complete install-fest. Both computers must belong to the same person, and one must be a desktop while the other is a portable device (a laptop). But it’s still a meaningful benefit to the typical user.
The legal department at Addison-Wesley wants to remind you that Tim Patrick does not have a sufficient understanding of the law, and cannot advise you on the contents of any licensing agreement you may want to craft for your projects.
Obfuscation
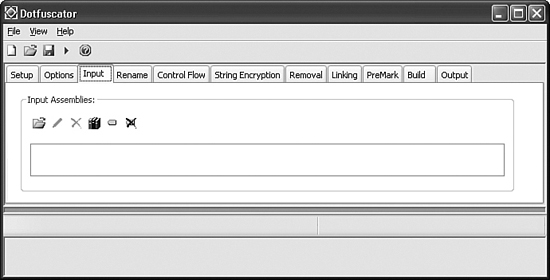
I hinted a little about the obfuscation features in Visual Studio 2005 in Chapters 1, “Introducing .NET,” and 5, “.NET Assemblies,” but it’s high time we actually took a look at the features. Visual Studio includes a stripped-down version of Dotfuscator from a company named PreEmptive Solutions (not a part of Microsoft—yet). To access the program, use the Tools ![]() Dotfuscator Community Edition menu command in Visual Studio. The main interface appears in Figure 21-2.
Dotfuscator Community Edition menu command in Visual Studio. The main interface appears in Figure 21-2.
Figure 21-2. It’s time to obfuscate!
Note
As of this writing, Dotfuscator Community Edition is not included with Visual Basic 2005 Express Edition.
Even though this is the basic version of the product, you can see that it has a gazillion options. If you want to dive into its enhanced features for your project, that’s fantastic. I’ll just cover the basic usage here.
Let’s recall quickly why you would want to obfuscate your code, or even use the word “obfuscate” in mixed company. Here’s some code from the Library project.
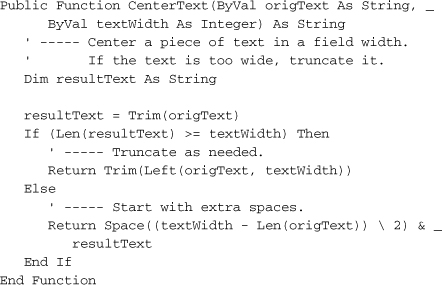
This code is quite easy to understand, especially with the comments and the meaningful method and variable names. Although .NET obfuscation works at the MSIL level, let’s pretend that the obfuscator worked directly on Visual Basic code. Obfuscation of this code might produce results similar to the following.
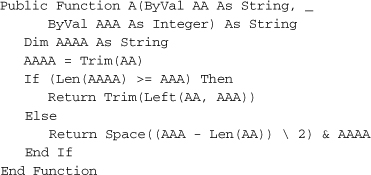
In such a simple routine, we could still figure out the logic, but with more effort than in the original version. Naturally, true obfuscation goes much further than this, scrambling the readability of the code at the IL level, and confounding code readers and hackers alike.
To obfuscate an assembly:
- Build your project in Visual Studio using the Build
 Build [Project Name] menu command.
 - Start Dotfuscator using the Tools Dotfuscator Community Edition menu command in Visual Studio.
- When prompted for a project type, select Create New Project, and click the OK button.
- On the Input tab of the Dotfuscator application window, click the Browse and add assembly to list toolbar button. This is the leftmost button—the one that looks like a file folder with a small arrow above it—on the panel shown earlier in Figure 21-2.
- When prompted for an assembly file, browse for your compiled application, and click the OK button. The assembly to use will be in the binRelease subdirectory within your project’s source code directory.
- Select the File Build menu command to generate the obfuscated assembly. You will be prompted to save the Dotfuscator project file (an XML file) before the build begins. Save this file to a new directory. When the build occurs, it will save the output assembly in a Dotfuscated subdirectory in the same directory that contains the XML project file.
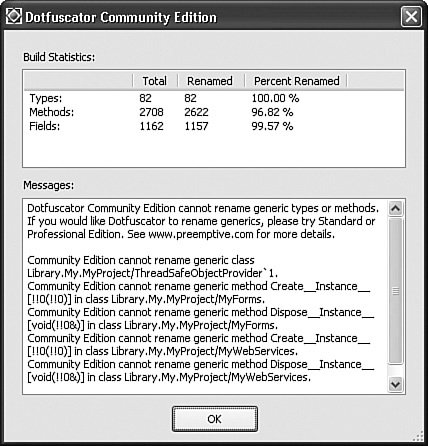
- The build completes, and a summary appears as shown in Figure 21-3. Your obfuscated file is ready to use. The process also generates a Map.xml file that documents all the name changes made to types and members within your application. It would be a bad thing to distribute this file with the assembly. It is for your debugging use only.
Figure 21-3. Summary of the obfuscation, with some advertising thrown in
To prove that the obfuscation took place, use the IL Disassembler tool that comes with Visual Studio to examine each assembly. (On my system, this program is accessed via Start ![]() [All] Programs
[All] Programs ![]() Microsoft .NET Framework SDK v2.0
Microsoft .NET Framework SDK v2.0 ![]() Tools
Tools ![]() MSIL Disassembler.) Figure 21-4 shows the global variables included in the Library Project’s General.vb file. The obfuscated version of these same variables appears in Figure 21-5.
MSIL Disassembler.) Figure 21-4 shows the global variables included in the Library Project’s General.vb file. The obfuscated version of these same variables appears in Figure 21-5.
Figure 21-4. Global variables before obfuscation
Figure 21-5. Global variables after obfuscation
I will not be performing obfuscation on the Library Project through this book’s tutorial sections. Feel free to try it out on your own.
The Library Licensing System
The tools and procedures we will use to design the Library Project’s licensing system can be built from features already discussed in previous chapters.
- The license file contains XML content. (Chapter 13, “XML”)
- The license appears as a separate file in the same directory as the Library.exe assembly. The Library software reads content from the license file. (See Chapter 15, “Files and Directories.”)
- The license will include a digital signature, which is based on public-private key encryption. (See Chapter 11, “Security.”)
Each time the Library application starts up, it attempts to read the license file. If the file doesn’t exist, or if it contains invalid data or an invalid signature, the program downgrades its available features, disabling those features that are considered licensed.
Designing the License File
The Library Project’s license file contains some basic ownership and rights information related to the user who purchased rights to the software. Here’s the XML content I’ve come up with.
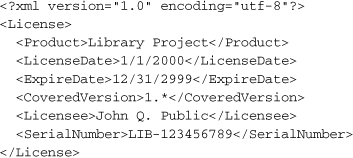
That seems sufficient. The process that builds the digital signature also stores an encrypted signature within the XML content.
Generating the License File
In the “Project” section of this chapter, we’ll build a new application that exists solely to generate license files for the Library application. It will have three primary components.
- Generate and manage the public and private keys used in the signature process.
- Prompt the user for the license date, expiration date, covered version, licensee name, and serial number for a single license. These are the values that appear in the license file’s XML content.
- Output the XML license file and digitally sign it using the private key.
Installing the License File
The “Project” portion of this chapter will show you how to generate a generic license file. This XML file will be distributed and installed with the Library application using the setup program that we will build in Chapter 24, “Deployment.” The file will be named LibraryLicense.lic (by default), and will always appear in the same directory as the Library.exe application file.
If I were developing a real application for paying customers, and I had a web site that supported XML Web Services (which I’ll talk about in Chapter 22, “Web Development”), here is one design for installing the license file that I might use.
- Run the Setup program to install the application on the user’s workstation.
- During installation, the Setup program prompts the user for the license details that will ultimately appear in the XML license file.
- The Setup program contacts an XML Web Service on my vendor web site, and passes the user-supplied values to that registration service.
- The registration service returns a digitally signed XML file that contains the licensing content.
- The Setup program installs this file along with the application.
- If for any reason the licensing cannot complete successfully during Setup, the main application contains identical licensing code, and can communicate with the registration service itself.
Using the License File
Whenever the Library application runs, it reads in the XML license file, and performs many checks to ensure that the license is valid for the current application installation. If the license is invalid for any reason, the application blocks access to the enhanced administrative features included in the Library system.
Summary
Because you will often spend dozens or hundreds of hours designing and developing a quality Visual Basic application, it is important to use appropriate licensing and obfuscation technology to protect your hard work. Licensing is another one of those common programming tasks that didn’t make it into the .NET Framework as an easy-to-use class—unless you are building and distributing design-time controls. For the rest of us, it’s make-it-up-as-you-go time. Fortunately, .NET has great support tools, so adding licensing support isn’t too difficult.
Project
In this chapter’s project code, we’ll follow two of the four licensing steps discussed in the “Library Licensing System” section of this chapter: generating the license file and using the license file. The design we created previously is good enough for our needs, although we still need to record it in the project’s technical documentation. We won’t formally install the license file until we create the Setup program in Chapter 24.
Update Technical Documentation
Because we’ll be adding a new external file that will be processed by the Library Project, we need to document its structure in the project’s Technical Resource Kit. Let’s add the following new section to that document.
Report Configuration File
The Library Project reads a customer-specific license file generated by the Library License Generation support application. That program generates a digitally signed XML license file that includes licensee information. Here is a sample of the license file content.
The <LicenseDate> and <ExpireDate> tags indicate the first and last valid dates of the license. <Licensee> indicates the name of the license owner. <SerialNumber> includes the vendor-defined serial number associated with this license. The <CoveredVersion> tag contains data similar to the assembly version number included in .NET applications. It has up to four dot-delimited parts:
<major>.<minor>.<build>.<revision>
Each component can include a number from 0 to 9999, or the “*” character, which indicates all valid values for that position.
The <Signature> section contains the generated digital signature. Its format is dependent on the XML Cryptography tools in .NET that generate this section. Always use the Library License Generation support application to build license files, to ensure a proper digital signature.
That support application generates a public and private key pair for use in digital signing. The public portion of this key (as an XML file) must be added as a resource named LicensePublicKey to the Library application. The private portion must be kept private. For consistency, the same key-pair should be used throughout the lifetime of the Library Project’s availability.
We will also store the location of the license file as an application setting in the main program. We need to record that setting with the other application settings already added to the User Settings section of the Resource Kit.
Library License Helper Application
Generating license files and digital signatures by hand using Notepad would be . . . well, let’s not even think about it. Instead, we’ll depend on a custom application to create the files and signatures for us. I’ve already developed that custom tool for you. You’ll find it in the installation directory for this book’s code, in the LibraryLicensing subdirectory.
This support application includes two main forms. The first (KeyLocationForm.vb, shown in Figure 21-6) locates or creates the public-private key files used in the digital signature process.
Figure 21-6. Support form for digital signatures
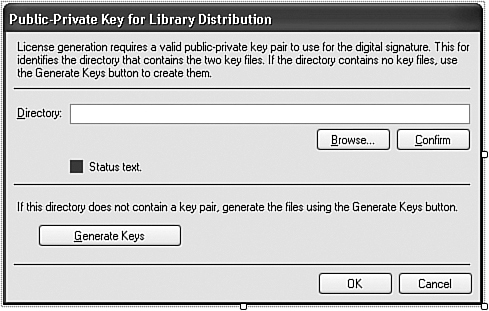
Most of the form’s code helps locate and verify the folder that will contain the two key files (one private, one public). Some of the code in the ActGenerate_Click event handler creates the actual files.
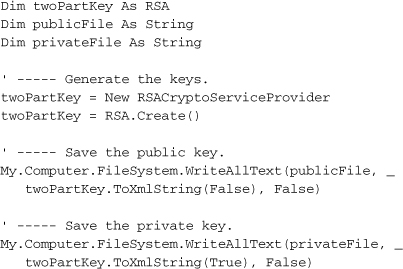
That’s really simple! The System.Security.Cryptography.RSA class and the related RSACryptoServiceProvider class do all the work. All you have to do is call the RSA.Create method, and then generate the relevant XML keys using the ToXmlString method, passing an argument of False for the public key, and True for the private key. If you want to look at some sample keys, open the LicenseFiles subdirectory in this book’s source installation directory. You’ll find two files, one for the public key and one for the private key. I’d print one of them here, but it all just looks like random characters.
The other support form is MainForm.vb, which generates the actual end-user license file, and appears in Figure 21-7.
Figure 21-7. Support form for license file generation
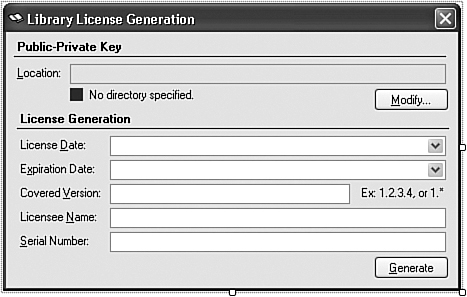
As with the first form, most of this form’s code simply ensures that the public and private key files are intact, and that the user entered valid data before generation. The ActGenerate_Click event handler is where the real fun is. First, we need some XML content, which we build in the BuildXmlLicenseContent method. It creates the content element by element, using the methods we learned about in Chapter 13. For instance, here’s the part of the code that adds the serial number.
![]()
Then comes the digital signature, via the SignXmlLicenseContent function, most of which appears here.
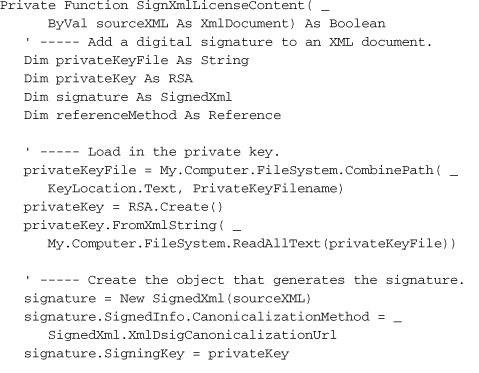
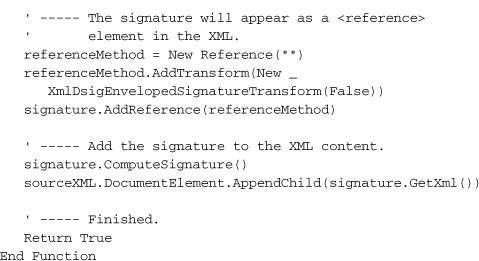
Digital signing occurs via the SignedXml class (in the System.Security.Cryptography.Xml namespace). This class uses a few different signing methods; the one I chose (XmlDsigCanonicalizationUrl) is used for typical XML and ignores embedded comments.
This signature appears as tags and values in the XML output, added through the AppendChild statement near the end of the routine. Because we don’t want the signature itself to be considered when we later scan the XML file for valid content, the SignedXml class adds the signature as a <reference> tag. This occurs in code by adding a Reference object that is programmed for that purpose. It’s added through the signature.AddReference method call.
Once we have the signature in the XML content, we write it all out to a file specified by the user via the standard XmlDocument.Save method (in the ActGenerate_Click event handler).
licenseXML.Save(LicenseSaveLocation.FileName)
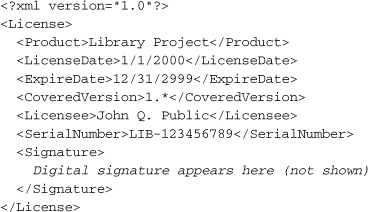
Here’s a sample XML license file that includes a digital signature. This is the one that I have included in the LicenseFiles directory in the book’s source installation directory (with some lines wrapped to fit this page).
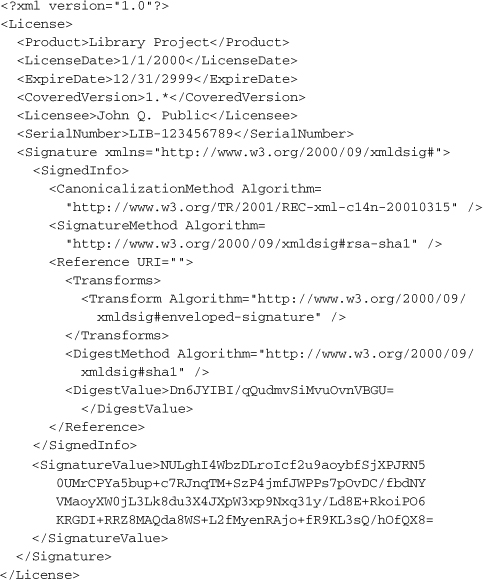
The digital signature appears as the scrambled content within the <SignatureValue> tag. Now, if anyone tries to modify any of the license values, the license will no longer match the signature, and the entire license will become invalid.
Instead of using a digital signature, we could have just encrypted the entire licensing file with the private key, and later used the public key to decrypt it and examine its contents. But I like the digital signature better, because it allows anyone to open up the license file and check the parameters of the license itself while still preventing any changes.
Adding the License to the Library Program
Let’s return to the Library application already in progress.
Project Access
Load the “Chapter 21 (Before) Code” project, either through the New Project templates, or by accessing the project directly from the installation directory. To see the code in its final form, load “Chapter 21 (After) Code” instead.
The program will adjust its behavior depending on whether it is licensed or not. But to make that determination, it needs to ensure that the contents of the licensing file are valid and haven’t been tampered with. To do this, it needs a way to unscramble the signature, and compare it with the rest of the license to make sure it matches. We built the signature using the private key; we must unscramble it using the public key.
We could store the public key in its own file outside of the program, but then it might get lost (just like my real keys). Instead, we’ll store the public key as an application resource, found externally in the source code’s Resources folder. I’ve already added the resource to your copy of the program, and named it LicensePublicKey. With this key embedded in the application, any regeneration of the public and private keys will require modification of this resource. In code, we refer to the XML content of the public key using its resource name.
My.Resources.LicensePublicKey
Some of the security features use classes found in the System.Security.Cryptography.Xml namespace. This is not one of the namespaces included by default in new Visual Basic applications, so we’ll have to add it ourselves. Open the project properties window, and select the References tab. Just below the list of References, click the Add button, and then select System.Security from the .NET tab of the Add Reference window that appears.
Because the project properties window is still open, click over to the Settings tab. Add a new String setting and use “LicenseFileLocation” for its name. We’ll use this setting to store the path to the license file. Save and close the project properties window.
Our general licensing needs throughout the application are pretty simple. We only need to know the current status of the licensing file, and have access to a few of the licensing values so that we can display a short message about the license. We may need to do this in various parts of the program, so let’s add some useful generic code to the General.vb module. Open that module now.
Right at the top of that file, the code already includes a reference to the System.Security.Cryptography namespace, because we include code that encrypts user passwords. But this doesn’t cover the standard or secure XML stuff. So add two new Imports statements as well.
Insert Snippet
Insert Chapter 21, Snippet Item 1.
Imports System.Xml
Imports System.Security.Cryptography.Xml
We’ll use an enumeration to indicate the status of the license. Add it now to the General module.
Insert Snippet
Insert Chapter 21, Snippet Item 2.

Let’s also add a simple structure that communicates the values extracted from the license file. Add this code to the General module.
Insert Snippet
Insert Chapter 21, Snippet Item 3.

By default, the license file appears in the same directory as the application, using the name LibraryLicense.lic. Add a global constant to the General module that identifies this default name.
Insert Snippet
Insert Chapter 21, Snippet Item 4.
Public Const DefaultLicenseFile _
As String = "LibraryLicense.lic"
All we need now is some code to fill in the LicenseFileDetail structure. Add the new ExamineLicense function to the General module.
Insert Snippet
Insert Chapter 21, Snippet Item 5.
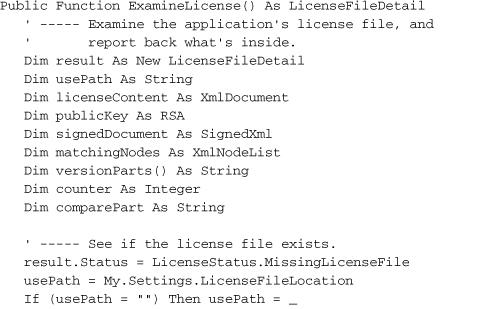
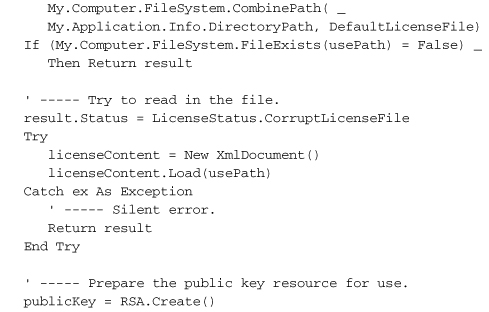
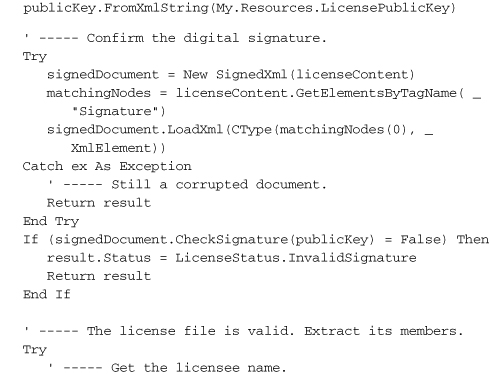
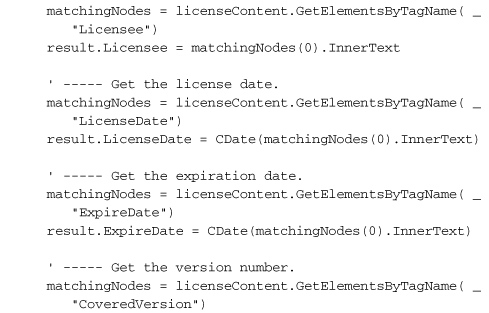
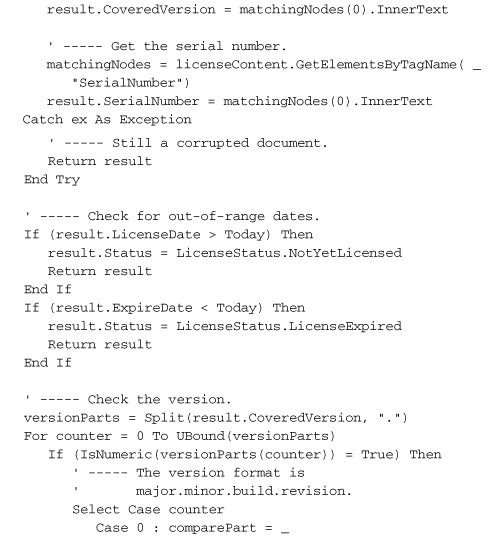
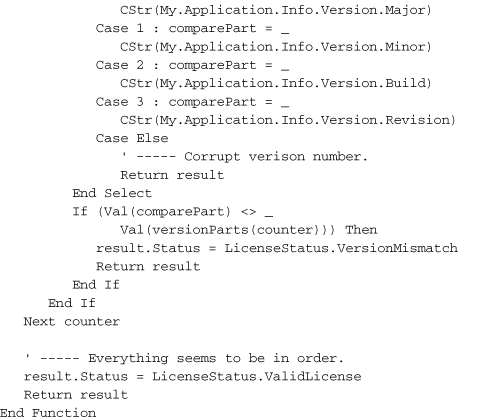
That’s a lot of code, but most of it just loads and extracts values from the XML license file. The signature-checking part is relatively short.
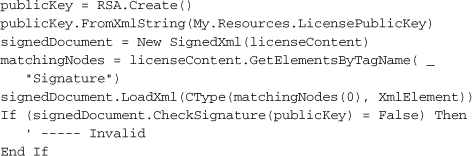
The SignedXml object—which we also used to generate the original license file—needs to know exactly which of the XML tags in its content represents the digital signature. You would think that having an element named <Signature> would be a big tip-off, but perhaps not. Anyway, once you’ve assigned that node using the SignedXml.LoadXml method, you call the CheckSignature method, passing it the public key. If it returns True, you’re good. I mean, not in a moral sense; the code doesn’t know anything about you. But the signature is good.
Display License on the About Form
When we added the About form to the project a few hundred pages ago, we included a Label control named LabelLicensed. It currently always displays “Unlicensed,” but now we have the tools to display a proper license, if available. Open the source code for the About.vb form, and add the following code to the start of the AboutProgram_Load event handler.
Insert Snippet
Insert Chapter 21, Snippet Item 6.
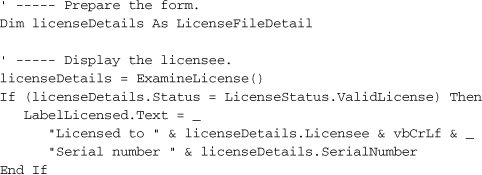
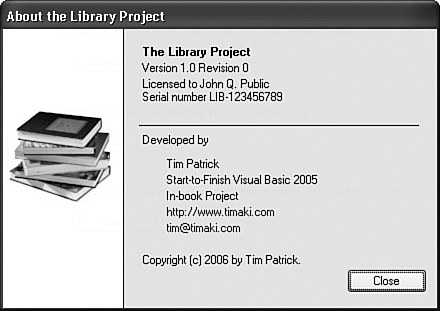
Figure 21-8 shows the About form in use with details displayed from the license file.
Figure 21-8. Displaying a valid license
Just for fun, I changed the version number in my license file from “1.*” to “2.*” without updating the digital signature. Sure enough, when I displayed the About form again, it displayed “Unlicensed,” because the check of the signature failed. How did I test the code this early? I copied the LibraryLicense.lic file from the book’s installed LicenseFiles subdirectory, and placed that copy in the binDebug subdirectory of the project’s source code. Later on, you’ll be able to put the file anywhere you want and browse for it, but we’re getting ahead of ourselves.
Enforcing the License
At some point, a missing or invalid license should have a negative impact on the use of the application. When that happens, we should give the user a chance to correct the problem by locating a valid license file. We’ll do this through the new LocateLicense.vb form. I’ve already added the form to your project. It appears in Figure 21-9.
Figure 21-9. The gentle way to enforce a product license
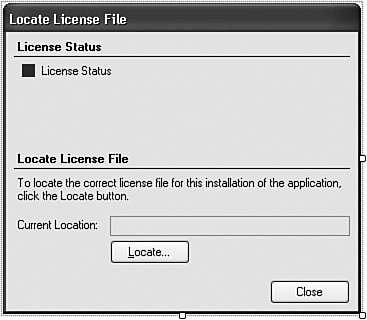
This form starts up with a call to its public ChangeLicense function, which returns True if the user changes the license. Most of this form’s code manages the display, presenting detailed reasons why a license is valid or invalid using the results of the ExamineLicense function. If for any reason the license is invalid, a click on the Locate button lets the user browse for a better version.
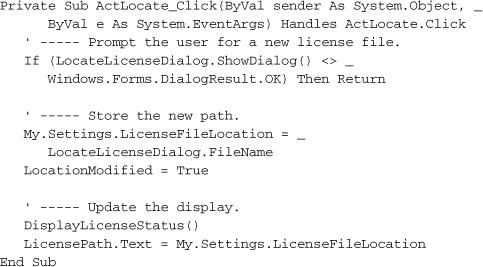
The LocationModified form-level variable gets sent back to the caller as a trigger to refresh the status of the license.
For the Library Project in particular, I didn’t see a point in enforcing the license on startup, because it’s not the patrons’ fault that the library stole this important work of software. Instead, I delay the verification process until an administrator or librarian tries to access the enhanced features of the application. Then, if the license check fails, the user should be able to browse the disk for a valid license file.
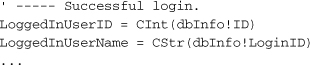
I think the best place to add the license check is just after the administrator successfully supplies a password. If we checked before that point, it would give ordinary patrons the ability to browse the disk, which is probably a no-no, because anyone and their uncle can walk up and use a patron workstation. Open the source code for the ChangeUser.vb form, locate the ActOK_Click event handler, and locate the “Successful login” comment.
Just before this block of code, add the following license-checking code.
Insert Snippet
Insert Chapter 21, Snippet Item 7.
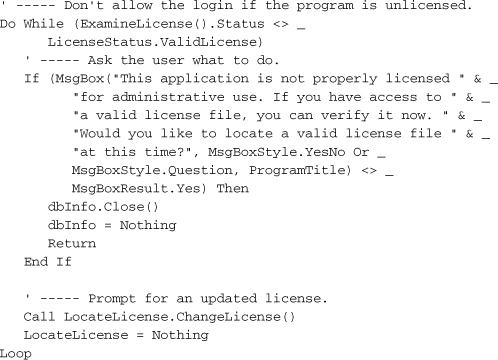
This code gives the user an unlimited number of chances to locate a valid license file. Once the license is validated, the code moves forward and enables administrative access.
Daily Item Processing
The last major set of code to be added to the Library Project isn’t related to licensing, but it’s important nonetheless: the processing of fines for overdue items. We’ll add a common method that will perform the processing, and then call it where needed throughout the application.
Add the new DailyProcessByPatronCopy method to the General module.
Insert Snippet
Insert Chapter 21, Snippet Item 8.
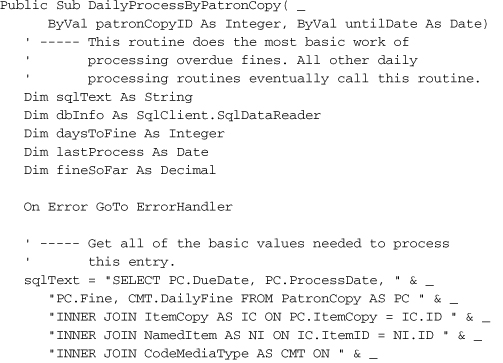
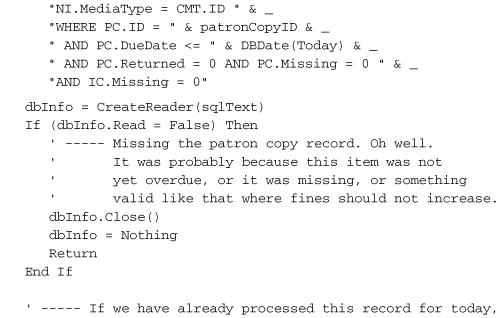
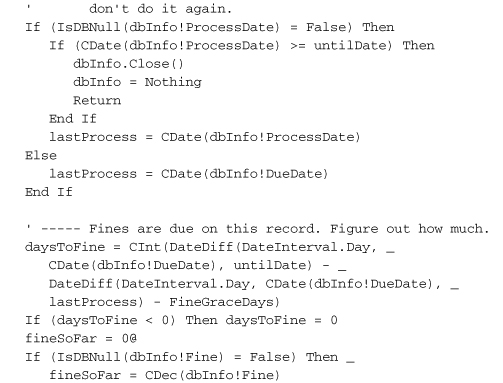
This code examines a PatronCopy record—the record that marks the checking-out of a single item by a patron—to see if it is overdue, and if so, what penalty needs to be added to the record. Each record includes a ProcessDate field. We don’t want to charge the patron twice on the same day for a single overdue item (no, we don’t), so we use the ProcessDate to confirm which days are uncharged.
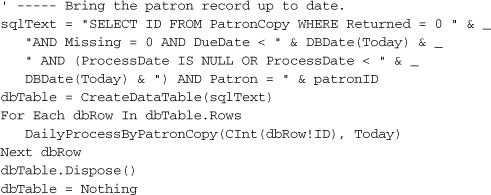
There are a few places throughout the application where we want to call this processing routine without bothering the user. The first appears in the PatronRecord form, the form that displays the fines a patron still owes. Just before showing that list, we should refresh each item checked out by the patron to make sure we display the most up-to-date fine information. Open that form’s source code, locate the PatronRecord_Load event handler, and add the following code, just before the call to RefreshPatronFines(–1) that appears halfway through the routine.
Insert Snippet
Insert Chapter 21, Snippet Item 9.

The overdue status for an item must also be refreshed just before it is checked in. Open the source code for the MainForm form and locate the ActDoCheckIn_Click event handler. About halfway through its code, you’ll find a comment that starts with, “Handle missing items.” Just before that comment, insert the following code.
Insert Snippet
Insert Chapter 21, Snippet Item 10.
' ----- Bring the status of the item up to date.
DailyProcessByPatronCopy(patronCopyID, CheckInDate.Value)
Check-out needs to refresh the patron’s fines as well, just before letting the patron know if there are, in fact, any fines due. Move to the MainForm.ActCheckOutPatron_Click event handler, and add the following declarations to the top of the routine.
Insert Snippet
Insert Chapter 21, Snippet Item 11.
Dim dbTable As Data.DataTable
Dim dbRow As Data.DataRow
In this same method, find a comment that starts with “Show the patron if there are any fines due.” As usual, it’s about halfway through the routine. Insert the following code just before that comment.
Insert Snippet
Insert Chapter 21, Snippet Item 12.
In addition to automatic fine processing, the Library Project also allows an administrator or librarian to perform daily processing of all patron items at will. This occurs through the Daily Processing panel on the main form (see Figure 21-10).
Figure 21-10. Daily administrative processing
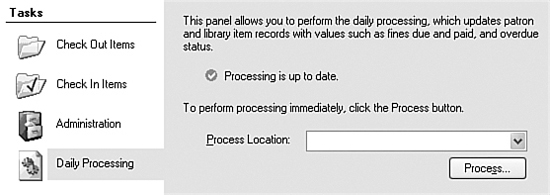
Currently, the panel doesn’t do much of anything, so let’s change that. The first task is to update the status label that appears at the top of the panel. Add a new method named RefreshProcessLocation to the MainForm form’s class.
Insert Snippet
Insert Chapter 21, Snippet Item 13.
I won’t show its code here, but it basically checks the CodeLocation.LastProcessing database field for either all locations, or for the user-selected location, and updates the status display accordingly.
The user selects a location for processing with the ProcessLocation drop-down list, but we haven’t yet added any code to populate that list. Find the TaskProcess method in the main form’s source code, and add these declarations to the top of its code.
Insert Snippet
Insert Chapter 21, Snippet Item 14.
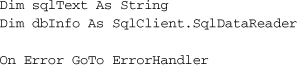
Then add the following statements to the end of the method.
Insert Snippet
Insert Chapter 21, Snippet Item 15.
Each time the user selects a different location from the list, we need to update the status display. Add the following code to the ProcessLocation_SelectedIndexChanged event handler.
Insert Snippet
Insert Chapter 21, Snippet Item 16.
' ----- Update the status based on the current location.
RefreshProcessLocation()
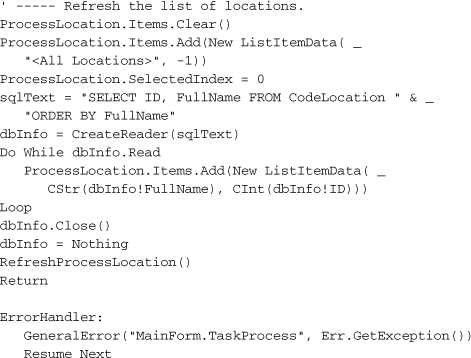
Daily processing occurs when the user clicks on the Process button. Add the following code to the ActDoProcess_Click event handler.
Insert Snippet
Insert Chapter 21, Snippet Item 17.

To try out the code, run it, locate a valid license file, and test out the different administrative features.
This marks the end of primary coding for the Library Project. Congratulations! But there’s still plenty to do, as you can tell by the presence of four more chapters. Now would not be the time to close the book and call it a day. But it would be good time to learn about ASP.NET, the topic of the next chapter.