
Chapter 22. Web Development
When Sir Tim Berners-Lee (knighted in 2004!) invented the World Wide Web in 1989, it really wasn’t a big deal. As the primary designer of HTTP and HTML, he certainly was no slouch. But most of the technologies that went into structuring and transporting web pages had been around for years, even decades. SGML (the basis of HTML) and hyper-linking systems had been around since the 1960s, and Internet-based transmission of data between clients and servers was already common among university campuses and some businesses. Still, here we are in the twenty-first century, and the World Wide Web is the focus of so much computer technology that it makes my head spin. Thank you, Mr. B-L.
Microsoft promotes .NET as the system for developing web pages and related software. And it really is a great system. As we get into the code, you’ll find that about 90 percent of what you do to write Web applications in Visual Studio is identical to what you do when writing desktop applications. It’s easy to do, and kind of fun, so you’ll probably want to write some programs using it. And that’s what we’ll do in this chapter. But first, let’s briefly review what happens in the world of client-server World Wide Web communications.
How the Internet Works
Before .NET, developing applications for “the Web” was cumbersome and boring. And with good reason: The World Wide Web was not designed as a programming or logic-processing platform. It was originally all about sending specially formatted text files from one computer to another. No programming languages to learn. No custom logic. Just plain text, and maybe a binary graphic image or two.
Early web browsers were really just glorified file-copy programs. When you started up the Mosaic browser (pretty much all there was back then) and requested a Web page from another computer, here is what would happen.
- The web browser determines the IP address of the remote system.
- The web browser contacts the remote system via TCP/IP port number 80.
- The remote system accepts the connection.
- The web browser says, “Hey, I’m looking for a file named index.html. Could you send it to me?”
- The remote system says, “I have it,” and immediately sends it.
- The remote system closes the connection.
Much of this process is hidden from view, but you can actually see it happen. If you’re interested, open the Windows command prompt, and type the following command.
telnet www.google.com 80
This runs the telnet program, a terminal emulation program that lets you connect to remote systems through a text interface. Telnet usually connects to TCP/IP port 23, but you can specify any port you want, as we did here with the default WWW port of 80.
Your screen may go blank, or it may just sit there, looking dead. If you’re lucky, you’ll see a “connected” message, but perhaps not. And that’s okay. Your system is connected to Google’s web server. Type the following command.
GET / HTTP/1.0
Don’t miss the spaces surrounded the first slash. Follow this command with two light taps on the Enter key. This command asks the remote system to send the default web page at the top of that server’s Web hierarchy. And because you asked, it will.
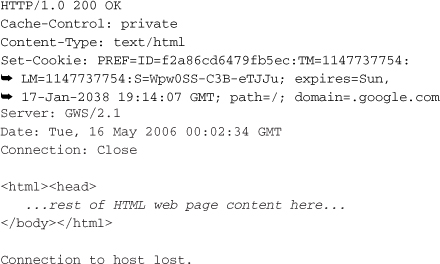
Of course, you do not normally see all this. The web browser carries on this dialog for you, and nicely formats the response as a web page. This is actually all there is to the World Wide Web. You have just experienced the major features involved: the transfer of basic data through a TCP/IP port. So where does programming come in?
Programming the Internet
Static pages were good for a while, but then the Internet became humdrum. Finally someone had a bright idea: “We have a program running on our web server that is responding to clients, and feeding them requested pages. What if we could enhance that program so that, for certain pages, it would call a program or script that would generate the HTML content on-the-fly, and have that content returned to the client?” So they changed the server process. Now, when the client asked for a web page ending with the extension .cgi, the web server process ran a separate script that generated the content. The system also provided a means for some client-supplied content to make its way to the script, making possible customization and personalization features.
From there it was a short step to a generic solution. On the Microsoft platform, Internet Information Server supported add-ins that could be called based on the file extension of the requested file. This led to Active Server Pages (ASP), a solution that allowed developers to embed server-side script (often using “VBScript,” a variation of Visual Basic) right in the HTML content, and have it adjust the content before it was sent to the client.
Someone else said, “If we can write scripts on the server side, couldn’t we also include a ’client-side script’ right in the HTML content that a smart web browser could process?” Before long, client-side and server-side developers were battling it out in the streets, but the battle didn’t get very far because all the programmers were exhausted. The cause? Programming in script! Whether it’s embedding script in HTML (the client side) or generating HTML from script (the server side), script programming is cumbersome, slow, high in “bad” cholesterol, and almost impossible to debug interactively.
Some web script programmers hadn’t used a language compiler for years, and were on the verge of lapsing into fatal script-induced comas. You could compile some server-side logic into a DLL and use it to process web pages, but it was far from easy, and these DLLs were still often linked into the HTML content via short scripts.
Then came .NET, and its support for compiled server-side application development. Script programmers breathed a collective sigh of relief from their hospital beds; they could now use the full power of Visual Studio and .NET languages to build HTML content. And this new system, “ASP.NET,” was designed so that you could craft entire web applications without even looking at a single HTML tag. The design goal: to make web development nearly identical to desktop application development. And Microsoft largely succeeded. It didn’t solve the client scripting problem (maybe soon!), but some of the new server-side features included in ASP.NET greatly reduced the need for custom client-side scripts.
The pages you build in ASP.NET are called “Web Forms,” and because they are so closely tied together, I sometimes use ASP.NET and Web Forms interchangeably. But they aren’t exactly the same thing: ASP.NET includes Web Forms.
ASP.NET Features
ASP.NET includes many new advances in web development technology. Here are just a few of the more famous ones.
- Compiled code. All of the code you write for ASP.NET applications is fully compiled into standard .NET DLL assemblies. When the client makes a request for a file with an .aspx extension, Internet Information Server locates this file (which contains HTML or combined HTML/ASP.NET content) and the associated compiled DLL, and uses them together to process the page content. You can pre-compile the DLL before deployment, or you can let ASP.NET compile it on the fly the first time the .aspx file gets called.
- .NET support. ASP.NET applications can access the full .NET Framework Class Libraries (except those that specifically target desktop development). Any of the cool features and classes you have in desktop .NET applications are right there in web applications as well.
- Object-based. HTML tags, such as the
<textarea>tag, are really just text strings within a larger HTML text file. Pre-.NET server-side scripting was an exercise in string concatenation, building up a larger file from smaller content strings. ASP.NET treats all web-page elements as true objects, complete with properties and events. And some of these objects implement complex client-side controls, backed up by hundreds of lines of client-side script that you get for free. - Deployment simplicity. Managing server-side scripts and custom DLLs before .NET was not very fun. Certain types of changes required a full shutdown of Internet Information Server, or at least of the portion that controlled the application being changed. ASP.NET lets you make changes on a production system without impacting active users. If you replace a compiled DLL, ASP.NET will start using it immediately, but still keep the older version around until all existing clients have detached from it.
- Browser independence. The web-page objects that you use in ASP.NET take responsibility for generating their own HTML and client-side script content. Many of them take the client’s browser type and version into account, enhancing or reducing features automatically when needed. As an ASP.NET developer, you don’t even have to know which browser is being used.
- Extensibility. If you want to enhance a web-page element, you can derive from its class and add the new enhanced features, just as you do with any other .NET class.
Of course, there are more great features than the few I listed here. But you’re probably ready to see ASP.NET in action. Let’s get started.
Trying Out ASP.NET
Let’s build a very simple ASP.NET application, and examine it and its parts to discover what it’s all about.
News, but Not Bad News
If you are using Visual Basic 2005 Express Edition, you will not be able to fully follow these instructions directly because that product does not include any ASP.NET or web development features. Instead, you need to download Visual Web Developer 2005 Express Edition from the Microsoft MSDN web site (msdn.microsoft.com). Its user interface, though streamlined, offers much of the same functionality as the full Visual Studio product. The tutorial included here was written using Visual Studio 2005 Professional Edition.
Start Visual Studio and select the File ![]() New Web Site menu command. The New Web Site form appears. Unlike desktop applications, you must immediately tell Visual Studio where you are going to store the files. We’ll choose a location on the local file system, but this form also lets you work on a remote web site via FTP or HTTP. Choose the “ASP.NET Web Site” template, enter a directory path where you want to store the files, and click the OK button.
New Web Site menu command. The New Web Site form appears. Unlike desktop applications, you must immediately tell Visual Studio where you are going to store the files. We’ll choose a location on the local file system, but this form also lets you work on a remote web site via FTP or HTTP. Choose the “ASP.NET Web Site” template, enter a directory path where you want to store the files, and click the OK button.
Figure 22-1. Creating a new ASP.NET application
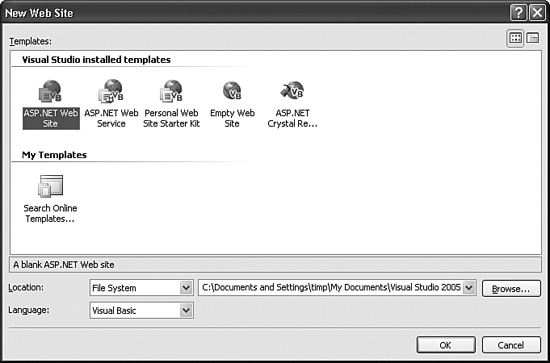
Figure 22-2 shows Visual Studio ready to start your new web application (the toolbars displayed are per my preferences).
Figure 22-2. A blank form is sometimes a good sign
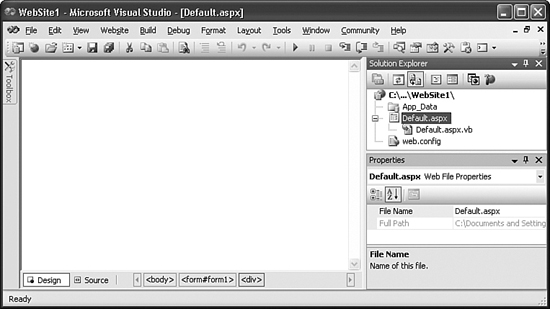
The Solution Explorer panel already shows three files and a folder included in the project. If you browse to the project’s directory—the default location is My DocumentsVisual Studio 2005WebSitesWebSite1—you’ll see these same files. The web.config file is an XML file that contains application-specific settings; it’s related to the app.config file used in desktop applications. Default.aspx is the web page itself, which will contain a mixture of HTML and special ASP.NET tags and directives. The related Default.aspx.vb file contains the Visual Basic “code behind” source code that will eventually be compiled to a DLL. The DLL gets stored in the App_Data directory when the site first loads.
Visual Studio also creates another folder at My DocumentsVisual Studio 2005WebSite1. This folder contains the solution files normally created with any Visual Studio project. They’re put out of the way so that they don’t get included with the deployed web site.
The blank area you see in Visual Studio is a web page, just waiting for text and control content. If you want proof, click the Source section button in the bottom-left corner of the display, or use the View ![]() Markup menu command. The window changes to HTML source code.
Markup menu command. The window changes to HTML source code.
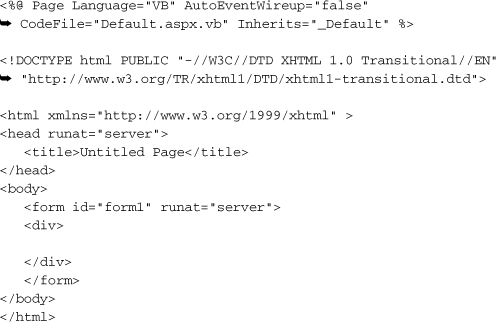
Well, most of it is HTML. There’s a line at the top that starts with <%@ that doesn’t look like real HTML—and it’s not. This is an ASP.NET page directive. It includes properties that help guide ASP.NET in the processing of the page. Borrowing a standard from its ASP predecessor, ASP.NET uses the <%...%> bracket pair to mark ASP.NET-specific commands and code. That’s enough of HTML. Who wanted to see it anyway? Click the Design section button, or use the View ![]() Designer menu command to return to the blank page.
Designer menu command to return to the blank page.
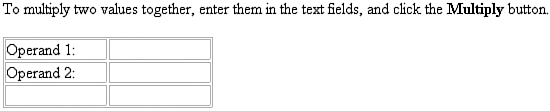
Let’s create an application that multiplies two user-supplied numbers together and displays the product. For such a simple feature, we could just write some JavaScript and include it as a client-side script, but we’re trying to avoid doing stuff like that. Type the following into the web page.
![]()
I made the word “Multiply” bold by using the Control-B key sequence, just as I would do in a word processor. Press Enter twice. By default, the web page lays out all elements like a word-processing document, a method called flow layout mode. You can also use absolute positioning of individual elements to place them at a specific location on the page.
There’s another way to organize elements on the page: through an HTML table. Let’s add one now. Use the Layout ![]() Insert Table menu command. When the Insert Table dialog appears, specify a custom table that is three rows by two columns. Then click OK. The table should immediately appear in the body of the web page.
Insert Table menu command. When the Insert Table dialog appears, specify a custom table that is three rows by two columns. Then click OK. The table should immediately appear in the body of the web page.
Type “Operand 1:” in the upper-left cell, and type “Operand 2:” in the cell just below it. Your page should look like Figure 22-3.
Figure 22-3. Just getting started on this application
It’s not much to look at, but it will get better. So far, we haven’t done much more than we could do in Notepad. But now we’re ready to add some controls. If you open the Toolbox, you’ll see controls that look a lot like those found in a Windows Forms application (see Figure 22-4).
Figure 22-4. Some of the Web Forms Toolbox
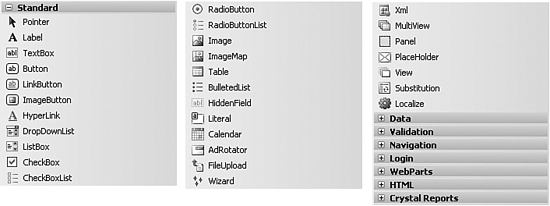
The controls are grouped by functionality.
- Standard. You will generally use the controls in this section to build the user interface of your web page. Many of these controls represent standard windows controls, with direct parallels in the Windows Forms world. For instance, the ListBox entry implements a standard Windows ListBox control within the web page. To you, the programmer, these controls look like standard .NET control classes, with properties, methods, and events. To the end user, they look like standard web-page controls, delivered using ordinary HTML. Some of these controls are composite controls, single controls built from multiple HTML controls working together, possibly with client-side scripting doing some of the work.
- Data. The data controls handle bound database interactions. As you may remember from previous chapters, I am not a big fan of bound controls in standard applications. But when you are communicating static data through a web page, they actually turn out to be a great timesaver. Some of these controls perform the data binding, while others perform the actual data presentation. You’ll also find the ReportViewer control, the web version of the report technology we discussed in Chapter 20, “Reporting.” It displays reports using the same RDLC files you built for your desktop application.
- Validation. Users are a lot of fun, especially when they enter wacky data into your quality software. Verifying the data they enter is hard enough in desktop applications, but it’s even more cumbersome when the client system only talks to the application host a few dozen seconds per hour. The validation controls remove some of the burden. They test for the most common types of data entry mistakes, and notify the user of problems, all without extra code on your part. When you do need to perform some custom validation logic, the CustomValidator control lets you add this logic as an event handler or client-side script.
- Navigation. This group includes a few controls designed to help the user move from page to page or section to section within your web site.
- Login. These controls encapsulate login and password management features so that the user can create a new user account, provide an authenticated password, or perform other security-related actions.
- WebParts. WebParts are control containers that the user rearranges using drag-and-drop within the web page. This reorganization of the display allows the user to personalize the display to fulfill the selfish wants that cloud his or her mind. You can record the state of the WebParts for redisplay the next time the user returns to the site or page.
- HTML. These are the standard HTML controls, such as
<textarea>, that web page developers have been using for years. Visual Studio does provide some IntelliSense and property validation for you, but using these controls is identical to typing the matching HTML tag directly into the page markup. - Crystal Reports. Crystal Reports includes both a desktop and a web-based set of reporting tools. The controls in this section specifically target ASP.NET applications.
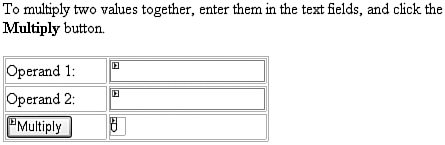
Let’s add a few controls from the Standard section of the Toolbox to the web page. In the bottom-left cell of the table we added earlier, add a Button control, give it the name ActMultiple, and set its Text property to “Multiply.”
Add two TextBox controls to the top two cells in the right-hand table column. Name one of them FirstOperand, and name the other one SecondOperand.
Add a Label control to the bottom-right corner cell of the table. Name it Product, and set its Text property to 0 (that is, zero).
Did you notice how setting each property for these controls was no different from what you did in the main Library application? Simple! By now, your web page should look like the one in Figure 22-5.
Figure 22-5. The completed user interface
Return briefly to the HTML markup for this page by clicking on the Source section button at the bottom of the page. If you’re familiar with HTML, you’ll notice the <table> tag for the table we added. But you’ll also find something unfamiliar within the first table row.
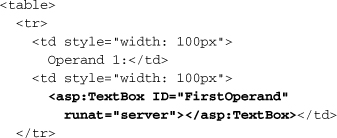
It’s that <asp:TextBox> tag. It looks something like other HTML tags, but there are no HTML tags that start with “asp.” This is a special ASP.NET tag that represents a Web Forms control class. These controls, and the runat="server" attributes strewn throughout the markup, are what make ASP.NET pages what they are. As ASP.NET processes the .aspx page, it strips out these custom control tags, and calls on the related controls to generate their own browser-neutral HTML.
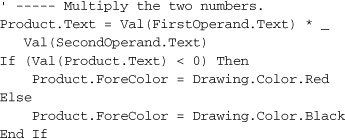
The user interface is done; let’s add the logic. We want the program to multiply the two operands together when we click on the Multiply button. Return to the web page design, and double-click on the Multiply button. It jumps to the code template for a button’s Click event, just as you expected it to do.
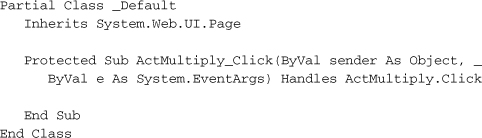
The design goal of ASP.NET was to have code that was as close to desktop application code as possible, and this is it. Add the following logic to the event handler.
As you were typing, did you notice all of the IntelliSense responding to your every keystroke? I couldn’t tell that this was a web-based application, and that’s great.
Press the F5 key to start the application. You’ll be prompted to turn on debugging, which you want to do. This will modify the application’s web.config file to support debugging. Later, you’ll want to disable that feature so that your users won’t be able to debug the application. If you open the web.config file, you’ll see this line:
<compilation debug="true" strict="false" explicit="true"/>
Just change the debug attribute to “false” to turn off debugging.
ASP.NET is a server application; it requires a living, breathing web server before pages can be processed. You may or may not have Internet Information Server installed on your system, but that’s OK. Visual Studio 2005 includes its own “ASP.NET Development Server” that exists just so you can test your ASP.NET applications. Figure 22-6 shows it popping up in the system tray.
Figure 22-6. Your built-in web server endeavors to give good service

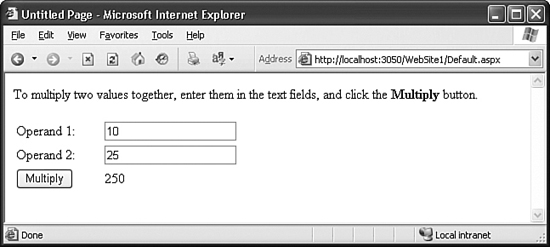
Figure 22-7 shows the application running in my default web browser, Internet Explorer. (Dear web browser companies, for information on product placement in this page, contact me directly.)
Figure 22-7. Wow, a whole web application in less than ten lines of code
More About Events
So far, our application looks just like a desktop application; the form displayed our initial drag-and-drop and property settings, and it responded to a button click by returning to the processing computer for the logic. But let’s be honest. There’s no way that a web application can ever be truly as responsive to events as a desktop application. What happens when the Internet connection goes down or it is just plain slow? How do you handle things like TextChanged events in text fields? You can’t have the web page go back to the web server every time the user types a key.
The ASP.NET TextBox control has a TextChanged event, but it does not trigger for each keystroke. In fact, it doesn’t trigger at all (by default) until something (like a button click) causes the page to go back to the server. And there are a lot of other control events that work like this. They are all saved up until the user does something to bring the whole page back to the web server for processing. At that time, these delayed events finally fire, and processing continues as normal.
So there are really two types of events: regular and premium. I mean postback and non-postback. Postback events are those that cause the web page to immediately return to the server for processing. Non-postback events delay their event handlers until something else causes a return to the server. Most events are one or the other, but some can be changed. The CheckBox control has a CheckedChanged that fires (in a non-postback way) when the user alters the state of the checkbox. However, if you set the control’s AutoPostBack property to True, the page will immediately return to the server anytime the user clicks the checkbox.
Besides control events, the entire page has a few events. The most significant is the Page_Load event. This is analogous to the Windows Forms’s Form_Load event; it’s a great place to configure initial control properties, fill in drop-down lists, etc. I’m going to add the following code to my page’s Load event.
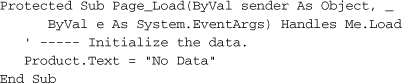
Now the Product label will display “No Data” the first time the page appears. The thing about the Load event handler is that it runs every single time the web page is displayed. Because this test application keeps using the same page over and over again for its results, the Load event handler will run afresh each time. For this test program, it’s not really a big deal; the code in the ActMultiply_Click event handler overrides its initial “No Data” value. But in other applications, you might not want to keep reinitializing the data. Fortunately, the Load event will let you know if this is the first time through or not through a page-level member called IsPostBack.
' ----- Initialize the data, but only the first time.
If (Me.IsPostBack = False) Then Product.Text = "No Data"
State and View State
Wait a minute. If I am reloading the page from scratch every time with the need to initialize values in the Page_Load event handler, how is it that the two text boxes kept the user-entered values when the page reloaded? We didn’t add any code to save and restore those values during initialization.
Here’s the story. Although the Page_Load event does give you the opportunity to initialize the page every time the page loads, for most fields the page will remember what was in each field. Remember, ASP.NET is designed so that you think it is running just like a Windows Forms application. You would never be happy if the fields on your Windows Form kept clearing out every time the user clicked a button. You wouldn’t be happy if they cleared out in a Web Forms application either.
Because web pages are disconnected from the web server most of the time, each web page needs some way to retain the state—the current property and data settings—of each control between page loads. The Web Forms system does this through a feature called View State. Here’s how it works: Each ASP.NET web page includes a hidden static field that includes an encrypted and compressed version of all important state information for the controls. When the user makes changes to each control and triggers some event that returns the page to the web server, it returns with both the embedded View State (built up from the previous construction of the page) and all the current settings for every control. Using this combined information, ASP.NET is able to reconstruct the true client-visible state of every control, and communicate that correctly to you in your server-side event handler code.
When you run an ASP.NET application, use the View ![]() Source menu command in Internet Explorer or your favorite browser of the month, and you’ll see something like the following:
Source menu command in Internet Explorer or your favorite browser of the month, and you’ll see something like the following:

That’s the View State. Don’t ask me how it works; I won’t tell you (because I don’t know). But it’s not important to know how it works. It’s only important that ASP.NET knows how it works so it can keep your application working like the Windows Forms system it truly isn’t.
As you add additional controls to your page, the View State will increase in size. Because all of the web page’s content must be transported repeatedly over the Internet, a larger View State results in longer transmission times. It is possible to turn off view state for specific controls using their EnableViewState property. If you don’t need a control’s value retained from page use to page use, it’s a good idea to turn it off.
Data Validation
Because this sample code uses the Visual Basic Val function to preprocess the user-supplied data, it almost always works without error. Any data considered invalid is simply converted to zero. Another option would be to chastise the user for invalid entry before processing occurs, to validate the supplied values. The five validators in the Validation section of the Web Forms Toolbox help you do just that.
- RequiredFieldValidator. Confirms that the user supplied any value at all in a control.
- RangeValidator. Complains if a control’s value does not fall between two values.
- RegularExpressionValidator. Lets you compare a control’s value against a regular expression pattern. For instance, you could compare the user’s entry of a serial number to a pattern to ensure that it included two letters followed by five digits.
- CompareValidator. Involves two controls, comparing the value between them. The control also doubles as a data type validator, confirming that a single field contains the proper type of data, such as a date value or an integer.
- CustomValidator. Lets you perform any type of validation you want through code you supply.
All of these controls perform server-side validation, and they optionally do their data check using client-side scripts (the default). Having the client-side check reduces the need to go back to the web server just to ensure a required field has data. Having the server-side check ensures that the data is valid even if the client has disabled scripting support.
The validators display their own error messages, so you place them on the page where you want the error message to appear. You can also have multiple validators display their collective issues in a single location by using a ValidationSummary control.
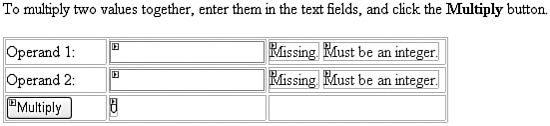
Let’s add some validation to the two input fields in the multiplication sample. We want to ensure that the data is supplied, and that both values are valid integers. To do this, we must add both a RequiredFieldValidator and a CompareValidator for each field. Right-click in the bottom-right cell of the table, just after the Product label, and choose Insert ![]() Column to the Right from the shortcut menu that pops up. In the new upper-right column, add a RequiredFieldValidator control. Set the following properties:
Column to the Right from the shortcut menu that pops up. In the new upper-right column, add a RequiredFieldValidator control. Set the following properties:
- Set ControlToValidate to “FirstOperand.”
- Set Display to “Dynamic.” This lets the size of the validator shrink to nothing when there is no error to display.
- Set ErrorMessage to “Missing.”
Just to the right of that validator, in the same table cell, add a CompareValidators, and set these properties:
- Set ControlToValidate to “FirstOperand.”
- Set ErrorMessage to “Must be an integer.”
- Set Operator to “DataTypeCheck.”
- Set Type to “Integer.”
Add a similar pair of validators to the second table row, using “SecondOperand” for the ControlToValidate. Your web page should look like Figure 22-8.
Figure 22-8. Bulking up on the validation support
Run the program and just try to enter faulty data in the input cells. The page will complain immediately when you click the Multiply button.
That’s all the multiplying we’ll do for now. I’ve saved a copy of the project for you in the WebSite1 subdirectory in the main directory where you installed this book’s sample code.
Database Integration
Connecting ASP.NET pages to a database, especially if you use some of the wizard-style features of Visual Studio, is extremely easy. That’s because many of the controls included with ASP.NET are specifically designed to display and interact with data from tabular data sources. We’ll try out a quick wizard example here, and do a lot more database integration in this chapter’s “Project” section.
In Chapter 20, the first of the five built-in reports we created for the Library system displayed a list of all checked-out items. We designed an RDLC report for it, and because ASP.NET includes an RDLC Report Viewer control, we could reuse that for a Web-based report. But instead we’ll display the report using one of the Web Forms controls, GridView. Here’s the query that retrieves the checked-out items.
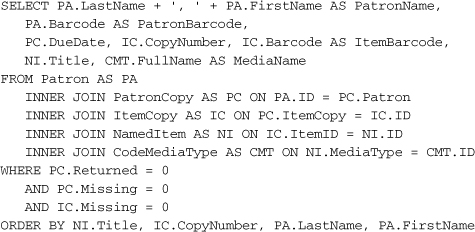
That should look familiar. Create a new ASP.NET web site through Visual Studio. Type the following line at the top of the content page.
ACME Library Checked Out Items
Feel free to embellish it to make it look nicer. I added <h1> tags around it in the markup to make it stand out. Below that title line, add a new GridView control to the page. I found it in the Data section of my Visual Studio Toolbox. The control’s smart tag opens and shows a panel of GridView Tasks, as shown in Figure 22-9.
Figure 22-9. A short list of tasks for the GridView control
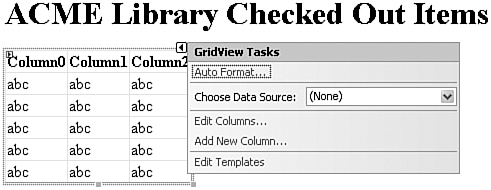
If you want to click on the “Auto Format” task and change the look of the grid, you can, but the important task for now is “Choose Data Source.” Select “<Add New Source>” from the list. Our old friend the Data Source Configuration Wizard appears again, although with some changes specific to ASP.NET. Select “Database” for the data source type and click the OK button. When prompted for the connection, you should already have a Library database connection in the list. Select it (or create a new connection) and click Next.
You’ll be asked to save the connection string in the application configuration file. If you do, it will add an entry to the <connectionStrings> section of the web.config file created for the ASP.NET application. If you like to play power games with your system administrator, leave the field unchecked. But if you want an easy way to modify the connection information later, you had better leave the field as it is, giving the entry a reasonable name. Then click Next.
The wizard prompts you for table and field details. Select Specify a custom SQL statement or stored procedure, click Next, and type in the checked-out-item query. Click Next again. The wizard gives you one last chance to test the query before you click the Finish button.
Now here’s the simple part. Visual Studio connects to the database, reads the schema, and creates columns in the grid perfectly designed for the query. Your application is complete. Press F5 to run it.
We’re going to stop there for now and pick this up in the “Project” section.
XML Web Services
Have you ever wanted to extract one piece of data from a web site for use in your Visual Basic application? No? Well let me tell you: It’s called “screen scraping,” and it’s a pain in the neck. Most web sites with valuable content are designed by selfish people, programmers who think only about their own company’s needs and nothing about other developers who need to pilfer essential data from—I mean, who need to add value to their own applications by enhancing it with content from a trusted third party.
Screen scraping is generally a bad thing. Not only is the HTML content ludicrously difficult to parse, but you never know when the web site owner is going to up and change the content without the courtesy of contacting you first. Fortunately, XML Web Services provides a solution to this problem. If a site has content or processes that need to be used by external applications, it can include a Web Service on the site that makes screen scraping unnecessary. XML Web Services implement the Web-based equivalent of function calls, complete with parameters and return values, all of which can be accessed remotely. They are based on published standards such as SOAP (Simple Object Access Protocol) that use plaintext and XML to simulate the function call between two systems.
There are a lot of technologies involved in making XML Web Services possible, but you don’t really need to know them. Instead, you will build a standard Visual Basic method, mark it for use as a Web Service, and make it available on your web site.
Web services appear as .asmx files on your web site. In Visual Studio, you can either create a new web site and select “ASP.NET Web Service” as the project type, or add a “Web Service” item to an existing web site project. When you do, Visual Studio adds the necessary files to your project. The first is the actual .asmx file. It’s a smart interface conduit between the web site and the actual web service code. Here’s what I found in my WebService.asmx file.
![]()
This directive refers the caller to the WebService class in the associated WebService.vb source code file. That file is much more interesting.
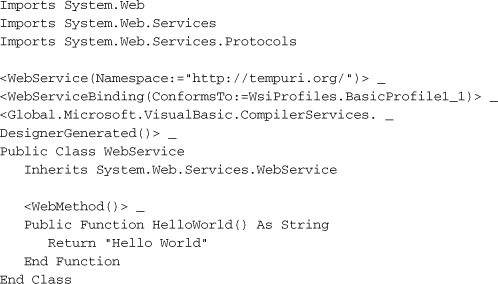
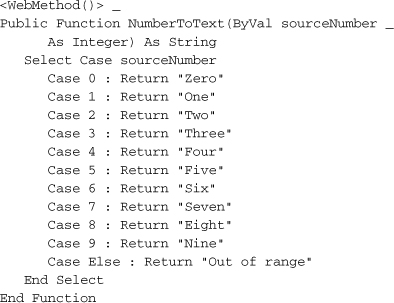
This code decorates the class and its methods with several attributes that mark those methods as Web Services. Remember that an attribute adds metadata to an assembly so that the compiler or some other program will do something special with the marked items. In this case, the <WebMethod> attribute tells ASP.NET to treat the HelloWorld function as a Web Service. ASP.NET responds by connecting all of the plumbing code that makes Web Services possible.
I’m going to replace the HelloWorld function with another one that at least pretends to do some real work.
The first attribute in the file refers to http://tempuri.org. You need to replace this with a namespace that is unique to your organization so that Web Services with the same name from different vendors don’t conflict. Normally you put a URL for a web page that may or may not exist (it doesn’t matter). As long as it’s unique to your organization, you can put whatever you want. You can also change the name of the class if you wish, although you’ll need to update the related .asmx file appropriately.
If you run this application in Visual Studio, your web browser opens with the page shown in Figure 22-10.
Figure 22-10. A web service running in your web browser
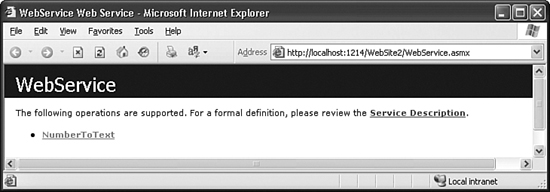
Web services are methods, and a web browser isn’t a typical medium for running subroutines and functions, so the page in Figure 22-10 appears instead. Besides, the web service expects specially formatted XML content to run properly. If you click on the NumberToText link on the web page, it brings up a page from which you can test the service.
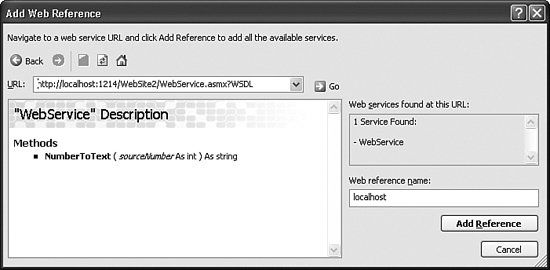
Web services are generally consumed by standard application code. Because I have this web service running on my system using my test ASP.NET web server, I’ll write a desktop application to call the NumberToText method. Start a separate instance of Visual Studio and create a new Windows Forms project. Select the Project ![]() Add Web Reference menu command. The Add Web Reference form appears, a tool you use to locate local and remote web services. If you click on the Web services on the local machine link to find your custom web service, nothing will happen. Actually it will fail, because the test web server is not advertising the service. But you can specifically request the service if you know its address. To determine this, double-click on the ASP.NET Development Web Server icon in the system tray. The Root URL field will provide the base of the address. On my system at this particular moment, it says “http://localhost:1214/WebSite2,” although it will change port numbers if I restart the service. Add to this the name of the .asmx file for your service, plus “?WSDL” as a query string.
Add Web Reference menu command. The Add Web Reference form appears, a tool you use to locate local and remote web services. If you click on the Web services on the local machine link to find your custom web service, nothing will happen. Actually it will fail, because the test web server is not advertising the service. But you can specifically request the service if you know its address. To determine this, double-click on the ASP.NET Development Web Server icon in the system tray. The Root URL field will provide the base of the address. On my system at this particular moment, it says “http://localhost:1214/WebSite2,” although it will change port numbers if I restart the service. Add to this the name of the .asmx file for your service, plus “?WSDL” as a query string.
http://localhost:1214/WebSite2/WebService.asmx?WSDL
Enter this address in the Add Web Reference form’s URL field, and click Go. If successful, the web server responds with a WSDL (Web Service Description Language) XML file that provides the details of the web service. These details appear in the dialog as shown in Figure 22-11. Click the Add Reference button.
Figure 22-11. A recognized web service
Visual Studio automatically adds the reference to the My.WebServices object. To test out the service, I added a TextBox control and a Button control to Form1, and added the following code.

Running the program, typing in a number from zero to nine, and then clicking the button correctly calls the web service and returns the English version of the number. And it would have worked just as well if the NumberToText service were running on a web server at one of the research facilities at the South Pole.
Summary
I really used to hate writing ASP applications. It was a pain to embed VBScript within HTML content. Although ASP.NET still supports a variation of this method, it’s much better to use the code behind features of Web Forms. This makes web development only slightly more difficult than desktop application. XML Web Services also make interactions between web-based code and desktop code as easy as developing a class with methods.
When Microsoft first came out with the .NET Framework, their marketing department really went full strength on the web development aspects of Visual Studio. I was dubious. And although I am still mainly a desktop application developer, I no longer lose up to a week of sleep when I contemplate the building of Internet applications.
Project
For this chapter’s project, I built a simple multi-page web site that (1) lets the user look up items in the Library database; and (2) duplicates the Library Statistics report created in Chapter 20, but without the RDLC component. I went ahead and included the completed project in your installed source code directory, in the LibraryWebSite subdirectory. You can open it by locating its directory with the File ![]() Open Web Site menu command in Visual Studio.
Open Web Site menu command in Visual Studio.
As shown in Figure 22-12, the project includes 11 files and two subdirectories.
Figure 22-12. The Library web site project files
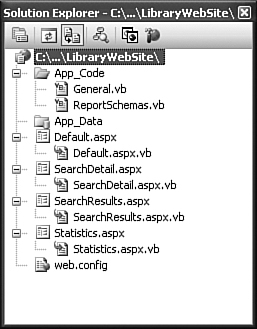
Here’s a quick rundown of each file and subdirectory.
- App_Code. The directory for all project code that is not code-behind for an actual ASP.NET web page. All of your general modules and classes for a project appear here.
- General.vb. A code module with six methods that I stole almost verbatim from the main Library Project’s General.vb file. I made just a few changes, mostly to deal with not having the LibraryDB global variable sitting around with its connection information.
- BoundSchemas.vb. When we started the checked-out-item report earlier in this chapter, we bound a GridView control to a database query. The GridView control, like most of the Web Forms controls, can also bind to any class that supports the IList interface, including the generic collection classes. The classes in this file will be used for instances within a generic collection in two of the web pages.
- App_Data. This directory normally contains data needed by the application. It was created automatically by Visual Studio. I don’t use it in this project.
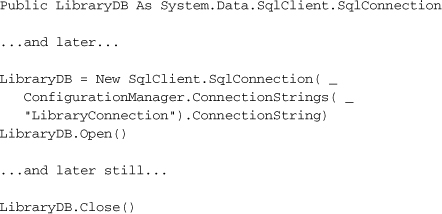
- Default.aspx and Default.aspx.vb. This is the entry point of the Library web site. The client browser requests the Default.aspx web page to start the library experience. The page includes a link to the statistics report, plus fields that let you look up library items by title or author.
- SearchResults.aspx and SearchResults.aspx.vb. Searches performed from the Default.aspx page end up here, with queries processed in code and then bound to a grid.
- SearchDetail.aspx and SearchDetail.aspx.vb. Each search result includes a link to this page. It provides additional detail for an item, in the same format used in the main Library project’s ItemLookup.vb file.
- Statistics.aspx and Statistics.aspx.vb. This page displays the Library Statistics report as a bound web page.
- Web.config. Every ASP.NET project includes a web.config file used to specify project-specific settings in the development and production environments.
Configuring the Database
The web.config file contains a place for database connection strings. I’ve added an entry within it for the Library database.

Modify the “MYSERVERSQLEXPRESS” portion to the name of your SQL Server database instance, and modify the other parts of the connection string as needed. All four of the web pages use the Library database, and they all access the connection string from this entry, via the ConfigurationManager object.
The Default Page
The Default.aspx page is the starting point for the Library web application, and appears in Figure 22-13.
Figure 22-13. The Library web site’s default page

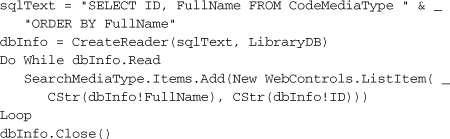
Its code is not much to talk about. It simply fills in the Media Type drop-down list with the available types from the database.
The page itself is a little more interesting. When we built the sample ASP.NET web application earlier, each click on the Multiply button sent the page back to itself. It was a one-page application. Most web applications would be useless with only a single page, so button clicks and links need to jump elsewhere in the project. The report link at the bottom of this page is a standard hyperlink to Statistics.aspx, another page within the application. In the search portion of the page, the Search button (ActSearch) also jumps to another project page, SearchResults.aspx. It does this through its PostBackUrl property, which is set to “~/SearchResults.aspx.” The new page will have indirect access to all of the field selections on this starting page.
Search Results
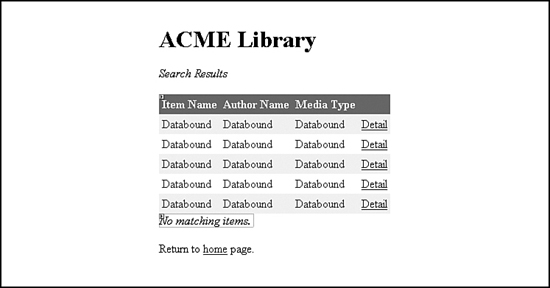
The SearchResults.aspx page displays any matching results from the Default.aspx item search section. As shown in Figure 22-14, it includes a GridView control for the listing of results, plus a Label control that shows a count of the matches.
Figure 22-14. The Library web site’s search results page
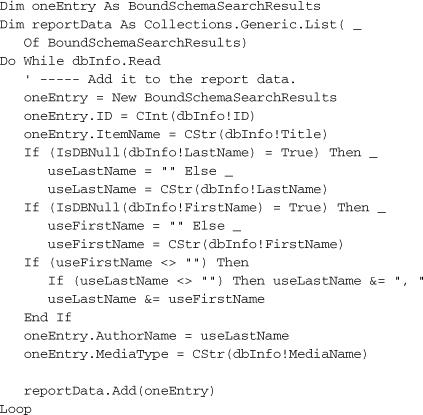
Unlike the GridView populated earlier, this one does not connect directly to a database query. Instead, I hand-build instances of the BoundSchemaSearchResults class (from BoundSchemas.vb), collect them into a generic List, and bind them to the fields in the GridView. Actually, binding in this way is a snap. Each column I configured in the GridView control looks for a property in the incoming records that matches a specific field name. These columns are defined through the Column Editor (see Figure 22-15), accessed via the control’s Columns property.
Figure 22-15. Editing columns in a GridView control

Figure 22-15 shows the properties for the first bound data column, “Item Name.” It’s bound to a field in the data named ItemData via the DataField property. The next two columns are configured similarly, but use the incoming data fields AuthorName and MediaType. The fourth column provides a hyperlink to the SearchDetail.aspx for each matching record. To build this column, I added it as a HyperLinkField column instead of a BoundField column. I set its Text property to “Detail,” which will appear on every record. Clicking on the link will pass the ID of the matching item (I set the DataNavigateUrlFields to ID) to the target page via a query string. The DataNavigateUrlFormatString property contains a string that will be sent to the String.Format method, along with the fields listed in DataNavigateUrlFields. Here is the format string.
SearchDetail.aspx?ID={0}
The “{0}” part gets replaced with the value of each record’s ID field.
This page’s Load event handler is triggered by a call from the Search button on the Default.aspx page. When a Web Forms page called itself, it can directly examine the values in its controls. But the controls on the Default.aspx page don’t exist here in the SearchResults.aspx page. Fortunately, the previous page’s controls are sent as data to the new page. You can access them through the PreviousPage object. The following code extracts the values from each of the search fields.
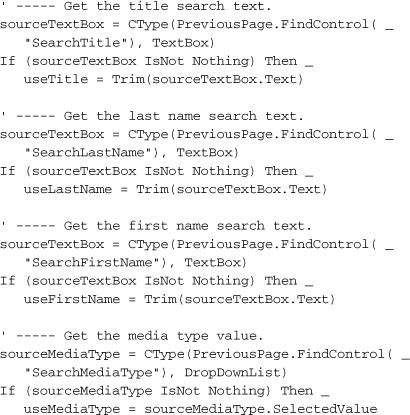
Amazingly, the previous page didn’t just send its fields as string values. Instead, they retained their existence as true objects. Using the CType function to convert them to TextBox and DropDownList controls was enough to access their control properties.
I use the user-supplied values to build a SQL statement and query the database for results. If there are any, the resulting data is massaged into a list of objects.
The results are bound to the grid, and a count is displayed to the user.
![]()
You must call the GridView control’s DataBind method or you won’t see any results.
Search Detail
When the user clicks on one of the Detail links in the search results, it sends the ID of the selected NamedItem record to the SearchDetail.aspx page as a query string. The page itself, which I won’t show here, includes many Label controls that attempt to mimic the output on the detail panel of the ItemLookup.vb form in the main Library application. I even use almost the same Cascading Style Sheet instructions in this page that I use in the application.
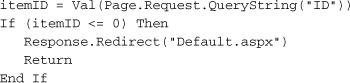
When the page’s Load event handler fires, it first examines the query string to extract the supplied NamedItem ID. A missing ID results in a return to the main search form.
Most of the formatting code for this page comes from the ItemLookup.vb file in the main application. It queries the database for details of the specified NamedItem record, and updates each label using these values. The only thing that is interesting—besides the fact that this seems all too easy for web-page development—is the creation of the table of item copies near the bottom of the page. In the ItemLookup.vb version of the code, I hand-crafted an HTML <table> set, and filled in its columns with the status of each available copy of the named library item. I thought it was a shame to ignore all of that great code, so I just copied it nearly unchanged into the code for SearchDetail.aspx.vb. So far, I haven’t had to do anything with HTML itself, except when I wanted to add <h1> tags around the page titles. But because I had written the HTML-generating code, and because ASP.NET applications target HTML, I thought I could use it.
And I can. One of the Web Forms controls is Literal, a control that exists only so you can set its Text property to properly formatted HTML content. After building up the table structure in a StringBuilder object named copyTable, I assign that HTML content to the Literal control.
' ----- Add the table to the output.
PutTableHere.Text = copyTable.ToString()
Statistics Report
The Statistics.aspx page displays the same summary information included in one of the reports from Chapter 20. In the original Statistics report, I displayed record counts from six different tables, and presented them as a list in an RDLC report format. In this web page, I do those same six queries, build a generic list of the results, and bind that list to—surprise—a GridView control, which is quickly becoming our favorite. Here’s the code for the page in its entirety.


I only included a minimum set of features in this web site, and don’t start cracking jokes about my web page design skills. If I were planning to deploy this web site, I would certainly enable some links on the SearchDetail.aspx page so that the user could click to search for other items by the same author, publisher, series, and so on. I would also add patron-specific features that would let them check their current checked-out items and any fines due. Another great feature to add would be online help content that told the patron or administrator how to use the system. And that just happens to be the topic for the next chapter. Lucky you.