
Individual responsibility
While others working on the programme (e.g. the producer) may have a contractual or insurance obligation for the overall safety of the production, health and safety legislation obliges everyone to take reasonable care of their own health and safety and that of others who may be affected by what they do or fail to do. Everyone also has a responsibility to cooperate, as necessary, to ensure satisfactory safety standards.
If you comply with the requirements for safety and something goes wrong, then your employer will be held to account. If you fail to comply, you may lose any claim for compensation for injury and could even be prosecuted individually.
What you must do
![]() Follow the safety requirements and any instructions that are given, especially in relation to emergencies (e.g. know the location of fire exits).
Follow the safety requirements and any instructions that are given, especially in relation to emergencies (e.g. know the location of fire exits).
![]() Ask for further information if you need it.
Ask for further information if you need it.
![]() Report accidents (or a ‘near miss’), dangerous situations or defects in safety arrangements.
Report accidents (or a ‘near miss’), dangerous situations or defects in safety arrangements.
![]() Do not interfere with or misuse safety systems or equipment, or engage in horseplay that could be dangerous.
Do not interfere with or misuse safety systems or equipment, or engage in horseplay that could be dangerous.
![]() Work within the limits of competence which means a knowledge of best practice and an awareness of the limitations of one’s own experience and knowledge.
Work within the limits of competence which means a knowledge of best practice and an awareness of the limitations of one’s own experience and knowledge.
Assessing risk
The key to good, safe working practices is to assess any significant risk and to take action to eliminate or minimize such risks. The procedure is as follows:
![]() Identify precisely what is required in the production.
Identify precisely what is required in the production.
![]() Identify any potential hazards in that activity.
Identify any potential hazards in that activity.
![]() Identify the means by which those risks can be controlled.
Identify the means by which those risks can be controlled.
The key terms in risk assessment are:
![]() hazard – the inherent ability to cause harm;
hazard – the inherent ability to cause harm;
![]() risk – the likelihood that harm will occur in particular circumstances;
risk – the likelihood that harm will occur in particular circumstances;
![]() reasonably practicable – the potential improvement in safety is balanced against the cost and inconvenience of the measures that would be required; if the costs and inconvenience do not heavily outweigh the benefits, then the thing is reasonably practicable and should be done;
reasonably practicable – the potential improvement in safety is balanced against the cost and inconvenience of the measures that would be required; if the costs and inconvenience do not heavily outweigh the benefits, then the thing is reasonably practicable and should be done;
![]() residual risk – the risk remaining after precautions have been taken.
residual risk – the risk remaining after precautions have been taken.
An example of the above four terms in action might be when it is proposed to rig a camera hoist near overhead power lines because it is claimed that this is the best position for the required shot. The power lines are a hazard. Touching them could result in death. What is the likelihood (risk) that harm will occur in particular circumstances? There may be the risk of a high wind blowing the hoist onto the power lines. Is the weather changeable? Could a high wind arise? What is reasonable and practical to improve safety? The obvious action is to reposition the hoist to provide a usable shot but eliminate all risk of it touching the power lines. As weather is often unpredictable, the hoist should be repositioned as the costs and inconvenience do not heavily outweigh the benefits. There remains the residual risk of operating a camera on a hoist which can only be partially reduced by wearing a safety harness.
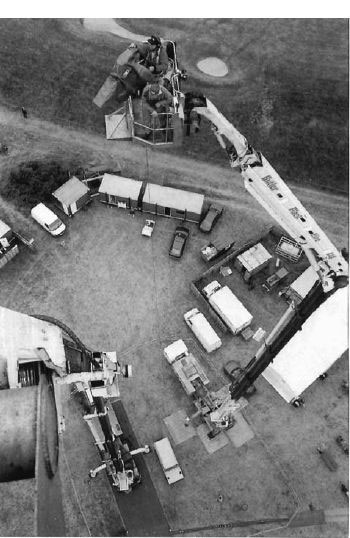
Covering the Open Golf Tournament – 60 m above the ground
The importance of safety
Nearly all television production environments are temporary rigs and therefore potentially hazardous. One of the most dangerous times is during rigging and de-rigging. Apart from the risks of lifting heavy equipment, hoisting, climbing and cabling, there is, when de-rigging, the universal tendency to want to get the job done as quickly as possible, coupled, on location, with a de-rig that is often carried out at night. It is in such situations that a couple of minutes of thought could prevent a lifetime of backache.
Fire
Make yourself aware of the fire procedure and alarms in studios and on location. A staff member of an organization is usually familiar with every corridor, exit and shortcut in a studio complex. A freelance may need to read signs when finding their way around. Make certain that you could find your way through smoke-filled corridors to the nearest exit.
Location work means continuously operating in new or unfamiliar buildings or stadiums filled with spectators. When rigging, walk the quickest route you can find to an outside exit in the case of fire.
Studio rigging
Allocated rigging time may be shared by many different craft groups. The simultaneous activities of rigging lights, setting, set dressing and sound and camera rigging can lead to a potentially dangerous situation. Ensure that all precautions are taken to ensure the safety of yourself and others. In particular observe the following:
![]() Check when pulling cables that they will not trip or unsettle other colleagues carrying weights.
Check when pulling cables that they will not trip or unsettle other colleagues carrying weights.
![]() Do not continue to pull a cable that is out of sight and snagged. Apart from the possible damage to the cable end, it may be snagged on a ladder in use, etc.
Do not continue to pull a cable that is out of sight and snagged. Apart from the possible damage to the cable end, it may be snagged on a ladder in use, etc.
![]() Get help when lifting heavy weights and use the advised procedure of bending at the knees and keeping the back straight when lifting. Lift in two stages – chair height, then up to required height.
Get help when lifting heavy weights and use the advised procedure of bending at the knees and keeping the back straight when lifting. Lift in two stages – chair height, then up to required height.
![]() Do not go into the grid area without observing the proper procedure (see Slung monitors, page 54).
Do not go into the grid area without observing the proper procedure (see Slung monitors, page 54).
Cable routing
Camera cable routing should ensure that access routes are not obstructed. Where necessary (e.g. crossing fire lanes, audience or performer entrances and exits), cables must be flown or ramped. Take special precautions in unlit areas of the studio (behind sets, etc.) which may be used by performers and crew in a hurry during a production. Ask for working lights to be rigged.
Where possible, camera cable runs should take the safest and shortest route to the cable point avoiding floor areas that are access points on to the set or to production rooms (e.g. make-up, wardrobe etc.). If a safety rail is fitted around the base of the studio wall, the camera cable should pass under the rail before being plugged into the cable point.
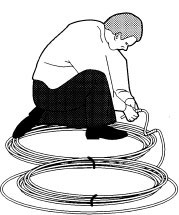
A cable eight (see above) is a convenient way of storing camera cable that is not immediately needed.
Monitors
Monitors play an important part on the studio floor and are used by different members of the production crew. Their positions are often very carefully sited to provide an unobstructed eyeline for the presenters, floor manager or boom operators (if the booms are not fitted with mini-monitors) and camera crew. Never stand in front of a monitor when watching the show. Stand to one side of the monitor and check that you are not obstructing anyone who is using the monitor. The same discipline applies to standing in front of an audience and obstructing their view of the show.
On location, monitors are crucial for keeping reporters, commentators, etc., in touch with the transmitted or recorded output.
In-vision monitors are used to conduct interviews with participants who are not in the studio or to display visual material. Large screen displays and video walls (numerous monitors stacked close to each other displaying a segment of a video image) are also used for a variety of purposes in-vision.
Switched feeds
A monitor can be fed with a single video source such as the output of the studio or location or it can be fed with two or more sources which are switchable on the monitor and therefore serve a dual purpose during a production.
It can also be remotely switched and fed a number of video sources from a technical area or vision mixing panel. It is therefore important when rigging a monitor that the video cable is plugged to the correct monitor video point on the wall box. These monitor points can be cross-plugged in the studio technical area to provide whatever video feed is required.
Studio monitors require a mains cable which is usually bound with the video cable or may be an integral dual video/mains cable. Location monitors may be battery fed if a mains power supply is inaccessible. Check the condition of the power cable before plugging into the technical mains socket. This is a separate power supply to isolate broadcast equipment from any induced interference on the standard mains supply of the studio complex.
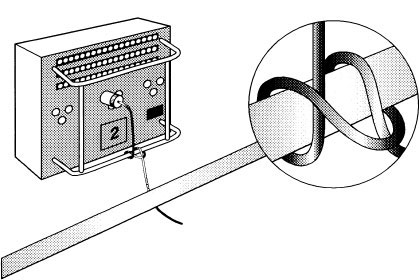
Secure the combined power/video cable to the wall box by passing it under the safety bar (if installed) and then tie off the cable using a clove hitch (see opposite).
All monitor cables crossing fire lanes should be ramped or covered with appropriate rubber mats, flown (above head height) or stuck down with special gaffer tape that has printed hazard stripes. If the cables are flown, remember to use quick-release knots to avoid wasting time at the de-rig untying tight and complicated ‘granny’ knots.
Prompters
Prompters attached to cameras are in effect specialist monitors and may require a feed from the prompter controller and a power supply.
Run all cables under the bar (if fitted) beneath the wall box. When possible tie off the cable using a clove hitch to prevent any accidental pulling on the cable disconnecting the cable or damaging the wall box connection.

Monitors in general production use are generally mounted on a wheeled trolley. Check that the monitor is securely attached to the trolley by safety straps or is a permanent fixture. Tie the combined cable to the monitor stand in the same way as at the wall box giving sufficient slack between the tied point and the inputs on the back of the monitor so that if inadvertently the monitor cable is pulled, it will not pull out the cable or damage the input connectors. If the feed for the monitor is the only video input, check that the monitor is terminated (i.e. switched to 75 ohms).
Never pull a monitor along by its cable and get assistance if it needs to be repositioned across cables or ramps. It is better to pull a monitor and lift it over obstructions rather than to push and risk the front end suddenly tipping when it hits an obstacle resulting in the monitor sliding off its stand.
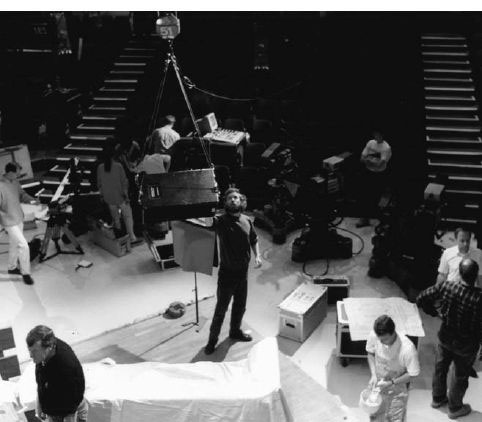
Working in the grid
Sometimes it is necessary to enter the grid area in order to sling a monitor above the studio floor. Extreme care should be taken that nothing taken on to the grid falls through on to the studio floor below. Access to the grid must be strictly controlled while people are working on the studio floor and the following procedures enforced:
![]() remove any loose item either worn or pocketed when entering the grid e.g. coins, keys, screwdrivers, spanners and especially video barrels;
remove any loose item either worn or pocketed when entering the grid e.g. coins, keys, screwdrivers, spanners and especially video barrels;
![]() if tools are essential for the rig, then they must be kept secure when working overhead;
if tools are essential for the rig, then they must be kept secure when working overhead;
![]() do not allow video or mains cable ends to fall though the grid but lower them to the floor;
do not allow video or mains cable ends to fall though the grid but lower them to the floor;
![]() if possible, clear the floor but if this is not practical, have an ‘exclusion zone’ with someone ‘policing’ it;
if possible, clear the floor but if this is not practical, have an ‘exclusion zone’ with someone ‘policing’ it;
![]() only suspend monitors from agreed suspension points (hoists etc.).
only suspend monitors from agreed suspension points (hoists etc.).
Slung monitors
![]() Check that the safe working load (SWL) of the hoist or support is suitable for the slung monitor and cradle.
Check that the safe working load (SWL) of the hoist or support is suitable for the slung monitor and cradle.
![]() Check the monitor cradle is safe and all adjustable struts are tight and hold the monitor securely.
Check the monitor cradle is safe and all adjustable struts are tight and hold the monitor securely.
![]() Use two people to lift and present the monitor/cradle to the suspension arm and have another to attach the monitor to the spigot or whatever method is used to attach the monitor cradle to the hoist.
Use two people to lift and present the monitor/cradle to the suspension arm and have another to attach the monitor to the spigot or whatever method is used to attach the monitor cradle to the hoist.
![]() Attach a steel safety bond (see opposite) to prevent the monitor falling if the primary means of attachment to the hoist should fail.
Attach a steel safety bond (see opposite) to prevent the monitor falling if the primary means of attachment to the hoist should fail.
![]() Video cable and mains cables should be tied off at the grid and also tied to the monitor cradle. Always check there is a sufficient amount of slack cable before lowering a hoist.
Video cable and mains cables should be tied off at the grid and also tied to the monitor cradle. Always check there is a sufficient amount of slack cable before lowering a hoist.
![]() When the mains/video cable is plugged to the monitor, switch on and check the monitor is functioning with the correct feed and termination, before hoisting.
When the mains/video cable is plugged to the monitor, switch on and check the monitor is functioning with the correct feed and termination, before hoisting.
![]() Do not manually assist the hoist.
Do not manually assist the hoist.
![]() The hoist must be under surveillance when being raised or lowered.
The hoist must be under surveillance when being raised or lowered.
![]() There must be nobody under the load.
There must be nobody under the load.
![]() Check that the hoist movement does not foul adjacent suspended items and sufficient slack cable is available when lowering.
Check that the hoist movement does not foul adjacent suspended items and sufficient slack cable is available when lowering.
Electricity
Rigging camera cables, monitors, and dolly power supplies is a daily occurrence but, however familiar, an electrical supply is a potential hazard unless safe handling procedures are observed. The electrical safety of plugs and connectors should be inspected before plugging into a supply and a periodic check should be made on earthing and the condition of cables for signs of cuts or worn insulation. Electrical equipment should be periodically tested by a competent person and date stamped.

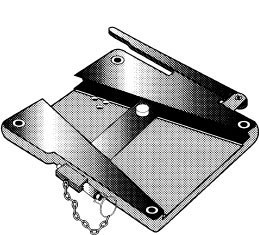
Safety bonds
A safety bond is used to protect every overhead rigged linkage in case of failure of the means of attachment to the suspension component. A safety bond is a flexible steel wire rope fitted with a quick release fastener. It is looped between a suspended item and a firm support and is a safeguard against the accidental release of a rigged connection. It is entirely separate from the primary means of support and normally carries no load.
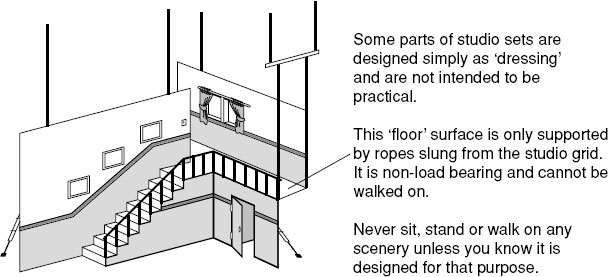
Scenery: Remember that scenery is often a three dimensional ‘fiction’ – a flimsy and temporary framework. Structures that appear weight bearing may be of very slight construction. Do not attempt to use part of the scenery as a camera platform unless the specific area has been pre-planned for the intended load capacity.
Smoke effects: Although most effects smoke machines produce a smoke of low toxicity it can irritate the nose, throat and lungs. An asthmatic may suffer a severe attack. There is a balance to be struck between generating the required density of smoke and the ventilation needed to clear it. Do not attempt to operate close to the smoke source for long periods.
On location, water (rain, sea, rivers, swimming pools, etc.) in contact with electricity poses a special hazard. When more than one power source is used at a location dangerous voltage differences can occur. There should be segregation between different power supplies.
Only open the side of the camera and alter controls if you can see what you are touching and are competent to carry out the adjustment. Never feel around for a control while looking in the viewfinder.
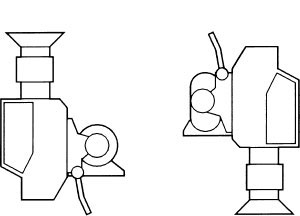
Basic checks need to be carried out before rigging or de-rigging a full facility television camera on to a wedge plate pan/tilt head attached to a mounting:
![]() Check the stability of the mounting and the head is secured to the mounting (e.g. on a four-bolt fixing, all bolts are in place and tight).
Check the stability of the mounting and the head is secured to the mounting (e.g. on a four-bolt fixing, all bolts are in place and tight).
![]() Tripod – is level and the base and legs are secure and locked.
Tripod – is level and the base and legs are secure and locked.
![]() Pedestal – the column is locked down with safety locks and the head is locked off with safety chains in place.
Pedestal – the column is locked down with safety locks and the head is locked off with safety chains in place.
![]() Crane or jib arm – the arm is locked or restrained with a security strap or someone is securing the boom. NB: do not stand on the crane platform when rigging or de-rigging a camera. The crane arm will require weights to be added at the rear of the boom arm to balance out the combined weight of camera operator, camera and lens.
Crane or jib arm – the arm is locked or restrained with a security strap or someone is securing the boom. NB: do not stand on the crane platform when rigging or de-rigging a camera. The crane arm will require weights to be added at the rear of the boom arm to balance out the combined weight of camera operator, camera and lens.
![]() Know the route you are carrying the camera and check that the route is clear and free from obstructions (e.g. closed doors can be pushed open in the direction of movement).
Know the route you are carrying the camera and check that the route is clear and free from obstructions (e.g. closed doors can be pushed open in the direction of movement).
![]() Check the safety locking pin on the wedge plate on the pan/tilt head is removed and the retaining spigot is clear of the shoe of the wedge plate and is in a condition to accept the wedge on the base of the camera (see opposite).
Check the safety locking pin on the wedge plate on the pan/tilt head is removed and the retaining spigot is clear of the shoe of the wedge plate and is in a condition to accept the wedge on the base of the camera (see opposite).
![]() Check the back of the pan/tilt head (i.e. the widest part of the wedge plate) is facing the direction in which camera will be slid on to the head.
Check the back of the pan/tilt head (i.e. the widest part of the wedge plate) is facing the direction in which camera will be slid on to the head.
![]() Check that the camera is seated in the wedge plate before sliding in the securing spigot and replacing the locking pin.
Check that the camera is seated in the wedge plate before sliding in the securing spigot and replacing the locking pin.
![]() When rigging a lens, protect the back element and keep the pedestal/crane or arm locked off at minimum height to facilitate hanging the lens on the camera. Remove the back element lens cap (if fitted) and the cap/protection for camera prism block. When rigging most box lenses, present the top of the lens to the hinge at the top of the camera and then lower the lens down to engage securing spigots. Slide the retaining clamp and tighten.
When rigging a lens, protect the back element and keep the pedestal/crane or arm locked off at minimum height to facilitate hanging the lens on the camera. Remove the back element lens cap (if fitted) and the cap/protection for camera prism block. When rigging most box lenses, present the top of the lens to the hinge at the top of the camera and then lower the lens down to engage securing spigots. Slide the retaining clamp and tighten.
![]() Connect lens cables and zoom controls checking that they are routed correctly and that there are no excessive loops of cable that could snag the pan/tilt head in operation.
Connect lens cables and zoom controls checking that they are routed correctly and that there are no excessive loops of cable that could snag the pan/tilt head in operation.
![]() When connecting a multi-core camera cable, check the position of the key ring configuration inside the cable connector and match this to the cable connector on the camera.
When connecting a multi-core camera cable, check the position of the key ring configuration inside the cable connector and match this to the cable connector on the camera.
![]() Remove the security bar or locking pins on the pedestal column, unlock any column brake and check the pedestal is balanced (see opposite).
Remove the security bar or locking pins on the pedestal column, unlock any column brake and check the pedestal is balanced (see opposite).
Wedge plate shoe showing the spigot that slides into the channel in the base of the camera wedge plate.
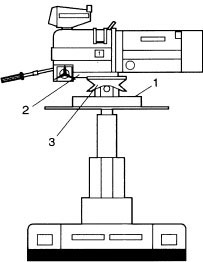
Raise the column and check the pedestal is correctly pressurized for the rigged camera/lens combination. Many camera mountings use compressed gas to balance the camera/lens on the column. The pressure of this gas must be adjusted by a competent, trained person.
Move the column of the pedestal through its complete range of operating heights and check that it remains at any height it is set to without rising or sinking. Use the trim weights (1) on the pedestal to adjust. Gas pressure varies with temperature and the pedestal may need further trim weight adjustment during operations.
When pan bars, viewfinder and zoom controls are adjusted for operation and the camera cable is connected, check the balance of the head with all friction removed and if required, unlock the wedge plate (2) and move the camera to reach a point of balance (i.e. the camera will stay at any angle of tilt). If after balancing, the camera either returns to a level position or it falls forward or backwards to the maximum tilt, it is likely that the wrong size of cams (3) are fitted for the camera/lens combination that has been rigged.
When the camera is balanced, apply the degree of friction that is operationally required for the production.
![]() Pedestal – check that the column is locked down and the safety chains are secured on the pan/tilt head and that, ideally, the pedestal wheels are oriented 90° to the wedge plate sliding section.
Pedestal – check that the column is locked down and the safety chains are secured on the pan/tilt head and that, ideally, the pedestal wheels are oriented 90° to the wedge plate sliding section.
![]() Crane or jib arm – check that the arm is locked or restrained with a security strap or someone is securing the boom.
Crane or jib arm – check that the arm is locked or restrained with a security strap or someone is securing the boom.
![]() Fit front lens cap and switch the camera off before disconnecting the camera cable and all lens cables.
Fit front lens cap and switch the camera off before disconnecting the camera cable and all lens cables.
![]() Recheck that no cables remain connected before removing lens and refitting back element lens cap.
Recheck that no cables remain connected before removing lens and refitting back element lens cap.
![]() Pan the camera so that both people sliding the camera out of the wedge plate are comfortably positioned and are able to move the camera away from the mounting without obstruction.
Pan the camera so that both people sliding the camera out of the wedge plate are comfortably positioned and are able to move the camera away from the mounting without obstruction.
![]() Remove the locking pin on the head and slide the restraining spigot out of the wedge plate channel.
Remove the locking pin on the head and slide the restraining spigot out of the wedge plate channel.
![]() Slide the camera back on the head and lift clear.
Slide the camera back on the head and lift clear.
![]() Leave the pedestal/crane/jib arm in a secure and balanced condition.
Leave the pedestal/crane/jib arm in a secure and balanced condition.
Rigging a lightweight camera
![]() Check the fitting on the base of the camera matches the tripod adaptor plate on the pan/tilt head fitting.
Check the fitting on the base of the camera matches the tripod adaptor plate on the pan/tilt head fitting.
![]() Check the cam size of the pan/tilt head if fitting a lightweight camera and box lens combination.
Check the cam size of the pan/tilt head if fitting a lightweight camera and box lens combination.
![]() When fitting a lightweight camera into a harness equipped with a box lens, take care to protect the back element of the lens as the camera is presented to the lens.
When fitting a lightweight camera into a harness equipped with a box lens, take care to protect the back element of the lens as the camera is presented to the lens.
![]() Make sure the height adjustment of the camera plate is correct so that no weight or pressure is applied to the lens to camera flange.
Make sure the height adjustment of the camera plate is correct so that no weight or pressure is applied to the lens to camera flange.
![]() When fitting a lightweight camera/lens on to a lightweight head, check that the holding pin is not in the centre of the wedge. Move lever to reseat the holding pin in its inoperative position. Slide camera into the tripod adaptor plate until a click is heard. Check that the camera is locked by testing if it can be slid out of the adaptor plate. The method of securing the base of a lightweight camera to the tripod adaptor varies with make of camera. Adjust balance, CoG and required friction.
When fitting a lightweight camera/lens on to a lightweight head, check that the holding pin is not in the centre of the wedge. Move lever to reseat the holding pin in its inoperative position. Slide camera into the tripod adaptor plate until a click is heard. Check that the camera is locked by testing if it can be slid out of the adaptor plate. The method of securing the base of a lightweight camera to the tripod adaptor varies with make of camera. Adjust balance, CoG and required friction.
![]() Cable up zoom, viewfinder, cue lights, mixed viewfinder and check if lens can be powered from camera cable or if it is to be battery driven.
Cable up zoom, viewfinder, cue lights, mixed viewfinder and check if lens can be powered from camera cable or if it is to be battery driven.
![]() Check that the connecting cable between lens and camera will supply the correct voltage on the correct pins.
Check that the connecting cable between lens and camera will supply the correct voltage on the correct pins.
![]() Route the camera cable and any other cable required to provide sufficient loop at any point on the mounting which moves. Check there is sufficient cable slack by positioning the arm throughout its complete operational range.
Route the camera cable and any other cable required to provide sufficient loop at any point on the mounting which moves. Check there is sufficient cable slack by positioning the arm throughout its complete operational range.
![]() If the dolly is motorized, check that the correct power supply is available before connecting. Secure the power cable to the camera cable with gaffer tape along the length of cable in use.
If the dolly is motorized, check that the correct power supply is available before connecting. Secure the power cable to the camera cable with gaffer tape along the length of cable in use.
![]() Always leave an unattended crane in a secure and locked condition.
Always leave an unattended crane in a secure and locked condition.
The head is correctly balanced when the minimum amount of even effort is required to move the head and the camera can be set in any tilt position and the head will remain in that position when the hand is removed from the pan bar. Pan/tilt head balance procedure will vary depending on design. The following instructions apply to the Vinten Vision range. Prior to balancing any head, ensure that the pan bars and any ancillary equipment have been fitted in the operating position in order to prevent upsetting the balance once it has been achieved.

1. Release tilt brake. Turn balance knob counter-clockwise until head falls away from horizontal under weight of camera.
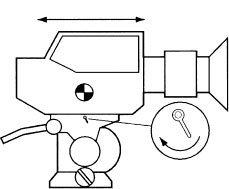
2. Release slide lock and slide camera backwards and forward until it balances horizontally. Apply slide lock.
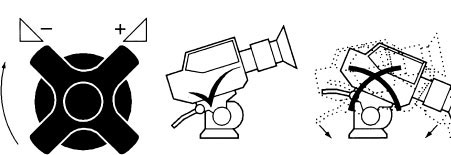
3. Turn balance knob clockwise until camera does not fall away when head is tilted and released.
4. Repeat steps 2 and 3 until perfect balance is achieved, when the camera will remain set at any angle from +90° to −90° without falling away or springing back. Re-apply the tilt brake.
Lightweight design
An outside broadcast is a programme that is recorded or transmitted away from normal studio facilities and therefore every item of equipment required by the production needs to be transported to the location.
Although in the past outside broadcast units were usually equipped with full facility cameras, it is now possible to use portable cameras for every type of production. Smaller cameras provide the obvious advantages of ease of rigging and greater flexibility in choice of camera position and smaller cables. Their disadvantages include lack of full production facilities found on larger cameras, sometimes a lack of positive zoom controls and smaller zoom lens ratios. Large box lenses are often used with a rigging harness on to a lightweight camera to allow greater zoom ratios.
At a location, camera mountings often have to be positioned on scaffolding, in stadiums or inside buildings inaccessible to wheeled transport. Every item has to be manhandled, for example, up stairs or to a remote part of the stadium before being rigged. Mountings need to be broken down into manageable sections that can be carried. In general, OB mountings are smaller and lighter than their studio equivalent although sharing the same operational range of height and manoeuvrability.
Once the camera and mounting have been carried to their operating position, a cable or a radio link is required to allow for the return signal, picture control and communications. Power may be supplied to the camera via cable, battery or from a local mains supply via an adaptor.
If possible, avoid rigging in isolation on location as this increases the risk of being hurt while lifting heavy weights without assistance or the risk of electrocution without immediate help.
OB rigging hazards
As well as the general details of rigging previously discussed, rigging cameras and mountings at a location involves solving problems caused by:
![]() lifting and carrying heavy weights when rigging;
lifting and carrying heavy weights when rigging;
![]() working among the public;
working among the public;
![]() working at heights (see opposite);
working at heights (see opposite);
![]() personal and equipment protection against adverse weather.
personal and equipment protection against adverse weather.
Hoisting and lifting equipment
Although instruction is available on lifting heavy weights to avoid back injury, the nature of access to some stadiums, public buildings, etc., makes recommended procedure impossible. Always attempt to maintain the advised body posture of chin in, straight arms and back when lifting heavy weights.
Rigging a camera onto a freestanding scaffold rostrum.
![]() Visually check that the structure is safe and competently assembled.
Visually check that the structure is safe and competently assembled.
![]() Check that a gallows arm is fitted at the corner of the rostrum with at least a 2:1 block and tackle fitted for hauling up the equipment.
Check that a gallows arm is fitted at the corner of the rostrum with at least a 2:1 block and tackle fitted for hauling up the equipment.
![]() The gallows arm should be high enough to allow the equipment to be swung over the hand rail. Great care should be taken if the height of the arm only allows equipment to be swung on board between the hand rail and the kicking board.
The gallows arm should be high enough to allow the equipment to be swung over the hand rail. Great care should be taken if the height of the arm only allows equipment to be swung on board between the hand rail and the kicking board.
![]() Hauling equipment up by a single pulley attached to the hand rail or by hand over the hand rail is dangerous and places everyone involved at risk.
Hauling equipment up by a single pulley attached to the hand rail or by hand over the hand rail is dangerous and places everyone involved at risk.
![]() Check the rope to be used to haul the equipment is of sufficient strength and is well stretched. New ropes tend to twist under strain and make hauling the equipment dangerous and difficult.
Check the rope to be used to haul the equipment is of sufficient strength and is well stretched. New ropes tend to twist under strain and make hauling the equipment dangerous and difficult.
![]() Check that a guard is fitted to the pulley to prevent the rope slipping out of the guide.
Check that a guard is fitted to the pulley to prevent the rope slipping out of the guide.
![]() A lifting bag marked with the maximum carrying weight should be used but if this not available, make a ‘parcel’ of the equipment box by attaching the rope to the carrying handles.
A lifting bag marked with the maximum carrying weight should be used but if this not available, make a ‘parcel’ of the equipment box by attaching the rope to the carrying handles.
![]() Attach a second rope to the lifting hook to allow the load to be controlled from the ground when lifting and pulled clear from the rostrum on the way up. This also allows the lifting hook and bag to be pulled down for the second load.
Attach a second rope to the lifting hook to allow the load to be controlled from the ground when lifting and pulled clear from the rostrum on the way up. This also allows the lifting hook and bag to be pulled down for the second load.
![]() At least three people should help with the rig, and with a full facility camera and mounting ideally four people – two at the top and two at the bottom of the scaffold.
At least three people should help with the rig, and with a full facility camera and mounting ideally four people – two at the top and two at the bottom of the scaffold.
![]() If possible, send the equipment up in the order of rig, i.e. mounting, pan/tilt head, camera, lens, etc.
If possible, send the equipment up in the order of rig, i.e. mounting, pan/tilt head, camera, lens, etc.
When hoisting equipment up to a height, use block and tackle if available and double check anchor points and securing arrangements on the equipment. Have someone policing the area below the hoisting position and whenever possible use an approved and tested lifting bag.
Make certain tripods and bases are secure, stable and level before rigging camera and lens. In an exposed position or on uneven ground, use additional ropes to anchor the mounting to prevent damage by high winds. Always leave the camera weather protected and with the smallest area of camera/lens facing the prevailing wind.
The appropriate route for a cable is where it is not constantly being stepped on or likely to trip up people and will not be damaged by vehicles. Camera cables need to be ramped, flown or buried where they are exposed to vehicles or the public and their presence identified with hazard striped tape.
Public interest
Most people watch television and therefore most people have an interest in how programmes are made. On location there will often be an interchange between the production crew and the public. Try to accommodate their genuine interest whilst safeguarding their safety.
Never rig or de-rig camera equipment above an audience unless a ‘safe area’ has been cleared and is being continuously ‘policed’. If a camera is positioned among the public (e.g. in an audience), make certain that there is someone, in addition to the camera operator, who can assist with organizing and controlling an operational area. Check that the condition of the camera, lens and mounting cannot cause harm if there is accidental contact in a crowd
Organize additional help if the camera is cabled and requires repositioning among the public. The rigger should ensure that sufficient slack cable is available at all times and be ready to pay it out as and when the camera moves. To a large extent, roving cameras are now equipped with radio links and therefore cable bashing for a mobile camera is redundant (e.g. running the touch line at a rugby or football match).
Cameras mounted above an audience must be rigged before the audience is seated and checked for any loose or movable items that could be displaced when operating. Cranes manoeuvring above an audience should be no lower than the height of a person suddenly standing up and with no trailing loops of cable. There should always be an observer of the camera’s physical position when manoeuvring a remotely controlled camera. On location, clearance to work a crane above an audience may be required from the local authority.
Camera crews working in front of audiences or spectators at public events or performances should wear the appropriate clothing to integrate with the event (e.g. avoid very casual clothes at a church service).
Security
Precautions must always be taken against loss or damage to equipment. When working in public places, avoid leaving equipment unattended. Overnight security of equipment is necessary unless the camera position is secure and inaccessible. If there is a risk of someone scaling a scaffold tower then blockboard can be used to clad the base and the access ladder removed.
Hostile crowds
No story is worth a life. During public disorder or a civil disturbance, stay together as a crew and avoid conspicuous display of cameras etc. Withdraw immediately if the presence of TV cameras intensifies a dangerous situation.

The microwave transmitter/antenna module is attached to the camera. Typical portable microwave link frequencies are between 2.5 GHz and 13 GHz.
The camera antenna transmits to the location control truck, video and audio output plus camera operator talkback.
The tracking base antenna transmits production talkback, camera controls (iris, lift, gain etc.) and a return video feed to allow the camera operator in the field to monitor on the camera viewfinder (if required) the ‘on air’ picture or any other video source that is needed.
Working at height
There is always the risk of a person or object falling from a height. The operating height at which a camera is a risk is any distance likely to cause injury, and certainly any drop in excess of 2 m. Either safety barriers must be erected (at least 1.1 m high) plus toe boards and intermediate rails or equivalent protection.
If the edge cannot be protected, then people must be kept at least 3 m from the edge or wear a harness attached to a securely anchored safety line. Any object that could fall or be blown off the structure (e.g. lens cap) should be removed or anchored. Equipment in exposed positions must be adequately secured to withstand the foreseeable wind force. Check when a camera cable is connected to an elevated camera that it is tied off so that the weight of the cable does not stretch the cable or pull on the camera.
Scaffolding
Scaffolding should be erected by an approved contractor and certified for its intended use before being rigged with camera/lens/mounting. There should be the normal ‘edge protection’ of a 1.1 m barrier and a ‘kick’ or toe board to indicate to the camera operator while operating the camera that he/she is approaching the edge of the platform.
Sometimes the base of the scaffolding is sheeted with blockboard for cosmetic or safety reasons (e.g. it prevents unauthorized personnel clambering up the scaffolding). Sheeted scaffold structures may suffer considerable strain at high wind speeds.
Be especially vigilant in the use of zip-up towers built from ‘snap-together’ components. The height to least-base ratio must not be more the 3:1 in light winds and a 3.5:1 ratio when used inside. Guy ropes and ground anchor/ballasting may be used to improve stability.
Ladders
Check that access ladders are securely attached to the scaffolding, and that rungs are free from mud, grease, etc. If a free-standing ladder is used for rigging, check that the foot of the ladder is on a firm and level surface and someone is using his/her weight to stabilize the ladder when in use.
Hydraulic platforms
![]() Check that a competent person is operating the hoist and will be in continuous attendance while the hoist is in use.
Check that a competent person is operating the hoist and will be in continuous attendance while the hoist is in use.
![]() Check safety inspection cards and date of last inspection.
Check safety inspection cards and date of last inspection.
![]() Check the arrangements to communicate between the cage and the ground.
Check the arrangements to communicate between the cage and the ground.
A scaffold clamp in operation at a rugby match
A quick and convenient method of mounting a camera on a scaffold structure is by the use of a scaffold clamp. This consists of a metal pod attached to two scaffold poles rigged on the scaffolding onto which the pan/tilt head is fixed. Usually this restricts the amount the camera can be panned left or right before the operator begins to lean out over the scaffold bar in order to see into the viewfinder.
![]() Check the emergency procedure if the camera operator is trapped aloft (e.g. bleeding down the system, rescue by another hoist, etc.).
Check the emergency procedure if the camera operator is trapped aloft (e.g. bleeding down the system, rescue by another hoist, etc.).
![]() Check the operation of any self-lowering system.
Check the operation of any self-lowering system.
![]() Check that the base of the hoist will be continuously supervised to prevent unauthorized operation.
Check that the base of the hoist will be continuously supervised to prevent unauthorized operation.
![]() Check the condition of the hoist and look for hydraulic oil leaks, cracks in the welding of the cage, etc.
Check the condition of the hoist and look for hydraulic oil leaks, cracks in the welding of the cage, etc.
![]() Check that the legs are positioned for adequate load spreading of the rig and are not positioned on or near drain covers.
Check that the legs are positioned for adequate load spreading of the rig and are not positioned on or near drain covers.
![]() Have a system for measuring wind speed and know the maximum wind speed for safe working on the specific rig and height to be worked.
Have a system for measuring wind speed and know the maximum wind speed for safe working on the specific rig and height to be worked.
![]() Use a harness and properly attached lifeline.
Use a harness and properly attached lifeline.
Height and overhead power cables
Be careful when using mast scaffold poles, mic booms, etc., when close to overhead power lines. Operating positions should be no closer than 15 m from wire suspended on a metal structure and no closer than 11 m from a wire suspended from a wooden structure.
Planning the weather?
Often the most unpredictable factor in an outside broadcast is the weather. The positions of the cameras are usually controlled by the nature of the event but they are often sited to avoid looking into the sun. Extreme weather changes may be experienced during the period of rig, rehearsal and transmission, and therefore adequate precautions must be made to protect:
![]() equipment against adverse weather;
equipment against adverse weather;
![]() personnel against adverse weather.
personnel against adverse weather.
Adverse weather conditions
The standard advice in weather protection for equipment or people is to prepare for the worst.
This means checking weather forecasts and assessing, if in exposed positions, that scaffold towers or hoists can withstand any anticipated high winds and if equipment requires additional anchorage. Often, long before the structure is at risk, the winds may be too high to hold a camera steady on anything other than a fairly wide angle.
A weather cover should always be fitted to a camera before use as it offers protection from rain and heat. Water and electricity do not mix and there should be precautions taken to protect all electrical connections such as headsets, zoom controls, cable plugs, etc. Often the simplest but most satisfactory method is covering hand controls with small plastic bags. In driving rain, keep the camera panned away from the wind whenever possible and use the front lens cap during any extended break in coverage. Check there is adequate ventilation if the camera is covered and left switched on overnight.
Rain building up on the front element of the lens will be more obvious on a wide angle shot and lens cloths will be needed to periodically clean the lens. In rainy conditions, the lens shade, if adjustable, should be positioned to provide the greatest protection with gaffer tape stuck along the top and bottom of the hood to reduce rain penetration or flare. Check that it does not vignette (i.e. appear in shot) when the widest angle of the lens is selected.
Extremes of cold or heat can have an adverse affect on the performance of cameras. Use additional thermal linings inside camera covers and/or shade from direct sun if feasible.
Personal weather protection
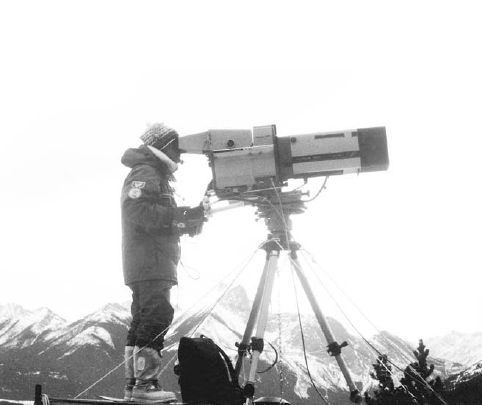
Large-scale events (e.g. golf) involve cameras being scattered a long way from the scanner. They also involve long transmissions. A camera operator setting out for the day therefore needs to equip him/herself with a choice of clothing to match any changing weather conditions.
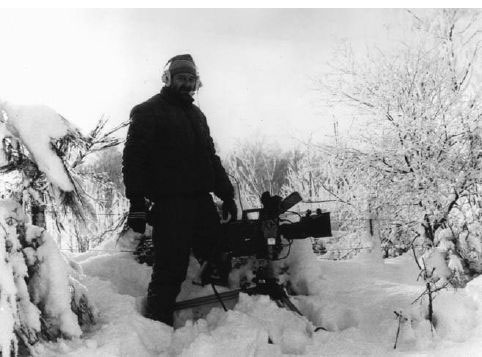
Specialist clothing can be purchased designed for outdoor pursuits such as mountaineering, sailing, etc. which are waterproof but allow a measure of physical activity without a build up of perspiration within the garment. Lightweight thermal gloves are available which allow the sensitive control of zoom and camera switches in very cold weather. One of the problems with camera miniaturization is that switches (talkback, mixed, viewfinder, etc.) have got smaller while gloved hands have remained the same size.
Condensation within wet weather clothing is a shared problem with a camera when it is moved from a cold environment to a warm moist interior (e.g. touch line to interview room).
Those who work regularly out of doors must make themselves aware of the risks involved and how to protect themselves against sunburn, skin cancer, heat stress and heat stroke, hypothermia, white finger and frost bite.
Risk assessment during a thunderstorm
A check on the effects of any extreme weather forecast must be made each day on exposed camera positions. Individual safety requires a personal assessment and only the individual on a scaffold tower or hoist can judge when it is time to call it a day and retreat from the threat of lightning.
A checklist of potential OB safety hazards includes the following:
![]() Boats – it is essential to wear life lines and life jackets when operating on a boat or near water such as on a harbour wall.
Boats – it is essential to wear life lines and life jackets when operating on a boat or near water such as on a harbour wall.
![]() Confined spaces – check the quality of air and ventilation when working in confined spaces such as trench, pipes, sewer, ducts, mines, caves, etc.
Confined spaces – check the quality of air and ventilation when working in confined spaces such as trench, pipes, sewer, ducts, mines, caves, etc.
![]() Children are a hazard to themselves. When working in schools or on a children’s programme, check that someone is available and responsible to prevent them touching or tripping over cables, floor lamps, camera mountings, etc.
Children are a hazard to themselves. When working in schools or on a children’s programme, check that someone is available and responsible to prevent them touching or tripping over cables, floor lamps, camera mountings, etc.
![]() Explosive effects and fire effects must be regulated by a properly trained effects operator and special care should be taken with those effects that cannot be rehearsed.
Explosive effects and fire effects must be regulated by a properly trained effects operator and special care should be taken with those effects that cannot be rehearsed.
![]() Excessive fatigue is a safety problem when operating equipment that could cause damage to yourself or others and when driving a vehicle on a long journey home after a production has finished.
Excessive fatigue is a safety problem when operating equipment that could cause damage to yourself or others and when driving a vehicle on a long journey home after a production has finished.
![]() Fork-lift trucks must have a properly constructed cage if they are to carry a camera operator and camera.
Fork-lift trucks must have a properly constructed cage if they are to carry a camera operator and camera.
![]() Lamps – all lamps should have a safety glass/safety mesh as protection against exploding bulbs. Compact source discharge lamps must always be used with a UV radiation protective lens. Lamps rigged overhead must be fitted with a safety bond. Check that lamp stands are secured and cabled to avoid being tripped over and that they are securely weighted at the base to prevent them being blown over.
Lamps – all lamps should have a safety glass/safety mesh as protection against exploding bulbs. Compact source discharge lamps must always be used with a UV radiation protective lens. Lamps rigged overhead must be fitted with a safety bond. Check that lamp stands are secured and cabled to avoid being tripped over and that they are securely weighted at the base to prevent them being blown over.
![]() Location safety – in old buildings, check for weak floors, unsafe overhead windows, derelict water systems and that the electrical supply is suitable for the use it is put to. Check the means of escape in case of fire and the local methods of dealing with a fire. Check for the impact of adverse weather and, in remote locations, the time and access to emergency services.
Location safety – in old buildings, check for weak floors, unsafe overhead windows, derelict water systems and that the electrical supply is suitable for the use it is put to. Check the means of escape in case of fire and the local methods of dealing with a fire. Check for the impact of adverse weather and, in remote locations, the time and access to emergency services.
![]() Level floor – every OB vehicle should be earthed and vehicles that require people to work inside should be parked and levelled with adequate ventilation. If operating a camera on the roof of a vehicle, it should either have a fully guarded edge or a safety harness and safety line should be worn by the camera operator. Check the risk from radio frequency radiation if there are aerials mounted on the same roof.
Level floor – every OB vehicle should be earthed and vehicles that require people to work inside should be parked and levelled with adequate ventilation. If operating a camera on the roof of a vehicle, it should either have a fully guarded edge or a safety harness and safety line should be worn by the camera operator. Check the risk from radio frequency radiation if there are aerials mounted on the same roof.
![]() Noise – high levels of location noise (machinery etc.), effects (gunshots, explosions) as well as close working to foldback speakers can damage hearing. Stress will be experienced attempting to listen to talkback with a very high ambient noise. Wear noise-cancelling headsets. If wearing single sided cans, use an ear plug in the unprotected ear.
Noise – high levels of location noise (machinery etc.), effects (gunshots, explosions) as well as close working to foldback speakers can damage hearing. Stress will be experienced attempting to listen to talkback with a very high ambient noise. Wear noise-cancelling headsets. If wearing single sided cans, use an ear plug in the unprotected ear.
![]() Stunt vehicles – motor vehicles travelling at speed involved in a stunt are likely to go out of control. Leave the camera locked-off on the shot and stand well away from the action area in a safe position agreed with the stunt coordinator.
Stunt vehicles – motor vehicles travelling at speed involved in a stunt are likely to go out of control. Leave the camera locked-off on the shot and stand well away from the action area in a safe position agreed with the stunt coordinator.
Camera operator working with a heavy duty tripod anchored against high winds
![]() Filming from a moving vehicle – the camera must be either securely mounted or independently secured on safety lanyards. Operators should be fitted with seat belts or safety harnesses attached to safety lines securely anchored.
Filming from a moving vehicle – the camera must be either securely mounted or independently secured on safety lanyards. Operators should be fitted with seat belts or safety harnesses attached to safety lines securely anchored.
![]() Roadside working – wear high-visibility clothing and have the police direct traffic if required. Police may give permission for a member of the crew to direct traffic but motorists are not obliged to obey such instructions.
Roadside working – wear high-visibility clothing and have the police direct traffic if required. Police may give permission for a member of the crew to direct traffic but motorists are not obliged to obey such instructions.