Continuous adjustment
Live or ‘recorded-as-live’ television production requires a camera mounting that can be quickly and silently repositioned off shot and have the flexibility to be smoothly positioned on shot to accomplish pre-rehearsed camera movements. It must also be capable of instant small adjustments in track or crab mode to compensate for masking by artistes or wrong positioning. A usable shot must always be provided in a continuous programme even though the position of the artistes is not as rehearsed.
In a studio these requirements are best served by a pedestal camera mounting controlled by the camera operator who can instantly compensate without misunderstanding or delay between tracker and camera operator.
The camera operator, while operating the camera, can also move the camera forwards, backwards or sideways by means of the ring steering wheel which alters the direction of the double wheel positioned at each corner of the base and he/she can alter the camera height. This must be accomplished silently, smoothly and with minimum effort. Continuous adjustment of the pedestal requires a smooth floor and complete mastery in the use of a pedestal.
The pedestal design
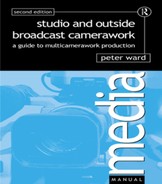
The most common camera mounting in a multi-camera production studio is the pedestal. The majority of studios are equipped with Vinten pedestals which are designed for a range of different weights and models of camera. These mountings have a triangular base with a pair of wheels at each corner controlled from a large ring steering wheel attached to the top of a hydraulically balanced column which can be smoothly raised or lowered (see opposite).
The larger pedestals (e.g. the Fulmar) with pan/tilt head, mainline camera, lens and lens controls can have a total weight of over 300 kg while a smaller lightweight pedestal and camera can be less than 140 kg. Moving 300 kg from a standing start, paced to the speed of the action covered while maintaining good composition and focus requires a specialist technique that is developed with experience. If you are new to multi-camera camerawork, do not underestimate the skills needed to move and stop the pedestal fluently, on cue and with precision.
Smoothly positioning the camera on and off shot requires learning skills in the use of the mounting. Practise as much as possible when not engaged in rehearsal but remember to defocus or cap up the camera to avoid distracting control room staff (who may be involved in rehearsing another sequence) by the moving images on your camera’s preview monitor.
Essential operational points are as follows:
![]() The camera and the mounting must be balanced and the head fitted with correct cams to ensure smooth operation.
The camera and the mounting must be balanced and the head fitted with correct cams to ensure smooth operation.
![]() The wheels must be free from any debris picked up from the studio.
The wheels must be free from any debris picked up from the studio.
![]() Always try to operate with the flat side of the pedestal base behind the camera.
Always try to operate with the flat side of the pedestal base behind the camera.
![]() Whenever possible, position wheels 90° to action so that instant adjustment to avoid masking can be achieved.
Whenever possible, position wheels 90° to action so that instant adjustment to avoid masking can be achieved.
Before rehearsal commences, check that all the operational controls of the camera, pedestal and pan/tilt head are functioning and set correctly and that they are adjusted to suit your operational technique.
Camera
![]() Check that zoom drive cables are clamped and will not snag when the camera is in use.
Check that zoom drive cables are clamped and will not snag when the camera is in use.
![]() Check that the pan bar and zoom control/shot box are positioned to your operational requirements and that the crib card-holder is conveniently positioned.
Check that the pan bar and zoom control/shot box are positioned to your operational requirements and that the crib card-holder is conveniently positioned.
![]() Check the range of viewfinder movement and adjust if necessary.
Check the range of viewfinder movement and adjust if necessary.
![]() Set up viewfinder – contrast/brightness/peaking/edge of frame and that all cue lights are switched on and working.
Set up viewfinder – contrast/brightness/peaking/edge of frame and that all cue lights are switched on and working.
![]() Check and adjust the back focus of the zoom if the lens has just been rigged.
Check and adjust the back focus of the zoom if the lens has just been rigged.
![]() Check that the camera channel and viewfinder definition is adequate for you to be the first to see loss of optical focus.
Check that the camera channel and viewfinder definition is adequate for you to be the first to see loss of optical focus.
![]() Check talkback and tie off headset cable for minimum loop.
Check talkback and tie off headset cable for minimum loop.
![]() Set up shot box angles if this is your preferred method of working.
Set up shot box angles if this is your preferred method of working.
![]() Check zoom and focus control setting and check the smoothness of their operation.
Check zoom and focus control setting and check the smoothness of their operation.
![]() Check the setting of the zoom extender.
Check the setting of the zoom extender.
![]() Check the lens front element and clean with lens tissue if necessary.
Check the lens front element and clean with lens tissue if necessary.
Pan/tilt head
![]() Remove locking chains or bar if fitted and unlock the pan/tilt head.
Remove locking chains or bar if fitted and unlock the pan/tilt head.
![]() Adjust balance of camera and check correct size cams are fitted for lens/camera/viewfinder configuration.
Adjust balance of camera and check correct size cams are fitted for lens/camera/viewfinder configuration.
![]() Adjust the degree of pan and tilt friction required for the programme format.
Adjust the degree of pan and tilt friction required for the programme format.
Pedestal
![]() Remove safety locking pin or bar if fitted.
Remove safety locking pin or bar if fitted.
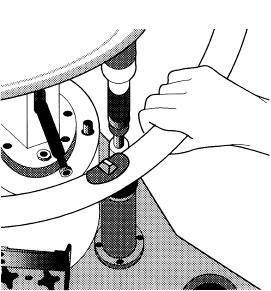
![]() Check the balance of the column is correct by raising the column to its highest point and check if the camera stays in this position. Reverse the procedure by depressing to the lowest point and check if camera rises. Add or subtract trim weights to balance the pedestal.
Check the balance of the column is correct by raising the column to its highest point and check if the camera stays in this position. Reverse the procedure by depressing to the lowest point and check if camera rises. Add or subtract trim weights to balance the pedestal.
![]() Check that there are sufficient trim weights in the storage tray to accommodate any change of temperature during rehearsal/recording.
Check that there are sufficient trim weights in the storage tray to accommodate any change of temperature during rehearsal/recording.
![]() Check that the camera cable is clamped and there is sufficient loop of cable to allow nearly 360° movement on the head.
Check that the camera cable is clamped and there is sufficient loop of cable to allow nearly 360° movement on the head.

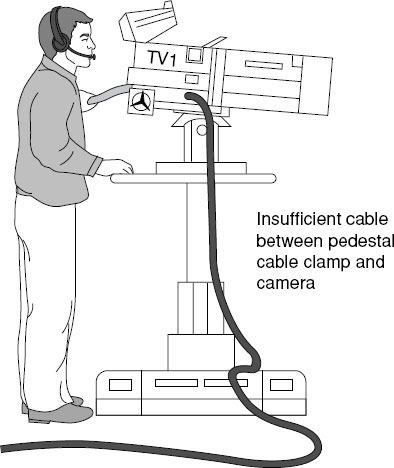
A universal camera ‘operating’ position. Sitting on the corner of the ped waiting for the start of rehearsal, the next shot or the next meal break!
![]() Check that cable guards are correctly set to avoid riding over the camera cable.
Check that cable guards are correctly set to avoid riding over the camera cable.
![]() Check the camera cable is eighted and will provide an unimpeded flow of cable when the camera moves.
Check the camera cable is eighted and will provide an unimpeded flow of cable when the camera moves.
Noise
Check that movement of the camera, mounting and pan/tilt head is silent and that you have the means to mark up camera position and to mark up camera cards if supplied.
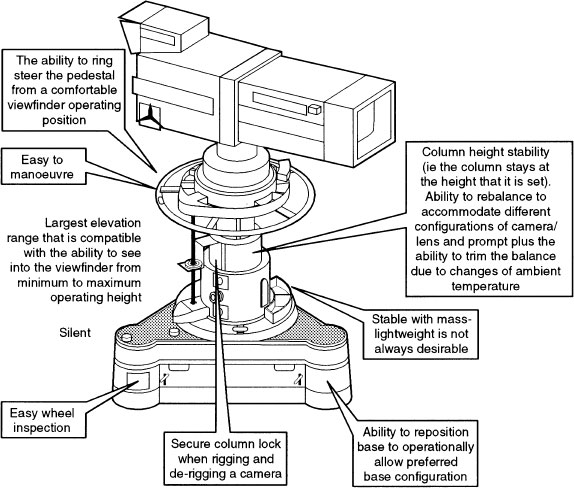
The main elements affecting smooth pedestal movement on shot are:
![]() the condition of the floor;
the condition of the floor;
![]() lens angle;
lens angle;
![]() movement and composition;
movement and composition;
![]() mechanical condition of the pedestal;
mechanical condition of the pedestal;
![]() camera cable;
camera cable;
![]() viewfinder;
viewfinder;
![]() space for the development;
space for the development;
![]() focus;
focus;
![]() eye, hand and body coordination.
eye, hand and body coordination.
The condition of the floor
Check over the floor for dropped nails or other small debris left from the scenery set and lights. Check over painted or ‘martacked’ floor areas for over-painted marking tapes, bubbles or general wear and tear of the floor surface. Have the floor swept and if possible plan the camera movement to avoid the worst conditions. The effects of an uneven floor will be exacerbated by working at the top of the pedestal column or by tracking on a narrow lens angle.
Lens angle
Select the correct lens angle from the zoom range for the camera development required. A long track on a narrow angle will not only be difficult to hold steady and in focus but will provide little or no change in the perspective of mass in the shot (see Perspective of line, page 122). There is no motivation for a camera move if there is no significant change in the composition of the shot.
In general, the wider the lens angle in use (e.g. > 30°) the steadier the movement and the greater control of framing and focus. Often a small amount of camera movement on a wide angle provides a substantial change in the shot (see The development shot, page 136).
Movement and composition
Good composition must be maintained throughout the pedestal movement. This can be achieved by starting and ending with good compositions and ensuring a smooth transition between these frames by the use of pivot points (see Zooming, page 108), by motivating the movement with action within the frame and at a speed that matches the content of the shot. A good pedestal development shot should provide a smooth, unobtrusive, continuous change in visual interest with no ‘dead’ area between the initial and final image.
Mechanical condition of the pedestal
Check for pieces of gaffer tape, nails or small debris embedded or stuck to the pedestal wheels. Check that the column of the pedestal is balanced. Changes in temperature affect the hydraulic system of the pedestal. If necessary transfer the trim weights stored at the base of the pedestal to the weight tray above the ring steering wheel. The balance of the camera should have been adjusted in the ‘start-of-day checks’ and a check made at the same time that the correct cams are fitted in the pan and tilt head for the camera/lens and prompter (if fitted) in use. Other mechanical checks such as cable guard clearance, slackness in the ring steer assembly will also affect the smoothness of the pedestal movement.
Camera cable
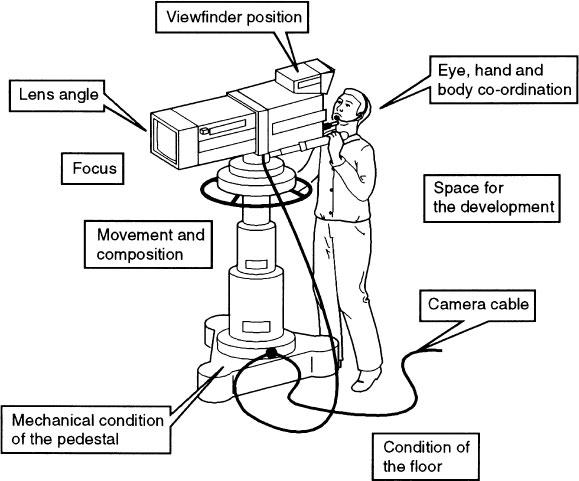
More pedestal movements on shot have suffered from cables being fouled, snagged or stood on than possibly for any other reason. If there is no one on the crew cable clearing, make certain that there is a sufficient length of unimpeded cable available for the intended movement. If possible, reduce the amount and distance the cable has to be pulled during the move. A long length of cable dragged across the studio floor adds to the weight of the pedestal/camera and the amount of effort required to move the pedestal.
Check that the camera cable is clamped to the base of the pedestal and that the loop of cable between clamp and camera will not become snagged on any part of the pedestal as the camera is panned and moved and that there is sufficient loop of cable when panning the camera at maximum elevation. Check that no ancillary cable wrapped around the camera cable has loose or exposed loops that could be trapped under the cable guards and stop the pedestal movement.
Viewfinder
If there is a change of height of the camera or, during a crabbing movement, it is necessary to position the body away from the centre of the viewfinder, provision must be made to alter the viewfinder hood in order to see the whole of the viewfinder image. If this cannot be achieved with a quick adjustment by the right hand released from the ring steer while the camera is moving, then the best compromise is to start in a difficult viewfinder viewing and body position and, as the shot develops, to arrive at a comfortable operating position at the end of the move.
Sometimes the camera has been positioned so far back on the pan and tilt head to balance out a heavy lens and prompt that the viewfinder ends up a long distance away from the ring steering wheel. In order to reach the ring steer even at full arm stretch, the face of the operator is almost pressed up against the viewfinder. This is a near impossible operating position for any kind of pedestal development camera work and either a larger ring steering wheel must be fitted to the pedestal or additional weights added to the back of the camera in order that balance can be achieved with the viewfinder positioned in a normal operating position.
There should be a sufficient loop of camera cable between pedestal base clamp and camera cable entry point to allow almost a 360° pan of the camera.
Space for the development
It seems self-evident that a camera move can only be attempted if there is sufficient floor space unimpeded by other equipment, set or artistes, that there is sufficient set to cover the whole of the move (including ‘shooting off’ the top of the set) and that the camera will not end up ‘in vision’ in the following shot. Although the above criteria may be obvious, it is not unknown for camera operators to set out on a complex development shot to find that they have fallen foul of one of the above pitfalls.
Focus
Needless to say, however fluent the camera development may be the significant subject in the frame must stay in focus during the whole of the move. There is no short-cut technique to focus pulling on the move. You need one hand on the pan bar to continuously reframe the shot, one hand on the ring steer to control the direction and to provide the impetus for the movement and one hand on the focus wheel to adjust focus. Three-handed camera operators are in great demand on multi-camera pedestal work.
Some development shots involve staying the same distance from the principal subject and therefore focus is not a problem. A wide angle lens development with a large depth of field may also allow control of the pedestal with both hands but with most tracks and crabs some stage is reached when the right hand must be freed to give a quick tweak to the focus. The right direction of wheel travel and a ‘kick off’ with the foot often allows the left hand on the pan bar to keep the camera moving while the right hand can be positioned on the focus wheel. Try to arrange the direction of the pedestal so that this type of movement control is achieved if a large focus pull is required.
Eye, hand and body coordination
Moving the pedestal on shot should become as familiar and easy as driving a car. Practice and experience, anticipation of the unexpected and the avoidance of impossible moves are all part of good pedestal control.
One of the most difficult moves on a pedestal is to crab right and around an artiste in a semi-circle. To push the pedestal, the body needs to be behind the direction of the move but this involves the panning handle, which is normally on the left of the camera, pushing into the body and preventing the operator from panning left to compensate for the crab right. If you can achieve this with fluency and precision you can remove your L plates from the pedestal.

Control of pedestal
At each corner of the base of the pedestal are a pair of wheels. Their direction is controlled by the large steering ring positioned under the trim weight storage tray. The direction of the alignment of the wheels is communicated to the hand by a raised red indicator attached to the steering ring so that without looking away from the viewfinder, information is always available as to the direction the pedestal will move when pushed (see opposite).
This centre ring control allows the camera operator to crab, steer and adjust height on shot with one hand (usually the right hand) while controlling framing via the pan bar with the other hand.
The alignment of the base of the pedestal can be adjusted to avoid constantly working with a corner of the base directly behind the camera.
Moving between shots
Practice is required to move the pedestal efficiently and quickly via the ring steering wheel. Multi-camera camerawork often involves a number of repositions of the camera during a sequence or scene and so movement off shot has to be fast and precise. Move the pedestal to the new position first before adjusting height.
If the framing of the shot relies on an exact position of the lens (e.g. a reflection in a mirror, an over the shoulder two shot, etc.) then the base of the pedestal requires a precise mark on the studio floor. Mark an arc following the base of the pedestal and add a number or letter which corresponds to the shot number (see opposite) and note this on the camera card.
The marks made with a floor crayon are quickly erased by pedestal and cable movement across them. They will need re-marking as there is a great deal of activity across the floor between rehearsal and transmission/recording. ‘Lo-tack’ tape (designed to be easily removed on de-rig) is more permanent but there is a risk, if there are too many marks on the studio floor, of bumping over the tape when moving on shot and causing a jump in the framing.
Repositioning the camera at speed
When repositioning the camera at speed across the studio floor, turn the camera in the direction of travel as it is easier to push a camera than to run backwards. Make certain that you walk around the pedestal in a direction that provides sufficient slack cable between camera and cable clamp on the pedestal base rather than winding the cable loop around the column.
Pushing the camera onto a new set also allows you to start composing the shot before you come to rest and speeds up the move.
The raised red pointer indicates the direction in which the pedestal will move and is a constant reminder of the position of the pedestal wheels.
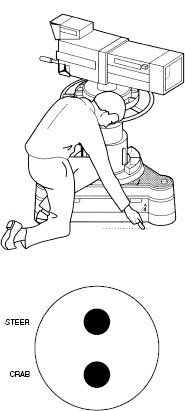
Mark up any critical camera position and number or letter the position and make a note on the camera card. The position marked ‘STEER’ on the base of the pedestal allows one set of wheels to be unlocked and the pedestal base swivelled to the optimum operating position. Return the wheels to ‘CRAB’ for normal movement.
Tracking is moving the camera towards or away from the principal subject in the frame. The three operational adjustments required in tracking are control of camera mounting and camera, framing and focusing. In addition, there is the need for the track to have a reason or some type of motivation (see Camera movement, page 126).
Before tracking
If possible, arrange the pedestal base so that you are working within an arc of the base. Position the angle of the viewfinder so that you can see the whole of the image from the start to the end of the track. Have sufficient slack cable for the whole of the track to avoid pulling a large length of cable across the studio floor. Check that nothing will impede your movement throughout the range of the track such as floor coverings, furniture, other cameras, cables or people! Check that your end position will not finish in the succeeding shot. Check that the lens angle selected is suitable for tracking (see the topic Lens angle, page 88).
To track in
Position the ring steering wheel to point the wheels in the direction of the track (preferably off shot) and holding the ring steer with the right hand at the position of the indicator and holding (not gripping) the pan bar with the left hand, push with the right foot to get the pedestal moving and continue the movement with the hand on the ring steer.
Adjust the framing of the shot as you track in (see Pivot points, Zooming, page 112) and while keeping the momentum of the movement with the left hand on the pan bar, the right hand can be released from the ring steer to the focus capstan in order to adjust focus if necessary as you approach the principal subject in the frame. If the design of the focus capstan is sufficiently robust, the right hand can also be used to push the pedestal.
Reduce the push on the pedestal towards the end of the track to allow the track to glide imperceptibly to a halt. Avoid abrupt changes of movement unless this is required by the motivation for the move. Most camera movement follows a non-linear rate of change. The move or zoom is started imperceptibly before accelerating to the maximum speed required and then falling off as the move reaches its end point. Audio fades often use the same technique with the sound gradually receding until it unobtrusively disappears so that the listener is unaware of the exact point of the completed fade. This is another aspect of invisible technique – visual or audio changes are softened to ease the transition.
To track out
Tracking out is operationally more demanding than a push-in as moving backwards is more awkward than a track-in. Overcoming the inertia required to get the 300 kg pedestal/camera moving has to be provided by the right hand on the ring steer without the benefit of a push off with the foot. Also, the biggest correction of focus will occur in the first part of the movement which requires the right hand to be controlling the capstan focus.
Essential operational points when tracking
![]() Select a lens angle wider than 25°.
Select a lens angle wider than 25°.
![]() Adjust the pedestal to allow you to work within an arc of the base.
Adjust the pedestal to allow you to work within an arc of the base.
![]() Adjust the viewfinder to fit the movement.
Adjust the viewfinder to fit the movement.
![]() Have sufficient slack cable.
Have sufficient slack cable.
![]() Check the floor space is clear for the move.
Check the floor space is clear for the move.
![]() Position ring steer in the direction of track.
Position ring steer in the direction of track.
![]() Use hand on ring steer and foot to ‘kick’ off movement.
Use hand on ring steer and foot to ‘kick’ off movement.
![]() Concentrate on steering and shot development before adjusting focus (if needed) when approaching the principal subject in frame.
Concentrate on steering and shot development before adjusting focus (if needed) when approaching the principal subject in frame.
![]() Glide to a halt following a non-linear speed of movement.
Glide to a halt following a non-linear speed of movement.
![]() When tracking out, focus change is critical at the start of the move and movement has to be maintained without the use of the ring steer.
When tracking out, focus change is critical at the start of the move and movement has to be maintained without the use of the ring steer.
![]() Avoid sweeping cable under your feet with the base of the camera when tracking out.
Avoid sweeping cable under your feet with the base of the camera when tracking out.
The technique is to pull on the ring steer with the right hand to get the pedestal moving and then quickly transfer this hand to the capstan and refocus while keeping the pedestal on the move with the left hand on the pan bar. A fast move will cover an unsynchronized focus pull provided the shot is sharp when the movement ends. Focusing is much more critical during a slow move and the camera movement must be activated through the pan bar and focus capstan as the right hand cannot be released to the ring steer or loss of focus will not be corrected in time.
All the conditions connected to a track-in apply to tracking out with the additional requirement to make certain that as you track out, the base of the pedestal does not pile up the camera cable around your feet creating the risk of loosing your footing.
Combined move
A pure crabbing movement is a camera move where the distance between the principal subject and the lens remains unchanged during the move. Frequently, however, a crab is combined with a track to provide a more visually interesting and dynamic camera development.
The name was probably coined from the ability of the crab to move sideways but it is almost impossible for a camera operator working with a full facility camera on a heavy duty pedestal, unaided, to move a pedestal sideways (parallel to the principal subject) from a standing start. This is because it is not practical to look into the viewfinder and reach around the camera to a point on the ring steer close to 90° from the lens in order to pull the pedestal parallel to the action. Most camera operators are unable to crab the pedestal by gripping the ring steer below the viewfinder. The same move, however, is relatively simple when operating with a lightweight camera and pedestal.
Pan bar conventions
Many countries have adopted the convention of pan bar on the left of camera and focus control on the right-hand side of the camera. The pan bar prevents the ring steer to the left of the camera being used by the cameraman to crab the pedestal.
The usual crabbing technique with a full facility camera and heavy duty pedestal is therefore to turn the wheels slightly into the subject so that the crabbing movement starts as a mixture of crab and track. The movement can be kicked off with the foot and then the shot development controlled with the steering ring. The position of the hand on the steering ring will depend on the degree of rotation of the wheel required by the shot development. The further the hand is positioned away from the wheel below the viewfinder, the less power there is in the arm to keep the pedestal moving. Once the pedestal is on the move, it is usually possible to steer into a crabbing line that is parallel to the principal subject’s movement.
A common technique to provide more physical power to move the pedestal is to offset the body on the right side (or opposite side to the pan bar) of the viewfinder in order to reach further around the ring steer and either pull (for a crab right) or push (for a crab left).
From bad to better
A good rule of thumb for any camera movement which involves at some point a bad body posture for operating or a bad sightline to the viewfinder, is to start from the worst operating condition and, during the camera development, unwind to a good operating position. This allows framing and focus at the end of the shot to be adjusted when working in the best operating position.
Keeping the whole of the viewfinder image in view is frequently difficult with a crabbing move. A side opening viewfinder hood or a viewfinder that swivels helps if the final operating position is not jeopardized. A common problem during such a move is that the cue light becomes obscured.
Crabbing operating requirements are similar to tracking viz:
![]() Select a lens angle wider than 35°.
Select a lens angle wider than 35°.
![]() If possible adjust the pedestal to allow most of the movement within one arc of the base.
If possible adjust the pedestal to allow most of the movement within one arc of the base.
![]() Adjust the viewfinder to fit the movement.
Adjust the viewfinder to fit the movement.
![]() Have sufficient slack cable.
Have sufficient slack cable.
![]() Check the floor space is clear for the move.
Check the floor space is clear for the move.
![]() Position ring steer in the direction of track.
Position ring steer in the direction of track.
![]() Use hand on ring steer and foot to ‘kick’ off movement except a crab right.
Use hand on ring steer and foot to ‘kick’ off movement except a crab right.
![]() Concentrate on steering and shot development before adjusting focus as necessary when approaching the principal subject in frame.
Concentrate on steering and shot development before adjusting focus as necessary when approaching the principal subject in frame.
![]() Glide to a halt following a non-linear speed of movement.
Glide to a halt following a non-linear speed of movement.
To maximize the effect of a crab see The development shot, page 136.
Crabbing right in an arc
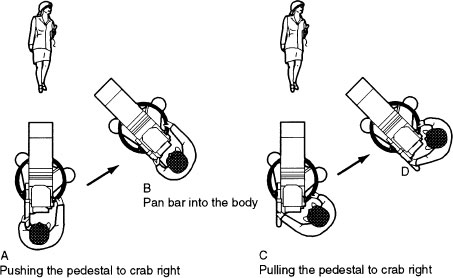
Because of the conventional position in the UK of the pan bar to the left of the camera, care should be taken when positioned in line with the viewfinder that a crab right does not develop with an operating position increasingly to the left of the viewfinder. This can easily happen if the crab right is started with a kick off with the foot (A) and as the movement develops the camera is increasingly panned left which pushes the pan bar further and further into the body trailing behind the camera (B). For a crab right, start with the body to the right of the viewfinder (C) and use the ring steer to develop the shot (D). This also places you in a more comfortable position to adjust focus if required.
Straight back
An average pedestal has an elevation range of approximately 95 cm (37.5 inches). Visually, the effect of a 95cm change in lens height can be significantly enhanced if the wider angle of the zoom lens is selected and there is suitable content in the frame. It is usually a shot using the wider lens angle where camera height becomes the most critical. Frequently the camera height is adjusted off shot to improve the composition of the shot by altering perspective of line.
The pedestal counterbalances the combined weight of camera and lens by pressurized gas and small trim weights. These trim weights can be added to the column to compensate for changes in gas pressure due to ambient temperature change. Even though the counterbalance system provides for very little effort to effect a change in height once the column is moving, there is an initial inertia to overcome and care should be taken in craning the camera up or down.
To avoid back strain or injury when lifting a heavy weight, it is recommended to keep the back straight and bend the knees. Unfortunately it is often not possible to follow this advice when operating a television camera. Viewfinder height is controlled by lens height which is frequently below normal standing eye height. Even with tilting viewfinders, the camera operator spends a great deal of operating time crouching in order to look into the viewfinder. With a bent back in this position he/she then has to crane the camera, for example, to follow an artiste standing up.
The safest body posture and the technique with the greatest control of movement is to position the shoulder over the ring steer and use the torso to force the pedestal down. To crane the camera up, use the reverse of this technique and with the shoulder over the pedestal pull the ring steering wheel up.
The most difficult manoeuvre, and potentially the most physically dangerous, is to attempt to crane up and down gripping the ring steer with the arm outstretched. A small adjustment of the pedestal height in this way can be made off shot but if the crane up is matched to artiste movement, then it is probably prudent to position the shoulder as close to the ring steer as possible before ‘lifting’ the ring steer.
Viewfinder
Craning the pedestal on shot through its full elevation range will cause problems with viewfinder position. At the lowest operating position of the pedestal, the viewfinder will need to be tilted up. As the camera is craned up (if not adjusted) the tilted viewfinder will eventually be pointing up at the studio lights and be inaccessible. It is sometimes possible to correct the angle of the viewfinder during the movement with the forehead or to give it a quick ‘knock’ at the end of the movement but the more usual solution is as illustrated.
Viewfinder position when craning

When craning the camera up, if the viewfinder is tilted up to provide a comfortable operating position at the start of the move, unless it is repositioned during the move, its position at the top of the column will be inoperable.
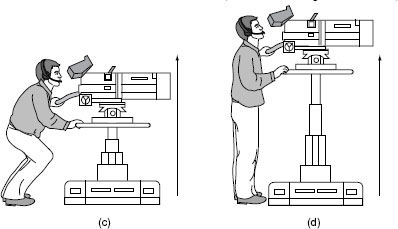
Start at the lowest camera position with the viewfinder tilted down at an angle that can just be usable in its highest position (c). Most viewfinders have the bottom part of the visor either open or able to be opened and therefore the face of the viewfinder can be seen at most heights. Again the rule of thumb can be applied of starting with a difficult operating position and during the crane up to move to an easier situation (d). Craning down simply reverses this technique.
Check that there is sufficient cable loop between camera and pedestal base cable clamp for any craning movement.
Terminology
The camera movement description to ‘crane up’ originally came from the camera crane movement. Some directors use ‘ped up’ or ‘ped down’ to describe changing the lens height of a camera mounted on a pedestal. Also ‘tilt up’ or ‘tilt down’ may be described as ‘pan up’ or ‘pan down’.
Depth of field
Focusing is the act of adjusting the lens elements to achieve a sharp image at the focal plane. Objects either side of this focus zone may still look reasonably sharp depending on their distance from the lens, the lens aperture and lens angle. The area covering the objects that are in acceptable focus is called the depth of field.
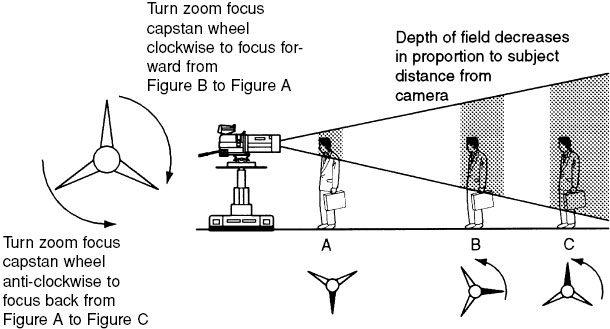
The depth of field can be considerable if the widest angle of the zoom is selected and, while working with a small aperture, a subject is selected for focus at some distance from the lens. When zooming into this subject, the depth of field or zone of acceptable sharpness will decrease (see opposite).
Capstan servo control
If the television camera is being operated from behind the camera using a large viewfinder, focusing is usually achieved by a capstan servo control mounted on the right of the camera. The position of the focus control and its operation will vary depending on country but the standard convention in the UK is to turn the capstan clockwise to focus forward (i.e. objects closer to the lens) and to turn it anti-clockwise for objects further from the lens (see opposite). If a portable camera is being used with a monocular viewfinder then focus is usually controlled by the focus ring on the lens.
Follow focus
Television is often a ‘talking head’ medium and the eyes need to be in sharp focus. Sharpest focus can be checked off shot by rocking the focus zone behind and then in front of the eyes. Detecting on shot which plane of the picture is in focus is more difficult. You, as the camera operator, must be the first to detect loss of focus but this can only be achieved if the viewfinder definition is better than that of the viewer and the plane of sharpest focus can be seen without rocking focus.
As camera or subject moves there will be a loss of focus which needs to be corrected. The art of focusing is to know which way to focus and not to overshoot. Practise following focus as someone walks towards the lens (UK convention – turn the capstan clockwise). Turn capstan anti-clockwise as the subject moves away from camera. Practise throwing focus from one subject to another.
Pre-focusing
Sometimes it is not possible to focus on a subject before the shot is required. Typically, as a presenter appears in the frame, the camera is cut to. Without some method of pre-focusing, the chances are that the shot will be soft and focus will have to be tweaked on shot. The solution is to focus up on the subject during rehearsal and then swing the camera (without altering focus) to find another part of the set which is sharp. On transmission/recording pre-focus on that object and then reposition for the subject to enter frame. Make certain that both camera position and subject position are marked.
Focus capstan wheel
The three variables that affect depth of field are:
![]() distance from camera of principal subject in focus
distance from camera of principal subject in focus
![]() aperture of the lens
aperture of the lens
![]() lens angle selected
lens angle selected
Focus problems
It is sometimes advantageous when a patterned subject is causing strobing – a patterning on the screen (e.g. a check coat which cannot be replaced or a monitor) – to slightly pull the focus forward of the surface of the material.
Aperture adjustment in multi-camera productions is centralized in vision control. A common technique is for the apertures of cameras in use to be set to an agreed value and left until all lighting adjustments are made during rehearsal. If correct exposure is not obtained by the lighting balance the aperture may require adjustment. This adjustment to the depth of field may occur late in the rehearsal period. If a critical camera move is contemplated where both hands are in use to develop a shot and focus is maintained by working within the prevailing depth of field beware that with a decrease in depth of field on transmission/recording the same move may now not be possible without adjusting focus.
Zoom lens and focus
A zoom lens is designed to keep the same focal plane throughout the whole of its range (provided the back focus has been correctly adjusted). Even if a zoom has not been rehearsed, always pre-focus whenever possible on the tightest shot of the subject. This is the best way of checking focus and it also prepares for a zoom-in if required.
Some focus demand units have small indentations which can be adjusted (off shot or during rehearsal) to indicate a specific focus point on the zoom. This allows a pre-rehearsed second focus point to be arrived at (after the first pre-focused point) by turning the capstan focus and feeling with the hand when the pre-set indentations are aligned.
Blind zooming
When zooming into a subject on which the focus has not been pre-determined (blind zooming) it is best to be focused slightly back behind the subject so that you know where your zone of focus is. As focusing becomes more critical at the end of the zoom range, focus can be pulled forward. This helps to correct focus the right way. Correcting the wrong way, for example, focusing back when you should have focused forward because you did not know where the zone of focus was positioned, is more obvious than a slight out of focus shot for part of the zoom. Practise focusing by fast zooming into a subject and then hitting the correct focus in one movement. Keep varying the distance of the objects zoomed into so that fast accurate focusing becomes instinctive.
Pulling focus
Within a composition, visual attention is directed to the subject in sharpest focus. Attention can be transferred to another part of the frame by throwing focus on to that subject. Use the principle of invisible technique and match the speed of the focus pull to the motivating action.
If the focus is on a foreground person facing camera with a defocused background figure and the foreground subject turns away from camera, focus can be instantly thrown back to the background. A slower focus pull would be more appropriate in music coverage, for example, moving off the hands of a foreground musician to a background instrumentalist. Avoid long focus pulls that provide nothing but an extended defocused picture before another subject comes into sharp focus unless this is motivated by the action (e.g. the subjective experience of someone recovering consciousness).
Differential focus
Differential focus is deliberately using a narrow depth of field to emphasize the principal subject in the frame in sharp focus which is contrasted with a heavily out of focus background.
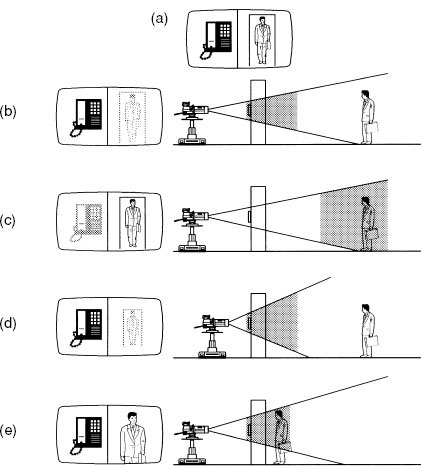
Figure (a) illustrates the required framing of the shot with a telephone mounted on a wall and a person entering a doorway in the background both in focus. Camera position and lens angle can achieve this framing but focused forward on the telephone (b) puts the background figure out of focus. Focusing back on the figure (c) puts the telephone out of focus. A wider angle lens (d) will not provide a greater depth of field if the camera is tracked-in to return to the original framing (a). Altering the light level may allow a smaller aperture and a larger depth of field but usually the best solution is to restage the action (e) to provide for both telephone and person to be covered by the existing depth of field.
A narrow depth of field can be achieved by either reducing lighting levels and opening up the lens aperture to achieve correct exposure or by using a neutral density filter to reduce light entering the lens requiring the aperture to be opened and reducing depth of field or by increasing the shutter speed.
Split focus
Because of aperture or lens angle it is sometimes not possible, in an unrehearsed situation, to hold two subjects at different distances from the lens in sharp focus. The focus therefore has to be split between them with either one or the other slightly soft.
Control of camera
Invisible camera technique requires camera movement to be unobtrusive and matched to content. Panning and tilting the camera is a basic skill that requires considerable practice until there is complete coordination between the eye and the hand on the pan bar. A requirement of good camerawork is the ability to move the camera smoothly and to be able to accelerate movement and decelerate movement.
The control of the camera during panning and tilting requires a combination of:
![]() correct friction (and cams);
correct friction (and cams);
![]() anticipation;
anticipation;
![]() correct body posture;
correct body posture;
![]() correct choice of lens angle.
correct choice of lens angle.
Condition of the pan/tilt head
Controlled smooth camera movement cannot be achieved unless the correct friction has been selected for the programme format. The amount of friction constraining vertical and horizontal movement is often a personal choice. Each camera operator needs to balance out the need for easy flexible movement against the operational difficulties of holding the camera steady when tracking, crabbing and panning the camera without friction.
A compromise amount of friction is therefore selected which suits the programme requirements and weather conditions. Using a long lens continuously at its narrow end in a high wind may require more friction than the same operation in a flat calm. It has been observed that when using the extreme narrow end of a 70-1 zoom lens (2× range extender lens angle approximately 0.28°) the pulse in the operator’s hand on the pan bar can be detected by a rhythmic movement in the frame.
Anticipation
Panning along a line of objects of unequal height will quickly demonstrate the need to anticipate change in framing. Good camerawork requires fast reflexes in reframing during a continuous move combined with smooth and unobtrusive transitions. Anticipating the direction of a compensating diagonal move at an early stage will avoid jerky and erratic camerawork. Practise smooth controlled camera movement by panning, in a tight shot (close-up), across a camera cable which is snaking across the floor. This also provides focus practice.
Non-linear movement
A pan often requires a non-linear rate of movement (see opposite).
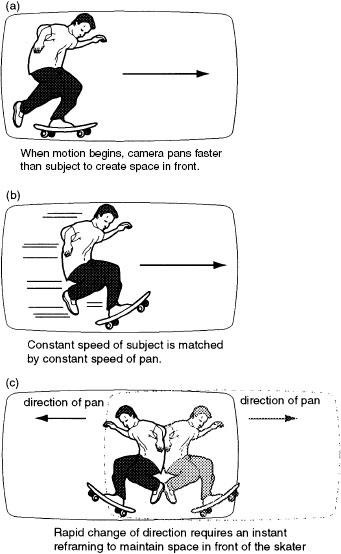
A pan often requires a non-linear rate of movement. Following a moving person requires a quick acceleration of the pan to create space in front of them to move into (a), a constant speed of pan as they move (b) and settling to a static frame as they stop. If the movement is continuous and constantly changing direction such as a skate board, then unobtrusive camerawork will require a constantly varying pan and tilt rate (c) combined with diagonal movement. If the viewer is unaware of this activity then the camera operator has exactly paced the movement correctly.
Body position
Anticipating the end of a pan or tilt allows the camera operator to position him/herself so that a comfortable operating stance can be adopted. The more body stress there is in following action, the more likely that changes in camera movement will be erratic and noticeable.
Choice of lens angle
Even the most experienced camera operators will experience difficulties in accomplishing very small detailed pans and tilts when using a very narrow lens angle. The difficulty of controlled movement will be exacerbated if camera and lens are fitted with ancillary equipment such as prompters, lamps or microphones. Panning with a lens angle of less than 1° requires a very small movement on the pan bar for a very big movement in the frame.
Variable lens angle
A zoom lens has a continuously variable lens angle and is therefore useful in multi-camera TV production for adjusting the image size without moving the camera position. When operating from behind the camera, the adjustment is controlled on most television cameras via the thumb on a two-way rocker switch which alters the direction and speed of the zoom. A good servo zoom should allow a smooth imperceptible take-up of the movement of the zoom which can then be accelerated by the thumb control to match the requirements of the shot. There is usually provision to alter the response of the thumb control so that a very slow zoom rate can be selected or a very fast zoom speed for the same movement of the thumb control.
When operating with a monocular viewfinder on a portable camera, the zoom lens can be controlled from a rocker switch mounted on the lens as well as a thumb control remoted to the pan bar or on a pistol grip.
Shot box
As the zoom lens has a continuous range of lens angles, individual settings can be pre-selected on a shot box. This is clamped to the pan bar sometimes as an integral part of the focus capstan and has a number of buttons which can be individually set to a required lens angle. When a shot box button is pushed, the zoom automatically moves to the pre-selected lens angle associated with that button.
Most shot boxes also have the provision to vary the rate at which the zoom lens moves to a selected lens angle. This allows the lens angle at the start of a shot to be programmed on one button and the lens angle at the end of the shot to be assigned to another button. The speed that the lens angle alters between the two buttons can then be adjusted to provide a precisely timed zoom in or out.
Use of the zoom
In general, the zoom is used in three ways in multi-camera TV production:
![]() to compose the shot;
to compose the shot;
![]() to readjust the composition on shot;
to readjust the composition on shot;
![]() to change the shot size in vision.
to change the shot size in vision.
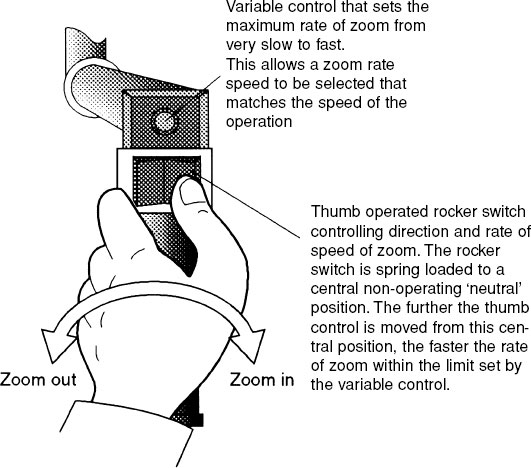
Thumb operated rocker switch controlling direction and rate of speed of zoom
The zoom lens allows the desired framing of a shot to be quickly achieved. Shot size can be quickly altered out of vision to provide a range of shots. Each shot can have the required size and framing to match other cameras (see Intercutting, page 156). Extended zoom ranges (30:1, 40:1, 70:1) allow a wide range of shots to be obtained from a fixed position (e.g. on an OB scaffold tower/hoist) and provide visual movement across terrain where tracking would not be possible.
The speed of response of the thumb control can be adjusted to allow a compromise between the need for a fast reposition out of vision balanced against a slower speed of movement on shot. If the very fastest speed is selected, there is a tendency to overshoot on the framing making small changes in lens angle difficult. At the other extreme, a slow rate of zoom to allow good control of an ‘in vision’ zoom may be too slow for fast repositioning out of vision.
Readjustment on shot
The zoom is often used to trim or adjust the shot to improve the composition when the content of the shot changes. Someone joining a person in shot is provided with space in the frame by zooming out. The reverse may happen when they leave shot – the camera zooms in to re-compose the original shot. Trimming the shot ‘in vision’ may be unavoidable in the coverage of spontaneous or unknown content but it quickly becomes an irritant if repeatedly used. Fidgeting with the framing by altering the zoom angle should be avoided.
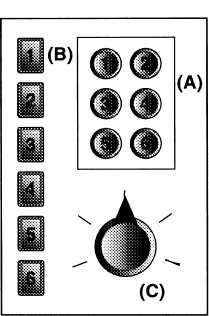
Each button on the shot box can be pre-set to a specific lens angle by variable controls (A).
When a button is pushed (B), the lens will be set to the pre-set lens angle at a speed controlled by (C).
The speed of zoom between two pre-set positions can therefore be precisely controlled. The speed between the pre-sets is normally set at the maximum setting for rapid change between pre-selected lens angles.
The shot box lens angle setting is instantly overridden when the thumb zoom demand is moved away from the neutral central position.
Zooming
Zooming into or away from the subject occurs in many programmes. There is a significant distinction between the perspective changes provided by tracking and zooming (see Tracking and zooming, page 138) but zooming is often the only choice to alter the image size because of the inability to move the camera. Zooming can be smoother, quicker and provide a greater change in image size than would be practical in tracking. It allows multicamera coverage at a distance from the principal subjects and avoids cameras moving close to the subject and appearing in adjacent shots. Working at a distance also helps to keep clear the audience’s view of the performers and to reduce the distraction of camera movement.
Like all changes in shot, the application of invisible technique requires this type of visual transition to be unobtrusive (except that type of programme content which draws attention to its method of presentation). Because a zoom involves no change of perspective, its harsh abrupt magnification or diminution of an image often requires some means of softening or disguising the transition. This can be achieved by combining the zoom with a camera movement and by the use of a pivot point.
Pivot points
A common mistake with users of domestic camcorders is to centre the subject of interest in the frame and then to zoom towards them keeping the subject the same distance from all four sides of the frame. The visual effect is as if the frame implodes in on them from all sides.
A more pleasing visual movement is to keep two sides of the frame at the same distance from the subject for the whole of the movement. This is achieved in a track or a zoom by pre-selecting a pivot point in the composition which is usually the main subject of interest and, while maintaining their position at a set distance from two adjacent sides of the frame, allow the other two sides of the frame to change their relative position to the subject (see opposite). This allows the subject image to grow progressively larger (or smaller) within the frame while avoiding the impression of the frame contracting in towards them.
It may be necessary on a combined track and crabbing movement to change this pivot point during the move but again, as in all camera technique, the changeover to a different pivot point must be subtle, unobtrusive and controlled by the main subject of interest.
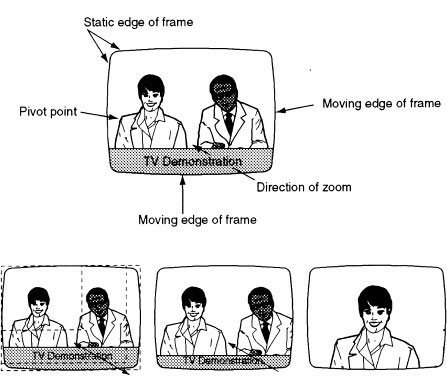
Pre-select one or two adjacent sides of the frame to the main subject of the zoom and whilst maintaining their position at a set distance from the main subject of the zoom allow the other two sides of the frame to change their relative position to the subject.
Keep the same relationship of the adjacent frame edge to the selected subject during the whole of the zoom movement.
The point that is chosen to be held stationary in the frame is called the pivot point. Using a pivot point allows the subject image to grow progressively larger (or smaller) within the frame whilst avoiding the impression of the frame contracting in towards them.