
In this chapter, we will build a fully featured iOS application. We will begin by designing our own custom classes, along with learning what enumerations are and how we can take advantage of them when building our apps.
We will create a Space Pizza Delivery iOS Application. We will go step by step from creating an Xcode project, to writing the necessary code to make our application function. We will be covering the following topics:
- Enumerations
- Private variables
- Property observers
- Protocols
- UIPickerView
- Switch statements

Let's assume that we're in some distant future that allows us to travel at the speed of light. Not only that, as a species, we've been able to figure out a way to inhabit all the planets in our solar system. This was no small feat! Our great great grandfather (named Frank) used to run his own pizza shop in our hometown on Earth, Brooklyn. Out of respect for him, we've decided to create the very first inter galactic pizza delivery service and call it Frank's Pizza.
In this distant future, everyone's love of pizza still exists. Due to this, our pizza service can deliver pizza to any planet in our solar system.
However, there's one problem. Traveling to these planets isn't cheap, so we've decided to create the following flyer to let everyone know what the costs are for getting a homemade slice of Brooklyn pizza delivered to them. Here is the flyer we've made which we intend to hand out to everyone:

The following is a screenshot of the iOS application you will be building in this chapter:
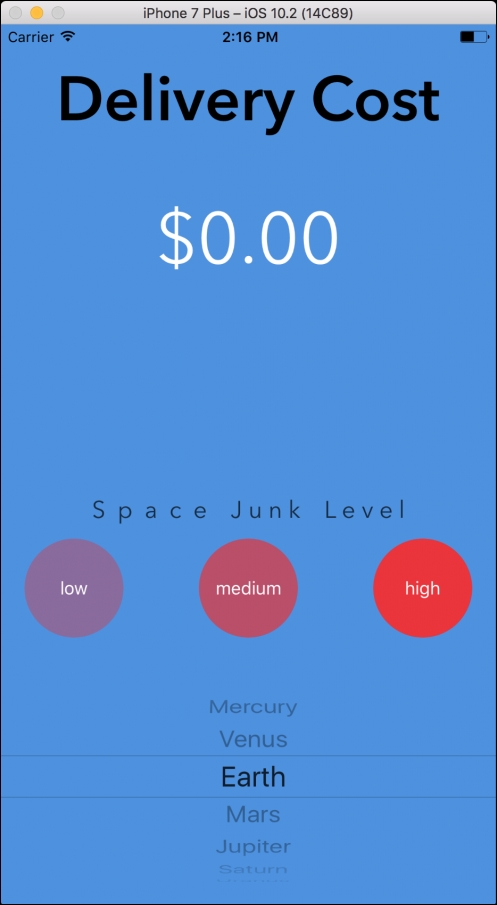
This iOS application will help us determine the delivery cost for delivering pizza to a certain planet. We will shortly go into detail as to what space junk is. When running the app, we will be able to scroll through our list of planets so that we can choose which one we want to deliver pizza to. We will also be able to change the space junk level by tapping on one of the three buttons (low, medium, or high). After selecting both the planet and the space junk level, we will update our label to reflect the pizza delivery cost.
Create a new Xcode application (Single View Application). You can name it whatever you like; we suggest naming it Space Pizza.
We will now create new Swift files in our Xcode project. Within Xcode, in the upper-left corner, you should be able to navigate to File | New | File..., which will bring up a window with a list of options (which you will see shortly).
Here is how you can navigate within Xcode to create a new Swift file:
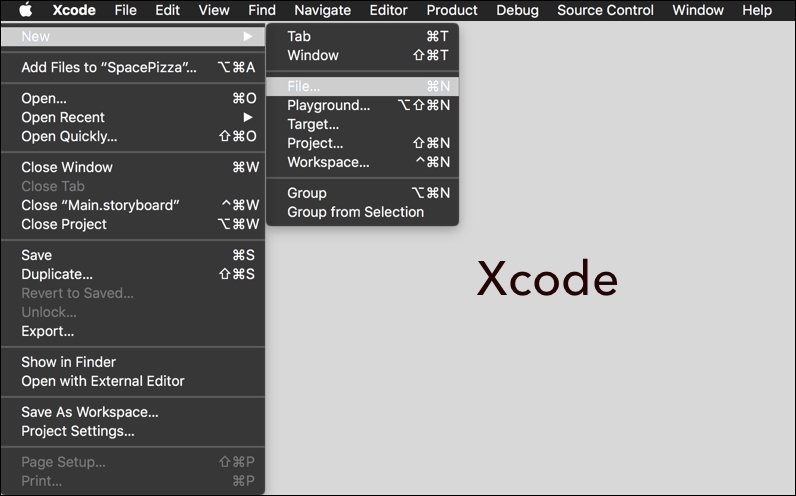
After finally selecting File... by going through the menu that we just listed, or by holding down the command key and pressing N (which does the same thing), you will be met with the following window:
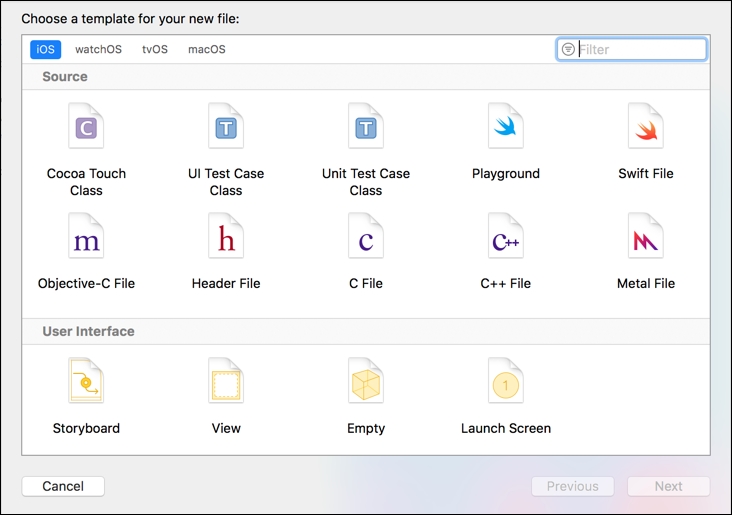
You will want to select Swift File before selecting Next. Make sure that iOS is selected at the top of this window, where it states Choose a template for your new file:. After selecting Next, you will be able to name your file. With this information, create three Swift files in your Xcode project, named:
Planet.swiftPizzaService.swiftSpaceJunk.swift
After creating these three new files, select the Planet.swift file in the Project Navigator.
Before we write any code, let's talk a little about enumerations.
An enumeration defines a common type for a group of related values. What exactly does that mean? An enumeration defines a type (just like classes do) that we can use in our code. We can create an enumeration in Swift using the enum keyword followed by a pair of braces, as follows:
enum Direction {

}
Tip
All related source code for this chapter can be found here: https://github.com/swift-book-projects/swift-3-programming-for-kids/tree/master/Chapter-13.
This is identical to how we define new classes.
As of now, we've only defined a type by creating an enum, called Direction. We still have to create the group of related values. In this scenario, the group of related values that relate to Direction will be up, down, left, and right. We want to associate these four values with some sort of type (the type here being an enum called Direction). Here is how we associate those four values with Direction:
enum Direction {
    case up
    case down
    case left
    case right
}
You create various values that would be associated with an enum by writing out the keyword case followed by the value you want.
This enum
-
Direction, now has four different values associated with it.
If you want to create an instance of Direction in your code, you do so by first typing out the name of the type, followed by a period, and you can select one of the values from the ones provided, as shown:

You first type out the name of the type. In this example, the name of our enum type is Direction. Following the type name, you should type out a period. After doing so, you will be met with the options you see in the preceding screenshot. Those options are down, left, right, and up.
Here is a screenshot of us creating two instances of Direction within a playground file:

In the preceding screenshot, we've created a constant, whereImGoing, and assigned it the Direction.right value. Here, whereImGoing is of the Direction type and its value is .right.
Well, what can we do with this new constant now? A lot of times, when writing your code, you will come across situations just like this where you need a type in your code to represent a group of similar values (just like Direction). If we're creating a game, we might be interested to know which direction our user is moving in. If the user is moving up, then we will let them through the door, if the user is moving right, then they will face the villain! If they are moving down, then we will let them through the secret passage. There's an action we want to take depending upon the direction our user is moving in.
In Swift, we can write code to check our whereImGoing variable and see what value it has. We can do this by writing a chain of if-else statements, as illustrated:
let whereImGoing = Direction.right

if whereImGoing == Direction.up {
    print("You are free to pass.")
} else if whereImGoing == Direction.right {
    print("Sorry! It's time to fight your arch nemesis.")
} else if whereImGoing == Direction.down {
    print("Welcome to the secret room.")
}

// Prints "Sorry! It's time to fight your arch nemesis."
As you can see, what prints to console is Sorry! It's time to fight your arch nemesis. Why? This is because, when you step through the various if statements, you will find that we enter the set of braces following the whereImGoing == Direction.right because that statement evaluates to true.
Instead of solving this problem with an if-else statement, we can use what's referred to as a switch statement. Solving this problem like we just did using an if-else statement isn't wrong, in fact, it's doing exactly what we want it to do. However, it just doesn't look right; it looks kind of messy. This problem is better suited to a switch statement.
We can solve the same problem using a switch statement. The following code solves the exact same problem of seeing what direction our user is moving in, but by using a switch statement:
switch whereImGoing {
case .up:
    print("You are free to pass.")
case .right:
    print("Sorry! It's time to fight your arch nemesis.")
case .down:
    print("Welcome to the secret room.")
case .left:
    print("The unknown")
}

// Prints "Sorry! It's time to fight your arch nemesis."
You might note that we are handling the .left case as well. We didn't handle the .left case in our if-else statement in our earlier example (although we could have if we wanted to). When using a switch statement, it must be exhaustive. We have no choice in the matter. If you decide to switch on a variable, you have to account for every single possibility. There are only four possibilities when switching on whereImGoing: up, right, down, and left. In our example here, we are accounting for every case.
The switch statement works just like the if statement. We are inspecting the value of a variable and, depending on what the value is, we run some code. One difference here is that, within our switch statement, we don't need to include the Direction type. It's inferred that the type is Direction and it would be redundant to write out Direction (over and over), so you can omit the word and just write out case .up, case .right, as we did in the preceding code snippet.
When describing the value of an enum type, you can omit the type's name and just write out the specific case. For example, we would write .up, .down, .left, or .right if it is known that we're referring to the Direction type (ensuring that we include the period before the name of the case).
You might also note that there's another difference in comparing the switch statement to the if statement. The switch statement doesn't include any braces. You write out the case keyword followed by one of the cases of the enum type and it is followed by a colon. Any code written after that colon up to the next case will be executed if the case matches up with what's being switched on.
The value of whereImGoing is .right. When entering our switch statement, this matches up with the case .right: line of code, which means any code following this colon up to the next case statement (which is .down in our example) will be executed. This is how Sorry! It's time to fight your arch nemesis. prints to the console.
Next, we will implement another enum-Planet , which will represent all the various planets that our user will be able to select. Here is the code that we will be writing in our Planet.swift file:
enum Planet: String {

    static let all: [Planet] = [.mercury, .venus, .earth, .mars,
      .jupiter, .saturn, .uranus, .neptune]

    case mercury
    case venus
    case earth
    case mars
    case jupiter
    case saturn
    case uranus
    case neptune

    var lightMinutesFromEarth: Double {
        switch self {
        case .mercury: return 5
        case .venus: return 2
        case .earth: return 0
        case .mars: return 4.5
        case .jupiter: return 35
        case .saturn: return 71
        case .uranus: return 152
        case .neptune: return 242
        }
    }

    var displayName: String {
        return rawValue.capitalized
    }

}
We will step through this code line by line. If you haven't already done so, navigate to the Planet.swift file that we created earlier. You will want to start out by defining the Planet type and providing it with the following cases:
enum Planet: String {

    case mercury
    case venus
    case earth
    case mars
    case jupiter
    case saturn
    case uranus
    case neptune

}
What's really cool (which we didn't talk about earlier) is that you could have also created this enum type not by having to write case over and over, as follows:
enum Planet: String {

    case mercury, venus, earth, mars, jupiter, saturn, uranus, neptune

}
But wait! What's this : String we added at the end of Planet? What does that do?
It's what's referred to as a raw value. Raw values can be strings, characters, or any of the integer or floating-point number types. Here, the raw value for the Planet, enum is defined to be of the String type.
Our cases in our Planet enum type now have all raw values associated with their case name. This means that Planet.mercury has a raw value of mercury, Planet.venus has a raw value of venus, and so on.
What does it mean to have a raw value?
The rawValue property is available to all instances of the Planet type (because we provided it with a raw value of String at declaration). Note that we didn't create this property ourselves; it just exists by virtue of being an enum. Each instance of Planet has its own rawValue property that contains a value. The value being the String version (letter for letter match) of the case. Here is an example of us creating an instance of Planet and accessing that instance's rawValue instance property:
let myFavPlanet = Planet.earth
print("I love (myFavPlanet.rawValue)")
// Prints "I love earth"
Here, myFavPlanet is a constant of the Planet type with a value of .earth. Following this constant is a print statement that uses string interpolation. We're accessing the rawValue property available to the myFavPlanet instance, which in turn will return the String value earth.
If rawValue returns a String value, then there's nothing stopping us from using any methods available to String on it. Here is an example of calling a method available to String instances on the rawValue instance property, which is itself a String:
let myFavPlanet = Planet.earth
print("I love (myFavPlanet.rawValue.uppercased()) and I want to
tell the world!")
// Prints "I love EARTH and I want to tell the world!"
Here, we're calling the uppercased() method on our String value (which is what rawValue gives us), which will end up being EARTH in this example.
Next, we should create a computed property, displayName, of the String type, which should return rawValue.capitalized. Here is that code:
var displayName: String {
    return rawValue.capitalized
}
To see this in action, let's create a new instance of Planet and print out the displayName property available to it:
let bigPlanet = Planet.jupiter
print("(bigPlanet.displayName) is a large planet.")
// Prints "Jupiter is a large planet.
Now, every instance of Planet has a displayName computed property available to it. As you can see, in this example, where we're using .jupiter, displayName returns the value Jupiter.
Next, we will create another computed property, called lightMinutesFromEarth, of the Double type. Here is that code:
    var lightMinutesFromEarth: Double {
        switch self {
        case .mercury: return 5
        case .venus: return 2
        case .earth: return 0
        case .mars: return 4.5
        case .jupiter: return 35
        case .saturn: return 71
        case .uranus: return 152
        case .neptune: return 242
        }
    }
This computed property is making use of a switch statement. It begins by switching on self. What exactly is happening here?
Well, we know that when you switch on a variable, you check to see which case matches up with the value of the variable. You can think of self here as being a variable whose value is equal to the value of the instance that called on this computed property. They are one and the same.
Here, we are creating a new instance of Planet and assigning it to a constant named thirdRockFromTheSun:
let thirdRockFromTheSun = Planet.earth
Here, thirdRockFromTheSun is a constant of the Planet type with a value of .earth. If thirdRockFromTheSun (being an instance of Planet) was to call on its lightMinutesFromEarth computed property (which it has available to it because, again, it's an instance of Planet), then self would be equal to .earth.
Here, we will store the value returned to us by lightMinutesFromEarth into a constant called minutes:
let minutes = thirdRockFromTheSun.lightMinutesFromEarth
print("We are (minutes) light minutes away.")
// Prints "We are 0.0 light minutes away."
Also, if you were to step through that switch statement in this example, we match up with the .earth case within the switch statement because self is equal to .earth. This is how we get back the 0.0 value, which is evident in our preceding print statement.
We have one more piece of code to write before we move on. The following is a constant, all, declared with the static keyword:
static let all: [Planet] = [.mercury, .venus, .earth, .mars, .jupiter, .saturn, .uranus, .neptune]
We've created a static constant, named all, of the [Planet] type.
A type property (created using the static keyword) is a property available only to the type itself. Let's pretend that we have a toy factory that creates instances of toys. Well, imagine that the toy factory had properties of its own. As in, a factory might have its own address. It might be a big building with its own color. These properties available to the factory are considered type properties and we create them in Swift using the static keyword. The properties associated with the factory (as in its address and color) are separate/different from the properties available to the toys that this factory creates.
Let's go back to our static property called all. How do we access this type property that is only available to the Planet type itself and not instances of Planet (like .mercury or .mars.)? Here is how we do that in code:
Planet.all
That's it; it's that easy. You type out the name of the type, followed by a period, and you should see listed any and all properties available to the type (in this case, there is only one). Also, you should see all cases you can select to create an instance of Planet. However, we don't want to do that, we want to select all. By doing this, we're getting back the array of Planet , which is stored in this constant named all.
Let's store this value in another constant that we will call allThePlanets to see how this is working. We will also loop through this array of Planet and print out each value to the console to see that this is indeed working as we expect:
let allThePlanets = Planet.all

for planet in allThePlanets {
    print(planet.displayName)
}

/* Prints
 Mercury
 Venus
 Earth
 Mars
 Jupiter
 Saturn
 Uranus
 Neptune
*/
We will be writing no more code in our Planet.swift file. This enum is complete!
Navigate to the SpaceJunk.swift file. Before we begin writing any code, let's have a little chat about space debris.

According to NASA, there are more than 20,000 pieces of debris larger than a softball orbiting the Earth. They travel at speeds of up to 17,500 mph (28,000 kmph), fast enough for a relatively small piece of orbital debris to damage a satellite or a spacecraft. There are 500,000 pieces of debris the size of a marble or larger. There are many millions of pieces of debris that are so small that they can't be tracked.
Considering that we deliver pizza from Earth to all the other planets in our solar system, we have to be safe about how we get there. Considering that our delivery spacecraft can move at the speed of light, there are certain precautions that need to be taken if there is a highly unusual amount of space debris out there.
The Earth's government keeps track of the levels of space debris out there in our solar system. There are three different levels: low, medium, and high.
Before looking at the answer (which you will find ahead), try to complete the following instructions to give yourself a challenge:
- Create an enum named
SpaceJunkwith a raw value of theStringtype. - The three cases that should be created in this enum are
low,medium, andhigh. - Define a computed property named
displayNameof theStringtype. In your implementation of this computed property, you should try to return aStringvalue that represents the name of the case, but is capitalized.
After making an attempt to create this enum from the preceding instructions, you should try to compare how you did with the following answer:
enum SpaceJunk: String {

    case low, medium, high

    var displayName: String {
        return rawValue.capitalized
    }

}
We now have a SpaceJunk enum, which we will be using shortly. Now, let's talk about our PizzaService class.
Navigate to the PizzaService.swift file. We will go through each line of code here, implementing our own custom PizzaService type.

This class will be the main class that controls our application. It will act as a real-life pizza service, where it will have a name and will be able to produce the costs associated with delivering pizza to certain planets. The following code is the completed implementation of the PizzaService type (note that the didSet observer which you will see implemented in the following code snippet is something we will be covering in the coming pages):
class PizzaService {

    let name: String

    private var pricePerLightMinute = 20.0

    var spaceJunk: SpaceJunk = .low {
        didSet {
            switch spaceJunk {
            case .low: pricePerLightMinute = 10.0
            case .medium: pricePerLightMinute = 20.0
            case .high: pricePerLightMinute = 50.0
            }
        }
    }


    init(name: String) {
        self.name = name
    }

    func deliveryCharge(for destination: Planet) -> Double {
        return pricePerLightMinute *
destination.lightMinutesFromEarth
    }

}
First, you should begin by defining a new class type (within the PizzaService.swift file) named PizzaService , as follows:
class PizzaService {

}
Next, you should create a constant, name, of the String type. Right below this constant, you should create an init function that takes in one argument, labeled name, of the String type. In your implementation of the init function, you should assign the name parameter to self.name.
Note
We have to use self within the init function. This is because we need to distinguish between our property called name and the arguments label, which is also called name. The compiler wouldn't even let us write name = name if we wanted to. We need to distinguish between the two by writing self. before the name of the instance's property we're referring to.
This is what your code should look like right now:
class PizzaService {

    let name: String

    init(name: String) {
        self.name = name
    }

}
Next, you should create a variable, pricePerLightMinute, which will be of the Double type. Considering that we're assigning a default value to this property, we can take advantage of type inference. You don't need to supply this variable with any type information, but assign it with a default value of 20.0. As we've assigned this variable with a default value (one that represents a Double type, by virtue of us including the decimal in the number), we don't need to supply it with any explicit type information. This is known as type inference.
One more thing-include the keyword private before the var keyword in your creation of this variable, as shown:
private var pricePerLightMinute = 20.0
Your PizzaService class should now look like this:
class PizzaService {

    let name: String

    private var pricePerLightMinute = 20.0

    init(name: String) {
        self.name = name
    }

}
What does that private keyword do? The private keyword is used when we want to disallow any instance of the type (that would normally be created in another file) from accessing that particular instance property.
To show you how this works, we will navigate to the ViewController.swift file (note that you don't have to follow along for this example) and create an instance of PizzaService in the viewDidLoad() method. We will store this PizzaService instance in a constant called testService. It's name property will be Jessica's Pizza Palace:
    override func viewDidLoad() {
        super.viewDidLoad()
        let testService = PizzaService(name: "Jessica's Pizza Palace")
    }
If we were to make an attempt to use this testService instance by typing a period after it, we would be met with the following output:

Note that, when we type out the word testService followed by a period, Xcode is able to show us everything available for us to use. We can only access the instance's name property and not pricePerLightMinute. That's because we marked the pricePerLightMinute property with the private keyword. Only name is available for us to use here.
Why would we do this? For starters, it makes writing code safer. What if we want to create an instance property that doesn't need to be accessible to any instance but will be used internally within the definition of the class? What if we want to ensure that no one (outside of the class that it belongs to, in our implementation of the type) can change this property? We ensure these things by marking the variable with the private keyword. By doing so, note how, when we were looking at the properties and methods available to us through testService, we were only able to see the name instance property in the preceding screenshot.
Note that you didn't need to be following along with us in Xcode for this example. If you were following along, you should remove any code that you've written within the viewDidLoad() function in the ViewController.swift file.
At this point, you should navigate back to the PizzaService.swift file.
Next, you should implement a function, deliveryCharge(for:), which takes in one argument, labeled as destination, of the Planet type. This function should return a Double value. In your implementation of this function, you should try to provide a solution to the following problem. We want to know how much we should charge our customers when we receive orders that require us to deliver pizza across the galaxy to a specific planet.
Considering that we have a price we charge per light minute (20.0), let's provide a solution to the problem. This method has one argument, labeled destination, of the Planet type. We know that a Planet instance has a lightMinutesFromEarth property. This property is of the Double type. Our pricePerLightMinute property is also of the Double type. In order to figure out the price we need to charge a customer, we need to multiply these two values. We should return the result of the pricePerLightMinute * destination.lightMinutesFromEarth statement.
Here's what our PizzaService class currently looks like:
class PizzaService {

    let name: String

    private var pricePerLightMinute = 20.0

    init(name: String) {
        self.name = name
    }

    func deliveryCharge(for destination: Planet) -> Double {
        return pricePerLightMinute *
destination.lightMinutesFromEarth
    }

}
The next thing we should do is implement a new property, called spaceJunk.
We know that there are three levels associated with how much space junk is out there in the solar system. Those three levels are .low, .medium, and .high. Depending on the level, our price per light minute should go up. Why? It's because it's more dangerous! The following list is a breakdown of the space junk level and the corresponding price per light minute:
- Low: $10.00
- Medium: $20.00
- High: $50.00
So, when the spaceJunk level changes, our pricePerLightMinute should also change, but how can we tie the two together? If spaceJunk is set to .high, then the pricePerLightMinute property should be 50.0. It should match up with the schedule we just provided. How do we provide a solution to this problem in code? One way is to use property observers.
A property observer is a block of code (think of a block of code as the code that executes in between braces {}) that executes when the value of a specific instance property changes. You create property observers within your declaration of an instance property. When that instance property's value changes, the property observer created within it executes.
Lets go right into the code and step through it line by line to make sure that we understand what a property observer is. The following code snippet is our current implementation of PizzaService, which now includes the property observer within our spaceJunk instance property. Note how spaceJunk also has a default value of .low:
class PizzaService {

    let name: String

    private var pricePerLightMinute = 20.0

    var spaceJunk: SpaceJunk = .low {
        didSet {
            print("Hello Universe!")
            }
    }

    init(name: String) {
        self.name = name
    }

    func deliveryCharge(for destination: Planet) -> Double {
        return pricePerLightMinute * destination.lightMinutesFromEarth
    }

}
Can you see how we create property observers now? It looks more confusing than it really is. If you have a firm grasp of what problem property observers are solving, then that is a great start! Don't feel that you should understand how to use them fully by seeing them here for the first time. It takes practice, and then it takes more practice! Don't be ashamed to have to revisit topics over and over when learning how to code.
Right after the .low default value, you can see that we created a new set of braces. Within the scope of those braces, we can create property observers:
willSetis a property observer that is called just before the value is storeddidSetis a property observer that is called immediately after the new value has been stored
You create a property observer by typing either the willSet or didSet keyword, followed by a set of braces. Within the scope of those braces, all the code you write will only execute when the value of the instance property it's written within changes.
Let's go through a quick example (you don't need to write this code anywhere). Here, we have a constant, mikesPizza, of the PizzaService type. Its value is a PizzaService instance with the Mike's Pizza name. Here is that code:
let mikesPizza = PizzaService(name: "Mike's Pizza")
Let's now change the spaceJunk property on mikesPizza to a different value, twice! Here, we are changing the spaceJunk instance property to .medium and then to .high, as shown:
mikesPizza.spaceJunk = .medium
mikesPizza.spaceJunk = .high
We've first changed the spaceJunk value to .medium. Then, on the following line of code, we changed the spaceJunk value to equal .high. Changing this value twice would have had the didSet property observer we created earlier execute twice. This means that "Hello Universe!" would have printed to the console twice.
This is a really powerful tool!
Now, knowing this, we don't want to just print Hello Universe! to the console, we want to update our pricePerLightMinute property to equal a different value depending on what the spaceJunk property was changed to (which could either be .low, .medium, or .high). This sounds like a problem that could be solved using a switch statement! Things are starting to come together.
The following is our fully implemented PizzaService type. We've added a switch statement inside our didSet observer. Here is that code:
class PizzaService {

    let name: String

    private var pricePerLightMinute = 20.0

    var spaceJunk: SpaceJunk = .low {
        didSet {
            switch spaceJunk {
            case .low: pricePerLightMinute = 10.0
            case .medium: pricePerLightMinute = 20.0
            case .high: pricePerLightMinute = 50.0
            }
        }
    }

    init(name: String) {
        self.name = name
    }

    func deliveryCharge(for destination: Planet) -> Double {
        return pricePerLightMinute * destination.lightMinutesFromEarth
    }

}
Now, anytime the value of our spaceJunk property is changed, the didSet observer we just created is called (or executed). In its execution, we enter a switch statement that begins by switching on spaceJunk itself (which is the property that we're in!). We know that this didSet observer is executed after the value of the spaceJunk property has been changed. This means, when we switch on spaceJunk, whatever its value is represented as what it was just changed to. So, if it was just changed to .low, then we will enter the .low case (as they match) and the code within that case will be executed. Sticking to this example, switch will execute the following piece of code:
pricePerLightMinute = 10.0
That's incredible! It's changing the value of our private variable, pricePerLightMinute. Even though it's marked as private, we can still access it within the PizzaService.swift file. It's protected in that we can only use it within this file and nowhere else. This makes it very safe-no one can accidentally assign a value to this property without us knowing about it.
Now, anytime someone changes the value of our spaceJunk property, the pricePerLightMinute will have its value changed, as it will reflect the price it should be at the space junk level that satisfies our preceding question.
Navigate to the Main.storyboard file. This is where we will design our iOS application.
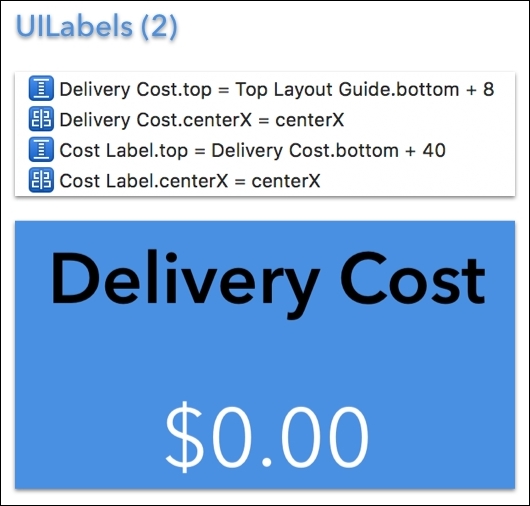
From the object library, you should drag out a UIPickerView and place it near the bottom of the screen. After doing that, you should drag out three UIButton objects and place them above the UIPickerView. We've changed the opacity of the three buttons, along with their titles. At the top of the screen should be a UILabel with its text set to Delivery Cost. Below this UILabel should be another UILabel with its text set to $0.00. We've changed the background colors of the buttons and labels. You can design it however you like!
The following is a screenshot of how we designed the application:

Feel free to skip the part of setting up all the constraints on the various view items (for now). Note, though, that this is something you shouldn't ignore if you want to finalize this application (meaning, release it to the App Store). We will provide a brief summary as to how we went about setting up our constraints, but know that this isn't typically how you would solve this problem. Meaning, someone won't be giving you a list of instructions to follow to set up your various views. While you're learning constraints, there is a lot of trial and error in becoming comfortable with them. Based upon how the views are laid out, you should be able to get some sense as to the constraints that need to be added. Be warned though, this isn't an easy task. Generally, you add one view at a time and constrain that one view before adding another to the hierarchy. Feel free to try to add your own constraints without making reference to the following cheat sheets.
Cheat sheet for UIPickerView:

Cheat sheet for UILabels:
Cheat sheet for UIButtons:

In the Identity Inspector in the upper-right hand corner, set the Class to ViewController. This now connects our view controller scene (which contains all our buttons and labels) with our ViewController.swift file. The following screenshot gives us a closer look:

Next, you will want to bring up the Assistant Editor because we will want to create a connection between these UIView objects we've created in our View Controller Scene with the ViewController.swift file. This will allow us to update what is being displayed to our user in code.
To bring up the Assistant Editor, hold down command + option and then hit the return key. To hide the Assistant Editor, while holding down the command key, press the return key. That is how you can hide and un-hide the Assistant Editor.
Now, you will want to control drag from your UIPickerView you have in the View Controller Scene to the ViewController.swift file (preferably at the top). After doing so, you will be asked to name it. You should name this outlet planetPickerView.
Next, you should create an outlet from the UILabel which will represent the total cost we will want to display to the user. While holding down control, drag from the UILabel down to the ViewController.swift file and name this outlet costLabel.
After completing those two tasks, your ViewController.swift file should contain the following two IBOutlets:
    @IBOutlet weak var planetPickerView: UIPickerView!
    @IBOutlet weak var costLabel: UILabel!
This allows us, within the scope of our ViewController class, to access any of these variables that connect to the view objects users will see on screen when the app launches.
Below these variables, you should create two new instance properties, as shown:
    var selectedPlanet = Planet.mercury
    let franksPizza = PizzaService(name: "Franks Pizza")
We're making use of the custom types we made earlier. Here, selectedPlanet is a variable where we're assigning it a default value of Planet.mercury. This means that selectedPlanet is of the Planet type, with its value being .mercury. As it's declared as a variable, we can change its value to whatever we want later on. This variable will keep track of what planet the user has currently selected on screen. When a user changes the planet (by scrolling through the various planets in our UIPickerView), this variable will change to reflect that. We will write this code shortly.
The franksPizza constant is of the type PizzaService. We're assigning it a default value, being an instance of PizzaService with its name set to Franks Pizza. We will be utilizing franksPizza throughout the various methods in our ViewController class. We will be calling on the deliveryCharge(for:) method on our franksPizza instance when a user changes the space junk level and/or the selected planet. That method call returns to us a Double value representing the cost. We will be displaying this cost to the user in our costLabel. We will be stepping through this in detail shortly.
Navigate to the top of your ViewController.swift file. Once you see the declaration of the ViewController class, you should add UIPickerViewDataSource and UIPickerViewDelegate to the right of where you see UIViewController. It should wind up looking like this:
So, what exactly did we do here? UIPickerViewDataSource and UIPickerViewDelegate are two protocols. You can think of protocols as promises. And by writing protocols after your declaration of a type, as we did, we are stating that we are making a promise.
If we made a promise to our mom that we would take out the trash, we would better take out the trash, no matter what! Our making the promise to our mom that we will do something is us adopting a protocol. Us actually taking the trash out is conforming to the protocol.
So, when we write out UIPickerViewDataSource and UIPickerViewDelegate, as we just did, we are adopting two separate protocols. We are making the promise that we will do something. These promises are slightly more complicated than taking out the trash though.
When you make a promise in code, you need to implement a certain function or create a specific variable. You can think of this as taking out the trash or satisfying the promise you made.
Let's start with UIPickerViewDataSource. When we make this promise, we need to implement the following two functions:
    func numberOfComponents(in pickerView: UIPickerView) -> Int {

    }

    func pickerView(_ pickerView: UIPickerView, numberOfRowsInComponent
      component: Int) -> Int {

    }
We first promised our mom that we will indeed take out the trash; now, this is us taking out the trash. However, you should note something. Both these functions return an Int value. We haven't implemented these functions yet, their bodies are empty.
Our UIPickerView, which we've decided to call planetPickerView when we created the IBOutlet, needs to know how many components and rows it needs to display to the user. This is how we tell it how many. We only want 1 component, which you can think of as a section. You can have different sections with different headers, but we're only displaying one group of items here (planets). The number of rows we want to display represents the number of items we want to display. In our case, we want to list all the planets, so the number of planets to display is what we should return in our second function, which is 8.
Your code should now look like this:
    func numberOfComponents(in pickerView: UIPickerView) -> Int {
        return 1
    }

    func pickerView(_ pickerView: UIPickerView, numberOfRowsInComponent
      component: Int) -> Int {
        return Planet.all.count
    }
Wait a minute! We're not returning the number 8 in that second function as we said we would. We're instead returning Planet.all.count. If you recall from earlier, we created a static property on the Planet type, called all, which looks like this:
    static let all: [Planet] = [.mercury, .venus, .earth, .mars,
      .jupiter, .saturn, .uranus, .neptune]
After we get back the array value that contains all the planets, if we call on the count property (available to all the instances of array), we will get back the number of items that exist inside the array. In this case, there are 8 items in this array, so by returning Planet.all.count, it evaluates to 8, so we're really returning 8 here.
Now, add the following line of code to the viewDidLoad() method:
planetPickerView.dataSource = self
The self instance represents the current instance of ViewController. The dataSource property is of planetPickerView (which is an instance of UIPickerView). We are setting this property to equal the current instance of ViewController. It's connecting two instances to allow them to communicate to each other. Think of it as establishing a conversation that can now be had.
The following is a diagram that may make it easier to see how this conversation is had:

To enable and allow this conversation to take place, you need to write the preceding line of code in your viewDidLoad() method. The snail in our diagram represents self and the panda represents planetPickerView.
Next, we should talk about UIPickerViewDelegate. This is the second promise we've made.
The UIPickerViewDelegate promise is a little different. We will be required to implement the following functions:
func pickerView(_ pickerView: UIPickerView, titleForRow row:
  Int, forComponent component: Int) -> String? {

}

func pickerView(_ pickerView: UIPickerView, didSelectRow row:
  Int, inComponent component: Int) {

}
The first function we will implement has a return type of String?. This means that we can either return a String value, such as Blue or Red, or we can return the value nil, which is the equivalent of stating that we're returning nothing. We have a choice in the matter. Note that we won't be returning nil in our example.
Our implementation of these two functions will look like this:
func pickerView(_ pickerView: UIPickerView, titleForRow row:
  Int, forComponent component: Int) -> String? {
    let planet = Planet.all[row]
    return planet.displayName
}

func pickerView(_ pickerView: UIPickerView, didSelectRow row:
  Int, inComponent component: Int) {
    selectedPlanet = Planet.all[row]
}
Let's go through the first function listed, pickerView(_:titleForRow:forComponent:). This function will be called 8 times because this continues part of the conversation we created earlier in our diagram. The pickerView(_:numberOfRowsInComponent:) function, whatever it returns (we have it returning 8), is the same as the amount of times the pickerView(_:titleForRow:forComponent:) function can get called. Where the user is scrolling within the UIPickerView will decide what the value of the row argument will be.
Tip
If you're ever confused as to how something is working or when something gets called, you should add print statements throughout your code to get a good sense of when a function gets called. Also, you should print out the various arguments to a function within the implementation of that function to see what their values are when your program runs.
Add the following line of code to the viewDidLoad() function in addition to what you had written earlier when setting the dataSource of the planetPickerView equal to self:
planetPickerView.delegate = self
This allows for the following conversation to take place:

Our instance of UIPickerView and planetPickerView will call on the pickerView(_:titleForRow:forComponent:) function 8 times. The preceding diagram shows that the panda is asking the snail what to display, providing it with the row value. The snail (or ViewController) can take this row value and look up the specific value at that index in the array of planets that we can access through Planet.all. Using subscript syntax (that is, Planet.all[0]), we can access certain values from this array by index. That's how we use the row argument-we use it as an index accessing specific planets from the Planet.all array. The specific planet accessed via index (or row in this case) is stored in a constant called planet. Then, we return the displayName property on the planet constant that represents the String value to be displayed to the user.
The second function should be implemented as follows:
func pickerView(_ pickerView: UIPickerView, didSelectRow row:
  Int, inComponent component: Int) {
    selectedPlanet = Planet.all[row]
}
This function is called whenever our user stops scrolling through the UIPickerView and picks a planet. Whenever a user decides to stop scrolling, this method will fire off. As soon as it does, the row argument of this function is all we're concerned with. Why? This is because where ever the user stopped scrolling, this row argument will reflect that. If the user stops scrolling and this function fires off where the row argument is equal to 0, then we know that the user stopped scrolling on Mercury. If the user scrolls all the way down to the bottom, this method will fire off and the row argument will be equal to 7. This means that the user has selected Neptune. We use this to our advantage. We update the selectedPlanet instance property to reflect this change. We have it equal to whatever Planet.all[row], which will reflect exactly where the user stopped scrolling and the planet they have selected returns to us.
Navigate back to the Main.storyboard file. Now bring up the Assistant Editor again. We will want to create an IBActions, making a connection between our UIButton and our ViewController.swift file.
Drag the button from the left-most UIButton (which we labeled as low) and create an IBAction in the ViewController.swift file, calling the function lowSpaceJunkChange. Then, create a separate IBAction from the middle UIButton and call the function mediumSpaceJunkChange. Lastly, create an IBAction from the third UIButton and call the function highSpaceJunkChange. After doing this, it should look as follows:
@IBAction func lowSpaceJunkChange(_ sender: Any) {
}

@IBAction func mediumSpaceJunkChange(_ sender: Any) {
}

@IBAction func highSpaceJunkChange(_ sender: Any) {
}
Now we need to implement these three functions. Depending on which UIButton the user taps on, the IBAction tied to that specific UIButton will fire off. When a user taps on one of the UIButton, depending on which UIButton was tapped, we will update the spaceJunk instance property on franksPizza. For example, if someone taps on the low button, then we should update the frankPizzas class' spaceJunk property to equal .low. If we were then to follow through with that change, we would also see that there's a didSet observer written within the scope of the spaceJunk instance property in the PizzaService.swift file that will fire off.
Considering we just updated this property to equal .low, we will fall within the .low case, where we will then change the pricePerLightMinute instance property to 20.0. All of this takes place as soon as a user taps on one of the three UIButton, how awesome! Here's a screenshot of us implementing the mediumSpaceJunkChange(_:) function, where we're ensuring that the spaceJunk property will be set to .medium:

As you can see, in updating the spaceJunk property, we have three options to change it to (being that SpaceJunk is an enum type with three cases). Here, we're updating it to the .medium value, in that we're writing this code within the mediumSpaceJunkChange(_:) function and a user would have just tapped the medium space level button.
After you're done updating each IBAction with the appropriate code, it should look like this:
    @IBAction func lowSpaceJunkChange(_ sender: Any) {
        franksPizza.spaceJunk = .low
    }

    @IBAction func mediumSpaceJunkChange(_ sender: Any) {
        franksPizza.spaceJunk = .medium
    }

    @IBAction func highSpaceJunkChange(_ sender: Any) {
        franksPizza.spaceJunk = .high
    }
The next thing we need to do is update the cost and show the user what the new cost is. When a user either taps on one of the three buttons or changes the selected planet to a different planet, we should update the cost label to reflect what that new price is.
Let's solve the problem of updating the label with the new price by creating a new function. This new function will be called updateCost() and it will not take in any arguments or return any values. It will look like this:
    func updateCost() {
        let cost = franksPizza.deliveryCharge(for: selectedPlanet)
        let numberFormatter = NumberFormatter()
        numberFormatter.numberStyle = .currency
        let number = NSNumber(floatLiteral: cost)
        let costText = numberFormatter.string(from: number)
        costLabel.text = costText
    }
The first thing we need to do in our implementation of this function is create a new constant, named cost, and assign it the return value of a call to franksPizza.deliveryCharge(for: selectedPlanet). The selectedPlanet value at that time (which would be whichever planet is selected within the UIPickerView) will be what is passed into this function call. If we go through our implementation of the deliveryCharge(for:) function implemented within the PizzaService.swift file, we will see that the following line of code will run:
return pricePerLightMinute * destination.lightMinutesFromEarth
This function call will return pricePerLightMinute, which is a private variable of the Double type. It's of the Double type because we assign it a default value of 20.0 and, through type inference, Swift is able to figure out that the number literal 20.0 can be inferred to be of the Double type. We take this value and multiply it by destination.lightMinutesFromEarth. destination is the name of our argument and we are accessing an instance property on it, called lightMinutesFromEarth. Depending on what our destination is, which is of the Planet type, we are looking to see how far away it is from Earth because that goes into the cost of how much we want to charge our customer. We take this value and multiply it by pricePerLightMinute, which is determined by how much space junk there is in the solar system. If the spaceJunk property on a PizzaService instance is set to .low, pricePerLightMinute is equal to 10.0, if it's set to .medium, the value is 20.0, and if it's set to .high, it's equal to 50.0. The result of this multiplication is what is returned to the caller of this function.
On our next line of code, we are creating a new constant called numberFormatter and assigning it a value being an instance of the NumberFormatter type. An instance of this type can convert textual representations of numeric values. We have a Double value that we would like to convert to a String. Not only that, we would like our Double value to display in the currency format. If our cost constant is equal to 20.0 (for example), then we would like to display this to the user as $20.00. An instance of NumberFormatter can do this conversion for us.
Next, we need to do a little setting up of our numberFormatter constant. We should update its numberStyle stored property to equal .currency. This will allow for the 20.0 value to be turned into $20.00. After updating this property, we should create a new constant called number and assign it a value being an instance of NSNumber. The NSNumber type has many init functions available for us to use. We are looking for the one that takes in a Double as its argument (as that is the type of our cost constant, above which we will be passing to it). Calling on NSNumber(floatLiteral:), you should pass in the cost constant as its argument. In doing so, an instance of NSNumber will be created and stored in the number constant. The reason we are doing this is that, in order to convert a numeric value into a String, the argument to the function that will be doing this work for us asks that, the type of the argument be of type NSNumber (which you will see shortly).
Lastly, create a constant called costText and assign it a value being equal to the return value we receive from a call to the string(from:) method available to instances of NSNumberFormatter. In calling on this function, we will pass it the number constant (as the argument of this function is of type NSNumber). After doing this, our costText constant is of type String and should represent the delivery charge (in currency format) we will be charging our customer. With this information, we can now update our costLabel by updating its text property to equal costText. In doing this, this will update the UILabel displayed on screen.
Now we need to use the updateCost function we just made.
All our IBAction should now call updateCost after they update the spaceJunk property on franksPizza. This should now look like this:
    @IBAction func lowSpaceJunkChange(_ sender: Any) {
        franksPizza.spaceJunk = .low
        updateCost()
    }

    @IBAction func mediumSpaceJunkChange(_ sender: Any) {
        franksPizza.spaceJunk = .medium
        updateCost()
    }

    @IBAction func highSpaceJunkChange(_ sender: Any) {
        franksPizza.spaceJunk = .high
        updateCost()
    }
Now, anytime one of the three UIButton are tapped on, we will update the spaceJunk property accordingly, and then call our updateCost() function, which will change the cost label to reflect the new price.
There's only one more line of code we need to write. There's another place that a user can do something in our app where we will need to change the price and update the cost label-it's when they select a different planet. We are currently updating the cost when a user taps on one of the three UIButton, but we're not accounting for when they might change the selectedPlanet to a different planet.
If you recall from earlier, this change (or update) occurs when the following method fires off (note that the following method now includes the updateCost() call), which is something you should add:
func pickerView(_ pickerView: UIPickerView, didSelectRow row:
 Int, inComponent component: Int) {
    selectedPlanet = Planet.all[row]
    updateCost()
}
When pickerView(_:didSelectRow:inComponent:) fires off, due to the fact that the user has just scrolled through the UIPickerView and changed it to a different planet, we will want to update the cost label. We call on our updateCost() method here as well, because the price will now be different.
This is the finished product after we've selected Jupiter (with medium space junk) when running the app:
