
You can register users on your online shop in many ways:
- Using special extensions for registration (the user needs to fill out a registration form)
- When customers complete a transaction by buying a product in your online shop (the system can send access information—username and password—after purchasing, and the user can use this information to log in to the online shop like a registered user)
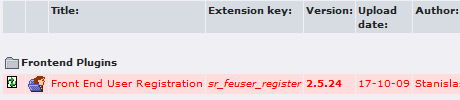
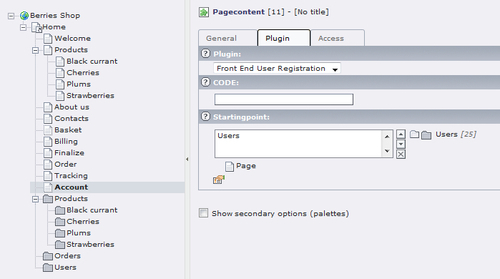
The most popular registration form for TYPO3 is the extension sr_feuser_register (Front End User Registration). You can see the Users folder in the site tree, as shown in the following screenshot:

You can add the user registration extension by following these steps:
- Download the extension from the TYPO3 repository.
- Using the Extension Manager, install the extension.
- Create a new SysFolder in your site tree (in this SysFolder, users and user groups will be saved together, if there are any).
- Add the registration form and set up the required option into the page for user registry.
- Add the template for the registry form (Old Style or CSS).
- Continue further Typoscript configuration using the Constant Editor. It is important to know that extensions can usually be improved with new functions and therefore the configuration of TypoScript can change. You can find these changes in the updated extensions manual and the instructions in the TYPO3 repository at the accordant extension. You can read the instructions online or download them in the SXW format (open with OpenOffice if you are using Windows/Linux or with NeoOffice if you using MacOS) through the Extension Manager.
- For extension installation, you should choose Ext Manager (Extension Manager) from the left menu section. This manager is a module of TYPO3 that provides management of the extensions' functions, such as import of new extensions, install/uninstall, and upgrading extensions to newer versions.
- As a first step before you start the installation, choose Settings from the top drop-down menu. Check Enable extensions without review in the checkbox, as you can see in the following screenshot:
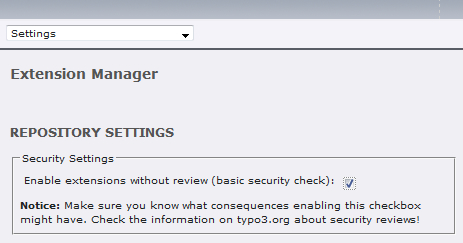
This check enables you to import extensions (and extensions without review) from the TYPO3 TER directly. We will discuss this further inChapter 8.
Next, go to the section Import extensions (through the top drop-down menu) and check for newer extensions by downloading the list from the TYPO3 extension repository (click on Retrieve/Update). After the list is updated, type the extension name or keyword you are searching for and click on Import. The extension will be imported to your web space, or if the extension is already installed and there's a newer version, you will be able to update the extension:
After the extension is set up, you should configure it using TypoScript. If the chosen extension has fail in the constants.txt, you can set up the template through the Template module. You can configure it now as follows:
- Choose the module Template and the page from the sitemap where the template is saved.
- From the module menu (top drop-down menu), choose Contant Editor. Then, from the Category section, choose the extension that you want to configure. In our example it will be PLUGIN.TX_SRFEUSERREGISTER_Pi1 (note that this title is the title of the extension confi guration syntax).
- Manage the necessary settings, specifying options such as:
- Enable features (extensive options that include sending notification, options for HTML format e-mails, producing automatic passwords and using MD5 coding passwords, among others.)
- Files (options for template files, and an attachment files menu that will be added to verification e-mails)
- Typography (typography-related settings for notice, error messages, and prompts)
- Colors (background colors for templates)
- Others (a SysFolder ID number where the registered users' data will be stored: register page ID, identification page ID, and so on.)
- After these changes, you should save the options by clicking on Save document at the top of the page.
For frontend users' registration extension, the addition of a static template is necessary. You can do this by following these steps:
From the top drop-down menu, choose the Info/Modify option. You can edit the template by clicking on Edit the whole template record. Through this section, all fields connected to the template can be edited.
Choose the table Includes and add the static template by clicking on its title in the Items column:
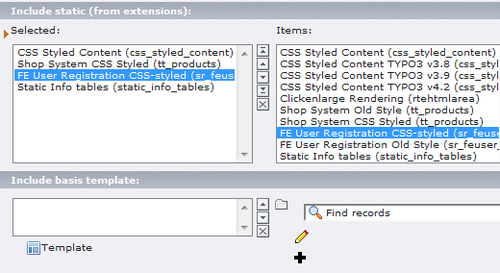
You should add the selected static template of the extension to the Selected column after the CSS Styled Content (css_styled_content) template. Otherwise, this template will not work, because css_styled_content is the base static template that is responsible for page layout and mapping.
Save the options and move on to adding extensions into the page.
You should remember that for using sr_feuser_register, you also need extra extensions: div2007 and static_info_tables. These extensions will be required in the sr_feuser_register installation process.
Also, you can use the extension tt_products for user registration. If you choose to use this extension for registering your online shop users, you need to configure TypoScript for this extension.
As in the previous example, create a SysFolder where the users' accounts data will be stored.
For the tt_products extension to be able to register new user accounts, you need to add the following code to the TypoScript configuration:
plugin.tt_products.createUsers = 1
Also, we set up some extra options in the setup field—setting up the group for a new user. Here we signed up these groups:
- Clients (with group ID 1)
- Trusted clients (with group ID 2)
- Administrator (with group ID 3)
For adding new users to clients, you need to add:
plugin.tt_products.memberOfGroup = 1
Also, specify the SysFolder ID where the new user accounts will be stored. New user accounts will be stored in this SysFolder:
plugin.tt_products.PIDuserFolder = 25
The new users will be sent e-mails with the username and password. The username will be the e-mail ID entered in the registration form, but the password will be generated automatically. At the same time, this data will be stored in your TYPO3 installation. The user can log into your web page with the received data. Also, you should remember that there aren't many avenues for adding user information using tt_products. If you want your users to be able to add detailed information about themselves, you should choose the sr_feuser_register extension. This extension provides the facility to add maximum information about the user. You can use this information in other parts of the web page - if you use an extension for a forum, for example.
For correct system operation, make sure that the accordant markers are in the created template file. For example, here is the code from products_css_en.html.html (the sample templates for tt_products are in typo3conf/ext/tt_products/template):
With your username and password it will be more convenient for you to order at our shop! Username: ###USERNAME### Password: ###PASSWORD### Please keep this e-mail in a secure place.