One of the biggest reasons to choose Time Machine for archives is its ease of use. Apple says it takes just one click to set it up; while that may be true in rare cases, it's usually a bit more involved. This section walks you through all the details of setting up Time Machine, backing up and restoring files, and numerous other activities.
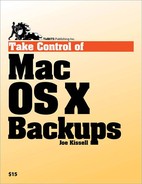
Time Machine has three visible components: a preference pane found
in System Preferences (Figure 7-1), an application
found in the Applications folder or in the Dock (the Dock icon is shown at
right), and (as of Mac OS X 10.5.2), a Time Machine menu
(![]() ) in the main menu bar. (You can enable or disable
this menu with the Show Time Machine Status in the Menu Bar checkbox in
the Time Machine preference pane.)
) in the main menu bar. (You can enable or disable
this menu with the Show Time Machine Status in the Menu Bar checkbox in
the Time Machine preference pane.)


Figure 7-1. Specify backup drives and ignored volumes in the Time Machine preference pane—in addition to switching the giant on/off button. (The icon for your backup drive may differ depending on whether you're using a local drive, a network drive, or a Time Capsule.)
Early versions of Time Machine have a silly bug, which I sincerely hope Apple fixes soon in a Mac OS X update. But in case they don't, the situation is this: if your computer doesn't have a name, or if the name contains any non-alphanumeric characters, then when you go to restore a file in Time Machine, you may see only your current files—not your backups. To fix (or, rather, prevent) this problem:
Go to System Preferences and open the Sharing preference pane.
Look in the Computer Name field at the top of the window. Make sure it's filled in, and that the name includes only the letters A–Z (uppercase or lowercase), the digits 0–9, and the space character.
Close System Preferences.