Find Yourself, Your Stuff, and Your Friends
Most of this chapter explains how to use Apple’s Maps app, but I also talk about Use Find My iPhone and Use Find My Friends. I also discuss the potentially life-saving feature, Do Not Disturb While Driving.
Use Maps
Apple’s homegrown Maps app is a built-in window to the world, providing maps, satellite images, business information, and directions.
Move Around the Map
When you first open Maps, you’re presented with a map of either your current location or the last location you were looking at. Here are the basics of how to move around the map manually:
Pan: Drag on the map.
Zoom in and out: Pinch in and out.
Rotate: Place two fingers on the screen and twist your wrist. To reset the view, tap the compass
 in the upper-right corner.
Set Map Views
You can choose a view by tapping the info ![]() icon to access the Maps Settings panel. Views include:
icon to access the Maps Settings panel. Views include:
Map: The Map view displays a drawn map showing roads, cities, and basic information (Figure 69). It’s usually the best view to use with cellular data, since it’s not as bandwidth-intensive as the other views.
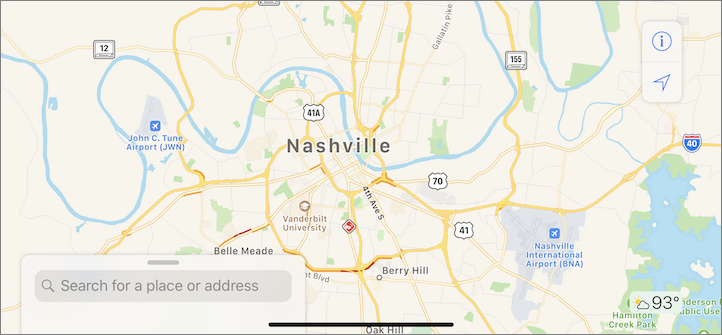
Figure 69: The Standard view shows just the facts. Transit: The Map view shows some transit lines (only in supported cities), but the Transit view shows even more, and emphasizes them, displaying routes, route numbers, and stops.
Satellite: The Satellite view provides an overhead picture of the planet, and it can show road names and other information if you enable the Labels switch in the Maps Settings panel. Satellite view changes between day and night themes depending on the time of day.
Find Yourself
Wherever you go, there you are, but if you don’t know where you are, you are by definition lost! Here is how to find yourself in Maps:
Zero in: Tap the Tracking
 arrow. Maps zooms to your location, which is represented by a blue dot.
Orient yourself: Tap the Tracking
 arrow again to align your location on the map with the direction the top of your device is pointing.
As the device rotates, so does the map, with a blue cone showing which direction you face. Tap the Tracking
 arrow to turn this off.
Find a Location
Once you’ve found yourself, you next want to figure where you want to go. Here are some tips for doing so:
Search: Tap the Search box to open the Search panel. Tap a Nearby button at the top of the panel (like Food) or type something generic, like
restaurant, or something specific, likeJJ’s Diner. You can also type the name of someone in your contacts list (a contact appears in search results only you have an address assigned to that contact).Tap an item in the search results list to show that location on the map. Search results also appear on the map as pins, which you can tap to view more information (Figure 70).
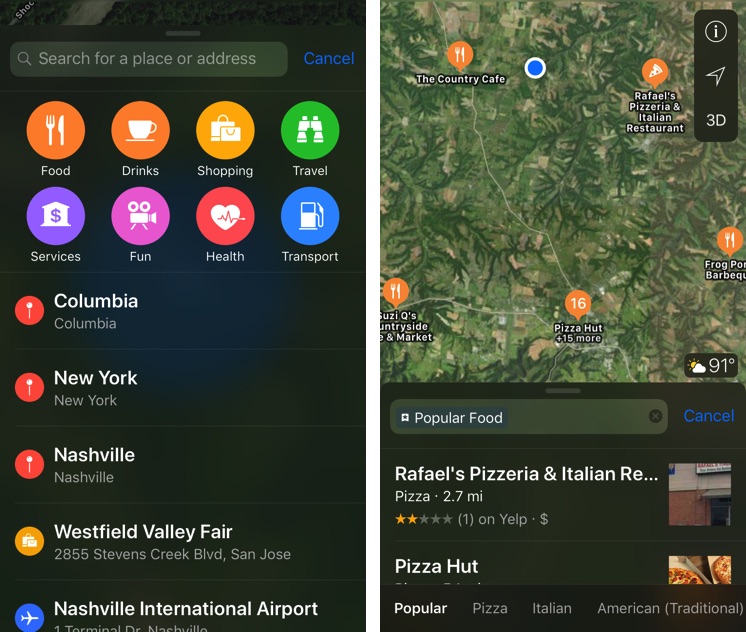
Figure 70: Don’t know what to search for? Maps offers suggestions like Food and Shopping. Search results show up in a list and as pins on the map. Business information: To view data about a business, tap its entry in the list or on its pin on the map. Numbered pins indicate multiple locations near each other—you can tap a numbered pin to narrow down the list to those entries.
From the business information, you can add it to favorites, share
 it, get directions, call it, message it (if it supports Business Chat), view its hours, or visit its website, if those things are listed.
When you view information about a business, you see its Yelp star rating alongside a sample of reviews if Yelp data is available. If you’ve installed the Yelp app, you can also tap Find Out More On Yelp to view the business’s full Yelp listing.
Drop a pin: If you want to mark an unlisted location, you can drop a pin on it by touching the spot until a pin appears. Here’s how to modify that pin:
To adjust the location of a pin, tap it, tap Edit Location, pan the map to adjust the pin’s location, and tap Done when finished.
Tap the pin to view directions, share the location, and more.
To delete the pin, tap the pin, tap Edit Location, and then tap Remove Marker.
Get Directions
Once you know where you’re going, you may want to know how to get there:
Search for a location or tap its pin on the map, choose it from the results, and tap Directions.
Choose from driving, walking, mass transit, or ride sharing directions.
Tap Go to receive turn-by-turn directions to your destination.
(Optional) Swipe up on the bottom bar and tap Details to view the directions as a text-based list.
(Optional) Add a secondary stop along the way by swiping up on the bottom bar and tapping Gas Stations, Dinner, or Coffee. Select your secondary stop and tap GO. Tap the blue bar at the top when you’re ready to navigate to your main destination.
When you reach your destination, if Maps doesn’t stop navigating automatically, tap End and then End Route.
Enable Do Not Disturb While Driving
Distracted driving is a deadly problem. To help combat that, Apple has introduced Do Not Disturb While Driving (DNDWD). When enabled, it blocks notifications on your iPhone (and your Apple Watch, if you wear one), and anyone who messages you receives an automatic reply saying that you won’t see the message until you’ve reached your destination. The sender can choose to reply “urgent” to force the original message through.
There are three ways to turn DNDWD on, which you can set in Settings > Do Not Disturb > Activate:
Automatically: This enables DNDWD when your iPhone detects motion that indicates that you’re driving. If you’re merely riding in a car, you’ll have to manually override it.
When Connected to Car Bluetooth: This setting enables DNDWD only when your iPhone connects to your car’s Bluetooth system. Note that this only works only with automaker Bluetooth systems, not aftermarket stereos or Bluetooth adapters.
Manually: When this selected, DNDWD does not trigger automatically.
You can enable or disable DNDWD by tapping its Control Center button—see Discover Control Center Functions to learn how to enable it.
When DNDWD is on, you’ll see a single notification on your Lock screen letting you know. To disable DNDWD via the notification, tap it and tap I’m Not Driving.
Use Find My iPhone
Find My iPhone lets you track wayward iOS devices, have them play a locating sound, and even lock and wipe them remotely.
The main screen is split into two sections: a list of devices, and a map showing the location of all of your online devices. To begin, select a device from the list and tap Actions at the bottom of the screen:
Play Sound: The function you’ll probably use the most is Play Sound, which plays a continuous sound on the device until you find it and deactivate the sound.
Lost Mode: Putting your iOS device into Lost Mode locks the screen, updates you regularly on its location, and displays your phone number on the missing device’s screen, if you like.
Lock: Since Macs don’t have a Lost mode, you can instead lock one, using a PIN that you choose while enabling Lock mode.
Track Your Device: If you want to retrieve your device yourself, tap the Car
 icon to see driving directions to your device in Maps.
Erase: As a last resort, you can elect to wipe all data from the device.
Use Find My Friends
Find My Friends lets you and your friends keep track of each other. Like Find My iPhone, it’s split into a map view and a list of friends you’ve exchanged locations with.
Here’s how to manage location sharing:
Sharing your location: To share your location with a contact, tap Add, then either select a name or enter an email address, and tap Send. You can choose to share for 1 hour, 1 day, or indefinitely.
Ask see a follower’s location: To request the location of someone following you, tap that person’s listing and then tap Ask to Follow.
Stop sharing your location: If you want to stop sharing your location with someone, tap that person’s listing, tap More, and then tap Stop Sharing My Location.