
Chapter 10
Shopping at the App Store
Perhaps the coolest thing about the iPhone is the multitude of apps available for it. As of this writing, more than 450,000 apps are available for the iPhone. These apps range from games to medical programs to reference utilities and more. If there's something you're interested in, there's most likely an app for it. The best news of all is that many apps are totally free, while most others are priced between 99 cents to $2 (though there are some apps that do cost hundreds of dollars). Even long after you've bought it, apps keep your iPhone fresh and new, and with the App Store on your iPhone, you can shop for apps wherever you have a Wi-Fi connection.
Connecting to the App Store
The App Store icon on the button bar at the bottom of your iPhone's home screen launches the App Store application. It is colored blue and shows a white A made up of a ruler, a pencil, and a brush with a circle around it (see Figure 10–1).
Figure 10–1. The App Store icon
When you tap the App Store icon, the application attempts to connect to Apple's storefront web server. Because of this, you must be located near a Wi-Fi hotspot and be connected to the Internet to use this application.
When your connection is not active or not strong enough to carry a signal, the iTunes Store application displays an error message saying your iPhone can't connect to the store. To resolve this problem, return to your home screen, and tap Settings > Wi-Fi. Make sure your iPhone is connected to a 3G or wireless network and that the signal registers at the top left of your screen with at least one arc or bar (and preferably three arcs or five bars).
Signing in to Your App Store Account
Before you can purchase anything from the App Store, you need to sign in to it. To sign in, scroll to the bottom of any App Store page in the app until you see the Sign In button. Tap it, and you'll be presented with three options, as shown in Figure 10–2: Use Existing Apple ID, Create Apple ID, or iForgot.
If you are signing in using an existing account, all you have to do is enter your Apple ID (usually your e-mail address) and password. You'll then be logged in and able to purchase apps. If you are creating a new Apple ID, the process is quick and easy. Choose what country you are in, agree to the license agreement, and create your user name and password. If you've forgotten your Apple ID, tap iForgot and you'll be taken through a short process to retrieve your exisiting Apple ID.
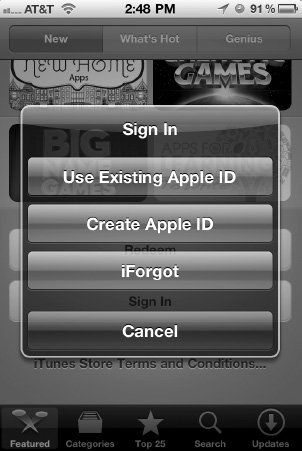
Figure 10–2. The App Store sign-in screen
Browsing Through the App Store
Figure 10–3 shows the App Store. Because it is dealing only with one thing—apps—and not a multitude of music, videos, podcasts, and audiobooks, and so on, the App Store has a simpler layout than the iTunes Store. At the bottom of the screen, you'll see shortcut buttons to different sections of the store. These buttons are Featured, Categories, Top 25, Search, and Updates. Let's explore the different sections of the App Store and how to navigate them.
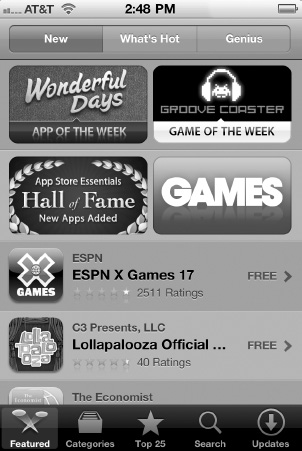
Figure 10–3. The App Store storefront
Featured
The Featured section of the App Store is the first one you'll see (see Figure 10–3). This section is broken down into three categories: New, What's Hot, and Genius. You'll also see banner ads for specific apps and collections of apps. For individual apps, tap any listing, and you'll be taken to its information page (discussed later) where you can read more about the app and download it.
Tap any of the tabs at the top of your screen to access the following sections:
New: The New section includes a list of the most recent apps that are available on the App Store.
What's Hot: This section features the most popular free and paid-for apps.
Genius: Genius is a feature Apple originally introduced in iTunes to recommend music you may like based on the music in your existing iTunes library. Apple has extended this Genius capability to its App Store. Tap the Genius tab, and you'll be presented with a list of free and paid apps that Apple thinks you'll like based on your previous app downloads.
In our experience, the Genius recommendations are spotty at best, but give it a try for yourself and see whether the feature works for you. You'll first need to turn on the Genius recommendations feature and agree to send information about the apps you've downloaded to Apple. This is kind of redundant since Apple already knows all the apps you've downloaded. Once you click Turn On Genius (Figure 10–4), you'll see a list of recommendations. You'll see the name of an app you've downloaded above the name of the recommended apps in which the Genius recommendation was based on. If you found an app you are interested in, tap its listing to go to its Info page.
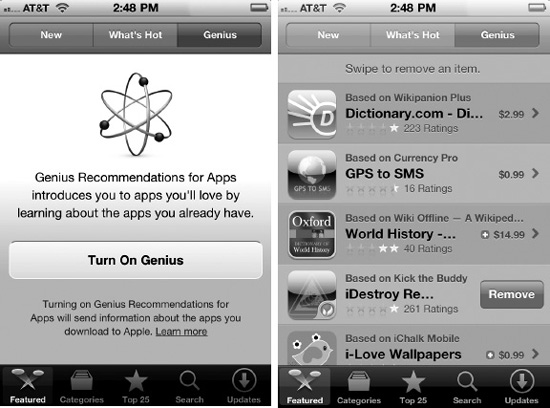
Figure 10–4. Turning on the Genius feature and the subsequent Genius list of apps
Not interested in one of the recommendations and never will be? Swipe the app from left to right to reveal a red Remove button. Tap the button to remove the app from the Genius list.
Categories
The second button on the shortcuts bar at the bottom of the screen is the Categories button. This divides the Apps Store into 20 categories (see Figure 10–5). Categories is a great feature when you know you want a certain type of app but are not sure exactly what app that is. Tap any category to be taken to that category screen. On the individual category screens, you'll see three tabs labeled Top Paid, Top Free, and Release Date. The tabs are just different ways of sorting the apps in the category, with the goal of making apps easier for you to find.
Top Paid: Lists the top paid apps people have purchased in that category
Top Free: Lists the top free apps people have downloaded in that category
Release Date: Lists the most recently released apps in that category

Figure 10–5. The categories screen (left) and a subsequent category view showing lists of Top Paid, Top Free apps, and apps by Release Date
As you might imagine, the Top Paid, Top Free, and Release Date lists change quite frequently. By default, 25 apps are shown on each tab. At the bottom of the 25th app, you can tap Twenty Five More to add another 25 apps to the list.
NOTE: The Games category has its own category sublist ranging from Action and Arcade games to Trivia and Word games.
Top 25
The third button at the bottom of the App Store is the Top 25 button. Tap this to be taken to a list of the top 25 downloaded apps in the App Store (see Figure 10–6). The Top 25 list takes into account apps from all categories and, as you can image, will change frequently. The Top 25 categories are important because they are probably the single best way to figure out what's worth buying. It's the wisdom of the masses. If an app isn't really good, it probably won't show up in the Top 25 lists.
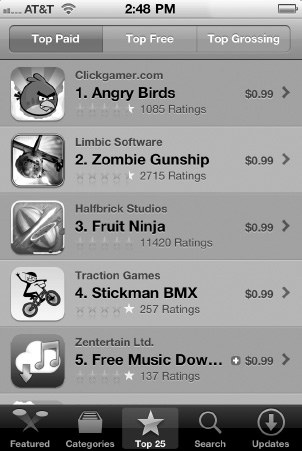
Figure 10–6. The Top 25 screen in the App Store
At the top of the Top 25 screen, you'll see three tabs labeled Top Paid, Top Free, and Top Grossing.
Top Paid: Lists the top paid apps people have purchased in the App Store.
Top Free: Lists the top free apps people have downloaded in the App Store.
Top Grossing: Lists the biggest moneymakers in the App Store. This is a category Apple added in order to help big app developers, such as major game developers, who wanted to port their popular games to the iPhone and iPhone touch. Porting major titles to the iPhone costs a lot of money, so the developers have to charge more for the games. Top Grossing ensures that costlier apps get eye time with customers and aren't pushed out of the way by all the 99-cent games.
At the bottom of the Top 25 screens, you can tap Show Top 50 to add the next 25 apps to the list.
Exploring an App's Information Page
After browsing the App Store, you're sure to come across an app you're interested in. Simply tap the app's listing on any App Store screen to be taken to its information page (see Figure 10–7). You'll only see parts of the Info page at a time since you have to scroll through it, but in the figure, we show you what the entire Info page for an app looks like for clarity's sake.
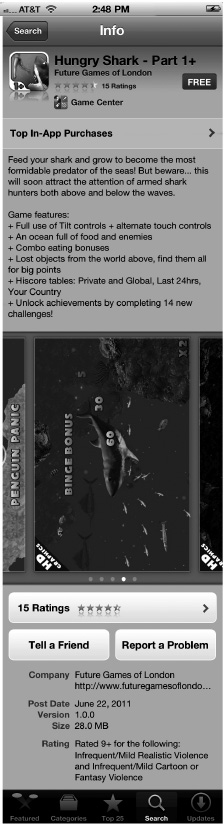
The page is basically divided into three parts: the top, the preview images, and the bottom. At the top of the page you'll find the app icon and name, as well as its user ratings. You'll find a blue button either with FREE or with the price of the app in it. Tap the blue button to download the app (we'll talk more about that in a moment). The remainder of the top of the screen is dedicated to a short text description of what the app does. Beneath the price button you'll see the Game Center icon if the app or game offers Game Center support (discussed later in this chapter). Finally, you'll see a section for Top In-App Purchases if the app offers additional add-ons you can buy from within the game.
In the center of the Info screen you'll see a series of pictures. These pictures are screenshots of the app; they show you what the app looks like. Below the screenshots you'll see a series of white dots. Each dot represents a picture. Swipe to the left or right to move through the pictures.
The bottom of the screen is where you'll find a link to user reviews of the app, a Tell a Friend button that allows you to send an e-mail with a link to the app in it, and a Report a Problem button that allows you to send a note to Apple if you find a problem with the app. The remainder of the screen shows general information about the app: who made it, its size, its age rating, its posting date, and its version number.
Keep in mind ratings aren't always reliable. A developer can easily have a bunch of his friends rate his app five stars. It doesn't happen all the time, but it does happen. As we mentioned earlier, the best way to tell whether an app is really good is if it appears in a Top 25 category.
Buying and Downloading Apps
There are two kinds of apps in the App Store: paid and free. Depending on which the app is, you'll either see a either a blue FREE button or see a blue button with a price in it at the top of an app's Info page. To download the app, tap the blue button. It will turn into a green INSTALL button for free apps or a BUY NOW button for paid apps.
Tap the green button, and a confirmation window will pop up asking you to enter your iTunes account password. Enter it, and tap OK; you will then be taken to your iPhone's home screen. On that screen you will see a dimmed icon of the app you just purchased with a blue progress bar signifying the download (see Figure 10–8). Once the bar fills, your app download is complete! Tap the app's icon, and enjoy!
NOTE: If you've already bought an app, you'll only see a blue INSTALL button next to it and tapping it will immediately begin downloading the app on your device. You will not be charged again for redownloading an app you've already bought.
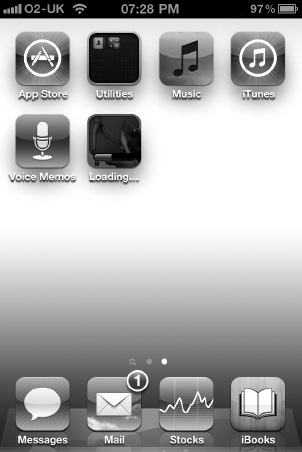
Figure 10–8. After you buy an app, you are returned to your home screen where the app proceeds to download. The download is signified by the blue progress bar.
Searching the App Store
Sometimes you may not want to browse the App Store. You may be on a mission to find a specific app or apps related to specific things. That's where the search feature comes in. The Search screen, shown in Figure 10–9, allows you to perform a live search with instant feedback. Start typing, and the App Store shows all the matches to your search string, updating whenever you type a new character.
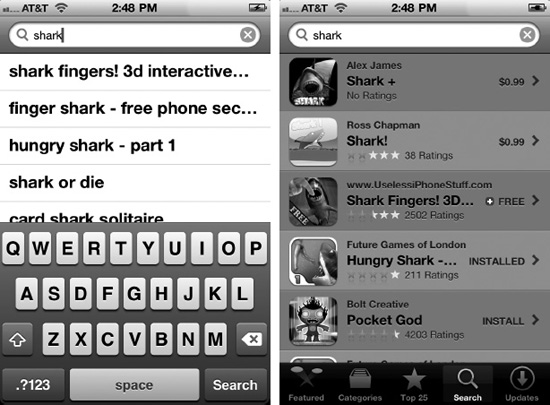
Figure 10–9. The App Store search feature matches your search string to available tracks as you type (left) and presents your results to you in a list (right).
Tap the search button on the keyboard to search for your term, or tap any of the search suggestions that appear above the keyboard. You'll be taken to the search results page that lists all the results that match your query. Tap the item you are looking for to go to its information page.
Downloading Updates and Previously Purchased Apps
Developers are always updating their apps. Updates can include major new features or just subtle performance tweaks. How do you know when there's an update to one of the apps you've downloaded? A red badge with a number will appear in the corner of the App Store icon on the iPhone home screen (Figure 10–10). The number in the red button tells you how many of your apps have available updates.

Figure 10–10. The red dot tells you how many apps have an update available. In this case, two apps have an update available.
To download the updated apps, tap the App Store icon, and then tap the Updates button at the bottom of the App Store (see Figure 10–11). You'll be presented with a list of all the apps on your iPhone touch that need updating. Tap Update All to automatically download all the app updates. To download just one of many app updates, select the app from the Update list, and tap the blue UPDATE button that appears on the app's Info page.
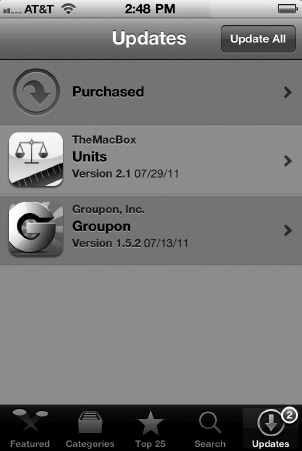
Figure 10–11. The App store's Updates page shows you available updates for apps on your iPhone touch.
NOTE: At this time, if an app shows up in the Updates page, the update will be free. You will never be charged again for any apps that appear on the Updates page. This of course can change in the future.
From the Updates section of the App Store you can also redownload any other apps you have previously download. It doesn't matter if they were free apps or paid apps. From the Updates screen, tap the “Purchased” button (Figure 10–11).
The Purchased screen (Figure 10–12) allows you to see all the apps you've ever bought from the iTunes Store. It doesn't matter if you bought them through iTunes on your computer, through the iTunes Store on your iPhone, or through the iTunes Store on another iOS device. If you bought any items with the Apple ID you are using on the iTunes Store on your iPhone, your entire purchase history will show up when you tap on the Purchased button.
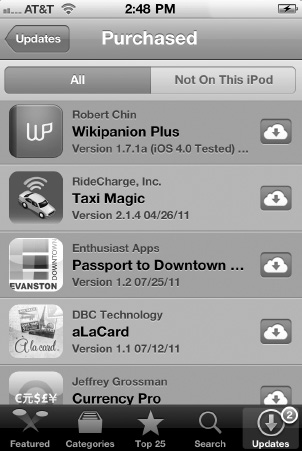
Figure 10–12. Viewing your purchase history.
You can sort through all your purchase history, or just your purchase history for items not currently on your iPhone by tapping the “All” or “Not on this iPhone” tabs at the top of the Purchased screen (Figure 10–12).
To redownload any of your previously purchased apps for free, simply tap on the button with the downward arrow in a cloud icon. You will not be charged again for downloading the items you already bought. This is a great feature if you're away from your computer and find you really want an app that you had download but you forgot to sync it to your iPhone. It's also a great way to check through all your apps and locate one you may have forgotten about, like a really good game.
Redeeming Gift Certificates and Codes
You can redeem gift certificates and codes on your iPhone. On the Featured screen, scroll all the way to the bottom of the page until you see a blue Redeem button. Tap the Redeem button; enter your App Store gift card, gift certificate, or other App Store code into the text box; and tap Redeem. Your App Store account will update, and you will be able to spend those funds directly in the App Store. Remember to type carefully, or else you might get a “code not valid” error. If you see an error, go back and carefully type in the code again.
Transferring Purchased Items to Your Computer
All apps bought on your iPhone transfers back to your computer when you sync the next time. Just plug in your iPhone and wait for the sync to complete. Any newly downloaded or update apps will be automatically transferred to iTunes.
Buying Apps Through iTunes on Your PC
It's important not to forget that you aren't limited to buying apps for your iPhone on your iPhone. You can also use the iTunes Store on your computer to browse for and purchase apps. We tend to browse for apps through iTunes more than the App Store app on our iPhone because our large computer screens. As you can see in Figure 10–13, the iTunes Store has a nice wide-screen layout that lets you easily navigate through all the app offerings.
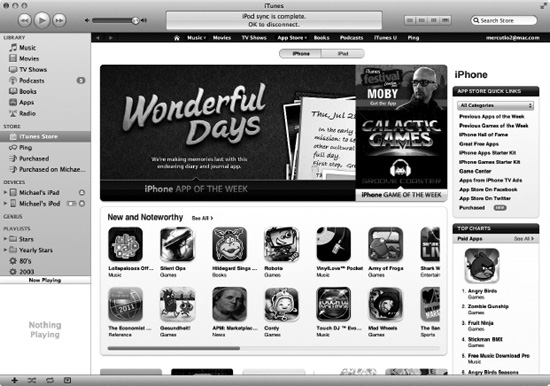
Figure 10–13. The desktop version of the App Store in iTunes
Any apps bought in the App Store in iTunes will automatically transfer to your iPhone on the next sync. See Chapter 2 for more details.
Getting Your Game on in Game Center
Not content at stopping with Ping (see the previous chapter), with iOS 4.1 Apple introduced Game Center, which is a gaming social media application (Figure 10–14). With Game Center, you can play certain games you've downloaded from the App Store against your friends or even complete strangers from around the world. If you are a big iPhone gamer, then Game Center will appeal to you.

Figure 10–14. The Game Center icon
To use Game Center, you'll first need to log in (Figure 10–15). You can do so using your existing Apple ID, or you can create a new ID right inside Game Center. Once logged in, you'll be able to set your online status, see which of your friends are online or invite new friends, view all the Game Center–compatible games you have on your iPhone, view the leaderboards for those games, and view any pending friend requests.
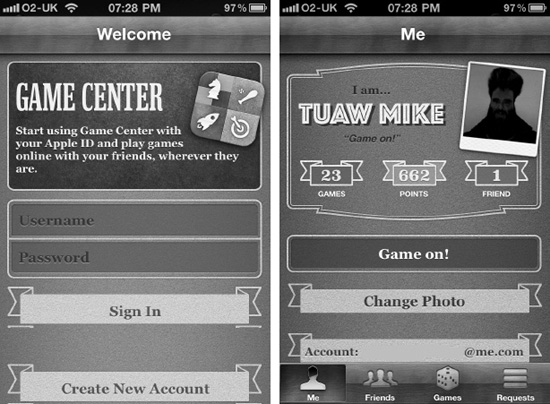
Figure 10–15. Log into Game Center (left) to be presented with your personal gaming stats.
Since it's introduction in iOS 4.1, Game Center has become a big hit. Improvents to Game Center in iOS 5 include the ability to add your own profile picture, get game reccomendations from within the app, and view overall achievement scores. Needless to say, Game Center caught on as a social media platform where Ping did not.
Summary
The App Store is one of the coolest things about the iPhone. It's your gateway to hundreds or thousands of apps that constantly turn your device into an amazing new machine. Here are some tips to take away with you:
- You can download apps through the App Store on the iPhone as well as through the iTunes Store on your desktop or laptop.
- Most apps on the App Store are free or very cheap.
- Use the App Store to check for updates to your apps. All updates will always be free.
- Any item purchased on the App Store app will automatically sync back to your iTunes app library on your computer.
- App Store categories like Top 25 frequently change. Check back often for new apps!
- Use the Genius feature to find new apps you might like based on your current app downloads.
- Game Center brings social media to gaming. If you're a big gamer, it's worth a try. If you're the kind of person who just likes to play Tetris while waiting for the train to work, Game Center is a pass.