You can name your Excel worksheets to help identify their content. For example, if your workbook contains four worksheets, each detailing a different sales quarter, then you can give each worksheet a unique name, such as Quarter 1, Quarter 2, and so on.

Excel highlights the current name.
You can also right-click the worksheet name and click Rename.


Excel assigns the new worksheet name.
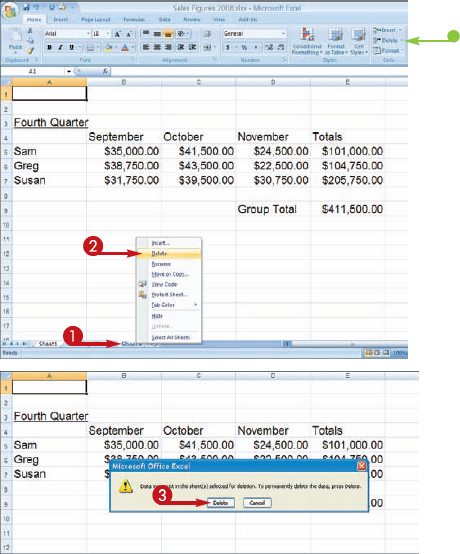
You can delete a worksheet that you no longer need in your workbook. You should always check the worksheet's contents before deleting it to avoid removing any important data. As soon as you delete a worksheet, Excel permanently removes it from the workbook file.
Delete a Worksheet

If the worksheet is blank, Excel deletes it immediately.
If the worksheet contains any data, Excel prompts you to confirm the deletion.
Excel deletes the worksheet.
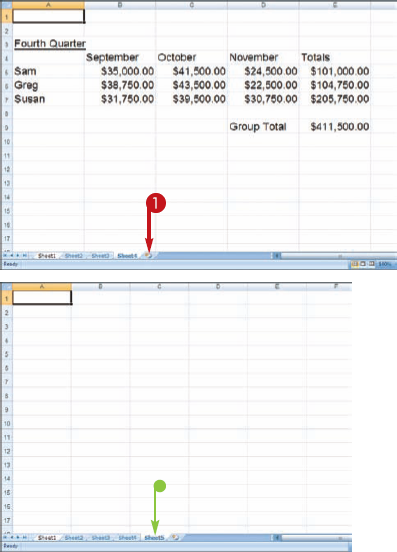
You can add a worksheet to your workbook to create another worksheet in which to enter data. By default, every Excel workbook opens with three worksheets. You can add more worksheets as you need them.
You can move worksheets to reposition their order. See the next task, "Move a Worksheet," for more information.
Add a Worksheet
You can also right-click a worksheet tab and click Insert to open the Insert dialog box, where you can choose to insert a worksheet.
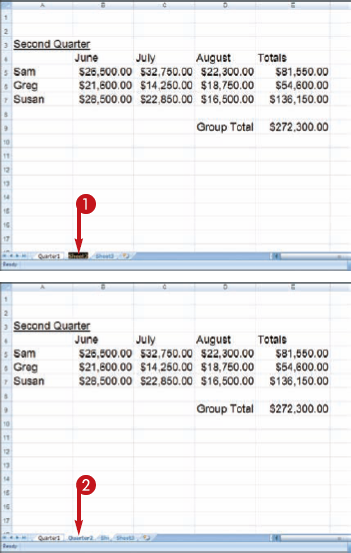
You can move a worksheet within a workbook to rearrange the worksheet order. For example, you may want to position the worksheet that you use most often as the first worksheet in the workbook.
Move a Worksheet
The


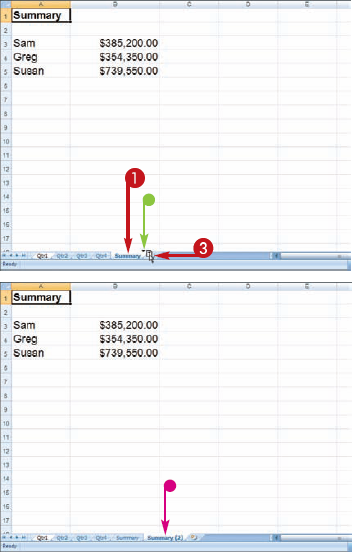
You can copy a worksheet within a workbook. For example, you may want to copy a worksheet to use as a starting point for data that is new, yet similar.
Copy a Worksheet
The


Note
Excel names worksheet copies sequentially with a number, starting with (2), after the worksheet name.
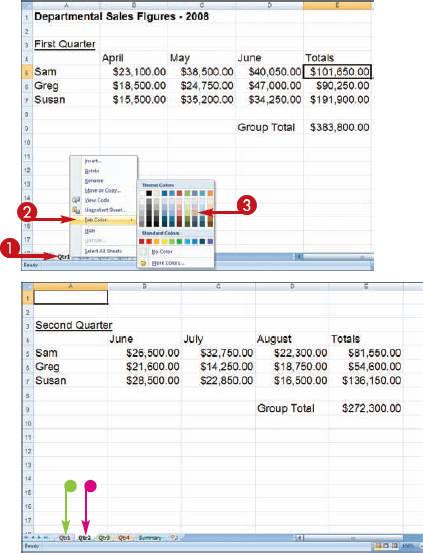
You can add color to your worksheet tabs to help distinguish one worksheet from another. The color that you add to a tab appears in the background, behind the worksheet tab name. By default, all worksheet tabs are white unless you assign another color.
Format the Worksheet Tab Color
Note
You can set the tab color to No Color to return it to the default state.
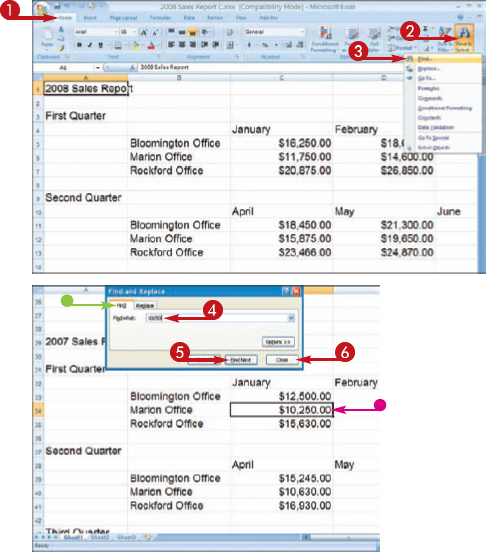
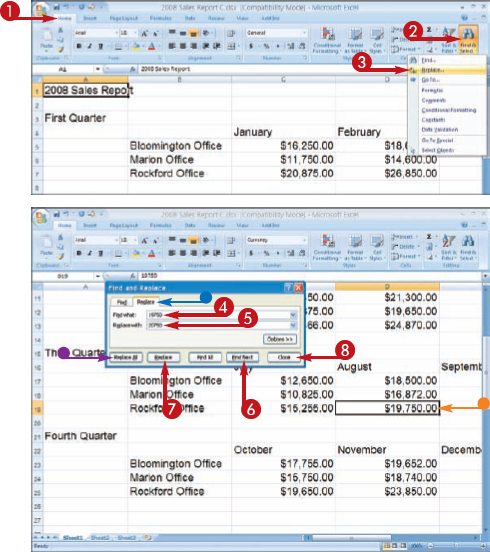
You can use Excel's Find tool to search through your worksheet for a particular number, formula, word, or phrase. You can use the Replace tool to replace instances of text or numbers with other data. For example, you may need to sort through a long worksheet to replace a reference with another name.

FIND DATA

You can click Find Next again to search for the next occurrence.

Note
Excel may display a prompt box when the last occurrence is found. Click OK.
REPLACE DATA
Note
Excel may display a prompt box when the last occurrence is found. Click OK.
Tip
Where can I find detailed search options?
You can click the Options button in the Find and Replace dialog box to reveal additional search options that you can apply. For example, you can search by rows or columns, matching data, and more. You can also search for specific formatting or special characters using Format options. To hide the additional search options, click the Options button again.

How can I search for and delete data?
You can search for a particular word, number, or phrase using the Find and Replace dialog box, and remove the data completely from the worksheet. Start by typing the text in the Find what field. Leave the Replace with field empty. When you activate the search, Excel looks for the data, and deletes it without adding new data to the worksheet.

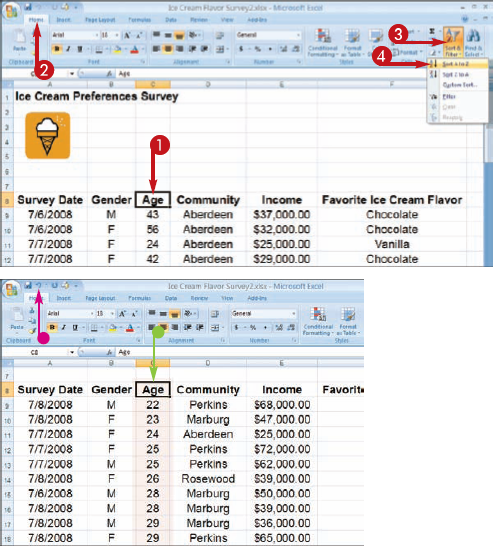
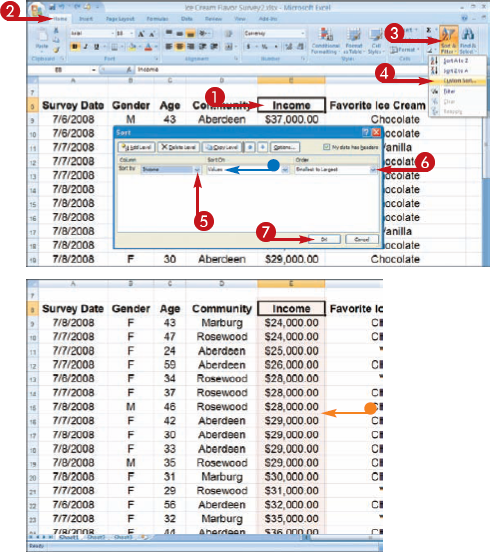
You can sort your Excel data to reorganize the information. This technique is particularly useful when using Excel to create database tables, which are lists of related data. For example, you might want to sort a client table to list the names alphabetically. An ascending sort lists records from A to Z, and a descending sort lists records from Z to A. In the case of numbers, an ascending sort lists numbers from lowest to highest, while a descending sort lists numbers from highest to lowest.

PEFORM A QUICK SORT
PERFORM A CUSTOM SORT
The Sort dialog box appears.

To specify additional sort fields, repeat Steps 5 and 6.


Tip
What are database tables, and how do I use them in Excel?
A database is a collection of related information, such as an address book. You can create a variety of database lists in Excel to manage sales contacts, inventory, household valuables, and more. An entire database list of information is called a table. You use rfields to break down your list into manageable pieces. Fields are typically the columns that you use to define each part of your list, such as name, address, and phone number. You use rows to enter each database entry for your list of data. Database entries are called records.

Can I sort data in rows?
Yes. If the listed data is across a row instead of down a column, you can activate the Sort left to right option. Open the Sort dialog box as shown in this task, and click the Options button. In the Sort Options dialog box that appears, click the Sort left to right option (

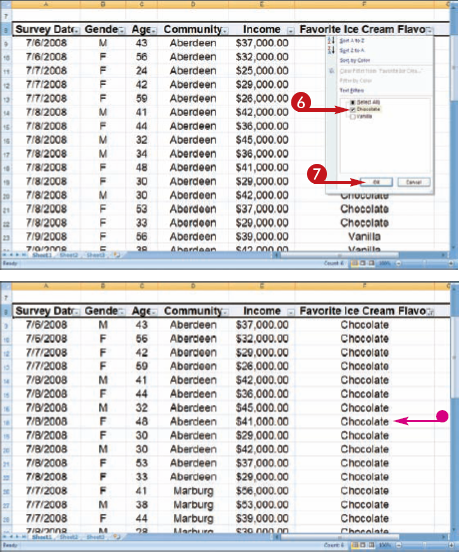
When using Excel as a database, you can use an AutoFilter to view only portions of your data. Unlike a sort, which sorts the entire table, a filter selects certain records to display based on your criteria, while hiding records that do not match the criteria.
You can refer to the previous task to learn how to sort data in Excel.
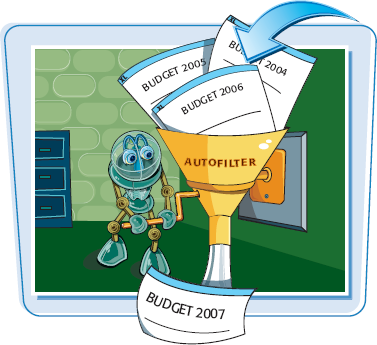
Filter Data with AutoFilter
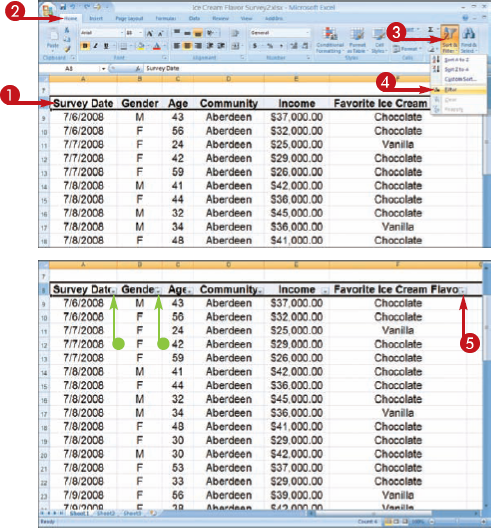
You can filter the table based on a particular field.
To view all of the records again, you can display the filter list and click Select All. You can also click the Clear Filter command to clear the filter.
Tip
Are there other filtering tasks that I can perform?
Yes. For real filtering power, you can use Microsoft Access. You can turn any Excel spreadsheet into an Access database and use the many filtering and sorting tools that are available in Access. To learn more about creating filters in Access, see Chapter 21.

In what ways can I customize a filter?
In the Filter drop-down list, click Text Filters or Number Filters, and then click Custom to open the Custom AutoFilter dialog box. Here you can further customize the filter by selecting operators and values to apply on the filtered data. To learn more about customizing AutoFilters, see Excel's Help files.

You can add comments to your worksheets to make a note to yourself about a particular cell's contents, or as a note for other users to see. For example, if you share your workbooks with other users, you can add comments to leave feedback about the data without typing directly in the worksheet. Excel displays comments in a balloon.
Insert a Comment
ADD A COMMENT
You can also right-click the cell and click New Comment.
A comment balloon appears.
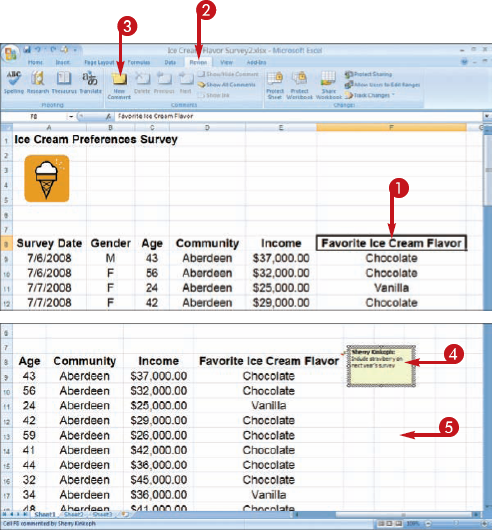
VIEW A COMMENT

Tip
How do I remove a comment?
To remove a comment that you no longer want to associate with a cell, right-click the cell containing the comment to display a shortcut menu. Click Delete Comment. Excel immediately removes the comment from the cell.

How do I respond to and edit another user's comment?
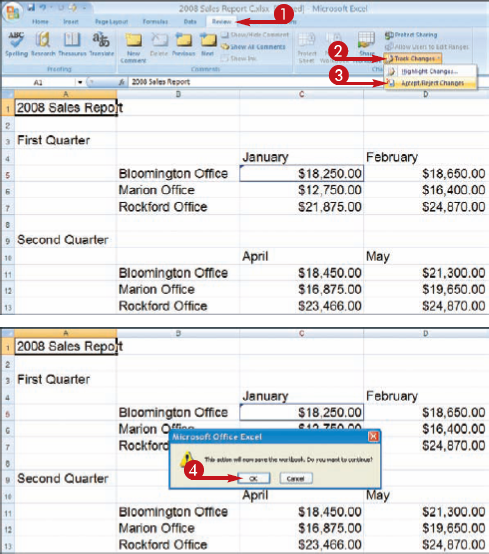
If the worksheet's tracking features are turned on, you can add a comment to another user's comment. Excel's tracking features enable you to see the edits that each user makes to the workbook. After all of the edits are completed, you can decide which edits to accept or reject to create a final file. To turn on workbook tracking, click the Review tab on the Ribbon, click the Track Changes

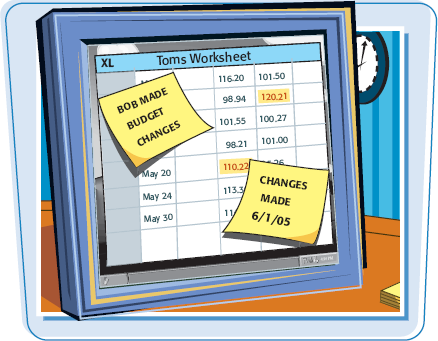
If you work in an environment in which you share your Excel workbooks with others, you can use the tracking and reviewing features to help you keep track of who adds changes to the files. For example, you can see what edits others have made, including formatting changes and data additions or deletions.
The tracking feature changes the color for each person's edits, making it easy to see who changed what in the workbook. When you review the workbook, you can choose to accept or reject the changes.
Track and Review Workbook Changes
TURN ON TRACKING
The Highlight Changes dialog box appears.
This option automatically creates a shared workbook file if you have not already activated the share workbook feature.
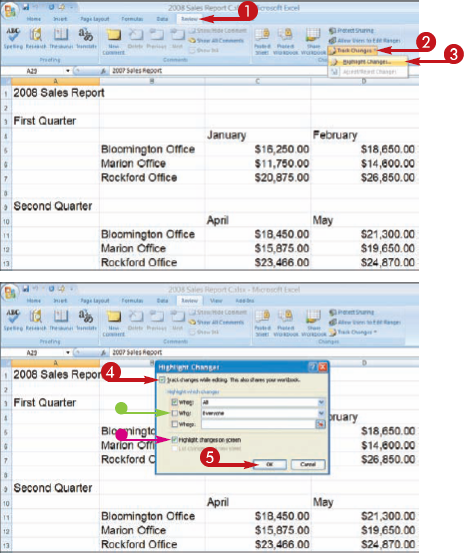
Excel prompts you to save the file.
Excel activates the tracking feature.
Tip
Is there a way to view all of the changes at the same time when reviewing a workbook?
Yes. Click the Track Changes

Can I remove a user from a shared workbook?
Yes. You can open the Share Workbook dialog box and view which users are using the file. Click the Review tab on the Ribbon, and then click the Share Workbook button to open the dialog box. You can then remove a user by clicking his or her name and then clicking Remove User.

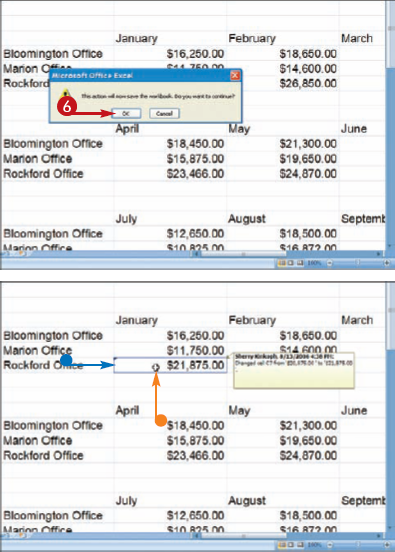
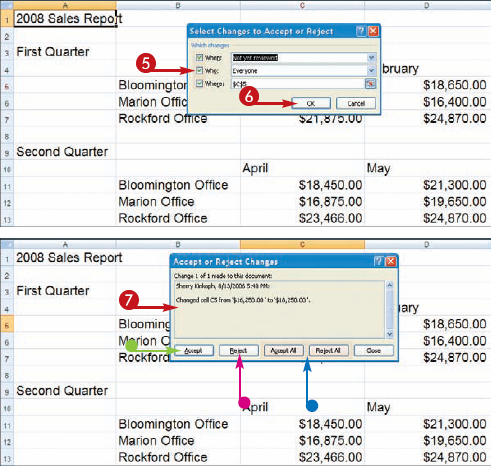
When you activate the reviewing process, Excel goes through each change in the worksheet and allows you to accept or reject the edit. When the review is complete, you can turn the tracking feature off.
REVIEW CHANGES
Excel prompts you to save the file.
The Select Changes to Accept or Reject dialog box appears.
The Accept or Reject Changes dialog box appears.

Tip
Are there certain edits that Excel does not track or highlight?
Yes. Excel's tracking feature does not keep track of changes in worksheet names, inserted or deleted worksheets, or hidden rows or columns. In addition, some of Excel's features do not work with shared workbooks, such as grouping data, recording and assigning macros, or inserting pictures or hyperlinks. For a complete list of changes and features that are supported with shared workbooks, see Excel's Help files.

How do I turn off the tracking feature?
Click the Review tab on the Ribbon, and then click the Track Changes

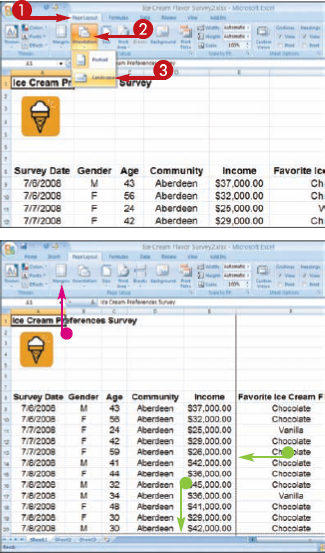
You can assign page setup options, such as page orientation, margins, paper size, and more using the tools on the Page Layout tab on the Ribbon. For example, if your workbook data appears too wide to fit on a regular 8½2-by-11 sheet, then you can change the page orientation to Landscape to fit more data on the page horizontally. You can also insert your own page breaks to control the placement of data on a printed page.

Change Page Setup Options
CHANGE THE PAGE ORIENTATION
Note
Portrait is the default orientation.
Excel applies the new orientation.

Tip
How do I define a print area?
You can assign a print area to print only a certain portion of a worksheet. For example, you may want to print only a range of cells. You can define a print area to prevent Excel from printing the entire worksheet every time you print. To do so, first select the cells that you want to define as the print area, and then click the Page Layout tab on the Ribbon. Next, click the Print Area button and click the Set Print Area command. Excel defines the print area.
How do I print a spreadsheet with gridlines?
By default, the gridlines that you see on a worksheet do not print out with the cell data. You can turn gridlines on for printing purposes. To do so, simply click the Gridlines Print check box on the Page Layout tab (