
CHAPTER 11
Making the Most of Your Photos
Each new MacBook comes with Photos, a powerful but easy-to-use application for managing, editing, and enjoying your photos. You can import photos from your digital camera, phone, or tablet; crop them, straighten them, and improve their colors; and use them in albums, slide shows, or e-mail messages.
Import Photos
Photos enables you to import photos directly from a wide range of digital cameras, phones, and tablets, including the iPhone, iPad, and iPod touch. Photos normally recognizes a camera automatically when you connect it to your MacBook and switch it on.
Alternatively, you can remove the digital camera’s memory card and insert it in a memory card reader connected to the MacBook; your camera’s manufacturer may recommend this method. Another possibility for some cameras and phones is to import photos via Bluetooth File Exchange.
Import Photos
![]() Connect your digital camera or device to your MacBook via USB.
Connect your digital camera or device to your MacBook via USB.
![]() Turn on the digital camera or device.
Turn on the digital camera or device.
Note: Some digital cameras turn on automatically when you connect them to a powered USB port, but most cameras need to be turned on manually. Phones and tablets usually remain on and wake from sleep.
Photos opens and displays the contents of the digital camera or device.
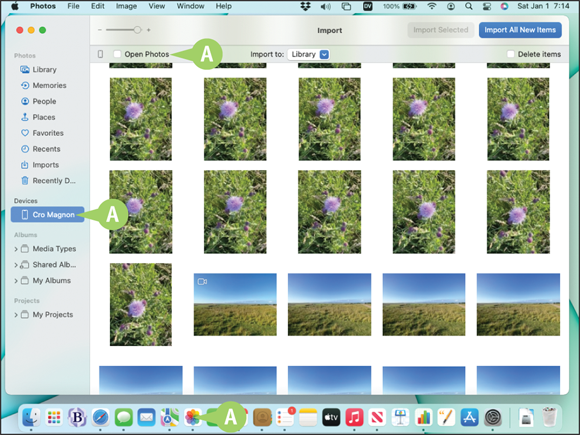
![]() If Photos does not open automatically, click Photos (
If Photos does not open automatically, click Photos (![]() ) on the Dock, click the device — such as iPhone — in the Devices list, and then click Open Photos (
) on the Dock, click the device — such as iPhone — in the Devices list, and then click Open Photos (![]() changes to
changes to ![]() ).
).
![]() You can drag the Zoom slider to zoom in or out on the thumbnails.
You can drag the Zoom slider to zoom in or out on the thumbnails.
Note: Scroll up and down as needed by swiping or dragging two fingers on the trackpad.
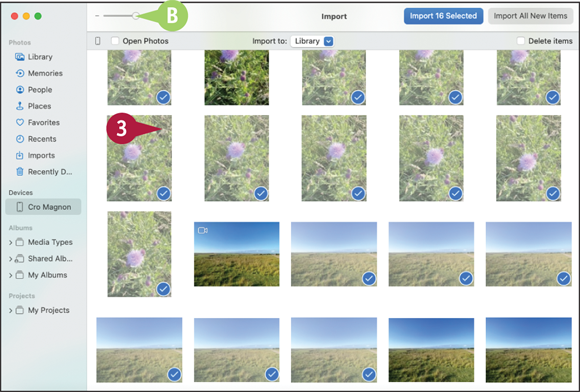
![]() Click each photo you want to import, placing a check mark (
Click each photo you want to import, placing a check mark (![]() ) on it. You can drag across multiple photos to select them.
) on it. You can drag across multiple photos to select them.
Note: To select a range of photos, click the first photo, and then press ![]() + click the last photo.
+ click the last photo.
Note: If you want to import all the new photos, you need not select any.

![]() Click Import to (
Click Import to (![]() ) and then click the destination. Your choices are Library, New Album, or an album in the My Albums list.
) and then click the destination. Your choices are Library, New Album, or an album in the My Albums list.
![]() You can select Delete items (
You can select Delete items (![]() ) to have Photos delete the photos from the camera after importing them.
) to have Photos delete the photos from the camera after importing them.
![]() Click Import Selected to import the photos you selected. Click Import All New Items to import all the new photos.
Click Import Selected to import the photos you selected. Click Import All New Items to import all the new photos.

Photos copies the photos from the digital camera or device to your MacBook.
![]() Photos displays the Imports screen, showing the photos you have just imported.
Photos displays the Imports screen, showing the photos you have just imported.
![]() An individual photo appears as a thumbnail.
An individual photo appears as a thumbnail.
![]() Photos shot in a burst appear as a stack.
Photos shot in a burst appear as a stack.
Note: For a digital camera, click Eject (![]() ) next to the camera’s name in the Devices list to eject the camera before you disconnect it.
) next to the camera’s name in the Devices list to eject the camera before you disconnect it.
![]() Disconnect the camera or device from your MacBook.
Disconnect the camera or device from your MacBook.
Browse Your Photos
To locate the photos you want to view and work with, you browse your photos. Photos enables you to browse your photos easily: You first select a category in the sidebar on the left side of the Photos window and then use the main part of the window to view the photos in the source.
If you have just imported photos, the best way to begin browsing is by viewing the Imports category, which contains the photos you have imported.
Browse Your Photos
Open the Photos App and Browse by Albums
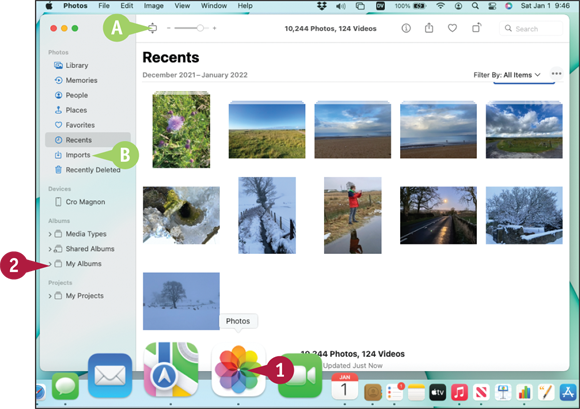
![]() Click Photos (
Click Photos (![]() ) on the Dock.
) on the Dock.
Photos opens.
![]() You can click Aspect Ratio (
You can click Aspect Ratio (![]() ) to switch the thumbnails between square and their full aspect ratios.
) to switch the thumbnails between square and their full aspect ratios.
![]() You can click Imports in the Library section of the sidebar to see photos you have imported.
You can click Imports in the Library section of the sidebar to see photos you have imported.
Note: If the Albums list is hidden, move the pointer over the Albums heading, making the Expand button appear, and then click Expand (![]() ).
).
![]() Click Expand (
Click Expand (![]() changes to
changes to ![]() ) next to My Albums.
) next to My Albums.

The Albums list appears.
![]() Click the album you want to view.
Click the album you want to view.
Note: Scroll up and down as needed by swiping or dragging two fingers on the trackpad.
![]() You can move the pointer over a photo and click Add to Favorites (
You can move the pointer over a photo and click Add to Favorites (![]() changes to
changes to ![]() ) to add the photo to your Favorites.
) to add the photo to your Favorites.
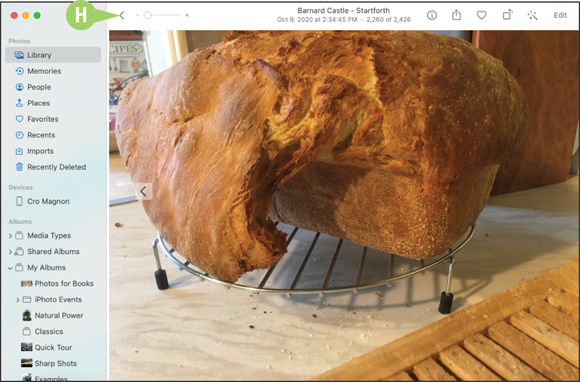
![]() Double-click the photo you want to view.
Double-click the photo you want to view.

Photos displays the photo.
![]() You can press
You can press ![]() + click the photo to display the contextual menu.
+ click the photo to display the contextual menu.
![]() You can click Share to display options for sharing the photo.
You can click Share to display options for sharing the photo.
![]() You can click Delete 1 Photo to delete this photo.
You can click Delete 1 Photo to delete this photo.
![]() Swipe left with two fingers on the trackpad to display the next photo, or swipe right with two fingers to display the previous photo.
Swipe left with two fingers on the trackpad to display the next photo, or swipe right with two fingers to display the previous photo.
The next photo or the previous photo appears, depending on which way you swiped.
Note: You can also press ![]() to display the previous photo or
to display the previous photo or ![]() to display the next photo.
to display the next photo.
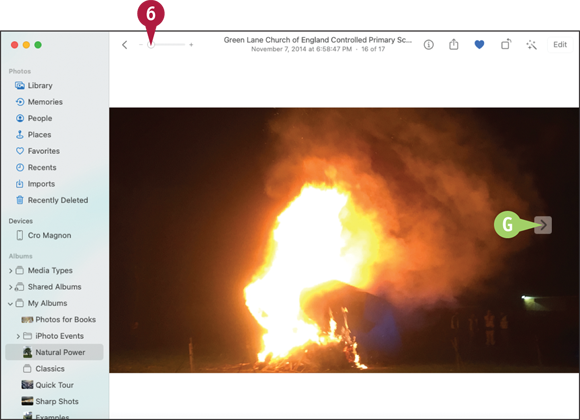
![]() You can also switch photos by moving the pointer to the left side of the photo and clicking Previous (
You can also switch photos by moving the pointer to the left side of the photo and clicking Previous (![]() ) or moving the pointer to the right side and clicking Next (
) or moving the pointer to the right side and clicking Next (![]() ).
).
![]() Drag the Zoom slider to zoom in.
Drag the Zoom slider to zoom in.
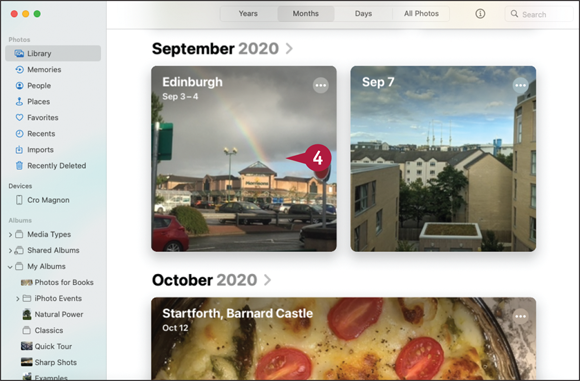
The Photos app automatically organizes your photos into groups called Years, Months, and Days. To access these groups, you select the Photos category in the Library section of the sidebar. You can then click the Years button, the Months button, or the Days button on the bar across the top of the Photos window to display the groups you want to see, and then double-click a group to open it.
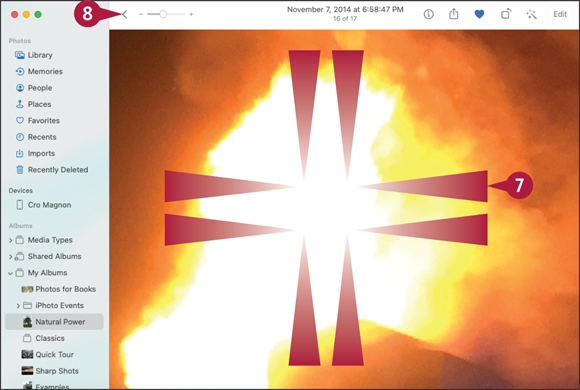
Photos zooms in on the middle of the photo.
Note: You can also zoom in by placing two fingers, or your finger and thumb, together on the trackpad and then moving them apart. To zoom out, place two fingers, or your finger and thumb, apart and then pinch inward.
![]() Drag with two fingers as needed to pan around the photo after zooming in.
Drag with two fingers as needed to pan around the photo after zooming in.
![]() Click Back (
Click Back (![]() ).
).
The album appears again.

Browse Photos by Years, Months, and Days
![]() In the Library section of the sidebar, click Library (
In the Library section of the sidebar, click Library (![]() ).
).
The Photos pane appears.
![]() Click Years.
Click Years.
The Years pane appears.
![]() Double-click the photo thumbnail for the Year you want to view.
Double-click the photo thumbnail for the Year you want to view.
The Months pane for the Year appears, showing larger thumbnails that represent the Months.
![]() Double-click the thumbnail for the Month you want to view.
Double-click the thumbnail for the Month you want to view.
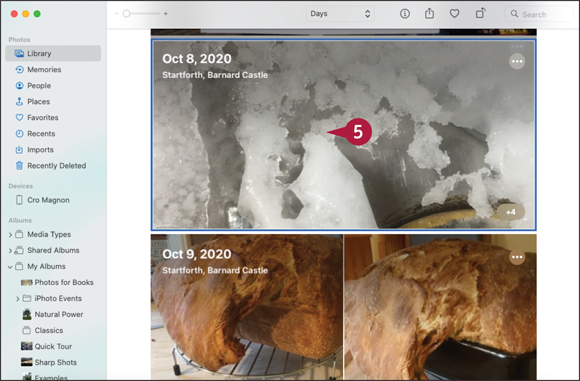
The Days pane for the Month appears.
![]() Double-click the thumbnail for the photo you want to view.
Double-click the thumbnail for the photo you want to view.
The Photos app enables you to browse your photos by the places in which you took them or the places with which you tagged them. Browsing by places is helpful when you need to find photos taken at a particular place without having to search by dates. Photos shows only the main places when the map is zoomed out, but displays more places the further you zoom in.
The photo opens.
![]() You can click Back (
You can click Back (![]() ) to return to the Days screen.
) to return to the Days screen.
Note: You can swipe left or right with two fingers to display the next photo or the previous photo.

Browse Your Photos by Places
Note: If the Photos list is collapsed, move the pointer over the Photos heading, making the disclosure triangle (![]() ) appear, and then click Expand (
) appear, and then click Expand (![]() changes to
changes to ![]() ).
).
![]() In the Photos section of the sidebar, click Places (
In the Photos section of the sidebar, click Places (![]() ).
).
The Photos app displays a map showing the places in which your photos were taken.
![]() Click Zoom In (
Click Zoom In (![]() ) one or more times to zoom in.
) one or more times to zoom in.
![]() You can click Zoom Out (
You can click Zoom Out (![]() ) to zoom out.
) to zoom out.
Note: You can also zoom in by pinching apart on the trackpad or zoom out by pinching together.
![]() You can click Satellite to switch to the photographic Satellite View.
You can click Satellite to switch to the photographic Satellite View.
![]() Click the thumbnail for the photo or group of photos you want to see.
Click the thumbnail for the photo or group of photos you want to see.
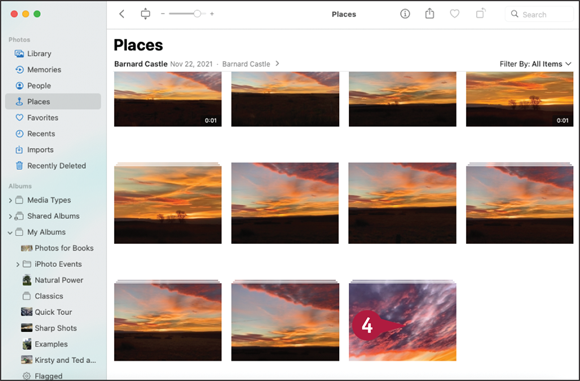
The photos taken in that place appear.
![]() Double-click the photo you want to view.
Double-click the photo you want to view.
The photo opens.
![]() You can click Zoom (
You can click Zoom (![]() ) to expand the Photos window to full screen so that you can examine the photo more closely.
) to expand the Photos window to full screen so that you can examine the photo more closely.
![]() Click Back (
Click Back (![]() ).
).
The photos in the place appear again.
![]() Click Back (
Click Back (![]() ) again.
) again.
The map appears again.
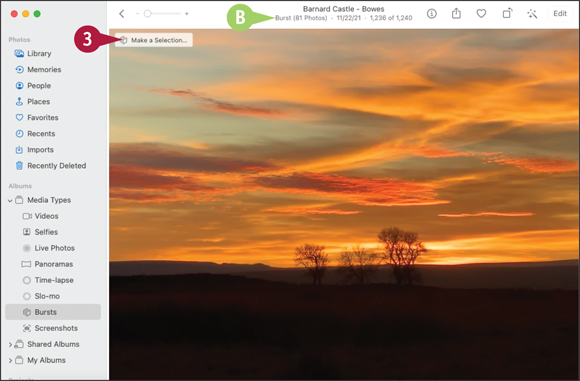
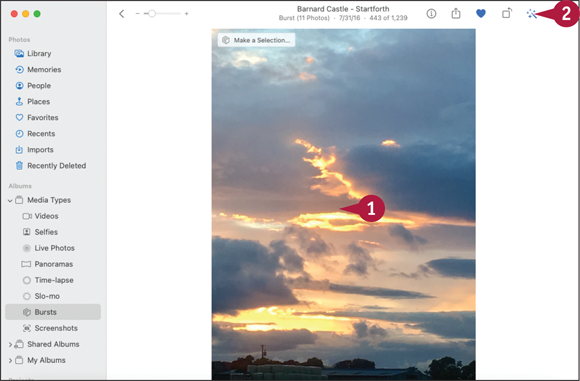
Select Photos from Bursts
Many digital cameras and devices, including most models of iPhone, can take bursts of photos. Bursts are great when you are trying to capture facial expressions, live action, or other unrepeatable moments.
The Photos app enables you to browse the photos you have taken in bursts. From a burst, you can choose which photos to keep as individual photos; you can also choose whether to keep the rest of the burst photos or delete them.
Select Photos from Bursts

![]() In Photos, navigate to the burst. To see all bursts, expand Albums, expand Media Types, and then click Bursts (
In Photos, navigate to the burst. To see all bursts, expand Albums, expand Media Types, and then click Bursts (![]() ).
).
Note: If you have added the burst recently, click Recents (![]() ).
).
Note: Scroll up and down as needed by swiping or dragging two fingers on the trackpad.
![]() Each burst appears as a stack of photos.
Each burst appears as a stack of photos.
![]() Double-click the burst you want to open.
Double-click the burst you want to open.
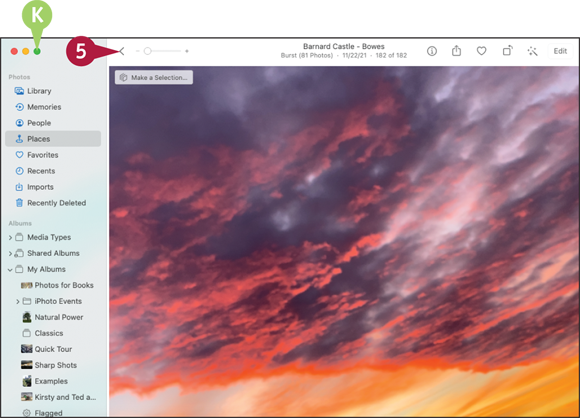
Photos displays the photo at the top of the stack in the burst.
![]() The Burst indicator shows you how many photos the burst contains.
The Burst indicator shows you how many photos the burst contains.
![]() Click Make a Selection.
Click Make a Selection.
Note: The Make a Selection prompt appears only on a burst of photos, not on individual photos.
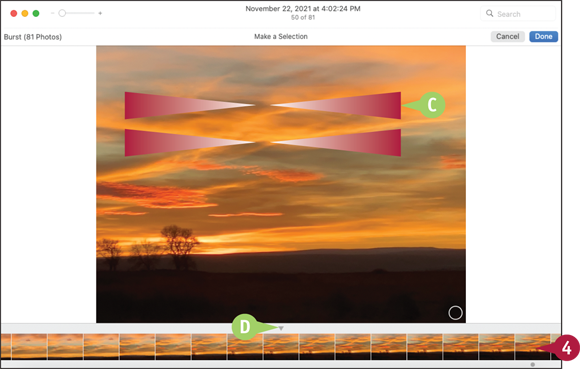
The Make a Selection pane appears.
![]() You can swipe left or right with two fingers, or press
You can swipe left or right with two fingers, or press ![]() or
or ![]() to display the next photo or previous photo.
to display the next photo or previous photo.
![]() The inverted triangle indicates the thumbnail for the current photo.
The inverted triangle indicates the thumbnail for the current photo.
![]() Click the thumbnail for the photo you want to view.
Click the thumbnail for the photo you want to view.
The photo appears.
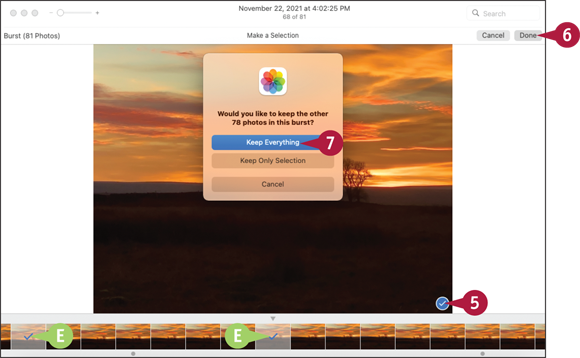
![]() Select the selection circle (
Select the selection circle (![]() ) if you want to keep the photo.
) if you want to keep the photo.
![]() A check mark appears on the thumbnail for each photo you select.
A check mark appears on the thumbnail for each photo you select.
![]() When you finish selecting photos from the burst, click Done.
When you finish selecting photos from the burst, click Done.
The Would You Like to Keep the Other Photos in This Burst? dialog opens.
![]() Click Keep Only Selection or Keep Everything, as needed. Click Cancel to return to the Make a Selection pane.
Click Keep Only Selection or Keep Everything, as needed. Click Cancel to return to the Make a Selection pane.
Crop a Photo
To improve a photo’s composition and emphasize its subject, you can crop off the parts you do not want to keep. Photos enables you to crop to any rectangular area within a photo, so you can choose exactly the part of the photo that you need. You can either constrain the crop area to a specific aspect ratio or crop freely. Constraining an area to specific dimensions is useful for producing an image with a specific aspect ratio, such as 3 × 5 or the ratio of your MacBook’s display.
Crop a Photo

![]() In Photos, open the photo you want to edit.
In Photos, open the photo you want to edit.
![]() Click Edit.
Click Edit.

Photos opens the photo for editing and displays the editing tools.
![]() Click Crop.
Click Crop.
Photos displays the cropping tools.
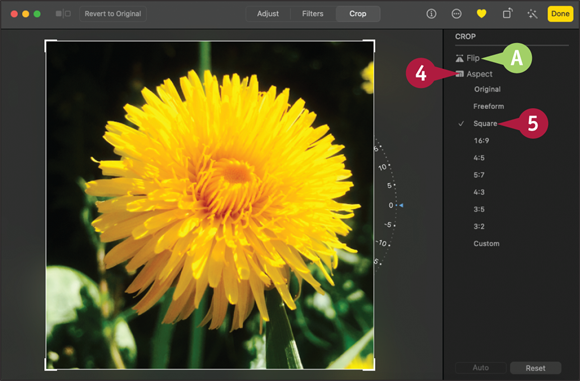
![]() If you want to crop to specific proportions or dimensions, click Aspect (
If you want to crop to specific proportions or dimensions, click Aspect (![]() ).
).
The Aspect pop-up menu opens.
![]() Click the aspect ratio you want to use, such as Square.
Click the aspect ratio you want to use, such as Square.
![]() You can click Flip (
You can click Flip (![]() ) to flip the photo horizontally. Press
) to flip the photo horizontally. Press ![]() (
(![]() changes to
changes to ![]() ) and then click Flip (
) and then click Flip (![]() ) to flip the photo vertically.
) to flip the photo vertically.
The crop box changes to show the aspect ratio you chose.
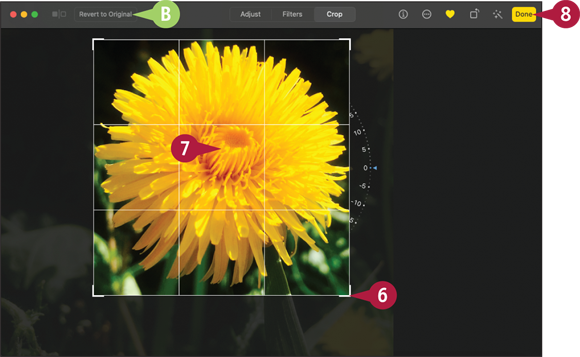
![]() Drag the corner handles to crop to the area you want.
Drag the corner handles to crop to the area you want.
![]() If necessary, click inside the cropping rectangle and drag the picture to change the part shown.
If necessary, click inside the cropping rectangle and drag the picture to change the part shown.
![]() You can click Revert to Original at any point to undo all the changes you have made to the photo.
You can click Revert to Original at any point to undo all the changes you have made to the photo.
![]() Click Done.
Click Done.
Photos crops the picture to the area you chose.
Photos hides the editing tools again.
Rotate or Straighten a Photo
With digital cameras, and especially with phones and tablets, you can easily take photos with the device sideways or the wrong way up. The Photos app enables you to rotate a photo easily by 90, 180, or 270 degrees to the correct orientation.
Photos also enables you to straighten a photo by rotating it a few degrees clockwise or counterclockwise. To keep the straightened picture in its current aspect ratio, Photos automatically crops off the parts that no longer fit.
Rotate or Straighten a Photo
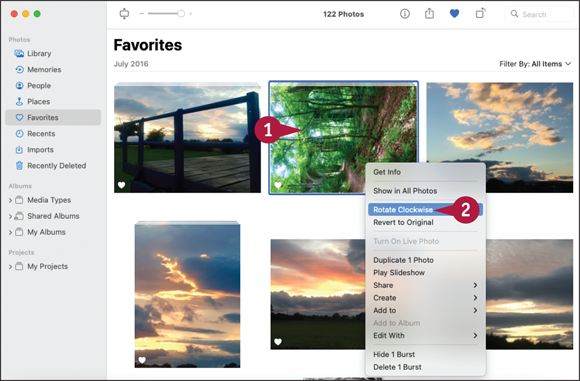
Rotate a Photo
![]() In Photos, press
In Photos, press ![]() + click the photo you want to rotate.
+ click the photo you want to rotate.
The contextual menu opens.
![]() Click Rotate Clockwise.
Click Rotate Clockwise.
Note: Press ![]() and then click Rotate Counterclockwise to rotate the photo counterclockwise.
and then click Rotate Counterclockwise to rotate the photo counterclockwise.
Photos rotates the photo 90 degrees clockwise.
Note: If you need to rotate the photo further, repeat the move.

Straighten a Photo
![]() In Photos, open the photo you want to straighten.
In Photos, open the photo you want to straighten.
![]() Click Edit.
Click Edit.

Photos opens the photo for editing and displays the editing tools.
![]() Click Crop.
Click Crop.

![]() You can click Rotate (
You can click Rotate (![]() ) to rotate the photo 90 degrees counterclockwise. To rotate the photo 90 degrees clockwise, press
) to rotate the photo 90 degrees counterclockwise. To rotate the photo 90 degrees clockwise, press ![]() (
(![]() changes to
changes to ![]() ) and then click Rotate (
) and then click Rotate (![]() ).
).
Photos displays the cropping and straightening tools.
![]() Drag the Angle dial to straighten the photo.
Drag the Angle dial to straighten the photo.
Note: Use the lines in the straightening grid to judge when lines in the picture have reached the horizontal position or the vertical position.
![]() Click Done.
Click Done.
Photos applies the straightening.
Photos hides the editing tools again.
Improve a Photo’s Colors
Photos includes powerful tools for improving the colors in your photos. If a photo is too light, too dark, or the colors look wrong, you can use these tools to make it look better.
Usually, the best way to start is to use the Auto Enhance tool, which boosts flat colors while muting overly bright ones. If Auto Enhance does not give you the results you need, you can use the Adjust tools to edit settings such as exposure, contrast, and saturation.
Improve a Photo’s Colors
Quickly Enhance the Colors in a Photo
![]() In Photos, open the photo you want to enhance.
In Photos, open the photo you want to enhance.
![]() Click Auto Enhance (
Click Auto Enhance (![]() changes to
changes to ![]() ).
).
Photos adjusts the exposure and enhances the colors.
Note: If the Auto Enhance tool does not improve the photo, click Auto Enhance again (![]() changes to
changes to ![]() ) to remove the enhancement, and then use the Adjust tools instead.
) to remove the enhancement, and then use the Adjust tools instead.
Using the Adjust Tools
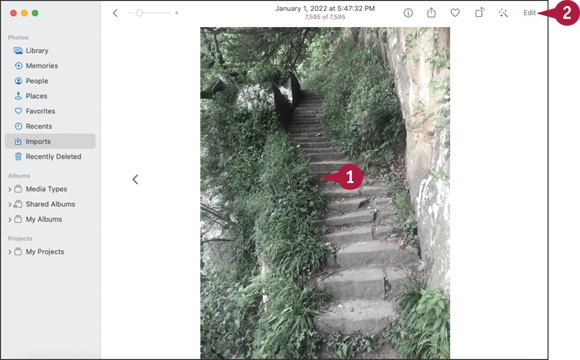
![]() Open the photo you want to adjust.
Open the photo you want to adjust.
![]() Click Edit.
Click Edit.
Photos opens the photo for editing and displays the editing tools.
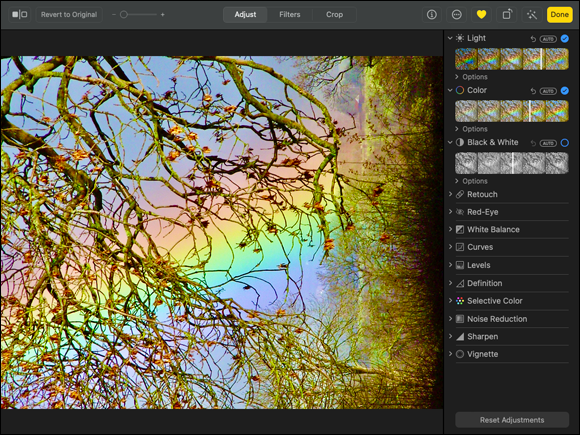
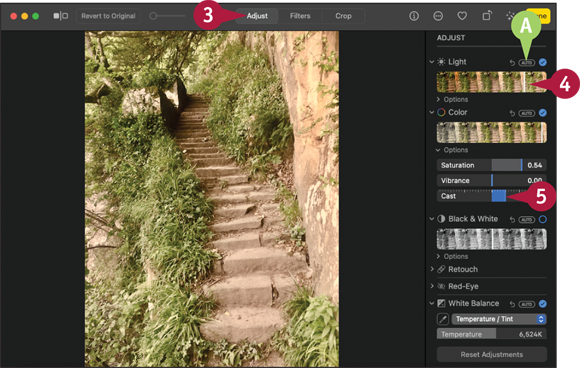
![]() Click Adjust.
Click Adjust.
The Adjust tools appear.
Note: If the set of tools you want to appear is collapsed, move the pointer over its heading and click Expand (![]() ) to expand it.
) to expand it.
![]() You can click Auto to have Photos adjust the group of settings automatically.
You can click Auto to have Photos adjust the group of settings automatically.
![]() Drag the group’s slider to adjust all the settings using preset balances.
Drag the group’s slider to adjust all the settings using preset balances.
![]() Drag an individual slider to adjust that setting alone.
Drag an individual slider to adjust that setting alone.
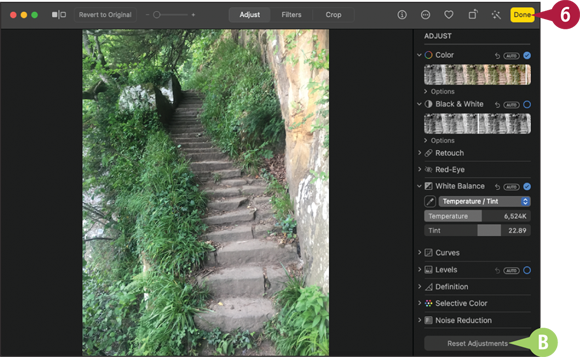
![]() You can click Reset Adjustments to undo your adjustments.
You can click Reset Adjustments to undo your adjustments.
Note: If you need to make the same adjustments to other photos, press ![]() + click the photo and click Copy Adjustments. You can then open each other photo for editing, press
+ click the photo and click Copy Adjustments. You can then open each other photo for editing, press ![]() + click the photo, and click Paste Adjustments to apply the copied adjustments.
+ click the photo, and click Paste Adjustments to apply the copied adjustments.
![]() When you finish working on the colors, click Done.
When you finish working on the colors, click Done.
Photos applies the changes to the photo.
Photos hides the editing tools again.
Add Filters to Photos
Photos includes ten preset filters that you can quickly apply to change a photo’s look and add life and interest to it. For example, you can change a color photo to black-and-white, boost or fade the color, or apply an instant-camera filter.
To add filters, you open the photo for editing and display the Filters panel. You can then experiment with the available filters to see which filter works best. After applying a filter, you can adjust its intensity if necessary.
Add Filters to Photos
![]() In Photos, open the photo to which you want to apply a filter.
In Photos, open the photo to which you want to apply a filter.
![]() Click Edit.
Click Edit.

Photos opens the photo for editing and displays the editing tools.
![]() Click Filters.
Click Filters.
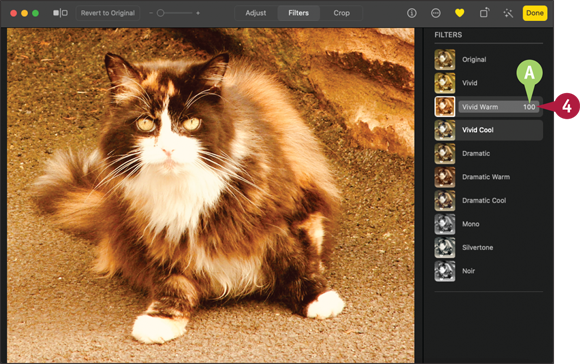
The Filters pane appears.
![]() Click the filter you want to apply. This example uses the Vivid Warm filter.
Click the filter you want to apply. This example uses the Vivid Warm filter.
![]() Photos applies the filter at full intensity — 100 out of 100 — at first.
Photos applies the filter at full intensity — 100 out of 100 — at first.
Note: The Photo Booth app provides a similar but more extensive collection of filters.
The photo takes on the filter.

![]() If you want to reduce the filter’s intensity, drag to the left.
If you want to reduce the filter’s intensity, drag to the left.
![]() When you are satisfied with the filter, click Done.
When you are satisfied with the filter, click Done.
Photos applies the filter to the photo.
Photos hides the editing tools again.
Create Photo Albums
When you want to assemble a custom collection of photos, you create a new album. You can then add to it exactly the photos you want from any of the sources available in Photos. After assembling the collection of photos, you can arrange them in your preferred order.
Photos can also create Smart Albums that automatically include all photos that meet the criteria you choose. Photos updates Smart Albums automatically when you download photos that match the criteria.
Create Photo Albums

![]() In Photos, move the pointer over the My Albums item in the Albums section of the sidebar.
In Photos, move the pointer over the My Albums item in the Albums section of the sidebar.
The Add (![]() ) button appears.
) button appears.
![]() Click Add (
Click Add (![]() ).
).
The Add pop-up menu opens.
![]() Click Album.
Click Album.
Note: To add photos to an existing album, select the photos, click Image on the menu bar, highlight Add to without clicking, and then click the album on the Add To submenu.
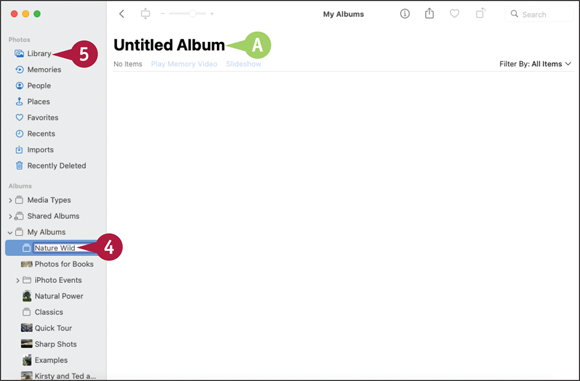
![]() Photos creates a new album, provisionally naming it Untitled Album and placing an edit box around its name in the sidebar.
Photos creates a new album, provisionally naming it Untitled Album and placing an edit box around its name in the sidebar.
![]() Type the name for the new album and press
Type the name for the new album and press ![]() .
.
![]() In the sidebar, click the photo collection from which you will add photos to the new album. This example uses the Library (
In the sidebar, click the photo collection from which you will add photos to the new album. This example uses the Library (![]() ) category.
) category.
The photo collection you clicked appears.
![]() Click the first photo you want to add.
Click the first photo you want to add.
A blue outline appears around the photo.
![]() Press
Press ![]() + click each other photo you want to add.
+ click each other photo you want to add.
A blue outline appears around each photo you click.
![]() Drag the photos to the new album in the sidebar.
Drag the photos to the new album in the sidebar.
![]() Click the new album.
Click the new album.

The photos in the album appear.
![]() To change the order of the photos, click a photo and drag it to where you want it.
To change the order of the photos, click a photo and drag it to where you want it.
Photos arranges the photos.
![]() Click Back (
Click Back (![]() ) when you want to return to the Albums pane.
) when you want to return to the Albums pane.
Create and Play Slide Shows
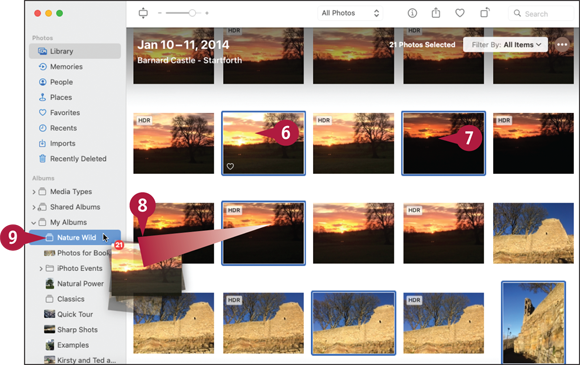
One of the best ways to enjoy your photos and share them with others is to play a slide show. Photos enables you to play an instant slide show by selecting the collection of photos you want to view, clicking File to open the File menu, and then clicking Play Slideshow. When you need greater control over the slide show, you can create a saved slide show with custom music and effects. You select photos, create the slide show, arrange the photos into your preferred order, and save the show so you can run it when needed.
Create a Saved Slide Show
Start by choosing the photos to include in the slide show. Click the photo collection from which you first want to select photos; click the first photo you want to use; and then ![]() + click each of the other photos.
+ click each of the other photos.
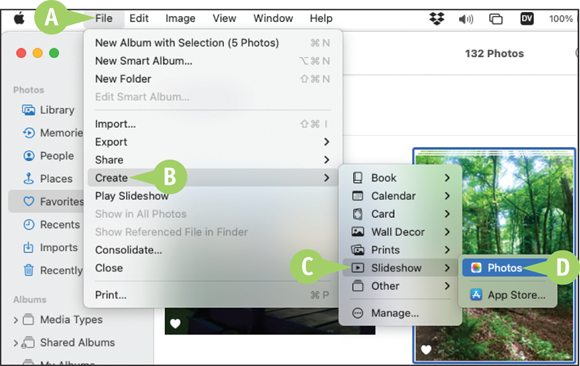
Once you have selected the photos, click File (A) to open the File menu, highlight Create (B) without clicking, click Slideshow (C), and then click Photos (D).
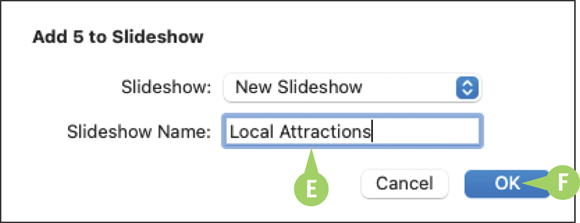
In the Add Photos to Slideshow dialog that opens, type the slide show name in the Slideshow Name box (E), and then click OK (F).
Arrange the Slides in Your Slide Show
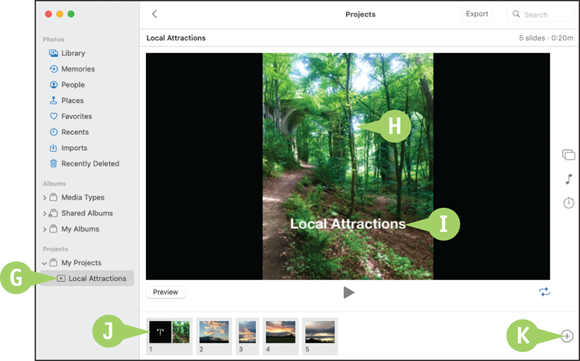
Photos creates the slide show, adds it (G) to the My Projects list in the My Projects section of the sidebar, and displays the screen for configuring the slide show. The slide show’s first slide (H) and title (I) appear above a bar of thumbnails (J) of the other slides. You can rearrange the slides by dragging them in the thumbnails bar. You can click Add (![]() , K) and then Add Photos on the pop-up menu to add further photos to the slide show.
, K) and then Add Photos on the pop-up menu to add further photos to the slide show.
Configure Your Slide Show
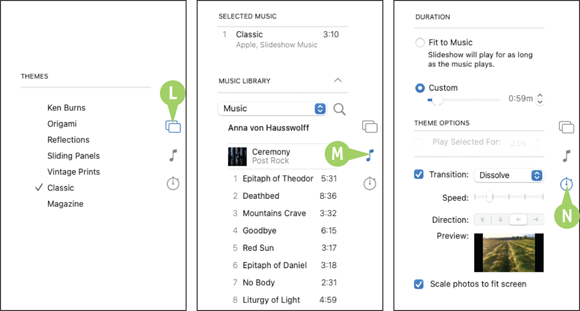
After adding all the photos and setting the slide order, configure your slide show. Click Themes (![]() , L) to display the Themes pane, and then click the theme you want; if you choose the Ken Burns theme, you then configure the start and end points for panning and zooming. Click Music (
, L) to display the Themes pane, and then click the theme you want; if you choose the Ken Burns theme, you then configure the start and end points for panning and zooming. Click Music (![]() , M) to display the Music pane, and select the music. Click Duration (
, M) to display the Music pane, and select the music. Click Duration (![]() , N), and then select duration settings.
, N), and then select duration settings.
Play Your Saved Slide Show
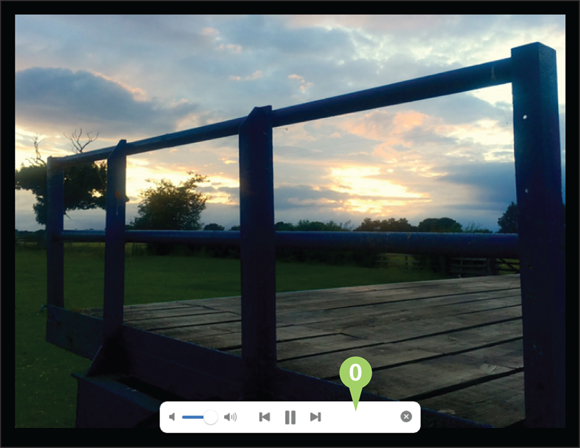
Once you have configured your slide show, click Preview to preview the show, and then make further adjustments, as needed. When the show is ready, click Play (![]() ) to start the show playing. You can then control the slide show by using the pop-up control bar (O); move the pointer to display this bar once it disappears.
) to start the show playing. You can then control the slide show by using the pop-up control bar (O); move the pointer to display this bar once it disappears.
E-Mail a Photo
From Photos, you can quickly create an e-mail message containing one or more photos you want to send to a contact or multiple contacts. You can specify the subject line for the message, add any text needed to explain what you are sending, and choose between including the full version of the photo and creating a smaller version of it that will transfer more quickly.
E-Mail a Photo

![]() In Photos, click the photo you want to send via e-mail.
In Photos, click the photo you want to send via e-mail.
![]() Click Share (
Click Share (![]() ) on the toolbar.
) on the toolbar.
The Share pop-up menu opens.
![]() Click Mail (
Click Mail (![]() ).
).
Note: The first time you give the Mail command, you may need to follow through a procedure to set up Photos with your e-mail account.

Photos creates a message containing the photo.
![]() Type the recipient’s address.
Type the recipient’s address.
![]() If Photos displays a pop-up menu of matching contacts, click the correct address.
If Photos displays a pop-up menu of matching contacts, click the correct address.
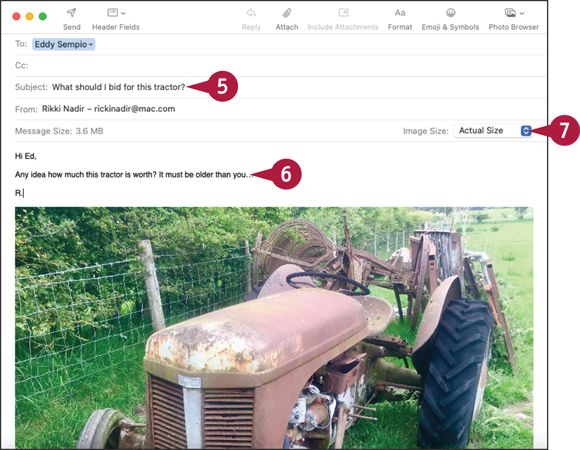
![]() Click Subject and type the subject for the message.
Click Subject and type the subject for the message.
![]() Click in the message box and type any message text needed to explain why you are sending the photo.
Click in the message box and type any message text needed to explain why you are sending the photo.
![]() Click Image Size (
Click Image Size (![]() ).
).
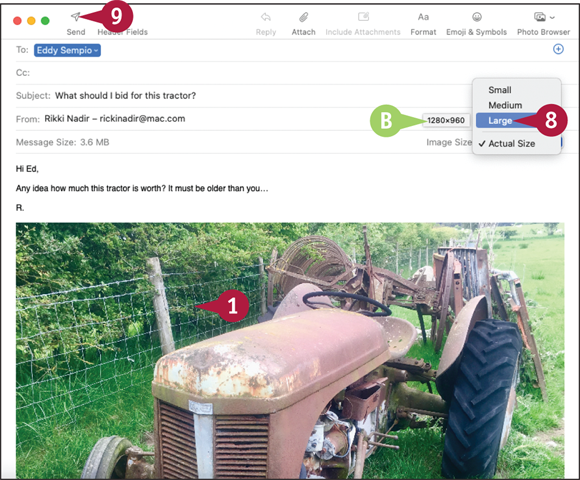
The Image Size pop-up menu opens.
![]() The tool tip shows the resolution of the photo at this size.
The tool tip shows the resolution of the photo at this size.
![]() Click the size of photo to send — for example, Large. See the tip for recommendations.
Click the size of photo to send — for example, Large. See the tip for recommendations.
![]() Click Send (
Click Send (![]() ).
).
Photos sends the message.
Take Photos or Movies of Yourself
Your MacBook includes a built-in FaceTime HD camera that is great not only for video chats with Messages and FaceTime but also for taking photos and movies of yourself using the Photo Booth application. You can use Photo Booth’s special effects to enliven the photos or movies. The special effects include distorted views, color changes such as Thermal Camera and X-Ray, and preset backgrounds that you can use to replace your real-world background.
Take Photos or Movies of Yourself
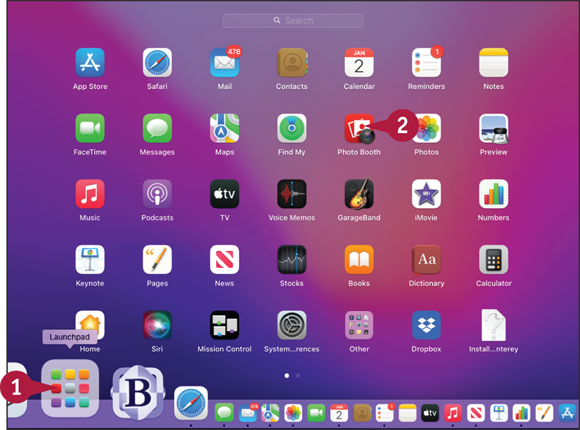
![]() Click Launchpad (
Click Launchpad (![]() ) on the Dock.
) on the Dock.
The Launchpad screen appears.
![]() Click Photo Booth (
Click Photo Booth (![]() ).
).
Note: You can use some macOS-compatible external cameras with Photo Booth. To change cameras, click Camera on the menu bar, and then click the appropriate camera on the menu.
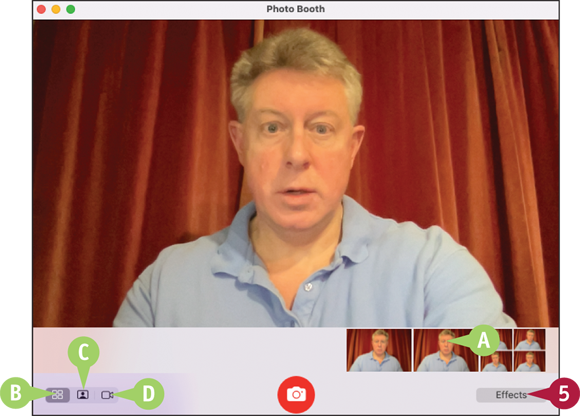
Photo Booth opens.
![]() The photo well shows photos taken earlier in Photo Booth.
The photo well shows photos taken earlier in Photo Booth.
![]() If your face appears off center, either rotate or tilt your MacBook’s screen or move yourself so that your face is correctly positioned.
If your face appears off center, either rotate or tilt your MacBook’s screen or move yourself so that your face is correctly positioned.
![]() Choose the type of picture to take:
Choose the type of picture to take:
![]() For four pictures, click Take four quick pictures (
For four pictures, click Take four quick pictures (![]() ).
).
![]() For a single still, click Take a still picture (
For a single still, click Take a still picture (![]() ).
).
![]() For a movie, click Record a movie clip (
For a movie, click Record a movie clip (![]() ).
).
![]() To add effects to the photo or movie, click Effects.
To add effects to the photo or movie, click Effects.

The Photo Booth window shows various effects applied to the preview.
![]() To see more effects, click Previous (
To see more effects, click Previous (![]() ) or Next (
) or Next (![]() ) or click a different dot in the bar. The center effect on each screen is Normal. Use this effect to remove any other effect.
) or click a different dot in the bar. The center effect on each screen is Normal. Use this effect to remove any other effect.
![]() Click the effect you want to use. This example uses Thermal Camera.
Click the effect you want to use. This example uses Thermal Camera.
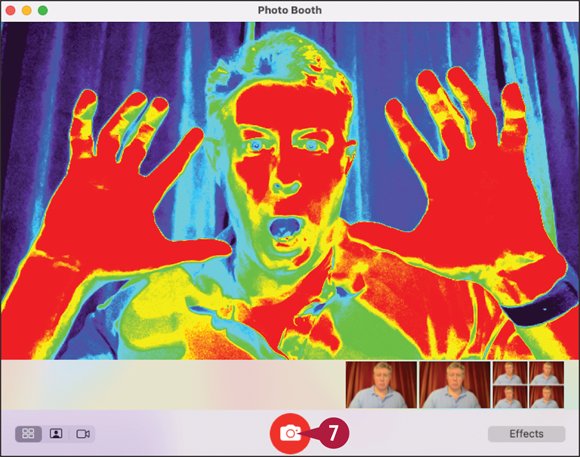
![]() Click Take Photo (
Click Take Photo (![]() ) or Take Movie (
) or Take Movie (![]() ).
).
Photo Booth counts down from 3 and then takes the photo or photos, or starts recording the movie.
![]() If you are taking a movie, click Stop Recording (
If you are taking a movie, click Stop Recording (![]() ) when you are ready to stop.
) when you are ready to stop.
Photo Booth adds the photo or movie to the photo well.