
CHAPTER 6
Surfing the Web
If your MacBook is connected to the Internet, you can browse, or surf, the sites on the World Wide Web. For surfing, macOS provides a web browser app called Safari. Using Safari, you can quickly move from one web page to another, search for interesting sites, and download files to your MacBook.

Open Safari and Customize Your Start Page
Open Several Web Pages at Once
Return to a Recently Visited Page
Play Music and Videos on the Web
Set Your Home Page and Search Engine
Create Bookmarks for Web Pages
Using Reader View and Reading List
Open Safari and Customize Your Start Page
You can launch Safari, the macOS browser, either from the Dock or from Launchpad. When you open Safari, it displays the start page, a customizable page that can contain a background image and up to seven categories of links and information: Favorites, which you designate; Frequently Visited, which Safari derives automatically as you browse; Shared with You, links from other people; Privacy Report; Siri Suggestions, links from Apple’s virtual assistant; Reading List, a list of pages you mark for reading; and iCloud Tabs, pages from your other devices that sign in to iCloud.
Open Safari and Customize Your Start Page

![]() Click Safari (
Click Safari (![]() ) on the Dock.
) on the Dock.
Safari opens.
Your start page appears.
![]() The Favorites section displays favorites you have created for web pages.
The Favorites section displays favorites you have created for web pages.
![]() The Frequently Visited section displays sites you have visited frequently.
The Frequently Visited section displays sites you have visited frequently.
Note: When you start using Safari, the Frequently Visited section will be empty, and Safari may hide it automatically.
![]() The Shared with You section shows links that others have shared with you.
The Shared with You section shows links that others have shared with you.

![]() Further down the start page, the Privacy Report section shows how many trackers Safari has blocked from following you in the last seven days.
Further down the start page, the Privacy Report section shows how many trackers Safari has blocked from following you in the last seven days.
![]() The Siri Suggestions section shows website suggestions from Siri.
The Siri Suggestions section shows website suggestions from Siri.
![]() The Reading List section shows web pages you have added to your Reading List.
The Reading List section shows web pages you have added to your Reading List.
![]() The iCloud Tabs section shows web pages open on your other devices.
The iCloud Tabs section shows web pages open on your other devices.
![]() You can click
You can click ![]() and select the iCloud device.
and select the iCloud device.
![]() You can click Show all (
You can click Show all (![]() ) to display all tabs for the device. Click Show less (
) to display all tabs for the device. Click Show less (![]() ) to show fewer tabs.
) to show fewer tabs.
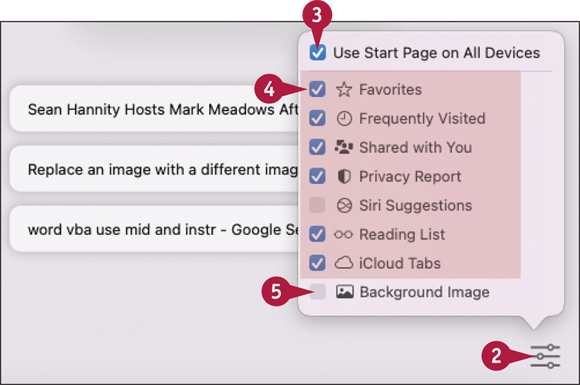
![]() Click Settings (
Click Settings (![]() ).
).
The Settings pop-up menu opens.
![]() Select (
Select (![]() ) or deselect (
) or deselect (![]() ) Use Start Page on All Devices, as needed.
) Use Start Page on All Devices, as needed.
![]() Select (
Select (![]() ) or deselect (
) or deselect (![]() ) Favorites (
) Favorites (![]() ), Frequently Visited (
), Frequently Visited (![]() ), Shared with You (
), Shared with You (![]() ), Privacy Report (
), Privacy Report (![]() ), Siri Suggestions (
), Siri Suggestions (![]() ), Reading List (
), Reading List (![]() ), and iCloud Tabs (
), and iCloud Tabs (![]() ), as needed.
), as needed.
![]() To apply a background image to the start page, select Background Image (
To apply a background image to the start page, select Background Image (![]() ).
).

The Background Image section of the pop-up menu opens.
![]() In the scrolling list, click the background image you want to apply.
In the scrolling list, click the background image you want to apply.
![]() Safari applies the image.
Safari applies the image.
![]() Click outside the pop-up menu.
Click outside the pop-up menu.
The pop-up menu closes.
Open a Web Page
Safari enables you to browse the Web in various ways. The most straightforward way to reach a web page is to type or paste its unique address, which is called a uniform resource locator or URL, into the address box in Safari.
This technique works well for short addresses but is slow and awkward for complex addresses. Instead, you can click a link or click a bookmark for a page you have marked. If you do not have a bookmark, you can use a search engine, such as Google or Bing, to locate the address.
Open a Web Page

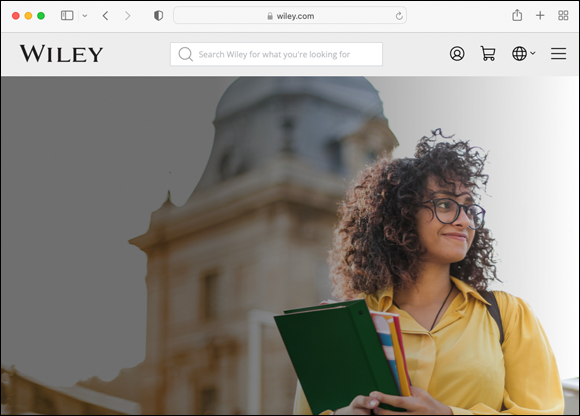
![]() Click Safari (
Click Safari (![]() ) on the Dock.
) on the Dock.
Safari opens.
![]() Click anywhere in the address box or press
Click anywhere in the address box or press ![]() +
+ ![]() .
.
Safari selects the current address.
![]() Type the URL of the web page you want to visit.
Type the URL of the web page you want to visit.
Note: You do not need to type the http:// or https:// part of the address. Safari adds this automatically for you when you press ![]() .
.
![]() Press
Press ![]() .
.
Safari displays the web page.
Note: To search, click the address box and start typing your search terms. If the Suggestions list displays a result that is what you want, click that result to go to the page. Otherwise, finish typing your search terms, press ![]() to display a page of search results, and then click the result you want to see.
to display a page of search results, and then click the result you want to see.
Follow a Link to a Web Page
You can click a link on a web page in Safari to navigate to another page or another marked location on the same page. Most web pages contain multiple links to other pages, which may be either on the same website or on another website. Some links are underlined, whereas others are attached to graphics or to different-colored text. When you position the pointer over a link, the pointer changes from the standard arrow (![]() ) to a hand with a pointing finger (
) to a hand with a pointing finger (![]() ).
).
Follow a Link to a Web Page

![]() In Safari, position the pointer over a link (
In Safari, position the pointer over a link (![]() changes to
changes to ![]() ).
).
Note: If you want to see the address of a link over which you move the pointer, display the status bar by clicking View and then clicking Show Status Bar. The address appears in the status bar.
![]() Click the link.
Click the link.
Safari shows the linked web page.
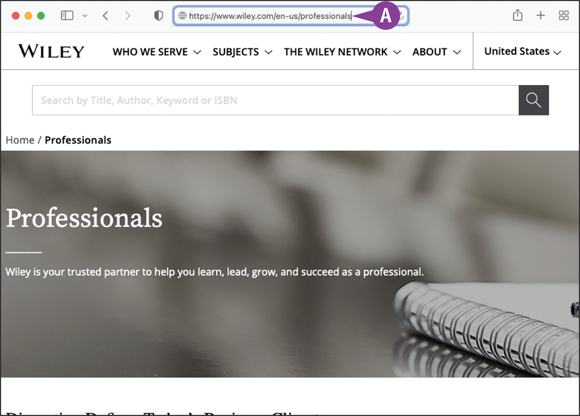
![]() You can click the address box to see the full address of the web page to which you have navigated.
You can click the address box to see the full address of the web page to which you have navigated.
Note: The address box in Safari normally shows the base name of the website you are visiting, such as wiley.com, rather than the full address of the web page.
Open Several Web Pages at Once
Safari enables you to open multiple web pages at the same time, which is useful for browsing quickly and easily. You can open multiple pages either on separate tabs in the same window or in separate windows. You can drag a tab from one window to another.
Use separate tabs when you need to see only one of the pages at a time. Use separate windows when you need to compare two pages side by side.
Open Several Web Pages at Once

Open Several Pages on Tabs in the Same Safari Window
![]() Go to the first page you want to view.
Go to the first page you want to view.
Note: You can also click Add (![]() ) or press
) or press ![]() +
+ ![]() to open a new tab showing your home page. Type a URL in the address box, and then press
to open a new tab showing your home page. Type a URL in the address box, and then press ![]() to go to the page.
to go to the page.
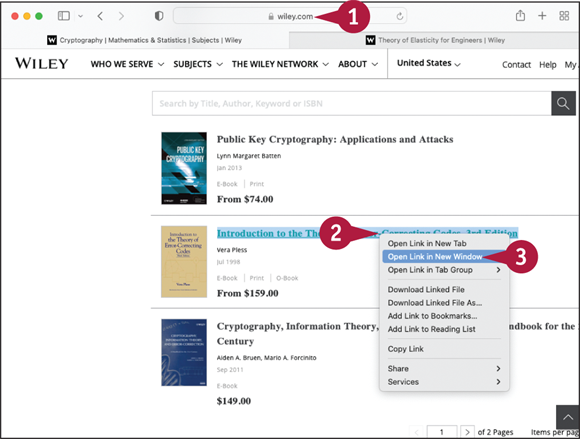
![]() Press
Press ![]() + click a link.
+ click a link.
The contextual menu opens.
![]() Click Open Link in New Tab.
Click Open Link in New Tab.
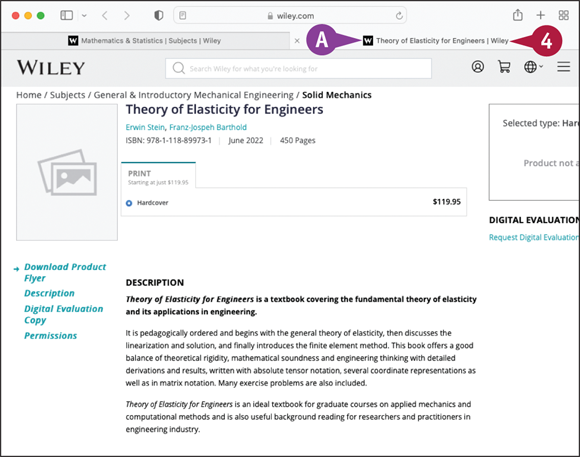
![]() Safari opens the linked web page in a new tab.
Safari opens the linked web page in a new tab.
Note: You can repeat steps 2 and 3 to open additional pages on separate tabs.
![]() To change the page Safari is displaying, click the tab for the page you want to see.
To change the page Safari is displaying, click the tab for the page you want to see.
Open Several Pages in Separate Safari Windows
![]() Go to the first page you want to view.
Go to the first page you want to view.
![]() Press
Press ![]() + click a link.
+ click a link.
The contextual menu opens.
![]() Click Open Link in New Window.
Click Open Link in New Window.
Note: You can also open a new window by pressing ![]() +
+ ![]() .
.

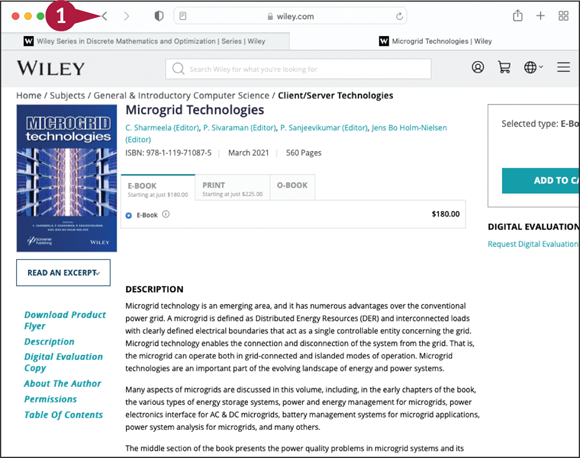
![]() Safari opens the linked web page in a new window.
Safari opens the linked web page in a new window.
![]() To move back to the previous window, click it. If you cannot see the previous window, click Window and then click the window on the Window menu.
To move back to the previous window, click it. If you cannot see the previous window, click Window and then click the window on the Window menu.
Note: You can also move back to the previous window by closing the new window you just opened.
Note: Press ![]() +
+ ![]() to cycle forward through windows and
to cycle forward through windows and ![]() +
+ ![]() +
+ ![]() to cycle backward.
to cycle backward.
Note: You can click Window and Merge All Windows to merge all windows onto tabs in a single window.
Navigate Among Web Pages
Safari makes it easy to navigate among the web pages you browse. Safari tracks the pages that you visit so that the pages form a path. You can go back along this path to return to a page you viewed earlier; after going back, you can go forward again as needed.
Safari keeps a separate path of pages in each open tab or window so you can move separately in each tab or window. You can also navigate using the browser history, as explained in the next section, “Return to a Recently Visited Page.”
Navigate Among Web Pages
Go Back One Page
![]() In Safari, click Previous Page (
In Safari, click Previous Page (![]() ).
).
Note: You can also swipe right with two fingers on the trackpad to go back to the previous page. You must start the movement from the left side of the window.
Safari displays the previous page you visited in the current tab or window.

Go Forward One Page
![]() Click Next Page (
Click Next Page (![]() ).
).
Note: The Next Page button is available only when you have gone back. Until then, there is no page for you to go forward to.
Note: You can also swipe left with two fingers on the trackpad to go forward to the next page. You must start the movement from the right side of the window.
Safari displays the next page for the current tab or window.
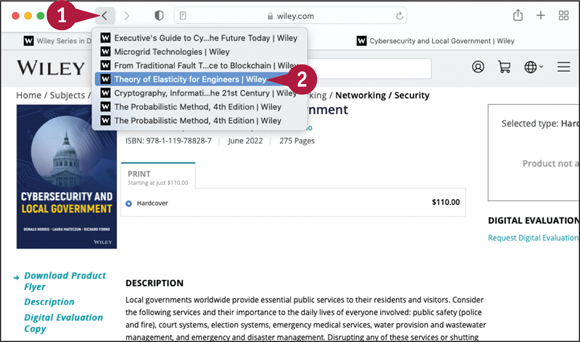
Go Back Multiple Pages
![]() Click Previous Page (
Click Previous Page (![]() ) and keep holding down the trackpad button.
) and keep holding down the trackpad button.
A pop-up menu opens showing the pages you have visited in the current tab or window.
![]() Click the page you want to visit.
Click the page you want to visit.
Safari displays the page.
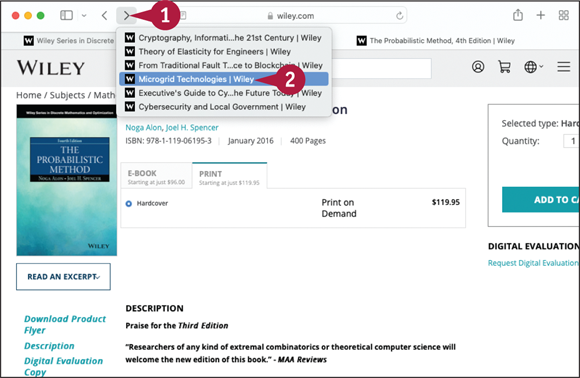
Go Forward Multiple Pages
![]() Click Next Page (
Click Next Page (![]() ) and keep holding down the trackpad button.
) and keep holding down the trackpad button.
A pop-up menu opens showing the pages further along the path for the current tab or window.
![]() Click the page you want to visit.
Click the page you want to visit.
Safari displays the page.
Return to a Recently Visited Page
To help you return to web pages you have visited before, Safari keeps the History list of all the pages you have visited recently.
Normally, each person who uses your MacBook has a separate user account, so each person has their own History. But if you share a user account with other people, you can clear the History list to prevent them from seeing what web pages you have visited. You can also shorten the length of time for which History tracks your visits.
Return to a Recently Visited Page

Return to a Page on the History List
![]() In Safari, click History.
In Safari, click History.
The History menu opens.
![]() If a menu item for the web page you want appears on the top section of the History menu, before the day submenus, simply click the item.
If a menu item for the web page you want appears on the top section of the History menu, before the day submenus, simply click the item.
![]() Highlight or click the day on which you visited the web page.
Highlight or click the day on which you visited the web page.
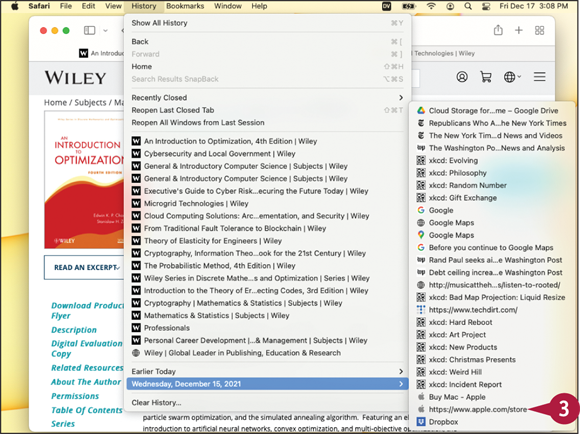
The submenu opens, showing the sites you visited on that day.
![]() Click the web page to which you want to return.
Click the web page to which you want to return.
Safari displays the web page.
Clear Your Browsing History
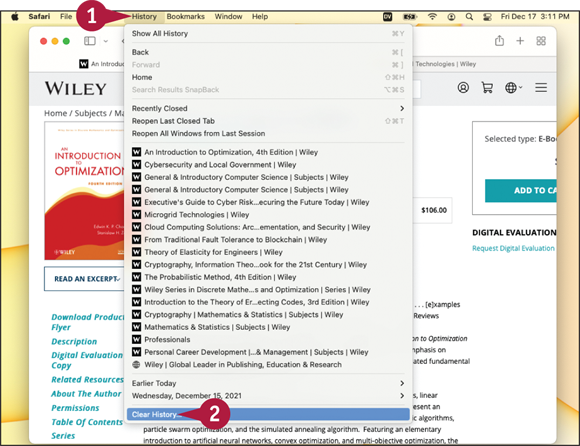
![]() Click History.
Click History.
The History menu opens.
Note: You may have to scroll down the History menu to reach the Clear History command.
![]() Click Clear History.
Click Clear History.

The Clearing History Will Remove Related Cookies and Other Website Data dialog opens.
![]() Click Clear (
Click Clear (![]() ) and then click the last hour, today, today and yesterday, or all history to specify what you want to clear.
) and then click the last hour, today, today and yesterday, or all history to specify what you want to clear.
![]() Click Clear History.
Click Clear History.
Safari clears the History list for the period you chose.
Note: If you want to browse without History storing the list of web pages you visit, click File and then click New Private Window. Any sites you browse in the Private Browsing window will not be stored.
Play Music and Videos on the Web
Many websites contain music files or video files that you can play directly in the Safari browser. Safari can play many widely used types of audio files and video files, and most sites provide easy-to-use buttons — such as a Play/Pause button and a volume slider — to enable you to control playback. This section shows the SoundCloud music website and the YouTube video website as examples.
You can play music and videos either directly on your MacBook or via AirPlay to a supported device, such as an Apple TV.
Play Music and Videos on the Web

Play Music
![]() In Safari, navigate to a music website and browse to find a song you want to play.
In Safari, navigate to a music website and browse to find a song you want to play.
Note: This example uses the SoundCloud site, www.soundcloud.com. There are many other music sites.
![]() Click Play (such as
Click Play (such as ![]() ).
).

The song starts playing.
![]() The progress indicator shows playback progress.
The progress indicator shows playback progress.
![]() Click Pause (such as
Click Pause (such as ![]() ) if you want to pause the music.
) if you want to pause the music.
![]() Some sites enable you to comment on the music.
Some sites enable you to comment on the music.
![]() The Audio icon (
The Audio icon (![]() ) appears on a tab that is playing audio. Click Audio (
) appears on a tab that is playing audio. Click Audio (![]() changes to
changes to ![]() ) to mute the audio.
) to mute the audio.
![]() If the audio is on the active tab, you can click Audio (
If the audio is on the active tab, you can click Audio (![]() changes to
changes to ![]() ) to mute the audio.
) to mute the audio.

Play Videos
![]() In Safari, navigate to a video website and browse to find a video you want to play.
In Safari, navigate to a video website and browse to find a video you want to play.
Note: This example uses the YouTube website, www.youtube.com. There are various other video websites; see the tip for information on some.
![]() Click the video to open it.
Click the video to open it.
The video starts playing automatically.
![]() You can click Settings (
You can click Settings (![]() ) to change the playback speed or the quality.
) to change the playback speed or the quality.
![]() Click Full Screen (
Click Full Screen (![]() )
)

The video appears full screen.
![]() Move the pointer over the video.
Move the pointer over the video.
The playback controls appear, and you can use them to control playback.
![]() You can click Share (
You can click Share (![]() ) to share the video with others.
) to share the video with others.
![]() You can click Exit Full Screen (
You can click Exit Full Screen (![]() ) to return from full screen to a window.
) to return from full screen to a window.
![]() You can click AirPlay (
You can click AirPlay (![]() ) to play the video to a TV connected to an Apple TV.
) to play the video to a TV connected to an Apple TV.
Set Your Home Page and Search Engine
When you open a new window, Safari automatically displays your home page, the page it is configured to show at first. You can set your home page to any web page you want or to an empty page. You can also control what Safari shows when you open a new tab or a new window: the Favorites screen, your home page, an empty page, or the page from which you opened the new tab or window.
You can also specify which search engine Safari uses and configure settings for it.
Change Your Home Page
![]() In Safari, navigate to the web page you want to make your home page.
In Safari, navigate to the web page you want to make your home page.
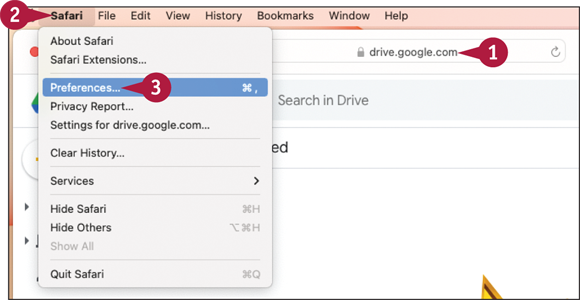
![]() Click Safari.
Click Safari.
The Safari menu opens.
![]() Click Preferences.
Click Preferences.
Note: You can also press ![]() +
+ ![]() to open the Preferences window.
to open the Preferences window.

The Preferences window opens.
![]() Click General (
Click General (![]() ).
).
The General pane opens.
![]() Click Set to Current Page.
Click Set to Current Page.
Safari changes the Home Page text field to show the page you chose.
![]() Click New windows open with (
Click New windows open with (![]() ) and click Start Page, Homepage, Empty Page, or Same Page, as appropriate.
) and click Start Page, Homepage, Empty Page, or Same Page, as appropriate.
![]() Click New tabs open with (
Click New tabs open with (![]() ) and select Start Page, Homepage, Empty Page, or Same Page, as appropriate.
) and select Start Page, Homepage, Empty Page, or Same Page, as appropriate.
![]() Click Search (
Click Search (![]() ).
).
The Search tab appears.
![]() Click Search engine (
Click Search engine (![]() ) and then click the search engine you want to use.
) and then click the search engine you want to use.
![]() Click Include search engine suggestions (
Click Include search engine suggestions (![]() changes to
changes to ![]() ) to have Safari show suggestions from the search engine.
) to have Safari show suggestions from the search engine.
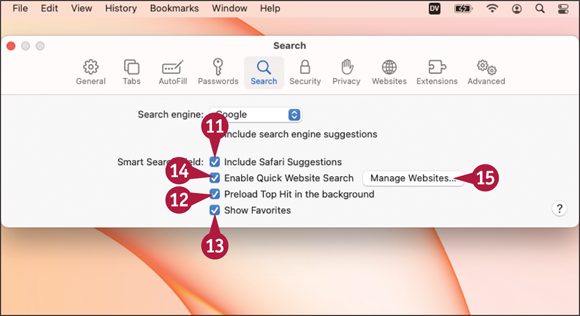
![]() Click Include Safari Suggestions (
Click Include Safari Suggestions (![]() changes to
changes to ![]() ) to include Safari suggestions in the Smart Search Field.
) to include Safari suggestions in the Smart Search Field.
![]() Click Preload Top Hit in the background (
Click Preload Top Hit in the background (![]() changes to
changes to ![]() ) to have Safari preload the Top Hit for the search to enable you to view it more quickly.
) to have Safari preload the Top Hit for the search to enable you to view it more quickly.
![]() Click Show Favorites (
Click Show Favorites (![]() changes to
changes to ![]() ) to include your Favorites in the Smart Search Field.
) to include your Favorites in the Smart Search Field.
![]() Click Enable Quick Website Search (
Click Enable Quick Website Search (![]() changes to
changes to ![]() ) to enable the Quick Website Search feature.
) to enable the Quick Website Search feature.
![]() Click Manage Websites.
Click Manage Websites.
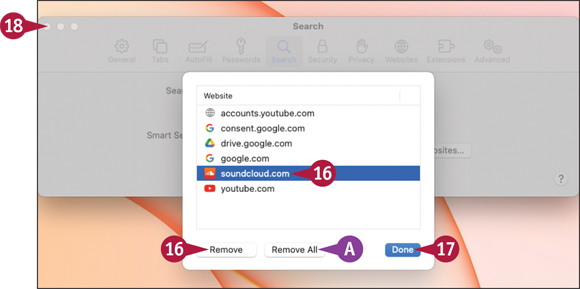
The Manage Websites dialog opens.
![]() To remove a website, click it, and then click Remove.
To remove a website, click it, and then click Remove.
![]() To remove all websites, click Remove All.
To remove all websites, click Remove All.
![]() Click Done.
Click Done.
The Manage Websites dialog closes.
![]() Click Close (
Click Close (![]() ).
).
The Preferences window closes.
Create Bookmarks for Web Pages
Safari enables you to create markers called bookmarks for the addresses of web pages you want to be able to revisit easily. When you find such a web page, you can create a bookmark for its address, assign the bookmark a descriptive name, and store it on the Favorites bar, on the Bookmarks menu, or in a Bookmark folder. You can then return to the web page’s address by clicking its bookmark. The content of the web page may have changed by the time you return.
Create Bookmarks for Web Pages

Create a New Bookmark
![]() In Safari, navigate to a web page you want to bookmark.
In Safari, navigate to a web page you want to bookmark.
![]() Click Bookmarks.
Click Bookmarks.
The Bookmarks menu opens.
![]() Click Add Bookmark.
Click Add Bookmark.
Note: You can also press ![]() +
+ ![]() to open the Add Bookmark dialog.
to open the Add Bookmark dialog.

The Add Bookmark dialog opens, with the web page’s title added to the text box in the middle of the dialog.
![]() Click Add this page to (
Click Add this page to (![]() ) and select the location or folder in which to store the bookmark.
) and select the location or folder in which to store the bookmark.
![]() Edit the default bookmark name — the web page’s title — to create a descriptive name.
Edit the default bookmark name — the web page’s title — to create a descriptive name.
![]() Optionally, click Description and type a description to help you identify the bookmark by searching.
Optionally, click Description and type a description to help you identify the bookmark by searching.
![]() Click Add.
Click Add.
The Add Bookmark dialog closes.
Safari creates the bookmark.
Organize Your Bookmarks
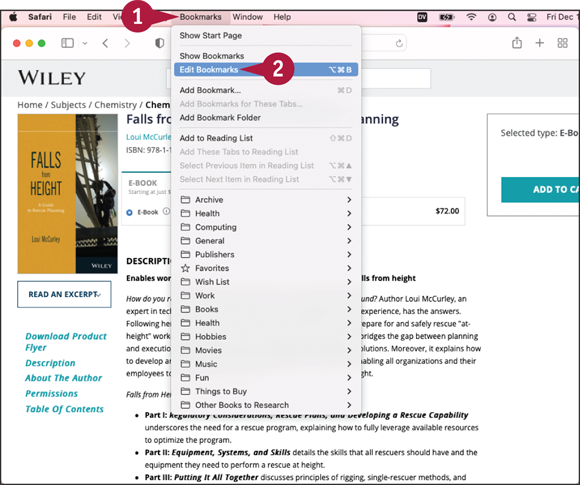
![]() Click Bookmarks.
Click Bookmarks.
The Bookmarks menu opens.
![]() Click Edit Bookmarks.
Click Edit Bookmarks.
Note: You can also press ![]() +
+ ![]() +
+ ![]() to display the Bookmarks screen.
to display the Bookmarks screen.
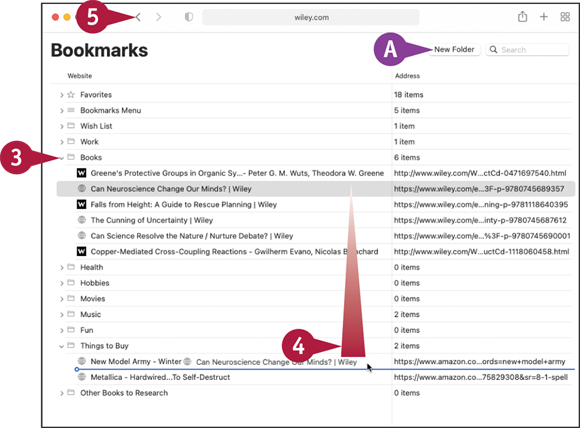
The Bookmarks screen appears.
![]() You can click New Folder to create a new folder, type the name for the folder, and then press
You can click New Folder to create a new folder, type the name for the folder, and then press ![]() .
.
![]() Double-click a collapsed folder to display its contents, or double-click an expanded folder to collapse it to the folder.
Double-click a collapsed folder to display its contents, or double-click an expanded folder to collapse it to the folder.
![]() Drag a bookmark to the folder in which you want to place it.
Drag a bookmark to the folder in which you want to place it.
Note: You can drag the bookmark folders into a different order. You can also place one folder inside another folder.
![]() Click Previous Page (
Click Previous Page (![]() ).
).
Safari returns you to the page you were viewing before.
Using Reader View and Reading List
Safari’s Reader View enables you to minimize distractions by displaying only the text of a web page in an easily readable format. Reader View works on many, but not all, web pages.
Safari also enables you to save a web page in its current state so that you can read it later. You can quickly add the current web page to Reading List, which you can then access via the Reading List pane in the sidebar.
Using Reader View and Reading List
Switch a Web Page to Reader View
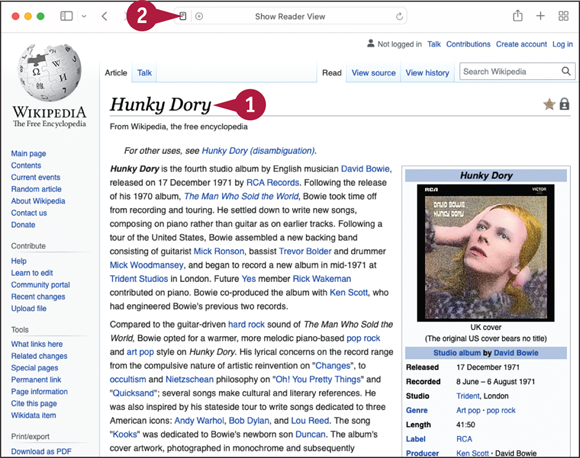
![]() In Safari, navigate to a web page you want to read.
In Safari, navigate to a web page you want to read.
![]() Click Show Reader View (
Click Show Reader View (![]() ).
).
Note: If the Show Reader View button does not appear, it is because Safari has determined that the page does not have content suitably formatted for Reader View.
Note: You can also switch to Reader View by clicking View and Show Reader and switch back by clicking View and Hide Reader. Alternatively, press ![]() +
+ ![]() +
+ ![]() to toggle Reader View on or off.
to toggle Reader View on or off.

Safari switches the web page to Reader View.
![]() The web page’s contents appear in easy-to-read fonts.
The web page’s contents appear in easy-to-read fonts.
![]() Links are easier to see but work as usual.
Links are easier to see but work as usual.
![]() When you finish using Reader View, click Hide Reader View (
When you finish using Reader View, click Hide Reader View (![]() ).
).
Safari switches the web page back from Reader View.

Add a Web Page to Reading List
![]() Navigate to a web page.
Navigate to a web page.
![]() Move the pointer over the Show Reader View button (
Move the pointer over the Show Reader View button (![]() ).
).
![]() Click Add Page to Reading List (
Click Add Page to Reading List (![]() ).
).
Safari displays a brief animation showing the page moving from the address box to the Show Sidebar button (![]() ).
).
Note: You can also click Bookmarks and select Add to Reading List or press ![]() +
+ ![]() +
+ ![]() .
.
Note: You can click Bookmarks and select Add These Tabs to Reading List to add all the tabs in the current window to Reading List.

Open Reading List and Display a Page
![]() Click Show sidebar (
Click Show sidebar (![]() ).
).
Safari displays the sidebar.
![]() Click Reading List (
Click Reading List (![]() ).
).
The Reading List pane opens.
![]() Click the item you want to read.
Click the item you want to read.
The item appears.
![]() When you are ready to remove an item from Reading List, press
When you are ready to remove an item from Reading List, press ![]() + click its entry and click Remove Item.
+ click its entry and click Remove Item.
Organize Safari Tabs into Tab Groups
If you browse extensively in Safari, you will likely open many tabs. You can organize your tabs to some extent by devoting a window to each major topic you are exploring and dragging tabs from one window to another as needed. But Safari also provides a better way to organize your tabs: tab groups.
As you open each new tab, Safari adds it to the ungrouped tabs. When you want to start organizing, you can create one or more tab groups, shuffle your open tabs into the groups, and display the group you want to work with.
Organize Safari Tabs into Tab Groups
![]() Open various tabs in a single Safari window.
Open various tabs in a single Safari window.
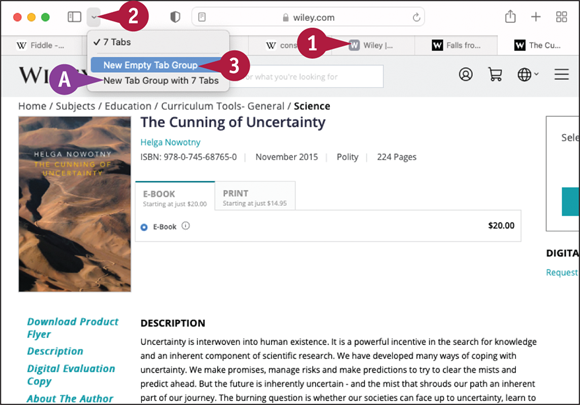
![]() Click Tab Group Picker (
Click Tab Group Picker (![]() ).
).
The Tab Group Picker pop-up menu opens.
![]() If you want to put all your tabs in a single group, click New Tab Group with N Tabs.
If you want to put all your tabs in a single group, click New Tab Group with N Tabs.
![]() Click New Empty Tab Group.
Click New Empty Tab Group.

Safari opens a new tab to your start page.
The sidebar appears.
Safari creates a new tab group with the provisional name Untitled and selects this name for you to type over.
![]() Type the name for the tab group and press
Type the name for the tab group and press ![]() .
.
Safari applies the name to the tab group.
![]() Create further tab groups by clicking New tab group, clicking New Empty Tab Group, typing a name, and pressing
Create further tab groups by clicking New tab group, clicking New Empty Tab Group, typing a name, and pressing ![]() .
.
![]() Click your list of ungrouped tabs.
Click your list of ungrouped tabs.

The ungrouped tabs appear.
![]() Press
Press ![]() + click the tab you want to assign to a group.
+ click the tab you want to assign to a group.
The contextual menu opens.
![]() Highlight Move to Tab Group.
Highlight Move to Tab Group.
The submenu opens.
![]() Click the appropriate tab group.
Click the appropriate tab group.
Safari adds the tab to the group.
![]() Repeat steps 7 to 9 to assign your tabs to groups.
Repeat steps 7 to 9 to assign your tabs to groups.
![]() Click the tab group you want to view.
Click the tab group you want to view.
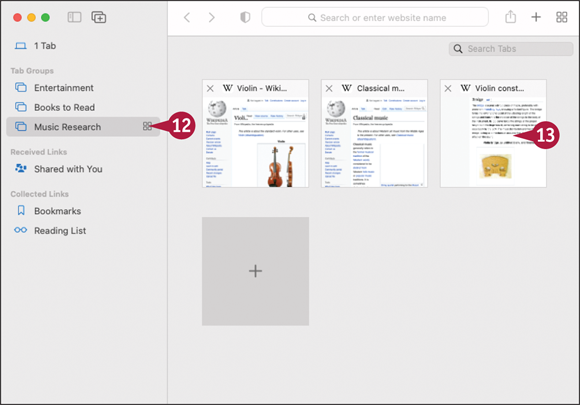
The active tab in the tab group appears.
![]() Click Show Tab Overview (
Click Show Tab Overview (![]() ).
).
The tab overview appears, showing a thumbnail of each tab.
![]() Click the tab you want to view.
Click the tab you want to view.
The tab appears.
Download a File
Many websites provide files to download, and Safari makes it easy to download files from websites to your MacBook’s file system. For example, you can download apps to install on your MacBook, pictures to view on it, or songs to play.
macOS includes apps that can open many file types, including music, graphic, movie, document, and PDF files. To open other file types, you may need to install extra apps or add plug-in software components to extend the features of the apps you already have.
Download a File
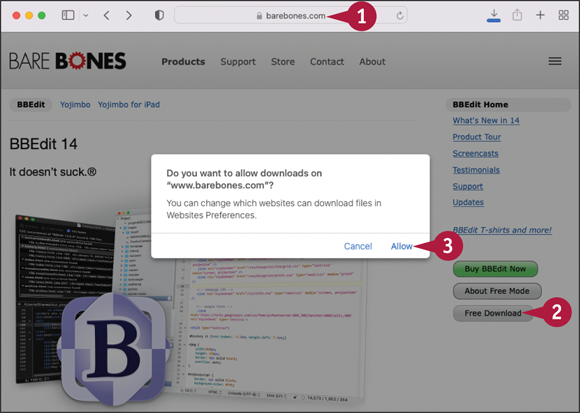
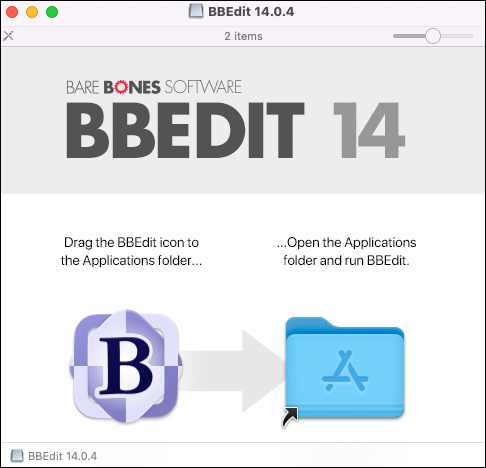
![]() In Safari, go to the web page that contains the link for the file you want to download.
In Safari, go to the web page that contains the link for the file you want to download.
![]() Click the link.
Click the link.
Note: For safety, download files only from sites that you trust, and use an anti-malware app or antivirus app to scan downloaded files before you open them.
![]() If the Do You Want to Allow Downloads? dialog opens, click Allow.
If the Do You Want to Allow Downloads? dialog opens, click Allow.
Safari starts the download.
Note: The indicator on the Downloads button (![]() ) shows the progress of the download.
) shows the progress of the download.
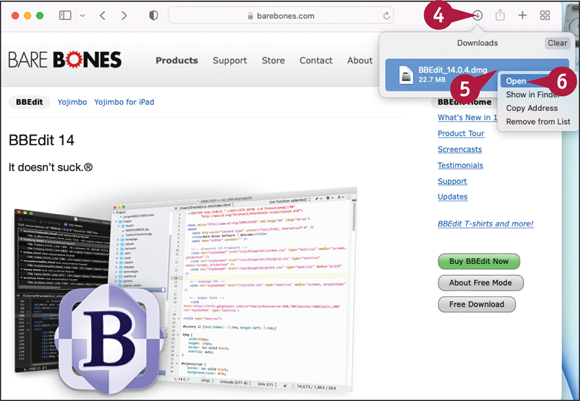
![]() Click Downloads (
Click Downloads (![]() ) to open the Downloads panel.
) to open the Downloads panel.
![]() When the download is complete, press
When the download is complete, press ![]() + click the file in the Downloads panel.
+ click the file in the Downloads panel.
The contextual menu opens.
![]() Click Open.
Click Open.
Note: Depending on the file type and the preferences you have set, Safari may open the file automatically for you.
The file opens.
Depending on the file type, you can then work with the file, enjoy its contents, or install it.
Note: If the file is an app, you can install it, as discussed in Chapter 4. If the file is a data file, such as a document or a picture, macOS opens the file in the app for that file type.

![]() If the file disappears from the Downloads window and Safari does not open the file for you, click Downloads on the Dock.
If the file disappears from the Downloads window and Safari does not open the file for you, click Downloads on the Dock.
The Downloads stack opens.
![]() Click the file you downloaded.
Click the file you downloaded.
The file opens.
Configure Safari for Security and Privacy
The Web is packed with fascinating sites and useful information, but it is also full of malefactors and criminals who want to attack your MacBook and steal your valuable data.
To keep your MacBook safe, you can prevent Safari from automatically opening supposedly safe files you download. Safari also enables you to choose whether to enable JavaScript, whether to allow cross-site tracking, and whether to hide your MacBook’s IP address. You can also choose which Internet plug-ins to use and which websites can use them.
Configure Safari for Security and Privacy

![]() With the Safari app running, click Safari.
With the Safari app running, click Safari.
The Safari menu opens.
![]() Click Preferences.
Click Preferences.
The Preferences window opens.
![]() Click General (
Click General (![]() ).
).
The General pane opens.
![]() Deselect Open “safe” files after downloading (
Deselect Open “safe” files after downloading (![]() ).
).
![]() Click Security (
Click Security (![]() ).
).
The Security pane opens.
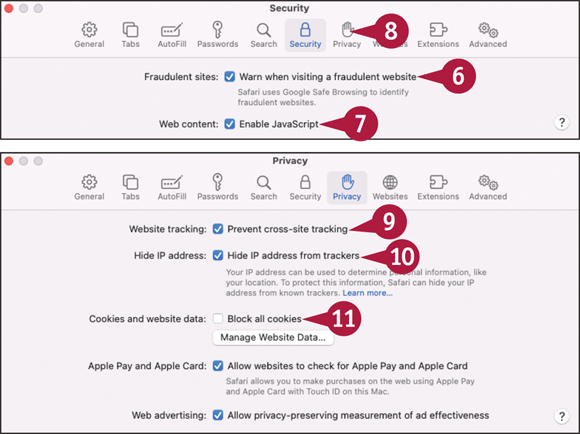
![]() Select Warn when visiting a fraudulent website (
Select Warn when visiting a fraudulent website (![]() ).
).
![]() Deselect Enable JavaScript (
Deselect Enable JavaScript (![]() ) if you want to disable JavaScript. See the tip for advice.
) if you want to disable JavaScript. See the tip for advice.
![]() Click Privacy (
Click Privacy (![]() ).
).
The Privacy pane appears.
![]() Select Prevent cross-site tracking (
Select Prevent cross-site tracking (![]() ) to have Safari try to prevent sites tracking your movements from one site to another.
) to have Safari try to prevent sites tracking your movements from one site to another.
![]() Select Hide IP address from trackers (
Select Hide IP address from trackers (![]() ) to have Safari hide your computer’s Internet address from known trackers.
) to have Safari hide your computer’s Internet address from known trackers.
![]() Select Block all cookies (
Select Block all cookies (![]() ) if you want to block all cookies. This is not usually helpful.
) if you want to block all cookies. This is not usually helpful.
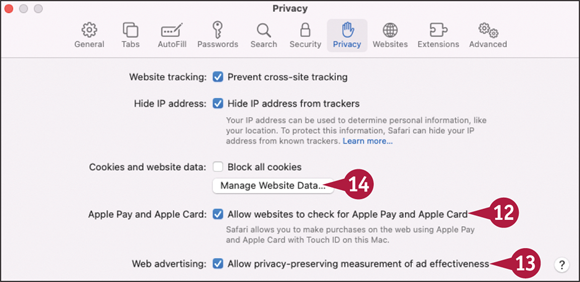
![]() Select Allow websites to check for Apple Pay and Apple Card (
Select Allow websites to check for Apple Pay and Apple Card (![]() ) to allow websites to determine whether you have Apple Pay and Apple Card as payment options.
) to allow websites to determine whether you have Apple Pay and Apple Card as payment options.
![]() Select (
Select (![]() ) or deselect (
) or deselect (![]() ) Allow privacy-preserving measurement of ad effectiveness (
) Allow privacy-preserving measurement of ad effectiveness (![]() ) to let Apple measure the effectiveness of advertisements without compromising your privacy.
) to let Apple measure the effectiveness of advertisements without compromising your privacy.
![]() Click Manage Website Data.
Click Manage Website Data.
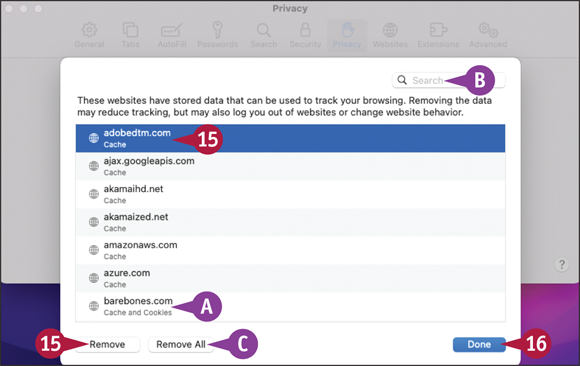
The Manage Website Data dialog opens.
![]() Each entry lists the types of data the site has stored about you.
Each entry lists the types of data the site has stored about you.
![]() You can search to locate a site.
You can search to locate a site.
![]() To remove the data a website has saved about you, click the site, and then click Remove.
To remove the data a website has saved about you, click the site, and then click Remove.
![]() You can click Remove All to remove all the sites’ saved data.
You can click Remove All to remove all the sites’ saved data.
![]() Click Done.
Click Done.
The Manage Website Data dialog closes.
In the Websites pane of Safari preferences, you can configure various aspects of how Safari interacts with websites you visit for security, privacy, and usability. For example, you can control which sites can automatically play media and which sites can send you notifications.
For each category of settings, you can choose custom settings for individual websites you visit and a global setting that applies to all websites for which you have not chosen custom settings. For example, you might allow specific sites to play videos automatically but block all other websites from doing so.

![]() Click Websites (
Click Websites (![]() ).
).
The Websites pane appears.
![]() In the General pane, click the category you want to customize first. To follow this example, click Auto-Play (
In the General pane, click the category you want to customize first. To follow this example, click Auto-Play (![]() ).
).
![]() In the Currently Open Websites list, click
In the Currently Open Websites list, click ![]() for a site you want to configure, and then click Allow All Auto-Play, Stop Media with Sound, or Never Auto-Play, as needed.
for a site you want to configure, and then click Allow All Auto-Play, Stop Media with Sound, or Never Auto-Play, as needed.
![]() Adjust the settings for sites in the Configured Websites list, as needed.
Adjust the settings for sites in the Configured Websites list, as needed.
![]() Click When visiting other websites (
Click When visiting other websites (![]() ) and click the setting to use for all other websites.
) and click the setting to use for all other websites.
![]() You can click a website and then click Remove to remove it from the list.
You can click a website and then click Remove to remove it from the list.
![]() Click Downloads (
Click Downloads (![]() ).
).
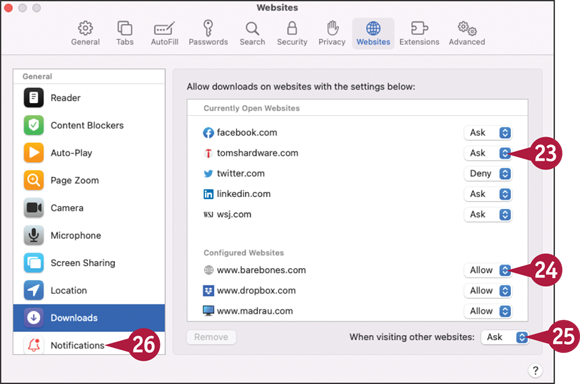
The Downloads pane appears. This pane enables you to control which sites Safari can download content from.
![]() In the Currently Open Websites list, click
In the Currently Open Websites list, click ![]() for a site you want to configure, and then click Ask, Deny, or Allow, as needed.
for a site you want to configure, and then click Ask, Deny, or Allow, as needed.
![]() Adjust the settings for sites in the Configured Websites list, as needed.
Adjust the settings for sites in the Configured Websites list, as needed.
![]() Click When visiting other websites (
Click When visiting other websites (![]() ) and click the setting to use for all other websites.
) and click the setting to use for all other websites.
![]() Click Notifications (
Click Notifications (![]() ).
).

The Notifications pane appears. This pane enables you to control which sites can send notifications in Notification Center.
![]() In the These Websites Have Asked for Permission to Show Alerts in Notification Center list, click
In the These Websites Have Asked for Permission to Show Alerts in Notification Center list, click ![]() for a site you want to configure, and then click Allow or Deny, as needed.
for a site you want to configure, and then click Allow or Deny, as needed.
![]() Select (
Select (![]() ) or clear (
) or clear (![]() ) Allow websites to ask for permission to send notifications, as needed.
) Allow websites to ask for permission to send notifications, as needed.
![]() Click other categories and choose settings, as needed. For example, click Camera (
Click other categories and choose settings, as needed. For example, click Camera (![]() ) and specify which websites can use your MacBook’s camera.
) and specify which websites can use your MacBook’s camera.
![]() Click AutoFill (
Click AutoFill (![]() ).
).

The AutoFill pane appears.
![]() In the AutoFill Web Forms list, click to select (
In the AutoFill Web Forms list, click to select (![]() ) or deselect (
) or deselect (![]() ) Using information from my contacts, User names and passwords, Credit cards, and Other forms, to specify the items for which you want to use AutoFill.
) Using information from my contacts, User names and passwords, Credit cards, and Other forms, to specify the items for which you want to use AutoFill.
![]() You can click Edit to view the stored information.
You can click Edit to view the stored information.
Note: Clicking Edit for Using Information from My Contacts opens the Contacts app.
![]() Click Close (
Click Close (![]() ).
).
The Safari Preferences window closes.