
CHAPTER 5
Managing Your Files and Folders
The Finder enables you to manage your files, folders, drives, and even your iPhone or iPad. You can take many actions in the Finder, including copying, moving, and deleting files and folders. You can customize the Finder settings to streamline your work.
Understanding Where to Store Files
Organize Your Desktop Files with Stacks
Control Which Folders Spotlight Searches
Understanding Where to Store Files
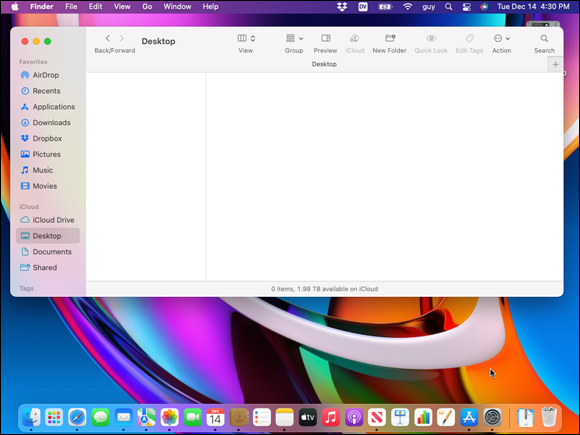
In macOS, your local home base is your Home folder, which is stored on your MacBook and contains folders such as Downloads, Music, and Pictures. Your online home base is your iCloud account, which macOS recommends you use to sync your Desktop folder and your Documents folder across your Macs and your iOS and iPadOS devices. If you choose not to use iCloud, the Desktop folder and Documents folder appear in the Home folder on your MacBook. You can easily navigate among your folders by using the sidebar or the Go menu.
Understanding Where to Store Files

![]() Click Finder (
Click Finder (![]() ) on the Dock.
) on the Dock.
A Finder window opens to your default folder or view.
![]() Click Recents.
Click Recents.
The Finder window displays the Recents view, which shows the files you have used most recently.
![]() The Finder toolbar can display its controls as icons with text, as shown here; as icons only; or as text only. See the section “Customize the Finder Toolbar,” later in this chapter, for details.
The Finder toolbar can display its controls as icons with text, as shown here; as icons only; or as text only. See the section “Customize the Finder Toolbar,” later in this chapter, for details.
![]() Click Documents.
Click Documents.
Note: Documents appears in the iCloud list if you accept the macOS suggestion to store your documents in iCloud, which syncs your documents automatically across devices. If you decline this suggestion, Documents is located on your MacBook and appears in the Favorites list.
The contents of the Documents folder appear.
![]() The Desktop folder contains items on your desktop.
The Desktop folder contains items on your desktop.
Note: The Documents folder is intended to be your storage place for word processing documents, spreadsheets, and similar files.
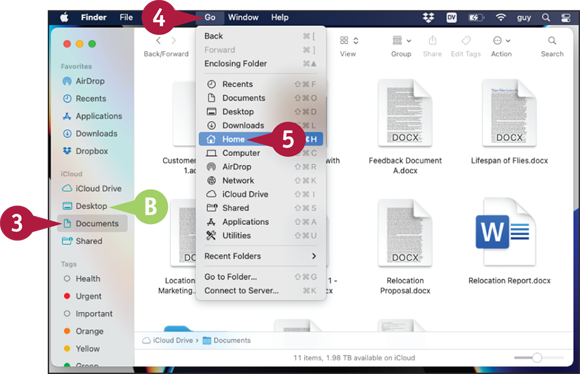
![]() Click Go.
Click Go.
The Go menu opens.
![]() Click Home.
Click Home.
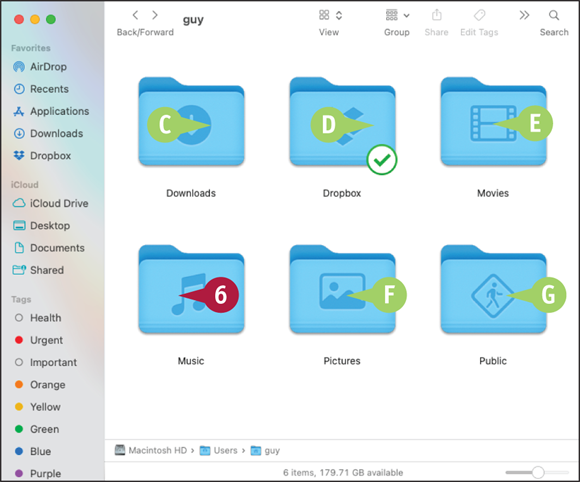
The contents of your Home folder appear.
![]() The Downloads folder contains files you download via apps such as Safari or Mail.
The Downloads folder contains files you download via apps such as Safari or Mail.
![]() The Dropbox folder appears only if you have installed the Dropbox online-storage app.
The Dropbox folder appears only if you have installed the Dropbox online-storage app.
![]() The Movies folder contains movies, such as iMovie projects.
The Movies folder contains movies, such as iMovie projects.
![]() The Pictures folder contains images.
The Pictures folder contains images.
![]() The Public folder is for sharing files with others.
The Public folder is for sharing files with others.
![]() Double-click Music.
Double-click Music.
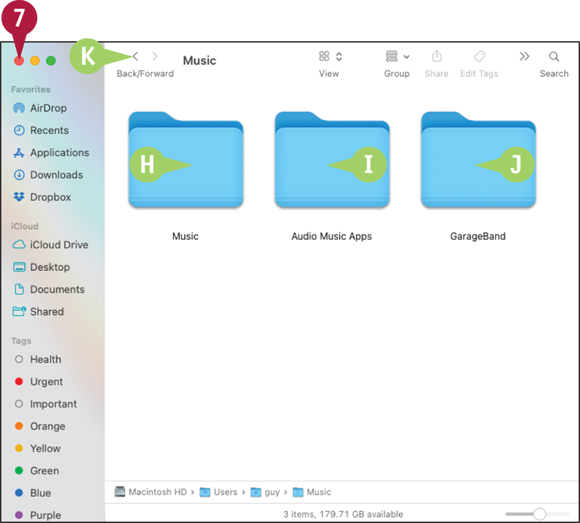
The contents of your Music folder appear.
![]() The Music folder contains your music library.
The Music folder contains your music library.
![]() The Audio Music Apps folder contains support files for GarageBand and other music apps.
The Audio Music Apps folder contains support files for GarageBand and other music apps.
![]() The GarageBand folder appears if you have used GarageBand, the music-composition app.
The GarageBand folder appears if you have used GarageBand, the music-composition app.
![]() You can click Back (
You can click Back (![]() ) to move back along the path of folders you have followed.
) to move back along the path of folders you have followed.
![]() Click Close (
Click Close (![]() ).
).
The Finder window closes.
Using the Finder’s Views
The Finder provides four views to help you find, browse, and identify your files and folders. You can switch views by using the View buttons on the toolbar, the View menu or the contextual menu, or keyboard shortcuts.
Icon view shows each file or folder as a graphical icon. List view shows folders as a collapsible hierarchy. Column view enables you to navigate quickly through folders and see where each item is located. Gallery view is great for identifying files visually by looking at previews of their contents.
Using the Finder’s Views
Using Icon View
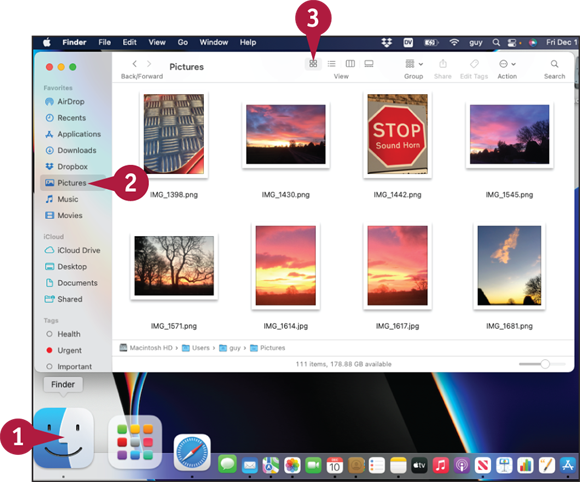
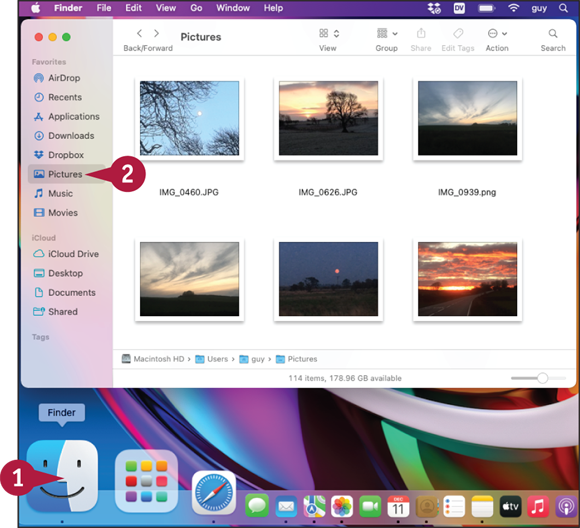
![]() Click Finder (
Click Finder (![]() ) on the Dock.
) on the Dock.
A Finder window opens showing your default folder or view.
![]() Click the folder you want to display.
Click the folder you want to display.
The folder appears — in this case, the Pictures folder.
![]() Click Icons (
Click Icons (![]() ) on the toolbar.
) on the toolbar.
Note: If the View pop-up menu appears instead of the four View buttons, click View (![]() ,
, ![]() ,
, ![]() , or
, or ![]() ), and then click the appropriate view — in this case, click as Icons (
), and then click the appropriate view — in this case, click as Icons (![]() ).
).
The files and folders appear in Icon view.
Using List View
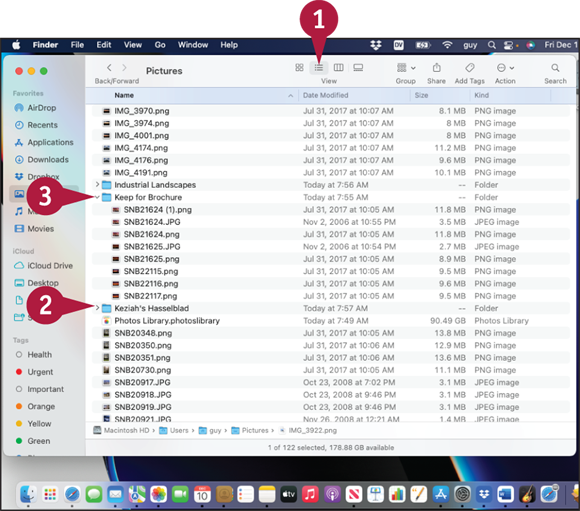
![]() Click List (
Click List (![]() ) on the toolbar.
) on the toolbar.
The files and folders appear in List view.
![]() Click Expand (
Click Expand (![]() changes to
changes to ![]() ) next to a folder.
) next to a folder.
The folder’s contents appear.
Note: If the disclosure triangles do not appear next to folders, click View to open the View menu, and then click Use Groups, removing the check mark.
![]() When you need to hide the folder’s contents again, click Collapse (
When you need to hide the folder’s contents again, click Collapse (![]() changes to
changes to ![]() ).
).
Note: Click a column header in List view to sort by that column. You can click the same column header again to reverse the sort order.

Using Column View
![]() In the Finder window, click Columns (
In the Finder window, click Columns (![]() ) on the toolbar.
) on the toolbar.
The files and folders appear in Column view.
![]() Click a folder in the first column after the sidebar.
Click a folder in the first column after the sidebar.
The folder’s contents appear in the next column.
Note: You can click another folder if necessary.
![]() Click a file.
Click a file.
![]() A preview of the file appears.
A preview of the file appears.

Using Gallery View
![]() In the Finder window, click Gallery (
In the Finder window, click Gallery (![]() ) on the toolbar.
) on the toolbar.
The files and folders appear in Gallery view.
![]() Click a file in the thumbnail bar.
Click a file in the thumbnail bar.
![]() A preview or icon appears, depending on the file type.
A preview or icon appears, depending on the file type.
![]() Information about the selected file appears in the right pane.
Information about the selected file appears in the right pane.
Note: You can also swipe left or right on the trackpad with two fingers to move through the thumbnails on the thumbnail bar.
Work with Finder Tabs
The Finder enables you to open multiple tabs within the same window. This capability is useful when you need to work in multiple folders at the same time. You can navigate quickly among the tabs by using the tab bar.
Finder tabs are especially useful if you switch a Finder window to full-screen mode. You can drag files or folders from one Finder tab to another to copy or move the items.
Work with Finder Tabs
![]() Click Finder (
Click Finder (![]() ) on the Dock.
) on the Dock.
A Finder window opens.
![]() Click the folder you want to view in the window.
Click the folder you want to view in the window.
![]() Press
Press ![]() +
+ ![]() or click File and New Tab.
or click File and New Tab.
Note: The Finder hides the tab bar by default when only one tab is open. You can display the tab bar by clicking View and clicking Show Tab Bar or pressing ![]() +
+ ![]() +
+ ![]() .
.
![]() The tab bar appears.
The tab bar appears.
![]() A new tab opens, showing your default folder or location.
A new tab opens, showing your default folder or location.
![]() Click the folder you want to view.
Click the folder you want to view.
Note: You can use a different view in each tab.
![]() Click New Tab (
Click New Tab (![]() ).
).
Note: To close a tab, position the pointer over it and then click Close (![]() ). You can also press
). You can also press ![]() +
+ ![]() or click File and select Close Tab.
or click File and select Close Tab.
A new tab opens.
![]() Drag the tab along the tab bar to where you want it.
Drag the tab along the tab bar to where you want it.
Note: You can drag a tab to another Finder window if you want. You can also drag a tab out of a Finder window to turn it into its own window.
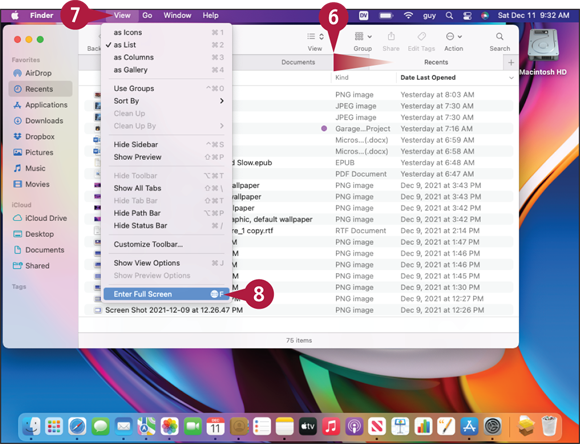
![]() Click View.
Click View.
The View menu opens.
![]() Click Enter Full Screen.
Click Enter Full Screen.
Note: Another way to switch to Full Screen view is to press ![]() +
+ ![]() +
+ ![]() .
.

The Finder window appears full screen, giving you more space for working with files, folders, and tabs.
![]() Click the folder you want to display.
Click the folder you want to display.
The folder's contents appear.
Note: To exit full-screen view, move the pointer to the top of the screen so that the menu bar appears, and then click View and Exit Full Screen. Alternatively, press ![]() or press
or press ![]() +
+ ![]() +
+ ![]() again.
again.
View a File with Quick Look
The Quick Look feature enables you to preview files in Finder windows without actually opening the files in their apps. You can use Quick Look to determine what a file contains or to identify the file for which you are looking. You can preview a file full screen with Quick Look or preview multiple files at the same time. Quick Look works for many widely used types of files, but not for all types.
View a File with Quick Look
![]() Click Finder (
Click Finder (![]() ) on the Dock.
) on the Dock.
A Finder window opens to your default folder or view.
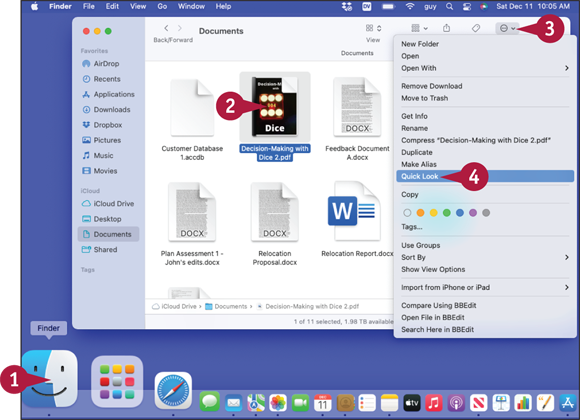
![]() Click the file you want to look through.
Click the file you want to look through.
![]() Click Action (
Click Action (![]() ).
).
The Action pop-up menu opens.
Note: You can also press ![]() to open a Quick Look window for the selected item.
to open a Quick Look window for the selected item.
![]() Click Quick Look.
Click Quick Look.
A Quick Look window opens, showing a preview of the file or the file’s icon.
Note: When you use Quick Look on an audio file or a video file, macOS starts playing the file.
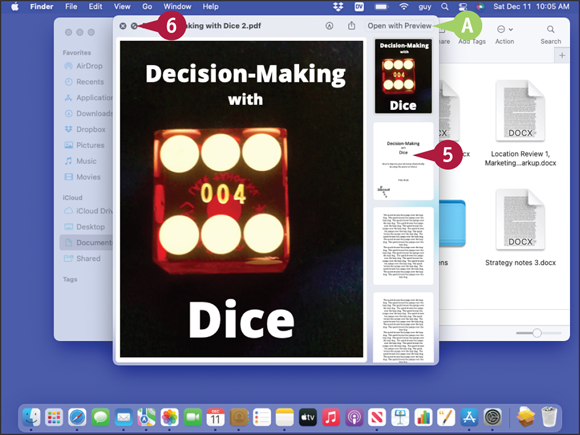
![]() If you need to scroll to see more of the file, click another page thumbnail or swipe up on the trackpad.
If you need to scroll to see more of the file, click another page thumbnail or swipe up on the trackpad.
![]() You can click Open with to open the file in its default app.
You can click Open with to open the file in its default app.
![]() To view the file as a full-screen preview, click Full Screen (
To view the file as a full-screen preview, click Full Screen (![]() ).
).

The Quick Look window expands to fill the screen.
Note: To see more of the file in full-screen view, scroll down, swipe up with two fingers, or press ![]() .
.
![]() Click Exit Full Screen (
Click Exit Full Screen (![]() ) when you finish using full-screen view.
) when you finish using full-screen view.

![]() Click Close (
Click Close (![]() ) to close the Quick Look window.
) to close the Quick Look window.
Note: Instead of closing the Quick Look window, you can press ![]() ,
, ![]() ,
, ![]() , or
, or ![]() to display another file or folder.
to display another file or folder.
Organize Your Desktop Files with Stacks
Many people find the desktop a handy place to save files that they need to be able to access quickly. But saving many files to the desktop can clutter up the desktop and make files hard to find quickly.
To solve this problem, macOS provides the Stacks feature, which organizes the desktop’s files by the criteria you choose. By turning on Stacks, you create a series of stacks that are easier to navigate. You can browse a stack quickly, find the file you need, and open it.
Organize Your Desktop Files with Stacks
Turn On Stacks and Choose the Grouping
![]() Click anywhere on the desktop.
Click anywhere on the desktop.
The Finder becomes active, and the Finder menus appear.
Note: The desktop is technically a Finder window, although it looks and behaves very differently from most Finder windows. This is why the Finder becomes active when you click the desktop.
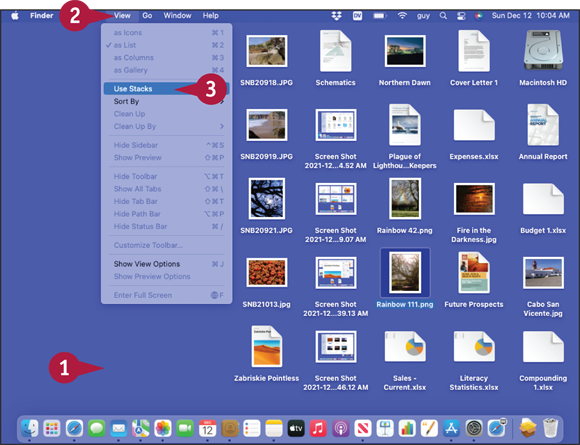
![]() Click View.
Click View.
The View menu opens.
![]() Click Use Stacks.
Click Use Stacks.

Finder sorts the documents into stacks using the default grouping, Kind. This grouping creates stacks such as Documents, PDF Documents, and Images.
![]() If you want to change the grouping, click View.
If you want to change the grouping, click View.
The View menu opens.
![]() Highlight Group Stacks By without clicking.
Highlight Group Stacks By without clicking.
The Group Stacks By submenu opens.
![]() Click the grouping you want, such as Date Last Opened.
Click the grouping you want, such as Date Last Opened.
Finder sorts the stacks by the new grouping.

Browse a Stack and Open a File
![]() Click the stack.
Click the stack.
The stack’s contents appear.
![]() Click the file you want to open.
Click the file you want to open.
The file opens in its default app.
Note: You can also take other actions after displaying a stack’s contents. For example, you can ![]() + click a file and then click Quick Look on the contextual menu to view the file’s contents using Quick Look.
+ click a file and then click Quick Look on the contextual menu to view the file’s contents using Quick Look.
Search for a File or Folder
macOS includes a powerful search feature called Spotlight that enables you to find the files and folders you need. Spotlight automatically indexes the files on your MacBook and connected drives so that it can deliver accurate results within seconds when you search.
You can use Spotlight either directly from the desktop or from within a Finder window. Depending on what you need to find, you can use either straightforward search keywords or complex search criteria.
Search for a File or Folder

Search Quickly from the Desktop
![]() Click Spotlight (
Click Spotlight (![]() ).
).
The Spotlight pop-up window opens.
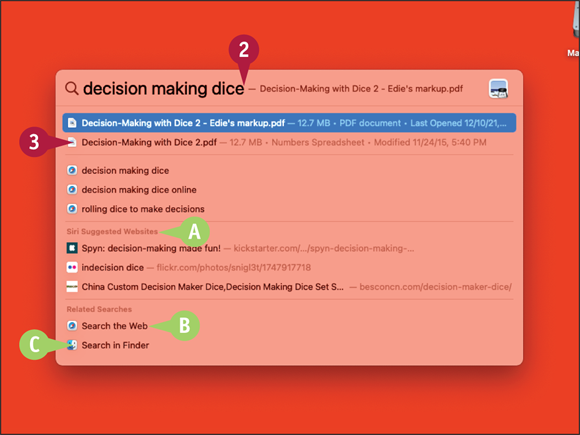
![]() Type one or more keywords.
Type one or more keywords.
Spotlight displays a list of matches.
![]() The Siri Suggested Websites section lists websites that may be relevant to your search.
The Siri Suggested Websites section lists websites that may be relevant to your search.
![]() In the Related Searches section, you can click Search the Web (
In the Related Searches section, you can click Search the Web (![]() ) to open a Safari window that searches the Web using your search terms.
) to open a Safari window that searches the Web using your search terms.
![]() You can click Search in Finder (
You can click Search in Finder (![]() ) to open a Finder window that searches your MacBook’s file system using your search terms.
) to open a Finder window that searches your MacBook’s file system using your search terms.
![]() Double-click the file you want to open.
Double-click the file you want to open.
The file opens in the application associated with it.
Search from a Finder Window
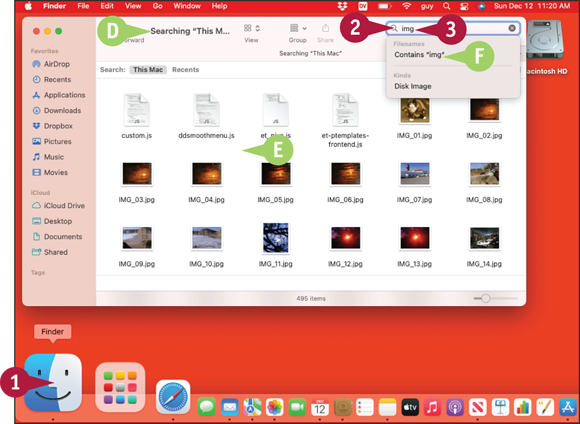
![]() Click Finder (
Click Finder (![]() ) on the Dock.
) on the Dock.
A Finder window opens.
![]() Click in the search field.
Click in the search field.
![]() Type the keywords for your search.
Type the keywords for your search.
![]() The Finder window’s title bar changes to Searching and the folder or location.
The Finder window’s title bar changes to Searching and the folder or location.
![]() A list of search results appears.
A list of search results appears.
![]() You can click a suggested search criterion on the pop-up menu to restrict the search.
You can click a suggested search criterion on the pop-up menu to restrict the search.

![]() To change where Spotlight is searching, click a button on the Search bar.
To change where Spotlight is searching, click a button on the Search bar.
![]() You can quickly view a file by
You can quickly view a file by ![]() + clicking it and then clicking Quick Look or by clicking it and pressing
+ clicking it and then clicking Quick Look or by clicking it and pressing ![]() .
.
![]() You can open a file by double-clicking it.
You can open a file by double-clicking it.
![]() You can click Save to save the search for future use.
You can click Save to save the search for future use.
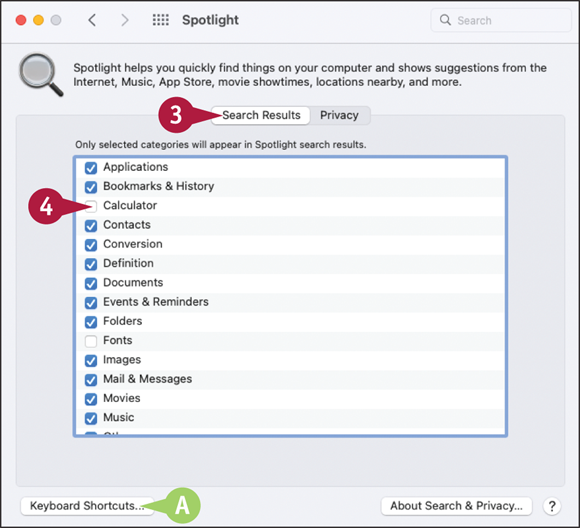
Control Which Folders Spotlight Searches
macOS’s Spotlight feature indexes your MacBook’s files so that you can easily search them either from the Spotlight icon on the menu bar or from a Finder window. To improve the search results that Spotlight returns, you can customize the folders that Spotlight searches. You can exclude folders you do not want to search and choose whether to use Spotlight Suggestions in Spotlight itself and in the Look Up feature, which enables you to look up words in documents or web pages.
Control Which Folders Spotlight Searches
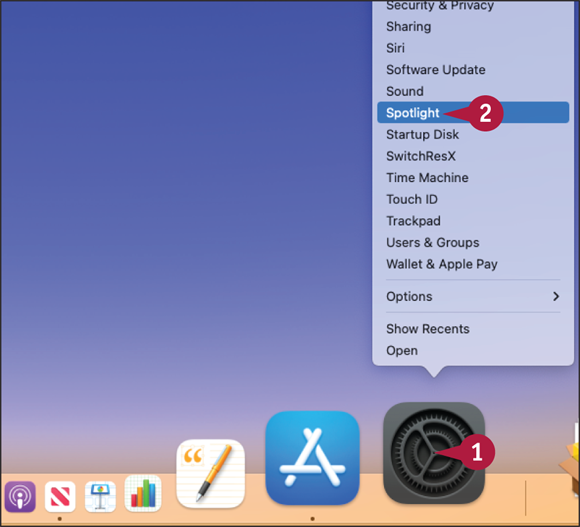
![]() Press
Press ![]() + click System Preferences (
+ click System Preferences (![]() ) on the Dock.
) on the Dock.
The contextual menu opens.
![]() Click Spotlight.
Click Spotlight.
Note: Alternatively, click Apple (![]() ), click System Preferences, and then click Spotlight (
), click System Preferences, and then click Spotlight (![]() ).
).
The System Preferences window opens with the Spotlight pane at the front.
![]() Click Search Results.
Click Search Results.
The Search Results pane appears.
![]() Deselect (
Deselect (![]() ) the check box for any item you want to exclude from search results.
) the check box for any item you want to exclude from search results.
![]() You can click Keyboard Shortcuts to display the Spotlight category in the Shortcuts pane in Keyboard preferences. Here, you can disable or change the keyboard shortcuts for Spotlight.
You can click Keyboard Shortcuts to display the Spotlight category in the Shortcuts pane in Keyboard preferences. Here, you can disable or change the keyboard shortcuts for Spotlight.
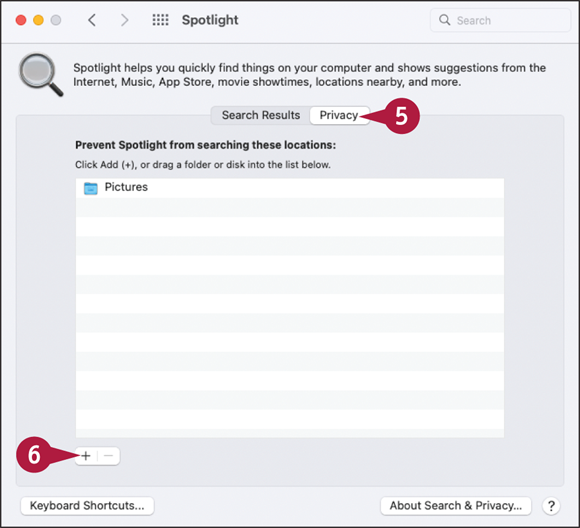
![]() Click Privacy.
Click Privacy.
The Privacy pane appears.
![]() Click Add (
Click Add (![]() ).
).
Note: After you add a folder to the exclusion list, Finder does not show results from that folder. This is true even if you open a Finder window to that folder and then perform the search. This can be confusing to users, because the files are right there and clearly match the search criteria.
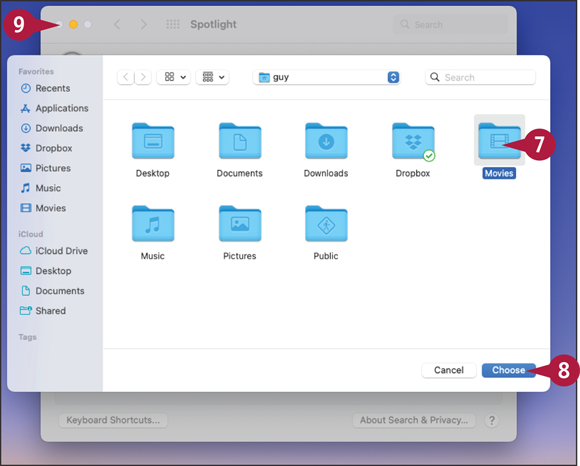
A dialog opens.
![]() Click the folder you want to add.
Click the folder you want to add.
Note: You can select two or more folders by clicking the first and then ![]() + clicking each of the others.
+ clicking each of the others.
![]() Click Choose.
Click Choose.
The dialog closes, and the folder appears in the list.
![]() Click Close (
Click Close (![]() ).
).
System Preferences closes.
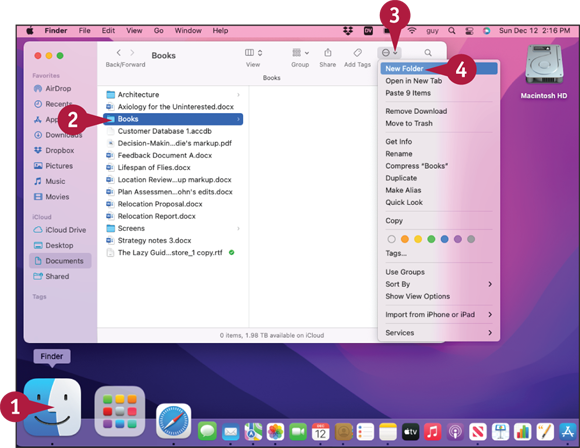
Create a New Folder
You can customize the hierarchy of folders in your user account by creating as many new folders and subfolders as you need. You can create folders and subfolders in your user account or in other parts of the file system, such as on an external drive connected to your MacBook or in your iCloud account. macOS blocks you from creating folders in folders or locations for which you do not have permission.
If you want to sync your folders automatically across your devices, create the folders in your iCloud account.
Create a New Folder
![]() Click Finder (
Click Finder (![]() ) on the Dock.
) on the Dock.
A Finder window opens to your default folder.
![]() Click the folder in which you want to create the new folder.
Click the folder in which you want to create the new folder.
![]() Click Action (
Click Action (![]() ) on the toolbar.
) on the toolbar.
The Action pop-up menu opens.
![]() Click New Folder.
Click New Folder.
Note: You can also create a new folder by pressing ![]() +
+ ![]() +
+ ![]() or by clicking File on the Finder menu bar and clicking New Folder.
or by clicking File on the Finder menu bar and clicking New Folder.
![]() A new folder appears in the Finder window.
A new folder appears in the Finder window.
The new folder shows an edit box around the default name, Untitled Folder.
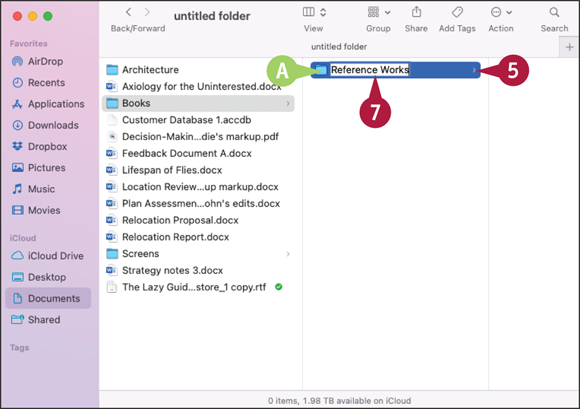
![]() Type the name you want to give the folder.
Type the name you want to give the folder.
![]() Press
Press ![]() .
.
The folder takes on the new name.
![]() Click or double-click the folder, depending on the view you are using.
Click or double-click the folder, depending on the view you are using.
The folder opens. You can now add files to the folder or create subfolders inside it.
Rename a File or Folder
The Finder enables you to rename any file or folder you have created. To keep your MacBook’s file system well organized, it is often helpful to rename files and folders.
macOS prevents you from renaming system folders, such as the System folder itself, the Applications folder, or the Users folder. macOS also prevents you from renaming the standard folders in each user account, such as the Documents folder and the Pictures folder, because apps expect these folders to be available with their default names.
Rename a File or Folder

![]() Click Finder (
Click Finder (![]() ) on the Dock.
) on the Dock.
A Finder window opens to your default folder.
![]() Navigate to the folder that contains the file or folder you want to rename. For example, click Documents and then click a subfolder in the Documents folder.
Navigate to the folder that contains the file or folder you want to rename. For example, click Documents and then click a subfolder in the Documents folder.
![]() Click the file or folder. This example uses a folder.
Click the file or folder. This example uses a folder.
![]() Press
Press ![]() .
.
Note: You can also display the edit box by clicking the file’s or folder’s name to select it, pausing, and then clicking again. You must pause between the clicks; otherwise, the Finder registers a double-click and opens the file or folder.

An edit box appears around the filename.
![]() Edit the file’s current name, or simply type the new name over the current name.
Edit the file’s current name, or simply type the new name over the current name.
![]() Press
Press ![]() .
.
The file takes on the new name.
Note: To rename multiple files or folders at once, select them, click File on the menu bar, and then click Rename. In the Rename Finder Items dialog, choose renaming options, and then click Rename.
Copy a File
The Finder enables you to copy a file from one folder to another. Copying is useful when you need to share a file with other people or when you need to keep a copy of the file safe against harm.
You can copy either by clicking and dragging or by using the Copy and Paste commands. You can copy a single file or folder at a time or copy multiple items.
Copy a File

Copy a File by Clicking and Dragging
![]() Click Finder (
Click Finder (![]() ) on the Dock.
) on the Dock.
A Finder window opens.
![]() Click the folder that contains the file you want to copy.
Click the folder that contains the file you want to copy.
![]() Click File.
Click File.
The File menu opens.
![]() Click New Finder Window.
Click New Finder Window.
A new Finder window opens.

![]() In the second Finder window, navigate to the destination folder.
In the second Finder window, navigate to the destination folder.
![]() Arrange the Finder windows so that you can see both.
Arrange the Finder windows so that you can see both.
![]() Select the file or files.
Select the file or files.
![]() Press and hold
Press and hold ![]() while you click the file and drag it to the destination folder.
while you click the file and drag it to the destination folder.
Note: Pressing and holding ![]() while dragging causes macOS to copy the file on a local drive instead of moving the file.
while dragging causes macOS to copy the file on a local drive instead of moving the file.
Note: The pointer displays a plus sign (![]() ) to indicate copying.
) to indicate copying.
The copy or copies appear in the destination folder.
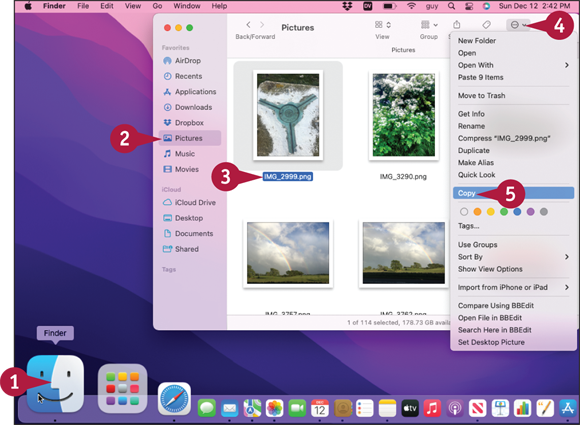
Copy a File Using Copy and Paste
![]() Click Finder (
Click Finder (![]() ) on the Dock.
) on the Dock.
A Finder window opens.
![]() Click the folder that contains the file you want to copy.
Click the folder that contains the file you want to copy.
![]() Click the file.
Click the file.
Note: You can also copy the selected item by pressing ![]() +
+ ![]() and paste the copied or cut item by pressing
and paste the copied or cut item by pressing ![]() +
+ ![]() .
.
![]() Click Action (
Click Action (![]() ).
).
The Action pop-up menu opens.
![]() Click Copy.
Click Copy.
Finder copies the file’s details to the clipboard.
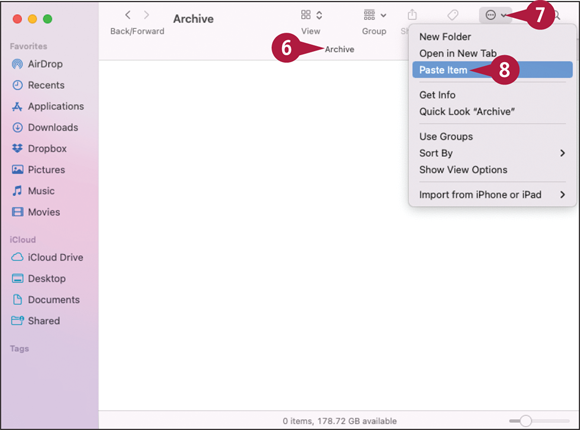
![]() Click the folder in which you want to create the copy.
Click the folder in which you want to create the copy.
![]() Click Action (
Click Action (![]() ).
).
The Action pop-up menu opens.
![]() Click Paste Item.
Click Paste Item.
A copy of the file appears in the destination folder.
Note: You can use the Paste command in either the same Finder window or tab or another Finder window or tab — whichever you find more convenient.
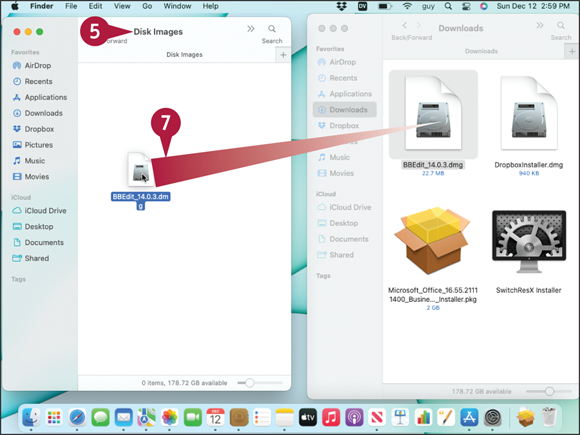
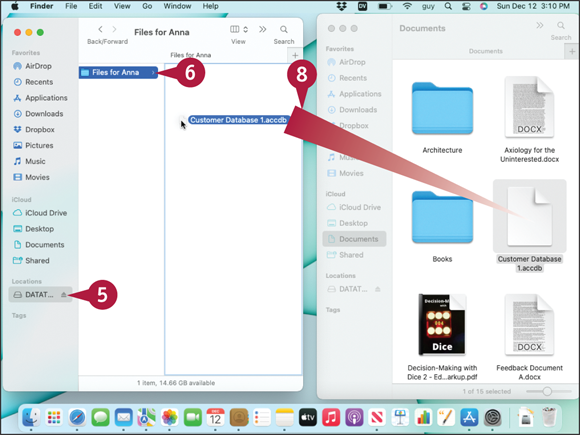
Move a File
The Finder makes it easy to move a file from one folder to another. You can move a file quickly by clicking it in its current folder and then dragging it to the destination folder.
When the destination folder is on the same drive as the source folder, the Finder moves the file to that folder. But when the destination folder is on a different drive, the Finder copies the file by default. To override this and move the file, you press ![]() as you drag.
as you drag.
Move a File

Move a File Between Folders on the Same Drive
![]() Click Finder (
Click Finder (![]() ) on the Dock.
) on the Dock.
A Finder window opens.
![]() Click the folder that contains the file you want to move.
Click the folder that contains the file you want to move.
![]() Click File.
Click File.
The File menu opens.
![]() Click New Finder Window.
Click New Finder Window.
A new Finder window opens.
![]() In the second Finder window, open the destination folder.
In the second Finder window, open the destination folder.
![]() Arrange the Finder windows so that you can see both.
Arrange the Finder windows so that you can see both.
![]() Click the file and drag it to the destination folder.
Click the file and drag it to the destination folder.
The file appears in the destination folder and disappears from the source folder.

Move a File from One Drive to Another
![]() Click Finder (
Click Finder (![]() ) on the Dock.
) on the Dock.
A Finder window opens.
![]() Click the folder that contains the file you want to move.
Click the folder that contains the file you want to move.
![]() Press
Press ![]() + click Finder (
+ click Finder (![]() ) on the Dock.
) on the Dock.
The contextual menu opens.
![]() You can click a recent folder to open that folder.
You can click a recent folder to open that folder.
![]() Click New Finder Window.
Click New Finder Window.
A new Finder window opens.
![]() In the second Finder window, click the drive to which you want to copy the file.
In the second Finder window, click the drive to which you want to copy the file.
![]() Click the destination folder.
Click the destination folder.
![]() Arrange the Finder windows so that you can see both.
Arrange the Finder windows so that you can see both.
![]() Press and hold
Press and hold ![]() while you click the file and drag it to the destination folder.
while you click the file and drag it to the destination folder.
The file appears in the destination folder and disappears from the source folder.
View the Information About a File or Folder
macOS keeps a large amount of information about each file and folder. When you view the file or folder in most Finder views, you can see the item’s name and some basic information about it, such as its kind, size, and date last modified.
To see more information about the file or folder, you can open the Info window. This window contains multiple sections that you can expand by clicking Expand (![]() ) or collapse by clicking Collapse (
) or collapse by clicking Collapse (![]() ).
).
View the Information About a File or Folder

![]() Click Finder (
Click Finder (![]() ) on the Dock.
) on the Dock.
A Finder window opens.
![]() Click the folder that contains the file whose info you want to view.
Click the folder that contains the file whose info you want to view.
![]() Click the file.
Click the file.
![]() Click Action (
Click Action (![]() ).
).
The Action pop-up menu opens.
![]() Click Get Info.
Click Get Info.
Note: You can also open the Info window for the selected item by pressing ![]() +
+ ![]() .
.
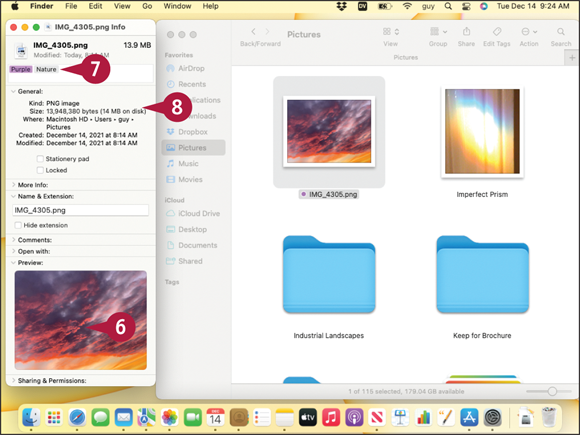
The Info window opens.
![]() View the preview.
View the preview.
![]() Review the tags. To add a tag, type the tag’s text, and then press
Review the tags. To add a tag, type the tag’s text, and then press ![]() .
.
Note: See the next section, “Organize Your Files with Tags,” for more on tags.
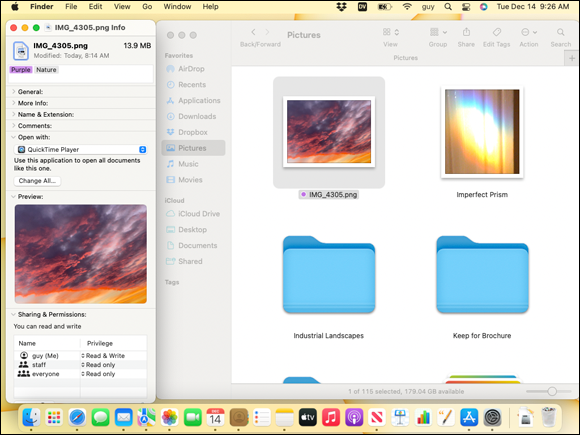
![]() Review the general information: Kind shows the file’s type. Size shows the file’s size on disk. Where shows the folder that contains the file. Created shows when the file was created. Modified shows when the file was last changed.
Review the general information: Kind shows the file’s type. Size shows the file’s size on disk. Where shows the folder that contains the file. Created shows when the file was created. Modified shows when the file was last changed.

![]() Review the details in the More Info section.
Review the details in the More Info section.
Note: The More Info details are especially useful for photos.
![]() You can change the filename or extension. Normally, though, it is best not to change the extension.
You can change the filename or extension. Normally, though, it is best not to change the extension.
![]() Select Hide extension (
Select Hide extension (![]() ) if you want to hide the extension.
) if you want to hide the extension.
![]() Type any comments to help identify the file.
Type any comments to help identify the file.

![]() Click Open with (
Click Open with (![]() ) and select the app with which to open this file.
) and select the app with which to open this file.
![]() Click Change All if you want to use the app for all files of this type.
Click Change All if you want to use the app for all files of this type.
![]() Click Close (
Click Close (![]() ).
).
The Info window closes.
Organize Your Files with Tags
You can organize your files and folders by giving them descriptive names and storing them in appropriate places. But macOS and its apps give you another means of organizing your files and folders: tags.
macOS includes a set of default tags that you can customize to better describe your projects. You can then apply one or more tags to a file to enable you to locate it more easily either on your MacBook or in iCloud.
Organize Your Files with Tags

Customize Your Tags
![]() Click the desktop.
Click the desktop.
The Finder becomes active.
![]() Click Finder.
Click Finder.
The Finder menu opens.
![]() Click Preferences.
Click Preferences.
The Finder Preferences window opens.
![]() Click Tags (
Click Tags (![]() ).
).
The Tags pane appears.
![]() Click a tag you want to rename, type the new name in the edit box that appears, and then press
Click a tag you want to rename, type the new name in the edit box that appears, and then press ![]() .
.
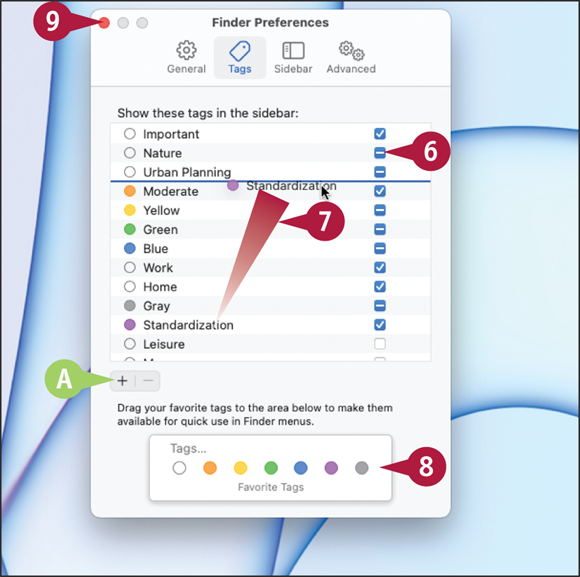
![]() Click the check box (
Click the check box (![]() changes to
changes to ![]() ) to make the tag appear in the list in the Finder.
) to make the tag appear in the list in the Finder.
![]() Drag the tags into the order in which you want them to appear.
Drag the tags into the order in which you want them to appear.
![]() Drag tags to the Favorite Tags list at the bottom to control which tags appear in Finder menus.
Drag tags to the Favorite Tags list at the bottom to control which tags appear in Finder menus.
![]() You can click Add (
You can click Add (![]() ) to add a new tag to the list.
) to add a new tag to the list.
![]() Click Close (
Click Close (![]() ).
).
The Finder Preferences window closes.
Apply Tags to Files and Folders
![]() If the Tags section of the sidebar is collapsed, position the pointer over Tags and click Expand (
If the Tags section of the sidebar is collapsed, position the pointer over Tags and click Expand (![]() ).
).
![]() Click the file or folder and drag it to the appropriate tag.
Click the file or folder and drag it to the appropriate tag.
Finder applies the tag.
Note: You can also apply tags from the File menu or from the contextual menu.
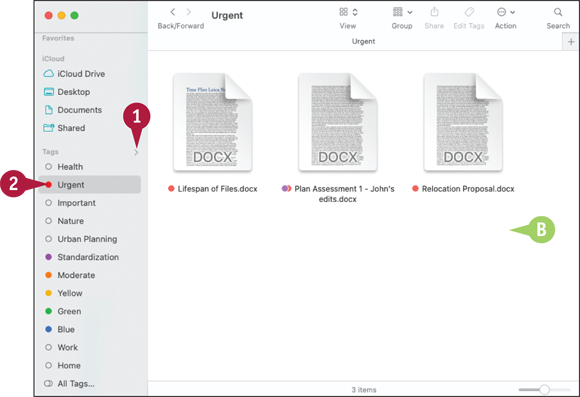
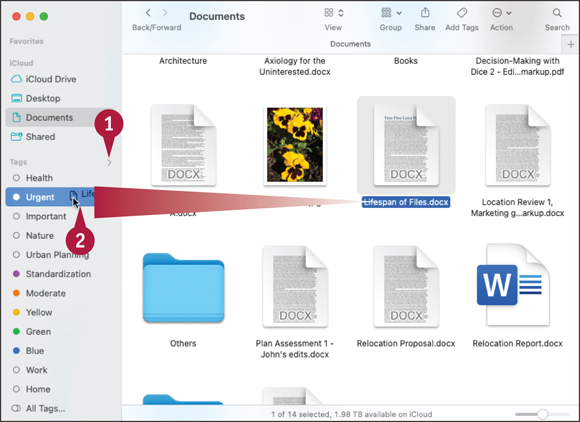
View Files and Folders by Tags
![]() If the Tags section of the sidebar is collapsed, position the pointer over Tags and click Expand (
If the Tags section of the sidebar is collapsed, position the pointer over Tags and click Expand (![]() ) when it appears.
) when it appears.
![]() Click the appropriate tag.
Click the appropriate tag.
![]() The Finder window shows the tagged files and folders.
The Finder window shows the tagged files and folders.
Work with Zip Files
macOS includes a compression tool that enables you to shrink files. Compression is especially useful for files you need to transfer across the Internet, place on a limited-capacity medium such as a USB drive, or archive for storage.
Using the Finder, you can compress a single file or multiple files. Compressing creates a compressed file in the widely used Zip format, often called a Zip file, that contains a copy of the files. The original files remain unchanged.
Work with Zip Files
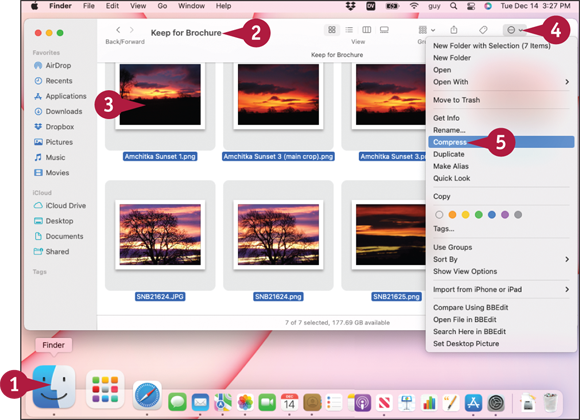
Compress Files to a Zip File
![]() Click Finder (
Click Finder (![]() ) on the Dock.
) on the Dock.
A Finder window opens.
![]() Click the folder that contains the file or files you want to compress.
Click the folder that contains the file or files you want to compress.
![]() Select the file or files.
Select the file or files.
![]() Click Action (
Click Action (![]() ).
).
The Action pop-up menu opens.
![]() Click Compress.
Click Compress.

![]() The compressed file appears in the folder.
The compressed file appears in the folder.
Note: If you selected one file, macOS gives the file the same name with the .zip extension. If you selected multiple files, macOS names the Zip file Archive.zip.
![]() Click the file and press
Click the file and press ![]() .
.
An edit box appears.
![]() Type the new name and press
Type the new name and press ![]() .
.
The file takes on the new name.
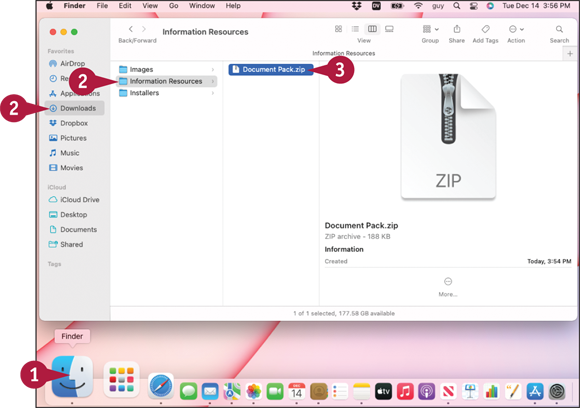
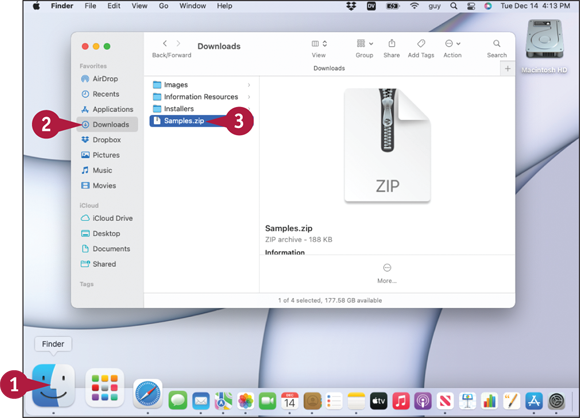
Extract Files from a Zip File
![]() Click Finder (
Click Finder (![]() ) on the Dock.
) on the Dock.
A Finder window opens.
![]() Click the folder that contains the Zip file.
Click the folder that contains the Zip file.
Note: If you receive the Zip file attached to an e-mail message, save the file as explained in Chapter 7.
![]() Double-click the Zip file.
Double-click the Zip file.

Archive Utility unzips the Zip file, creates a folder with the same name as the Zip file, and places the contents of the Zip file in it.
![]() Click the new folder to see the files extracted from the Zip file.
Click the new folder to see the files extracted from the Zip file.
Note: If you no longer need the Zip file now that you have extracted its contents, you can delete the Zip file.
Using the Trash
macOS provides a special folder called the Trash in which you can place files and folders you intend to delete. Like a real-world trash can, the Trash retains files until you actually empty it. So if you find you have thrown away a file that you need after all, you can recover the file from the Trash. The Trash icon appears at the right end of the Dock by default, giving you quick access to the Trash and an easy way to eject removable media, which you must remove from the macOS file system before physically disconnecting.
Using the Trash
Place a File in the Trash
![]() Click Finder (
Click Finder (![]() ) on the Dock.
) on the Dock.
A Finder window opens to your default folder or view.
![]() Click the folder that contains the file you want to throw in the Trash.
Click the folder that contains the file you want to throw in the Trash.
![]() Click the file you want to delete.
Click the file you want to delete.
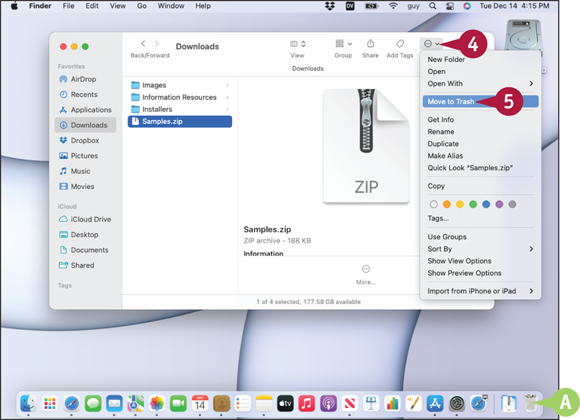
![]() Click Action (
Click Action (![]() ).
).
The Action pop-up menu opens.
![]() Click Move to Trash.
Click Move to Trash.
![]() The file disappears from the folder and moves to the Trash.
The file disappears from the folder and moves to the Trash.
Note: You can also place a file in the Trash by clicking and dragging it to the Trash icon on the Dock, or from the keyboard by clicking the file and then pressing ![]() +
+ ![]() .
.
Recover a File from the Trash
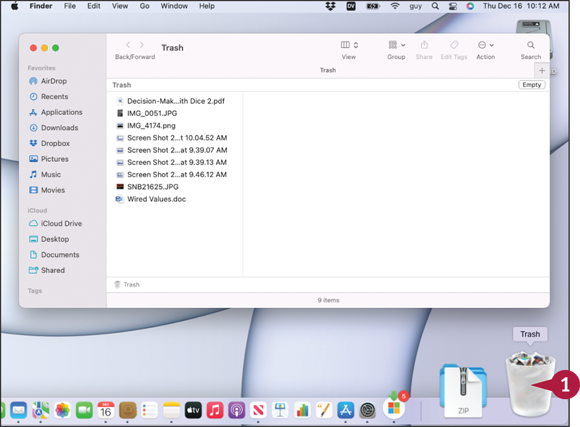
![]() Click Trash (
Click Trash (![]() ) on the Dock.
) on the Dock.
The Trash window opens.
Note: You can use Quick Look to examine a file in the Trash. For example, click the file and press ![]() to open the Quick Look window. However, you cannot open a file from the Trash; to open a file, you must first remove it from the Trash, putting it in either its original folder or another folder.
to open the Quick Look window. However, you cannot open a file from the Trash; to open a file, you must first remove it from the Trash, putting it in either its original folder or another folder.
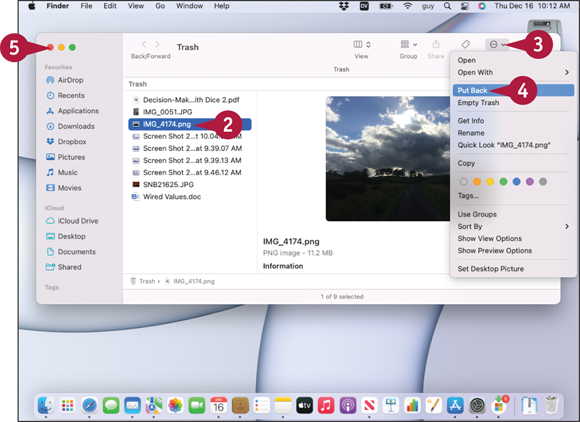
![]() Click the file you want to recover.
Click the file you want to recover.
![]() Click Action (
Click Action (![]() ).
).
The Action pop-up menu opens.
![]() Click Put Back.
Click Put Back.
The Finder restores the file to its previous folder.
Note: If you want to put the file in a different folder, drag it to that folder. For example, drag the file to the desktop.
![]() Click Close (
Click Close (![]() ) or press
) or press ![]() +
+ ![]() .
.
The Trash window closes.
Customize the Finder Toolbar
The toolbar that appears at the top of the Finder window contains buttons that you can use to access commands quickly and easily. For example, the various View buttons appear there along with the Action menu button. The Finder toolbar includes a useful set of buttons by default, but you can configure the toolbar so that it contains the buttons you use most frequently.
Customize the Finder Toolbar

![]() Click Finder (
Click Finder (![]() ) on the Dock.
) on the Dock.
A Finder window opens to your default folder or view.
![]() Click View.
Click View.
The View menu opens.
![]() Click Customize Toolbar.
Click Customize Toolbar.

The Customize Toolbar dialog opens.
![]() To add a button to the toolbar, drag it from the Customize Toolbar dialog and drop it on the toolbar where you want it to appear.
To add a button to the toolbar, drag it from the Customize Toolbar dialog and drop it on the toolbar where you want it to appear.
Note: You can click a button on the toolbar and drag it to a new position.
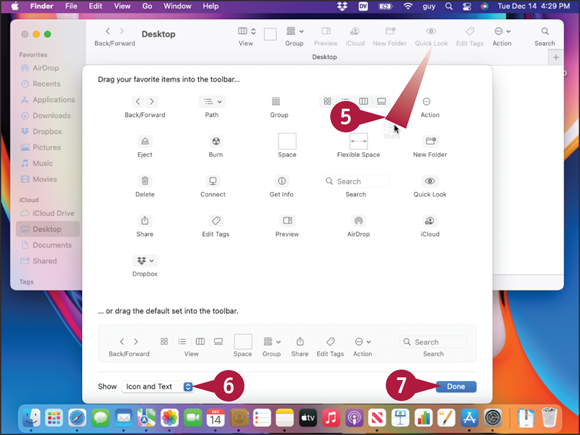
![]() If you need to restore the toolbar to its original state, click the … or drag the default set into the toolbar box and drag it to the toolbar.
If you need to restore the toolbar to its original state, click the … or drag the default set into the toolbar box and drag it to the toolbar.
The button appears on the toolbar.
![]() To remove a button from the toolbar, drag its icon from the toolbar into the Customize Toolbar dialog.
To remove a button from the toolbar, drag its icon from the toolbar into the Customize Toolbar dialog.
![]() Click Show (
Click Show (![]() ) and then click the appearance you want: Icon and Text, Icon Only, or Text Only.
) and then click the appearance you want: Icon and Text, Icon Only, or Text Only.
![]() Click Done.
Click Done.
The Customize Toolbar dialog closes.
The Finder toolbar appears in its customized form.
Customize the Sidebar
The sidebar on the left side of Finder windows gives you quick access to files, folders, and apps. You can customize the sidebar from its default contents to make it contain only the items you find most useful.
The sidebar contains four sections. Favorites are items you access frequently. iCloud includes your iCloud Drive, plus your Desktop folder and Documents folder if you choose to store these in iCloud. Locations include your MacBook, hard disks, external disks and optical drives, computers running the Bonjour sharing protocol, and connected servers. Tags shows your list of tags for identifying and accessing items.
Customize the Sidebar

![]() Click Finder (
Click Finder (![]() ) on the Dock.
) on the Dock.
A Finder window opens to your default folder or view.
Note: If the sidebar does not appear, click View and then click Show Sidebar. Alternatively, press ![]() +
+ ![]() +
+ ![]() .
.
![]() Optionally, move the pointer over the border of the sidebar, and then drag to change the width.
Optionally, move the pointer over the border of the sidebar, and then drag to change the width.
![]() Click the folder that contains the item you want to add to the sidebar.
Click the folder that contains the item you want to add to the sidebar.
![]() Click the item you want to add.
Click the item you want to add.

![]() Click File.
Click File.
The File menu opens.
![]() Click Add to Sidebar.
Click Add to Sidebar.

The item appears at the bottom of the sidebar.
![]() Optionally, click the item and drag it to a different position on the sidebar.
Optionally, click the item and drag it to a different position on the sidebar.
The item appears in its new position.

![]() To remove an item from the sidebar, press
To remove an item from the sidebar, press ![]() + click the item.
+ click the item.
The contextual menu opens.
![]() Click Remove from Sidebar.
Click Remove from Sidebar.
Configure Finder Preferences
The Finder is the application that controls the macOS desktop, how files and folders are managed, and many other aspects of the way your MacBook operates. Like most applications, the Finder has a set of preferences you can configure to change the way it looks and works. You change Finder preferences using its Preferences command. The Preferences window has several tabs that you use to configure specific aspects of how the Finder looks and behaves.
Configure Finder Preferences

![]() Click the desktop.
Click the desktop.
The Finder becomes active.
![]() Click Finder.
Click Finder.
The Finder menu opens.
![]() Click Preferences.
Click Preferences.
The Finder Preferences window opens.
![]() Click General (
Click General (![]() ).
).
The General tab appears.
![]() In the Show These Items on the Desktop list, select (
In the Show These Items on the Desktop list, select (![]() ) each item you want to appear on the desktop.
) each item you want to appear on the desktop.
![]() Click New Finder windows show (
Click New Finder windows show (![]() ) and select the default location for new Finder windows, such as Documents.
) and select the default location for new Finder windows, such as Documents.
![]() Select Open folders in tabs instead of new windows (
Select Open folders in tabs instead of new windows (![]() ) if you want each folder to open in a new tab in the current window rather than in a new window.
) if you want each folder to open in a new tab in the current window rather than in a new window.
![]() Click Sidebar (
Click Sidebar (![]() ).
).

The Sidebar tab appears.
Note: The Sidebar tab in Finder preferences displays the default list of items for the sidebar. To add or remove individual locations or files, use the technique explained in the previous section.
![]() Select (
Select (![]() ) each item you want the sidebar to show.
) each item you want the sidebar to show.
![]() Deselect (
Deselect (![]() ) each item you want to remove from the sidebar.
) each item you want to remove from the sidebar.
![]() Click Advanced (
Click Advanced (![]() ).
).

The Advanced tab appears.
![]() Select (
Select (![]() ) Show all filename extensions to make the Finder always display all filename extensions.
) Show all filename extensions to make the Finder always display all filename extensions.
![]() Select (
Select (![]() ) Show warning before changing an extension to receive a warning when you change a filename extension. This is normally helpful.
) Show warning before changing an extension to receive a warning when you change a filename extension. This is normally helpful.
![]() Select (
Select (![]() ) Show warning before removing from iCloud Drive to receive a warning when you move a file so that it will no longer be synced by iCloud Drive.
) Show warning before removing from iCloud Drive to receive a warning when you move a file so that it will no longer be synced by iCloud Drive.
![]() Select (
Select (![]() ) Show warning before emptying the Trash to confirm emptying the Trash.
) Show warning before emptying the Trash to confirm emptying the Trash.
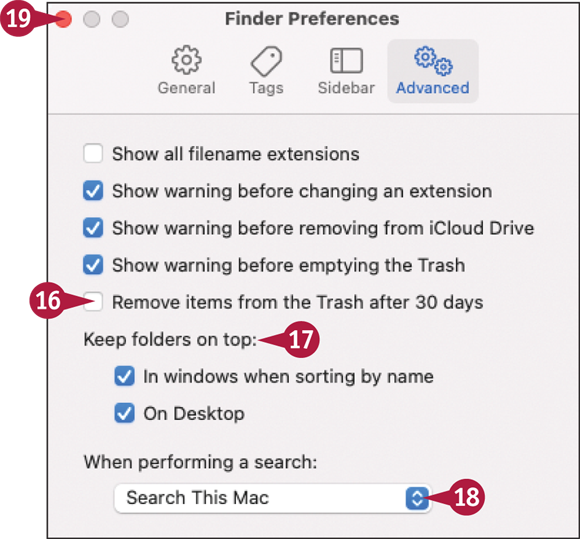
![]() Select (
Select (![]() ) Remove items from the Trash after 30 days if you want macOS to delete items automatically after 30 days.
) Remove items from the Trash after 30 days if you want macOS to delete items automatically after 30 days.
![]() In the Keep Folders on Top area, select (
In the Keep Folders on Top area, select (![]() ) each check box if you want folders to remain at the top of windows when sorting items by name or on the Desktop.
) each check box if you want folders to remain at the top of windows when sorting items by name or on the Desktop.
![]() Click When performing a search (
Click When performing a search (![]() ) and then click Search This Mac, Search the Current Folder, or Use the Previous Search Scope, as needed.
) and then click Search This Mac, Search the Current Folder, or Use the Previous Search Scope, as needed.
![]() Click Close (
Click Close (![]() ).
).