
CHAPTER 3
Sharing Your MacBook with Others
macOS makes it easy to share your MacBook with other people. Each user needs a separate user account for documents, e-mail, and settings.
Configure Your MacBook for Multiple Users
Share Your MacBook with Fast User Switching
Turn On Screen Time and Set Downtime
Set Time Limits for Apps and Websites
Make Apps Always Available to a User
Create a User Account
A user account is a group of settings that controls what a user can do in macOS. By creating a separate user account for each person who uses your MacBook regularly, you enable users to have their own folders for files and to use the settings they prefer. You can also use the Screen Time feature to limit and monitor the actions a child user can take.
When initially setting up your MacBook, you create an administrator account that you can use to configure macOS. You can also create a nonadministrator account for yourself for day-to-day use.
Create a User Account
![]() While logged in using your administrator account, press
While logged in using your administrator account, press ![]() + click System Preferences (
+ click System Preferences (![]() ) on the Dock.
) on the Dock.
The contextual menu opens.
![]() Click Users & Groups.
Click Users & Groups.
The System Preferences window opens.
The Users & Groups pane appears.
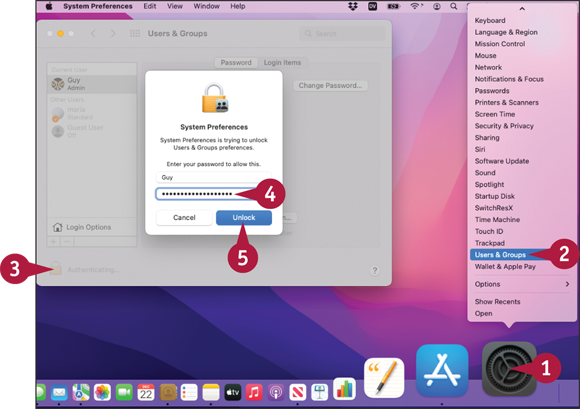
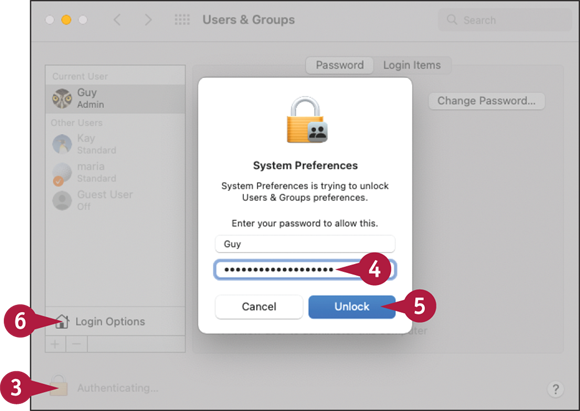
![]() Click the lock icon (
Click the lock icon (![]() ) to unlock System Preferences.
) to unlock System Preferences.
System Preferences prompts you to enter your password.
![]() Type your password.
Type your password.
![]() Click Unlock.
Click Unlock.
![]() System Preferences unlocks the preferences (
System Preferences unlocks the preferences (![]() changes to
changes to ![]() ).
).
![]() Click Add (
Click Add (![]() ).
).
The New Account dialog opens.
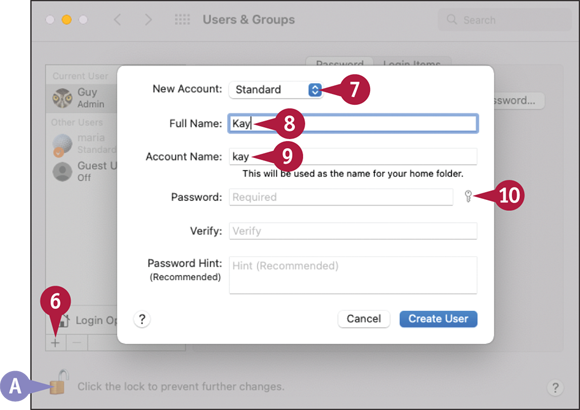
![]() Click New Account (
Click New Account (![]() ) and then click Standard.
) and then click Standard.
![]() In the Full Name box, type the user’s name, such as Kay or Kay Renner.
In the Full Name box, type the user’s name, such as Kay or Kay Renner.
![]() If necessary, adjust the default account name that macOS derives from the user’s name.
If necessary, adjust the default account name that macOS derives from the user’s name.
![]() Click Password Assistant (
Click Password Assistant (![]() ).
).

The Password Assistant dialog opens.
![]() Click Type (
Click Type (![]() ) and click the type, such as Letters & Numbers.
) and click the type, such as Letters & Numbers.
![]() Drag the Length slider to set the password length.
Drag the Length slider to set the password length.
![]() Click Suggestion (
Click Suggestion (![]() ) and then click a suggested password.
) and then click a suggested password.
![]() The password appears in the Password box and the Verify box.
The password appears in the Password box and the Verify box.
![]() Optionally, type a password hint. See the second tip for details.
Optionally, type a password hint. See the second tip for details.
![]() Click Create User.
Click Create User.

The New Account dialog closes.
![]() The new account appears in the Other Users list.
The new account appears in the Other Users list.
![]() You can click the default profile picture and then select a new profile picture or create a Memoji character, a 3-D avatar.
You can click the default profile picture and then select a new profile picture or create a Memoji character, a 3-D avatar.
![]() Click System Preferences.
Click System Preferences.
The System Preferences menu opens.
![]() Click Quit System Preferences.
Click Quit System Preferences.
The System Preferences app closes.
Configure Your MacBook for Multiple Users
As well as letting any user log in individually from the login screen, macOS includes a feature called Fast User Switching that enables multiple users to remain logged in to your MacBook at the same time. After you enable Fast User Switching, another user can log in either directly from your macOS session or from the login screen. Your macOS session keeps running in the background, ready for you to resume it.
You can also enable the Guest User account to give a visitor temporary use of your MacBook without creating a dedicated account.
Configure Your MacBook for Multiple Users

![]() Press
Press ![]() + click System Preferences (
+ click System Preferences (![]() ) on the Dock.
) on the Dock.
Note: You can click Apple (![]() ) and then click System Preferences to open the System Preferences window. Then click Users & Groups (
) and then click System Preferences to open the System Preferences window. Then click Users & Groups (![]() ) to display the Users & Groups pane.
) to display the Users & Groups pane.
The contextual menu opens.
![]() Click Users & Groups.
Click Users & Groups.
The System Preferences app opens and displays the Users & Groups pane at the front.
![]() Click the lock icon (
Click the lock icon (![]() ).
).
System Preferences displays a dialog asking you to type your password.
Note: If you are using a standard account or managed account, the dialog prompts you to enter an administrator name and password.
![]() Type your password.
Type your password.
![]() Click Unlock.
Click Unlock.
System Preferences unlocks the preferences (![]() changes to
changes to ![]() ).
).
![]() Click Login Options.
Click Login Options.
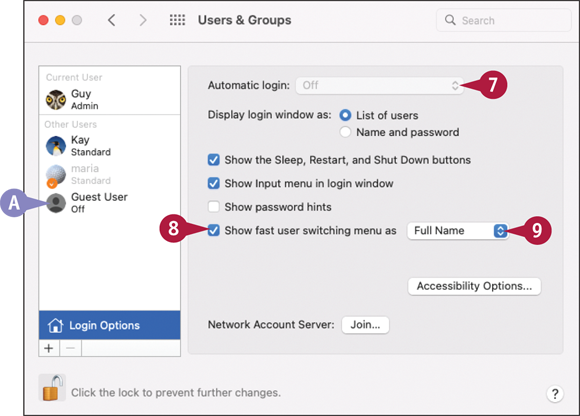
The Login Options pane appears.
![]() If Automatic Login is available, click Automatic login (
If Automatic Login is available, click Automatic login (![]() ) and click Off to ensure that whoever logs in must use their own user account.
) and click Off to ensure that whoever logs in must use their own user account.
![]() Select Show fast user switching menu as (
Select Show fast user switching menu as (![]() ).
).
![]() Click Show fast user switching menu as (
Click Show fast user switching menu as (![]() ).
).
![]() Guest User is a special account you can use to enable someone to use your MacBook temporarily without creating a dedicated account.
Guest User is a special account you can use to enable someone to use your MacBook temporarily without creating a dedicated account.
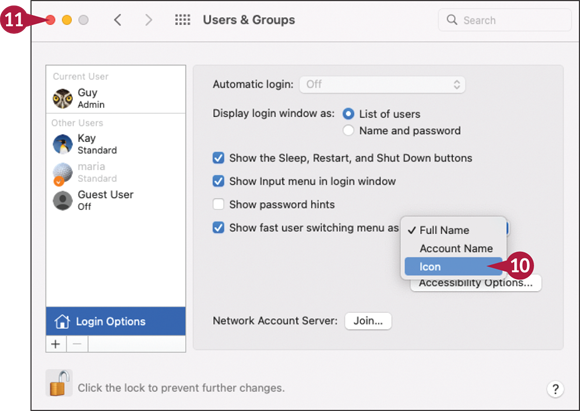
![]() Click Full Name to show usernames, click Account Name to show account names, or click Icon to show icons.
Click Full Name to show usernames, click Account Name to show account names, or click Icon to show icons.
Fast User Switching is now enabled.
![]() Click Close (
Click Close (![]() ).
).
The System Preferences window closes.
Note: Fast User Switching uses more memory and resources, so it can make your MacBook run more slowly. If your MacBook runs too slowly, try turning Fast User Switching off. For some MacBook models, you may also be able to add RAM to improve performance.
Share Your MacBook with Fast User Switching
With Fast User Switching enabled, multiple users can remain logged in to macOS on your MacBook. Only one user can use the keyboard, trackpad, and screen at any given time, but each other user’s computing session keeps running in the background, with all their applications still open.
macOS automatically stops multimedia playing when you switch users. For example, if another user is still playing music in iTunes when you switch to your user account, iTunes stops playing the music.
Share Your MacBook with Fast User Switching
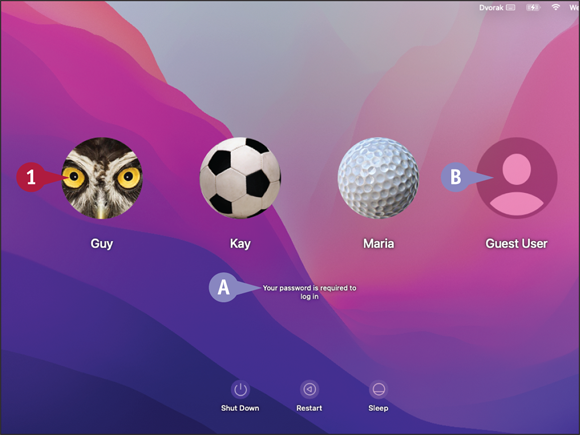
Log In to the MacBook
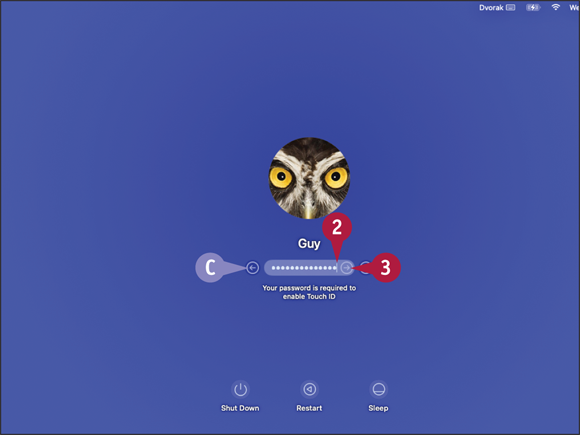
Note: You can also log in using Touch ID by placing one of your registered fingertips on the fingerprint scanner. You do not need to click your username or icon first.
Note: To scroll the list left or right, swipe left or right with two fingers on the trackpad.
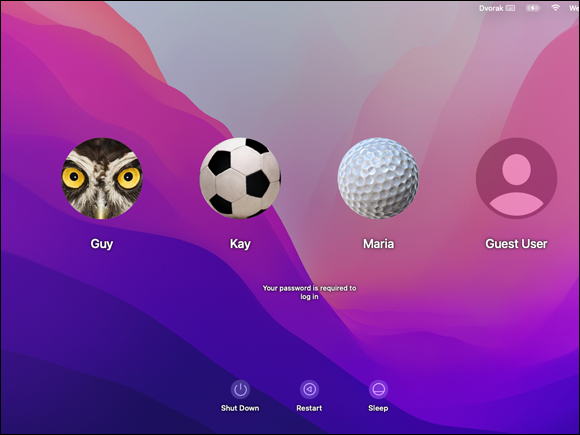
![]() If the message Your password is required to log in appears, you cannot use Touch ID.
If the message Your password is required to log in appears, you cannot use Touch ID.
![]() On the login window, click your username or icon.
On the login window, click your username or icon.
![]() If you have enabled the Guest User account, a guest can click Guest User to log in.
If you have enabled the Guest User account, a guest can click Guest User to log in.
macOS prompts you for your password.
![]() You can click Back (
You can click Back (![]() ) to return to the login window if you need to log in using a different account.
) to return to the login window if you need to log in using a different account.
![]() Type your password.
Type your password.
![]() Click Log In (
Click Log In (![]() ) or press
) or press ![]() .
.
Your desktop appears.
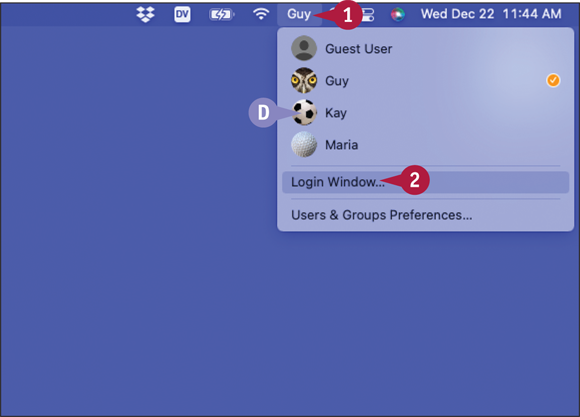
Display the Login Window
![]() When you are ready to stop using the MacBook but do not want to log out, click your name, account name, or icon on the menu bar.
When you are ready to stop using the MacBook but do not want to log out, click your name, account name, or icon on the menu bar.
The Fast User Switching menu opens.
![]() You — or another user — can click the user’s name to log in that user.
You — or another user — can click the user’s name to log in that user.
![]() Click Login Window.
Click Login Window.
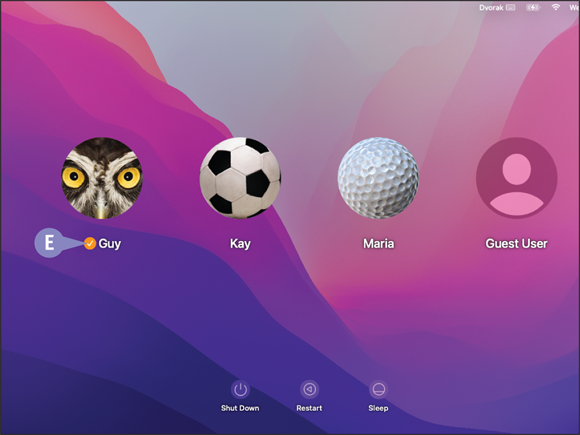
The login window appears.
![]() Your username shows a check mark icon (
Your username shows a check mark icon (![]() ), indicating that you have a session open.
), indicating that you have a session open.
Any of the MacBook’s users can log in by clicking their username or by placing their registered Touch ID finger on the fingerprint scanner.
Set Up Family Sharing
The Family Sharing feature lets you share purchases from the iTunes Store, the App Store, and the Apple Books service with your family members. You can also share an iCloud storage plan; subscriptions to Apple services, such as Apple Music, Apple TV, Apple Arcade, and Apple News + ; and other items, such as a photo album and a family calendar. Family Sharing also enables family members to find each other’s devices by using the Find My app.
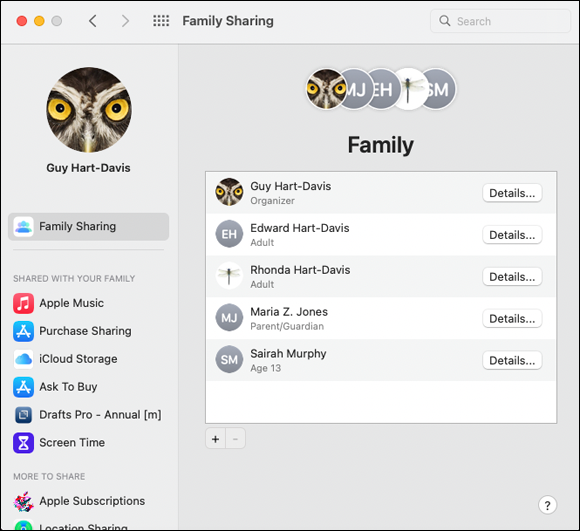
Understanding How Family Sharing Works
The Family Sharing group consists of one organizer plus up to five family members. This section assumes that you are the organizer. The family members can be either adults or children.
Each family member must have an Apple ID, an e-mail address and password credential used to identify users to Apple services. Any family member aged 13 or older who does not yet have an Apple ID can create one online at https://appleid.apple.com or by using various mechanisms built into macOS, iOS, and iPadOS. You, the organizer, can create an Apple ID for a family member younger than 13.
You add the family members to Family Sharing by using their Apple IDs. You can either send an invitation via e-mail or, if the family member is present, have them enter their Apple ID details on a device you use for administering Family Sharing, such as your MacBook.
You can administer Family Sharing on a Mac, on an iPad, on an iPhone, or on an iPod touch.
For the services shared with family members, you can specify which members can purchase items, such as songs and movies, without restriction and which members need your approval. You can designate adult family members as parents/guardians who can approve requests to purchase content.
Access the Family Sharing Controls
You access the Family Sharing controls via the Family Sharing preferences pane in the System Preferences app. The quick way to open the Family Sharing preferences pane is to ![]() + click System Preferences (
+ click System Preferences (![]() ) on the Dock and then click Family Sharing on the contextual menu. Alternatively, click Apple (
) on the Dock and then click Family Sharing on the contextual menu. Alternatively, click Apple (![]() ) and then System Preferences to open the System Preferences window, and then click Family Sharing (
) and then System Preferences to open the System Preferences window, and then click Family Sharing (![]() ).
).
Add a Person to Family Sharing

To add a person to Family Sharing, click Add (![]() ) in the Family category of the Family Sharing preferences pane. In the Invite People to Your Family dialog, you can either add a person who has an Apple ID or set up a new Apple ID for a child who does not yet have one.
) in the Family category of the Family Sharing preferences pane. In the Invite People to Your Family dialog, you can either add a person who has an Apple ID or set up a new Apple ID for a child who does not yet have one.
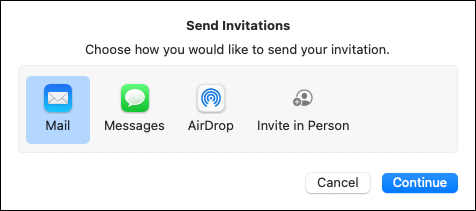
For a person with an Apple ID, click Invite People. In the Send Invitations dialog that opens, click Mail (![]() ), Messages (
), Messages (![]() ), AirDrop (
), AirDrop (![]() ), or Invite in Person (
), or Invite in Person (![]() ), as needed. Click Continue, and then follow the prompts to identify the person and send the invitation.
), as needed. Click Continue, and then follow the prompts to identify the person and send the invitation.
For a child without an Apple ID, click Create Child Account in the Invite People to Your Family dialog. Follow the prompts for authenticating yourself, providing the information needed to set up the child’s account; and accepting terms and conditions, such as the Parental Consent Terms and Conditions.
Configure Ask to Buy for a Family Member
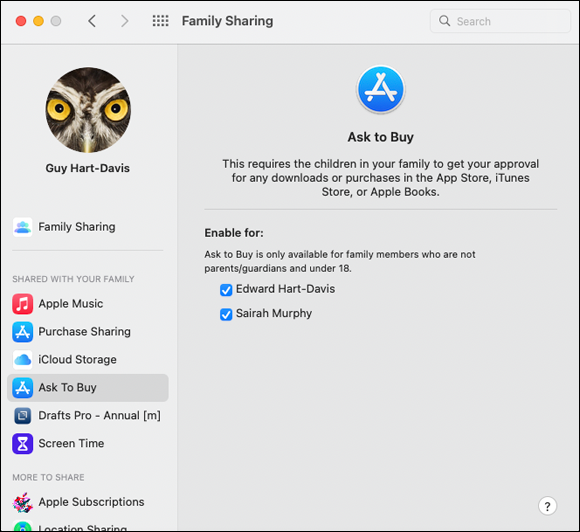
To control whether a family member needs permission to purchase items and services from Apple, you configure the Ask to Buy setting. In the Family Sharing preferences pane, click Ask to Buy (![]() ) to display the Ask to Buy controls. In the Enable For list, select (
) to display the Ask to Buy controls. In the Enable For list, select (![]() ) or deselect (
) or deselect (![]() ) the check box for each family member who appears, as needed.
) the check box for each family member who appears, as needed.
If you turn on the Ask to Buy feature for some of your family members, you as the organizer will receive notifications of their requests to buy items. You may want to designate some adult family members as parents/guardians who can approve or deny such requests.
After setting up Family Sharing, you can use the Screen Time feature to apply restrictions to what child family members can do on Macs, iPads, and iOS devices on which they sign in using their Apple ID. The following sections explain how you can set “downtime” for a user, set limits on app and website usage, and apply content restrictions.
Designate an Adult Family Member as a Parent/Guardian
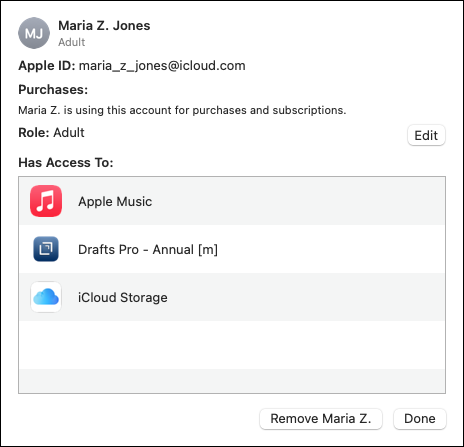

You can designate an adult family member as a parent/guardian who can approve or deny purchases from the services you enable in Family Sharing. In the Family Sharing preferences pane, click the Family Sharing category in the left pane to display the list of family members, and then click Details on the row for the family member you want to make a parent/guardian. In the dialog that opens, click Edit to display the Family Roles dialog. Click Parent/guardian (![]() changes to
changes to ![]() ), click Done to close the Family Roles dialog, and then click Done in the previous dialog.
), click Done to close the Family Roles dialog, and then click Done in the previous dialog.
Remove a Person from Family Sharing

To remove a person aged 13 or older from Family Sharing, click the person’s name in the Family Sharing category in the Family Sharing pane, and then click Details. In the dialog that opens, click Remove Person. In the Remove Person from Family? dialog that appears next, click Remove Person.
Once you have added a child younger than 13 to Family Sharing, you cannot remove them from your family except by transferring them to another family. To transfer a child, the organizer of another family group must request the transfer. You, the organizer of your family group, receive a notification of the requested transfer, which you then approve to effect the transfer.
Set Up the Services Available in Family Sharing
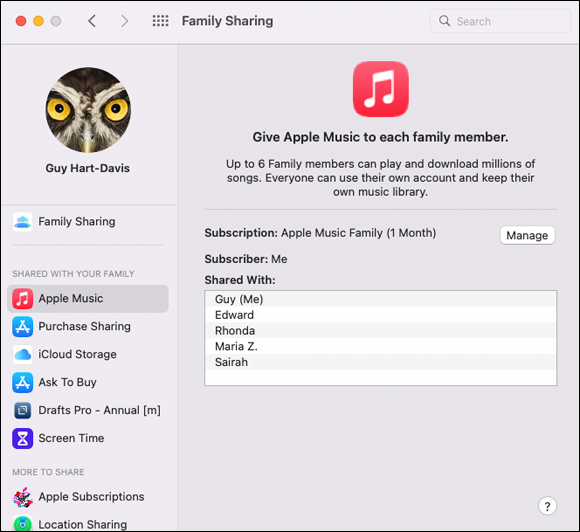
Once you have added your family members and designated any parents/guardians needed, set up the services available to the family members through Family Sharing. Click each item — such as Purchase Sharing (![]() ), iCloud Storage (
), iCloud Storage (![]() ), Location Sharing (
), Location Sharing (![]() ), and Apple Music (
), and Apple Music (![]() ) — in turn, and use the controls that appear to set up the services you want to share with your family members.
) — in turn, and use the controls that appear to set up the services you want to share with your family members.
Approve a Purchase


When a family member who does not have authority to make purchases tries to buy an item, the macOS app involved prompts them to ask permission to make the purchase. If the family member clicks Ask, macOS sends a notification to the organizer and to each parent/guardian. The organizer or parent/guardian can review the purchase and click Decline to refuse it, click Buy to authorize payment for an item, or click Get to authorize a free item.
Turn On Screen Time and Set Downtime
The Screen Time feature in macOS, iOS, and iPadOS enables you to track how much time a person spends using their devices. You can use Screen Time to monitor your own usage and set limits on it, such as enforcing “downtime,” but you may find it more useful for monitoring and setting limits on what other family members do.
Once you have enabled Family Sharing, you can manage Screen Time through Family Sharing using either the same Mac, iPad, or iOS device that a family member uses or a different Mac or device.
Turn On Screen Time and Set Downtime

![]() Press
Press ![]() + click System Preferences (
+ click System Preferences (![]() ) on the Dock.
) on the Dock.
The contextual menu opens.
![]() Click Screen Time.
Click Screen Time.
The System Preferences app opens and displays the Screen Time pane at the front.
Note: The first time you access the Screen Time settings, macOS displays an informational dialog. Read the contents and click Continue.
![]() Click the pop-up menu (
Click the pop-up menu (![]() ) and then click the user for whom you want to turn on Screen Time.
) and then click the user for whom you want to turn on Screen Time.
![]() Click Options (
Click Options (![]() ).
).
The Options screen appears.
![]() Click Turn On.
Click Turn On.

Other controls appear in the Screen Time pane.
![]() Select Include Website Data (
Select Include Website Data (![]() ) to make Screen Time monitor the user’s web activity.
) to make Screen Time monitor the user’s web activity.
![]() Select Use Screen Time Passcode (
Select Use Screen Time Passcode (![]() ).
).
A dialog opens, prompting you to set a Screen Time passcode.
![]() Type a four-digit passcode, and then type it again when prompted.
Type a four-digit passcode, and then type it again when prompted.
The dialog closes.
![]() Click Downtime (
Click Downtime (![]() ).
).

The Downtime pane appears.
![]() Click Turn On.
Click Turn On.
The Turn Off button replaces the Turn On button.
![]() If you want to apply the same downtime hours for each day, click Every Day (
If you want to apply the same downtime hours for each day, click Every Day (![]() changes to
changes to ![]() ), and then set the hours. If you want to set different hours for different days, click Custom (
), and then set the hours. If you want to set different hours for different days, click Custom (![]() changes to
changes to ![]() ).
).

![]() If you click Custom, use the controls to specify the downtime schedule. Click to deselect (
If you click Custom, use the controls to specify the downtime schedule. Click to deselect (![]() ) the check box for any day on which you do not want to use downtime. For each other day, use the time controls to set the hours for downtime — for example, from 9:00 PM on Sunday to 7:00 AM on Monday.
) the check box for any day on which you do not want to use downtime. For each other day, use the time controls to set the hours for downtime — for example, from 9:00 PM on Sunday to 7:00 AM on Monday.
![]() Select Block At Downtime (
Select Block At Downtime (![]() ) if you want to block the user from using devices when downtime starts.
) if you want to block the user from using devices when downtime starts.
Now that Screen Time is enabled, you can configure other aspects of it, as explained in the following sections.
Set Time Limits for Apps and Websites
Screen Time enables the Family Sharing organizer to set time limits for a child’s use of apps and websites. These limits apply to all the devices with which the child uses their Apple ID for Screen Time. For example, you might allow the child only a short time for games but allow a longer time for apps in the Creativity category.
You can use the App Limits controls, like the other Screen Time controls, to set limits for your own account if you want.
Set Time Limits for Apps and Websites

![]() Press
Press ![]() + click System Preferences (
+ click System Preferences (![]() ) on the Dock to open the contextual menu.
) on the Dock to open the contextual menu.
![]() Click Screen Time.
Click Screen Time.
The System Preferences app opens and displays the Screen Time pane at the front.
![]() Click the pop-up menu (
Click the pop-up menu (![]() ) and then click the user for whom you want to configure app limits.
) and then click the user for whom you want to configure app limits.
![]() Click App Limits (
Click App Limits (![]() ).
).
The App Limits category appears.
![]() Click Turn On, and then type the Screen Time passcode if prompted to do so.
Click Turn On, and then type the Screen Time passcode if prompted to do so.
Screen Time enables the App Limits controls.
![]() Click Add (
Click Add (![]() ).
).

The Create a New App Limit dialog opens.
![]() You can click Search (
You can click Search (![]() ) and type a search term.
) and type a search term.
![]() You can select All Apps & Categories (
You can select All Apps & Categories (![]() ) to set time limits for all apps and categories in one move.
) to set time limits for all apps and categories in one move.
![]() You can select an app category (
You can select an app category (![]() ) to affect all apps in the category.
) to affect all apps in the category.
![]() Click Expand (
Click Expand (![]() changes to
changes to ![]() ).
).
The app category expands.
![]() Select the check box (
Select the check box (![]() ) for the app.
) for the app.
![]() In the Time area, either click Every Day (
In the Time area, either click Every Day (![]() changes to
changes to ![]() ) and click the spin buttons (
) and click the spin buttons (![]() ) to set the same time limit for each day, or click Custom (
) to set the same time limit for each day, or click Custom (![]() changes to
changes to ![]() ) to customize the schedule.
) to customize the schedule.

Note: Screen Time records the length of time an app is open, regardless of whether the app is being actively used. This blunt measurement method makes it difficult to set effective time limits, because users typically run multiple apps at once and switch among them as needed.
![]() If you clicked Custom, click Edit.
If you clicked Custom, click Edit.
The Daily Time Limit dialog opens.
![]() Set the time limit for each day.
Set the time limit for each day.
Note: The Daily Time Limit dialog does not let you set a limit of 0 hours 0 minutes for a day, but you can set 0 hours 1 minute, if necessary.
![]() Click Done.
Click Done.

The Daily Time Limit dialog closes.
![]() To set daily time limits for websites, click Expand (
To set daily time limits for websites, click Expand (![]() changes to
changes to ![]() ) next to Websites.
) next to Websites.
The Websites category opens.
![]() Click Add Website (
Click Add Website (![]() ).
).
An edit box opens.
![]() Type the website’s address, such as www.wiley.com, and press
Type the website’s address, such as www.wiley.com, and press ![]() .
.
![]() In the Time area, either click Every Day (
In the Time area, either click Every Day (![]() changes to
changes to ![]() ) and click the spin buttons (
) and click the spin buttons (![]() ) to set the same time limit for each day, or click Custom (
) to set the same time limit for each day, or click Custom (![]() changes to
changes to ![]() ) and click Edit to create a custom schedule.
) and click Edit to create a custom schedule.
![]() Select Block at end of limit (
Select Block at end of limit (![]() ) if you want to block the apps when the user reaches the time limit.
) if you want to block the apps when the user reaches the time limit.
![]() Click Done.
Click Done.
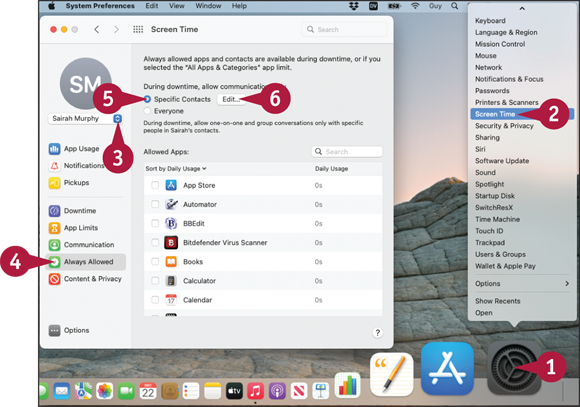
Make Apps Always Available to a User
The Always Allowed feature in Screen Time enables you to make specific apps always available for a user to use even during downtime. You can use Always Allowed to make sure the user always has those communications apps and features they need to stay in contact and stay safe. You may also want to provide productivity and creativity apps for the user to use when they are blocked from entertainment apps, social networking, and other time sinks.
Make Apps Always Available to a User
![]() Press
Press ![]() + click System Preferences (
+ click System Preferences (![]() ) on the Dock to open the contextual menu.
) on the Dock to open the contextual menu.
![]() Click Screen Time.
Click Screen Time.
The System Preferences app opens and displays the Screen Time pane at the front.
![]() Click the pop-up menu (
Click the pop-up menu (![]() ) and then click the user for whom you want to configure app limits.
) and then click the user for whom you want to configure app limits.
![]() Click Always Allowed (
Click Always Allowed (![]() ).
).
The Always Allowed category appears.
![]() In the During Downtime, Allow Communication With area, click Specific Contacts (
In the During Downtime, Allow Communication With area, click Specific Contacts (![]() changes to
changes to ![]() ) or Everyone (
) or Everyone (![]() changes to
changes to ![]() ).
).
![]() If you choose Specific Contacts, click Edit.
If you choose Specific Contacts, click Edit.
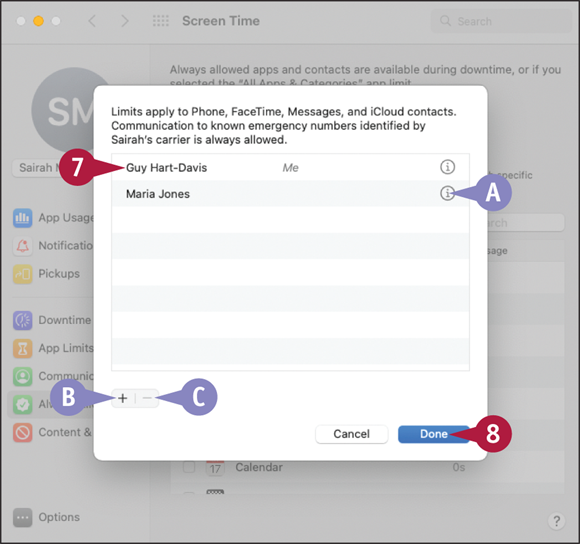
The Choose Specific Contacts dialog opens.
![]() Check that the list of contacts is appropriate and complete.
Check that the list of contacts is appropriate and complete.
![]() You can click Info (
You can click Info (![]() ) to display and edit the contact’s information.
) to display and edit the contact’s information.
![]() You can click Add (
You can click Add (![]() ) to start adding a contact.
) to start adding a contact.
![]() You can select a contact and click Remove (
You can select a contact and click Remove (![]() ) to remove them.
) to remove them.
![]() Click Done.
Click Done.

The Choose Specific Contacts dialog closes.
![]() You can click Search (
You can click Search (![]() ) and type a search term to find an app quickly.
) and type a search term to find an app quickly.
![]() To make the list of apps easier to navigate, click Sort by (
To make the list of apps easier to navigate, click Sort by (![]() ).
).
The Sort By pop-up menu opens.
![]() Click Sort by Daily Usage or Sort by Name — whichever you will find better.
Click Sort by Daily Usage or Sort by Name — whichever you will find better.
Note: The Sort by State option sorts the apps by whether they are allowed or not, putting the allowed apps at the top of the list.

Screen Time reorders the list in the order you chose.
![]() Select each app (
Select each app (![]() ) you want to make always available to the user.
) you want to make always available to the user.
Apply Content and Privacy Restrictions
The Content & Privacy category in Screen Time enables you to choose settings to limit the content a user can access online. After turning on Content & Privacy Restrictions, you can choose settings on the Content tab, the Stores tab, the Apps tab, and the Other tab of the Content & Privacy category.
The Content tab includes controls for limiting access to web content. You can either set Safari to limit access to adult websites or allow a user access to only the websites on an approved list.
Apply Content and Privacy Restrictions
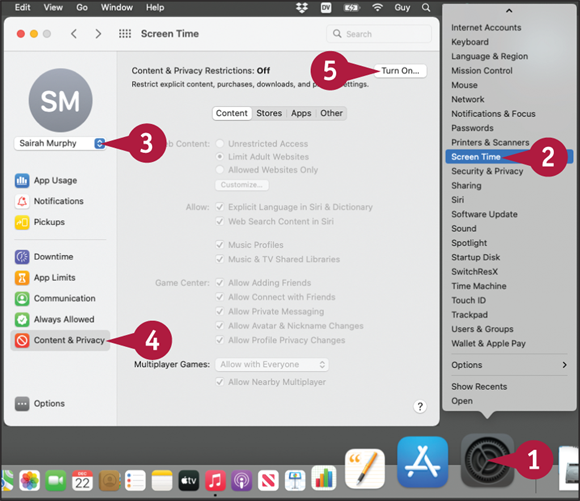
Display the Content & Privacy Pane and Enable Restrictions
![]() Press
Press ![]() + click System Preferences (
+ click System Preferences (![]() ) on the Dock.
) on the Dock.
The contextual menu opens.
![]() Click Screen Time.
Click Screen Time.
The System Preferences app opens and displays the Screen Time pane at the front.
![]() Click the pop-up menu (
Click the pop-up menu (![]() ) and then click the user for whom you want to configure Content & Privacy settings.
) and then click the user for whom you want to configure Content & Privacy settings.
![]() Click Content & Privacy (
Click Content & Privacy (![]() ).
).
The Content & Privacy category appears.
![]() Click Turn On, and then type the Screen Time passcode if prompted to do so.
Click Turn On, and then type the Screen Time passcode if prompted to do so.
Screen Time enables the Content & Privacy Restrictions controls.
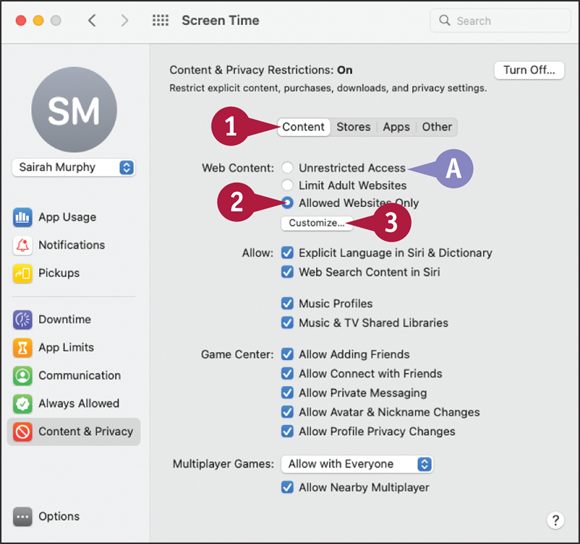
Allow Access to Only Specific Websites
![]() Click Content.
Click Content.
The Content tab appears.
![]() Click Unrestricted Access (
Click Unrestricted Access (![]() changes to
changes to ![]() ) if you want to impose no restrictions on the user’s access to websites. Normally, this is not wise for a child.
) if you want to impose no restrictions on the user’s access to websites. Normally, this is not wise for a child.
![]() Click Allowed Websites (
Click Allowed Websites (![]() changes to
changes to ![]() ).
).
![]() Click Customize.
Click Customize.
Note: When you permit a user to visit only certain websites, those sites appear on the Bookmarks bar in Safari.
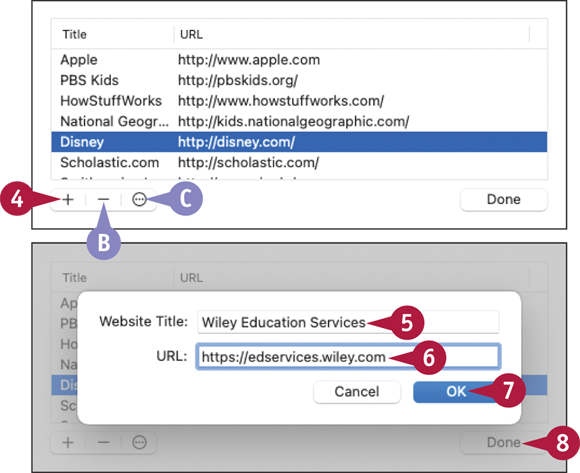
A dialog opens, showing a prepopulated list of child-friendly websites.
![]() You can click Remove (
You can click Remove (![]() ) to remove the selected website.
) to remove the selected website.
![]() You can click Settings (
You can click Settings (![]() ) to change the display name or address for the selected website.
) to change the display name or address for the selected website.
![]() Click Add (
Click Add (![]() ).
).
A dialog opens for adding a website.
![]() Type the name under which you want to list the website.
Type the name under which you want to list the website.
![]() Type or paste the website address.
Type or paste the website address.
![]() Click OK to close the second dialog.
Click OK to close the second dialog.
Note: You can now add other websites, as needed.
![]() Click Done to close the first dialog.
Click Done to close the first dialog.
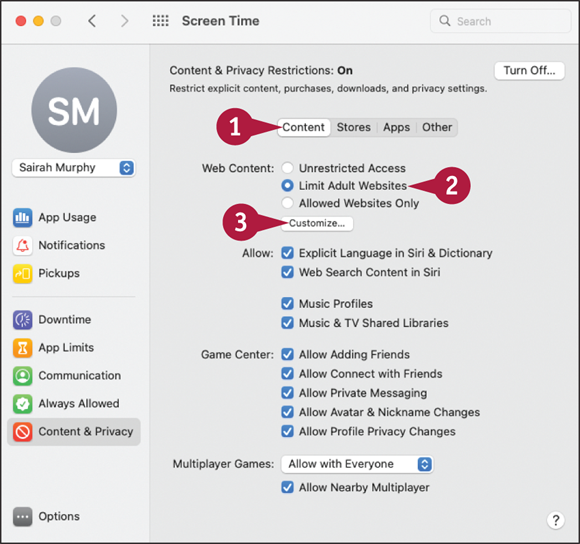
Specify Allowed and Blocked Sites
![]() Click Content.
Click Content.
The Content tab appears.
![]() Click Limit Adult Websites (
Click Limit Adult Websites (![]() changes to
changes to ![]() ).
).
![]() Click Customize.
Click Customize.
Apart from controlling website access, the Content tab of the Content & Privacy category also enables you to choose whether to allow explicit language in Siri and the Dictionary app, web search content in Siri, music profiles — artist information — in the Music app, multiplayer games in Game Center, and the ability to add friends in Game Center.
On the Stores tab, you can choose ratings limits for movies, TV shows, and apps; restrict explicit books, music, podcasts, and news; set app restrictions on iOS and iPadOS; and require a password for every purchase on Apple’s stores and services.
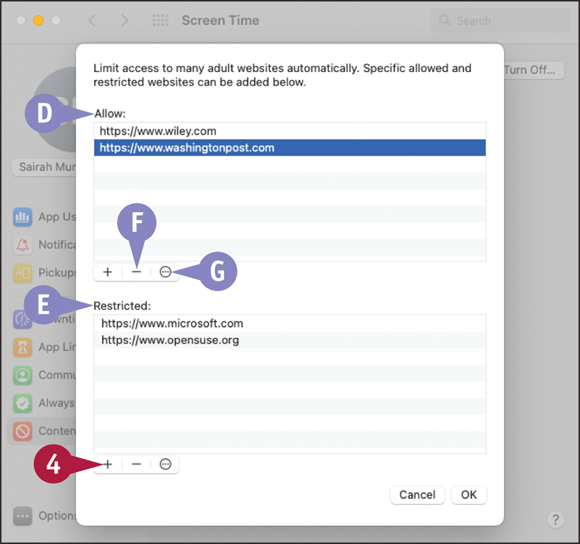
A dialog opens.
![]() The Allow list box shows allowed websites.
The Allow list box shows allowed websites.
![]() The Restricted list box shows restricted — blocked — websites.
The Restricted list box shows restricted — blocked — websites.
![]() You can click Remove (
You can click Remove (![]() ) to remove the selected website.
) to remove the selected website.
![]() You can click Settings (
You can click Settings (![]() ) to change the address for the selected website.
) to change the address for the selected website.
![]() Click Add (
Click Add (![]() ) below the Allow list box or the Restricted list box. This example uses Restricted.
) below the Allow list box or the Restricted list box. This example uses Restricted.
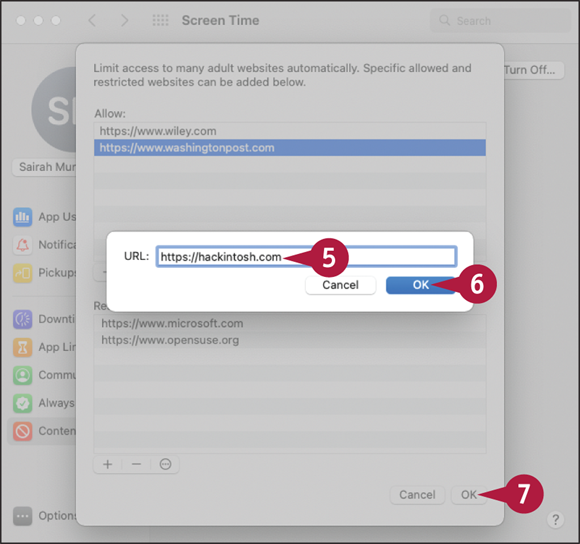
A dialog opens for adding a website.
![]() Type or paste the website address.
Type or paste the website address.
Note: Although the setting on the Content tab of Content & Privacy preferences is called Limit Adult Websites, you can put any websites you want on the Allow list and the Restricted list.
![]() Click OK.
Click OK.
The dialog closes.
Screen Time adds the website to the appropriate list.
![]() When you finish adding websites to the lists, click OK.
When you finish adding websites to the lists, click OK.
The dialog closes.
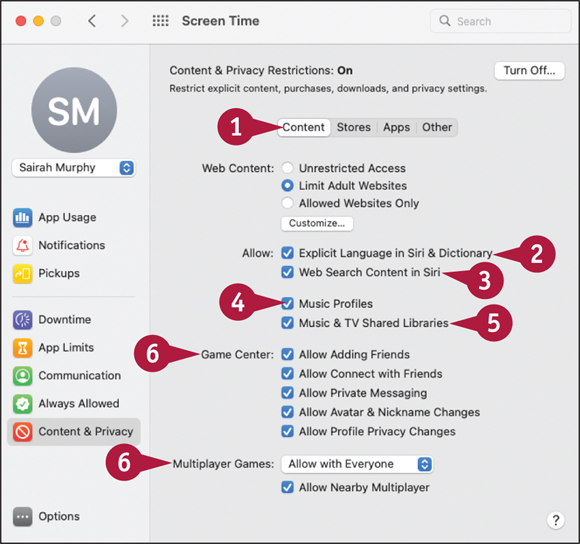
Choose Which Content to Allow
![]() Click Content to display the Content tab.
Click Content to display the Content tab.
![]() Select (
Select (![]() ) or deselect (
) or deselect (![]() ) Explicit Language in Siri & Dictionary, as needed.
) Explicit Language in Siri & Dictionary, as needed.
![]() Select (
Select (![]() ) or deselect (
) or deselect (![]() ) Web Search Content in Siri, as needed.
) Web Search Content in Siri, as needed.
![]() Select (
Select (![]() ) or deselect (
) or deselect (![]() ) Music Profiles, as needed.
) Music Profiles, as needed.
![]() Select (
Select (![]() ) or deselect (
) or deselect (![]() ) Music & TV Shared Libraries, as needed.
) Music & TV Shared Libraries, as needed.
![]() Select (
Select (![]() ) or deselect (
) or deselect (![]() ) Game Center and Multiplayer Games options, as needed.
) Game Center and Multiplayer Games options, as needed.
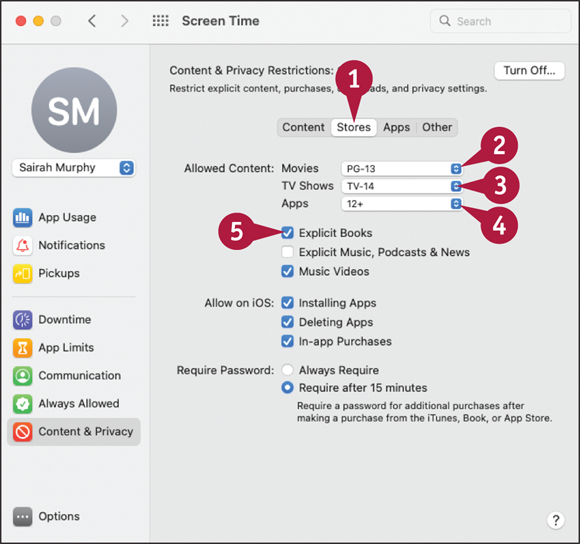
Set Store Restrictions
![]() Click Stores.
Click Stores.
The Stores tab appears.
![]() Click Movies (
Click Movies (![]() ) and then click the highest certification to allow, such as PG-13 or R.
) and then click the highest certification to allow, such as PG-13 or R.
Note: To block movies, TV shows, or apps completely, click Don’t Allow Movies, Don’t Allow TV Shows, or Don’t Allow Apps.
![]() Click TV Shows (
Click TV Shows (![]() ) and then click the highest certification to allow, such as TV-PG or TV-14.
) and then click the highest certification to allow, such as TV-PG or TV-14.
![]() Click Apps (
Click Apps (![]() ) and then click the highest age rating to allow, such as 12+.
) and then click the highest age rating to allow, such as 12+.
![]() Select (
Select (![]() ) or deselect (
) or deselect (![]() ) Explicit Books, Explicit Music, Podcasts & News, and Music Videos, as needed.
) Explicit Books, Explicit Music, Podcasts & News, and Music Videos, as needed.
The Other tab in Content & Privacy preferences enables you to control whether the user can configure various key features on iOS and iPadOS devices for themselves. For example, you can prevent the user from changing their passcode; altering Cellular Data settings, such as Data Roaming; or messing with the Do Not Disturb While Driving settings.
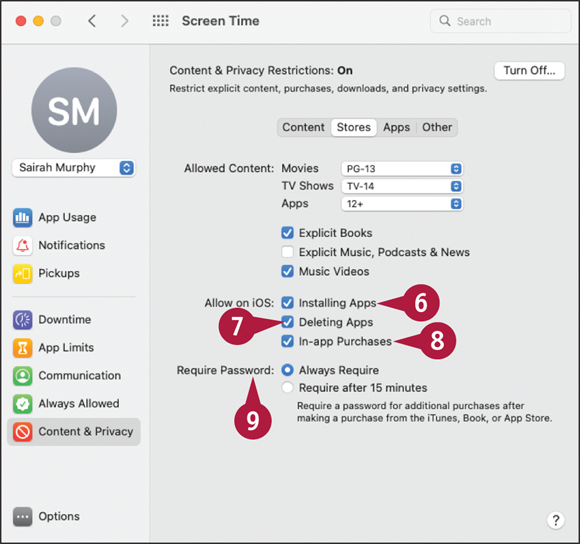
![]() Select (
Select (![]() ) or deselect (
) or deselect (![]() ) Installing Apps, as needed.
) Installing Apps, as needed.
![]() Select (
Select (![]() ) or deselect (
) or deselect (![]() ) Deleting Apps, as needed.
) Deleting Apps, as needed.
![]() Select (
Select (![]() ) or deselect (
) or deselect (![]() ) In-app Purchases, as needed.
) In-app Purchases, as needed.
![]() In the Require Password section, click Always Require (
In the Require Password section, click Always Require (![]() changes to
changes to ![]() ) or Require after 15 minutes (
) or Require after 15 minutes (![]() changes to
changes to ![]() ), as needed.
), as needed.
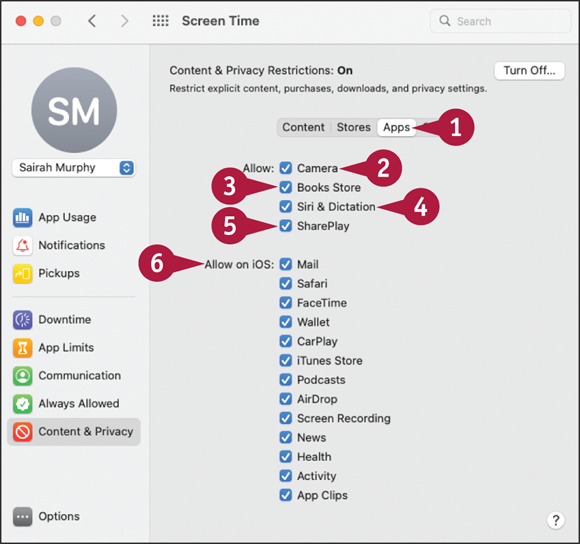
Control Access to Apps and Features
![]() Click Apps to display the Apps tab.
Click Apps to display the Apps tab.
![]() Select (
Select (![]() ) or deselect (
) or deselect (![]() ) Camera to control whether apps the user runs can access the device’s camera or cameras.
) Camera to control whether apps the user runs can access the device’s camera or cameras.
![]() Select (
Select (![]() ) or deselect (
) or deselect (![]() ) Books Store to control whether the user can access the Books Store.
) Books Store to control whether the user can access the Books Store.
![]() Select (
Select (![]() ) or deselect (
) or deselect (![]() ) Siri & Dictation to control whether the user can use the Siri and Dictation features.
) Siri & Dictation to control whether the user can use the Siri and Dictation features.
![]() Select (
Select (![]() ) or deselect (
) or deselect (![]() ) SharePlay to control whether the user can use the SharePlay feature.
) SharePlay to control whether the user can use the SharePlay feature.
![]() In the Allow on iOS section, select (
In the Allow on iOS section, select (![]() ) or deselect (
) or deselect (![]() ) each item to control whether the user can access them on iOS and iPadOS devices.
) each item to control whether the user can access them on iOS and iPadOS devices.
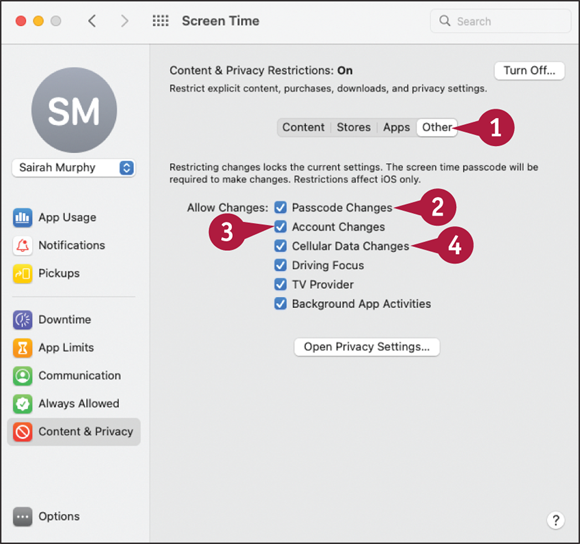
Apply Other Content & Privacy Restrictions
![]() Click Other.
Click Other.
The Other tab appears.
![]() Select (
Select (![]() ) or deselect (
) or deselect (![]() ) Passcode Changes to control whether the user can change their passcode.
) Passcode Changes to control whether the user can change their passcode.
![]() Select (
Select (![]() ) or deselect (
) or deselect (![]() ) Account Changes to control whether the user can make account changes.
) Account Changes to control whether the user can make account changes.
![]() Select (
Select (![]() ) or deselect (
) or deselect (![]() ) Cellular Data Changes to control whether the user can change the cellular data plan.
) Cellular Data Changes to control whether the user can change the cellular data plan.
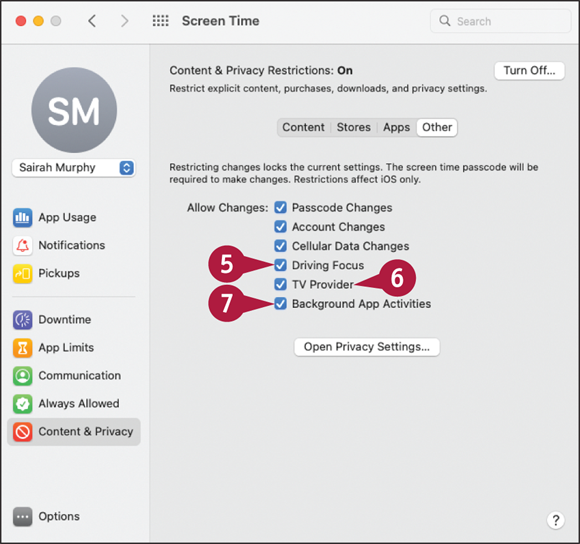
![]() Select (
Select (![]() ) or deselect (
) or deselect (![]() ) Driving Focus to control whether the user can configure Driving Focus.
) Driving Focus to control whether the user can configure Driving Focus.
![]() Select (
Select (![]() ) or deselect (
) or deselect (![]() ) TV Provider to control whether the user can change the TV Provider setting.
) TV Provider to control whether the user can change the TV Provider setting.
![]() Select (
Select (![]() ) or deselect (
) or deselect (![]() ) Background App Activities to control whether the user can change the settings for what apps can do when in the “background.” See the tip for more information.
) Background App Activities to control whether the user can change the settings for what apps can do when in the “background.” See the tip for more information.
Review a User’s Actions
After you, as the Family Sharing organizer, enable Screen Time for a child user, Screen Time logs the actions that user takes when logged in to devices using their Apple ID. You can review the logs of a user’s actions to see what the user has done and what they have tried to do. Using this information, you can decide whether you need to adjust the Screen Time settings to allow more freedom or tighter control. You can review the Screen Time logs either from your MacBook or from another device you log in to using your Apple ID.
Review a User’s Actions

![]() Press
Press ![]() + click System Preferences (
+ click System Preferences (![]() ) on the Dock.
) on the Dock.
The contextual menu opens.
![]() Click Screen Time.
Click Screen Time.
The System Preferences app opens and displays the Screen Time pane at the front.
![]() Click the pop-up menu (
Click the pop-up menu (![]() ) and then click the user whose Screen Time data you want to view.
) and then click the user whose Screen Time data you want to view.
![]() Click App Usage (
Click App Usage (![]() ).
).
The App Usage category appears.
![]() Click the pop-up menu (
Click the pop-up menu (![]() ) and then click the Mac or device for which you want to view data.
) and then click the Mac or device for which you want to view data.
![]() Navigate to the date you want to view:
Navigate to the date you want to view:
![]() You can click Today to display the current date.
You can click Today to display the current date.
![]() You can click Choose Date (
You can click Choose Date (![]() ) and then click the date on the pop-up panel.
) and then click the date on the pop-up panel.
![]() You can click Previous (
You can click Previous (![]() ) to display the previous day.
) to display the previous day.
![]() You can click Next (
You can click Next (![]() ) to display the next day.
) to display the next day.

![]() The user’s usage data for the day appears.
The user’s usage data for the day appears.
![]() This readout shows when the data was last updated.
This readout shows when the data was last updated.
![]() You can click Apps to display the usage data by apps.
You can click Apps to display the usage data by apps.
![]() Click Categories.
Click Categories.
Screen Time sorts the usage data by categories, such as the Productivity & Finance category and the Reading & Reference category.
![]() Click Notifications (
Click Notifications (![]() ).
).
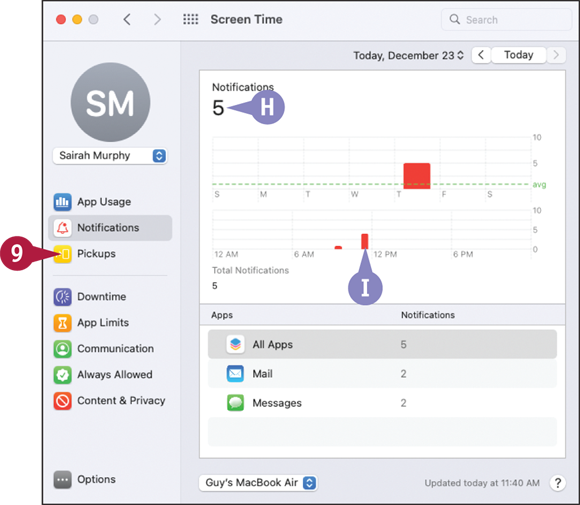
The Notifications category appears.
![]() You can see how many notifications the user has received.
You can see how many notifications the user has received.
![]() You can see when the notifications occurred.
You can see when the notifications occurred.
![]() Click Pickups (
Click Pickups (![]() ).
).
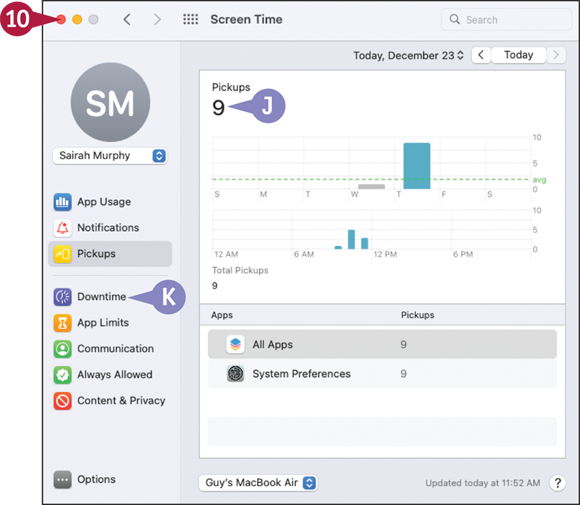
The Pickups category appears.
![]() You can see how many times the user unlocked an iOS device, iPad, or Mac.
You can see how many times the user unlocked an iOS device, iPad, or Mac.
Note: Pickups includes restarts of the Mac, iPad, or iOS device. Pickups appears to be intended as a proxy metric that gives you an idea of roughly how much a user uses their devices, but it is arguably too imprecise to be useful.
![]() You can click another category, such as Downtime (
You can click another category, such as Downtime (![]() ) or App Limits (
) or App Limits (![]() ), if you need to change Screen Time settings.
), if you need to change Screen Time settings.
![]() Click Close (
Click Close (![]() ).
).
System Preferences closes.