
CHAPTER 2
Configuring Your MacBook
You can customize many aspects of macOS to make it work the way you prefer. You can change the desktop background; personalize the Dock icons, the menu bar, and Control Center; and adjust the keyboard and trackpad or other pointing device. You can also run apps or open specific documents each time you log in or set your MacBook to go to sleep automatically when you are not using it.

Configure Battery and Sleep Settings
Configure the Menu Bar and Control Center
Create Hot Corners to Control Screen Display
Configure the Appearance, Accent, and Highlight
Configure the Trackpad or Other Pointing Device
Using an Apple TV and HDTV as an Extra Display
Change the Desktop Background
macOS enables you to change the desktop background to show the picture you prefer. macOS includes many varied desktop pictures and solid colors, but you can also set any of your own photos as the desktop background. You can tile, stretch, or crop the photo to fill the screen or center it on the screen.
You can also choose between displaying a single picture on the desktop and displaying a series of images that change automatically.
Change the Desktop Background
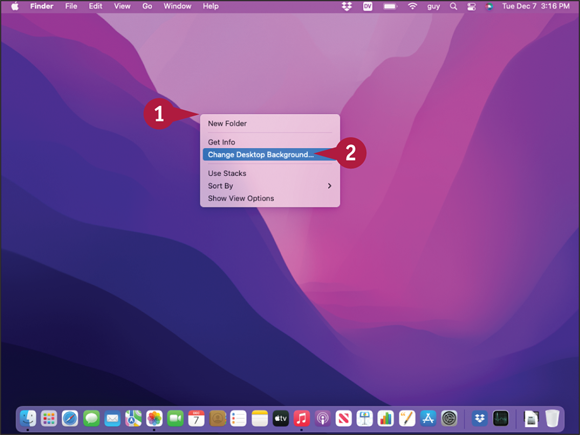
![]() Press
Press ![]() + click the desktop.
+ click the desktop.
The contextual menu opens.
![]() Click Change Desktop Background.
Click Change Desktop Background.

The Desktop pane in System Preferences appears.
![]() Click the category of image you want to see.
Click the category of image you want to see.
![]() Apple contains the built-in desktop backgrounds and solid colors.
Apple contains the built-in desktop backgrounds and solid colors.
![]() Photos contains your Photos library.
Photos contains your Photos library.
![]() Folders contains your folders.
Folders contains your folders.
![]() Click Add (
Click Add (![]() ) to add a folder.
) to add a folder.
The images appear in the right-hand pane.
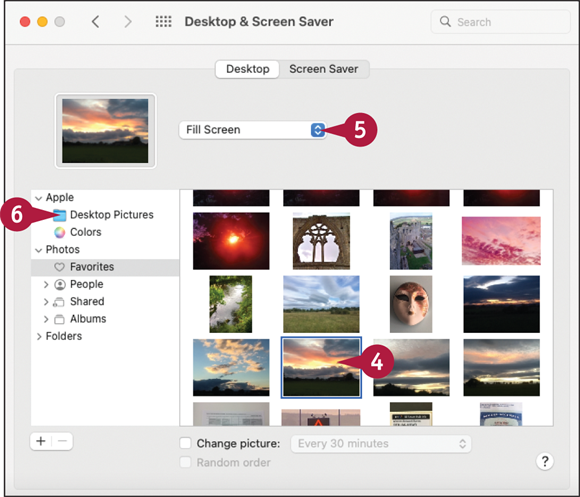
![]() Click the image you want to use.
Click the image you want to use.
The image appears on the desktop.
![]() If you chose a photo or picture of your own, click the pop-up menu (
If you chose a photo or picture of your own, click the pop-up menu (![]() ) and then click the way to fit the image to the screen. See the tip for details.
) and then click the way to fit the image to the screen. See the tip for details.
![]() If you want to set a series of background images, click the category.
If you want to set a series of background images, click the category.
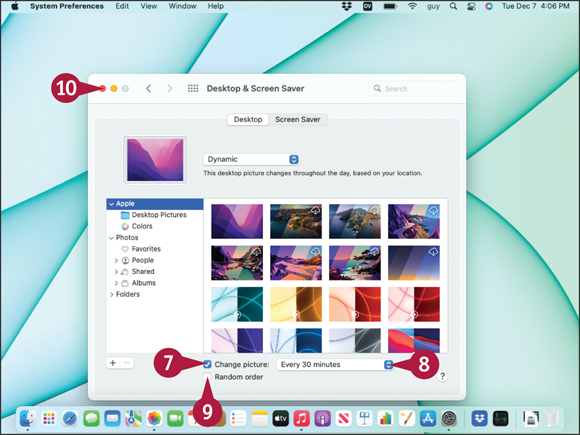
![]() Select Change picture (
Select Change picture (![]() ) if you want macOS to change the desktop picture automatically for you.
) if you want macOS to change the desktop picture automatically for you.
![]() Click Change picture (
Click Change picture (![]() ) and click the interval — for example, Every 30 minutes.
) and click the interval — for example, Every 30 minutes.
![]() Select Random order (
Select Random order (![]() ) if you want the images to appear in random order.
) if you want the images to appear in random order.
![]() Click Close (
Click Close (![]() ).
).
System Preferences closes.
Set Up a Screen Saver
macOS enables you to set a screen saver to hide what your screen is showing when you leave your MacBook idle. A screen saver is an image, a sequence of images, or a moving pattern that appears on the screen. You can choose what screen saver to use and the length of the period of inactivity before it starts.
macOS comes with a variety of attractive screen savers. You can download other screen savers from websites.
Set Up a Screen Saver
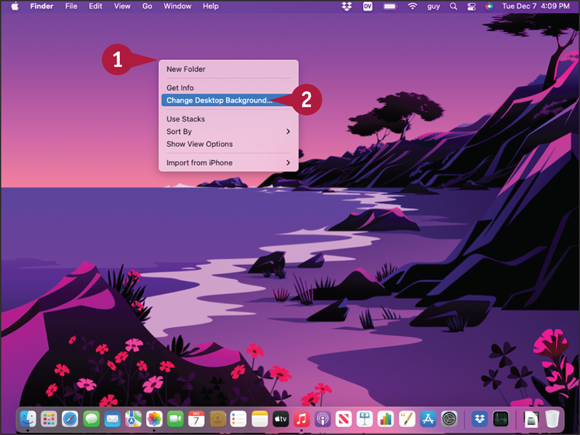
![]() Press
Press ![]() + click the desktop.
+ click the desktop.
The contextual menu opens.
![]() Click Change Desktop Background.
Click Change Desktop Background.

The Desktop pane of Desktop & Screen Saver preferences opens.
![]() Click Screen Saver.
Click Screen Saver.
The Screen Saver pane appears.
![]() Select Show screen saver after (
Select Show screen saver after (![]() ).
).
![]() Click a screen saver in the list on the left.
Click a screen saver in the list on the left.
The screen saver you clicked starts playing in the Preview area.
![]() You can select Show with clock (
You can select Show with clock (![]() ) to display a clock on the screen saver.
) to display a clock on the screen saver.
![]() Click
Click ![]() to the right of Show Screen Saver After.
to the right of Show Screen Saver After.

The pop-up menu opens.
![]() If
If ![]() appears, the screen saver delay is longer than the Turn Display Off After delay, so the screen saver will not run.
appears, the screen saver delay is longer than the Turn Display Off After delay, so the screen saver will not run.
![]() Click the length of time to wait until the screen saver starts, such as 20 Minutes.
Click the length of time to wait until the screen saver starts, such as 20 Minutes.
Note: To turn off the screen saver, select Never in the Start After pop-up menu.
![]() Position the pointer over the preview.
Position the pointer over the preview.
The Preview button appears.
![]() Click Preview.
Click Preview.
The screen saver preview appears full screen.
![]() Click anywhere on the screen saver when you want to stop the preview.
Click anywhere on the screen saver when you want to stop the preview.
The Screen Saver pane appears.
![]() Press
Press ![]() +
+ ![]() .
.
System Preferences closes.
Configure Battery and Sleep Settings
The Battery preferences pane enables you to view your MacBook’s battery level and battery usage, configure power settings separately for when your MacBook is running from the battery and from the power adapter, and set up a schedule for waking your MacBook or making it sleep. You can set your MacBook to turn off the display after a period of inactivity, dim the display on battery power, and enable Low Power Mode. You can put your MacBook to sleep manually at any time by closing the lid or by clicking Apple (![]() ) and Sleep.
) and Sleep.
Configure Battery and Sleep Settings
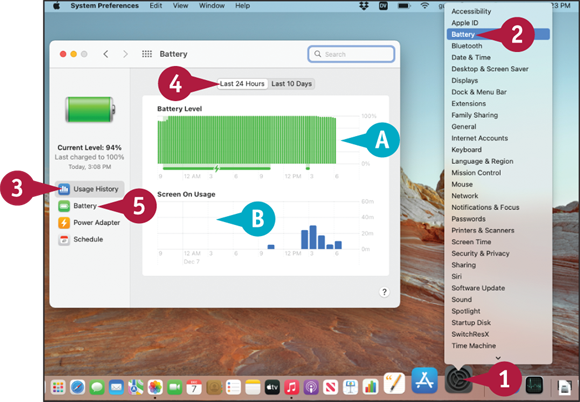
![]() Press
Press ![]() + click System Preferences (
+ click System Preferences (![]() ) on the Dock.
) on the Dock.
The System Preferences contextual menu opens.
![]() Click Battery.
Click Battery.
The Battery pane appears.
![]() Click Usage History (
Click Usage History (![]() ).
).
The Usage History pane appears.
![]() Click Last 24 Hours or Last 10 Days to specify the timeframe.
Click Last 24 Hours or Last 10 Days to specify the timeframe.
![]() The Battery Level histogram shows battery levels for the timeframe.
The Battery Level histogram shows battery levels for the timeframe.
![]() The Screen On Usage histogram shows when and how long the screen has been on.
The Screen On Usage histogram shows when and how long the screen has been on.
![]() Click Battery (
Click Battery (![]() ).
).

The Battery pane appears.
![]() Drag the Turn display off after slider to set the period of inactivity before turning off the display.
Drag the Turn display off after slider to set the period of inactivity before turning off the display.
![]() Select Slightly dim the display while on battery power (
Select Slightly dim the display while on battery power (![]() ) to reduce power usage by dimming the display.
) to reduce power usage by dimming the display.
![]() Select Optimize video streaming while on battery (
Select Optimize video streaming while on battery (![]() ) to reduce battery usage while streaming video.
) to reduce battery usage while streaming video.
![]() Select Optimized battery charging (
Select Optimized battery charging (![]() ) to reduce battery aging.
) to reduce battery aging.
![]() Select Show battery status in menu bar (
Select Show battery status in menu bar (![]() ) to display the battery readout in the menu bar.
) to display the battery readout in the menu bar.
![]() Select Low power mode (
Select Low power mode (![]() ) if you want to reduce performance to increase battery runtime.
) if you want to reduce performance to increase battery runtime.
![]() Click Battery Health.
Click Battery Health.
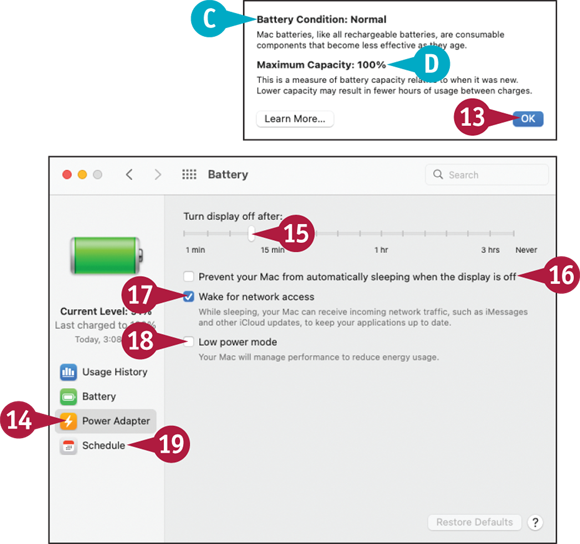
![]() The Battery Condition readout shows the battery’s condition.
The Battery Condition readout shows the battery’s condition.
![]() The Maximum Capacity shows the battery’s maximum capacity.
The Maximum Capacity shows the battery’s maximum capacity.
![]() Click OK.
Click OK.
![]() Click Power Adapter (
Click Power Adapter (![]() ).
).
The Power Adapter pane appears.
![]() Drag the Turn display off after slider, as needed.
Drag the Turn display off after slider, as needed.
![]() Select Prevent your Mac from sleeping automatically when the display is off (
Select Prevent your Mac from sleeping automatically when the display is off (![]() ) to keep the MacBook awake.
) to keep the MacBook awake.
![]() Select Wake for network access (
Select Wake for network access (![]() ) to enable waking the MacBook via the network.
) to enable waking the MacBook via the network.
![]() Select Low power mode (
Select Low power mode (![]() ) if needed.
) if needed.
![]() Click Schedule (
Click Schedule (![]() ).
).
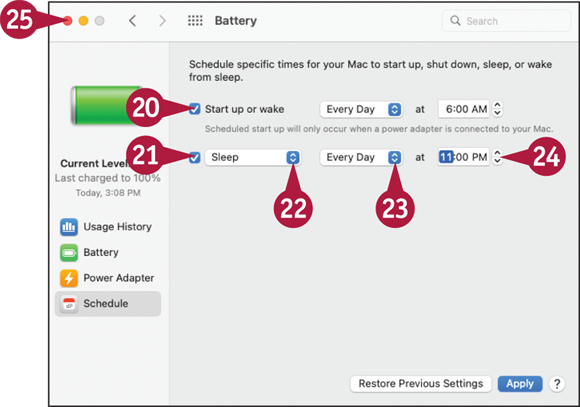
The Schedule pane appears.
![]() On the top row, select Start up or wake (
On the top row, select Start up or wake (![]() ) to start or wake your MacBook, set the frequency, and set the time.
) to start or wake your MacBook, set the frequency, and set the time.
![]() On the second row, select the check box (
On the second row, select the check box (![]() ).
).
![]() Click
Click ![]() , and then click Sleep, Restart, or Shut Down, as needed.
, and then click Sleep, Restart, or Shut Down, as needed.
![]() Click
Click ![]() , and then click Weekdays, Weekends, Every Day, or a specific day.
, and then click Weekdays, Weekends, Every Day, or a specific day.
![]() Set the time.
Set the time.
![]() Click Close (
Click Close (![]() ).
).
System Preferences closes.
Customize the Dock
macOS enables you to customize the Dock so that it contains the icons you find most useful and it appears in your preferred position on the screen. You can add apps, files, or folders to the Dock; reposition the Dock’s icons; and remove most of the existing items if you do not need them.
To customize the Dock, you drag items to it, from it, or along it. You can also use the Dock’s contextual menu to change the Dock’s position, configuration, or behavior.
Customize the Dock
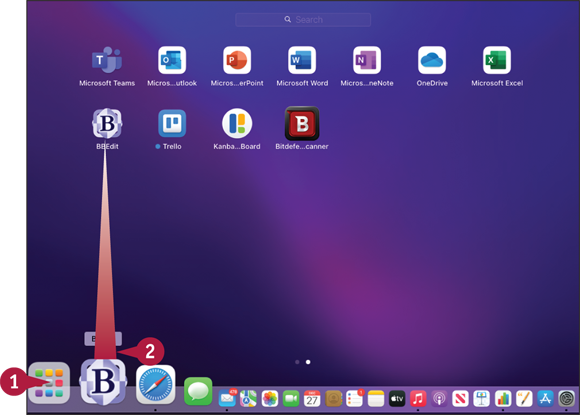
Add an App to the Dock
![]() Click Launchpad (
Click Launchpad (![]() ) on the Dock.
) on the Dock.
The Launchpad screen appears.
![]() Drag the app to the left side of the divider line on the Dock.
Drag the app to the left side of the divider line on the Dock.
The app’s icon appears on the Dock.
Note: You can also add an app to the Dock by opening the app, pressing ![]() + clicking its Dock icon, highlighting or clicking Options, and then clicking Keep in Dock.
+ clicking its Dock icon, highlighting or clicking Options, and then clicking Keep in Dock.
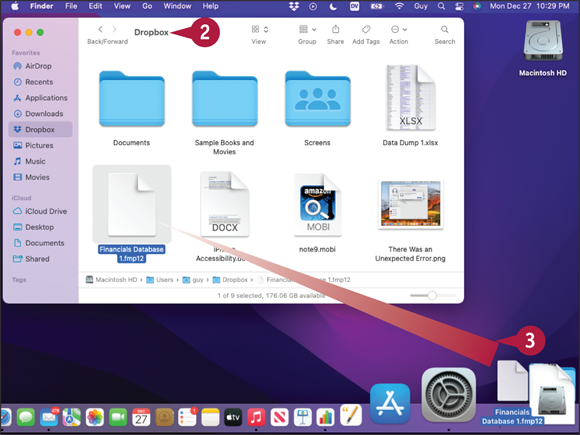
Add a File or Folder to the Dock
![]() Click Finder (
Click Finder (![]() ) on the Dock.
) on the Dock.
![]() In the Finder window, navigate to the file or folder you want to add to the Dock.
In the Finder window, navigate to the file or folder you want to add to the Dock.
![]() Drag the file or folder to the right side of the divider line on the Dock.
Drag the file or folder to the right side of the divider line on the Dock.
The item’s icon appears on the Dock.
Note: When you drag a file or folder to the Dock, macOS creates a link to the file or folder rather than moving the original item.
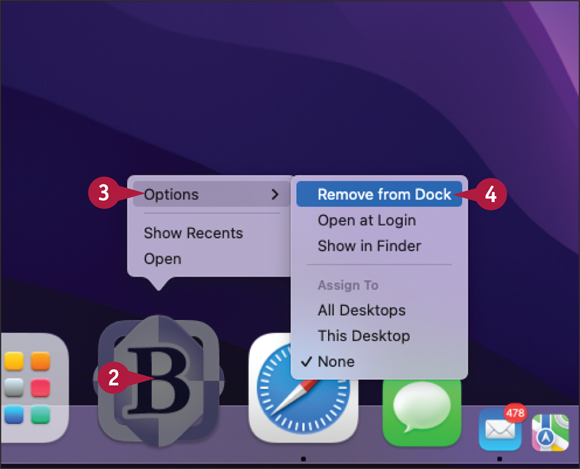
Remove an Item from the Dock
![]() If the app is running, press
If the app is running, press ![]() + click its Dock icon and then click Quit on the contextual menu.
+ click its Dock icon and then click Quit on the contextual menu.
![]() Press
Press ![]() + click the app’s icon on the Dock.
+ click the app’s icon on the Dock.
The contextual menu opens.
![]() Highlight or click Options.
Highlight or click Options.
The Options submenu opens.
![]() Click Remove from Dock.
Click Remove from Dock.
macOS removes the icon from the Dock.
Note: You can also click an icon and drag it from the Dock toward the middle of the desktop. When a Remove pop-up message appears, release the icon.
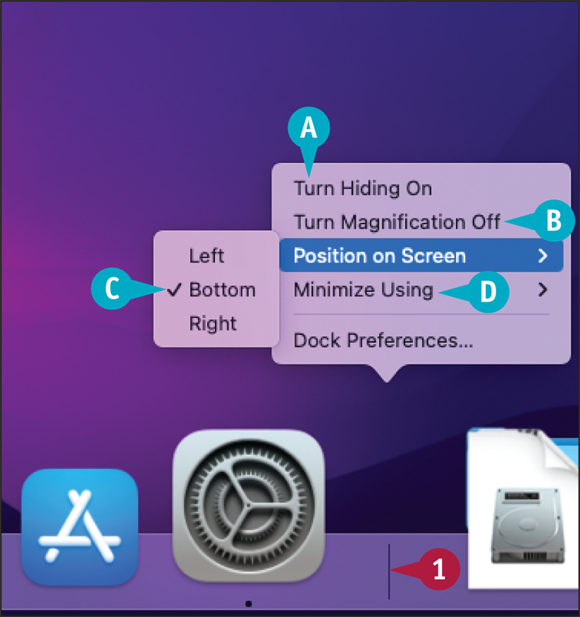
Configure the Dock
![]() Press
Press ![]() + click the Dock divider bar.
+ click the Dock divider bar.
![]() Click Turn Hiding On to hide the Dock when the pointer is not over it.
Click Turn Hiding On to hide the Dock when the pointer is not over it.
![]() Click Turn Magnification Off to turn off magnification.
Click Turn Magnification Off to turn off magnification.
![]() Click Position on Screen and then click Left, Bottom, or Right to reposition the Dock.
Click Position on Screen and then click Left, Bottom, or Right to reposition the Dock.
![]() Click Minimize Using and then click Genie Effect or Scale Effect.
Click Minimize Using and then click Genie Effect or Scale Effect.
Configure the Menu Bar and Control Center
You can configure the items that appear on the right side of the macOS menu bar between the last menu of the active app and the date and time readouts. Typically, you would want to put on the menu bar only those items to which you need instant access.
Some of the available items — such as Wi-Fi, Bluetooth, AirDrop, and Focus — always appear in Control Center, giving you easy access to them at all times. You can decide whether other items appear in Control Center.
Configure the Menu Bar and Control Center
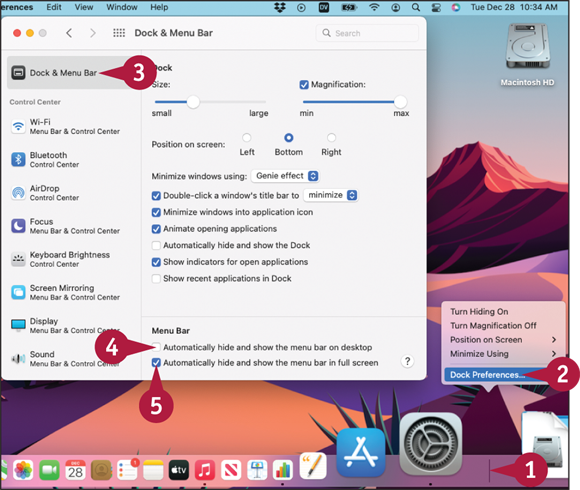
![]() Press
Press ![]() + click the Dock divider bar.
+ click the Dock divider bar.
The contextual menu opens.
![]() Click Dock Preferences.
Click Dock Preferences.
The Dock & Menu Bar preferences pane appears.
![]() Click Dock & Menu Bar (
Click Dock & Menu Bar (![]() ).
).
The Dock & Menu Bar category appears.
![]() Select Automatically hide and show the menu bar on desktop (
Select Automatically hide and show the menu bar on desktop (![]() ) to hide the menu bar automatically when no app is full screen.
) to hide the menu bar automatically when no app is full screen.
![]() Select Automatically hide and show the menu bar in full screen (
Select Automatically hide and show the menu bar in full screen (![]() ) to hide the menu bar automatically when an app is full screen.
) to hide the menu bar automatically when an app is full screen.
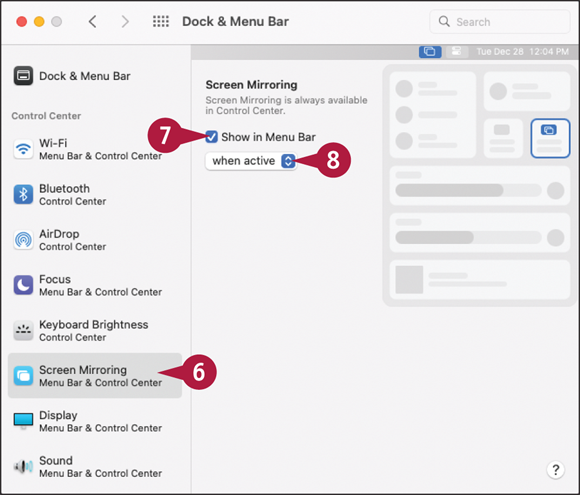
![]() In the Control Center section of the left pane, click a feature you want to place on the menu bar, remove from the menu bar, or otherwise configure.
In the Control Center section of the left pane, click a feature you want to place on the menu bar, remove from the menu bar, or otherwise configure.
This example uses Screen Mirroring (![]() ).
).
The controls for the feature appear.
![]() Select (
Select (![]() ) or deselect (
) or deselect (![]() ) Show in Menu Bar, as needed.
) Show in Menu Bar, as needed.
![]() If the pop-up menu appears, click
If the pop-up menu appears, click ![]() , and then click when active or always, as needed.
, and then click when active or always, as needed.
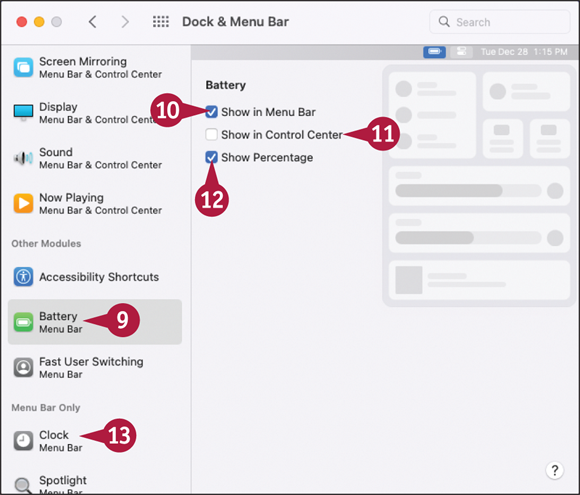
![]() In the Other Modules section of the left pane, click Battery (
In the Other Modules section of the left pane, click Battery (![]() ).
).
The Battery controls appear.
![]() Select (
Select (![]() ) or deselect (
) or deselect (![]() ) Show in Menu Bar, as needed.
) Show in Menu Bar, as needed.
![]() Select (
Select (![]() ) or deselect (
) or deselect (![]() ) Show in Control Center, as needed.
) Show in Control Center, as needed.
![]() Select Show Percentage (
Select Show Percentage (![]() ) to display the battery percentage on the menu bar.
) to display the battery percentage on the menu bar.
![]() Click Clock (
Click Clock (![]() ).
).
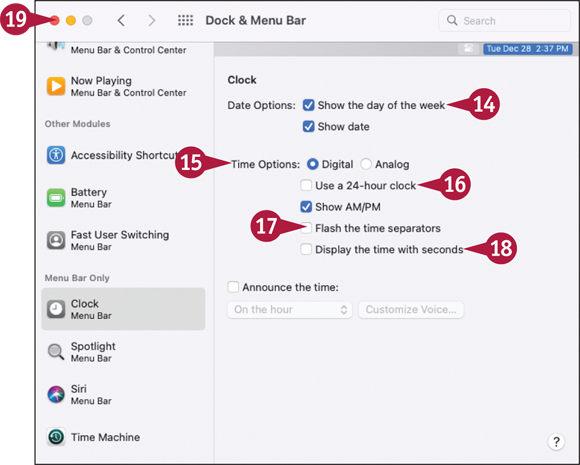
The Clock controls appear.
![]() Select (
Select (![]() ) or deselect (
) or deselect (![]() ) Show the day of the week and Show date, as needed.
) Show the day of the week and Show date, as needed.
![]() Select Digital (
Select Digital (![]() ) or Analog (
) or Analog (![]() ), as appropriate.
), as appropriate.
![]() Select (
Select (![]() ) or deselect (
) or deselect (![]() ) Use a 24-hour clock, as needed. If you deselect it, you can select Show AM/PM (
) Use a 24-hour clock, as needed. If you deselect it, you can select Show AM/PM (![]() ).
).
![]() Select Flash the time separators (
Select Flash the time separators (![]() ) to make the separator colon flash.
) to make the separator colon flash.
![]() Select Display the time with seconds (
Select Display the time with seconds (![]() ) if you want to see seconds.
) if you want to see seconds.
![]() Click Close (
Click Close (![]() ).
).
The System Preferences window closes.
Add or Remove Desktop Spaces
macOS enables you to create multiple desktop spaces on which to arrange your documents and apps. You can switch from space to space quickly to move from app to app. You can tie an app to a particular space so that it always appears in that space or allow it to appear in any space.
When you no longer need a desktop space, you can remove it in just moments. To configure desktop spaces, you use Mission Control.
Add or Remove Desktop Spaces
![]() Swipe up the trackpad with three fingers or press
Swipe up the trackpad with three fingers or press ![]() +
+ ![]() .
.
Note: On some keyboards, you press ![]() to invoke Mission Control. On other keyboards, you press
to invoke Mission Control. On other keyboards, you press ![]() . Depending on your MacBook’s settings, you may need to press
. Depending on your MacBook’s settings, you may need to press ![]() in combination with the function key.
in combination with the function key.
Note: Another way to invoke Mission Control is to run the Mission Control app from Launchpad or from an icon you add to the Dock.
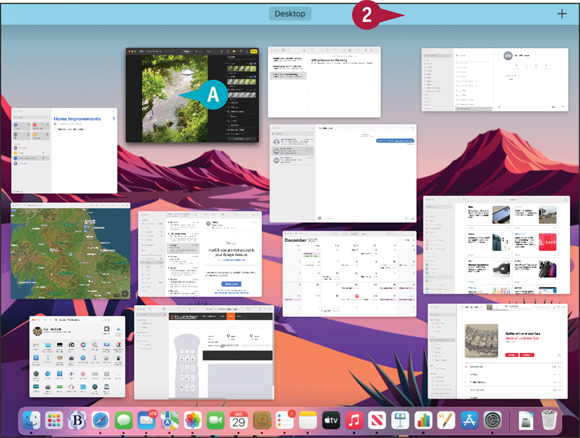
The Mission Control screen appears.
![]() You can click a window to switch quickly to it.
You can click a window to switch quickly to it.
![]() Move the pointer to the top of the screen.
Move the pointer to the top of the screen.

The bar at the top of the screen grows deeper when the pointer is over it.
A panel showing a + sign appears.
Note: If you have positioned the Dock on the right, the + sign appears in the upper-left corner of the screen.
![]() Click the + panel.
Click the + panel.
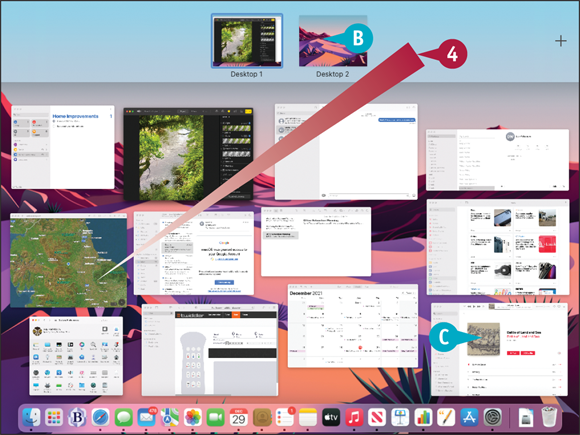
![]() Another desktop space appears at the top of the Mission Control screen.
Another desktop space appears at the top of the Mission Control screen.
![]() You can click a window and drag it to the desktop space in which you want it to appear.
You can click a window and drag it to the desktop space in which you want it to appear.
![]() Click a window you want to display full screen, and then drag it to the bar at the top of the screen.
Click a window you want to display full screen, and then drag it to the bar at the top of the screen.
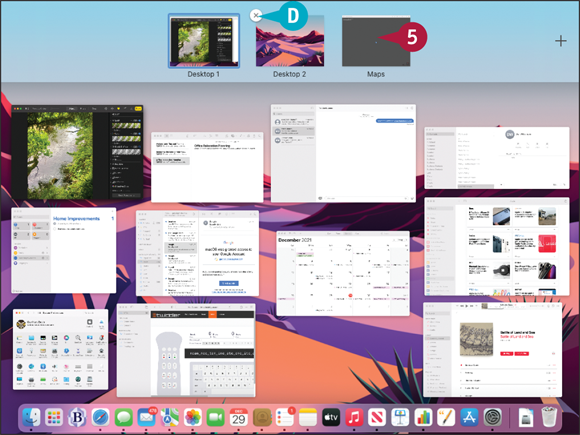
The app appears as a full-screen item on the row of desktops.
![]() When you need to close a desktop, move the pointer over it, and then click Close (
When you need to close a desktop, move the pointer over it, and then click Close (![]() ).
).
![]() Click the desktop space or full-screen app you want to display.
Click the desktop space or full-screen app you want to display.
The desktop space or app appears.
Create Hot Corners to Control Screen Display
The Hot Corners feature enables you to trigger actions by moving the pointer to the corners of the screen. You can set up hot corners for as many of the four corners of the screen as you want. Each hot corner can perform an action such as opening Mission Control, displaying your desktop, or starting the screen saver.
To set up hot corners, you use the Hot Corners dialog. You can open this dialog from the Mission Control pane or the Screen Saver pane in System Preferences.
Create Hot Corners to Control Screen Display
Set Up a Hot Corner
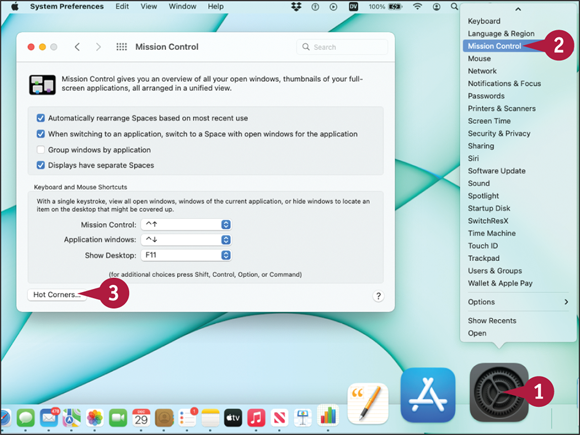
![]() Press
Press ![]() + click System Preferences (
+ click System Preferences (![]() ) on the Dock.
) on the Dock.
The contextual menu opens.
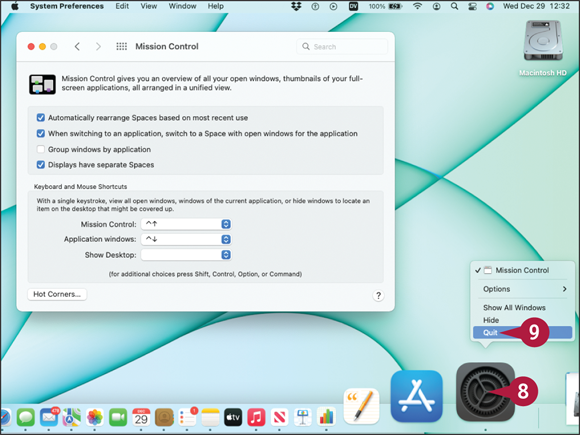
![]() Click Mission Control.
Click Mission Control.
System Preferences opens and displays the Mission Control pane.
![]() Click Hot Corners.
Click Hot Corners.
The Hot Corners dialog opens.
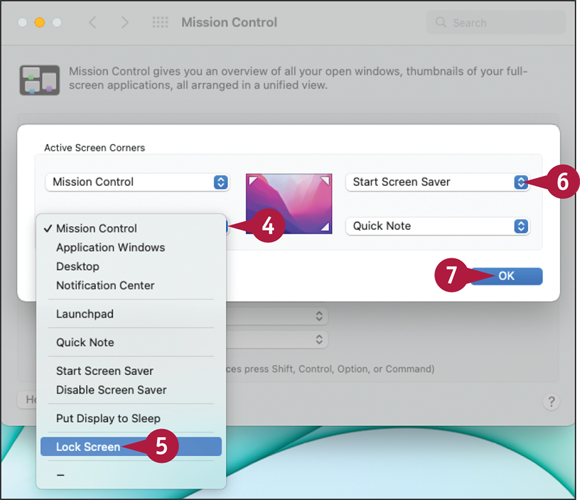
![]() Click the pop-up menu (
Click the pop-up menu (![]() ) for the hot corner you want to set.
) for the hot corner you want to set.
The pop-up menu opens.
![]() Click the action you want to assign to the corner.
Click the action you want to assign to the corner.
![]() Choose other hot corner actions as needed.
Choose other hot corner actions as needed.
Note: You can set up multiple hot corners for the same feature if you want.
![]() Click OK.
Click OK.
The Hot Corners dialog closes.
![]() Press
Press ![]() + click System Preferences (
+ click System Preferences (![]() ) on the Dock.
) on the Dock.
The contextual menu opens.
![]() Click Quit.
Click Quit.
System Preferences closes.

Using a Hot Corner to Run Mission Control
![]() Move the pointer to the hot corner you allocated to Mission Control.
Move the pointer to the hot corner you allocated to Mission Control.
The Mission Control screen appears.
![]() Click the window you want to display.
Click the window you want to display.
Make the Screen Easier to See
The Accessibility features in macOS include several options for making the contents of your MacBook’s screen easier to see. You can invert the colors, use grayscale instead of colors, enhance the contrast, and increase the cursor size. You can also turn on the Zoom feature to enable yourself to zoom in quickly up to the limit you set. To configure these options, you open System Preferences and work in the Accessibility pane.
Make the Screen Easier to See

![]() Press
Press ![]() + click System Preferences (
+ click System Preferences (![]() ) on the Dock.
) on the Dock.
The System Preferences contextual menu opens.
![]() Click Accessibility.
Click Accessibility.
The Accessibility pane appears.
![]() Click Zoom (
Click Zoom (![]() ).
).
The Zoom options appear.
![]() Select Use keyboard shortcuts to zoom (
Select Use keyboard shortcuts to zoom (![]() ).
).
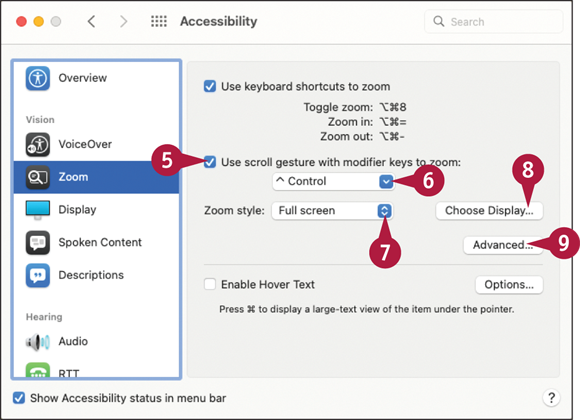
![]() Select Use scroll gesture with modifier keys to zoom (
Select Use scroll gesture with modifier keys to zoom (![]() ) if you want to zoom by holding a modifier key and scrolling on the trackpad.
) if you want to zoom by holding a modifier key and scrolling on the trackpad.
![]() Click the drop-down menu (
Click the drop-down menu (![]() ) and then click Control, Option, or Command to specify the modifier key.
) and then click Control, Option, or Command to specify the modifier key.
![]() Click Zoom style (
Click Zoom style (![]() ) and then click Full screen, Split screen, or Picture-in-picture, as needed.
) and then click Full screen, Split screen, or Picture-in-picture, as needed.
![]() If your MacBook uses multiple displays, click Choose Display and then click the display to use for zoom.
If your MacBook uses multiple displays, click Choose Display and then click the display to use for zoom.
![]() Click Advanced to open the Advanced dialog with the Appearance tab at the front.
Click Advanced to open the Advanced dialog with the Appearance tab at the front.
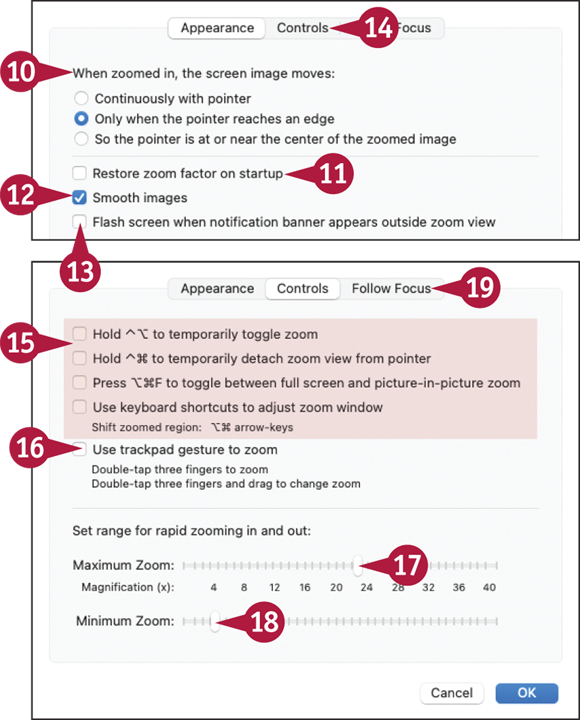
![]() In the When Zoomed In, the Screen Image Moves list, click Continuously with pointer, Only when the pointer reaches an edge, or So the pointer is at or near the center of the zoomed image, as needed.
In the When Zoomed In, the Screen Image Moves list, click Continuously with pointer, Only when the pointer reaches an edge, or So the pointer is at or near the center of the zoomed image, as needed.
![]() Select Restore zoom factor on startup (
Select Restore zoom factor on startup (![]() ) to restore the zoom when you log in.
) to restore the zoom when you log in.
![]() Select Smooth images (
Select Smooth images (![]() ) to have macOS smooth images.
) to have macOS smooth images.
![]() Select Flash screen when notification banner appears outside zoom view (
Select Flash screen when notification banner appears outside zoom view (![]() ) to get alerts for banners outside the zoom view.
) to get alerts for banners outside the zoom view.
![]() Click Controls.
Click Controls.
![]() Click to select (
Click to select (![]() ) or clear (
) or clear (![]() ) the top four check boxes to configure the zoom shortcuts you want to use.
) the top four check boxes to configure the zoom shortcuts you want to use.
![]() Select Use trackpad gesture to zoom (
Select Use trackpad gesture to zoom (![]() ) to use three-finger gestures on the touchpad for zooming.
) to use three-finger gestures on the touchpad for zooming.
![]() Drag Maximum Zoom to the appropriate level.
Drag Maximum Zoom to the appropriate level.
![]() Drag Minimum Zoom to the appropriate level.
Drag Minimum Zoom to the appropriate level.
![]() Click Follow Focus.
Click Follow Focus.
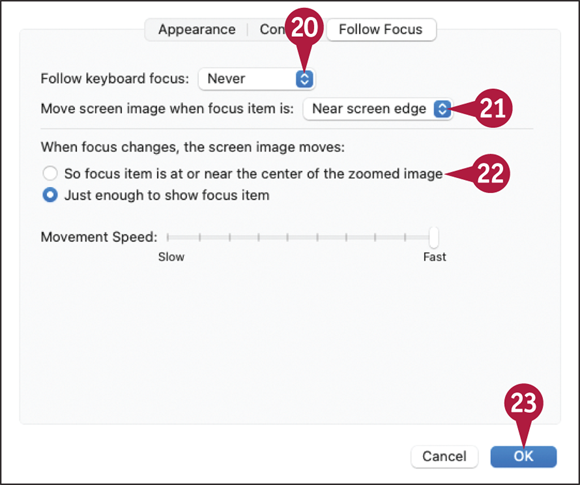
![]() If you want the zoomed area to follow the keyboard focus, click Follow keyboard focus (
If you want the zoomed area to follow the keyboard focus, click Follow keyboard focus (![]() ), and then click Always or When typing, as appropriate.
), and then click Always or When typing, as appropriate.
![]() To control how the screen image moves, click Move screen image when focus item is (
To control how the screen image moves, click Move screen image when focus item is (![]() ), and then click Off-center, On screen edge, or Near screen edge, as appropriate.
), and then click Off-center, On screen edge, or Near screen edge, as appropriate.
![]() Choose other focus settings, as needed.
Choose other focus settings, as needed.
![]() Click OK to close the Advanced dialog.
Click OK to close the Advanced dialog.
The Hover Text feature enables you to quickly zoom an item by moving the mouse pointer over it and pressing ![]() or another key you specify. You can configure options for text entry using Hover Text.
or another key you specify. You can configure options for text entry using Hover Text.
If you tend to lose track of the pointer, you can turn on the Shake Mouse Pointer to Locate feature, which expands the pointer when you move the pointer back and forth quickly. You can also increase the cursor size to make the pointer more visible.

![]() Select Enable Hover Text (
Select Enable Hover Text (![]() ) to enable zooming the item under the pointer by pressing
) to enable zooming the item under the pointer by pressing ![]() .
.
![]() If you enable Hover Text, click Options.
If you enable Hover Text, click Options.
![]() Click Text size (
Click Text size (![]() ) and specify the text size.
) and specify the text size.
![]() Click Text font (
Click Text font (![]() ) and specify the font.
) and specify the font.
![]() Click Text-entry location (
Click Text-entry location (![]() ) and click the location, such as Top left or Near current line.
) and click the location, such as Top left or Near current line.
![]() Click Activation modifier (
Click Activation modifier (![]() ) and then click Control, Option, or Command.
) and then click Control, Option, or Command.
![]() You can click Colors to display extra controls for specifying the colors to use for hover text.
You can click Colors to display extra controls for specifying the colors to use for hover text.
![]() Click OK to close the Options dialog.
Click OK to close the Options dialog.
![]() Click Display (
Click Display (![]() ) to show the Display options.
) to show the Display options.

![]() Select Invert colors (
Select Invert colors (![]() ) if you want to invert the video colors for visibility. macOS does not invert the colors of images.
) if you want to invert the video colors for visibility. macOS does not invert the colors of images.
![]() You can select Classic Invert (
You can select Classic Invert (![]() ) to invert the colors of images as well.
) to invert the colors of images as well.
![]() Select (
Select (![]() ) on deselect (
) on deselect (![]() ) other options. See the Tip for details.
) other options. See the Tip for details.
![]() Click Menu bar size (
Click Menu bar size (![]() ), and then click Default or Large, as needed.
), and then click Default or Large, as needed.
![]() Drag the Display contrast slider to increase the contrast.
Drag the Display contrast slider to increase the contrast.
![]() Click Pointer.
Click Pointer.

The Pointer tab appears.
![]() Select Shake mouse pointer to locate (
Select Shake mouse pointer to locate (![]() ) if you want to be able to enlarge the pointer temporarily by shaking it.
) if you want to be able to enlarge the pointer temporarily by shaking it.
![]() Drag the Pointer size slider to set the pointer size.
Drag the Pointer size slider to set the pointer size.
![]() To change the color of the pointer outline, click Pointer outline color, and then select a color.
To change the color of the pointer outline, click Pointer outline color, and then select a color.
![]() To change the color of the pointer fill, click Pointer fill color, and then select a color.
To change the color of the pointer fill, click Pointer fill color, and then select a color.
![]() You can click Reset to reset the pointer colors.
You can click Reset to reset the pointer colors.
![]() Click Color Filters.
Click Color Filters.

The Color Filters tab appears.
![]() Select Enable Color Filters (
Select Enable Color Filters (![]() ) if you want to apply a color filter.
) if you want to apply a color filter.
![]() Click Filter type (
Click Filter type (![]() ) and then click the filter, such as Grayscale.
) and then click the filter, such as Grayscale.
![]() Click Close (
Click Close (![]() ).
).
System Preferences closes.
Configure the Appearance, Accent, and Highlight
macOS has two systemwide appearances, the Light appearance and the Dark appearance. You can switch manually between appearances by using the Appearance setting in System Preferences. Alternatively, you can choose the Auto setting to have macOS switch automatically between Light appearance and Dark appearance to suit the time of day at your current location.
The Dark appearance, which is often called Dark Mode, can be easier on your eyes. If you use Dynamic wallpapers, the Dark appearance changes the wallpaper between the light still image and the dark still image.
Configure the Appearance, Accent, and Highlight
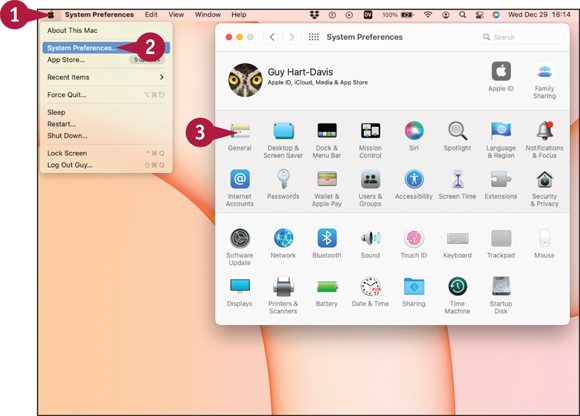
![]() Click Apple (
Click Apple (![]() ).
).
The Apple menu opens.
![]() Click System Preferences.
Click System Preferences.
The System Preferences window opens.
![]() Click General (
Click General (![]() ).
).
The General pane opens.
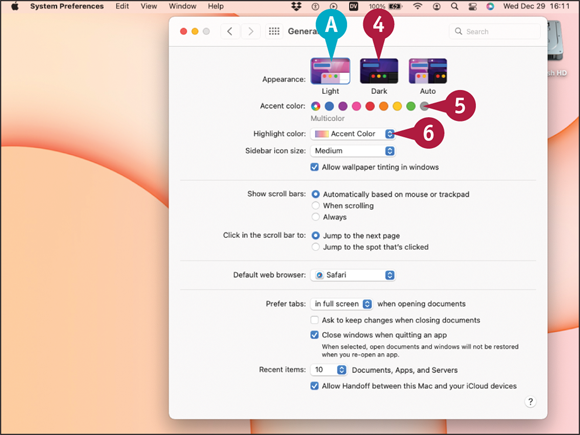
![]() In the Appearance area, the current appearance has a blue outline.
In the Appearance area, the current appearance has a blue outline.
![]() Click Light, Dark, or Auto to set the appearance.
Click Light, Dark, or Auto to set the appearance.
![]() In the Accent Color area, click the accent color you want to use.
In the Accent Color area, click the accent color you want to use.
![]() Click Highlight color (
Click Highlight color (![]() ), and then click Accent Color or a preset color, such as Blue. Alternatively, click Custom and use the color picker to specify your preferred color.
), and then click Accent Color or a preset color, such as Blue. Alternatively, click Custom and use the color picker to specify your preferred color.
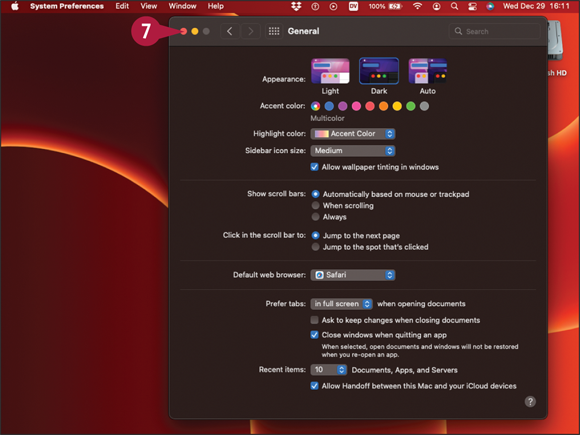
The appearance changes.
![]() Click Close (
Click Close (![]() ).
).
Note: The Dark appearance is a recent addition to macOS. The Dark appearance works with all the apps that come with your MacBook, but some third-party apps may not support it.
System Preferences closes.
If you have a Dynamic wallpaper set, the wallpaper changes to suit the appearance.
Configure the Keyboard
You can customize your MacBook’s keyboard by adjusting the repeat rate and the delay until repeating starts, creating text shortcuts that work for all devices using your Apple ID, and turning on automatic spell checking. You can also customize the action of the Function/Globe key. If you have difficulty pressing the keys, you can turn on Sticky Keys or Slow Keys. Sticky Keys enables you to set a modifier key, such as ![]() , without having to hold it down. Slow Keys increases the delay between you pressing a key and macOS registering the keystroke.
, without having to hold it down. Slow Keys increases the delay between you pressing a key and macOS registering the keystroke.
Configure the Keyboard
![]() Press
Press ![]() + click System Preferences (
+ click System Preferences (![]() ) on the Dock.
) on the Dock.
The contextual menu opens.
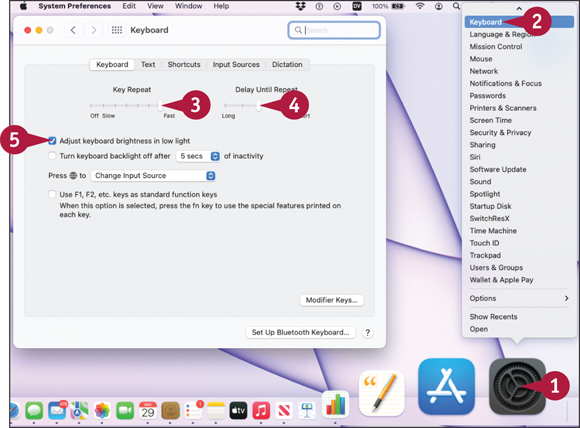
![]() Click Keyboard.
Click Keyboard.
System Preferences opens and displays the Keyboard pane.
![]() Drag the Key Repeat slider to control how quickly a key repeats.
Drag the Key Repeat slider to control how quickly a key repeats.
![]() Drag the Delay Until Repeat slider to set the repeat delay.
Drag the Delay Until Repeat slider to set the repeat delay.
![]() If it appears, select Adjust keyboard brightness in low light (
If it appears, select Adjust keyboard brightness in low light (![]() ) to have your MacBook adjust the keyboard brightness automatically.
) to have your MacBook adjust the keyboard brightness automatically.

![]() To turn the keyboard backlight off automatically, select Turn keyboard backlight off after [time] of inactivity (
To turn the keyboard backlight off automatically, select Turn keyboard backlight off after [time] of inactivity (![]() ), click the pop-up menu (
), click the pop-up menu (![]() ), and select the delay, such as 5 secs.
), and select the delay, such as 5 secs.
![]() Click Press
Click Press ![]() to (
to (![]() ), and then click Change Input Source, Show Emoji & Symbols, Start Dictation, or Do Nothing, as needed.
), and then click Change Input Source, Show Emoji & Symbols, Start Dictation, or Do Nothing, as needed.
![]() Select Use F1, F2, etc. keys as standard function keys (
Select Use F1, F2, etc. keys as standard function keys (![]() ) to use the dedicated keys as regular function keys.
) to use the dedicated keys as regular function keys.
![]() Click Text.
Click Text.

The Text pane appears.
![]() Click Add (
Click Add (![]() ).
).
![]() Type the text that will trigger the replacement.
Type the text that will trigger the replacement.
![]() Type the replacement text.
Type the replacement text.
![]() Choose options for spelling and typing, such as Correct spelling automatically and Capitalize words automatically.
Choose options for spelling and typing, such as Correct spelling automatically and Capitalize words automatically.
![]() Select Use smart quotes and dashes (
Select Use smart quotes and dashes (![]() ) if you want macOS to replace regular quotes and dashes with smart quotes and dashes.
) if you want macOS to replace regular quotes and dashes with smart quotes and dashes.
![]() Click and hold Show All (
Click and hold Show All (![]() ); still holding, click Accessibility (
); still holding, click Accessibility (![]() ) on the menu that opens.
) on the menu that opens.
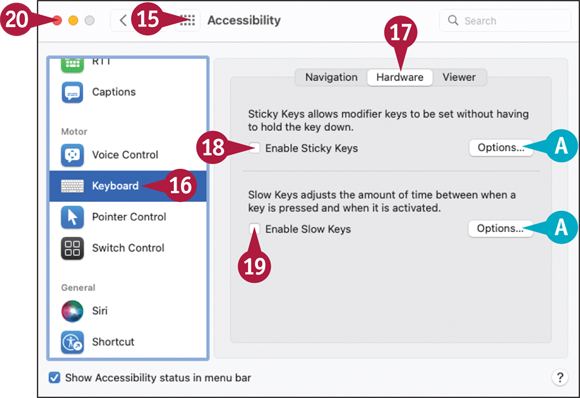
The Accessibility pane appears.
![]() Click Keyboard (
Click Keyboard (![]() ).
).
![]() Click Hardware.
Click Hardware.
![]() Select Enable Sticky Keys (
Select Enable Sticky Keys (![]() ) if you want to press modifier keys separately from the keys they modify.
) if you want to press modifier keys separately from the keys they modify.
![]() Select Enable Slow Keys (
Select Enable Slow Keys (![]() ) if you want to slow down macOS’s registration of keystrokes.
) if you want to slow down macOS’s registration of keystrokes.
![]() You can click Options to configure Sticky Keys or Slow Keys.
You can click Options to configure Sticky Keys or Slow Keys.
![]() Click Close (
Click Close (![]() ).
).
System Preferences closes.
Configure the Trackpad or Other Pointing Device
You can customize the settings for your MacBook’s trackpad to make it work the way you prefer. For example, you can adjust the firmness of the click, increase or decrease the tracking speed, and select which gestures to use. If you find the trackpad awkward, you can also connect a mouse or other pointing device via Bluetooth or USB; alternatively, you can turn on the Mouse Keys feature, which enables you to control the pointer from the keyboard.
Configure the Trackpad or Other Pointing Device

![]() Press
Press ![]() + click System Preferences (
+ click System Preferences (![]() ) on the Dock to open the contextual menu.
) on the Dock to open the contextual menu.
![]() Click Trackpad to display the Trackpad pane in System Preferences.
Click Trackpad to display the Trackpad pane in System Preferences.
![]() Click Point & Click.
Click Point & Click.
![]() Select each feature you want to use (
Select each feature you want to use (![]() ).
).
![]() You can click a pop-up menu (
You can click a pop-up menu (![]() ) to choose options for a feature.
) to choose options for a feature.
![]() Drag the Click slider to set Light, Medium, or Firm clicks.
Drag the Click slider to set Light, Medium, or Firm clicks.
![]() Drag the Tracking speed slider to adjust the tracking speed.
Drag the Tracking speed slider to adjust the tracking speed.
![]() Select Silent clicking (
Select Silent clicking (![]() ) to turn off click noises.
) to turn off click noises.
![]() Select Force Click and haptic feedback (
Select Force Click and haptic feedback (![]() ) to enable the Force Click feature and vibration feedback.
) to enable the Force Click feature and vibration feedback.
![]() Click Scroll & Zoom.
Click Scroll & Zoom.
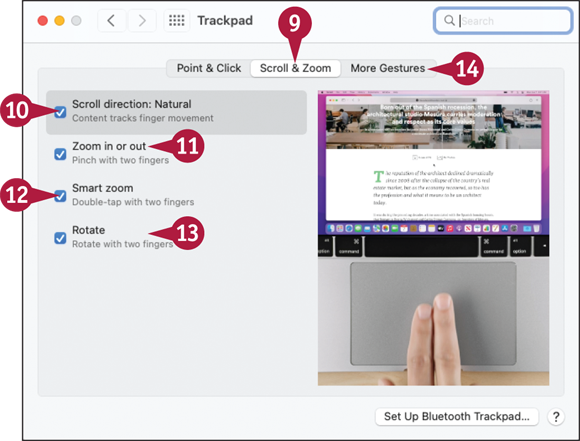
The Scroll & Zoom pane appears.
![]() Select Scroll direction: Natural (
Select Scroll direction: Natural (![]() ) to have scrolling follow your finger movements.
) to have scrolling follow your finger movements.
![]() Select Zoom in or out (
Select Zoom in or out (![]() ) to zoom by pinching in or out.
) to zoom by pinching in or out.
![]() Select Smart zoom (
Select Smart zoom (![]() ) to zoom by double-tapping with two fingers.
) to zoom by double-tapping with two fingers.
![]() Select Rotate (
Select Rotate (![]() ) to rotate objects by placing two fingers and rotating them.
) to rotate objects by placing two fingers and rotating them.
![]() Click More Gestures.
Click More Gestures.
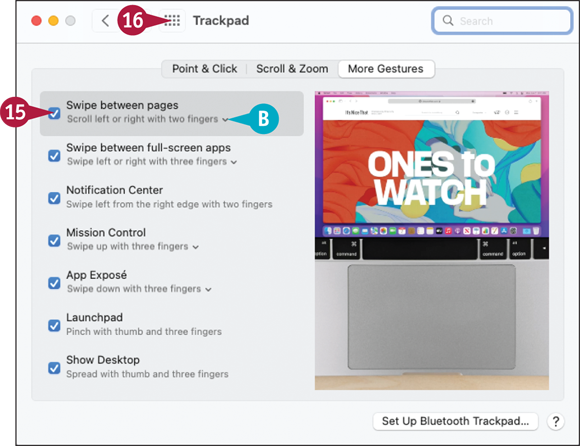
The More Gestures pane appears.
![]() Select each feature you want to use (
Select each feature you want to use (![]() ).
).
![]() You can click a pop-up menu (
You can click a pop-up menu (![]() ) to choose options for a feature.
) to choose options for a feature.
![]() Click and hold Show All (
Click and hold Show All (![]() ); still holding, click Accessibility (
); still holding, click Accessibility (![]() ) on the menu that opens.
) on the menu that opens.
The Accessibility pane appears.
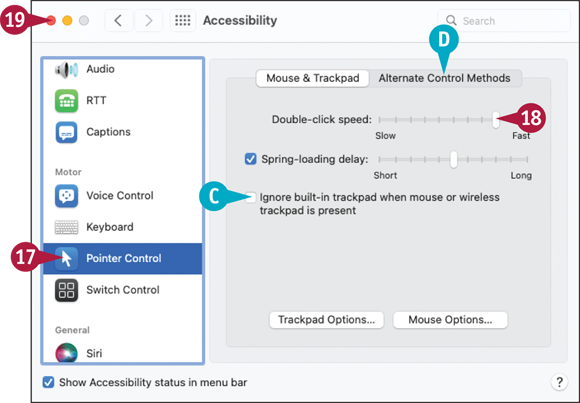
![]() Click Pointer Control (
Click Pointer Control (![]() ).
).
![]() Drag the Double-click speed slider to adjust the double-click speed.
Drag the Double-click speed slider to adjust the double-click speed.
![]() You can select Ignore built-in trackpad when mouse or wireless trackpad is present (
You can select Ignore built-in trackpad when mouse or wireless trackpad is present (![]() ) to deactivate the trackpad.
) to deactivate the trackpad.
![]() You can click Alternate Control Methods and then select Enable Mouse Keys (
You can click Alternate Control Methods and then select Enable Mouse Keys (![]() ) to turn on Mouse Keys. With Mouse Keys on, you press
) to turn on Mouse Keys. With Mouse Keys on, you press ![]() ,
, ![]() ,
, ![]() ,
, ![]() ,
, ![]() ,
, ![]() ,
, ![]() ,
, ![]() , and
, and ![]() to move the pointer.
to move the pointer.
![]() Click Close (
Click Close (![]() ).
).
System Preferences closes.
Configure iCloud Settings
Apple’s iCloud service adds powerful online sync features to your MacBook. iCloud also enables you to use the Find My Mac feature or the Find My app on iPhone or iPad to locate your MacBook if it goes missing — or even to erase the MacBook remotely.
To use iCloud, you set your MacBook user account to use your Apple ID and then choose which features to use. If you added your iCloud account when first setting up your MacBook, iCloud is already configured, but you may want to select different settings for it.
Set Up iCloud and iCloud Keychain
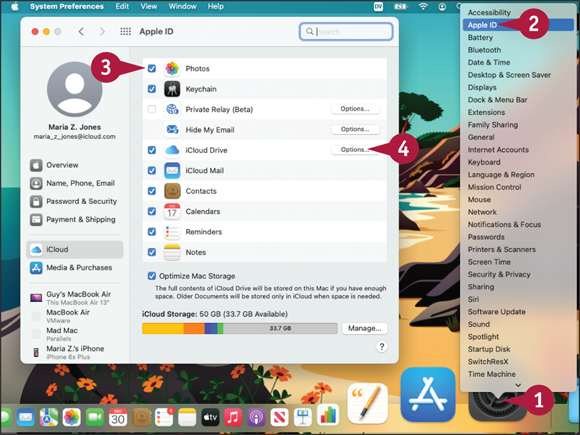
![]() Press
Press ![]() + click System Preferences (
+ click System Preferences (![]() ) on the Dock.
) on the Dock.
The contextual menu opens.
![]() Click Apple ID.
Click Apple ID.
System Preferences opens and displays the Apple ID pane.
Note: If the Sign In with Your Apple ID prompt appears, type your Apple ID and password, and then click Sign In.
![]() Select each feature you want to use (
Select each feature you want to use (![]() ).
).
![]() Click Options to the right of iCloud Drive.
Click Options to the right of iCloud Drive.

The Options dialog for iCloud Drive opens.
![]() Select Desktop & Documents Folders (
Select Desktop & Documents Folders (![]() ) to store your Desktop folder and Documents folder in iCloud.
) to store your Desktop folder and Documents folder in iCloud.
![]() Select each app (
Select each app (![]() ) you want to enable to store documents and data in iCloud.
) you want to enable to store documents and data in iCloud.
![]() Click Done.
Click Done.
The Options dialog for iCloud Drive closes.
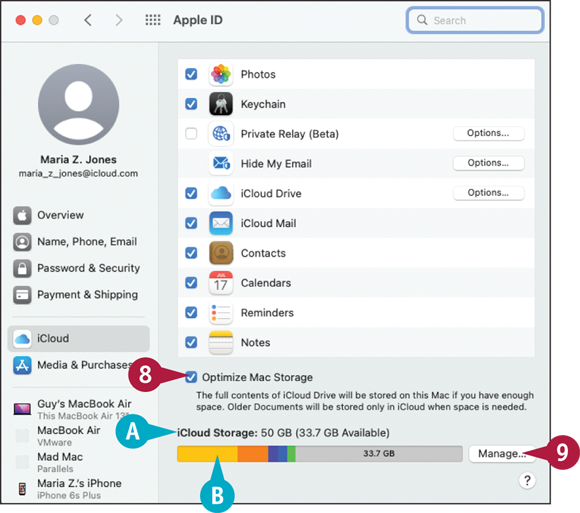
![]() The iCloud Storage readout shows how much iCloud storage space you have and how much is available.
The iCloud Storage readout shows how much iCloud storage space you have and how much is available.
![]() The histogram shows a visual representation of what is taking up space. Move the pointer over a color to display a pop-up label showing what the color represents. For example, yellow represents Photos and Videos, orange represents Documents, and royal blue represents Mail.
The histogram shows a visual representation of what is taking up space. Move the pointer over a color to display a pop-up label showing what the color represents. For example, yellow represents Photos and Videos, orange represents Documents, and royal blue represents Mail.
![]() Select Optimize Mac Storage (
Select Optimize Mac Storage (![]() ) to store as much of your iCloud Drive on your MacBook as possible.
) to store as much of your iCloud Drive on your MacBook as possible.
![]() Click Manage.
Click Manage.

The Manage Storage dialog opens.
![]() In the left pane, click the item you want to manage. This example uses Backups.
In the left pane, click the item you want to manage. This example uses Backups.
The right pane shows the details for the item you clicked.
![]() Use the management features as needed. For example, you can click a backup and then click Delete (
Use the management features as needed. For example, you can click a backup and then click Delete (![]() ) to delete it.
) to delete it.
![]() Click Done.
Click Done.
The Manage Storage dialog closes.
![]() Click Close (
Click Close (![]() ).
).
System Preferences closes.
Add a Second Display
macOS enables you to add one or more external displays to your MacBook to give yourself more space for your apps. You connect the display to one of the USB-C/Thunderbolt ports on the MacBook. If the display has a USB-C connector, you connect it directly; if not, you use a suitable adapter. Some displays that connect via USB-C can charge your MacBook; some provide additional ports.
After connecting the external display using a suitable cable, you use the Displays pane in System Preferences to set the resolution and specify the arrangement of the displays.
Add a Second Display

![]() Connect the display to your MacBook.
Connect the display to your MacBook.
Note: To connect an external display to the MacBook, you may need Apple’s USB-C Digital AV Multiport Adapter or a functional equivalent. This adapter provides an HDMI port for connecting the external display.
![]() Connect the display to power and turn it on.
Connect the display to power and turn it on.
![]() Press
Press ![]() + click System Preferences (
+ click System Preferences (![]() ) on the Dock.
) on the Dock.
The contextual menu opens.
![]() Click Displays.
Click Displays.
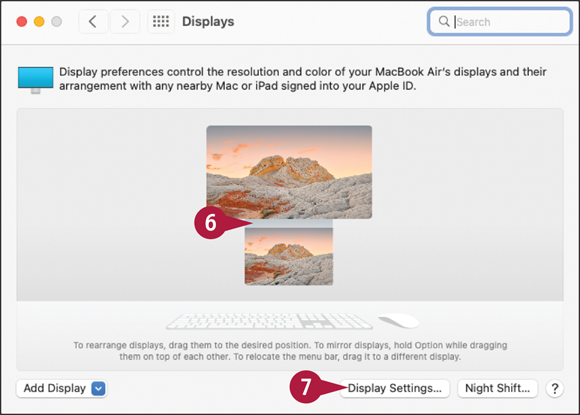
System Preferences opens and shows the Displays pane.
![]() If you are not sure which display is the MacBook’s internal display and which is the external display, move the pointer over a display’s thumbnail.
If you are not sure which display is the MacBook’s internal display and which is the external display, move the pointer over a display’s thumbnail.
![]() The pop-up message identifies the display.
The pop-up message identifies the display.
![]() If necessary, drag the display thumbnails to tell macOS their positions relative to each other.
If necessary, drag the display thumbnails to tell macOS their positions relative to each other.
The display thumbnails appear in their new positions.
![]() To move the menu bar and Dock, drag the menu bar from the MacBook’s thumbnail to the external display’s thumbnail.
To move the menu bar and Dock, drag the menu bar from the MacBook’s thumbnail to the external display’s thumbnail.
![]() Click Display Settings.
Click Display Settings.
The Display Settings dialog opens.
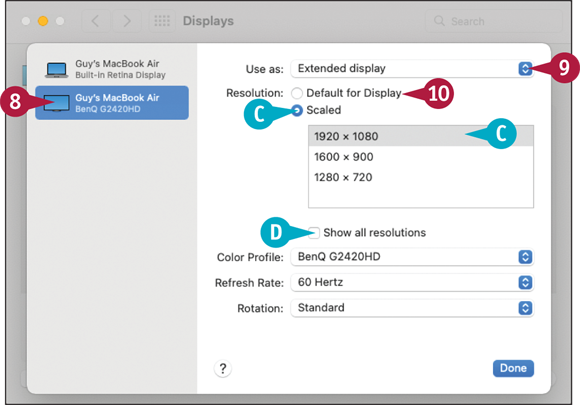
![]() In the sidebar, click the external monitor.
In the sidebar, click the external monitor.
The settings for the monitor appear.
![]() Click Use as (
Click Use as (![]() ), and then click Main display, Extended display, or Mirror for Built-in Retina Display, as needed.
), and then click Main display, Extended display, or Mirror for Built-in Retina Display, as needed.
![]() Click Default for Display (
Click Default for Display (![]() changes to
changes to ![]() ) to apply the display’s best resolution.
) to apply the display’s best resolution.
![]() You can click Scaled (
You can click Scaled (![]() changes to
changes to ![]() ) and then click a different resolution.
) and then click a different resolution.
![]() If the Scaled box does not show the resolution you want, select Show all resolutions (
If the Scaled box does not show the resolution you want, select Show all resolutions (![]() ).
).
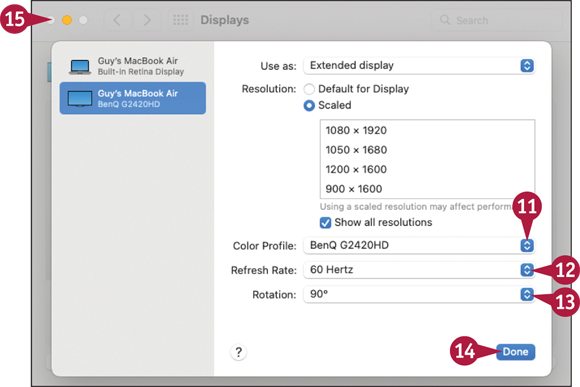
![]() If you need to apply a different color profile to the display, click Color Profile (
If you need to apply a different color profile to the display, click Color Profile (![]() ), and then click the appropriate profile.
), and then click the appropriate profile.
![]() If you need to adjust the display’s refresh rate, click Refresh Rate (
If you need to adjust the display’s refresh rate, click Refresh Rate (![]() ), and then click the appropriate rate.
), and then click the appropriate rate.
![]() If you need to change the rotation, click Rotation (
If you need to change the rotation, click Rotation (![]() ), and then click Standard, 90°, 180°, or 270°, as needed.
), and then click Standard, 90°, 180°, or 270°, as needed.
![]() Click Done.
Click Done.
The Display Settings dialog closes.
![]() Click Close (
Click Close (![]() ).
).
System Preferences closes.
Using an Apple TV and HDTV as an Extra Display
With a second-generation or later Apple TV — any black model — you can wirelessly broadcast your MacBook’s display on the device to which the Apple TV is connected. This is great for watching movies or videos on a big-screen TV, enjoying a shared web-browsing session, or giving presentations from your MacBook to a group of people. To broadcast to an Apple TV, your MacBook uses AirPlay. This technology enables Macs, iOS devices, and iPadOS devices to send a signal to an Apple TV for it to display on a television.
Using an Apple TV and HDTV as an Extra Display
Note: If the Apple TV is not already set up, connect it to a power outlet, to your television, and to your wireless network. Enable AirPlay by opening the Apple TV’s Settings screen, selecting AirPlay, and setting AirPlay to On.
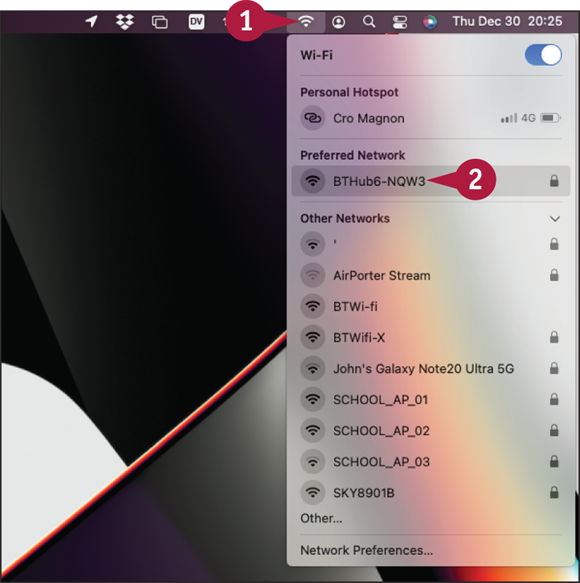
![]() Click Wi-Fi (
Click Wi-Fi (![]() ) on the menu bar.
) on the menu bar.
The Wi-Fi menu opens.
![]() Click the network to which Apple TV is connected.
Click the network to which Apple TV is connected.
Note: Your MacBook and the Apple TV must be on the same network for AirPlay to work.
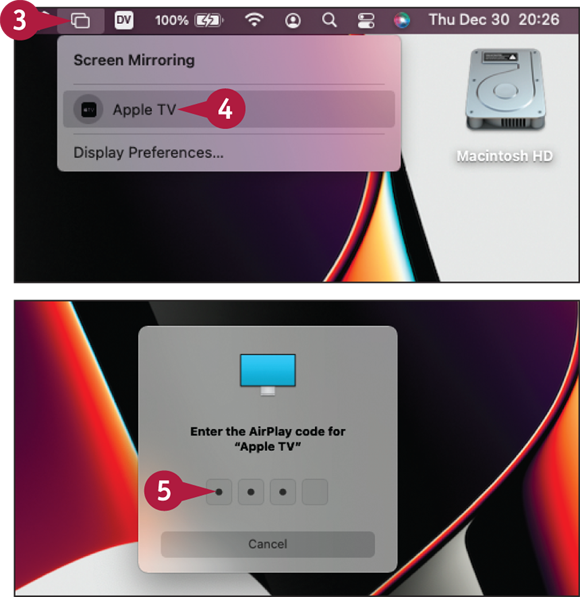
![]() Click Screen Mirroring (
Click Screen Mirroring (![]() ) on the menu bar.
) on the menu bar.
The Screen Mirroring menu opens.
![]() Click the Apple TV you want to use.
Click the Apple TV you want to use.
The Enter the AirPlay Code dialog opens.
Note: The Apple TV displays the AirPlay code when a device attempts to connect to it.
![]() Type the AirPlay code.
Type the AirPlay code.

The Enter the AirPlay Code dialog closes automatically.
Your MacBook’s desktop appears on the television to which the Apple TV is connected. By default, the Apple TV mirrors the MacBook’s screen, showing the same image.
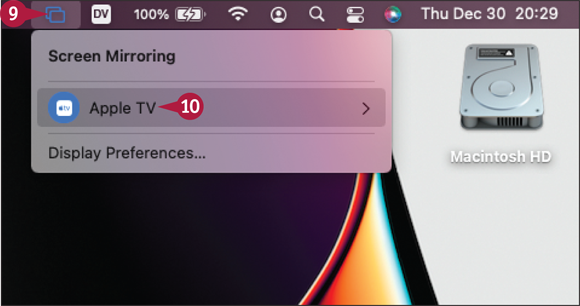
![]() Click Screen Mirroring (
Click Screen Mirroring (![]() ).
).
The Screen Mirroring menu opens.
![]() Click Apple TV to expand the menu section for the Apple TV your MacBook is using.
Click Apple TV to expand the menu section for the Apple TV your MacBook is using.
![]() Click Use As Separate Display if you want to use the HDTV as a separate display. Otherwise, leave the Mirror Built-In Retina setting selected.
Click Use As Separate Display if you want to use the HDTV as a separate display. Otherwise, leave the Mirror Built-In Retina setting selected.
macOS extends your desktop to the HDTV, giving you more desktop space.
![]() When you finish using the HDTV, click Screen Mirroring (
When you finish using the HDTV, click Screen Mirroring (![]() ) on the menu bar.
) on the menu bar.
The Screen Mirroring menu opens.
![]() Click the Apple TV you have been using.
Click the Apple TV you have been using.
Your MacBook stops displaying content via the Apple TV.
Using an iPad as an Extra Display and Input Device
The Sidecar feature enables you to use an iPad as an extra display for your MacBook Pro or MacBook Air, giving you extra space for your work. You can use Sidecar either by connecting both the MacBook and the iPad to the same Wi-Fi network or by connecting them with a USB cable. With both devices logged in to the same iCloud account, you can quickly move windows between the MacBook’s screen and the iPad’s screen, as needed. You can also show the sidebar and the Touch Bar on the iPad.
Using an iPad as an Extra Display and Input Device

![]() Press
Press ![]() + click System Preferences (
+ click System Preferences (![]() ) on the Dock.
) on the Dock.
The System Preferences contextual menu opens.
![]() Click Displays.
Click Displays.
System Preferences opens.
The Displays pane appears.
![]() Click
Click ![]() in the lower-left corner.
in the lower-left corner.
The pop-up menu opens.
![]() Click the iPad.
Click the iPad.

The Displays pane shows the internal display and the iPad.
![]() If you are not sure which display is the MacBook’s internal display and which is the iPad’s screen, move the pointer over a display’s thumbnail.
If you are not sure which display is the MacBook’s internal display and which is the iPad’s screen, move the pointer over a display’s thumbnail.
![]() The pop-up message identifies the display.
The pop-up message identifies the display.
![]() If necessary, drag the display thumbnails to tell macOS their positions relative to each other.
If necessary, drag the display thumbnails to tell macOS their positions relative to each other.
The display thumbnails appear in their new positions.
Note: To move the menu bar and Dock, drag the menu bar from the MacBook’s thumbnail to the iPad’s thumbnail.
![]() Click Display Settings.
Click Display Settings.
The Display Settings dialog opens.
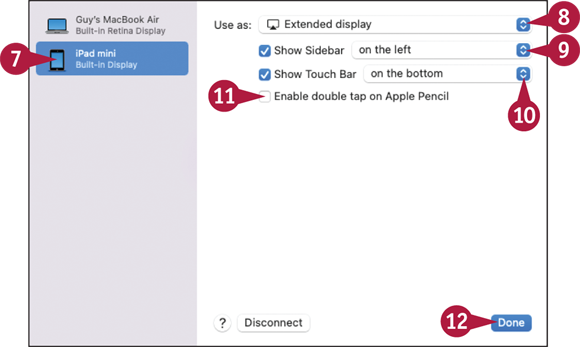
![]() In the left pane, click the iPad to display its settings.
In the left pane, click the iPad to display its settings.
![]() Click Use as (
Click Use as (![]() ), and then click Main display, Extended display, or Mirror for Built-in Retina Display, as needed.
), and then click Main display, Extended display, or Mirror for Built-in Retina Display, as needed.
![]() Select Show Sidebar (
Select Show Sidebar (![]() ) to use the sidebar to display controls on the iPad. Then click Show Sidebar (
) to use the sidebar to display controls on the iPad. Then click Show Sidebar (![]() ) and click on the left or on the right.
) and click on the left or on the right.
![]() If your MacBook has the Touch Bar, select Show Touch Bar (
If your MacBook has the Touch Bar, select Show Touch Bar (![]() ), click Show Touch Bar
), click Show Touch Bar ![]() , and then click on the top or on the bottom.
, and then click on the top or on the bottom.
![]() Optionally, select Enable double tap on Apple Pencil (
Optionally, select Enable double tap on Apple Pencil (![]() ). See the first tip.
). See the first tip.
![]() Tap Done.
Tap Done.
The Display Settings dialog closes.

![]() To move a window to the iPad, either drag it; or hold the pointer over Zoom (
To move a window to the iPad, either drag it; or hold the pointer over Zoom (![]() ) and then click Move to iPad on the pop-up menu.
) and then click Move to iPad on the pop-up menu.
On the iPad, you can:
![]() Tap Show/Hide Touch Bar (
Tap Show/Hide Touch Bar (![]() ) to toggle the Touch Bar.
) to toggle the Touch Bar.
![]() Tap Show/Hide Dock (
Tap Show/Hide Dock (![]() ) to toggle the Dock.
) to toggle the Dock.
![]() Tap Command (
Tap Command (![]() ), Option (
), Option (![]() ), Control (
), Control (![]() ), or Shift (
), or Shift (![]() ) to issue a modifier keypress.
) to issue a modifier keypress.
![]() Tap Undo (
Tap Undo (![]() ) to undo the last action.
) to undo the last action.
![]() Tap Keyboard (
Tap Keyboard (![]() ) to display the on-screen keyboard.
) to display the on-screen keyboard.
![]() Tap Disconnect (
Tap Disconnect (![]() ) to disconnect the iPad.
) to disconnect the iPad.
Connect External Devices
To extend your MacBook’s capabilities, you can connect a wide variety of external devices. This section covers connecting speakers for audio output, connecting printers for creating hard-copy output from digital files, and connecting external drives for extra storage.
Connect Speakers

Each MacBook model has built-in speakers, but you can connect external speakers when you need greater volume. The easiest way to connect speakers is via the 3.5mm headphone jack that each MacBook model includes. On some models, the headphone jack can output only an analog signal. On other models, the headphone jack can output either an analog signal or a digital signal and switches automatically between analog and digital to match the type of cable you connect.
You can also connect speakers via a USB port. For any current MacBook, you need Apple’s USB-C Digital AV Multiport Adapter or a similar adapter to provide a regular USB port instead of the USB-C port.
If you prefer not to connect your MacBook to speakers via a cable, you can use AirPlay or Bluetooth instead. For AirPlay, you need either speakers that are AirPlay-capable or speakers connected either to an AirPort Express wireless access point or to an Apple TV. For Bluetooth, you need either compatible Bluetooth speakers or a compatible Bluetooth audio receiver.
Whichever means of connection you use, you can use the Output pane in Sound preferences to specify which audio device to use. To give yourself easy control of audio inputs and outputs as well as the volume, select Show Sound in menu bar (![]() , A), click Show Sound in menu bar (
, A), click Show Sound in menu bar (![]() , B), and then click always or when active, as needed.
, B), and then click always or when active, as needed.
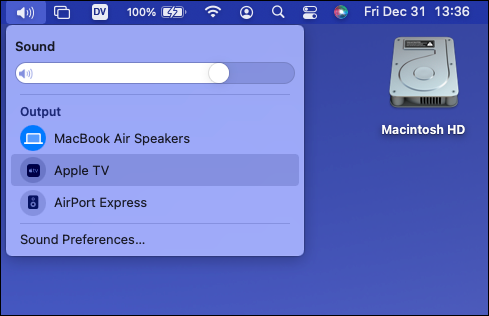
You can then press ![]() + click Sound (
+ click Sound (![]() ) to display a menu for selecting sound output and input options quickly. For example, you can click a device in the Output list on the menu to direct the sound output to that device. You can also click Sound Preferences at the bottom of the menu to display the Sound pane in System Preferences.
) to display a menu for selecting sound output and input options quickly. For example, you can click a device in the Output list on the menu to direct the sound output to that device. You can also click Sound Preferences at the bottom of the menu to display the Sound pane in System Preferences.
Connect a Printer
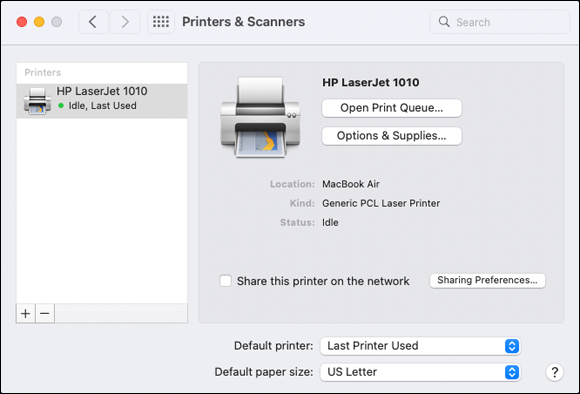
To print from your MacBook, you need to connect a printer and configure a driver, the software for the printer. macOS includes many printer drivers, so you may be able to connect your printer and simply start printing. But if your printer is a new model, you may need to locate and install the driver for it.
You can connect a printer directly to your MacBook by using a USB cable. Unless the printer has a USB-C cable, you will need Apple’s USB-C Digital AV Multiport Adapter or a similar adapter to provide a regular USB port.
After connecting the printer to the MacBook and to power and turning on the printer, press ![]() + click System Preferences (
+ click System Preferences (![]() ) on the Dock and then click Printers & Scanners on the contextual menu to display the Printers & Scanners pane in System Preferences. See if the printer appears in the Printers list in the left pane. If not, click Add (
) on the Dock and then click Printers & Scanners on the contextual menu to display the Printers & Scanners pane in System Preferences. See if the printer appears in the Printers list in the left pane. If not, click Add (![]() ) and use the Add dialog to add the printer.
) and use the Add dialog to add the printer.
Connect an External Drive
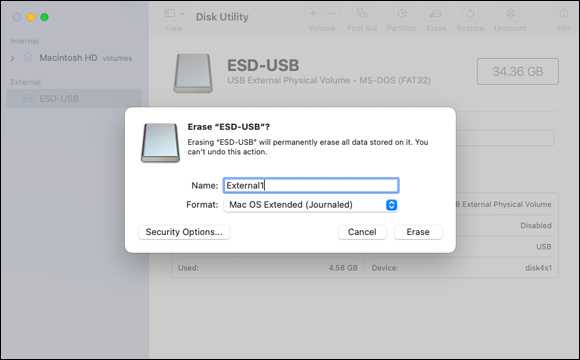
To give yourself more disk space, you can connect an external drive to your MacBook via one of its USB-C/Thunderbolt ports. If the drive has a USB-C cable, you can connect it directly; if not, you will need Apple’s USB-C Digital AV Multiport Adapter or a similar adapter to provide a regular USB port.
The drive can connect to your MacBook using either a USB standard or a Thunderbolt standard. USB-connected drives are ubiquitous and affordable, whereas Thunderbolt drives offer better performance than USB can provide, but they typically cost more. You can connect a USB drive to any computer, but relatively few non-Mac computers support Thunderbolt.
For best results, choose a drive that is designed for use with Macs. Normally, after connecting a drive, you will find that it appears in the Devices section of the sidebar in Finder windows; if so, you can simply start using the drive. But if you need to store large files on the drive, you may want to reformat the drive using the macOS Extended (Journaled) file system. You can do this by using Disk Utility, which you can launch by clicking Launchpad (![]() ) on the Dock, typing disk, and then clicking Disk Utility (
) on the Dock, typing disk, and then clicking Disk Utility (![]() ).
).
Explore Other Important Settings
macOS is highly configurable, and the System Preferences app includes many settings beyond those you have met so far in this chapter. This section introduces you to five other categories of settings you may want to explore in order to get the most out of your MacBook: Language & Region, Extensions, Startup Disk, Dictation, and Spoken Content.
To choose these settings, first display the System Preferences window by either clicking System Preferences (![]() ) on the Dock or clicking Apple (
) on the Dock or clicking Apple (![]() ) on the menu bar and then clicking System Preferences on the menu.
) on the menu bar and then clicking System Preferences on the menu.
Choosing Language & Region Settings

Click Language & Region (![]() ) to display the Language & Region preferences pane. Use the controls in the Preferred Languages pane to specify the languages you want to use, and then use the controls on the right side to specify the region, the first day of the week, the calendar type, whether to use 24-hour time, and which temperature scale to use.
) to display the Language & Region preferences pane. Use the controls in the Preferred Languages pane to specify the languages you want to use, and then use the controls on the right side to specify the region, the first day of the week, the calendar type, whether to use 24-hour time, and which temperature scale to use.
Click Advanced to open the Advanced dialog. Here, you can choose a wider variety of language and region settings. For example, you can click the Dates tab at the top and configure custom date formats as needed, or click the Times tab and set up exactly the time formats needed.
Choosing Extensions Settings
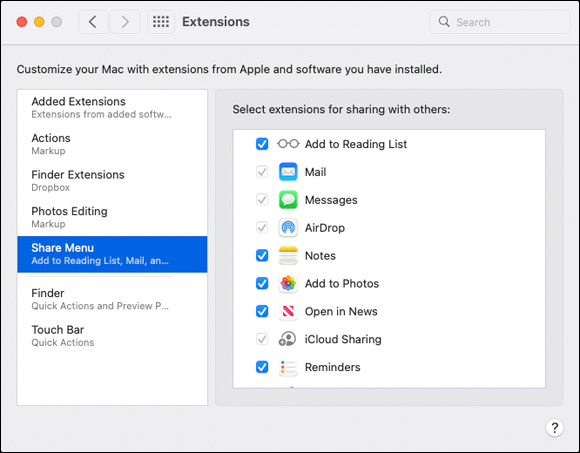
Click Extensions (![]() ) to display the Extensions preferences pane, which enables you to manage extensions, add-on components that provide additional functionality to macOS.
) to display the Extensions preferences pane, which enables you to manage extensions, add-on components that provide additional functionality to macOS.
In the left pane, click the category of extensions you want to configure. For example, click Share Menu in the left pane to display the Select Extensions for Sharing with Others list in the right pane, and then select (![]() ) or clear (
) or clear (![]() ) the check boxes to specify which items you want to have on the Share menu. Then click Finder in the left pane to display the Select Quick Actions and Document Providers to Show in Finder list, and then select (
) the check boxes to specify which items you want to have on the Share menu. Then click Finder in the left pane to display the Select Quick Actions and Document Providers to Show in Finder list, and then select (![]() ) or clear (
) or clear (![]() ) the check boxes to specify which items to include.
) the check boxes to specify which items to include.
Choosing Startup Disk Settings
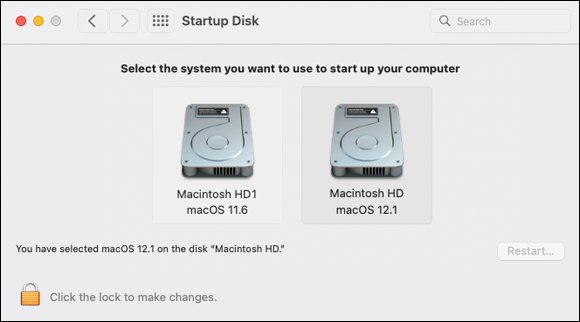
Click Startup Disk (![]() ) to display the Startup Disk preferences pane. Here, you can choose which disk to use for starting your MacBook. This functionality is useful not only for troubleshooting your MacBook and repairing its operating system, but it also enables you to switch among multiple operating systems installed on your MacBook.
) to display the Startup Disk preferences pane. Here, you can choose which disk to use for starting your MacBook. This functionality is useful not only for troubleshooting your MacBook and repairing its operating system, but it also enables you to switch among multiple operating systems installed on your MacBook.
Choosing Dictation and Spoken Content Settings
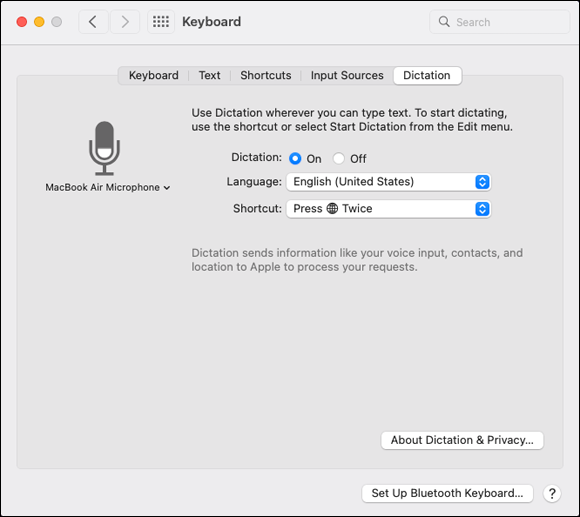
Click Keyboard (![]() ) to display the Keyboard preferences pane, and then click the Dictation tab at the top to configure settings for dictation. On the Dictation line, click On (
) to display the Keyboard preferences pane, and then click the Dictation tab at the top to configure settings for dictation. On the Dictation line, click On (![]() changes to
changes to ![]() ) to enable dictation. Click the Microphone pop-up menu (
) to enable dictation. Click the Microphone pop-up menu (![]() ) and select which microphone to use. Then click Language (
) and select which microphone to use. Then click Language (![]() ) and select the language to use. Last, click Shortcut (
) and select the language to use. Last, click Shortcut (![]() ) and specify the keyboard shortcut for invoking Dictation.
) and specify the keyboard shortcut for invoking Dictation.
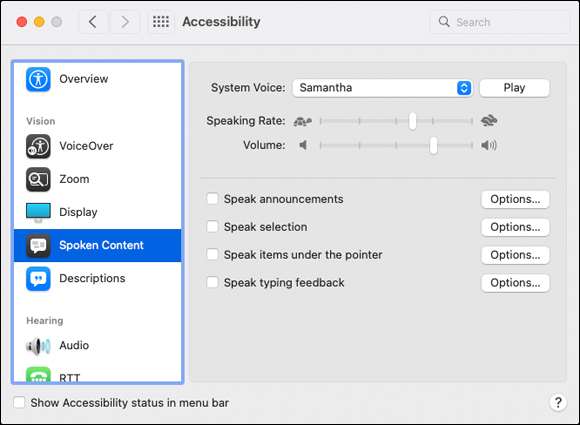
To configure Spoken Content settings — having your MacBook speak selected text and notifications to you — click Accessibility (![]() ) to display the Accessibility pane, and then click Spoken Content (
) to display the Accessibility pane, and then click Spoken Content (![]() ) to display the Spoken Content settings.
) to display the Spoken Content settings.
Click System Voice (![]() ) to choose among different system voices; click Customize on the pop-up menu to download other voices, including novelty voices; and then drag the Speaking Rate slider to set the speaking speed.
) to choose among different system voices; click Customize on the pop-up menu to download other voices, including novelty voices; and then drag the Speaking Rate slider to set the speaking speed.