
CHAPTER 12
Networking, Security, and Troubleshooting
macOS enables you to share files, printers, and scanners across networks. To keep your MacBook running well, you need to use macOS’s security features and perform basic maintenance, such as emptying the Trash and updating both macOS and your apps with the latest fixes. You may also need to troubleshoot your MacBook.
Connect to a Shared or Network Printer
Enable and Configure the Firewall
Reclaim Space by Emptying the Trash
Keep Your MacBook Current with Updates
Control Checking for Software and App Updates
Transfer Files Using AirDrop
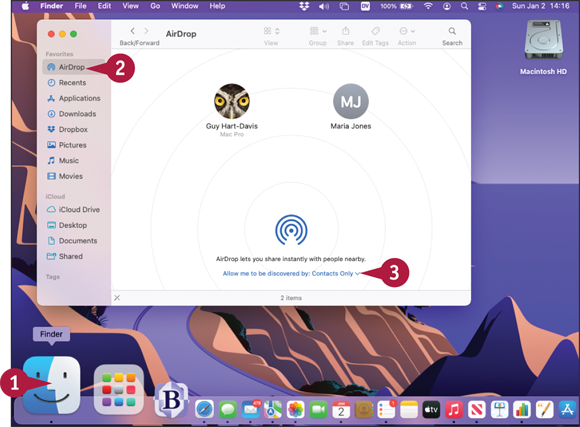
macOS’s AirDrop feature enables you to transfer files easily via Bluetooth and Wi-Fi between your MacBook and nearby Macs, iPads, or iOS devices. Activating AirDrop in a Finder window shows you available Macs and iOS devices, and you can drag a file to the Mac or iOS device to which you want to send it. Similarly, nearby Macs and iOS devices can send files to your MacBook via AirDrop, and you can decide whether to accept or reject each file.
Transfer Files Using AirDrop
Send a File via AirDrop
![]() Click Finder (
Click Finder (![]() ) on the Dock.
) on the Dock.
A Finder window opens.
Note: If AirDrop does not appear in the sidebar, click Go on the menu bar and then click AirDrop. If AirDrop does not appear on the Go menu either, your Mac is not compatible with AirDrop.
![]() Click AirDrop (
Click AirDrop (![]() ).
).
The AirDrop screen appears.
![]() Click Allow me to be discovered by.
Click Allow me to be discovered by.
The pop-up menu opens.
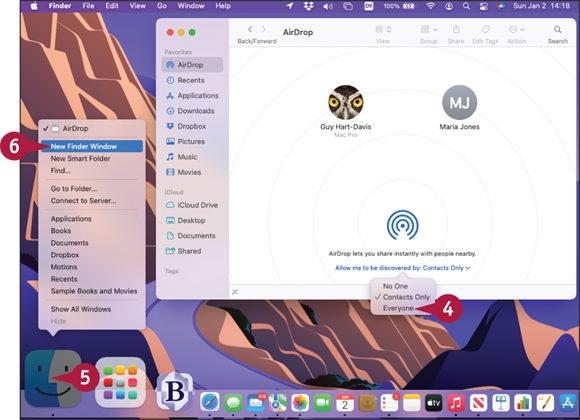
![]() Click No One, Contacts Only, or Everyone to specify which people’s Macs, iOS devices, and iPads can see your MacBook via AirDrop.
Click No One, Contacts Only, or Everyone to specify which people’s Macs, iOS devices, and iPads can see your MacBook via AirDrop.
![]() Press
Press ![]() + click Finder (
+ click Finder (![]() ) on the Dock.
) on the Dock.
The contextual menu opens.
![]() Click New Finder Window.
Click New Finder Window.
A second Finder window opens.
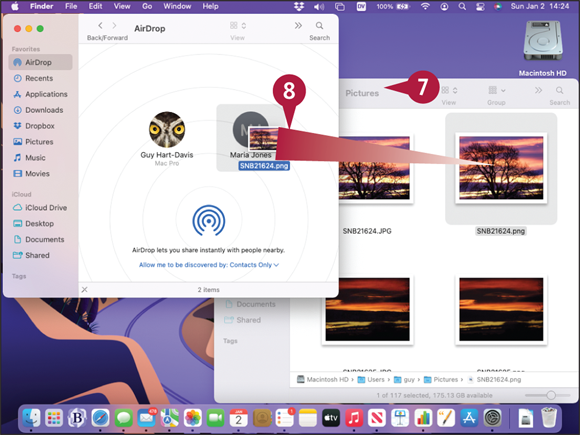
![]() Arrange the Finder windows so you can see both.
Arrange the Finder windows so you can see both.
![]() Drag the file to the icon for the Mac, iOS device, or iPad you want to send it to.
Drag the file to the icon for the Mac, iOS device, or iPad you want to send it to.
The Mac or iOS device prompts the user to accept the file.
If the user accepts the file, the Finder sends the file to the recipient.
Note: If the Mac iOS device declines the file, the Finder displays a dialog telling you so.

Receive a File via AirDrop
When someone sends you a file via AirDrop, a dialog appears on-screen.
![]() For a picture, the dialog shows a preview.
For a picture, the dialog shows a preview.
![]() Move the pointer over the dialog.
Move the pointer over the dialog.
The Options button appears.
![]() Click Options.
Click Options.
The Options menu opens.
![]() Click a menu item, such as Show in Finder or Open.
Click a menu item, such as Show in Finder or Open.
macOS performs the action you chose. For example, if you click Show in Finder, macOS opens a Finder window to the folder that contains the item — normally the Downloads folder. If you click Open, macOS opens the item in its default app, such as the Preview app for an incoming picture file.
Connect to a Shared Folder
macOS enables each Mac to share folders with other computers on the same network. You can connect your MacBook to other Macs and work with the files in their shared folders.
The user who sets up the sharing can assign other users different levels of access to the folder. Depending on the permissions set for the folder, you may be able to view files in the folder but not alter them, or you may be able to not only view but also create, change, and delete files in the folder.
Connect to a Shared Folder

![]() Click Finder (
Click Finder (![]() ) on the Dock.
) on the Dock.
A Finder window opens.
![]() If the Locations category is collapsed, position the pointer over it, and then click Expand (
If the Locations category is collapsed, position the pointer over it, and then click Expand (![]() ) to expand it.
) to expand it.
![]() Click Network (
Click Network (![]() ).
).
The list of devices on the network appears.
![]() Click the computer that is sharing the folder.
Click the computer that is sharing the folder.
![]() Click Connect As.
Click Connect As.
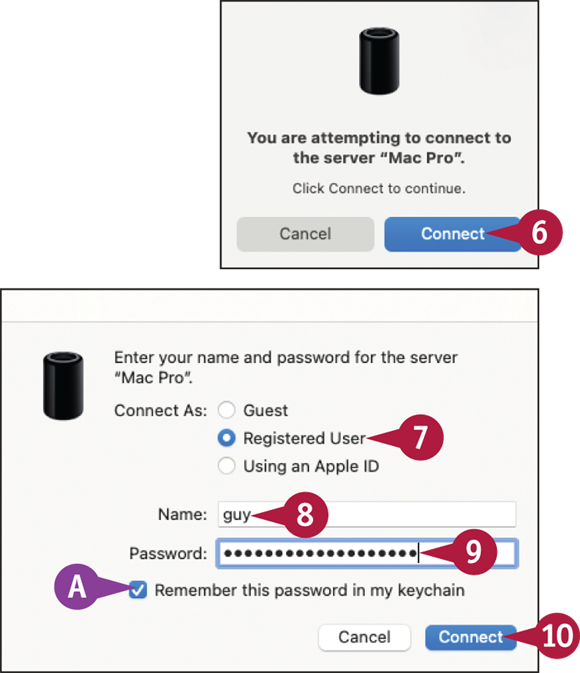
The You Are Attempting to Connect to the Server dialog opens.
![]() Click Connect.
Click Connect.
The Connect As dialog opens.
![]() Click Registered User (
Click Registered User (![]() changes to
changes to ![]() ) if you have a user account on the Mac. Click Using an Apple ID to use your Apple ID as your credential. Otherwise, click Guest (
) if you have a user account on the Mac. Click Using an Apple ID to use your Apple ID as your credential. Otherwise, click Guest (![]() changes to
changes to ![]() ) and go to step 10.
) and go to step 10.
![]() Type your username.
Type your username.
![]() Type your password.
Type your password.
![]() You can select Remember this password in my keychain (
You can select Remember this password in my keychain (![]() ) if you want to store your password for future use.
) if you want to store your password for future use.
![]() Click Connect.
Click Connect.
The Connect As dialog closes.
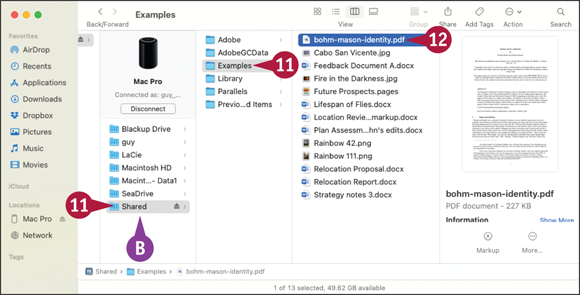
![]() The shared folders appear.
The shared folders appear.
Note: The shared folders you see are the folders you have permission to access. Other users may be able to access different folders.
![]() Navigate to the folder whose contents you want to see.
Navigate to the folder whose contents you want to see.
![]() Work with files as usual. For example, open a file to work on it, or copy it to your MacBook.
Work with files as usual. For example, open a file to work on it, or copy it to your MacBook.

![]() When you finish using the shared folder, click Eject (
When you finish using the shared folder, click Eject (![]() ) next to the computer’s name in the Locations list.
) next to the computer’s name in the Locations list.
Your MacBook disconnects from the computer sharing the files.
![]() You can also click Disconnect to disconnect from the sharing computer.
You can also click Disconnect to disconnect from the sharing computer.
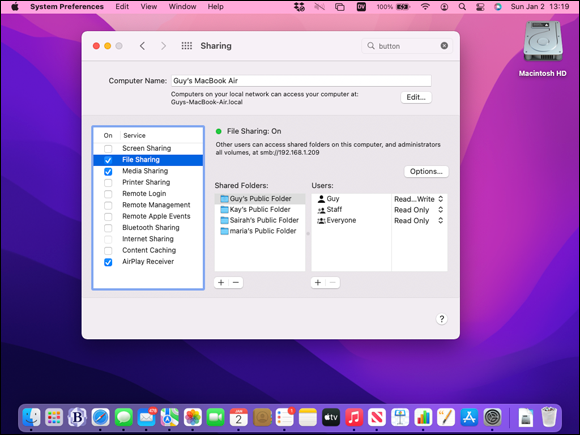
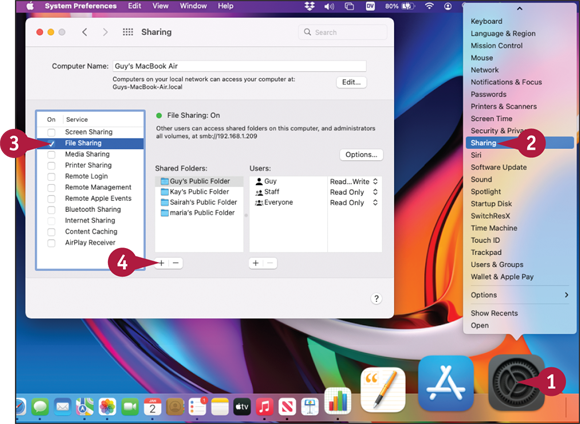
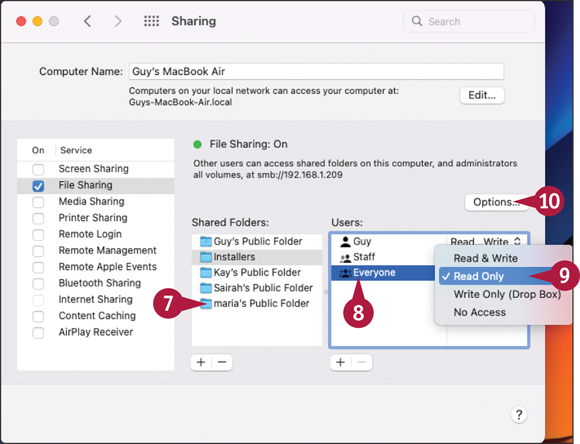
Share a Folder
macOS enables you to share folders on your MacBook with other users on the network. You can set different permissions for different users, such as allowing some users to change files, allowing other users to view files but not change them, and allowing other users no access at all.
To share a folder, you enable and configure the File Sharing service in Sharing preferences. System Preferences sets up sharing for Macs automatically. You can configure sharing for Windows users manually.
Share a Folder
![]() Press
Press ![]() + click System Preferences (
+ click System Preferences (![]() ) on the Dock.
) on the Dock.
The contextual menu opens.
![]() Click Sharing.
Click Sharing.
System Preferences opens and displays the Sharing pane.
![]() Select File Sharing (
Select File Sharing (![]() ).
).
System Preferences turns on file sharing.
![]() Click Add (
Click Add (![]() ) under the Shared Folders box.
) under the Shared Folders box.
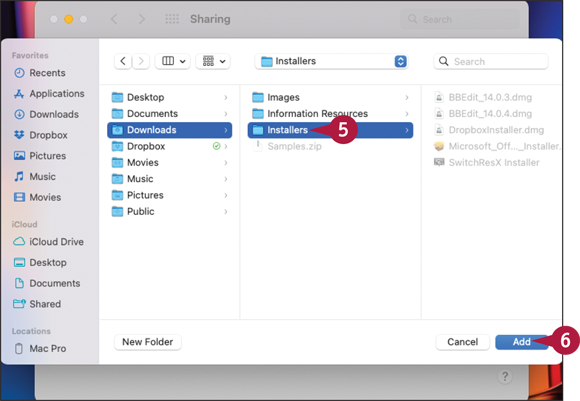
A dialog for choosing a folder opens.
![]() Click the folder you want to share.
Click the folder you want to share.
![]() Click Add.
Click Add.
Note: Each user account includes a drop box folder into which other people can place files and folders but whose contents only the user can see. To access this folder, click Finder (![]() ) on the Dock, click Go on the menu bar, and then click Home. Click or double-click Public, depending on the Finder view, and then click or double-click Drop Box.
) on the Dock, click Go on the menu bar, and then click Home. Click or double-click Public, depending on the Finder view, and then click or double-click Drop Box.
The dialog closes, and the folder appears in the Shared Folders list.
![]() Click the folder.
Click the folder.
![]() Click Everyone.
Click Everyone.
![]() Click the pop-up menu (
Click the pop-up menu (![]() ) and select the appropriate permission. See the tip for details.
) and select the appropriate permission. See the tip for details.
![]() If you need to configure sharing for Windows users, click Options. Otherwise, go to step 16.
If you need to configure sharing for Windows users, click Options. Otherwise, go to step 16.
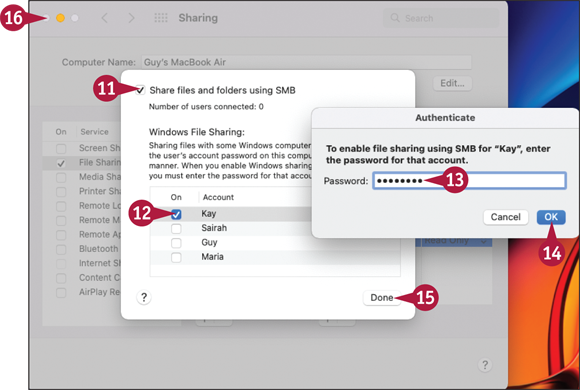
The Options dialog opens.
![]() Select Share files and folders using SMB (
Select Share files and folders using SMB (![]() ).
).
![]() Select On for a user (
Select On for a user (![]() ).
).
The Authenticate dialog opens.
![]() Type the user’s password.
Type the user’s password.
![]() Click OK.
Click OK.
The Authenticate dialog closes.
![]() Click Done.
Click Done.
The Options dialog closes.
![]() Click Close (
Click Close (![]() ).
).
System Preferences closes.
Connect to a Shared or Network Printer
macOS enables you to connect to shared printers and network printers and print documents to them. By sharing printers, you not only can enable each computer to print different types of documents as needed, but also reduce the costs of printing.
To use a shared printer or network printer, you first set it up on your MacBook using Printers & Scanners preferences. After you set up the printer, you can access it from the Print dialog just like a printer connected directly to your MacBook.
Connect to a Shared or Network Printer
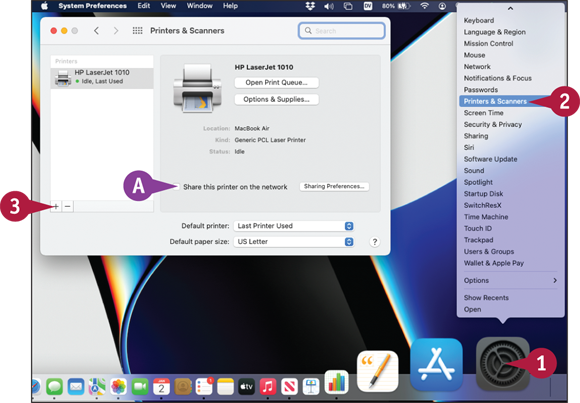
![]() Press
Press ![]() + click System Preferences (
+ click System Preferences (![]() ) on the Dock.
) on the Dock.
The contextual menu opens.
![]() Click Printers & Scanners.
Click Printers & Scanners.
System Preferences opens and displays the Printers & Scanners pane.
![]() You can share an existing printer with other users by selecting Share this printer on the network (
You can share an existing printer with other users by selecting Share this printer on the network (![]() ).
).
![]() Click Add (
Click Add (![]() ).
).
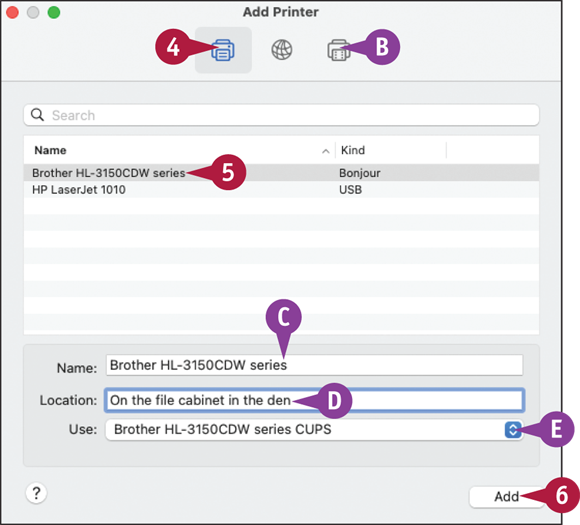
The Add Printer dialog opens.
![]() Click Default (
Click Default (![]() ).
).
![]() Click Windows (
Click Windows (![]() ) to see printers shared by Windows PCs on the network.
) to see printers shared by Windows PCs on the network.
The Default pane appears.
![]() Click the printer.
Click the printer.
![]() You can change the name shown in the Name box.
You can change the name shown in the Name box.
![]() You can change the location shown in the Location box.
You can change the location shown in the Location box.
![]() You can select a printer driver if macOS does not select one automatically.
You can select a printer driver if macOS does not select one automatically.
![]() Click Add.
Click Add.
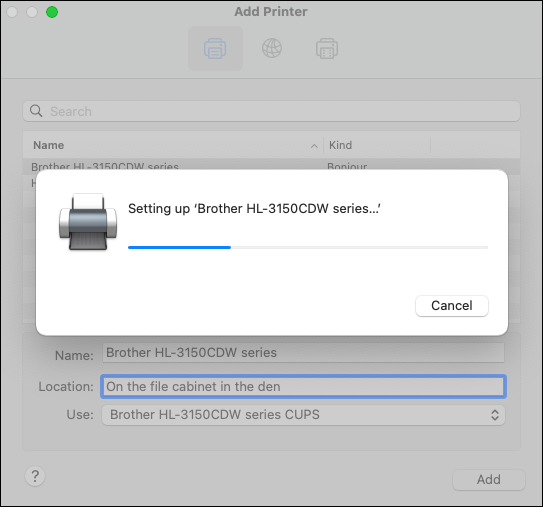
A dialog opens showing the progress as macOS downloads and installs the software.
The dialog then closes automatically.
The Add Printer dialog closes.
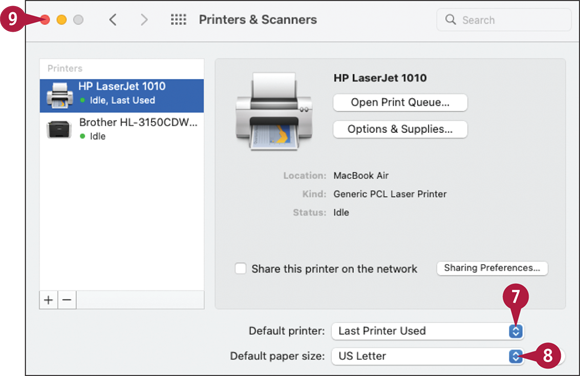
The printer appears in the Printers & Scanners pane.
![]() Click Default printer (
Click Default printer (![]() ) and click the printer to use as the default. Your options are Last Printer Used or one of the printers you have added.
) and click the printer to use as the default. Your options are Last Printer Used or one of the printers you have added.
![]() Click Default paper size (
Click Default paper size (![]() ) and click the default paper size, such as US Letter.
) and click the default paper size, such as US Letter.
![]() Click Close (
Click Close (![]() ).
).
System Preferences closes.
Turn Off Automatic Login
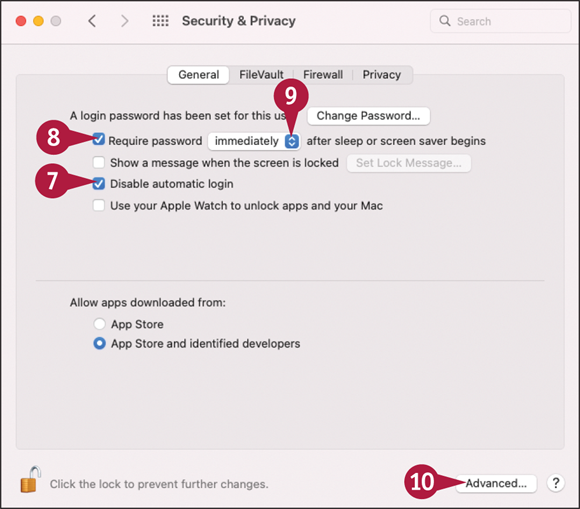
If your MacBook does not use the FileVault disk-encryption feature, you can set your MacBook to log in one user account automatically, bypassing the login screen. Automatic login is convenient if you are the only person who can access your MacBook, but it is more secure to disable automatic login so each user must log in.
To enable or disable automatic login, you use the Login Options pane in Users & Groups preferences. You must have an administrator account or provide administrator credentials to change these options.
Turn Off Automatic Login
![]() Press
Press ![]() + click System Preferences (
+ click System Preferences (![]() ) on the Dock.
) on the Dock.
The contextual menu opens.
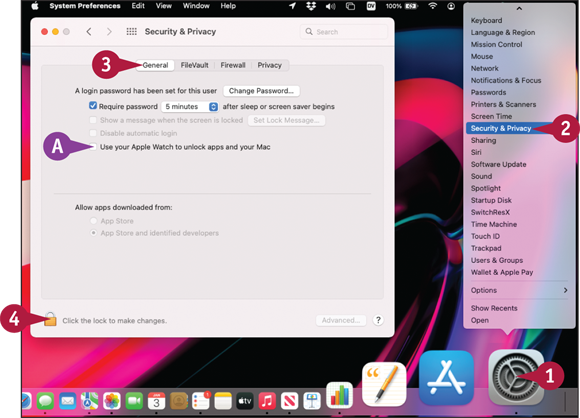
![]() Click Security & Privacy.
Click Security & Privacy.
System Preferences opens and displays the Security & Privacy pane.
![]() Click General.
Click General.
The General pane appears.
![]() If you wear an Apple Watch, you can select Use your Apple Watch to unlock apps and your Mac (
If you wear an Apple Watch, you can select Use your Apple Watch to unlock apps and your Mac (![]() ) to have the Apple Watch automatically unlock your MacBook.
) to have the Apple Watch automatically unlock your MacBook.
![]() Click the lock icon (
Click the lock icon (![]() ).
).
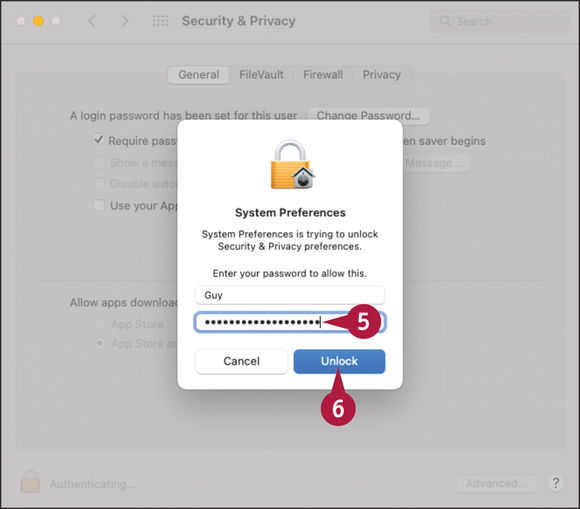
The authentication dialog opens.
![]() Type your password.
Type your password.
![]() Click Unlock.
Click Unlock.
System Preferences unlocks the preferences (![]() changes to
changes to ![]() ).
).
![]() Select Disable automatic login (
Select Disable automatic login (![]() ).
).
![]() For greater security, select Require password timing after sleep or screen saver begins (
For greater security, select Require password timing after sleep or screen saver begins (![]() ).
).
![]() Click the pop-up menu (
Click the pop-up menu (![]() ) and click immediately or a short time: 5 seconds, 1 minute, or 5 minutes.
) and click immediately or a short time: 5 seconds, 1 minute, or 5 minutes.
![]() Click Advanced.
Click Advanced.
The Advanced dialog opens.
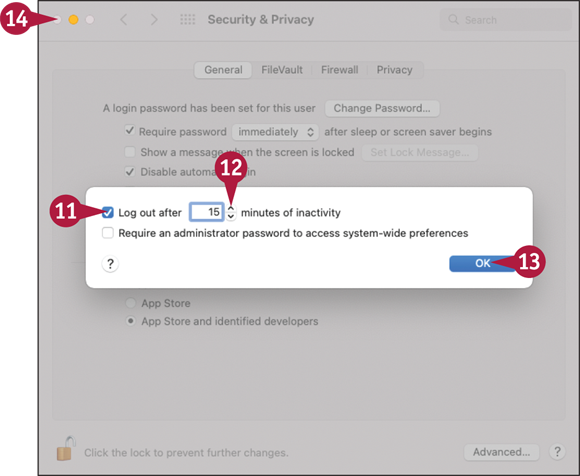
![]() Select Log out after N minutes of inactivity (
Select Log out after N minutes of inactivity (![]() ).
).
![]() Click the text box and enter the period of inactivity either by typing or by clicking the spin buttons.
Click the text box and enter the period of inactivity either by typing or by clicking the spin buttons.
![]() Click OK.
Click OK.
The Advanced dialog closes.
![]() Click Close (
Click Close (![]() ).
).
System Preferences closes.
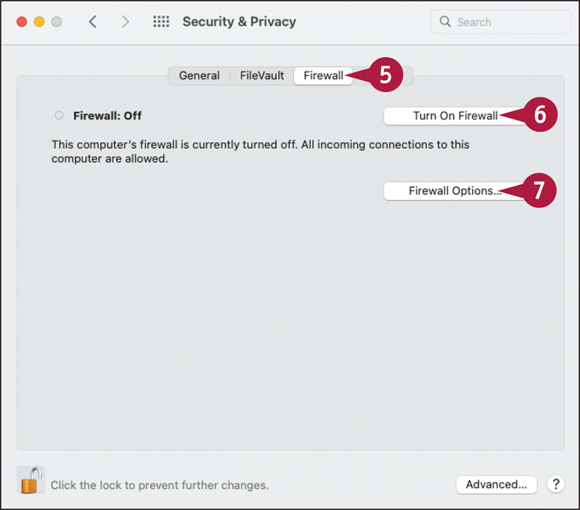
Enable and Configure the Firewall
macOS includes a firewall that protects your MacBook from unauthorized access by other computers on your network or on the Internet. macOS enables you to configure the firewall to suit your needs. To configure the firewall, you use the Firewall pane in Security & Privacy preferences.
Even if your Internet router includes a firewall configured to prevent Internet threats from reaching your network, you should use the macOS firewall to protect against threats from other computers on your network.
Enable and Configure the Firewall

![]() Press
Press ![]() + click System Preferences (
+ click System Preferences (![]() ) on the Dock.
) on the Dock.
The contextual menu opens.
![]() Click Security & Privacy.
Click Security & Privacy.
System Preferences opens and displays the Security & Privacy pane.
![]() Click the lock icon (
Click the lock icon (![]() ).
).
The authentication dialog opens.
![]() Touch your registered fingertip to the Touch ID sensor.
Touch your registered fingertip to the Touch ID sensor.
![]() Alternatively, click Use Password, type your password in the dialog that opens, and then click Unlock.
Alternatively, click Use Password, type your password in the dialog that opens, and then click Unlock.
System Preferences unlocks the preferences (![]() changes to
changes to ![]() ).
).
![]() Click Firewall.
Click Firewall.
The Firewall pane appears.
![]() If Firewall: Off appears, click Turn On Firewall.
If Firewall: Off appears, click Turn On Firewall.
The firewall starts, and Firewall: On appears.
![]() Click Firewall Options.
Click Firewall Options.
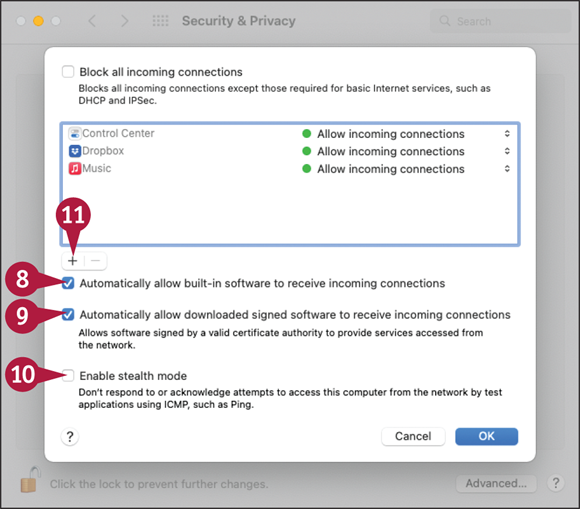
The Firewall Options dialog opens.
![]() Select Automatically allow built-in software to receive incoming connections (
Select Automatically allow built-in software to receive incoming connections (![]() ) if you want to allow your MacBook’s built-in software to receive incoming connections.
) if you want to allow your MacBook’s built-in software to receive incoming connections.
![]() Click Automatically allow downloaded signed software to receive incoming connections (
Click Automatically allow downloaded signed software to receive incoming connections (![]() changes to
changes to ![]() ) if you want to prevent apps you have installed from accepting connections automatically across the network.
) if you want to prevent apps you have installed from accepting connections automatically across the network.
![]() Select Enable stealth mode (
Select Enable stealth mode (![]() ) if you want to prevent your MacBook from responding to network test applications.
) if you want to prevent your MacBook from responding to network test applications.
![]() To allow incoming connections to a particular application, click Add (
To allow incoming connections to a particular application, click Add (![]() ).
).
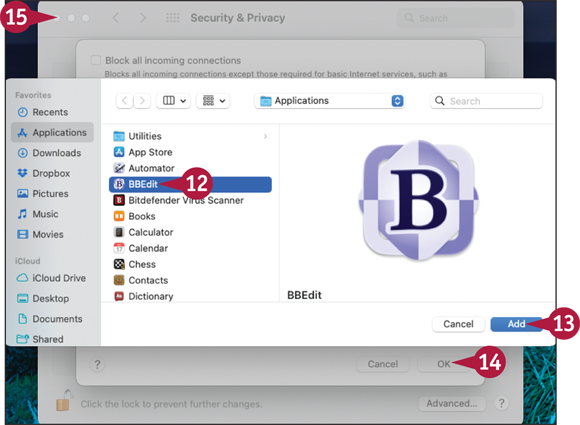
The Add dialog opens.
![]() Click the app.
Click the app.
![]() Click Add.
Click Add.
The Add dialog closes.
System Preferences adds the app to the list.
![]() Click OK.
Click OK.
The Firewall Options dialog closes.
![]() Click Close (
Click Close (![]() ).
).
System Preferences closes.
Choose Privacy Settings
The settings in the Privacy pane in Security & Privacy preferences enable you to control which apps can request access to potentially sensitive information, such as the MacBook’s location, and files, such as contacts and photos. You can also specify whether to send diagnostic data and usage data to Apple to help it improve macOS and its apps, and whether to share app crash data with the developers of the apps in question.
Choose Privacy Settings

![]() Press
Press ![]() + click System Preferences (
+ click System Preferences (![]() ) on the Dock.
) on the Dock.
The contextual menu opens.
![]() Click Security & Privacy.
Click Security & Privacy.
System Preferences opens and displays the Security & Privacy pane.
![]() Click the lock icon (
Click the lock icon (![]() ).
).
The authentication dialog opens.
![]() Touch your registered fingertip to the Touch ID sensor.
Touch your registered fingertip to the Touch ID sensor.

![]() Alternatively, click Use Password, type your password in the dialog that opens, and then click Unlock.
Alternatively, click Use Password, type your password in the dialog that opens, and then click Unlock.
The controls in the Security & Privacy pane become enabled.
![]() Click Privacy.
Click Privacy.
The Privacy pane appears.
![]() Click Location Services (
Click Location Services (![]() ).
).
The Location Services preferences appear.
![]() Click Enable Location Services to enable (
Click Enable Location Services to enable (![]() ) or disable (
) or disable (![]() ) the feature.
) the feature.
![]() If you enable Location Services, click each app or service in the list to enable (
If you enable Location Services, click each app or service in the list to enable (![]() ) or disable (
) or disable (![]() ) its use of Location Services, as appropriate.
) its use of Location Services, as appropriate.
![]() Click Details.
Click Details.

The Allow System Services to Determine Your Location dialog opens.
![]() In the upper section, click each item to enable (
In the upper section, click each item to enable (![]() ) or disable (
) or disable (![]() ) it from determining your location.
) it from determining your location.
![]() Click Show location icon in menu bar when System Services request your location to enable (
Click Show location icon in menu bar when System Services request your location to enable (![]() ) or disable (
) or disable (![]() ) the icon from appearing in the menu bar.
) the icon from appearing in the menu bar.
![]() Click Done.
Click Done.
![]() Click Contacts (
Click Contacts (![]() ) and choose which apps can access contacts. Similarly, choose settings for other apps and features, such as Calendars (
) and choose which apps can access contacts. Similarly, choose settings for other apps and features, such as Calendars (![]() ), Reminders (
), Reminders (![]() ), and Accessibility (
), and Accessibility (![]() ).
).

![]() Click Analytics & Improvements (
Click Analytics & Improvements (![]() ) toward the bottom of the left pane.
) toward the bottom of the left pane.
![]() Click Share Mac Analytics to enable (
Click Share Mac Analytics to enable (![]() ) or disable (
) or disable (![]() ) sharing diagnostic and usage data.
) sharing diagnostic and usage data.
![]() Click Improve Siri & Dictation to enable (
Click Improve Siri & Dictation to enable (![]() ) or disable (
) or disable (![]() ) sharing your Siri and Dictation recordings with Apple.
) sharing your Siri and Dictation recordings with Apple.
![]() Click Share with App Developers to enable (
Click Share with App Developers to enable (![]() ) or disable (
) or disable (![]() ) sharing data with third-party developers.
) sharing data with third-party developers.
![]() Click Close (
Click Close (![]() ).
).
System Preferences closes.
Reclaim Space by Emptying the Trash
In macOS, the Trash is a receptacle for files you delete from your MacBook’s drives. Any file you place in the Trash remains there until you empty the Trash or until the Trash runs out of space for files and automatically deletes the earliest files it contains; until then, you can recover the file from the Trash. You can reclaim drive space by emptying the Trash manually.
Reclaim Space by Emptying the Trash

Empty the Trash
![]() Click Trash (
Click Trash (![]() ) on the Dock.
) on the Dock.
Note: If the Trash icon on the Dock is the empty Trash can (![]() ), the Trash is already empty.
), the Trash is already empty.
A Finder window opens showing the contents of the Trash.
![]() You can click Icon View (
You can click Icon View (![]() ), List View (
), List View (![]() ), Column View (
), Column View (![]() ), or Gallery View (
), or Gallery View (![]() ) to change the view, as usual.
) to change the view, as usual.
![]() Look through the files and folders in the Trash to make sure it contains nothing you want to keep.
Look through the files and folders in the Trash to make sure it contains nothing you want to keep.
Note: To quickly view the contents of a file, use Quick Look. Click the file, and then press ![]() .
.
Note: You cannot open a file while it is in the Trash. If you want to open a file, you must remove it from the Trash.
![]() Click Empty.
Click Empty.
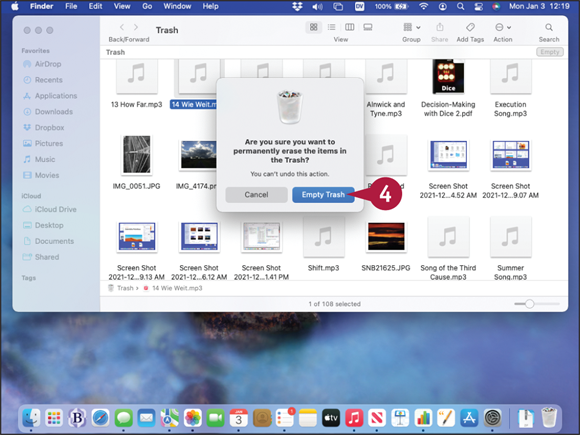
A dialog opens to confirm that you want to permanently erase the items in the Trash.
Note: You can turn off the confirmation of deleting files. Click Finder and then click Preferences. Click Advanced and then deselect Show warning before emptying the Trash (![]() ).
).
![]() Click Empty Trash.
Click Empty Trash.
macOS empties the Trash and then closes the Finder window.
Delete a File or Folder Immediately Without Emptying the Trash
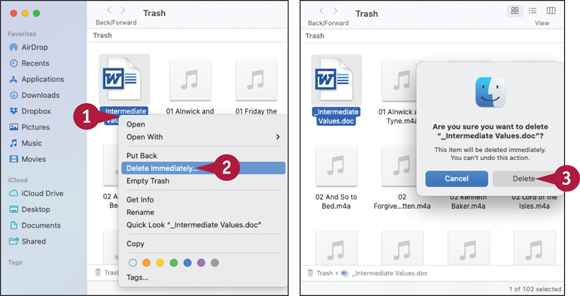
![]() In the Trash folder,
In the Trash folder, ![]() + click the file or folder.
+ click the file or folder.
The contextual menu opens.
![]() Click Delete Immediately.
Click Delete Immediately.
A confirmation dialog opens.
![]() Click Delete.
Click Delete.
macOS deletes the file or folder without affecting the rest of the Trash.
Restore a File or Folder to Its Previous Location
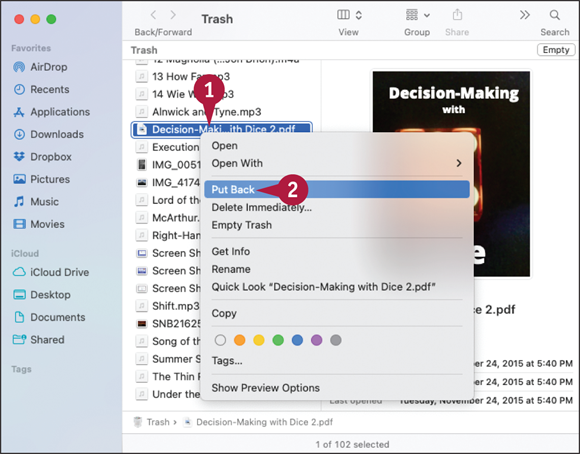
![]() In the Trash folder, press
In the Trash folder, press ![]() + click the file or folder.
+ click the file or folder.
The contextual menu opens.
![]() Click Put Back.
Click Put Back.
Note: You can also click the item, click Action (![]() ) to open the Action menu, and then click Put Back.
) to open the Action menu, and then click Put Back.
macOS restores the file or folder to its previous location.
Note: To move a file from the Trash to another folder, drag the file to that folder. For example, you can drag a file to the desktop.
Keep Your MacBook Current with Updates
You can use the App Store app built into macOS to check for updates to your MacBook, its operating system, and your App Store apps. When the App Store app finds updates, you can choose which to install.
Your MacBook must be connected to the Internet when you check for updates and download them. You can install most updates when your MacBook is either online or offline. Some updates require restarting your MacBook.
Keep Your MacBook Current with Updates

Note: macOS may display an Updates Available dialog prompting you to install updates. You can click Updates Available to go to the Updates tab in the App Store app, click Install to install the updates immediately, or click Later to install the updates later.
![]() A badge on the App Store icon indicates the number of updates available.
A badge on the App Store icon indicates the number of updates available.
![]() Click App Store (
Click App Store (![]() ) on the Dock.
) on the Dock.
Note: You can also open the App Store app by clicking Apple (![]() ) and then clicking App Store.
) and then clicking App Store.
The App Store app opens.
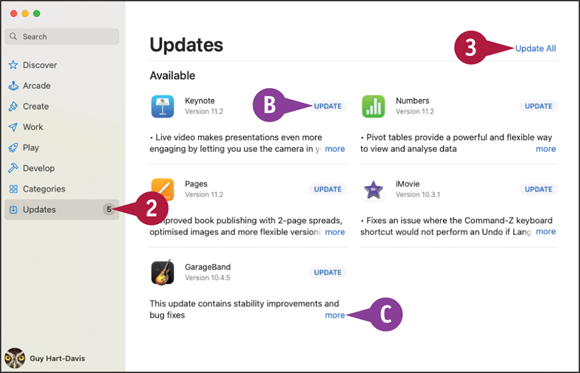
![]() Click Updates (
Click Updates (![]() ).
).
The Updates pane appears.
App Store automatically checks for updates.
If updates are available, the Available list shows the details.
Note: If the message No Updates Available appears, go to step 4.
![]() You can install an individual update by clicking Update. If the update requires a restart, click Restart.
You can install an individual update by clicking Update. If the update requires a restart, click Restart.
![]() You can click more to display full details of an update.
You can click more to display full details of an update.
![]() To install all the updates, click Update All.
To install all the updates, click Update All.

Note: If installing the updates requires a restart, App Store displays a dialog telling you so. Click Restart to restart now. Alternatively, click Later and then click Install in an Hour, Install Tonight, or Remind Me Tomorrow.
macOS installs the updates.
![]() A progress indicator appears for each app.
A progress indicator appears for each app.
![]() The Open button replaces the progress indicator when the app update is complete. App Store then moves the app to the Updated Recently category.
The Open button replaces the progress indicator when the app update is complete. App Store then moves the app to the Updated Recently category.
Note: macOS restarts your MacBook if necessary.

![]() Click Close (
Click Close (![]() ).
).
The App Store app closes.
Control Checking for Software and App Updates
In macOS, the Software Update feature handles updates for the operating system and built-in apps, while the App Store app handles updates for apps you add via the App Store. To keep your MacBook running smoothly and protect it from both online and offline threats, you should apply system software updates when they become available. You may also want to install app updates soon to take advantage of any bug fixes or improvements they offer.
Control Checking for Software and App Updates
Set Software Update to Update Your MacBook Automatically
![]() Press
Press ![]() + click System Preferences (
+ click System Preferences (![]() ) on the Dock.
) on the Dock.
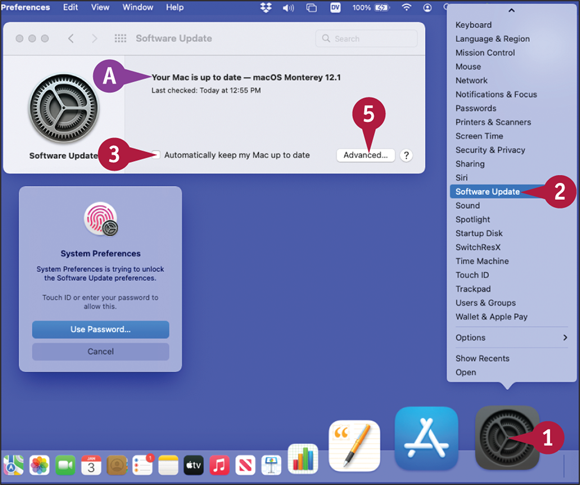
![]() Click Software Update.
Click Software Update.
System Preferences opens and displays the Software Update pane.
![]() The status readout tells you whether your MacBook is up to date.
The status readout tells you whether your MacBook is up to date.
![]() To keep your MacBook up to date, select Automatically keep my Mac up to date (
To keep your MacBook up to date, select Automatically keep my Mac up to date (![]() ). See the tip for advice.
). See the tip for advice.
![]() Touch the Touch ID scanner; or click Use Password, type your password, and then tap Unlock.
Touch the Touch ID scanner; or click Use Password, type your password, and then tap Unlock.
![]() For more options, click Advanced.
For more options, click Advanced.
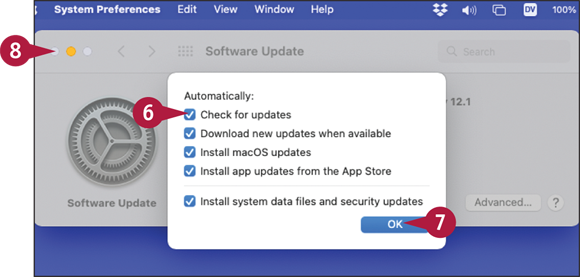
The Advanced dialog opens.
![]() Verify that each check box is selected (
Verify that each check box is selected (![]() ) unless you need to turn off a particular feature.
) unless you need to turn off a particular feature.
Note: Selecting the Automatically Keep My Mac Up to Date check box in the Software Update pane selects all the check boxes in the Advanced dialog. See the tip for details.
![]() Click OK.
Click OK.
The Advanced dialog closes.
![]() Click Close (
Click Close (![]() ).
).
The System Preferences window closes.
Set the App Store App to Install Updates Automatically
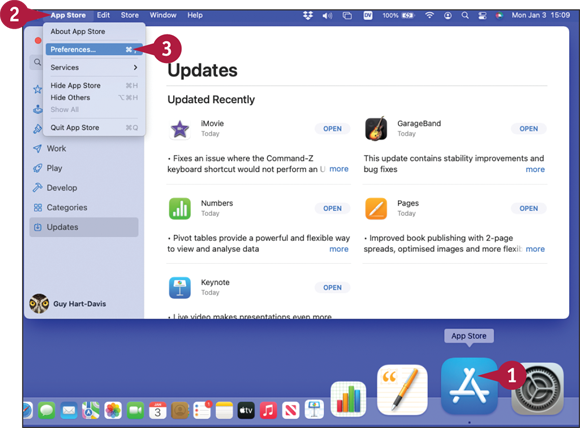
![]() Click App Store (
Click App Store (![]() ) on the Dock.
) on the Dock.
The App Store app opens.
![]() Click App Store.
Click App Store.
The menu opens.
![]() Click Preferences.
Click Preferences.
The Preferences window opens.
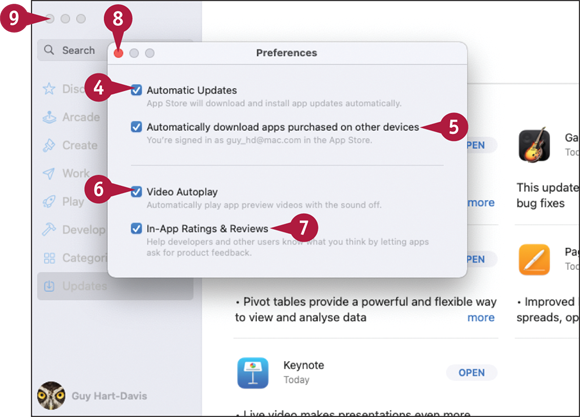
![]() Select Automatic Updates (
Select Automatic Updates (![]() ) to have App Store download and install app updates automatically.
) to have App Store download and install app updates automatically.
![]() Select Automatically download apps purchased on other devices (
Select Automatically download apps purchased on other devices (![]() ) if you want to automatically install apps you buy or get on your other Apple devices.
) if you want to automatically install apps you buy or get on your other Apple devices.
![]() Select Video Autoplay (
Select Video Autoplay (![]() ) if you want App Store to automatically play preview videos with the sound off.
) if you want App Store to automatically play preview videos with the sound off.
![]() Select In-App Ratings & Reviews (
Select In-App Ratings & Reviews (![]() ) if you want to allow apps to prompt you for ratings and reviews.
) if you want to allow apps to prompt you for ratings and reviews.
![]() Click Close (
Click Close (![]() ).
).
The Preferences window closes.
![]() Click Close (
Click Close (![]() ).
).
The App Store app closes.
Back Up Your Files
To enable you to keep your valuable files safe, macOS includes an automatic backup application called Time Machine. Time Machine automatically saves copies of your files to an external drive or an AirPort Time Capsule, a wireless router and backup device Apple discontinued in 2018. You can choose what drive to use, how frequently to back up your files, and what folders to include.
To protect your data, you must back up your files. Time Machine is the most convenient choice because it takes only a few minutes to set up and thereafter runs automatically.
Back Up Your Files
![]() If you will use an external drive for Time Machine, connect the drive to your MacBook.
If you will use an external drive for Time Machine, connect the drive to your MacBook.
![]() Press
Press ![]() + click System Preferences (
+ click System Preferences (![]() ) on the Dock.
) on the Dock.
The contextual menu appears.
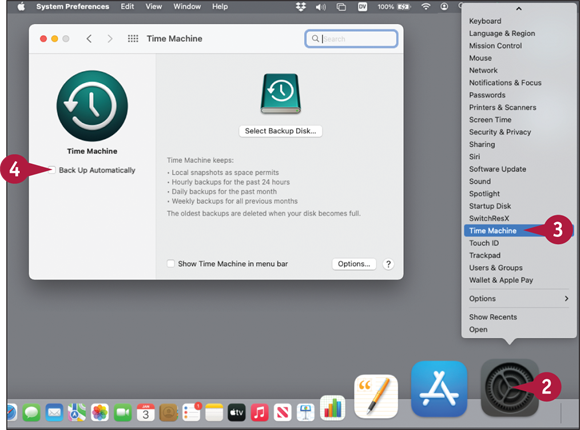
![]() Click Time Machine.
Click Time Machine.
The System Preferences window opens, showing the Time Machine preferences pane.
![]() Select Back Up Automatically (
Select Back Up Automatically (![]() ).
).
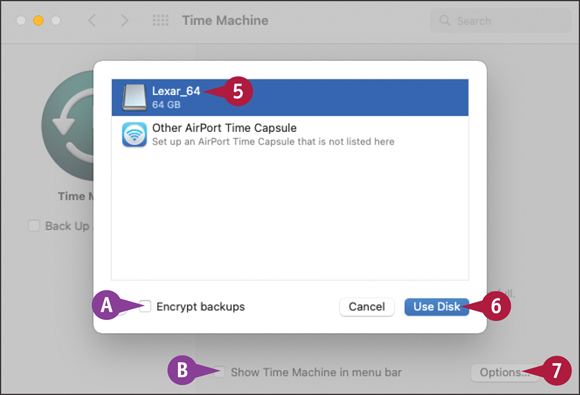
The Select Disk dialog opens.
![]() Click the drive or AirPort Time Capsule you want to use for backup.
Click the drive or AirPort Time Capsule you want to use for backup.
![]() You can select Encrypt backups (
You can select Encrypt backups (![]() ) to encrypt your backups.
) to encrypt your backups.
![]() Click Use Disk.
Click Use Disk.
The Select Disk dialog closes.
![]() You can select Show Time Machine in menu bar (
You can select Show Time Machine in menu bar (![]() ) to give yourself easy access to Time Machine.
) to give yourself easy access to Time Machine.
![]() Click Options.
Click Options.
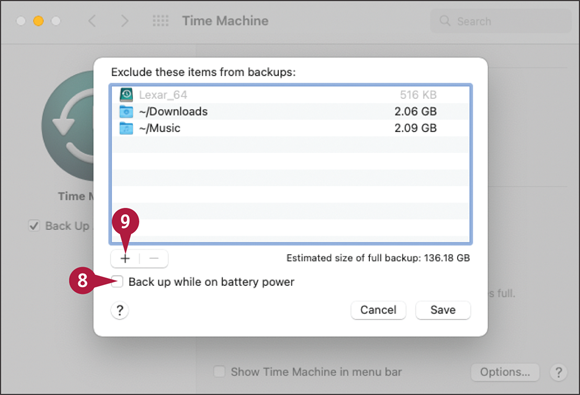
The Options dialog opens.
![]() Select Back up while on battery power (
Select Back up while on battery power (![]() ) only if you want your MacBook to perform backups even when it is running on battery power. Backing up on battery power will reduce the MacBook’s runtime on the battery.
) only if you want your MacBook to perform backups even when it is running on battery power. Backing up on battery power will reduce the MacBook’s runtime on the battery.
![]() Click Add (
Click Add (![]() ).
).

A dialog opens.
![]() Select each drive or folder you want to exclude from backup.
Select each drive or folder you want to exclude from backup.
![]() Click Exclude.
Click Exclude.
The dialog closes, and Time Machine adds the items to the Exclude These Items from Backups dialog.
![]() Click Save.
Click Save.
The Options dialog closes.
![]() Click Close (
Click Close (![]() ).
).
The System Preferences window closes.
Recover Files from Backup
The Time Machine feature enables you to easily recover files from your backups. So when you delete a file by accident or discover that a file has become corrupted, you can recover the file from backup by opening Time Machine. You can recover either the latest copy of the file or an earlier copy.
If you still have the current copy of the file that you recover, you can choose whether to overwrite that copy or keep it. Time Machine refers to this copy as the “original” file.
Recover Files from Backup

Note: This section shows you how to recover files using the Finder. To recover old data within Contacts, Calendar, or Mail, open the appropriate app and make it active before giving the Enter Time Machine command.
![]() Click Finder (
Click Finder (![]() ) on the Dock.
) on the Dock.
A Finder window opens.
![]() Navigate to the folder that used to contain the file or folder you want to recover.
Navigate to the folder that used to contain the file or folder you want to recover.
![]() Click Time Machine (
Click Time Machine (![]() ) on the menu bar.
) on the menu bar.
The Time Machine menu opens.
![]() Click Enter Time Machine.
Click Enter Time Machine.
Note: If Time Machine (![]() ) does not appear on the menu bar, click Launchpad (
) does not appear on the menu bar, click Launchpad (![]() ) on the Dock, and then click Time Machine (
) on the Dock, and then click Time Machine (![]() ) on the Launchpad screen.
) on the Launchpad screen.

Time Machine opens.
![]() The front window shows your MacBook’s drive or drives in their current state.
The front window shows your MacBook’s drive or drives in their current state.
![]() Backups of the selected drive or folder appear in the windows behind it, with the newest at the front.
Backups of the selected drive or folder appear in the windows behind it, with the newest at the front.
![]() The timeline on the right shows how far back in time the available backups go.
The timeline on the right shows how far back in time the available backups go.
![]() Click the date or time from which you want to recover the files or folders.
Click the date or time from which you want to recover the files or folders.
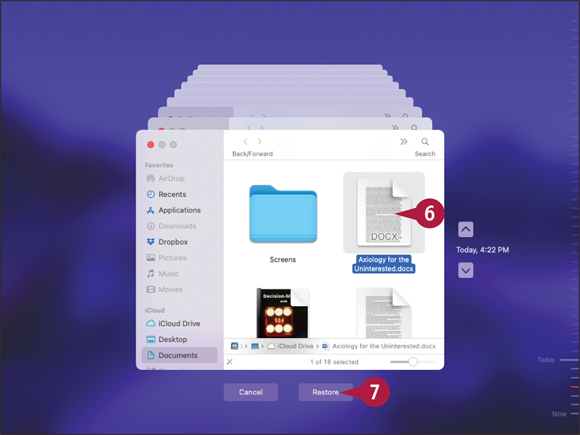
Time Machine brings the backup you chose to the front.
![]() Select the item or items you want to restore.
Select the item or items you want to restore.
![]() Click Restore.
Click Restore.
Time Machine disappears.
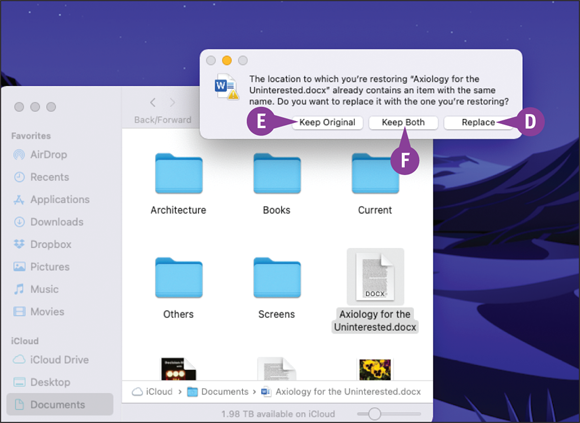
If restoring a file will overwrite the current version, the Copy dialog opens.
![]() Choose how to handle the file conflict:
Choose how to handle the file conflict:
![]() Click Replace to replace the current file with the older file.
Click Replace to replace the current file with the older file.
![]() Click Keep Original to keep the current file.
Click Keep Original to keep the current file.
![]() Click Keep Both to keep both versions of the file. Time Machine adds “(Original)” to the name of the current version.
Click Keep Both to keep both versions of the file. Time Machine adds “(Original)” to the name of the current version.
Recover When macOS Crashes
Normally, macOS runs stably and smoothly, but sometimes the operating system may suffer a crash. Crashes can occur for various reasons, including power fluctuations, bad memory modules, an app that has been corrupted, or problems with disk permissions.
Your MacBook may detect that the crash has occurred and display an informational message, but in other cases the MacBook’s screen may simply freeze and continue displaying the same information. Normally, you can recover from a crash by turning off your MacBook’s power and then turning it on again.
Recover When macOS Crashes

Recover from the Screen Freezing
![]() If the pointer shows the “wait” cursor that looks like a spinning beach ball, wait a couple of minutes to see if macOS can recover from the problem. If the pointer has disappeared, go straight to step 2.
If the pointer shows the “wait” cursor that looks like a spinning beach ball, wait a couple of minutes to see if macOS can recover from the problem. If the pointer has disappeared, go straight to step 2.
![]() To verify that your MacBook is not responding, press keys on the keyboard or move your fingers on the trackpad.
To verify that your MacBook is not responding, press keys on the keyboard or move your fingers on the trackpad.
Note: If possible, connect your MacBook to power when attempting to recover from a freeze or a crash.

![]() Press and hold
Press and hold ![]() +
+ ![]() and press the MacBook’s power button.
and press the MacBook’s power button.
![]() If the MacBook does not respond to that key combination, press and hold the MacBook’s power button for about 4 seconds.
If the MacBook does not respond to that key combination, press and hold the MacBook’s power button for about 4 seconds.
The MacBook turns off.
![]() Wait at least 8 seconds, and then press the power button once to restart the MacBook.
Wait at least 8 seconds, and then press the power button once to restart the MacBook.
Recover from a Detected Crash
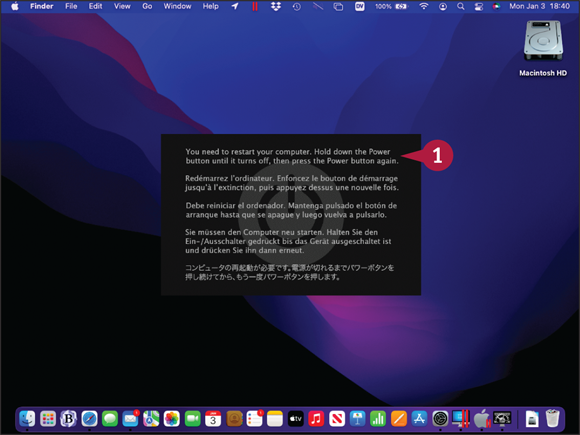
When your MacBook detects a macOS crash, it dims the screen and displays a message in the center.
![]() Read the message for information.
Read the message for information.
![]() Press and hold the MacBook’s power button for about 4 seconds.
Press and hold the MacBook’s power button for about 4 seconds.
The MacBook turns off.
![]() Wait at least 8 seconds, and then press the power button once to restart the MacBook.
Wait at least 8 seconds, and then press the power button once to restart the MacBook.
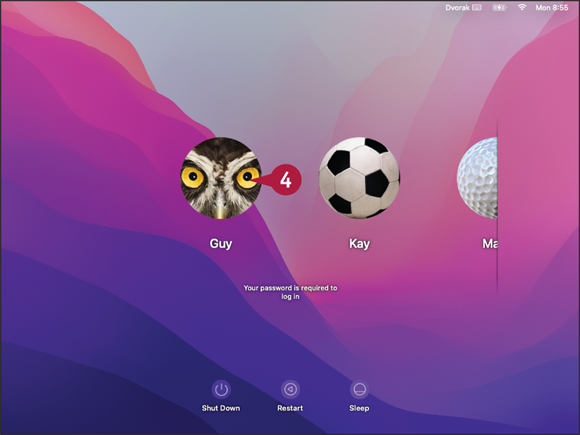
Note: Depending on how your MacBook is configured, macOS may log you in automatically or display the Login dialog.
The login screen appears.
![]() Click your username, and then log in to your account as normal.
Click your username, and then log in to your account as normal.
Troubleshoot Corrupt Preference Files
macOS and many apps enable you to set preferences to customize the way they run. Each app stores its configuration in a special file called a preference file. Sometimes a preference file becomes corrupted, which may prevent the app from running properly or cause it to crash.
To fix the problem, you delete the preference file. This forces the app to create a new preference file from scratch with default settings. When the app is running properly again, you can choose your custom settings again.
Troubleshoot Corrupt Preference Files
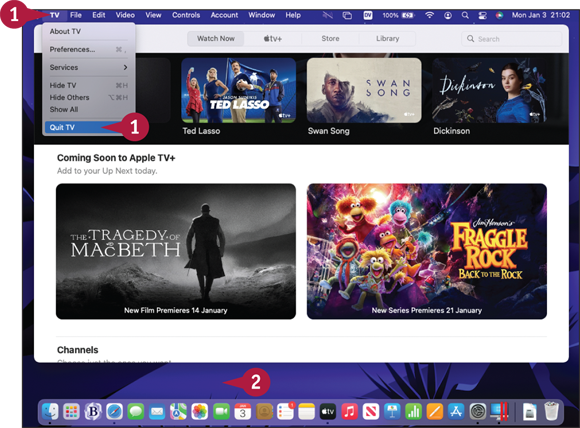
![]() Quit the problem app if it is running. Click the app’s menu, such as the TV menu for the Contacts app, and then click the Quit command, such as Quit TV.
Quit the problem app if it is running. Click the app’s menu, such as the TV menu for the Contacts app, and then click the Quit command, such as Quit TV.
Note: If you cannot quit the app by using its Quit command, force quit it. Press ![]() + click the app’s Dock icon and click Force Quit on the contextual menu.
+ click the app’s Dock icon and click Force Quit on the contextual menu.
![]() Click an open space on the desktop.
Click an open space on the desktop.

The Finder becomes active.
![]() Click Go.
Click Go.
The Go menu opens.
![]() Press and hold
Press and hold ![]() .
.
The Library item appears on the Go menu.
Note: macOS hides the Library item on the Go menu until you press ![]() .
.
![]() Click Library.
Click Library.
The contents of the Library folder appear.
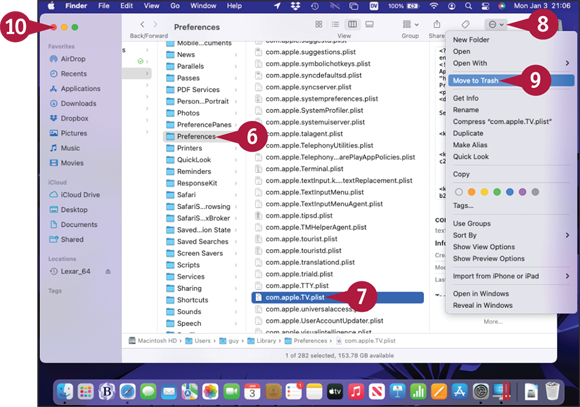
![]() Click Preferences.
Click Preferences.
The contents of the Preferences folder appear.
![]() Click the preference file for the problem application. See the tip for help on identifying the file.
Click the preference file for the problem application. See the tip for help on identifying the file.
Note: If the application has two or more preference files, move them all to the Trash.
![]() Click Action (
Click Action (![]() ).
).
The Action menu opens.
![]() Click Move to Trash.
Click Move to Trash.
macOS moves the file to the Trash.
![]() Click Close (
Click Close (![]() ).
).
The Finder window closes.
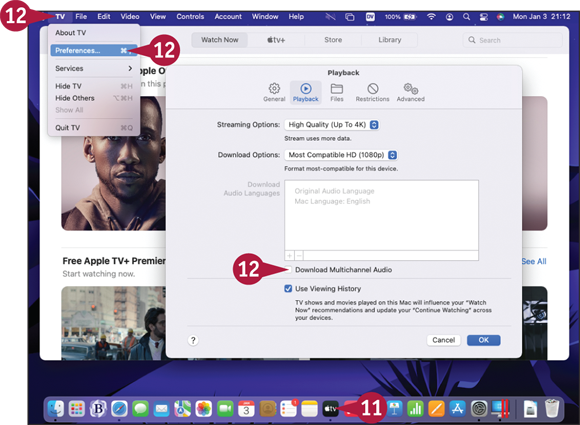
![]() Start the application. Continuing the example, click TV (
Start the application. Continuing the example, click TV (![]() ) on the Dock.
) on the Dock.
The application creates a new preference file containing default settings.
![]() Set preferences in the application. In most applications, click the application’s menu and click Preferences to open the Preferences window.
Set preferences in the application. In most applications, click the application’s menu and click Preferences to open the Preferences window.
The application saves your preferences in the new preference file.
Recover, Restore, or Reinstall macOS
If your MacBook is suffering frequent freezes or crashes, you should turn to Apple’s Recovery toolkit, which enables you to repair disk problems, restore from a backup, or reinstall macOS from scratch. To use Recovery, you start your MacBook from its recovery partition and then use the Recovery utilities. You can then run First Aid from outside macOS, restore your macOS installation from a Time Machine backup, or reinstall macOS from scratch.
Launch macOS Recovery

To launch macOS Recovery on a MacBook with an Apple Silicon processor, such as an M1, M1 Pro, or M1 Max, shut the MacBook down as usual. Then press the Power button and keep holding it down until you see the message Loading startup options appear on the screen. Release the Power button and wait for the Recovery screen to appear.
On a MacBook with an Intel processor, click Apple (![]() ), click Restart, and then click Restart in the confirmation dialog that opens. When the startup chime plays, hold down
), click Restart, and then click Restart in the confirmation dialog that opens. When the startup chime plays, hold down ![]() +
+ ![]() , and keep holding down the keys until the Apple logo appears on the screen. Release the keys and wait for the Recovery screen to appear.
, and keep holding down the keys until the Apple logo appears on the screen. Release the keys and wait for the Recovery screen to appear.
Run First Aid from Recovery Utilities
After launching Recovery Utilities, you can open Disk Utility and run First Aid on a disk.
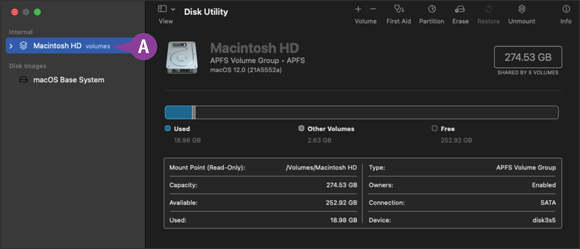
Click Disk Utility (![]() ) on the Recovery Utilities screen, and then click Continue. On the Disk Utility screen, click Macintosh HD volumes (A) in the left pane, and then click First Aid (
) on the Recovery Utilities screen, and then click Continue. On the Disk Utility screen, click Macintosh HD volumes (A) in the left pane, and then click First Aid (![]() ) on the toolbar.
) on the toolbar.
When First Aid finishes, click Disk Utility on the menu bar, and then click Quit Disk Utility. The Recovery screen then appears again.
Restore macOS from a Time Machine Backup
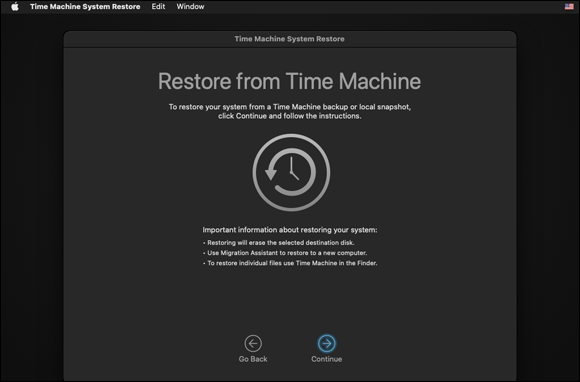
If you have been using Time Machine to back up your MacBook’s files, you can restore your MacBook from a recent backup.
Click Restore from Time Machine on the Recovery Utilities screen, and then click Continue. On the Restore from Time Machine screen, click Continue again, and then follow the instructions for selecting the backup to use and restoring it to the MacBook.
Reinstall macOS from Recovery Utilities

If nothing else has worked, you may need to reinstall macOS on your MacBook. Click Reinstall macOS Monterey on the Recovery Utilities screen to start the process. On the macOS Monterey screen, click Continue, and then follow the prompts.