
Networking Raspberry Pi
Your Pi works well on a network. You can control it remotely, share files, set up a web server, send e-mail, and even put your Pi on the Internet. Linux network tools provide a complete kit of software parts you can install and use as needed.
Using ssh for Remote Command Line Access
Get Started with curl and wget
Understanding Networking
Your Pi works well on a network. You can control it remotely from another computer. You can set it up as a web server so you can create custom web pages to display useful information, such as readings from temperature sensors.
Understanding “Headless” Operation

“Headless” operation means remote control. Instead of typing on your Pi's keyboard and viewing its output on a monitor or TV, you can use the keyboard and screen of another computer on your network. You can also work with your Pi from any remote location over the Internet.
Understanding ssh
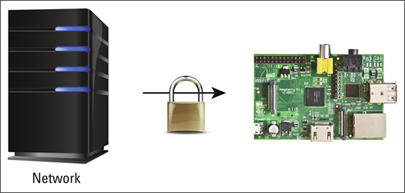
You can control your Pi in more than one way. ssh (secure shell) gives you remote access to the command line of your Pi. You can type commands and view the Pi's response on any remote computer with a terminal client — software for sending and viewing text. The ssh connection is encrypted — secured — so you can type passwords and other sensitive details safely.
Understanding Virtual Network Computing
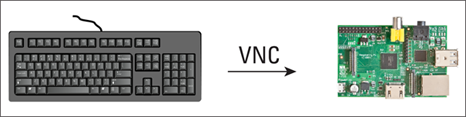
You can use VNC (Virtual Network Computing) for remote desktop access. VNC supports mouse actions and desktop graphics. You can view the Pi's desktop in a window on another computer and work remotely. To use VNC, you must install special VNC software on your Pi. You can use Safari on a Mac to access your Pi. On Windows, you can use free VNC client software.
Understanding Samba
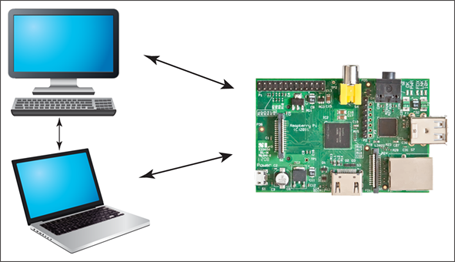
If you install a samba server on your Pi you can access its files using standard file viewers, such as Finder on the Mac and Windows Explorer on Windows systems. You do not need extra software. Although it is possible to set up Samba so you can use it over the Internet, Samba works best on your local network. It is a good way to set up your Pi as a file server and to exchange files with other networked computers.
Understanding Web Servers
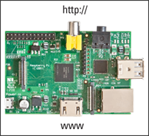
If you plan to use your Pi for software or hardware projects, you can install a web server to generate pages you can view in any web browser. Optionally, you can make the pages visible on the Internet. With a web server your Pi can display information generated by a script or small application. For example, your Pi can read information from hardware sensors, process the data, and use the web server to display results as text or graphics that can be viewed from any computer or smartphone with a web browser.
You can use your Pi to send and receive e-mail. The Pi is not very fast. It is not a good replacement for e-mail on a desktop or laptop computer. But you can set up e-mail to send you messages, warnings, and notifications. For example, if you set up a home automation system, your Pi can send you an e-mail if the outdoor temperature drops below freezing.
Set a Static IP Address
You can simplify networking by giving your Pi a static IP address. IP, or Internet Protocol, addresses consist of four numbers separated by periods, for example 192.168.0.20.
For applications such as ssh you need to know your Pi's address. Your home router assigns network addresses automatically, but you can force it to assign an address of your choice to your Pi. You can then use this address when you want to access your Pi remotely.
Set a Static IP Address
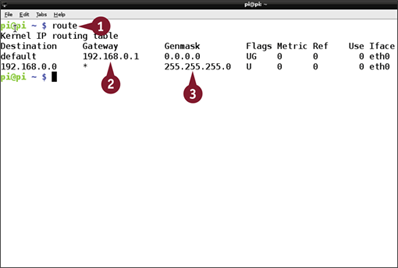
![]() At the command prompt or in LXTerminal, type route and press
At the command prompt or in LXTerminal, type route and press ![]() .
.
Note: The route command shows important information about your network.
![]() Make a note of the IP address under the Gateway heading.
Make a note of the IP address under the Gateway heading.
Note: The first two numbers are usually 192.168 for home networks and 10.1 for business and college networks.
![]() Make a note of the numbers at the bottom of the Genmask column, usually 255.255.255.0.
Make a note of the numbers at the bottom of the Genmask column, usually 255.255.255.0.
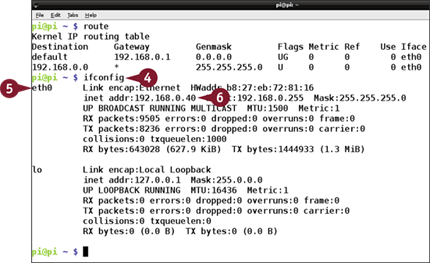
![]() Type ifconfig and press
Type ifconfig and press ![]() .
.
![]() Find eth0 if you have a wired network connection, or wlan0 if you are using Wi-Fi.
Find eth0 if you have a wired network connection, or wlan0 if you are using Wi-Fi.
Note: eth0 is the Ethernet (cabled network) connection. wlan is a Wi-Fi connection.
![]() Make a note of the address after inet addr:.
Make a note of the address after inet addr:.
Note: On a home network, the third number is usually 0, 1, or 2. The last number is usually between 2 and 254.
![]() Type sudo nano/etc/network/interfaces and press
Type sudo nano/etc/network/interfaces and press ![]() .
.
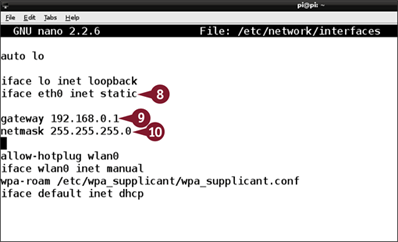
![]() Find dhcp after eth0 inet or wlan0 inet. Delete it and replace it with static.
Find dhcp after eth0 inet or wlan0 inet. Delete it and replace it with static.
![]() Add a new line with gateway followed by the number you noted in step 2.
Add a new line with gateway followed by the number you noted in step 2.
![]() Add a new line with netmask followed by the number you noted in step 3.
Add a new line with netmask followed by the number you noted in step 3.

![]() Add a new line with address and the address you noted in step 6.
Add a new line with address and the address you noted in step 6.
Note: This address is now your Pi's permanent static network address.
![]() Press
Press ![]() +
+![]() ,
, ![]() , and
, and ![]() +
+![]() to save the changes and exit nano.
to save the changes and exit nano.
![]() Type sudo reboot to restart your Pi.
Type sudo reboot to restart your Pi.
The Pi reboots. Its IP address is set permanently to the address you typed in step 11.
Set Up ssh
You can use a command called ssh (short for secure shell) to log in to your Pi from another computer and control it by typing commands. The Pi responds just as if you were typing commands from the Pi's own keyboard.
ssh is enabled by default. If you use your Pi as a public web server, you should disable it for security. Otherwise, your Pi could be hacked. If you use your Pi on your home network only and do not allow access from the Internet, you can skip this section.
Set Up ssh
![]() Power up Raspberry Pi and wait for it to boot.
Power up Raspberry Pi and wait for it to boot.
![]() Type sudo raspi-config and press
Type sudo raspi-config and press ![]() at the command prompt.
at the command prompt.
Note: You can also launch the desktop and make the changes in LXTerminal, as shown here.
![]() Press
Press ![]() and
and ![]() to highlight Advanced Options, and press
to highlight Advanced Options, and press ![]() to select.
to select.
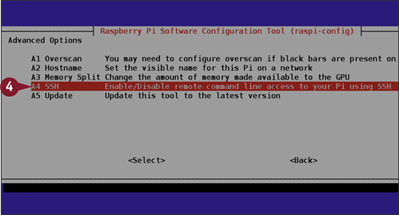
![]() Press
Press ![]() and
and ![]() to highlight SSH, and press
to highlight SSH, and press ![]() to select.
to select.

![]() Press
Press ![]() and
and ![]() to select Enable or Disable.
to select Enable or Disable.
![]() Press
Press ![]() .
.
Setup Options flashes a confirmation message.
![]() Press
Press ![]() to select OK and return to the main Setup Options screen.
to select OK and return to the main Setup Options screen.
ssh is enabled or disabled, as you specified.
Using ssh for Remote Command Line Access
After you set up ssh on your Pi, you can log in to your Pi remotely from any computer on your network with an ssh client. On a Mac, you can use Terminal. On a PC, a popular choice is the free PuTTY application from www.chiark.greenend.org.uk/~sgtatham/putty.
ssh uses a random security key. By default, all copies of Raspbian have the same key. This makes your Pi very easy to hack. For maximum security, generate a unique key before using ssh.
Using ssh for Remote Command Line Access
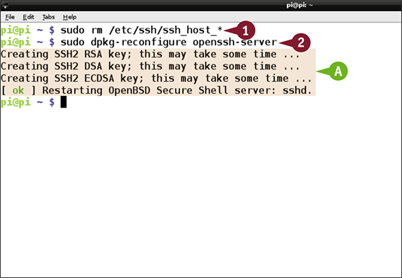
![]() At the command prompt, type sudo rm/etc/ssh/ssh_host_* and press
At the command prompt, type sudo rm/etc/ssh/ssh_host_* and press ![]() .
.
Note: Step 1 deletes the existing security keys.
![]() At the prompt, type sudo dpkg-reconfigure openssh-server and press
At the prompt, type sudo dpkg-reconfigure openssh-server and press ![]() .
.
A The Pi generates new keys for ssh access and restarts the ssh server.
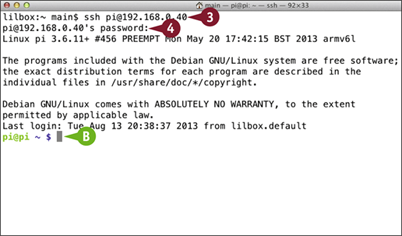
![]() Using a terminal application on your remote computer, type ssh pi@[your Pi's static IP address] and press
Using a terminal application on your remote computer, type ssh pi@[your Pi's static IP address] and press ![]() .
.
Note: If your Pi's address is 192.168.0.40, type ssh [email protected] and press ![]() . To set a static IP address, see the section “Set a Static IP Address.”
. To set a static IP address, see the section “Set a Static IP Address.”
Note: Type yes and press ![]() if ssh asks you to confirm the connection.
if ssh asks you to confirm the connection.
![]() Type the password for the Pi user.
Type the password for the Pi user.
B ssh logs you in. You can now use the Pi's command prompt remotely.
Note: If ssh notes that the key has changed, type ssh-keyscan [your Pi's static IP address] >> ~/.ssh/known_hosts and press ![]() to validate the new key.
to validate the new key.
Set Up Remote Access with VNC
You can install a package called tightvncserver to allow remote desktop control of your Pi. You can then run tightvncserver manually to create a virtual desktop.
The virtual desktop does not appear on your Pi's monitor. You can only access it remotely from another computer over the network. If you have already launched the desktop with startx, tightvnserver creates another desktop. You cannot access the second desktop from your Pi.
Set Up Remote Access with VNC
Set Up Remote Access on the Pi
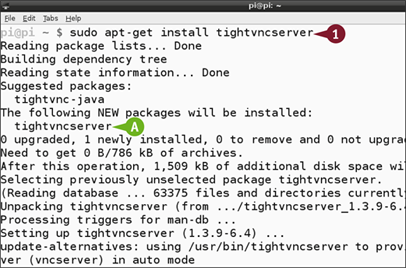
![]() At the command prompt or in LXTerminal type sudo apt-get install tightvncserver and press
At the command prompt or in LXTerminal type sudo apt-get install tightvncserver and press ![]() .
.
Note: Type Y and press ![]() if asked to confirm.
if asked to confirm.
A Linux installs tightvncserver.
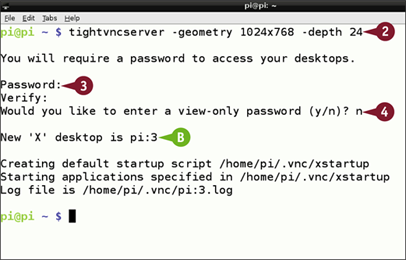
![]() Type tightvncserver -geometry 1024x768 -depth 24 and press
Type tightvncserver -geometry 1024x768 -depth 24 and press ![]() .
.
Note: You can set the desktop resolution by typing different numbers after geometry, up to 1920 × 1200.
Note: VNC is slow. Use the smallest acceptable resolution.
![]() Type a password and type it again at the verify prompt.
Type a password and type it again at the verify prompt.
![]() Type and verify a view-only password.
Type and verify a view-only password.
Note: The two passwords can be the same. You will only be asked to type them the first time you launch tightvncserver.
B tightvncserver creates an “invisible” desktop you can access from another computer.
Access the Pi Desktop on a Mac
![]() Launch Safari.
Launch Safari.
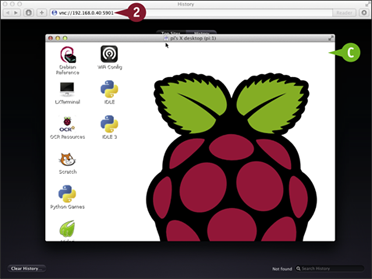
![]() Type vnc://[your Pi's static address]:5901 and press
Type vnc://[your Pi's static address]:5901 and press ![]() into Safari's address bar.
into Safari's address bar.
C The Pi's desktop appears on your Mac. You can use the mouse and keyboard in the usual way.
Note: Screen updates are much slower than they are on the Pi.
Access the Pi Desktop on a PC
![]() Visit the Real VNC site at www.realvnc.com/download/viewer.
Visit the Real VNC site at www.realvnc.com/download/viewer.
![]() Download and install either the 32-bit or 64-bit viewer, depending on your version of Windows.
Download and install either the 32-bit or 64-bit viewer, depending on your version of Windows.
![]() Launch the Viewer.
Launch the Viewer.
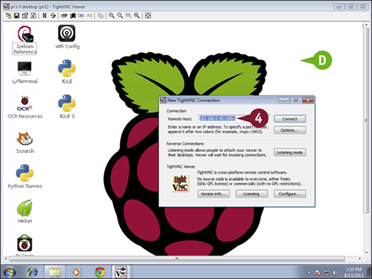
![]() Type the Pi's IP address followed by::5901 in the dialog box.
Type the Pi's IP address followed by::5901 in the dialog box.
D The Viewer loads the Pi's desktop. You can control it with your PC's keyboard and mouse.
Note: To improve image quality at the expense of speed, or vice versa, select Options and click and drag the Allow JPEG, set image quality slider.
Share Files with Samba
You can install an application called Samba to share the files on your Pi with other computers on your network. You can access files directly from Finder on a Mac or Windows Explorer on a PC. You do not need extra software.
Samba is easy to install, but the contents of the configuration file that controls Samba are critical. You must use the correct settings, or Samba does not work. This example sets up a configuration file that is known to work correctly.
Share Files with Samba
Note: You can find the code used in this section on this book's website, www.wiley.com/go/tyvraspberrypi.
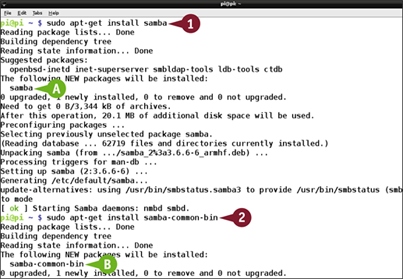
![]() At the command prompt or in LXTerminal, type sudo apt-get install samba and press
At the command prompt or in LXTerminal, type sudo apt-get install samba and press ![]() .
.
Note: Type y if asked to confirm.
A Linux downloads and installs the main Samba package web server.
![]() At the command prompt or in LXTerminal, type sudo apt-get install samba-common-bin and press
At the command prompt or in LXTerminal, type sudo apt-get install samba-common-bin and press ![]() .
.
B Linux downloads and installs supporting tools for Samba.
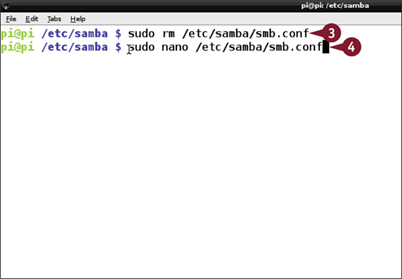
![]() Type sudo rm /etc/samba/smb.conf and press
Type sudo rm /etc/samba/smb.conf and press ![]() .
.
Note: This deletes the default configuration file, which does not work on the Pi.
![]() Type sudo nano /etc/samba/smb.conf and press
Type sudo nano /etc/samba/smb.conf and press ![]() .
.
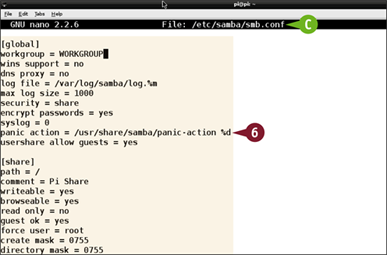
C nano creates an empty file.
![]() On the first line, type sudoworkgroup = followed by the name of your Windows workgroup, or WORKGROUP if you do not have one.
On the first line, type sudoworkgroup = followed by the name of your Windows workgroup, or WORKGROUP if you do not have one.
![]() Type the rest of the text exactly as shown in the figure.
Type the rest of the text exactly as shown in the figure.
Note: This configuration sets up a share, or access point, for the Pi on your network.
![]() Press
Press ![]() +
+![]() ,
, ![]() , and then
, and then ![]() +
+![]() to save the file.
to save the file.
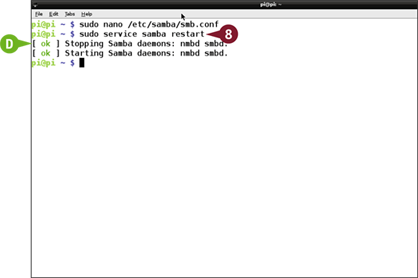
![]() Type sudo service samba restart and press
Type sudo service samba restart and press ![]() .
.
D Samba restarts and loads the new configuration.
After a few minutes, the Pi appears on your network. You can log in as a guest with no password and access all files.
TIPS
Why does the Pi not appear in Finder on a Mac?
You may need to force Finder to recognize the Pi. In Finder, click Go and then Connect to Server. Type smb://pi or smb://[your Pi's static IP address] and press ![]() . Finder should then connect to the share. Double-click the Share icon to access the files on the Pi.
. Finder should then connect to the share. Double-click the Share icon to access the files on the Pi.
Why does the Pi not appear in Windows Explorer?
Windows has a complex relationship with Samba shares. On XP, shares usually work. On Windows 7 and 8, support is version dependent. Try selecting Network in Windows Explorer and typing //[your Pi's static IP address] into the address bar. If your version of Windows 7 or 8 supports Samba, the Pi should appear as a share. Double-click it to access the files.
Set Up a Simple Web Server
You can use your Pi to set up a web server. When you type the Pi's IP address into a browser, it displays pages you have designed and uploaded to a special directory on the Pi. Pages can include static text and images. Your Pi can also generate smart pages that include live information, such as a temperature reading from a sensor or the contents of a Twitter feed.
You can install various web server packages. This example installs a simple web server called lighttpd, which is powerful enough to be useful, but is also easy to set up.
Set Up a Simple Web Server

![]() At the command prompt or in LXTerminal, type sudo apt-get install lighttpd and press
At the command prompt or in LXTerminal, type sudo apt-get install lighttpd and press ![]() .
.
![]() Type Y when asked to confirm.
Type Y when asked to confirm.
A Linux downloads and installs the lighttpd web server.
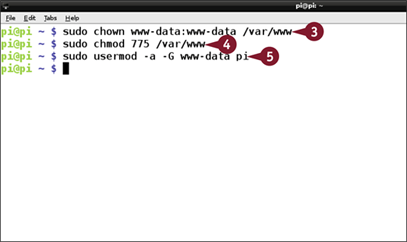
![]() Type sudo chown www-data:www-data/var/www and press
Type sudo chown www-data:www-data/var/www and press ![]() .
.
![]() Type sudo chmod 775/var/www and press
Type sudo chmod 775/var/www and press ![]() .
.
![]() Type sudo usermod -a -G www-data pi and press
Type sudo usermod -a -G www-data pi and press ![]() .
.
Note: These “magic word” commands in steps 3 to 5 set up the web server's directory for web content, and give the Pi user access to it.
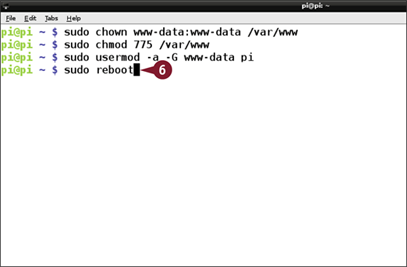
![]() Type sudo reboot and press
Type sudo reboot and press ![]() to reboot the Pi.
to reboot the Pi.
Note: You must reboot to force the web server to notice your changes.
![]() Type startx and press
Type startx and press ![]() to launch the desktop.
to launch the desktop.
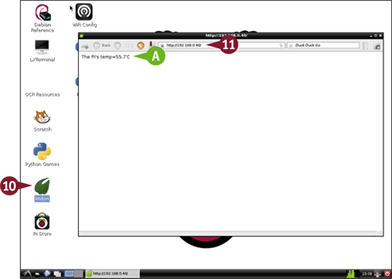
![]() Double-click the Midori icon to launch the Midori web browser.
Double-click the Midori icon to launch the Midori web browser.
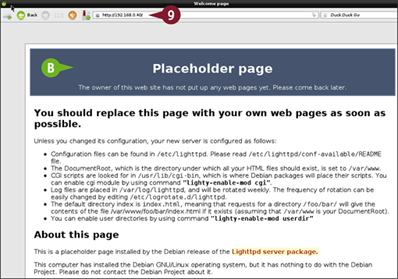
![]() Type your Pi's static IP address into the browser address box and press
Type your Pi's static IP address into the browser address box and press ![]() .
.
B The browser loads a web page. The page is hosted on your Pi.
Note: The placeholder content is in /var/www/index.lighttpd.html.
Note: You can also access the server on your Pi only by typing localhost into a web browser address bar.
Create a Simple Web Page
You can create a simple web page on your Pi by writing a file called index.html to the /var/www directory. The file can contain any valid fixed HTML. The web server looks for a file starting with “index” when it receives a request to display a page.
This example creates a page that displays a line of text. If you have web programming experience, you can create a more complex web page by adding more content to index.html.
Create a Simple Web Page
![]() At the command prompt or in LXTerminal type sudo nano/var/www/index.html and press
At the command prompt or in LXTerminal type sudo nano/var/www/index.html and press ![]() .
.
Linux launches nano.
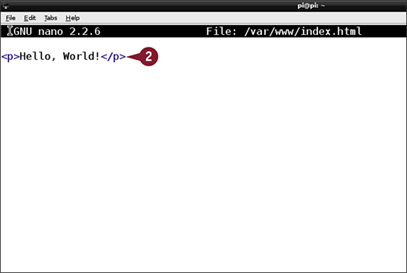
![]() Type <p>Hello, World!</p>.
Type <p>Hello, World!</p>.
![]() Press
Press ![]() +
+![]() ,
, ![]() , and
, and ![]() +
+![]() to save and close the file.
to save and close the file.
Note: This very simple demo content does not include all the code used on commercial web pages, but all browsers display it without errors.
![]() Type startx and press
Type startx and press ![]() to launch the desktop if it is not already running.
to launch the desktop if it is not already running.
![]() Double-click the Midori icon to launch the Midori web browser.
Double-click the Midori icon to launch the Midori web browser.
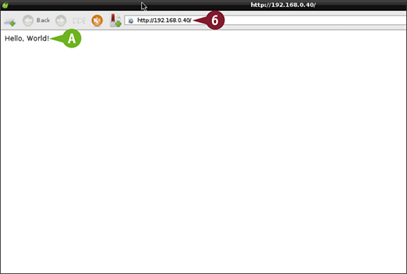
![]() Type your Pi's static IP address into the address bar and press
Type your Pi's static IP address into the address bar and press ![]() .
.
A The browser loads the page you created.
Note: If you are not familiar with HTML you can find many tutorials and examples online, such as the course at www.w3schools.com.
Install PHP
You can install PHP (short for PHP: Hypertext Processor) to enhance your web server so it can generate smart web pages. If you do not install PHP, you can only create static web pages with fixed text and images.
With PHP, your web server can generate smart web pages that can read information, process it, and display the results. PHP is complex and has many features. You can generate graphics, format text in creative ways, save and load information, and create complex custom web applications.
Install PHP
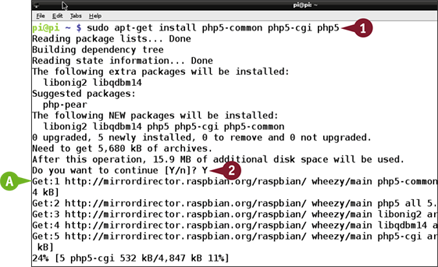
![]() At the main command prompt or in LXTerminal, type sudo apt-get install php5-common php5-cgi php5 and press
At the main command prompt or in LXTerminal, type sudo apt-get install php5-common php5-cgi php5 and press ![]() .
.
![]() Type Y and press
Type Y and press ![]() when asked to confirm.
when asked to confirm.
A Linux downloads and installs the elements that make up PHP.
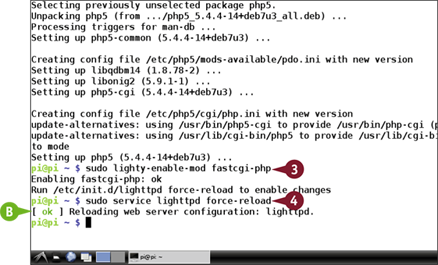
![]() Type sudo lighty-enable-mod fastcgi-php and press
Type sudo lighty-enable-mod fastcgi-php and press ![]() .
.
Note: This tells lighttpd that PHP is available.
![]() Type sudo service lighttpd force-reload and press
Type sudo service lighttpd force-reload and press ![]() .
.
B Linux restarts the web server. You can now create web pages that include PHP scripts.
Note: To find out more about PHP, view the free introductory course at www.w3schools.com.
Create a Smart Web Page
After you install PHP, you can create a smart web page that uses PHP to run a Linux command or script, and display the results. Save your PHP code in index.php file in /var/www. (If index.php exists, the server ignores index.html.)
This example runs a Linux command that checks the Pi's internal temperature and displays it. Although this example is very simple, it demonstrates how you can run a script and show the results in a web page.
Create a Smart Web Page
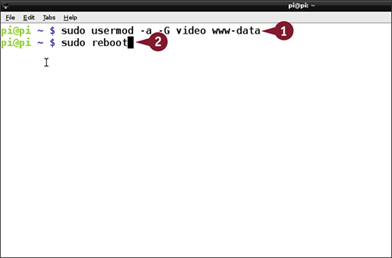
![]() At the command prompt or in LXTerminal type sudo usermod -a -G video www-data and press
At the command prompt or in LXTerminal type sudo usermod -a -G video www-data and press ![]() .
.
Note: This is a “magic word” command that allows the web server to read the Pi's temperature.
Note: Somewhat unexpectedly, the Pi's temperature sensor is part of its video system.
![]() Type sudo reboot, press
Type sudo reboot, press ![]() , and wait for the Pi to reboot.
, and wait for the Pi to reboot.
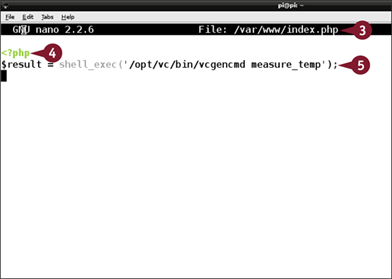
![]() At the command prompt or in LXTerminal type sudo nano/var/www/index.php and press
At the command prompt or in LXTerminal type sudo nano/var/www/index.php and press ![]() .
.
![]() Type <?php and press
Type <?php and press ![]() .
.
Note: This line tells the web server to interpret what follows as a PHP script.
![]() Type $result = shell_exec(‘/opt/vc/bin/vcgencmd measure_temp’); and press
Type $result = shell_exec(‘/opt/vc/bin/vcgencmd measure_temp’); and press ![]() .
.
Note: In PHP, shell_exec runs a Linux command. The “magic word” command that follows displays the Pi's temperature.

![]() Type echo ("The Pi's ".$result); and press
Type echo ("The Pi's ".$result); and press ![]() .
.
Note: This line uses PHP's echo command to display a result.
![]() Type ?>.
Type ?>.
Note: This line tells the web server the PHP script is complete.
![]() Press
Press ![]() +
+![]() ,
, ![]() , and
, and ![]() +
+![]() to save and close the file.
to save and close the file.
Note: nano automatically colorizes PHP scripts. Text strings are colored yellow. The text remains black while you type.
![]() Type startx and press
Type startx and press ![]() to launch the desktop.
to launch the desktop.
![]() Double-click the Midori icon to launch the Midori web browser.
Double-click the Midori icon to launch the Midori web browser.
![]() Type your Pi's static IP address into the address bar and press
Type your Pi's static IP address into the address bar and press ![]() .
.
A The browser loads a web page that runs a script to display the Pi's current temperature. To update the reading, reload the page.
Send E-Mails
You can install an e-mail package to send e-mails using Linux commands. The Pi is not powerful enough to be a full desktop replacement, so this option works well for automated e-mails generated by scripts or custom software you create with PHP or Python. For example, you can send e-mails with temperature warnings, weather alerts, or timed reminders. You can also grab frames from a webcam and send them in attachments.
This example uses a simple e-mail package called ssmtp to forward e-mail via a Gmail account. You can send e-mail to any address, but it appears to come from the Gmail account.
Send E-Mails
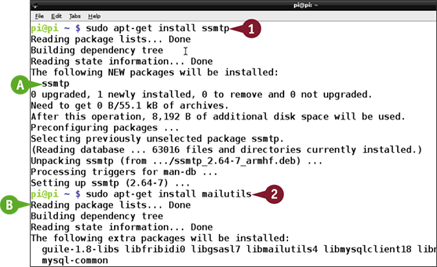
![]() At the command prompt or in LXTerminal, type sudo apt-get install ssmtp and press
At the command prompt or in LXTerminal, type sudo apt-get install ssmtp and press ![]() .
.
A Linux downloads and installs the ssmtp mail sender.
![]() Type sudo apt-get install mailutils and press
Type sudo apt-get install mailutils and press ![]() .
.
B Linux downloads and installs extra e-mail tools used by ssmtp.
Note: Visit http://mail.google.com to set up a Gmail account.
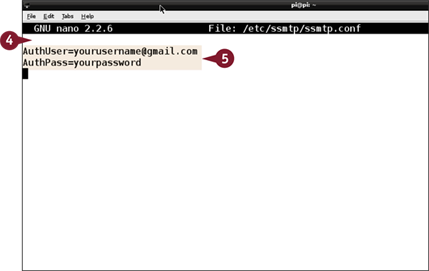
![]() Type sudo nano/etc/ssmtp/ssmtp.conf and press
Type sudo nano/etc/ssmtp/ssmtp.conf and press ![]() .
.
![]() Repeat
Repeat ![]() +
+![]() to delete every line.
to delete every line.
![]() Add the following lines:
Add the following lines:
AuthUser= [[email protected]]
AuthPass= [yourpassword]

![]() Continue adding lines:
Continue adding lines:
mailhub=smtp.gmail.com:587
UseSTARTTLS=YES
FromLineOverride=YES
![]() Press
Press ![]() +
+![]() ,
, ![]() , and
, and ![]() +
+![]() to save the file.
to save the file.
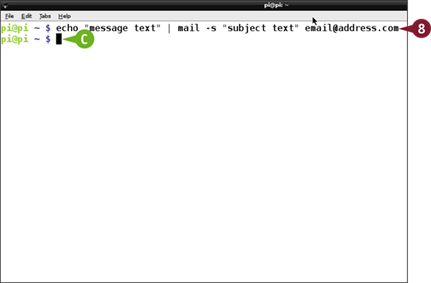
![]() At the command prompt, type echo “message text” | mail -s “subject text” [email protected] and press
At the command prompt, type echo “message text” | mail -s “subject text” [email protected] and press ![]() .
.
C The command prompt disappears for a few seconds while Linux sends the e-mail.
Linux sends the e-mail to the address you specify with the subject and message in the command.
Note: When the e-mail arrives, it appears to come from your Gmail account.
Get Started with curl and wget
You can the curl and wget commands to access information on web sites directly from the command line or a script, without having to use a browser.
Most popular sites, including Twitter, Facebook, and public utility sites such as transport authorities offer an API, or Application Programming Interface, to their web services. You can use curl and wget commands to exchange information with these sites. This example introduces curl and wget but does not attempt to work with any specific API.
Get Started with curl and wget
curl
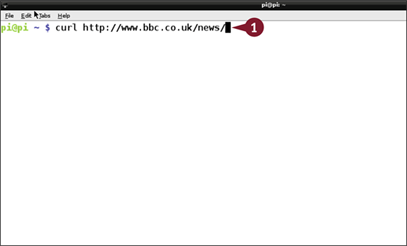
![]() At the command prompt or in LXTerminal, type curl http://www.bbc.co.uk/news/ and press
At the command prompt or in LXTerminal, type curl http://www.bbc.co.uk/news/ and press ![]() .
.
Note: Remember to add the final / character. You will see an error message if you do not include it.
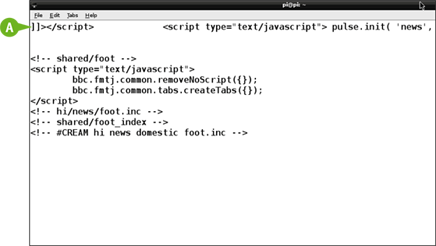
A curl downloads and displays the raw HTML used by the BBC news site.
Note: The raw HTML is many pages. You can stop scrolling at any time by pressing ![]() +
+![]() .
.
wget
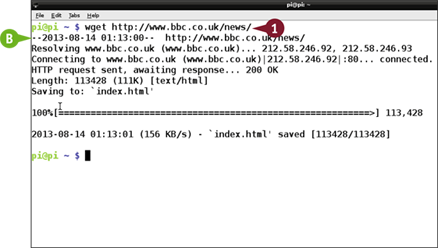
![]() At the command prompt or in LXTerminal, type wget http://www.bbc.co.uk/news/ and press
At the command prompt or in LXTerminal, type wget http://www.bbc.co.uk/news/ and press ![]() .
.
B Linux downloads the raw HTML into a file called index.html.
![]() Type less index.html and press
Type less index.html and press ![]() to view the file.
to view the file.
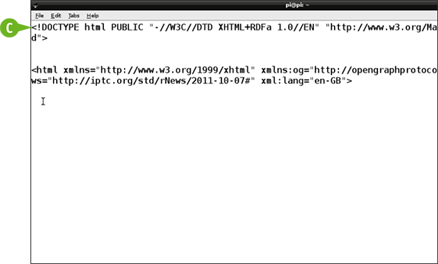
C Linux displays the contents of index.html, split into screens.
Note: wget and curl download exactly the same content.
Note: If you repeat wget, it generates files called index.html.1, index.html.2, and so on.
Put Your Pi on the Internet
You can put your Pi on the Internet and make your web server accessible from any location. If your Internet provider gives you a static IP address, or an online address that never changes, you can put your Pi online by making some simple changes to the settings in your router to set up port forwarding. Port forwarding tells your router to send web requests to your Pi.
Note that all routers are different. You will probably not see the pages shown here. But you can usually find similar settings. Most router manufacturers and ISPs provide detailed instructions.
Put Your Pi on the Internet
![]() If you do not know your router's address, type route at the command line or in LXTerminal.
If you do not know your router's address, type route at the command line or in LXTerminal.
![]() Note the Gateway address.
Note the Gateway address.
Note: See the section “Set a Static IP Address” earlier in this chapter for an example.
![]() Open a web browser on the Pi or any other computer.
Open a web browser on the Pi or any other computer.
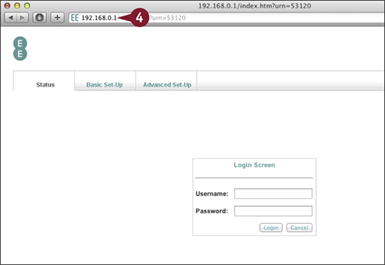
![]() Type the Gateway address to view your router's login screen.
Type the Gateway address to view your router's login screen.
![]() Type a username and password to log in to your router.
Type a username and password to log in to your router.
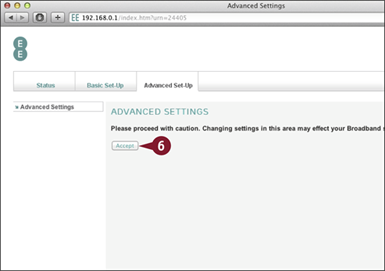
![]() If your router has an Advanced Settings option, click it to select it.
If your router has an Advanced Settings option, click it to select it.
Note: As in this example, you may be asked to click a button to confirm that you want to access the advanced settings.
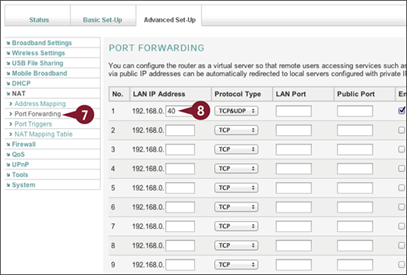
Note: Port Forwarding may be part of another option labeled NAT.
Your router displays a table of forwarding options.
Note: The table may have different graphics, but is likely to show similar information.
![]() Type the static IP address you set in the section “Set a Static IP Address” under LAN IP Address.
Type the static IP address you set in the section “Set a Static IP Address” under LAN IP Address.
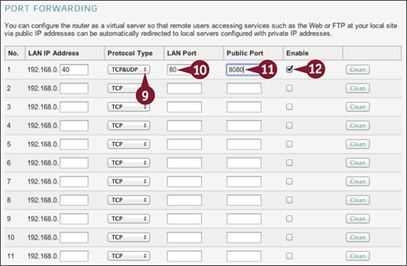
![]() Select TCP&UDP if there is a Protocol Type option.
Select TCP&UDP if there is a Protocol Type option.
![]() Type 80 for the LAN Port setting.
Type 80 for the LAN Port setting.
Note: This option sends web traffic to your Pi.
![]() Type 8080 (or some other number) for the Public Port or WAN Port setting.
Type 8080 (or some other number) for the Public Port or WAN Port setting.
Note: You can set this to 80, but it may not work and is less secure than using another port number.
![]() Click Enable (
Click Enable (![]() changes to
changes to ![]() ).
).
The Pi's web server should now be visible on the Internet.