
Working with Applications
The Raspberry Pi comes with a basic set of preinstalled desktop applications. You can use them to finish setting up your Pi before you begin learning more about the Linux operating system.
Introducing the Raspberry Pi Apps
Work with Files in File Manager
Introducing Raspberry Pi Apps
The Raspberry Pi uses an operating system called Linux, which is popular with software developers. Linux comes in many different distros, or distributions. The official distro for the Pi is called called Raspbian Wheezy, a customized version of Debian, a distro known for its reliability. (The Pi includes a reference guide to Debian on the desktop, but the content is very technical.) In spite of the unusual name, Wheezy includes many familiar features. You can work with it by typing commands from the keyboard, or by launching applications from a desktop and using a mouse, keyboard, menus, and icons.
Understanding the Linux Desktop

In Linux, the desktop is a just another application. You can launch it manually after the Pi boots with the startx command. You can also select a Boot to Desktop option using raspi-config. Larger variants of Linux give you a choice of desktops. Because the Pi is a small computer with limited memory, Wheezy includes a single lightweight desktop application called LXDE.
Browse the Web

The default desktop on the Pi includes a web browser called Midori. Midori is designed for slow computers with limited memory but still provides advanced features such as tabs, page code inspection, and support for Mozilla plug-ins. On the Pi, Midori runs more slowly than the desktop browsers you may be used to.

Because text commands are so widely used in Linux, LXDE includes a terminal application called LXTerminal. Terminal is an old computing word for a device that accepts text commands and displays text output.
Edit Text Files
Wheezy's text editor is called Leafpad. It is similar to Notepad on Windows and TextEdit on the Mac. However, Leafpad does not allow you to edit many important files. To fix this you must understand Linux security. For details, see the information about becoming a superuser in Chapter 5.
Work with Games and Software
Because the Pi is designed for education, it includes a “toy” programming language for kids called Scratch. It also includes two versions of the popular Python programming language and a set of extensions for Python called Pygame, which makes it easy to create simple animated games. Scratch, Python, and Pygame are described in later chapters.
Because the Pi is slow, apps often take longer to respond than you may be used to. LXDE lacks an hourglass or a spinning beach ball to show when the operating system is busy. However, the bottom of the taskbar shows a miniature graph that tells you how hard the Pi is working. When the graph is solid green, the Pi is busy and may respond slowly.
Set Up Wi-Fi
You can connect your Pi to a network with Wi-Fi. To use Wi-Fi, plug an optional Wi-Fi dongle — a small aerial — into one of your Pi's USB ports. You can then configure a connection with the wpa_gui application on the desktop.
Always plug in a dongle with the power off. In theory, your Pi should be able to cope with live connection/disconnection. In practice, the power drained by a dongle may crash it, forcing it to reboot.
Set Up Wi-Fi
![]() Plug a Wi-Fi dongle into one of the Pi's USB ports or into a connected USB hub.
Plug a Wi-Fi dongle into one of the Pi's USB ports or into a connected USB hub.
![]() Launch the desktop with startx if it is not already open.
Launch the desktop with startx if it is not already open.
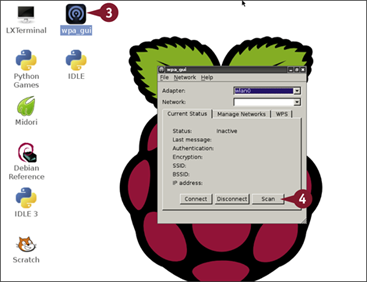
![]() Double-click wpa_gui.
Double-click wpa_gui.
The wpa_gui application dialog box opens.
![]() Click Scan.
Click Scan.
A dialog box opens and the Pi scans the available networks.
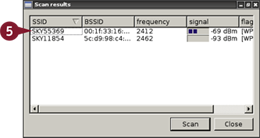
![]() Double-click a network to set up a password.
Double-click a network to set up a password.
Note: The signal column shows how strong the Wi-Fi signal is for each network. The smaller the number, the stronger the signal.

![]() If the network uses WPA security, type the network password into the PSK box.
If the network uses WPA security, type the network password into the PSK box.
Note: If the network uses older and less secure WEP security, select Static WEP (Shared Authentication) from the Encryption menu and type the WEP key (or keys) into the WEP Keys box.
![]() Click Add.
Click Add.
The Pi connects to the Wi-Fi network you selected.

A You can click Connect if the wap_gui does not connect automatically.
View Web Pages
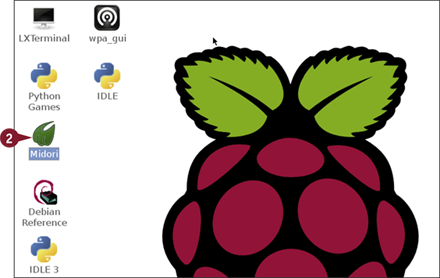
You can view web pages with the Midori browser. To open Midori, double-click its desktop icon. Midori includes support for tabs and for Mozilla-format plug-ins.
Midori on the Pi is not a speedy browser. Pages take a few seconds to load — noticeably longer than they take on a recent PC or Mac.
View Web Pages
![]() Launch the desktop if it is not already open.
Launch the desktop if it is not already open.
![]() Double-click Midori.
Double-click Midori.
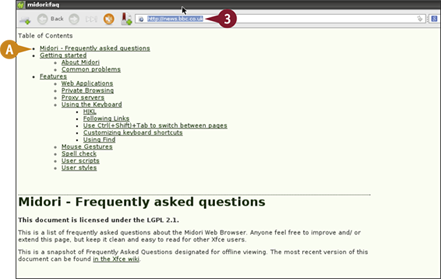
A Midori loads with a default page showing an introductory help file.
![]() To view a different page, type its URL into the browser bar, just as you would when using a mainstream browser.
To view a different page, type its URL into the browser bar, just as you would when using a mainstream browser.
Midori goes to the new web page.

![]() To perform a web search, type a phrase into the search bar.
To perform a web search, type a phrase into the search bar.
![]() To select a different search engine, click and hold the icon at the left of the search bar.
To select a different search engine, click and hold the icon at the left of the search bar.
Note: By default, Midori uses the Duck Duck Go search engine.
![]() To open another tab, click the New Tab icon (
To open another tab, click the New Tab icon (![]() ).
).
![]() Click the gear icon (
Click the gear icon (![]() ) to view more options.
) to view more options.
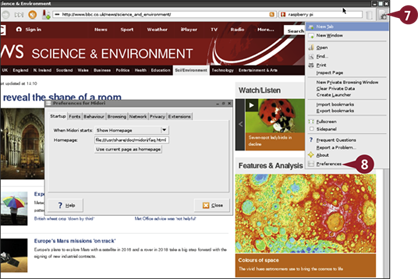
![]() Click Preferences.
Click Preferences.
The Preferences opens.
![]() Click any tab to select a set of preferences, such as Startup or Fonts.
Click any tab to select a set of preferences, such as Startup or Fonts.
Work with Files in File Manager
You can navigate the file system using the File Manager tool on the desktop. To launch File Manager, click the icon to the right of the LXDE icon in the Application Launch bar. The Pi user can also double-click the File Manager icon.
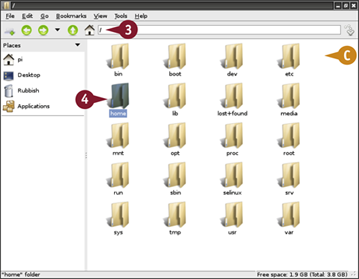
Use the Forward, Back, and Home buttons to navigate through folders. A “level up” takes you to the containing folder one level up the directory tree. File Manager launches with a view of the /home/pi folder. To view the list of system folders, type / in the address bar. To open any folder, double-click it.
Work with Files in File Manager
![]() Launch the desktop if it is not open.
Launch the desktop if it is not open.

![]() Click the File Manager icon (
Click the File Manager icon (![]() ) in the Application Launch bar.
) in the Application Launch bar.
A You can also click the LXDE icon (![]() ), Accessories, and then File Manager.
), Accessories, and then File Manager.
B LXDE launches File Manager in a window.
Note: Even if you are running as root, File Manager always displays the /home/pi folder.
![]() To view the main system folder, drag the mouse over home/pi to highlight it, press
To view the main system folder, drag the mouse over home/pi to highlight it, press ![]() or
or ![]() , and press
, and press ![]() .
.
C File Manager displays the contents of /, the main system directory.
![]() To open a folder, double-click it.
To open a folder, double-click it.

![]() Repeat the double-click to drill down into a series of folders inside the / folder.
Repeat the double-click to drill down into a series of folders inside the / folder.
Note: This example shows the results of double-clicking home, Pi, and then Desktop to view/home/pi/Desktop.
![]() Double-click IDLE to launch the Python editor application.
Double-click IDLE to launch the Python editor application.
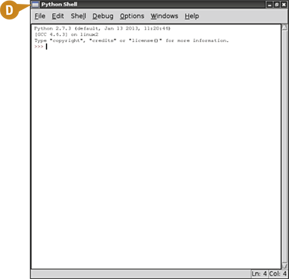
D The application launches in a new window.
Note: You can double-click any application to launch it.
Note: If a file is a text file or image, right-click it to view more options. For example, you can edit a text file with Leafpad.
Edit Text with Leafpad
You can use Leafpad to edit text files. Leafpad is a simple WYSIWYG (What You See Is What You Get) text editor with basic features. It is not a word processor, but you can use it to edit your Pi's configuration files.
Note that Leafpad does not allow you to edit critical files unless you have root superpowers. Use File Manager to promote yourself to root before you try to edit important files. For more about promoting yourself to root, see the previous section, “Work with Files in File Manager,” and also Chapter 5.
Edit Text with Leafpad
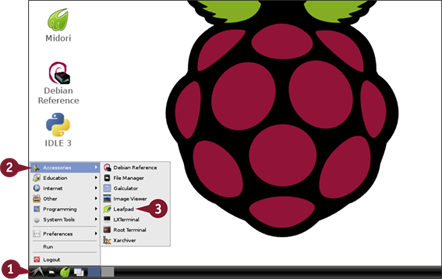
![]() Click the LXDE icon (
Click the LXDE icon (![]() ).
).
![]() Click Accessories.
Click Accessories.
![]() Click Leafpad.
Click Leafpad.
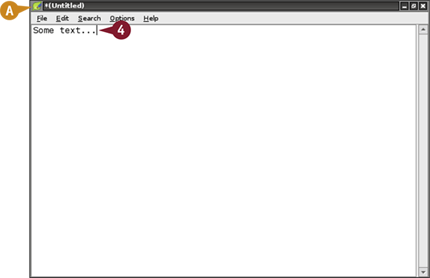
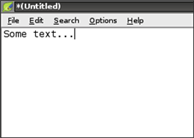
A Leafpad launches with an empty window.
![]() Type some text.
Type some text.
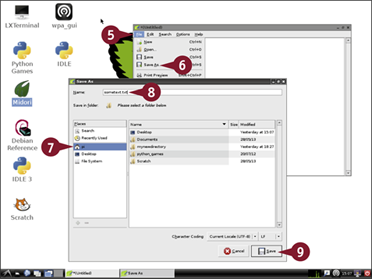
![]() Click File.
Click File.
![]() Click Save As.
Click Save As.
![]() Click the pi icon to save the file to the /home/pi folder.
Click the pi icon to save the file to the /home/pi folder.
![]() Type a name for the file.
Type a name for the file.
![]() Click Save.
Click Save.
Leafpad saves the file to your home folder.
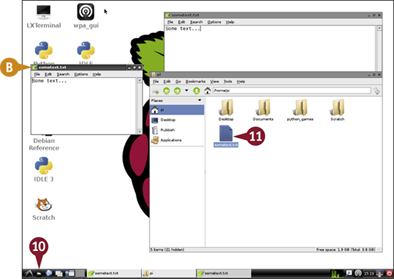
![]() Click the File Manager icon (
Click the File Manager icon (![]() ).
).
File Manager launches if it is not already open.
![]() Double-click the file you saved.
Double-click the file you saved.
B Leafpad opens in a new window and loads the file into it.
Configure the Desktop
If you experiment with the desktop's many menus, you can find plenty of configuration options. With the most useful options you can customize the wallpaper, and add or remove icons on the desktop. Ignore the other options, which are not essential. Changing them may break the desktop.
Note there are two desktops. They show the same icons, but you can have different windows open on them. To switch desktops, click the blue/white rectangles in the bottom bar.
Configure the Desktop
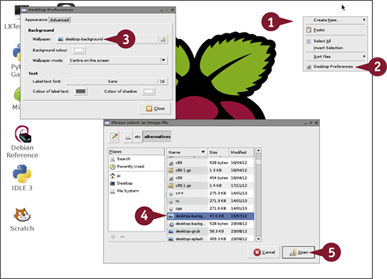
![]() Right-click the desktop.
Right-click the desktop.
![]() Click Desktop Preferences.
Click Desktop Preferences.
![]() In the Desktop Preferences, click the Wallpaper box.
In the Desktop Preferences, click the Wallpaper box.
![]() Select a new file from the file selector.
Select a new file from the file selector.
![]() Click Open.
Click Open.
The new wallpaper loads.
Note: The Pi does not include preinstalled wallpaper files. Use Midori to search for and save alternative wallpapers. Or you can leave the default Raspberry Pi wallpaper unchanged.
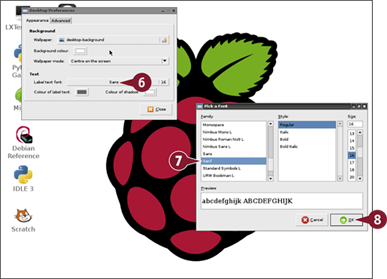
![]() To change the font used for the desktop icons, click the Label text font box in the Desktop Preferences.
To change the font used for the desktop icons, click the Label text font box in the Desktop Preferences.
![]() Select one of the alternative fonts.
Select one of the alternative fonts.
Note: You can see a preview of the font in the Preview box.
![]() Click OK.
Click OK.
Note: Do not access the Advanced tab in Desktop Preferences. You may accidentally remove the right-click menu.
![]() Click the File Manager icon (
Click the File Manager icon (![]() ).
).
File manager launches.
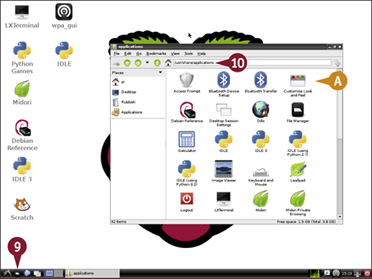
![]() Type /usr/share/application into the address bar and press
Type /usr/share/application into the address bar and press ![]() .
.
Note: You can also type / to navigate to the root folder and then drill down by double-clicking the usr, share, and applications folders.
A File Manager displays a list of installed applications.
![]() Press and hold
Press and hold ![]() and drag an application icon to the desktop to add it.
and drag an application icon to the desktop to add it.
Note: You can keep adding applications until your desktop is full.
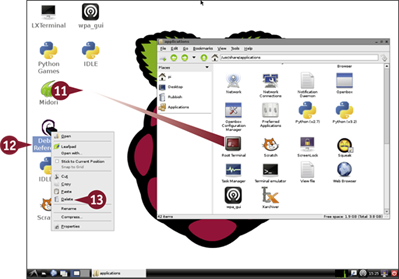
![]() To remove an application from the desktop, right-click it.
To remove an application from the desktop, right-click it.
![]() Click Delete.
Click Delete.
Note: Deleting an icon removes it from the desktop. It does not remove the application from your Pi.
Configure the Launch Panel
The Launch Panel is unique to LXDE. It is based on the Quick Launch apps that appear in the Windows XP taskbar. It looks like a single bar, but in fact it includes multiple items, including the main Start menu, quick links to File Manager and Web Browser, a CPU performance graph, and so on.
You can add and remove items and customize each item to control what it includes. You can also insert spacers between items to push them toward the left or right of the panel.
Configure the Launch Panel
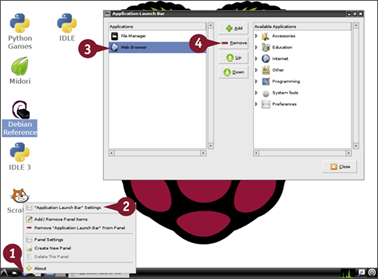
![]() Right-click the second or third icons from the left of the launch panel.
Right-click the second or third icons from the left of the launch panel.
![]() Click “Application Launch Bar” Settings.
Click “Application Launch Bar” Settings.
The Application Launch Bar Preferences open.
![]() Click Web Browser.
Click Web Browser.
![]() Click Remove.
Click Remove.
Note: This removes the Dillo web browser that is preinstalled on the launch panel.
![]() Click the triangle next to Internet.
Click the triangle next to Internet.
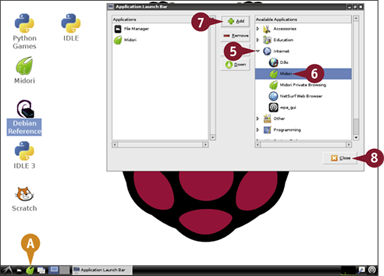
![]() Click Midori.
Click Midori.
![]() Click Add.
Click Add.
![]() Click Close.
Click Close.
A A Midori icon appears in the launch panel.
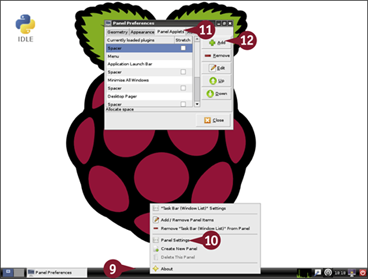
![]() Right-click the launch panel.
Right-click the launch panel.
![]() Click Panel Settings.
Click Panel Settings.
The Panel Preferences open.
![]() Click the Panel Applets tab.
Click the Panel Applets tab.
![]() Click Add.
Click Add.
The Add Plugin to Panel pane appears.
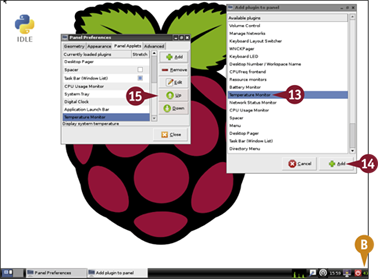
![]() Click Temperature Monitor.
Click Temperature Monitor.
![]() Click Add.
Click Add.
B A temperature monitor appears on the panel.
![]() Click Up or Down to move the monitor left or right on the panel.
Click Up or Down to move the monitor left or right on the panel.
Note: You can click Remove to remove an item from the launch panel.