
Setting Up Raspbian
Before you can use your Pi you must set it up. You can change the password, select a keyboard layout to match the keyboard you are using, set a time zone, and set up the memory card. Optionally, you can also overclock the Pi so it runs faster.
Manage Memory and SD Card Options
Set a Password
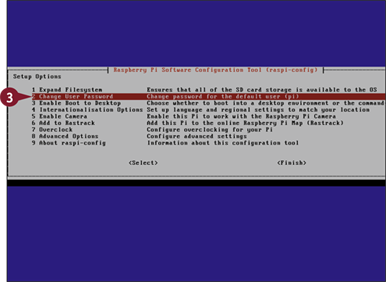
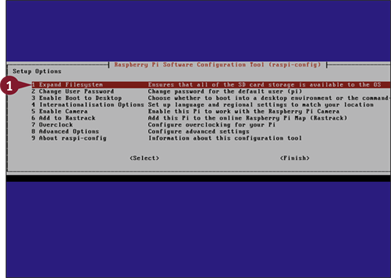
The first time the Pi boots, a Setup Options screen, also known as the Configuration tool, appears. On this screen, you can change your Pi's basic settings, including your user password. The default username is pi, and the default password is raspberry.
You can shorten the password to a single letter for convenience or choose a much longer password for security. You cannot set a blank password or disable the login prompt.
Select a Password
![]() Boot up and wait until the Setup Options screen appears.
Boot up and wait until the Setup Options screen appears.

![]() Press
Press ![]() to position the red highlight on the Change User Password option and press
to position the red highlight on the Change User Password option and press ![]() .
.
Note: You can also press ![]() to highlight <Select> and press
to highlight <Select> and press ![]() .
.
Note: Because the Pi's software is always being updated, your Pi may not show the same setup options in the same order.
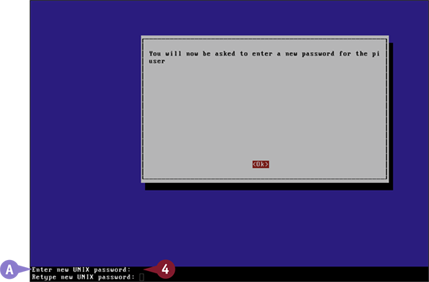
A The Pi shows a prompt at the bottom of the screen.
![]() Type your new password and press
Type your new password and press ![]() at the prompt.
at the prompt.
Note: The password does not appear on the screen as you type.
The Pi asks you to enter your password again.
![]() Type your new password again and press
Type your new password again and press ![]() .
.
A message appears saying your password changed successfully.
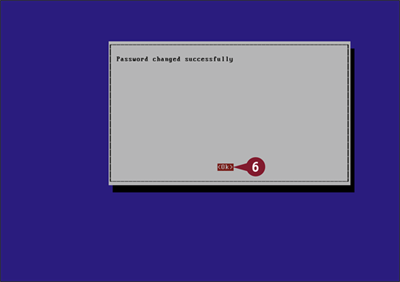
![]() Press
Press ![]() to return to the Setup Options screen.
to return to the Setup Options screen.
TIPS
How do I quit the Setup Options?
On the main Setup Options screen, press ![]() to highlight <Finish> and press
to highlight <Finish> and press ![]() . The Pi displays the system prompt, a short text message ending with a dollar sign ($), to show it is ready for commands. Note that the Setup Options text remains on the screen, but you cannot scroll up and down the options.
. The Pi displays the system prompt, a short text message ending with a dollar sign ($), to show it is ready for commands. Note that the Setup Options text remains on the screen, but you cannot scroll up and down the options.
What should I do if I lose my password?
If you lose your password, you can buy a fresh copy of the operating system on an SD card or create your own fresh copy (see Chapter 2). You can then configure the Pi again from scratch. Experienced users can attempt hacks and workarounds to reset the password. For a list of suggestions see www.raspberrypi.org/phpBB3/viewtopic.php?f=28&t=44114.
Select a Keyboard Layout
You can use the Setup Options to localize your Pi so it produces the letters and characters printed on the keys.
This step is recommended. If you do not understand a setting, leave it unchanged. If your keyboard produces incorrect characters, run Setup Options again (explained in the section “Revise the Configuration” later in this chapter) and check online for the correct settings for your hardware and local language. You may need to try various combinations until you find one that works.
Select a Keyboard Layout
![]() On the Setup Options screen, press
On the Setup Options screen, press ![]() and
and ![]() to select Internationalisation Options and press
to select Internationalisation Options and press ![]() .
.
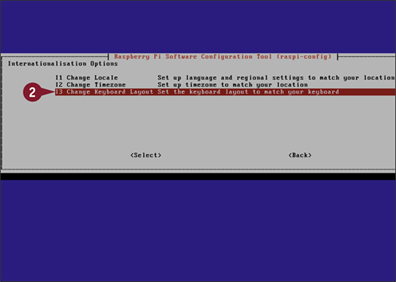
![]() Press
Press ![]() and
and ![]() to select Change Keyboard Layout and press
to select Change Keyboard Layout and press ![]() .
.
![]() Wait until the Pi loads the keyboard configuration page.
Wait until the Pi loads the keyboard configuration page.
Note: This screen appears after about 15 seconds. The Pi seems to be doing nothing while it loads.
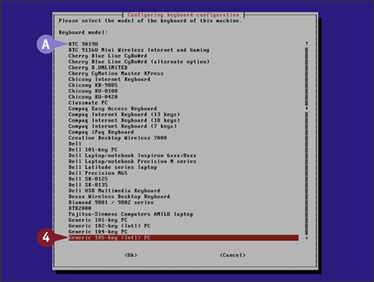
A The Pi displays a list of keyboard makes and models.
![]() Press
Press ![]() and
and ![]() to select your keyboard model and press
to select your keyboard model and press ![]() .
.
Note: If you cannot see your keyboard or do not know which one to select, select Generic Keyboard for the United States or Generic Keyboard (Intl) for the United Kingdom.
The Keyboard Layout screen appears.
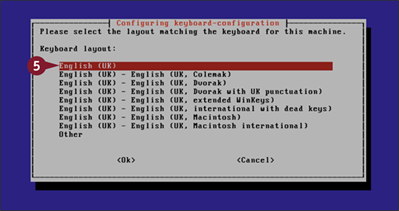
![]() Press
Press ![]() and
and ![]() to select a keyboard subtype on the list and press
to select a keyboard subtype on the list and press ![]() .
.
Note: The default option is usually correct. Select a Macintosh keyboard layout if you are using an Apple keyboard.
![]() Press
Press ![]() and
and ![]() to skip the AltGR and Compose Key screens.
to skip the AltGR and Compose Key screens.
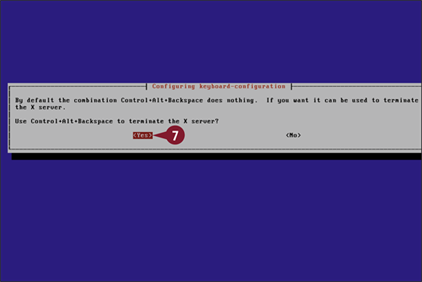
![]() Press
Press ![]() to select the option to use Control+Alt+Backspace to quit the Pi's desktop if it is running.
to select the option to use Control+Alt+Backspace to quit the Pi's desktop if it is running.
After 10 seconds, the Pi returns you to the Setup Options screen. The new keyboard layout is now set.
Select a Time Zone
You can use the Time Zone option to set how your Pi displays the time and date, and how it manages Daylight saving time (Summer time).
Note that the Pi does not have a full built-in clock. It uses a “fake” clock that loads the time from the Internet. If you do not connect your Pi to the Internet, the clock will be wrong. You cannot use the Time Zone setup option to set the time.
Select a Time Zone
![]() On the Setup Options screen, press
On the Setup Options screen, press ![]() and
and ![]() to select Internationalisation Options and press
to select Internationalisation Options and press ![]() .
.
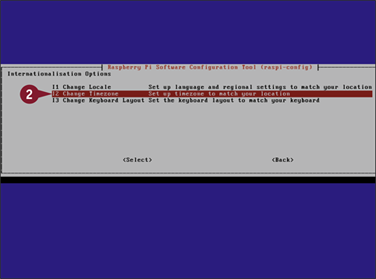
![]() Press
Press ![]() and
and ![]() to select Change Timezone and press
to select Change Timezone and press ![]() .
.
After a few seconds, the Pi displays the Geographic Area screen with a list of continents.
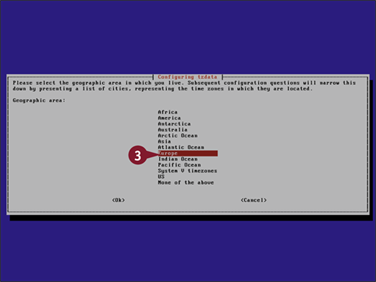
![]() Press
Press ![]() and
and ![]() to select your region and press
to select your region and press ![]() .
.
The Time Zone screen appears with a list of time zone regions.
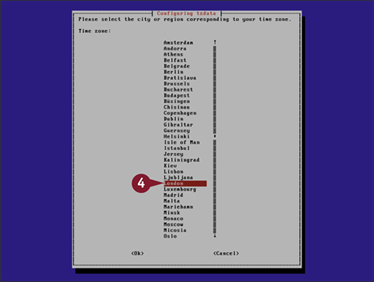
![]() Press
Press ![]() and
and ![]() to select your nearest city or region and press
to select your nearest city or region and press ![]() .
.
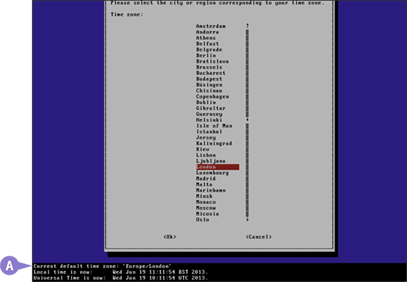
A The Pi displays a message confirming that the Time Zone has changed, and then it returns you to the Setup Options screen.
Manage Memory and SD Card Options
Memory is limited on the Pi. You can change two settings to make the most of the Pi's built-in memory and the free space on the SD card.
The Expand Filesystem option reformats your SD card to make all of its space available for storage. By default, storage is limited to 2GB, even on larger cards. This option expands it to make full use of the card. The Memory Split option in Advanced Options splits the Pi's memory between the built-in graphics and the operating system.
Manage Memory and SD Card Options
![]() On the Setup Options screen, press
On the Setup Options screen, press ![]() and
and ![]() to select the Expand Filesystem option and press
to select the Expand Filesystem option and press ![]() .
.
The Pi displays some text, which flashes past too quickly to read, and then displays a message saying the file system will be enlarged upon the next reboot.
![]() Press
Press ![]() again to return to the Setup Options screen.
again to return to the Setup Options screen.
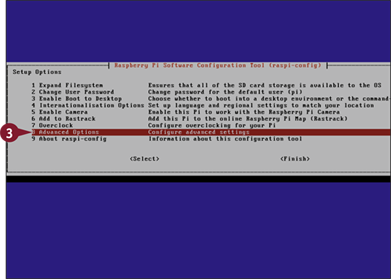
![]() Press
Press ![]() and
and ![]() to select Advanced Options and press
to select Advanced Options and press ![]() .
.
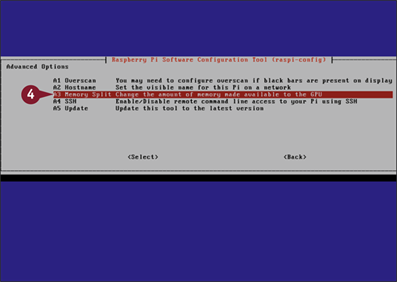
![]() Press
Press ![]() and
and ![]() to select Memory Split and press
to select Memory Split and press ![]() .
.
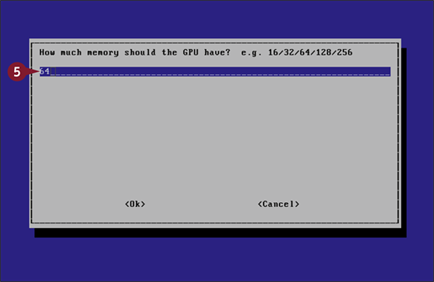
![]() Type one of the numbers from the list at the top.
Type one of the numbers from the list at the top.
![]() Press
Press ![]() to return to the Setup Options screen.
to return to the Setup Options screen.
The Pi reorganizes its memory and gives more to the options you selected.
Set Up Overclocking
You can overclock your Pi to make it run faster. Overclocking modifies key system settings. It improves performance, but makes your Pi run hotter. Overclocking does not void the warranty, but it can make your Pi less reliable and shorten its working life.
To overclock your Pi, select the Overclock option in the Configuration tool. You can choose one of five speed presets. The faster a preset, the hotter your Pi runs and the more likely it is to stop working reliably. If you enclosed your Pi in a case it runs even hotter.
Set Up Overclocking
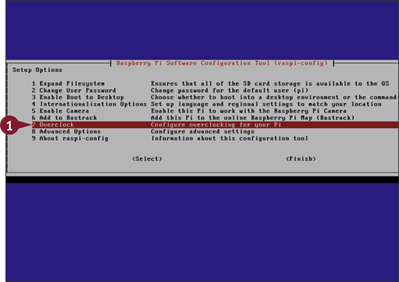
![]() On the Setup Options screen, press
On the Setup Options screen, press ![]() and
and ![]() to select Overclock and press
to select Overclock and press ![]() .
.
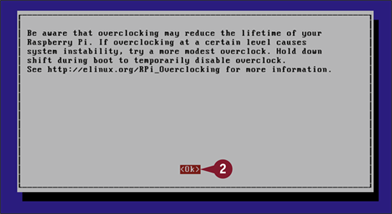
![]() Press
Press ![]() to skip past the warning message.
to skip past the warning message.
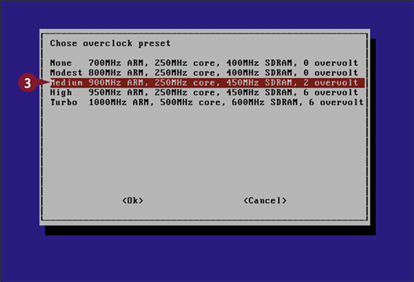
![]() Press
Press ![]() and
and ![]() to select an overclocking option and press
to select an overclocking option and press ![]() .
.
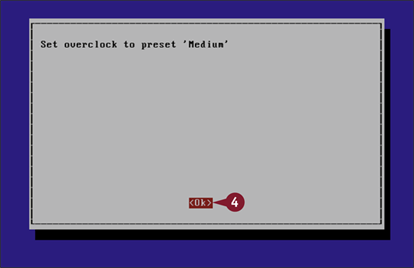
![]() Press
Press ![]() again to return to the Setup Options screen.
again to return to the Setup Options screen.
Overclocking is set immediately. You do not need to reboot.
Connect to the Internet
You can link your Pi to the Internet by connecting it to a router or modem with a standard Ethernet cable. If your router is set up to provide local network addresses automatically, as consumer routers usually are, your Pi appears on your local network almost as soon as you connect it.
You can then load and view web pages, as described in Chapter 4. You can also begin to turn your Pi into a web server, file server, or home media player, as described in later chapters.
Connect to the Internet
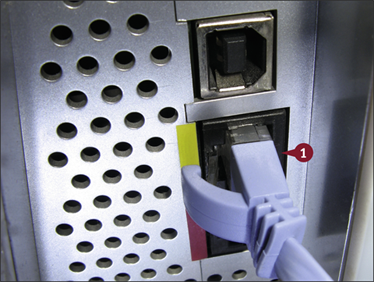
![]() Plug an Ethernet cable into your router.
Plug an Ethernet cable into your router.
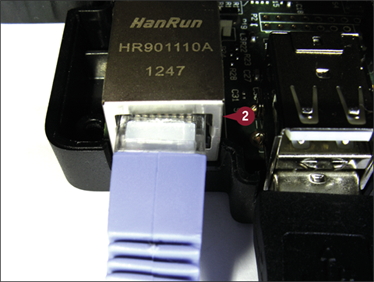
![]() Plug the other end of the cable into the Ethernet socket on your Pi.
Plug the other end of the cable into the Ethernet socket on your Pi.
After a few moments, your router automatically connects your Pi to your local network and the Internet.
Note: If you have an optional Wi-Fi dongle, you can connect the Pi over Wi-Fi. For details, see Chapter 4.
Note: Some applications require a static IP address. See Chapter 7 for details.
The Pi connects to the Internet. For information about using a web browser, see Chapter 4.
Revise the Configuration
When you finish configuring your Pi for the first time, the options you choose are saved to the memory card. You do not have to enter them again.
The Pi does not reload the Setup Options screen the next time it boots. But you can access the screen and change the options again — for example, if you decide to experiment with overclocking — by typing a simple text command.
Revise the Configuration
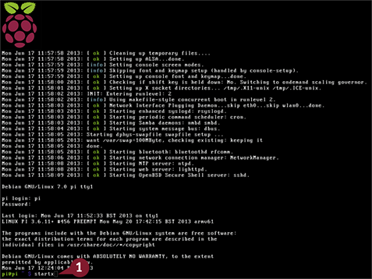
![]() Power up the Pi, log in, and wait for the command-line prompt, indicated by the dollar sign ($).
Power up the Pi, log in, and wait for the command-line prompt, indicated by the dollar sign ($).
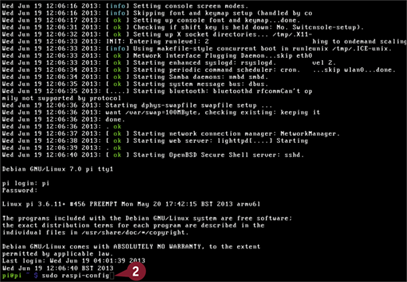
![]() Type sudo raspi-config and press
Type sudo raspi-config and press ![]() .
.
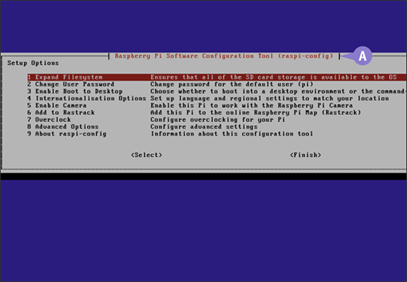
A The Setup Options screen appears. You can revise setup options here.
Update the Operating System
If you boot your Pi using an SD card with a preinstalled version of the OS, or operating system, the software that runs your Pi, it may be out of date. You can update the OS to the latest version by typing two simple commands at the command prompt. To do this, reboot your Pi and log in at the system prompt.
A full update can take a couple of hours, and you must connect your Pi to the Internet before you begin.
Update the Operating System
![]() If you are starting from Setup Options, return to the main screen and press
If you are starting from Setup Options, return to the main screen and press ![]() to select Finish and press
to select Finish and press ![]() .
.
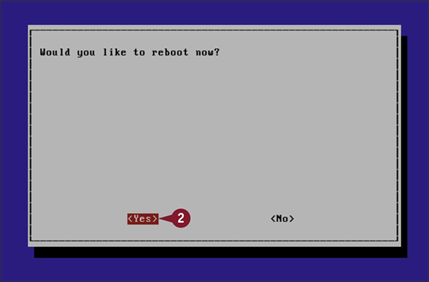
![]() If you see a screen asking if you want to reboot now, press
If you see a screen asking if you want to reboot now, press ![]() again.
again.
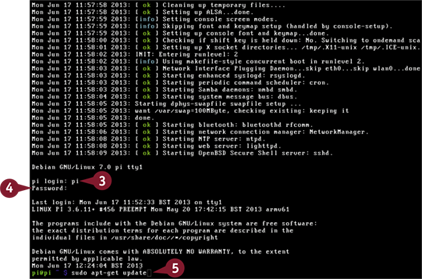
![]() If you are starting from the login prompt, type pi and press
If you are starting from the login prompt, type pi and press ![]() .
.
![]() Type your password and press
Type your password and press ![]() .
.
Note: Remember to type your new password if you changed it in Setup Options.
![]() When the dollar sign ($) prompt appears, type sudo apt-get update and press
When the dollar sign ($) prompt appears, type sudo apt-get update and press ![]() .
.
Note: Include all spaces and punctuation. Make sure the spelling is correct.
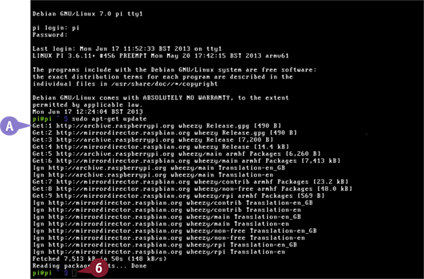
A The Pi starts displaying text to show that it is downloading and updating files.
![]() Wait until the Done message appears, followed by the prompt.
Wait until the Done message appears, followed by the prompt.
![]() When the dollar sign ($) prompt appears, type sudo apt-get upgrade and press
When the dollar sign ($) prompt appears, type sudo apt-get upgrade and press ![]() .
.
![]() Press
Press ![]() when the Pi asks if you want to continue.
when the Pi asks if you want to continue.
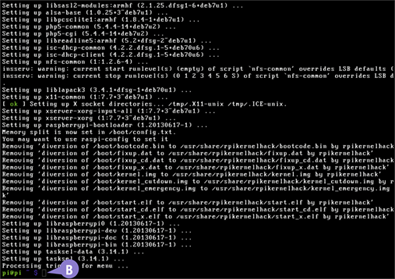
B The upgrade ends when the dollar sign ($) prompt reappears.
Note: The upgrade process can take a couple of minutes to a couple of hours.
Note: Linux does not tell you when updates are available. But you can update and upgrade at any time.
Launch the Desktop
You can launch the desktop on your Pi by typing the startx command at the system prompt. The Pi blanks the screen while the desktop loads — this can take awhile. After a few seconds the Pi displays a desktop with icons, a task bar, and official Raspberry Pi wallpaper.
Although some of the icons are unusual, the basic features of the desktop — clickable icons, a start menu, and a toolbar — should be familiar to users of Windows 7 and XP. Mac users may need to take some time to experiment with this environment.
Launch the Desktop
![]() At the command prompt type startx and press
At the command prompt type startx and press ![]() .
.
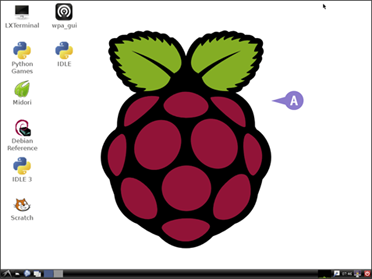
A The Pi loads and displays the LXDE desktop.
Shut Down the Pi
Do not shut down your Pi by unplugging the power. You can corrupt the contents of the memory card, losing files and perhaps damaging the operating system and making it unstable or even unusable.
You can shut down the Pi from the command prompt. To get to the command prompt, you must quit the desktop. Note you can reboot your Pi by typing sudo reboot.
Shut Down the Pi
![]() Click the power icon.
Click the power icon.
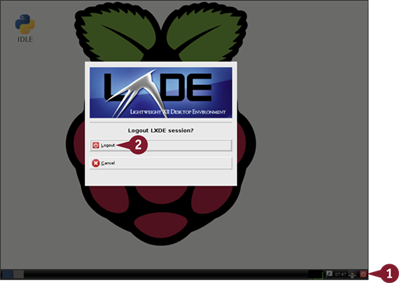
![]() Click the Logout option on the floating menu.
Click the Logout option on the floating menu.
A The desktop quits and returns you to the command prompt.
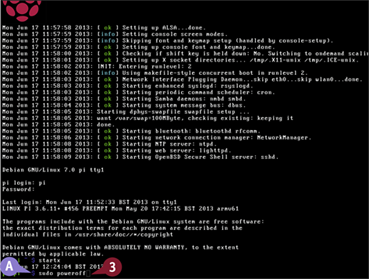
![]() Type sudo poweroff and press
Type sudo poweroff and press ![]() .
.
The Pi runs a shutdown sequence.
Note: After your screen goes blank, wait until the ACT light on the Pi stops flashing before unplugging the power.
Note: If you launch the desktop as superuser/root — see Chapter 5 — the power button displays extra reboot and shutdown options when you click it.