
Creating Graphics with Pygame
You can combine Pygame's basic features with the standard features of Python to create simple games.
Understanding Graphics and Animation
Understanding Sprites and Images
Understanding Graphics and Animation
Pygame is designed to make graphics and animation easy. Most games spend most of their time responding to user events, drawing a screen full of graphics, and repeating this loop over and over. Each repeat redraws everything on the screen from scratch.
Understanding Surfaces
A surface is an area of memory into which you can draw. When you create a window on the screen, it comes with a “free” surface you can use for graphics. You can also create your own surfaces. The contents of a surface are invisible unless you blit, or copy, them to the window's surface.
Understanding Blitting
Blitting copies some or all of one surface to another. (The word is a short form of Block Image Transfer.) Pygame supports blit effects that can combine the source and destination surface in complex ways. Most blit operations simply overwrite the destination with the source. But you can subtract the destination from the source to create special effects.
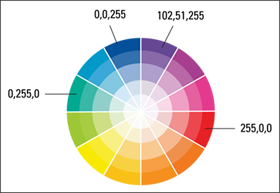
Pygame defines colors as a mix of red, green, and blue — a system known as RGB. You can make colors transparent by setting an optional value called alpha, in RGBA. You can vary the brightness of each color between 0 and 255. (255,255,255) is white, (255,0,0) is red, and (0,0,0) is black. If you set alpha to 128, the color is partly transparent.
Understanding Shapes

Pygame includes a set of functions for basic shapes, including circles, boxes, polygons, lines, ellipses, and arcs. You can also draw antialised lines, which are deliberately blurred slightly to appear smoother on the screen. When you draw a shape, you can specify a width parameter that strokes, or draws a line, around the outside of the shape. If you set the stroke width to 0, Pygame fills the shape with a single color.
Understanding Fonts

Fonts are letter shapes. Linux on the Raspberry Pi includes a small library of predefined fonts such as Droid Sans, Déjà Vu Serif, Liberation Sans, and Free Sans. You can use these fonts to add text to your game — for example, to show a score. Fonts are handled like other shapes. You cannot print text to a Pygame window. You must create a surface, pick letters of a certain size and style by creating a font object, render text using the font object to draw it, and then blit the text surface to the main window.

All games cycle around a loop. The code checks whether the user has clicked a button or moved the mouse. Next, it checks for collisions and other game events and uses this information to calculate the positions of all the visible graphics in the game. Finally, it uses the new position information to draw and display the game graphics. The loop then begins again. The loop typically repeats 30 or 60 times a second to create smooth movement.
Understanding Sprites and Images
Pygame includes special classes to simplify game coding. You can use image files to make your games look more interesting, and sprites to simplify drawing and collision testing.
Understanding Images
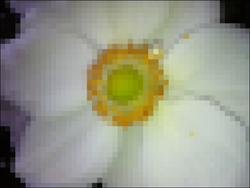
An image is a rectangular grid of dots, or pixels. Each pixel is a single color, defined by the brightness of separate red, green, and blue values, with an optional alpha (transparency) value. In Pygame, images are always stored in a surface.
Understanding Image Formats in Pygame

Saving an image grid creates large files and is inefficient. Images are typically compressed to remove duplicated and unnecessary information. Lossy compression degrades image detail. When you save an image with lossy compression, some of the detail is gone forever. Lossless compression keeps all the detail. The main lossless formats Pygame can work with have a PNG, GIF, or TIF extension. The main lossy format is JPG. Pygame supports other formats such as TGA, BMP, and LBM, but these are old and rarely used.
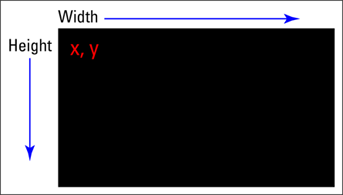
A rect, short for rectangle, defines a rectangular area with an x, y position referenced to the top-left corner, a width, and a height. Sprites use rects to check for collisions. Pygame also includes a pygame. Rect() class with many methods for defining, copying, and combining rects, and checking if rects overlap. Most methods create a new rect. In place methods have a _ip() suffix and modify the original rect.
Understanding Sprites

A sprite is an object that stores an image and includes useful methods for grouping objects and checking if they have collided. By default, a sprite stores a surface and its dimensions. You can fill the surface by loading an image from a file or by using Pygame's draw methods. Sprites are stored in groups. Sprite methods can draw all sprites in a group with one line of code.
Understanding Vectors
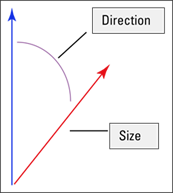
You can use vector math in games to control the speed and direction of a sprite. Pygame does not include a vector class, so you must create your own code to manage movement. The simplest technique is to use separate x and y velocities to control the x and y speed of a game object. A more advanced, but slower, technique is to define a speed and direction and to calculate the x and y speeds with a polar-rectangular conversion. You only need to perform the conversion once when the speed changes.
Understanding Collisions and Bounces
Most game events are collisions between on-screen objects. Pygame includes special features that manage collisions. You can test a sprite group for collisions with a single line of code. The test checks all the sprites in a group for overlap with a single sprite you specify. Optionally, you can force the test to delete colliding sprites automatically. You can also create manual test code, which checks for collisions by comparing the position and size of two sprites and checking for an overlap. Sprites often bounce on collision. To create a bounce, invert the x or y velocity, depending on the bounce direction.
Get Started with Surfaces
You can use a surface to draw graphics. With Pygame, you cannot draw directly into a window. Instead, you can use pygame.display.get_surface() to find the window's surface and then fill or draw to the surface. You can also create your own surface objects and draw into them. Use pygame.Surface() with a width and a height to create a surface.
The surface object has many options. You can read and set individual pixels and areas, fill a surface with a color, and set a clipping area that limits drawing and copying operations to just part of the surface. You do not need these options in a simple game.
Get Started with Surfaces
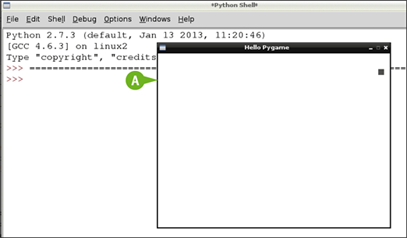
![]() Launch the desktop and IDLE if they are not already open.
Launch the desktop and IDLE if they are not already open.

![]() Click File.
Click File.
![]() Click New Window to open a new code window.
Click New Window to open a new code window.
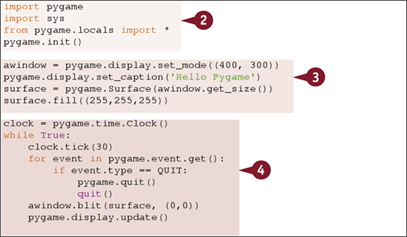
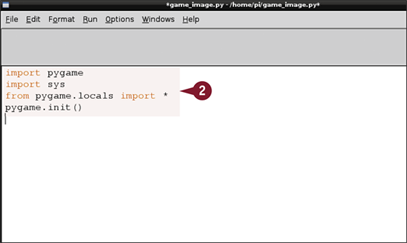
![]() Type import pygame, sys and press
Type import pygame, sys and press ![]() .
.
![]() Type from pygame.locals import * and press
Type from pygame.locals import * and press ![]() .
.
![]() Type pygame.init() and press
Type pygame.init() and press ![]() .
.
Note: Steps 5 and 6 load the Pygame module and set it up.
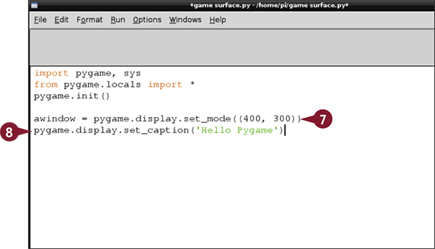
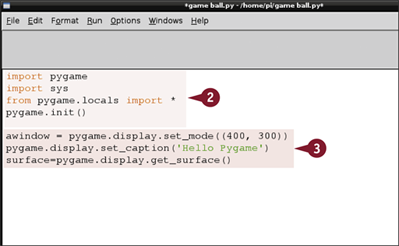
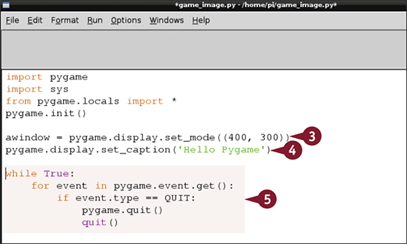
![]() Type awindow = pygame.display.set_mode((400, 300)) and press
Type awindow = pygame.display.set_mode((400, 300)) and press ![]() .
.
![]() Type pygame.display.set_caption('Hello Pygame') and press
Type pygame.display.set_caption('Hello Pygame') and press ![]() .
.
Note: Steps 7 and 8 create a window and set the title.
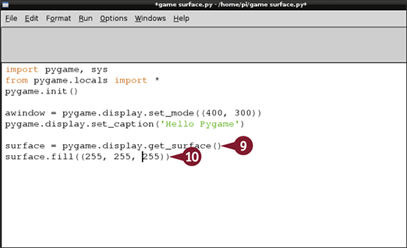
![]() Type surface = pygame.display.get_surface() and press
Type surface = pygame.display.get_surface() and press ![]() .
.
![]() Type surface.fill((255, 255, 255)) and press
Type surface.fill((255, 255, 255)) and press ![]() .
.
Note: Steps 9 and 10 get the surface used in the window, and fill the surface with black.
![]() Press
Press ![]() and save the file as game surface.py.
and save the file as game surface.py.

A The code creates a window and fills its surface with black.
Define Colors
You can use the pygame.Color object to predefine colors as a list of red, green, and blue brightness values between 0 and 255. Optionally, you can specify a fourth alpha value to set the transparency of the color.
You can use pygame.Color() in two ways. You can create named color variables and insert them whenever a method requires a color. Or, as a shortcut, you can leave out pygame.Color() and place RGB values as a list between double round brackets.
Define Colors
Note: You can find the code used in this section on this book's website, www.wiley.com/go/tyvraspberrypi.
![]() Launch the desktop and IDLE if they are not already open.
Launch the desktop and IDLE if they are not already open.

![]() Add code to import and set up Pygame.
Add code to import and set up Pygame.
![]() Add code to create a window and find its surface.
Add code to create a window and find its surface.
![]() Add code to set up three variables named r, g, b to control color.
Add code to set up three variables named r, g, b to control color.
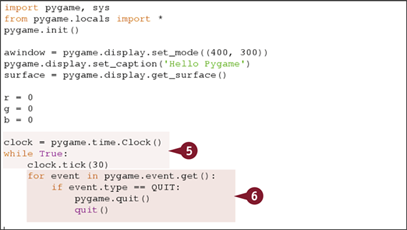
![]() Add code to create a timed loop.
Add code to create a timed loop.
![]() Add code to quit when the user clicks the Close box on the game window.
Add code to quit when the user clicks the Close box on the game window.
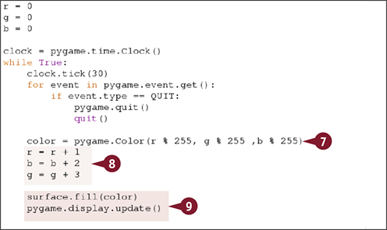
![]() Add code to create a color object using the values of r, g, and b.
Add code to create a color object using the values of r, g, and b.
Note: The % module division forces the values into the range 0 to 255.
![]() Add code to update the values of r, g, and b.
Add code to update the values of r, g, and b.
Note: Step 8 makes the color change slowly.
![]() Add code to fill the surface with the color and update the display.
Add code to fill the surface with the color and update the display.
Note: For more information about steps 2 to 9, see Chapter 12.
![]() Press
Press ![]() and save the file as game color.py.
and save the file as game color.py.
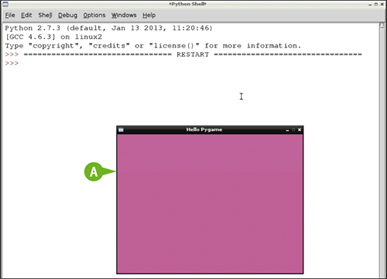
A The code creates a window and fills its surface with cycling colors.
Draw Shapes
You can use pygame.draw() methods to draw simple shapes to a surface. The methods can draw rectangles, polygons, circles, ellipses, arcs, and lines, either individually or as a connected sequence. For example, pygame.draw.circle() draws a circle.
If you do not specify a line width, pygame fills the shape with the color you select. Otherwise, pygame strokes the shape, or draws a line around the edge. You cannot stroke and fill in different colors. However, you can draw the same shape twice with slightly different dimensions and colors to create a similar effect. This example uses randint to create randomly colored and sized rectangles.
Draw Shapes
Note: You can find the code used in this section on this book's website, www.wiley.com/go/tyvraspberrypi.
![]() Launch the desktop and IDLE if they are not already open.
Launch the desktop and IDLE if they are not already open.

![]() Add code to import and set up Pygame.
Add code to import and set up Pygame.
![]() Include an extra line to import and set up randint.
Include an extra line to import and set up randint.
Note: randint is a random number generator.
![]() Add code to create a window and find its surface.
Add code to create a window and find its surface.

![]() Add code to create a game clock loop to check for QUIT events.
Add code to create a game clock loop to check for QUIT events.
![]() Add code to fill the surface with white.
Add code to fill the surface with white.
![]() Add code to pick random values for r, g, and b variables.
Add code to pick random values for r, g, and b variables.

![]() Add code to convert r, g, and b into a color object.
Add code to convert r, g, and b into a color object.
![]() Add code to draw a rectangle with the random color, with a random position and dimensions.
Add code to draw a rectangle with the random color, with a random position and dimensions.
![]() Add code to update the display.
Add code to update the display.
![]() Press
Press ![]() and save the file as game shapes.py.
and save the file as game shapes.py.

A Python creates a window with a randomly colored and positioned rectangle.
Note: Because the window is set to white on every game loop before a rectangle is drawn, the random rectangles flash once. They do not fill up the window.
Animate an Object
You can animate an object by changing one or more of its properties over time. The simplest form of animation is movement. To move an object, use x and y variables to store its position. If you change x and y on each game loop and redraw the object, it appears to move.
Game objects often move at a fixed speed and angle. To control the speed, use an extra pair of variables to control how quickly x and y change. These variables are often called dx and dy (short for delta, which is a change in value). Add dx and dy to x and y on each game loop.
Animate an Object
Note: You can find the code used in this section on this book's website, www.wiley.com/go/tyvraspberrypi.
![]() Launch the desktop and IDLE if they are not already open.
Launch the desktop and IDLE if they are not already open.
![]() Add code to import and set up Pygame.
Add code to import and set up Pygame.
![]() Add code to create a window with a title, and get its surface.
Add code to create a window with a title, and get its surface.

![]() Add code to create a gray color.
Add code to create a gray color.
![]() Add animation variables to set the size, position, and two-axis speed of a square ball.
Add animation variables to set the size, position, and two-axis speed of a square ball.
Note: ball_dx and ball_dy hold the horizontal and vertical speed of the ball.
![]() Add code to create a timed loop, and to check for QUIT events.
Add code to create a timed loop, and to check for QUIT events.
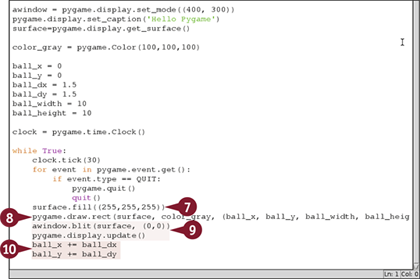
![]() Add code to fill the window with white.
Add code to fill the window with white.
![]() Add code to draw the ball as a rect.
Add code to draw the ball as a rect.
![]() Add code to update the display.
Add code to update the display.
![]() Add code to calculate the next ball position.
Add code to calculate the next ball position.

![]() Press
Press ![]() and save the file as ball game.py.
and save the file as ball game.py.
A Pygame creates a window, paints it white, and animates a ball moving from the top left.
Note: The ball does not include code for bounces, so it moves off the bottom of the window.
Bounce a Shape
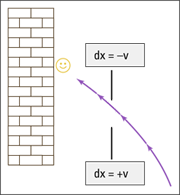
You can bounce an object off the side of your window with some simple tests and basic arithmetic. To check if an item has collided with the window edges, test if the x and y positions are outside the window.
For example if your game window is 400 pixels wide and the x position of your ball is greater than or equal to 400, the ball has collided with the right-hand edge. To make an object bounce, multiply dx or dy by –1, depending on the edge. This makes the object move in the opposite direction.
Bounce a Shape
![]() Launch the desktop and IDLE if they are not already open.
Launch the desktop and IDLE if they are not already open.
![]() Load game ball.py from the previous section, “Animate an Object.”
Load game ball.py from the previous section, “Animate an Object.”

![]() Change ball_dx and ball_dy to 3 so the ball moves faster.
Change ball_dx and ball_dy to 3 so the ball moves faster.
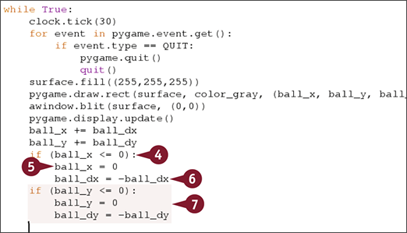
![]() Add code to check if the left corner of the ball is outside the left window edge.
Add code to check if the left corner of the ball is outside the left window edge.
![]() Add code to move the ball to the edge if it is outside it.
Add code to move the ball to the edge if it is outside it.
Note: Step 5 avoids some subtle animation errors.
![]() Add code to reverse the horizontal speed of the ball at the left edge.
Add code to reverse the horizontal speed of the ball at the left edge.
![]() Repeat the code in steps 4 to 6, changing x to y for the top edge of the ball and window.
Repeat the code in steps 4 to 6, changing x to y for the top edge of the ball and window.
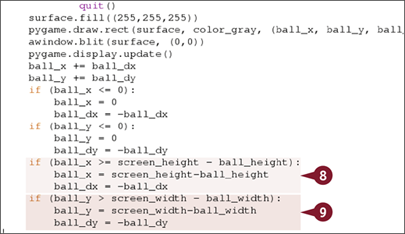
![]() Repeat the previous code making changes for the right window edge and ball corner.
Repeat the previous code making changes for the right window edge and ball corner.
![]() Repeat the code from step 7 making changes for the bottom of the screen.
Repeat the code from step 7 making changes for the bottom of the screen.
Note: The ball should bounce from the bottom right edge, but the ball is drawn from the top left. You must offset the test by the width and height of the ball to compensate.
![]() Press
Press ![]() and save the file as game bounce.py.
and save the file as game bounce.py.
A The ball bounces off the edges of the window.
Draw Text with Fonts
You must call pygame.font.init() before working with fonts. You can then use pygame.font.get_fonts() to show a list of fonts on the Pi, and pygame.font.SysFont() to load a font from the list. The method takes the name of the font as a string and a size in pixels (not points) as an integer.
To write text to a surface, use the render() method on the loaded font object. This creates a surface that holds an image of the text. You can then blit the surface to your main game window to display it. Optionally, text.get_rect() returns the rect size of the text.
Draw Text with Fonts
Note: You can find the code used in this section on this book's website, www.wiley.com/go/tyvraspberrypi.
![]() Launch the desktop and IDLE if they are not already open.
Launch the desktop and IDLE if they are not already open.
![]() Add code to import and set up Pygame.
Add code to import and set up Pygame.
![]() Add code to create a window, find its surface, and fill it with white.
Add code to create a window, find its surface, and fill it with white.
![]() Add code to create a timed event list and blit the surface contents back to the window.
Add code to create a timed event list and blit the surface contents back to the window.

![]() Add code to initialize the font module.
Add code to initialize the font module.
![]() Add code to get a list of available fonts.
Add code to get a list of available fonts.
![]() Add code to print the list of fonts.
Add code to print the list of fonts.
Note: Steps 5 to 7 are instructional so you can see a font list. You do not need it to load and display a font, unless you want to check if a specific font is available.
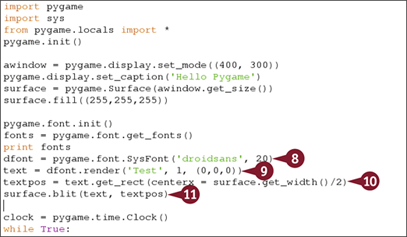
![]() Add code to load the droidsans font, which is preinstalled on Raspbian.
Add code to load the droidsans font, which is preinstalled on Raspbian.
![]() Add code to render font text to a surface.
Add code to render font text to a surface.
![]() Add code to center the text.
Add code to center the text.
Note: In Python, you can work out a result in brackets to pass it as a parameter.
![]() Add code to blit the text surface to the window surface at the position.
Add code to blit the text surface to the window surface at the position.
![]() Press
Press ![]() and save the file as game font.py.
and save the file as game font.py.
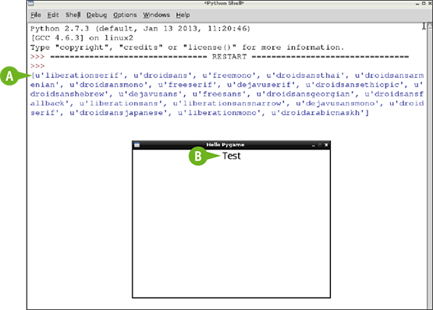
A Python displays a list of preinstalled fonts.
B Python displays the text centered on the top line of the window using the font you selected.
Load and Show an Image
You can use the pygame.image.load() method to load an image from a file. Pygame does a good job of guessing the file type, but you can add an optional name hint to specify the type explicitly. The method automatically creates a surface. You can blit the surface to your window's surface in the usual way.
You may need to use optional methods to optimize the date before blitting. Use surface.convert() to optimize the image for the display, and the convert_alpha() method to load .png files with alpha transparency.
Load and Show an Image
Note: You can find the code used in this section on this book's website, www.wiley.com/go/tyvraspberrypi.
![]() Launch the desktop and IDLE if they are not already open.
Launch the desktop and IDLE if they are not already open.
![]() Add code to import and set up Pygame.
Add code to import and set up Pygame.
![]() Add code to set the window title.
Add code to set the window title.
Note: Step 4 is optional.
![]() Add code to create a timed game loop and to check for QUIT events.
Add code to create a timed game loop and to check for QUIT events.

![]() Add code to define a file path.
Add code to define a file path.
Note: If you do not set a file path, Python looks in your home directory.
![]() Add code to load an image from the file.
Add code to load an image from the file.
Note: .convert() makes the image format compatible with the current display.
![]() Add code to blit the background image to the display surface.
Add code to blit the background image to the display surface.
Note: Change (0,0) to control the position of the image in the window.
![]() Add code to update the display.
Add code to update the display.

![]() Press
Press ![]() and save the file as game image.py.
and save the file as game image.py.
A Python loads the file and displays it in the window.
Note: In this example, the file is a game background with a white-to-black gradient fill. You can use any compatible image file.
Note: If the image does not fit into the window, it is clipped automatically.
Create a Sprite Class
You can use your own version of the sprite class to create custom sprites. The sprite must include a custom method called __init__ to set up the sprite. Your code must define a rect for the sprite. If you want the sprite to be visible, it must include an image property.
Sprites are often collected into groups. Use pygame.sprite.Group.add() to add a sprite to a group. You can draw all the sprites in a group with pygame.sprite.Group.draw(). Games often include an “all sprites” group for drawing, and subgroups to check for game events and collisions.
Create a Sprite Class
![]() Launch the desktop and IDLE if they are not already open.
Launch the desktop and IDLE if they are not already open.
![]() Add the code introduced in previous sections to load and set up Pygame, create a window and get its surface, and create a timed game loop.
Add the code introduced in previous sections to load and set up Pygame, create a window and get its surface, and create a timed game loop.
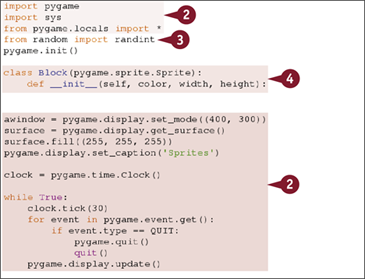
![]() Add code to import the randint module from random.
Add code to import the randint module from random.
![]() Add code to create a class called Block with an __init__ method that takes a color, height, and width.
Add code to create a class called Block with an __init__ method that takes a color, height, and width.

![]() Add code to the __init__ method to create a sprite.
Add code to the __init__ method to create a sprite.
![]() Add code to link the sprite's image contents with a new surface.
Add code to link the sprite's image contents with a new surface.
![]() Add code to fill the image with a color, and to set the sprite's height and width to match the height and width of the image.
Add code to fill the image with a color, and to set the sprite's height and width to match the height and width of the image.
Note: The image.lock() and image.unlock() methods speed up the fill() function.
![]() Add code to create two sprite groups — one for block sprites and one for all sprites.
Add code to create two sprite groups — one for block sprites and one for all sprites.
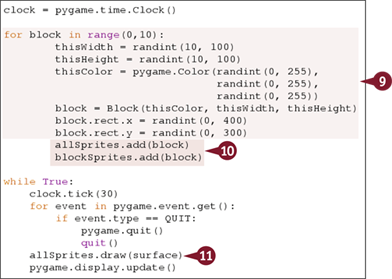
![]() Add a for loop to create ten instances of the Block class with random width, height, color, and position.
Add a for loop to create ten instances of the Block class with random width, height, color, and position.
![]() Add code to add the blocks to both sprite groups.
Add code to add the blocks to both sprite groups.
![]() Add code to draw the all sprites group in the main game loop.
Add code to draw the all sprites group in the main game loop.
Note: Including a group for all sprites means you can draw them in the main loop with this one line of code.
![]() Press
Press ![]() and save the file as game sprites.py.
and save the file as game sprites.py.
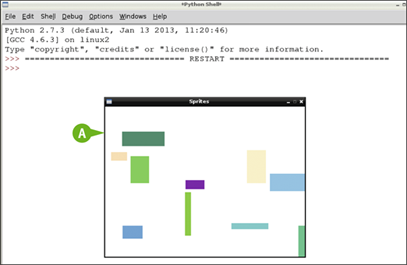
A The code draws ten block sprites with random colors and positions.
Note: The code does not include position updates, so the sprites do not move.
Note: You can find the code used in this section on this book's website, www.wiley.com/go/tyvraspberrypi.
Check for Sprite Collisions
You can use various pygame.sprite.collide() methods to check if two sprites overlap. Collision testing is a key component of many games, and Pygame's collision options can handle most requirements. With the collision testing methods, you can check entire sprite groups with a few lines of simple code.
This example uses the simple spritecollide() method to check if a moving ball sprite is touching a group of random block sprites. The method returns a list of sprites. You can decide to delete sprites automatically on collision. This code leaves the sprites where they are, and prints the x y location of all sprites overlapping the ball.
Check for Sprite Collisions
![]() Launch the desktop and IDLE if they are not already open.
Launch the desktop and IDLE if they are not already open.
![]() Either open or create the game sprites.py file from the previous section, “Create a Sprite Class.”
Either open or create the game sprites.py file from the previous section, “Create a Sprite Class.”
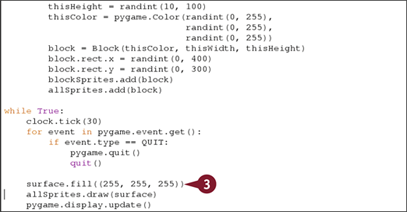
![]() Add code to fill the display window with white at the beginning of the game loop.
Add code to fill the display window with white at the beginning of the game loop.
Note: This line ensures the window has no content left over from the previous update.
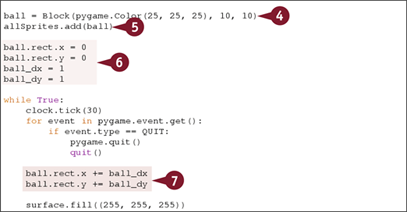
![]() Add code to create a new Block sprite with a gray color and 10-pixel sides.
Add code to create a new Block sprite with a gray color and 10-pixel sides.
![]() Add code to add the ball to the allSprites group, so it is drawn with the other sprites.
Add code to add the ball to the allSprites group, so it is drawn with the other sprites.
![]() Add code to set the starting position and speed of the ball.
Add code to set the starting position and speed of the ball.
![]() Add code to the main loop to move the ball's position.
Add code to the main loop to move the ball's position.
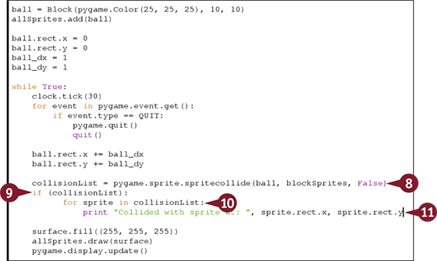
![]() Add code for the main loop to get a collision list with all the block sprites colliding with the ball.
Add code for the main loop to get a collision list with all the block sprites colliding with the ball.
Note: If you change False to True, sprites are deleted as soon as they collide.
![]() Add code to check if the collision list is empty.
Add code to check if the collision list is empty.
![]() Add code to step through the sprites in a nonempty list.
Add code to step through the sprites in a nonempty list.
![]() Add code to print the x and y position of each sprite.
Add code to print the x and y position of each sprite.
![]() Press
Press ![]() and save the file as sprite collisions.py.
and save the file as sprite collisions.py.

A The code animates a ball passing through randomly positioned rectangles.
B The code prints the position of the sprites overlapping the ball on every game loop.
Note: You can find the code used in this section on this book's website, www.wiley.com/go/tyvraspberrypi.
Create a Breakout Game
You can use the techniques you learned in this chapter and in Chapter 12 to create a simple video game with a wall of blocks, a ball, and a paddle, controlled from the keyboard that returns the ball. The ball removes a brick when it collides with it.
This example is a minimal version you can extend with your own enhancements. It uses sprites and code from previous sections for all the game elements. A key enhancement over previous examples is that the window size and other settings are stored in variables, so you can modify them with a single edit.
Create a Breakout Game
Note: You can find the code used in this section on this book's website, www.wiley.com/go/tyvraspberrypi.

![]() Launch the desktop and IDLE if they are not already open and create a new file. Add code to import and set up Pygame.
Launch the desktop and IDLE if they are not already open and create a new file. Add code to import and set up Pygame.
![]() Add code to create a sprite class.
Add code to create a sprite class.
![]() Add code to define variables to set the window size, number of blocks, ball size, paddle dimensions, and paddle speed.
Add code to define variables to set the window size, number of blocks, ball size, paddle dimensions, and paddle speed.
![]() Add code to create and set up a window and surface using variable values instead of integers.
Add code to create and set up a window and surface using variable values instead of integers.
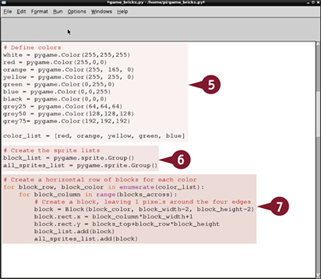
![]() Add code to define the colors used in the game, and make a list of block colors.
Add code to define the colors used in the game, and make a list of block colors.
Note: See the section “Define Colors” for details.
![]() Add code to create two sprite groups — one to manage screen redraws and one to hold the block list.
Add code to create two sprite groups — one to manage screen redraws and one to hold the block list.
![]() Add two for loops to create a row of blocks for each color, and columns of blocks in each row.
Add two for loops to create a row of blocks for each color, and columns of blocks in each row.
Note: The block size calculation allows some space between the blocks so they do not form a single long row.

![]() Add code to create a ball sprite and add it to the main sprite list.
Add code to create a ball sprite and add it to the main sprite list.
![]() Add code to set the ball speed.
Add code to set the ball speed.
Note: Increasing these numbers makes the ball move more quickly. The horizontal and vertical speeds are kept separate to simplify bounce calculations.
![]() Add code to create a sprite for the game paddle.
Add code to create a sprite for the game paddle.
Note: The rect.x calculation sets the width of the paddle.
![]() Add two flags — True/False values — to manage the status of the ball.
Add two flags — True/False values — to manage the status of the ball.
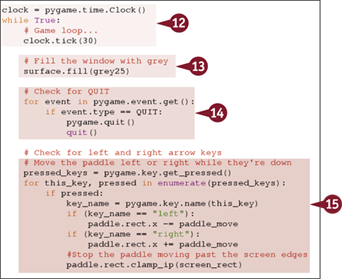
![]() Add code to create a game loop.
Add code to create a game loop.
![]() Add code to fill the window with a medium gray color.
Add code to fill the window with a medium gray color.
Note: You can also use white or a lighter gray.
![]() Add code to check for a QUIT event.
Add code to check for a QUIT event.
![]() Add code to control the paddle from the keyboard.
Add code to control the paddle from the keyboard.
Note: The code checks if ![]() or
or ![]() are pressed, and updates the paddle position and direction if they are.
are pressed, and updates the paddle position and direction if they are.
Create a Breakout Game (continued)
After setting up the game graphics, you can use simple code to manage ball bounces and sprite collisions. Because the ball can only bounce off the paddle, you do not need to include code to check for bounces off the bottom of the screen.
This example uses a version of the code from the section “Bounce a Shape” to control the bounces, and the section “Check for Sprite Collisions” code to manage collisions between the ball and the blocks. It includes an extra test to check for collisions between the paddle and ball.
Create a Breakout Game (continued)
Note: Red lines beginning with # are comments. Python ignores them.
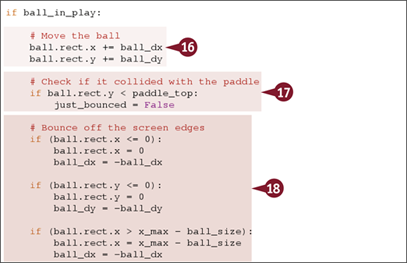
![]() Add code to update the ball position.
Add code to update the ball position.
![]() Add code to check if the ball has collided with the paddle.
Add code to check if the ball has collided with the paddle.
![]() Add code to bounce the ball off the screen edges.
Add code to bounce the ball off the screen edges.
Note: An alternative and simpler way to check for edge bounces is to create “invisible” sprites off the sides of the screen and use sprite collision methods to check for bounces.

![]() Add code to check if the ball bounced off the paddle, using sprite collision detection.
Add code to check if the ball bounced off the paddle, using sprite collision detection.
![]() Add code to change the vertical speed after a bounce.
Add code to change the vertical speed after a bounce.
![]() Add code to check if the ball passed by the paddle and the game is over.
Add code to check if the ball passed by the paddle and the game is over.

![]() Add code to check if the ball collided with a block.
Add code to check if the ball collided with a block.
Note: Setting True means blocks are deleted automatically when the ball bounces off them.
![]() Add code to change the ball's vertical direction after a bounce.
Add code to change the ball's vertical direction after a bounce.
![]() Add code to draw all sprites and update the display.
Add code to draw all sprites and update the display.
![]() Press
Press ![]() and save the file as game bricks.py.
and save the file as game bricks.py.
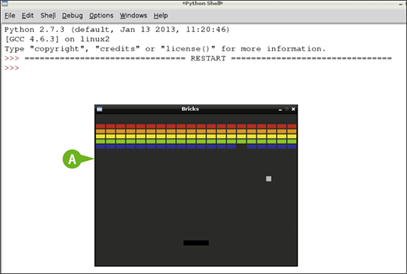
A The code draws the graphics for a bricks game with an animated ball and paddle, and collision detection for all elements.
Share Your Games
You can share your games and download other games and apps at the official Raspberry Pi App Store. The store uses a special app called pistore that is preinstalled in the official release of Raspbian. You should update it to the most recent and most reliable version.
To share your games you must register as a developer with Indie City, the Pi App Store's official distribution partner. Registration is a complex multistage process. Clear instructions are available online, so this section indicates where to find them without taking you through every step.
Share Your Games

![]() At the command prompt or in LXTerminal type sudo apt-get update && sudo apt-get install pistore and press
At the command prompt or in LXTerminal type sudo apt-get update && sudo apt-get install pistore and press ![]() .
.
Linux checks if a more recent version of pistore is available, and downloads and installs it.
Note: If there is no updated version, this command does not install new software.
![]() In LXTerminal, type pistore and press
In LXTerminal, type pistore and press ![]() .
.
The Pi App Store loads in its own window.
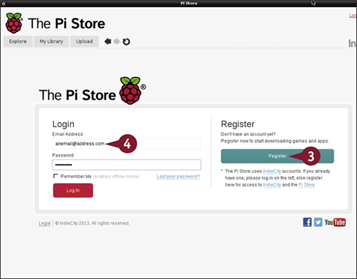
![]() If you have not yet registered, click Register and follow the steps.
If you have not yet registered, click Register and follow the steps.
![]() If you have registered, type your e-mail address and password and click Log In.
If you have registered, type your e-mail address and password and click Log In.

![]() Click Upload.
Click Upload.
![]() Click How to upload content to the Pi Store.
Click How to upload content to the Pi Store.
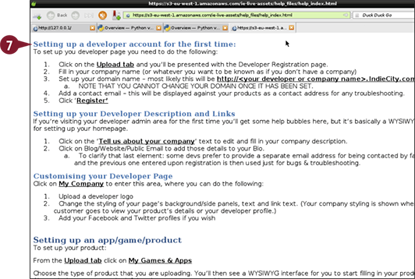
![]() Follow the instructions to set up a developer account.
Follow the instructions to set up a developer account.
Note: You may need to package some applications if they work with sudo apt-get install. Search online for “Debian Package Maker” for details.