
Selecting an Operating System
Unlike a PC or a Mac, a Raspberry Pi can run many operating systems. The recommended OS, described in the rest of this book, is called Raspbian Wheezy. You can experiment with other OS options by installing them on an SD card.
Select and Install Raspbian Wheezy
Understanding OS Options
Before you can use your Pi, you must install an operating system, or OS, on an SD card. If you are assembling your own Pi system, you can use a free software application called NOOBS, or New Out of Box Software, to select an OS from a list and install it on a card. Older Pi kits included SD cards with Raspbian Wheezy preinstalled. Newer kits include cards with NOOBS preinstalled; you must use NOOBS to set up Raspbian Wheezy before you can use your Pi.
Understanding NOOBS

Because many users could not understand how to install an OS on a blank SD card, the creators of the Pi produced NOOBS to make the process simpler. NOOBS works in four steps. First, prepare an SD card. Next, download NOOBS, unzip it, and copy the files it holds to your card. Plug the card into your Pi, and apply power to start the Pi running, which is called booting the Pi. When NOOBS launches, select an operating system from a list built in to NOOBS and install it on the card. Finally, NOOBS restarts, or reboots, your Pi automatically, and the Pi launches the OS you installed on the card. You can then begin working with your operating system.
Understanding Linux Choices

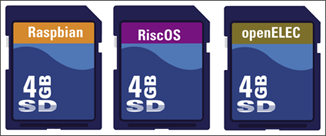
You cannot install Windows or OS X on your Pi. Instead, the Pi works well with an alternative OS called Linux, which is free, highly customizable, and available in a number of different distros, or distributions. NOOBS includes three general Linux distros designed to work with your Pi called Raspbian Wheezy, Archilinux, and Pidora. This book is about Raspbian Wheezy. Archilinux and Pidora are more experimental and not recommended for beginners.
Understanding Media Center Choices

Most Linux distros are for general computing. But some are more specialized and designed to do one job well. A distro called XBMC turns any compatible computer into a media center and includes software for playing, downloading, streaming, and managing video and audio files. NOOBS includes two versions of XBMC created for the Pi — RaspBMC and OpenELEC. Either can turn your Pi into a powerful media player. XBMC is not covered in this book. You can find out more at http://xbmc.org/about.
Understanding Other OS Choices
As of summer 2013, NOOBS includes one OS that is not based on Linux. RiscOS is an updated version of a British desktop operating system developed during the late 80s and early 90s, and supports an optional package of productivity software called NutPi, which sells for $50 (£35). RiscOS is not covered in this book. You can find out more at www.riscosopen.org/content.
Understanding the Recovery Option
Because the Pi is designed for education, you can experiment freely with applications and settings. Some mistakes can trash an operating system and stop it working. NOOBS includes a recovery option to rescue you if you ever need to start from scratch: Boot while holding down ![]() to relaunch NOOBS, wipe your SD card, and reinstall an OS. Note this option wipes all the data and settings on the card.
to relaunch NOOBS, wipe your SD card, and reinstall an OS. Note this option wipes all the data and settings on the card.
Understanding Card Swapping
In theory you can use NOOBS to create a collection of SD cards with different operating systems. When you want to transform your Pi into a different computer, you can power it down, remove one SD card, plug in another, and apply power again to reboot. In practice, the Pi's SD card connector is not robust enough for regular swapping, and it can become unreliable after a few tens of swaps. You can experiment with different OS options on different cards to a limited extent, but enthusiastic card swapping is not recommended.

BerryBoot is an alternative to NOOBS for more experienced users. With BerryBoot you can install multiple operating systems on a single card. You can pick a different OS whenever you reboot, which makes your Pi more useful and avoids physical card swapping. You can also use BerryBoot to install operating systems on more robust media, such as hard drives and USB flash drives. When you gain more experience with Linux, you can customize the list of operating systems available with BerryBoot.
Prepare an SD Card
You can prepare an SD card for use with NOOBS by downloading and running a free application from the website of the SD Association. Different versions of the application are available for Macs and PCs, but they do the same job and are set up in a similar way.
Technically, you prepare a card by formatting it. This takes a few minutes and erases all the information on the card. You can format and reuse the same card more than once, but if you repeat the process many tens of times the card may become unreliable.
Prepare an SD Card
![]() Connect a card reader and insert an SD card.
Connect a card reader and insert an SD card.
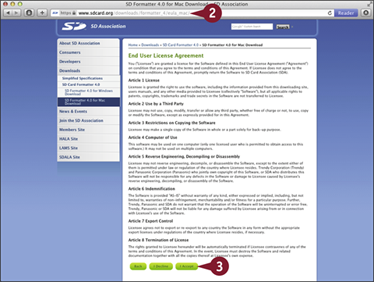
![]() Open a web browser and visit www.sdcard.org/downloads/formatter_4/eula_mac.
Open a web browser and visit www.sdcard.org/downloads/formatter_4/eula_mac.
Note: If you cannot find version 4 of the formatter, check www.sdcard.org/downloads to find the most recent version.
![]() Click I Accept.
Click I Accept.
Your browser downloads the file.
![]() Navigate to the PKG file in Finder, double-click it, and follow the steps to install the application.
Navigate to the PKG file in Finder, double-click it, and follow the steps to install the application.
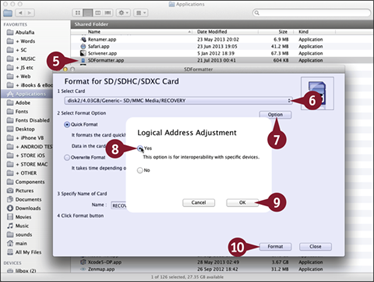
![]() Open your Applications folder and double-click SDFormatter.app.
Open your Applications folder and double-click SDFormatter.app.
![]() If you have more than one card or USB stick connected, click the Select Card menu and select your SD card.
If you have more than one card or USB stick connected, click the Select Card menu and select your SD card.
![]() Click Option.
Click Option.
![]() In the Logical Address Adjustment dialog, click Yes (
In the Logical Address Adjustment dialog, click Yes (![]() changes to
changes to ![]() )
)
![]() Click OK to confirm.
Click OK to confirm.
![]() Click Format.
Click Format.
The tool takes a few seconds to format the card.
![]() Connect a card reader and insert an SD card.
Connect a card reader and insert an SD card.
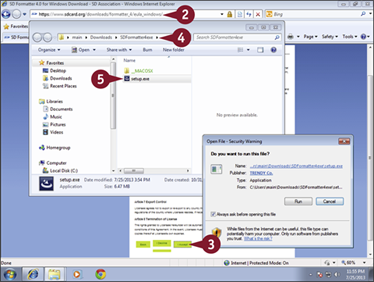
![]() Open a web browser and visit www.sdcard.org/downloads/formatter_4/eula_windows.
Open a web browser and visit www.sdcard.org/downloads/formatter_4/eula_windows.
Note: If you cannot find version 4 of the formatter, check www.sdcard.org/downloads to find the most recent version.
![]() Click I Accept.
Click I Accept.
Your browser downloads the file.
![]() Navigate to the file, right-click it, and select Extract All to unzip it to a folder.
Navigate to the file, right-click it, and select Extract All to unzip it to a folder.
![]() Open the folder, double-click setup.exe, and follow the steps to install the application.
Open the folder, double-click setup.exe, and follow the steps to install the application.
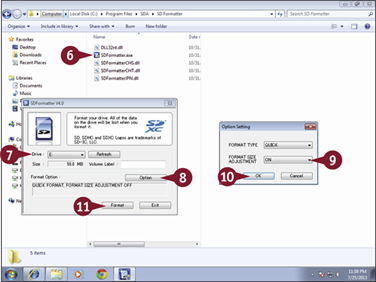
![]() Navigate to the SDA folder in Program Files and double-click SDFormatter.exe.
Navigate to the SDA folder in Program Files and double-click SDFormatter.exe.
![]() If you have more than one card or USB stick connected, click Drive and select the letter corresponding to your SD card.
If you have more than one card or USB stick connected, click Drive and select the letter corresponding to your SD card.
![]() Click Option.
Click Option.
![]() Select ON.
Select ON.
![]() Click OK to confirm.
Click OK to confirm.
![]() Click Format.
Click Format.
The tool takes a few seconds to format the card.
Copy NOOBS to an SD card
You can download NOOBS for free from the Raspberry Pi support site. Unzip it to reveal a collection of files. To install NOOBS on a card, use Windows Explorer or Finder to copy all files to the card.
Finder on the Mac and some unzip tools on a PC create a new folder when you unzip NOOBS. Do not copy the folder to your card. Copy the files in the folder.
Copy NOOBS to an SD Card
![]() Follow the instructions in the previous section to prepare an SD card; leave it plugged in to your computer.
Follow the instructions in the previous section to prepare an SD card; leave it plugged in to your computer.
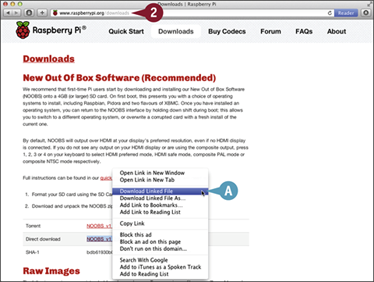
![]() Open a web browser and visit http://downloads.raspberrypi.org/noobs.
Open a web browser and visit http://downloads.raspberrypi.org/noobs.
Note: If you see a File Not Found message, repeat step 2.
NOOBS should begin to download automatically.
A If nothing happens, right-click Direct Link and select Save link as, Download Linked File.
Note: In Windows, skip to step 6.
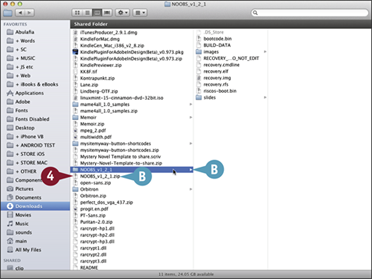
![]() Navigate to the download location and find the NOOBS Zip file.
Navigate to the download location and find the NOOBS Zip file.
Note: The usual location is the Downloads folder. If you have customized your browser to save to a different folder, look there instead.
Note: The name of the NOOBS file includes the version number, for example, NOOBS_v1_2_1.zip.
![]() Double-click the file to unzip it.
Double-click the file to unzip it.
B Finder unzips the contents of the file to a new folder.
Note: On a Mac, skip steps 6 to 8.

![]() On a PC, open Windows Explorer and navigate to your Downloads folder.
On a PC, open Windows Explorer and navigate to your Downloads folder.
![]() Right-click the NOOBS file and select Extract All.
Right-click the NOOBS file and select Extract All.
C You can change the destination folder.
![]() Click Extract.
Click Extract.
![]() Open a new window in either Finder or Windows Explorer.
Open a new window in either Finder or Windows Explorer.
Note: This example shows Finder on a Mac.
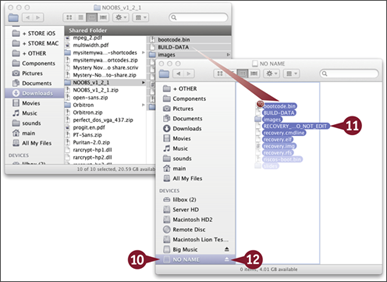
Note: If you did not set a name for the card, the name appears as NO NAME.
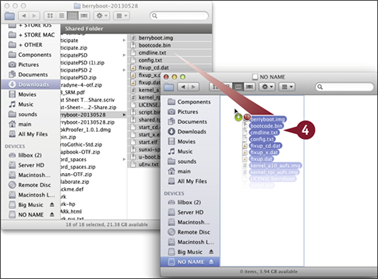
![]() Select all the files in the unzipped NOOBS folder and drag them to the empty SD card.
Select all the files in the unzipped NOOBS folder and drag them to the empty SD card.
Note: Copy the files in the folder. Do not select and copy the folder itself.
![]() Eject the card.
Eject the card.
Note: On a Mac, click the eject triangle next to NO NAME in Finder. On a PC, open Computer or My Computer in Windows Explorer, right-click the drive, and select Eject.
Select and Install Raspbian Wheezy
You can use NOOBS to select and install an OS on an SD card. NOOBS runs the first time you power up your Pi after preparing an SD card on your Mac or PC and inserting it into the Pi's card slot. In NOOBS, you can select an OS and install it on the card.
NOOBS does not run again unless you force it to. When you reboot, your Pi launches the OS you picked. But if you hold down ![]() on your keyboard while rebooting, NOOBS displays its recovery option. You can use this option to wipe the contents of your card and install another OS.
on your keyboard while rebooting, NOOBS displays its recovery option. You can use this option to wipe the contents of your card and install another OS.
Select and Install Raspbian Wheezy
Note: NOOBS requires a USB hub, a mouse, and a power supply. Work through Chapter 1 if you have not yet bought these items and connected your Pi to them.
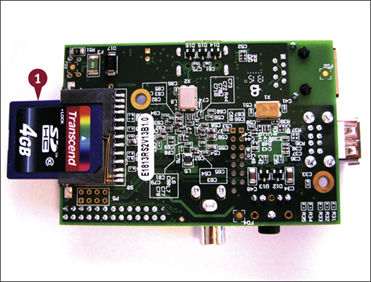
![]() Plug the card you created in the previous sections in this chapter in to your Pi.
Plug the card you created in the previous sections in this chapter in to your Pi.
Note: The card slot is under the Pi. Plug the card in the slot so the label is visible from the bottom, as in the photo.
![]() Connect your Pi to the power supply you selected in Chapter 1.
Connect your Pi to the power supply you selected in Chapter 1.
Note: You can select a different language in the menu at the bottom of the screen. The default British English option is also suitable for users in the United States.
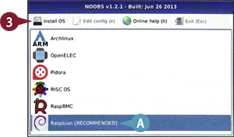
A Raspbian is preselected.
![]() Click Install OS.
Click Install OS.
Note: To install a different OS, select one of the other OS options before clicking Install OS.
![]() When the alert box appears, click Yes to confirm.
When the alert box appears, click Yes to confirm.
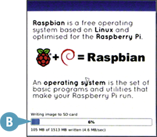
B NOOBS begins copying Raspbian to the SD card.
Note: NOOBS displays a progress bar and various notes about Raspbian as it works.
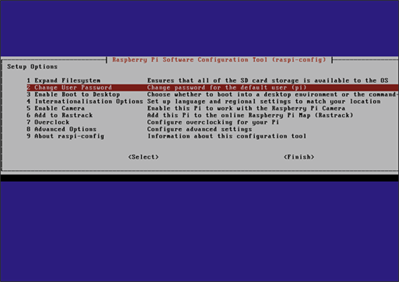
When NOOBS finishes it reboots your Pi automatically. Initially, your Pi displays many lines of scrolling text. After a minute or so it displays the Raspbian configuration options. To use these options to configure your Pi, see Chapter 3.
Back Up an SD Card
You can use a Mac or PC to back up the contents of an SD card. Backing up a card saves configuration options, installed applications, and other files. You can make multiple backups as you work. The backup process works with every Pi OS, including Raspbian Wheezy.
Note you cannot simply copy the files from a card to back it up. On a Mac, use the Disk Utility application. On a PC, use a free application called win32DiskImager.
Back Up an SD Card
![]() Shut down your Pi using the instructions Chapter 3.
Shut down your Pi using the instructions Chapter 3.
Note: Do not simply unplug the power lead.
On a Mac
![]() Unplug the SD card from the Pi and insert it into a card reader connected to your Mac.
Unplug the SD card from the Pi and insert it into a card reader connected to your Mac.
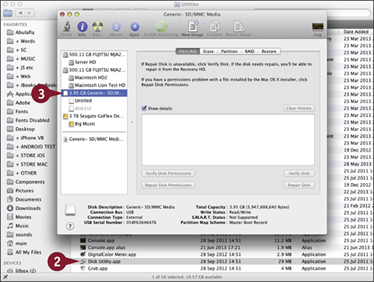
![]() Navigate to the Utilities folder in Applications and double-click the Disk Utility application.
Navigate to the Utilities folder in Applications and double-click the Disk Utility application.
![]() Click the card device to select it.
Click the card device to select it.
Note: Do not select the headings under the device. The correct item includes the words Generic and SD.
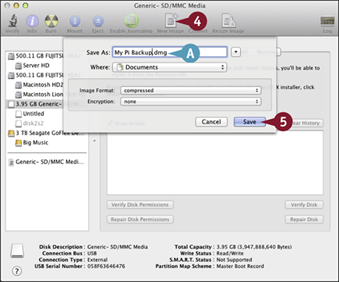
![]() Click New Image.
Click New Image.
A You can optionally change the filename and location of the backup in the Save As field.
![]() Click Save.
Click Save.
The utility creates a DMG file that holds the contents of the card, and adds the file to the list of disk images in the area at the left.
![]() Open a web browser and visit http://sourceforge.net/projects/win32diskimager. Click Download.
Open a web browser and visit http://sourceforge.net/projects/win32diskimager. Click Download.
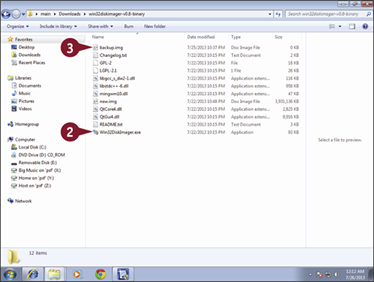
![]() Double-click Win32DiskImager-v0.8-binary.zip and extract it to a folder.
Double-click Win32DiskImager-v0.8-binary.zip and extract it to a folder.
Note: The version number may be greater than 0.8.
![]() In Windows Explorer, create a file with an IMG extension, for example, by right-clicking, selecting New and then Text Document, and renaming the file extension to .img.
In Windows Explorer, create a file with an IMG extension, for example, by right-clicking, selecting New and then Text Document, and renaming the file extension to .img.
Note: Version 0.8 of Win32DiskImage has a bug. You must create an IMG file manually in Windows Explorer before Win32DiskImager allows you to write a backup file.
![]() Double-click Win32DiskImager.exe to launch it.
Double-click Win32DiskImager.exe to launch it.
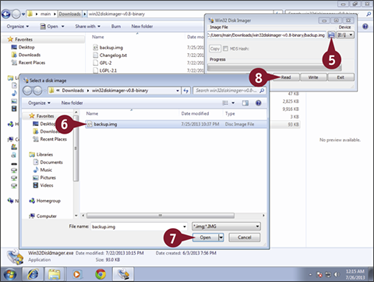
![]() Click the folder icon (
Click the folder icon (![]() ).
).
![]() Navigate to the file you created in step 1 and click it.
Navigate to the file you created in step 1 and click it.
![]() Click Open.
Click Open.
![]() Click Read.
Click Read.
Win32DiskImager copies the contents of your card to an IMG file. This can take up to 20 minutes.
Get Started with BerryBoot
You can use a free application called BerryBoot to install multiple operating systems. With BerryBoot, you can switch between a different OS every time you restart your Pi. You can also install OS files on other devices, including USB memory sticks and hard drives. Where a 4GB SD card has room for just one or two OS options, a 16GB or 32GB USB stick gives you room for many more.
BerryBoot is easy to use. Note that it downloads files from the Internet when you install a new OS. This can take an hour or two, and requires a good broadband connection.
Get Started with BerryBoot
![]() Follow the instructions in the section “Prepare an SD Card” to prepare a blank SD card.
Follow the instructions in the section “Prepare an SD Card” to prepare a blank SD card.
![]() Open a web browser and visit www.berryterminal.com/doku.php/berryboot.
Open a web browser and visit www.berryterminal.com/doku.php/berryboot.
![]() Download the latest version of the berryboot.zip file.
Download the latest version of the berryboot.zip file.
![]() Follow the instructions in the section “Copy NOOBS to an SD Card” to copy the BerryBoot files to your card. Instead of downloading and copying the NOOBS files, copy the BerryBoot files you downloaded in step 3.
Follow the instructions in the section “Copy NOOBS to an SD Card” to copy the BerryBoot files to your card. Instead of downloading and copying the NOOBS files, copy the BerryBoot files you downloaded in step 3.
![]() Place the SD card into your Pi and apply power.
Place the SD card into your Pi and apply power.
BerryBoot displays a Welcome screen.
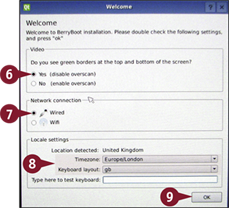
![]() Click Yes (
Click Yes (![]() changes to
changes to ![]() ).
).
![]() Click a network option (
Click a network option (![]() changes to
changes to ![]() ).
).
Note: You must connect your Pi to the Internet to use BerryBoot.
![]() Select a time zone and a keyboard layout.
Select a time zone and a keyboard layout.
Note: You can skip step 8 if you do not customize BerryBoot or change any advanced settings.
![]() Click OK.
Click OK.

![]() Select a storage device for your OS files.
Select a storage device for your OS files.
Note: The SD card is labeled “device mmcblk0.” If you connected your Pi to any other storage device, it appears automatically in the list.
![]() Click Format.
Click Format.
BerryBoot reformats the card.
Note: This wipes all the information on your storage device. Be very careful, and double-check that you are not wiping useful information.
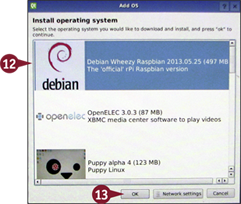
![]() Select an operating system from the list.
Select an operating system from the list.
![]() Click OK.
Click OK.
BerryBoot downloads the files for the OS and installs them on the device you selected in step 10.
Note: When you restart your Pi, BerryBoot loads a screen with a list of installed OS options. Click Add OS to add another OS to the list, Delete to remove an OS, and Make Default to choose the OS loaded by BerryBoot after a short wait.
Note: Experienced users can edit the boot options. See the BerryBoot web page for details.