
Chapter 2
Using Empathy as a Design Tool
The first step in the design thinking process is to empathize—to imagine ourselves standing in the users’ shoes, look through their eyes, and feel what they feel. This allows us to better know their like and dislikes, what motivates them, and what gets in their way.
To accomplish this, we need to conduct research with our users. We can conduct lots of types of research, but one of the most common types (which we will go into depth about) is to talk with our users and hear from them directly. Through conversations, we learn more about their experiences and begin to develop the empathy we need.
Empathizing through design thinking is artistic—to have a conversation with someone else is an art form. Navigating the complexity of a conversation—the content, the context, the emotions—all within seconds of a response time requires you to be nimble, attentive, and present. Conversations are unique, and everyone’s style is just a little different.
Empathizing through design thinking is also scientific. There is a methodology in choosing what questions to ask, in what order, and in what ways, so we can avoid bias, allow the participant to feel comfortable, and seek out answers.
By applying both art and science to the empathize phase of design thinking, we can have the conversations that allow us to understand our users’ wants and needs, better understand how to solve their problems, and start to develop a solution that changes their experiences for the better.
Types of Research
You’ve arrived! You’re ready to begin the design thinking process. Looking at the model (FIGURE 2.1),1 you are at the first step: empathize.
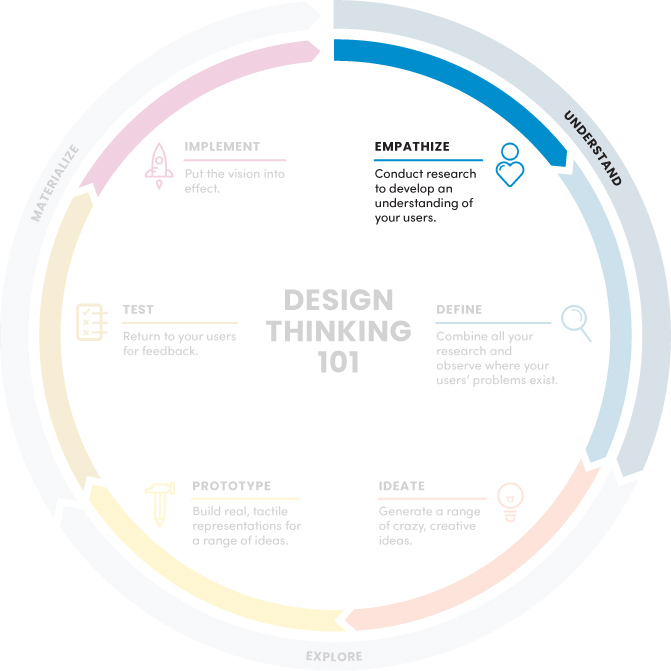
FIGURE 2.1 The NN/g design thinking model. The first step of the model is empathize. It is part of the understand phase of design thinking, where you seek to understand more about your users and the problem you are trying to solve.
1 Adapted from www.nngroup.com/articles/design-thinking/
You are ready to begin the phase of the project where you try to understand. Who are the users? What are their wants, needs, and goals? What problem are you trying to solve? You will hopefully come to these answers as you move through this phase.
To empathize with users and their problems, you must perform research. You need to talk with the users, or observe them, or learn more about them in some way that lets you empathize with them. Thankfully, there are plenty of research methods that will allow you to do this.
Research, as it applies to design thinking, can be broken into four categories, which are discussed in the following subsections along with ideas from NN/g, the Nielsen Norman Group.2 Christian Rohrer (an NN/g researcher)3 has developed matrices for these categories, which are also included in the following subsections.
2 www.nngroup.com/articles/which-ux-research-methods
3 www.linkedin.com/in/crohrer/details/experience/
Behavioral vs. Attitudinal
You can approach research from a usercentric perspective and think about the users’ actions, such as what they do in a situation. Perhaps you could create a prototype, give it to people, and watch where they click around the interface. This would be behavioral research in that you would observe behaviors as people took actions in an experience.
Alternatively, you could think about the opinions of the users, such as what they think or feel about a situation. Perhaps you use that same prototype, but instead of watching people click around the interface, you ask for their opinions of that interface. Is it intuitive? Does it solve their problems? Would it help them with their goals? This would be attitudinal research in that you would record what people say as they were asked questions about an experience.
If you map these two characteristics of research in a chart, you’d get something like FIGURE 2.2. On the top of this axis are behavioral types of research, based on what people do. On the bottom of this axis are attitudinal types of research, based on what people say.

FIGURE 2.2 Christian Rohrer’s research methods landscape matrix. This portion of the matrix maps out behavioral research versus attitudinal research.
An example of behavioral research would be something like eye tracking, where a user’s eye movements are monitored as they look at an interface. This type of research has produced, for example, the F-pattern and Z-pattern4 for the web.
4 https://99designs.com/blog/tips/visual-hierarchy-landing-page-designs/
An example of attitudinal research would be something like a user interview, where a researcher talks with users to understand more about their goals, wants, and needs. This type of research has produced design artifacts like personas (representations of our target user), where you attain a better understanding of the people you design for.
Qualitative vs. Quantitative
You can also approach research strategy from a feedback perspective. Are you obtaining information directly, by having a conversation with users? Or are you obtaining it indirectly, by having them fill out a survey?
If you map those characteristics to a chart, you’d get something like FIGURE 2.3.

FIGURE 2.3 Christian Rohrer’s research methods landscape matrix. This portion of the matrix maps out qualitative research versus quantitative research.
On one side of the x-axis are direct research methods, which are qualitative and based on a why. On the other side of the x-axis are indirect research methods, which are quantitative and based on a quantity.
An example of qualitative research would be a focus group, where you bring in several users to discuss a problem and work with them to understand why that problem exists and how to fix it. Focus groups are less common in product design, but could still occur in the context of branding, for example.
An example of quantitative research would be an unmoderated UX study, where participants try to complete tasks in a UI without any direction or guidance. You gain quantitative data, learning how many users can complete a task or how much time it takes to complete the task without guidance.
The Research Landscape Chart
If you combine these two axes, you get the chart in FIGURE 2.4. Using this matrix, you can map out all the different types of user research to consider (FIGURE 2.5).

FIGURE 2.4 Christian Rohrer’s research methods landscape matrix, fully put together.

FIGURE 2.5 Christian Rohrer’s research methods landscape matrix, filled in with example types of research. An interview, for example, is a form of attitudinal, qualitative research, as you record the opinions people have and form qualitative data. A/B testing is a form of behavioral, quantitative research, as you record the actions people take in an experience and form quantitative data.
Figure 2.5 includes a comprehensive list of the different types of research available to you as a designer. Based on this matrix, you can start to think about how to conduct research.
Do you need to talk with users via an interview? If so, you need direct contact with those users and attitudinal questions to ask them. What are their goals when they come to the product? What are some of the pain points when using our product? How do they currently solve their problems? You can start to structure the research approach depending on the type of research you choose to conduct.
Conversely, you can use this matrix to think about the type of data you want to know. Are you curious about click-through rates in our product? Well, you need to know how many people can complete a task on our website, and how much time it takes for them to do so. Referencing the matrix, you see that you want quantitative, behavioral information, and from there choose a method like clickstream analysis.
Now that you have a sense of the types of research you can conduct and what categories they fall under, let’s look at the instances in which you’ll want to use these methods.
Stages of Design Research
Depending on where you are in your projects (and your research budget), you will want to conduct different types of research. You can think of research occurring in three points in time:
Before you begin to design (before the ideate step of the design thinking process)
After you have created some designs (after ideate, but before implement)
After your designs have been released (after implement)
Formative Research
The purpose of formative research is to align what you want to make with what users want to use. The goal is to build a picture of users while also understanding any solutions that currently exist to their problems. You have several methods you can use to get a better understanding of these things.
Surveys
Surveys are a great way to get a lot of information about users with a small amount of time invested. You can create a form with a few questions you want answers to and send it to a lot of participants to generate qualitative and quantitative information. Additionally, you can create screener surveys, which function as a filter for finding users you really want to talk with (FIGURE 2.6).

FIGURE 2.6 A survey question about online purchasing habits
Interviews
Once you’ve identified a few users you want to talk with, you can schedule conversations with them. User interviews (FIGURE 2.7) are excellent opportunities to directly ask questions and better understand people’s motivations. You can go into detailed conversations to understand what they need, and dive deeper into those needs by asking “why?” directly.

FIGURE 2.7 In a user interview, a researcher asks questions about a person’s opinions and experiences to gain data about their wants and needs. (Edvard Nalbantjan/Shutterstock)
Competitive Analysis
In addition to understanding your users, it’s crucial to understand the products that exist in the marketplace. Are there other businesses that have solved this problem already? What can you do to solve the problem differently? Are there common conventions in your industry that you need to be aware of as a designer, such as the way users are used to seeing content? By understanding the competition, you can get a sense of what works, what doesn’t, and how you can improve it.
You can do competitive research in many ways. You can create a comparison table (like the one in FIGURE 2.8) to identify which features are most prominent across different products, which would let you know market expectations. You can conduct usability tests of your competitors’ products to better understand the usability of those products and see what does or doesn’t work for users. You can do user-perception tests of other products to learn how people experience those products and what they think of the competition. You can do a lot related to competitive analysis. Chapter 3, “Defining the User’s Problem,” will go into more detail.
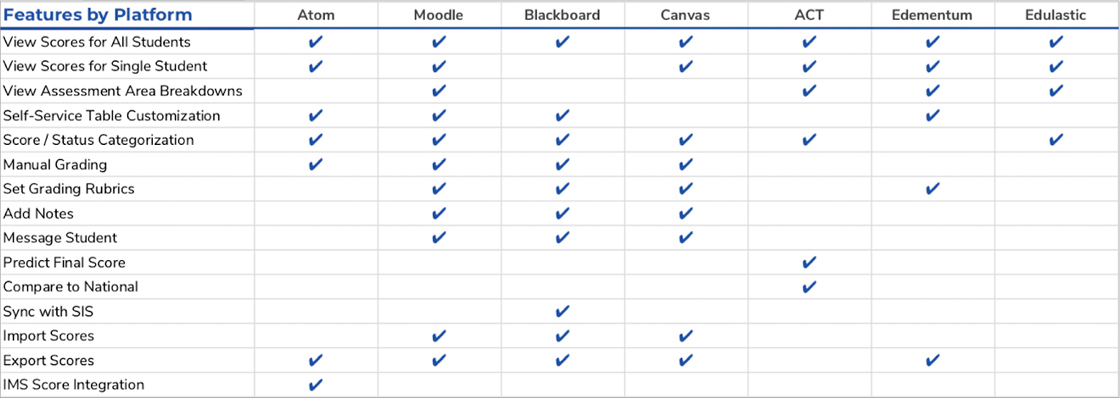
FIGURE 2.8 A table comparing the features of a new platform to those of its competitors.
Figure 2.8 is an example of some formative research I did for a project at Kaplan. I was working on a dashboard redesign for educators that informed them of their students’ progress throughout a course. The product manager for that project talked to teachers daily and asked a few of them to participate in user interviews. We spoke to those teachers to understand how they used the platform in its current form, and we learned of some places we could improve. This research was formative—it allowed us to form opinions about the problems we wanted to solve.
Additionally, we looked at competing educational platforms that had dashboards for teachers to learn about student progress. We made a comparison table (Figure 2.8) that allowed us to understand which features were more common across all our competitors. This was also formative research. Based on the table, we formed opinions on what features to focus on for the relaunch of our platform.
Once you have a good understanding of your users and competitors, you would move on in the design thinking process. You’d define the problem to solve, ideate possibilities, and eventually design solutions. When those solutions are ready to be shown to users, you’d conduct usability research.
Evaluative Research
The purpose of evaluative research (FIGURE 2.9) is to validate assumptions and make sure designs work. Can users use what you made? Does it make sense, and is it intuitive? Or does it fail? That’s OK too—you haven’t launched it yet. You need to know what works and what doesn’t so you can improve your designs and release them.

FIGURE 2.9 A usability study in which a researcher asks someone to use an experience and provide feedback about it. (Gaudilab/Shutterstock)
This works with anything you’ve made: sketches, wireframes, prototypes, live apps, or even websites. You can conduct usability research in the earlier steps of the design thinking process with, for example, competitor products to expose the usability issues in those products. Or you can conduct usability research on your existing product, to learn how you can enhance it.
You can also revisit conversations with users you spoke with during the background research. A user you interviewed at the start of your project could come back to test the designs, and you could ask them how well you succeeded.
Going back to the Kaplan example, we also performed evaluative research on our redesign of the dashboard. We conducted usability testing with the users we interviewed—the teachers who were going to use the platform—and asked them to complete a few tasks in a prototype. We observed their thoughts and feelings as we tracked task completion rates, places where the designs didn’t make sense to them, and the elements of our design that really worked well. With this evaluative research, we were able to evaluate what worked about the design and what didn’t so that we’d know what we needed to revise before we built the product.
Once your evaluative research is in a place where you feel ready to implement the designs, you can move on in the process. You would finish your designs, build them with developers, then watch as users start to adopt your product. After some product usage, you could conduct research to see how our product is doing.
Summative Research
The purpose of summative research (sometimes called ROI, or return on investment, research), is to see the product’s performance. How is what you made doing? How is it performing in terms of its design, usability, sales, revenue, conversion, or engagement?
Several methods are very informative for this type of research.
Analytics
Analytics allow you to gather a large amount of quantitative data (FIGURE 2.10) about how things are performing. For example, you could observe your SEO (search engine optimization) to understand how many people come to your website and how often. It’s behavioral rather than attitudinal, however, so you won’t necessarily understand why.

FIGURE 2.10 Analytics provide behavioral insight into how people move around a product and use it, such as what source they come from, how long they stay in the product, and what actions they take while they are in it. (a-image/Shutterstock)
A/B Testing
You could also conduct A/B testing in your product (FIGURE 2.11). What is it like to change a word or a color? To move an image from the left side of the screen to the right? This type of testing is quite granular and happens with more mature products looking to optimize their designs. Google is famous for an extreme example of this type of testing, where they tested 41 different shades of blue to determine the optimal color for incentivizing engagement.5
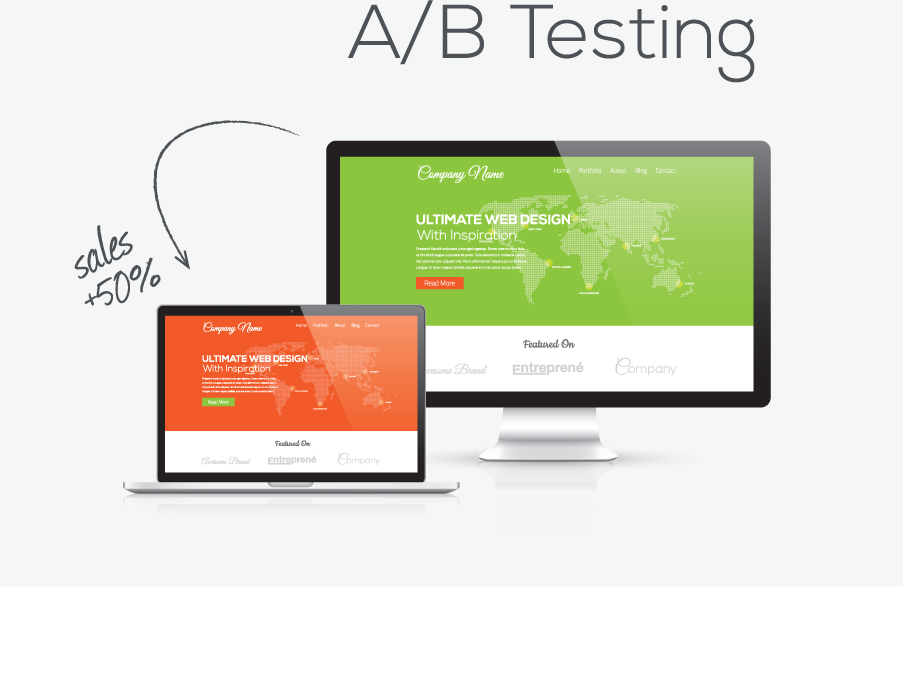
FIGURE 2.11 A/B testing allows you to test two versions of a design to understand which one performs better. Even simple changes, like changing a color, can result in improved results for the product. (mpFphotography/Shutterstock)
5 www.theguardian.com/technology/2014/feb/05/why-google-engineers-designers
User Engagement Scores
A more attitudinal research method for understanding the performance of your product is to ask users how they feel after using it. One way to do so is by using CSAT, or customer satisfaction, scores (FIGURE 2.12). This method asks users to rate whether their expectations have been met after using the product. You can take those ratings and average them to determine how satisfied users are after using a product.
FIGURE 2.12 A survey that asks for user engagement scores.
Since this is the first stage of the design thinking process, you’ll want to conduct background research. That means you’ll need to understand who the users are, and what currently exists to help them.
For the student progress dashboard redesign project at Kaplan, we conducted summative research as well. After we launched the redesign, we spoke with teachers to hear more of their thoughts about the product. We tracked the performance of the platform, such as which features were being used more than others. We also collected user-engagement scores in a process like the survey in Figure 2.12.
Research Is an Ongoing Process
User research can happen at any stage in your product’s lifecycle. You may need to understand more about the problem you’re trying to solve—if so, conduct background research. If you’re wondering whether people can use your solution, conduct usability research. If you’re more curious about how your product is performing, conduct ROI research.
Truthfully, you should be doing all three types of research for your products. Learning more about our users and how you can help them with their goals is an ongoing process that allows you to make the best solutions you can for the people you design for.
Surveys
One primary way you can understand more about users and empathize with them is to hear their stories, their thoughts, their wants and needs by asking them questions about their opinions and experiences. Surveys are a perfect tool for us to do so. In this section, we’ll cover surveys—what they are, how to write them, and how to use them in the empathize step of the design thinking process.
What Is a Survey?
In the context of design, a UX research survey is a set of questions sent to a targeted group of users that probes their attitudes and preferences. Users are asked questions in a form, and those questions help us understand information about our product, an industry, or users’ attitudes toward something (remember that surveys are attitudinal in nature, as opposed to behavioral).
You use research surveys for two purposes:
To gain information about users (qualitative or quantitative)
To recruit potential users for research (user interviews, usability studies, and so on)
For both purposes, surveys can be very valuable as a scalable form of research. It’s difficult to invest time talking to each user and asking them questions; with surveys, you can send a link to a large number of people and get a lot of data quickly with low effort. There’s an initial investment, but it pays dividends once you do the work to create the survey.
To make a survey, and to make it well, you need to consider the steps to conducting survey-based research.
Start with an Objective
Surveys begin with a research objective. What is the purpose of the survey? Why do you need to use this research method to obtain the information (or users) you’re looking for? What do you hope to gain by opening a survey? And how will you analyze your responses? You need a research plan so you’re well prepared for recruiting participants and analyzing your results.
Ask Questions Around the Objective
Once you know the point of your study, you can ask questions around it. Your questions should be focused on that objective—don’t ask questions that do not directly support your objective.
For example, if you are trying to learn about ride-share app habits, do you need to know the average annual income of your users? Do you need to know their age? Or their ethnicity? You may be tempted to ask questions you think would help you build a profile of your users, but each question you ask makes it harder for your users to complete your survey. Stick to the crucial questions that support your objective.
Recruit Participants
Author’s Note
I send surveys for my personal projects via social media. I use LinkedIn, Slack, and Discord design groups that I belong to, and I ask my friends if they’d like to be involved.
Once your survey has a good structure, you can research people for your study. How will you find participants? Do you have an email list you can send a link through? Do you have a product with the ability to survey your users within it? Do you have any company (or personal) social media accounts that you could post to? Any of these methods could be appropriate for your research—the purpose is to get participants, ideally ones who are your target users, though sometimes you can be a little more relaxed about who you send surveys to (such as for a usability study).
Analyze Responses
Once you’ve sent your survey and received enough responses, you can use those responses as a data set. Some survey providers, like Google Forms, provide data visualizations for each question you ask, which you can use to form opinions about your users and better empathize. These responses can inform your opinion of who you want to design for, influence your ideation, and even help you determine certain people to interview.
Reach Out to Key Participants
Author’s Note
I like to include a question at the end of all my surveys asking if the respondent is open to participating in a 10-to-15-minute call. That way, I can more easily follow up with respondents I want to interview.
As you look at your responses, you may find certain participants who would be great candidates to follow up with for an interview. You can contact these respondents and ask if they would be open to speaking with you about some additional questions. In fact, there is a subset of surveys, called screener surveys, that are designed to filter for appropriate candidates to do individual research with (like a user interview).
With a good understanding of how to structure a survey, let’s look at how you can structure questions.
Survey Question Types
Broadly speaking, a survey can have two types of questions:
Closed-response questions
Open-response questions
Closed-Response Questions
Closed-response questions are those that offer users a limited number of possible answers. The set of possible answers is “closed” and is defined by you, the researcher.
The example questions in FIGURE 2.13 are closed. The two questions have a set number of response possibilities, all of which were written and decided by the researcher. In this example, the researcher is seeking a specific information point about participants and is using these questions to filter users into categories around that point. For example, this researcher may want to see the patterns of people who shop online “often.” In that case, they may want to look only at responses from those who shop online once a month. If that’s the case, the researcher would filter out responses from users who select the responses that are longer than one month.

FIGURE 2.13 Two examples of closed questions. Closed questions can be single response (radio buttons) or multiple response (check boxes).
Closed-response questions are quantitative in nature. They lack context, motivation, or cause, but they are easy to visualize and simple for participants to answer (they click a button rather than write a response).
Closed-response questions are usually easy to identify—they have check boxes or radio buttons and are usually multiple choice.
Open-Response Questions
The opposite of the closed-response question is the open-response question, for which users can provide whatever answer they feel is appropriate. The set of possible answers is open and is defined by your users, who provide answers in the words they think are best.
The example questions in FIGURE 2.14 are “open,” as they allow users to provide whatever answer they feel is appropriate. Here, the researcher is a teacher looking to learn what the class understood from the lesson. The teacher has no way of knowing what students specifically learned and, as a result, needs them to say what they understood. Here, the teacher is seeking feedback from students, and it’s up to the students to provide that feedback. The teacher would use the results of the survey to better adjust educational materials, or revisit concepts in class that a lot of students say they didn’t understand.
FIGURE 2.14 Several open-response questions that ask the user to input information rather than select from a set of predetermined answers.
Open-response questions are qualitative in nature. Answer responses contain behavior around an action, or how a user thinks about a problem. They’re excellent at getting users to describe the situation in their own words, which flows nicely into persona work or advocating for users when building your product. But because the answers aren’t organized into a system (like they are with closed questions), they take a lot longer to analyze and are harder to sort.
You can recognize an open-response question in a survey by looking for text boxes. These input fields are the primary way researchers structure open-response questions.
Survey Best Practices
When writing your own surveys, you should keep in mind some best practices to ensure you get quality and quantity responses.
Ask “Easy” Questions
Users will need to navigate your entire survey. If you ask complicated questions, or ones that are long or have a lot of responses to choose from, you are at risk of overwhelming your users. Questions should be easy to understand and easy to answer.
Ask “Neutral” Questions
Author’s Note
Although you should be neutral in your questions to avoid intentionally directing your user’s feedback, you can still ask the questions “What do you like?” and “What do you dislike?” as they give good general feedback about the user’s sentiment.
Questions should be asked in a neutral way, to avoid assuming an answer or introducing bias. If you ask, “What is great about our product?” you are assuming your product is great (users might not think so). If you instead ask, “What do you think about our product?” you remove that bias and will get a different quality to the responses.
Cover All Conditions
When structuring closed-response questions, you need to think through the logic of those questions. Make sure you have every answer choice in your set of responses, or else you may alienate users who don’t fit into your choices.
Let’s revisit the closed-response question from before (FIGURE 2.15). Think about our question with the last answer choice removed. If you did so, the survey question would be comprehensive but would miss out on any user who doesn’t shop online every two months. Perhaps you don’t want to know more about that user, but you should still include that option as a response.

FIGURE 2.15 When using closed-response questions, make sure every logical possibility is covered. What if a respondent shops online every day? What if they never shop online? We’ve covered all logical possibilities by structuring the question in this way.
Keep It Short
Be mindful of how long your survey is. The longer your survey, the lower your completion rates will be. Write shorter surveys to have better completion rates. This is why it’s crucial to ask the most important, most relevant questions for what you’re trying to learn. Even a single wasted question will affect how many people complete your survey.
Show Progress
If you can, use a tool that allows users to view their progress when taking the survey. Knowing how long a survey will take will improve your completion rates for users who begin your survey, as users will have an understanding of how much time they must spend on it. Tools like Google Forms, Qualtrics, and Typeform are good at displaying completion rates for respondents as they fill out the survey.
Test It
Author’s Note
I like sharing my survey with a team member and asking them to fill it out to get some good feedback on how other people will interpret it.
As with all your designs, you should test your survey before inviting users to complete it. As you should for a prototype, test your survey internally or with a small segment of people before sharing it widely with the public. Does the survey behave as you expect it to? Did you leave out crucial questions? Do some questions feel incorrectly written? This is the perfect time to make sure what you wrote works.
Survey Bias
When you’re creating and distributing surveys, be mindful of introducing bias. Bias can adjust the quality of responses and result in you drawing conclusions from research that are incorrect or don’t accurately represent the users. There are various forms of bias—how you write your questions, how you distribute your surveys, and how you interpret your results.
Leading Questions
Priming occurs when you write questions in a way that leads users to an answer choice. Imagine you list all your website’s service options in a question and ask users which ones they use. Then in the next question, you ask users if your website is robust and has a lot of options. You’re introducing bias in this test—you just showed users all your options and then asked if you have a lot of options. Instead, flip the order of these questions—first ask if users think you have a lot of options, then ask which options they use. It may look like a small change, but it’s important to avoid that type of bias in your study.
Double-Barreled Questions
Double-barreled questions ask two things at the same time. Each question should elicit a single response to make it clearer and easier for your users and to avoid bundling answers together. For example, if you ask, “Do you want to buy jeans and a T-shirt?” you exclude users who want to buy one of those items but not both.
Undercoverage
Undercoverage occurs when you send out a survey and miss a percentage of the population in the results. For example, think of telephone surveys. It’s common to survey people’s opinions of political candidates by calling landlines and questioning the people who respond. This technique, however, misses any person who doesn’t have a landline or who screens their phone calls.
To avoid undercoverage, try to send surveys to multiple locations.
Nonresponse
Nonresponse bias occurs when you send out a survey and the people who choose to complete it are meaningfully different from the people who don’t. Perhaps the people who are inclined to complete the survey have a different personality type or set of opinions, which would affect the results meaningfully. Consider census data, for example, where non-respondents may be in a different economic situation than respondents. Or perhaps they could be digital nomads, traveling from city to city without a permanent address or one that they check often.
Author’s Note
Recruiting the right participants has a lot of nuances. It varies widely, depending on the product, audience, and questions you want answered. As a result, it’s very challenging to have a one-size-fits-all survey. Try to find people that fit the parameters of who you are designing for and what you want to know.
It’s hard to avoid all types of bias. But being aware of them will allow you to best structure your surveys and to best search for people to take them.
Recruiting Participants
Once the survey is ready to go and you are confident about its structure and content, you can begin to find people to talk with. There are many methods of recruitment—some more feasible than others, depending on your working situation.
Current Users
One of the best ways to get feedback about your product is to ask the people who currently use it. They have the most context and are the most invested in your product to provide quality feedback about it. You can find these users by putting links in your product to surveys or emailing your users through the product itself.
Social Media
Social media is the best way to get feedback for your personal projects or if you have a limited research budget. Posting your survey on LinkedIn, through Slack or Discord groups, or through other social media channels can get participants quite easily. The quality of these participants is uncertain, however, since you lack the context of their experience with your product (and you don’t know if they even fit into your user demographics). This is a method that’s valuable for fast and easy research, however, and one that is common among students especially.
Recruitment Services
If you have an extensive research budget, this option can help ensure quality participants. Services like Maze, UserTesting.com, and more can find users for you based on a set of parameters you provide. You can filter by age, income, product usage, or professional industry to target more specific users. This also allows you to avoid asking these types of questions in the survey itself, which gives you more time to ask the questions you really want to know the answers to.
Online Advertisements
As with the social media approach, you can take out ads asking for users to complete your surveys. Sometimes paired with compensation, this method is the widest-reaching one for finding users—which puts the quality of your survey at risk. Still, it’s a possible method that research teams with the budget to do so employ.
Survey Example
Author’s Note
If you work for a large organization, you may be able to pull some of this from your company’s databases and avoid asking a few of these preliminary demographic questions. It’ll save your users time filling out the survey.
With all this in mind, let’s look at an example survey created for a student project to understand user opinions regarding electronics e-commerce.
The survey begins with some simple logistical information: name and email (FIGURE 2.16). These pieces of information are relevant for us to reach out to this individual should we want to conduct an interview.

FIGURE 2.16 The first two questions of our survey. They’re easy, not too commit-tal, and logistically important.
Next, we ask about online shopping behavior—here (FIGURE 2.17), we want to filter for people who shop online often, as they are the target audience and more familiar with online shopping.
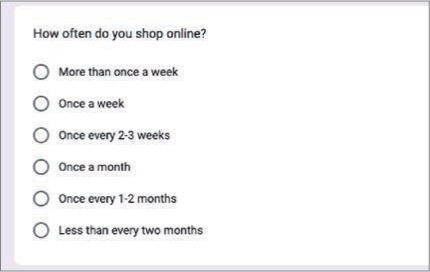
FIGURE 2.17 A closed, single-response question.
Next, we ask about purchasing habits (FIGURE 2.18). We want to avoid priming users or leading them to a specific response, so even though we care only about electronics purchases, we add other types of goods here as well to avoid that type of bias. We are most interested in the electronics purchases, such as a computer or TV.

FIGURE 2.18 A closed, multiple-response question.
Next, we ask about the device used to make the purchase (FIGURE 2.19). We care mostly about desktop devices for the design problem, so we are trying to filter for that device.

FIGURE 2.19 Another closed, multiple-response question.
Next, we ask about the stores (FIGURE 2.20) used to make the purchase. In this project, we are trying to redesign Best Buy’s website, so we hope to speak to users who have used that site before. However, we’re still open to talk with people who use other sites, so it all depends on how users respond to this question.
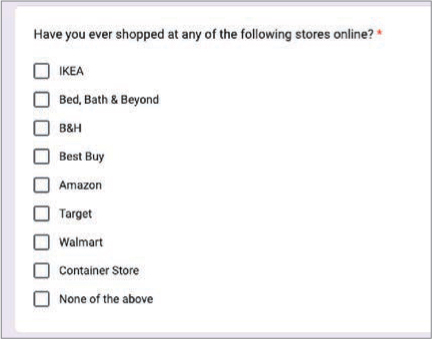
FIGURE 2.20 A closed, multiple-response question to determine the stores where the respondent makes purchases.
Lastly, we want to know whether the user is open to conducting a usability test with us during a certain time range—we had a tight research timeline for this project and needed to talk with people immediately. We prescreen for users willing to speak to us (FIGURE 2.21) so we don’t waste time asking them and waiting for a response from someone uninterested.

FIGURE 2.21 A closed, single-response question to determine the receptiveness to an interview.
This survey was sent out via social media, and after 30 participants took it, we found enough people for us to talk with directly for our research.
Using methods like these will enable you to conduct your own research, no matter the problem you are trying to solve.
Let’s Do It!
Now that we’ve covered what makes a good survey, let’s make one for ourselves! Remember that the problem space you want to apply design thinking to is solo travel—what can you do to encourage or otherwise support solo travel? You want to enrich and improve the lives of solo travelers.
To do so, you need to understand more about the solo traveler. Who are they? What do they want? What do they need? What are their goals?
To do this, you need to find solo travelers and talk with them.
To find solo travelers, one method to use is the survey. If you create a survey and distribute it to the public, you can find solo travelers to speak with and ask them about their experiences.
Your task? Create a screener survey for solo travelers. To do this, keep the tenets of good survey design in mind:
Be neutral. Don’t lead users toward one answer or another.
Be short. Don’t ask too many questions, or people won’t fill out your survey.
Ask easy questions. Survey respondents shouldn’t have to think too hard when answering questions, and they shouldn’t be writing essays. Save the harder questions for the actual interviews.
Author’s Note
Refer to the “Surveys” section of Chapter 2 in the appendix for examples to compare your survey with.
Remember, you are screening for participants. The survey should be designed to find great people to talk with, not to answer all your questions.
You can use whatever platform you like, but I recommend Google Forms for simplicity, cost, and the ability to share with others.
Preparing for User Interviews
One of the primary ways you learn from others when designing is by talking with them about their opinions and experiences. You do this through user interviews—a technique that allows you to have a conversation with users, learn their goals and frustrations, and hear stories about their experiences. You then use the data generated this way to move forward in the design process, creating design artifacts that help you empathize with users as you start to think about solutions.
So much of design thinking involves designing for other people. Imagine yourself in a scenario and think about what you would do in that scenario, but you must remember that you aren’t the user. Although you may have opinions about a situation, you can’t assume that your wants and needs are the same as those of the people you are designing for. The best way to understand the target audience is to learn from them directly.
Let’s take a closer look at what a user interview is and how to prepare for one.
What Is a User Interview?
A user interview is a research method in which a researcher asks a participant questions with the intent to uncover information regarding that participant’s behavior and preferences. User interviews are a great way to collect insights directly from users, one on one. They can be done at multiple stages of the design process, depending on where your team is at and what you’re trying to learn. Most commonly, they are done at the beginning of the design thinking process, when you are trying to empathize and understand the users.
Generally speaking, a user interview consists of the following elements:
A facilitator to conduct the interview
A participant to provide information during the interview
A note-taker or note-taking device to capture information from the interview
A script that the facilitator uses to conduct the interview
Each one of these elements helps ensure you are prepared for the conversation, able to pay full attention to the user, and can capture the data you need to move forward in the design thinking process.
How Do You Start Preparing?
To have an efficient, successful interview, it’s important to do as much preparation as you can. One way to prepare is by coming up with a list of questions you have about your users’ experiences. By knowing what questions you want to ask in advance of the interview, you can create a well thought-out, structured interview that gets the most information possible from the people you speak with. To do this, you can create something called a user interview script.
A user interview script is a list of questions you want to ask research participants, structured around the topic you wish to understand better. It’s a roadmap, or a set of guidelines, to conduct research and navigate a conversation with real users to obtain the information you need to empathize with them and design for them.
To build one, align as a team around the questions you want to ask participants. Debate the pieces of information you need to learn during a conversation so that you are well-prepared to ask the right questions and not waste users’ time or bias the test in any way. By taking the time to build a script, you can enter an interview with clear, unbiased, and non-leading questions.
Let’s look at the anatomy of a user interview script.
Introduction
At the beginning of each user interview, take time to introduce yourself. Explain who you are, why you’re here today, and the context around what you’re working on. Set the expectations for how much time it will take and the types of questions you’ll ask. Provide time for your participant to ask any questions as well.
Here’s a sample introduction I’ve used before on projects:
Hi there! I’m a designer working at [company] on [product vertical]. I’m looking to learn more about your thoughts and opinions on the [industry I work in]. I’m going to ask you some questions today about how you interact with [product]. Overall, this should take around [number of minutes]. How does that sound? Do you have any questions before we begin?
The goal at this stage is to make sure the user is comfortable, that expectations are clear, and that everything is ready to go for the interview.
I also like to add one extra part at the beginning that helps segue into the interview and allow the user to feel comfortable with recording the conversation:
Great. One last thing—before we begin, would you mind if I record this session? It’ll be used only to share internally with my team later.
This piece is important to ask so that the user is aware they are being recorded and gives you their permission to do so. You’re capturing data about your users, and it’s respectful to inform users you are doing so and to gain their permission before you start recording.
You might think users won’t give you permission if you ask explicitly, but it’s the right thing to do, to preserve their wishes and treat their information as sensitive. Additionally, in some states, it is illegal to record someone without their permission. Thankfully, just about every user I’ve asked this question has given me permission—out of all the user interviews I’ve done before, I’ve had someone request not to be recorded only once.
Opening Questions
These questions get the interview started. They should be easy to answer and easy to follow. They aren’t typically demographic in nature, as that information comes from something like a screener survey. Rather, they’re used to get the user comfortable and ready to think about the topics you want to discuss.
What do you do for a living?
Are you familiar with [product]?
How often do you use [product]?
The goal here is to get users warmed up for the interview. These questions are supposed to be simple, introductory questions that establish rapport with the user and get them comfortable with providing answers. A few simple questions that invite the user to participate and show that you’re listening to their responses opens the interview for deeper questions (and responses) later.
These questions also frame the user interview, as they get the user to start thinking about the product and how they use it.
Specific Questions
After the users are comfortable and thinking about the main topic, ask questions that allow you to better empathize and design. These are the questions that help inform the features, the product you want to make, or how you can better solve the users’ problems.
Imagine you were working on a payments product and trying to understand more about users’ behaviors around making donations. You seek to understand how people find and donate to charitable causes. To do so, you need to learn more about the specifics around these topics—how do people find them? How often, in general, do they donate to them? What motivates them to donate, and why? You could ask several different questions, like so:
How do you usually discover causes to donate toward?
When was the last time you donated to a cause?
What motivates you to donate to a cause?
Additionally, you may have research goals around creating campaigns for causes, not just discovering and donating to them. You can probe into this behavior, with the goal of creating a marketplace for people to create causes and for others to find and donate to them:
Have you ever created a campaign for people to donate toward?
How did you promote your campaign?
What would encourage you to create a campaign?
Closing Remarks
At the end of the interview, it’s important to provide a few minutes to wrap things up and give the space for any information you didn’t plan to discover. To do so, you will want to invite the user to share anything they haven’t yet. End the interview with the question:
Is there anything else you’d like to share with us?
This will allow you to learn about new pieces of information you may want to explore in your research. If a user responds with:
Yes, I’d love to tell you about this product I use all the time…
Then you have a new source of inspiration you can look at for your ideation, a step that occurs later in the design thinking process. Give users the space to tell you about unprompted information. Great questions to ask at the end of an interview include:
Is there anything else you’d like to share with us?
Is there anything we didn’t talk about today?
What’s one thing I didn’t mention yet that I should know about?
Once the interview is over, thank your users for their time, and take some time on your end to review your notes or write down any observations that stood out in your mind during the interview. Ideally, you’ll have another person taking notes, you’ll record the session, or both so that you can review it later.
Question Quality
To help scripts be as effective as possible, you should consider the quality of questions and how you structure them, to achieve the best information possible from users so that you may help them.
Open-ended
Open-ended questions are crucial for getting the most information out of users. They require elaboration and can’t be answered as easily as a binary question. Look at the following question:
Do you like our product?
What are the possible responses here? A user will answer the question—yes or no. Did that give you enough information? Do you know more about their preferences or attitudes? Unfortunately, these types of questions don’t add enough to give you more context and need to be elaborated on. Usually, you’ll have to follow up with “why” to get more information.
Author’s Note
You don’t have to already have a product to do user interviews. For example, you could ask about a user’s situation instead of their use of a product. Write interview questions that help you get the answers you’re looking for.
Let’s improve it:
What do you like about our product?
Now, it’s more open ended. It requires the user to think and say what they like. This question will give you more information.
Unbiased
Questions should avoid biasing users’ responses. Instead of assuming a certain quality or attribute about a situation or attitude, remain neutral—and the questions should as well. Consider the previous question:
What do you like about our product?
Sounds pretty innocent—it is an open-ended question about the user’s attitude toward the product. However, this question already assumes part of the answer—that our product is liked.
Let’s improve it:
What do you think about our product?
Now, that bias is gone—the user may not like it. Maybe they don’t like anything about the product. That’s information you need to know! This gives the user the opportunity to share what’s on the top of their mind, rather than stay in the confines of a liked aspect of the product.
Past Experiences
By nature, user interviews are attitudinal. You are asking questions about how users feel, what they perceive, and what they think about situations and experiences. You get data about their current state of thinking.
However, it can be advantageous to ask users to recall how they acted, to gain context around their use cases. Getting users to think about the last time they took an action will get them to think about the situation, and the context around that situation, which will improve the quality of the information you get from them.
Consider the question from before:
What do you think about our product?
This is a good interview question, and one you should ask, but let’s toss another question in front of it:
Author’s Note
If you didn’t have a product to work on and instead were curious about behavior more generally, you could ask something like “Tell me about the last time you experienced ________.”
Could you tell me about the last time you used our product?
Here, you are asking users to imagine a scenario in which they used the product—in this case, the last time they used it. They’ll think deeply of that experience, trying to recall the goal they had, the steps they took, and the outcome. By asking this question first, then asking what they think about it, they’ll be able to recall their most recent experiences with the product information you’ll want to know.
How Can You Structure the Script?
People always want to know how many questions to ask in an interview. Too few and you waste a lot of opportunity to learn the answers you wish to know. Too many and you run out of time or fail to go deep enough into behaviors and desires to get great data.
I find it’s good to work backward from the questions I have and how long the interview will be. I like to approach my interviewing flexibly, with enough content to make the interview worth it but not so much content that I fail to gain answers to my most critical questions.
Generally, I structure interviews like so:
Have a core set of your most important questions. These are your biggest, deepest unanswered curiosities, which will represent the bulk of your interview time.
Have a set of follow-up questions to your most important questions. These allow you to probe more deeply in case your core questions don’t reveal enough data.
Have a set of backup questions. These are things you’re curious about but are secondary to the most important unanswered areas for your research.
I then structure my interview script around my core questions, with follow-up questions for the core questions should I need them, and backup questions to help probe for ancillary wants and needs. It would look something like this:
Greetings
Permission to record
Icebreaker/easy-to-answer question
Core question 1
Follow-up
Core question 2
Follow-up
Core question 3
Follow-up
Core question 4
Follow-up
Core question 5
Follow-up
Backup question 1
Backup question 2
Backup question 3
Final thoughts
If I make it through all my script, great! If not, that’s OK too—I got most core questions answered because I put them first.
Structuring the script in this way allows for multiple interviewee participation styles:
If the participant talks too little, I have enough content to fill the interview and follow-up questions to promote dialogue.
If the participant talks too much, I prioritize the main content and if I don’t hit the extra content, that’s not a big deal.
I like having a short, simple warmup question to start most interviews. This helps ease the participant into the interview, breaks the ice so the participant feels more comfortable, and sets the tone for the conversation. Having an easy-to-answer question at the start gives the participant confidence in their answers and loosens them up to be more candid for later questions.
I also like to structure my scripts so the participant isn’t jumping around mentally. I’ll group related ideas and make sure the script flows between ideas naturally, rather than jump around between similar concepts. Asking a participant to recall an answer from two questions ago adds cognitive load and confuses them. I like to keep the script flowing between related concepts rather than ask about a thing, ask about a new thing, and then go back to the old thing.
It looks something like this:
Greetings
Permission to record
Concept 1
Concept 2 (builds off 1)
Concept 3 (builds off 2)
Concept 4 (unrelated to any previous concepts)
Concept 5 (builds off 4)
…
This way, each question flows into the next (and sometimes builds off the previous) so that the participant logically proceeds from one step of the interview to the next—just like a product experience I would design for them.
As for the number of questions to ask, that depends on how much time you have and how complicated your questions are. I can’t give a general answer that will cover all use cases, but a good rule of thumb for a 30-minute interview is six to eight core questions and as many backups as you’d like. Setup and final thoughts take a few minutes, and you don’t want the interview to feel rushed, so expect to get good answers to six to eight of the questions you have.
Prepare Beforehand for a Smooth, Well-Structured Interview
By preparing and putting thought into your script—the way you ask questions, the language in those questions, and the order to those questions—you can construct a well thought-out, well-flowing script to interview users with.
Let’s Do It!
Now that you’ve seen how to create a user interview script, let’s make one for our project. Remember that the problem space you want to apply design thinking to is solo travel—what can you do to encourage or otherwise support solo travel? You want to enrich and improve the lives of solo travelers.
To do so, you need to understand more about the solo traveler. What are their wants, their needs, their frustrations? Why do they travel alone? What stops them from doing so?
To understand more about their experiences, you need to talk with solo travelers. With your screener survey, you were able to find good candidates to speak with. Now, you want to ask them all your questions.
Take some time to think about what questions you have for solo travelers. Do you want to know why they travel alone? Perhaps how they travel alone? What about the difference between traveling alone versus in a group? These are all valid questions to have in mind for conversations with solo travelers.
Your task is to create a user interview script that you will use to talk with the solo travelers you found via your screener survey.
Author’s Note
Refer to the “Interview Script” section of Chapter 2 in the appendix for examples to compare your survey with.
Remember to keep the tenets of good interview scripts in mind:
Ask permission to record and remind participants that conversations are private.
Keep questions open-ended and unbiased. Don’t assume answers and put those assumptions into your questions.
Make sure your questions have a flow to them—try to think of a logical progression to your questions, and make sure you group themes into similar sections in your script.
Conducting User Interviews
Author’s Note
Although they may not be the “ideal” users, friends and family can be a great resource when conducting the design thinking process for a personal project.
Once you’ve put together the user interview script, you’re finally ready to start talking to users. Hopefully, you find users to speak with via the screener survey or another recruitment method that homes in on finding the ideal candidate, but you can also ask friends, family, or strangers, provided you think they will be representative of the target users.
After you schedule interviews, start having the conversations that will establish the backbone of research efforts and filter into future design thinking work.
Finding Participants
Finding the right users to interview is crucial. Since design thinking builds off itself as you move through each step in the process, the users you speak with become the foundation of the product you build. Thus, it’s ideal if you find the “right” people to speak with.
Who are the right people, though? That’s up to you and your team to decide. Who do you want to target? Are you building a mobile recipe app? Then you’ll probably want to talk to people who cook a lot or are interested in cooking but are blocked in some way. Are you building a learning dashboard? Then you’ll want to talk with students, or with teachers who would manage those dashboards. Try to think of the ideal types of people who would use and love the product you want to build.
Author’s Note
I’ve had teachers tell me they speak to no fewer than 100 people to develop personas for clients. This is deep, high-level research best handled by specific client engagements and dedicated research teams in multiyear projects. You don’t need that many interviews to get a sense of how you can help people and where to start.
What about the right number of people? For user interviews, this isn’t clear. For complex persona work, for example, you need to talk with a lot of people to develop a robust, clear understanding of the market and your users. Unfortunately, most teams don’t have the time or money to invest in this. For quicker projects, you can make proto-personas, or archetypes of your users, with just a handful of interviews. To start, I’d recommend at least six—that should give you enough data to work with when analyzing your results. If you’re looking for more nuanced details for your personas, I’d recommend somewhere from 15 to 20 participants.
After you have an idea of who and how many people to interview, you need to find them. You can do that in a few ways.
Surveys
Sending out screener surveys is an effective way to find users to interview. You can write a survey that is structured to home in on the ideal user. If you have an idea of your users—such as that they shop online often—then you can write a survey and include questions about shopping habits. You can reach out to the users who indicate that they shop a lot.
It’s common to send out screener surveys that answer high-level questions you have about the market (perhaps how often people take a certain behavior) and gain some information about market trends. For the users who seem promising, bring them in to talk. It’s a two-tiered approach to getting really good information.
It’s common to receive surveys in emails, on websites, and even in specialized groups via Slack, Discord, or message forums. When researching your project, you can do the same. Try to find the communities that could have the users you want. If you want to interview writers, try looking at common blogging sites like Medium. To talk with gamers, you can hop onto popular Discord servers and drop a link to your survey to see who answers.
Social Media
You can find the popular communities for your users and post to social media asking for user interview participants. If you want to find people who like guitar, you could head to Facebook and post to guitar groups.
Alternatively, if you have a social media presence, you can ask your friends and family to participate in research to help you. This is a common method for students, for example, who may not have the budget or network to afford compensating individuals for their time.
Recruitment Services
To recruit users, you can also rely on companies like UserTesting.com, Mechanical Turk, or Maze. These companies find users for you, for a fee. Although potentially costly, they help filter for demographic information, which lets you home in on the best user possible. Additionally, the user population has already opted in to being involved in research, so you know that whoever passes your criteria will want to be involved in a research study. Since user interviews are so crucial to the entire design thinking process, it’s common to make the investment upfront to get the best quality you can.
Guerilla Testing
On the opposite end of the spectrum of targeted service-driven user recruitment is guerilla testing. This is a do-it-yourself approach to recruitment—you go to a physical location where your target users congregate and talk with them yourself.
If you know you want to talk with avid book readers, go to a bookstore and find strangers willing to answer a few questions. Or perhaps you want to talk with nature lovers—go to a park.
This method has the highest variability, because you don’t know if the willing people will be good interview candidates. However, it’s a faster way to get results and a low-cost way to do so.
Each method of recruitment has its pros and cons and can be valid depending on your time, budget, and comfort level. Once you have your users, the next step is to conduct the interview.
Interviewing Your Participants
After all your preparation, it’s time to interview! This is one of the most exciting parts of the process—when you speak directly to the people you want to help. It can be challenging to have these conversations because there are so many ways to navigate them, and it takes practice to become good at doing interviews.
Your users are probably nervous too! You’re about to ask them a bunch of potentially personal questions about what they do and what they think, and they might not know what to expect.
Luckily, you can do some things to make this process easier.
Make Sure Users Are Comfortable
At the beginning of the conversation, ensure your users are comfortable. Asking if they want any water or need anything before the interview starts can go a long way toward making them more comfortable.
If your users aren’t comfortable, the conversation will be awkward, and it will be difficult to learn from them. Start by asking them how they are doing today, then explain the interview process:
Hi there! I’m [name], and I’m working on a problem to better understand [issue]. How are you doing today?
We’re meeting today to discuss your experiences with [issue]. We’re going to spend around [amount of time] talking. Do you have any questions for me before we begin?
Capture Audio/Video
To make sure you capture all the information revealed during the interview, record the conversation. If you can, you can avoid taking notes. This has a powerful, subtle effect—you can focus completely on the conversation and the user, fully engaging them in the interview, rather than focus on taking notes or writing down a quote. Ideally, there is both a notetaker and a facilitator present, but you can get by with just yourself and rely on technology to record the conversation.
When recording a conversation, make sure you have your user’s permission:
Would you mind if I record our conversation? It will be helpful to have a record to refer to. I promise that I’ll use it only for internal purposes, to share with my team and reflect on, and it won’t be used publicly.
Ask Why/Clarifying a Response
When asking questions from your script, it’s easy to stick to each question and move through it, like going down a shopping list. However, make sure you have received a satisfactory answer to your question before proceeding to the next one. If you don’t fully understand a user’s motivation behind an answer, you need to ask for clarification. Simply asking “why?” can get you that clarity.
Imagine the following conversation:
Do you like our app?
“Yes!
Perfect! Moving on…
The interviewer missed an opportunity to learn why the user likes the app. Knowing that reason helps you probe into motivation, attitudes, and feelings around the behaviors and opinions you seek to understand. Let’s see what could happen if you follow up on that response.
Do you like our app?
Yes!
Interviewer pauses for a moment… why do you like our app?
Because it’s easy to use!
…Why is it easy to use?
Because I understand where everything’s placed, and it’s just there, ready for me to use!
Ah, OK, great!
Another tactic you can use in place of asking why is silence. If you don’t say anything, your participant may feel compelled to fill that silence with more information.
Do you like our app?
Yes!
………
…because it’s easy to use!
………
…I understand where everything’s placed and it’s just there, ready for me to use!
Ah, OK, great!
User interviews are really challenging to do, and to do well. To see an example of a talented researcher (FIGURE 2.22) in action, check out this great video where a researcher speaks with a participant about her experiences (www.youtube.com/watch?v=eNMTJTnrTQQ).

FIGURE 2.22
After the Interview
Once the interview concludes, thank your participant for their time. If there’s any follow-up, like payment, make sure you have a plan for that as well.
As for the content of the interview, you can do a few things to make it easier for you to analyze your results.
Take Notes Post Interview
Author’s Note
I like to schedule interviews with 10- to 15-minute breaks between them so I have time to reflect on a completed interview and write down my most important observations. This helps me highlight the important parts of the last interview while adjusting the script if needed as I prepare for the next one.
Immediately after the interview, write down key observations. The conversation is still fresh in your mind, and you’ll want to highlight things. Some shorthand notes of where to look back, or overall impressions, will help you later.
Transcribe Audio into Text
Once you have the recording from the interview, it can be difficult to transcribe that information into design thinking artifacts like transcripts and pull quotes (which are really valuable for highlighting key insights from the conversation). Using audio transcription services like Otter.ai6 make this process a lot faster and will help you pull information once you’re ready to synthesize all your interviews.
Let’s Do It!
Let’s start finding some users to talk with for our project! You have the screener survey and the script. Now, you can send out that screener survey (if you haven’t already) to various forums and social media channels to start finding users to talk to.
Author’s Note
Whatever number you target, I recommend adding one or two more users to that number in case an interview goes poorly, such as if you don’t get enough data, the user cancels, or the user isn’t a good fit for your project.
Alternatively, if you want to spend a bit of money to find users, feel free to use some of the other resources discussed in this chapter to recruit users, like UserTesting.com7 or another recruitment service.
The goal of this activity is to speak to users for our project. Schedule six to eight interviews and start having conversations with your target users.
To make the interviews more successful and capture good data, try the following:
Be polite and explain the purpose of the interview—that you are looking to learn more about solo travelers and their experiences.
Ask permission to record, and remind the participants that conversations are private.
Ask follow-up questions if you don’t understand the core reason behind a participant’s answer. The question “why?” or silence after a response are perfect ways to get users to elaborate further.
Schedule breaks between your interviews to take notes and prepare for the next conversation. Even a few minutes of down time helps you reset and focus for the following interview.
Affinity Mapping
Once interviews are complete, you’ll have a lot of data from users. You’ll have heard a lot of stories about their experiences and have a good understanding of what they want and what they need. But what are you supposed to do with all this information? How do you sort it in a way that helps focus and move forward in the design thinking process?
Luckily, there is a technique that allows you to take the data from all your user interviews and organize that data in a way that helps you understand users better. This process is known as affinity mapping, and it’s the final step to paint a clear picture of the types of people you are trying to design for.
What Is Affinity Mapping?
The purpose of the first step of the design thinking process is to empathize. You must find users, learn more about them, and discover their wants, needs, and frustrations. The goal is to understand them so you can create something that helps them.
Author’s Note
This can also be done with digital tools if you prefer, such as Miro or FigJam. The purpose of the exercise is to organize similarities across different users to produce themes.
As a final part of the empathize step, you have a good understanding of who you are designing for. Here, you take all the user research and combine it into something called a persona—a type of person to design for. To do so, you need to take insights from the user interviews and search for any themes that emerge (FIGURE 2.23). This process is called affinity mapping.

FIGURE 2.23 An affinity map, which groups user interview data into themes that inform our design thinking goals.
Affinity mapping is a way to turn interview notes into insights about users. The process begins by writing observations on sticky notes. You comb through user interview transcripts for insights that stood out during the interview, like a quote, a behavior, a like, or a dislike. You write each single observation on its own sticky note and put that on a wall or whiteboard.
Author’s Note
If you choose to do this with sticky notes, I recommend using a Sharpie and writing in all capital letters. This will allow you to see each note more clearly at a glance.
Once you have written all the observations from across all the interviews, you start the sorting process. Place similar notes into groups. Analyze those groups to form insights. Finally, refine and reframe the groups as needed until you come to a clearer picture of the users.
To watch this process in action, the Nielsen Norman Group has prepared an excellent video8 of a real-world affinity mapping session (they call it affinity diagramming in this video, but it’s the same concept).
Affinity Mapping Process
Affinity mapping is simple. First, write down all the key observations from your research.
FIGURE 2.24 shows three participants that were interviewed about a food app, for example. They answered questions about their pain points, goals, frustrations, and behaviors around cooking. Those observations became sticky notes in the affinity map.
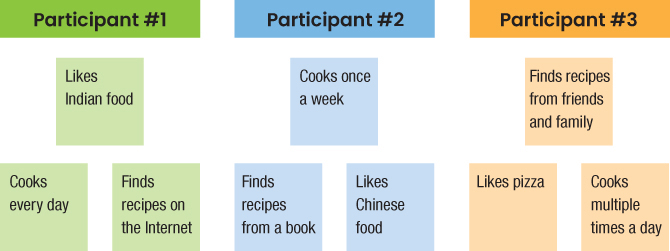
FIGURE 2.24 The first step in affinity mapping is to write down each observation for each participant and put them on a board.
Next, take similar concepts and create groupings.
For the food app, we took the individual observations and grouped similar ones. FIGURE 2.25 shows observed food preferences, how often people cook, and where they find recipes. This will help when trying to create someone to design for! Trends are developing in the data.

FIGURE 2.25 The next step in affinity mapping is to organize observations into groupings.
Finally, take those groupings and come up with I statements for each category.
In the food app example, we change less empathetic phrases like “frequency” or “source” into powerful, user-driven sentiments like “I cook regularly” or “I find from all over” (FIGURE 2.26). Imagine someone saying these things, which is where their power lies. It’s a lot easier to feel for users and be empathetic with these statements. They are statements you can define the problem to solve with. Perhaps you want to create an app for someone who cooks regularly—that’s an aspect you can ideate around. Maybe a food app with reminders, or rotating content? This puts you in an excellent place to eventually design.
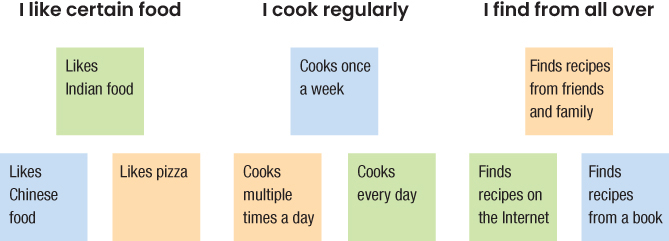
FIGURE 2.26 The last step in affinity mapping is to create titles for each grouping. The titles become behaviors and attributes for the persona—the representation of the target user.
As you make your clusters, be wary of the distribution of information in them. Let’s look at a few potential pitfalls when making groupings.
Too Few Data Points
If you have too few data points, you can’t call it an insight that applies to a lot of users. For example, if you interview six people and then create a group in the affinity map that has fewer than three sticky notes, then that observation doesn’t show up frequently enough. Try putting those observations in another group instead.
Too Many Data Points
Similarly, if you have too many data points in a group (more than 10), you can probably get more specific. It’s possible you’re missing something deeper, or you could gain multiple insights instead of the single insight you’re currently getting. Try breaking them up into multiple insights by splitting the group.
Too Few Perspectives
If you have a grouping with too many sticky notes from a single source, then that insight might not apply to the entire group. Be mindful of having a single user interview skew the results of your affinity map. If a grouping has too many of a single user, see if other users can fit into that theme as well, or consider not including that theme in your results (FIGURE 2.27).
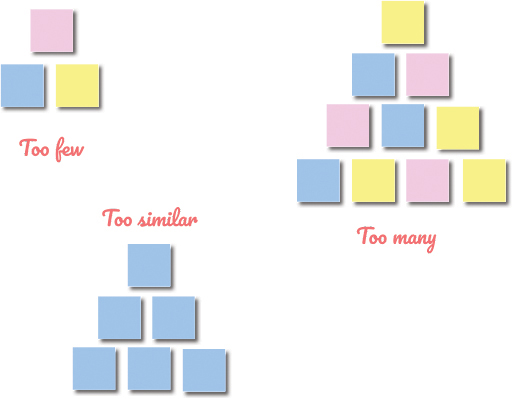
FIGURE 2.27 Examples of groupings that could be better sorted in an affinity map. Too few observations in an insight won’t apply for everyone. Too many observations in an insight can be split out into multiple insights. Too many observations from a single user will lead to bias for your persona.
Not Sure Where It Goes? Put It in the Parking Lot
If you can’t immediately find a home for an observation, that’s OK! Sometimes you’ll see an observation, not be sure where to put it, and feel confused. That’s a natural part of this process.
Luckily, there’s a technique called the parking lot to store observations temporarily as you decide where they should go. As you sort your data, come back to the parking lot from time to time and see if any of those observations fit into a category. Over time, you’ll add and remove items from the parking lot as you make more sense of your data.
Let’s Do It!
Now that you have the user interview data, you can start to affinity map that data to better understand users.
To do so, take the observations, put them on sticky notes, and sort those sticky notes into themes.
Author’s Note
Refer to the “Data Set” section of Chapter 2 in the appendix for examples to compare your data set with.
Remember the following advice as you sort your data:
One observation per sticky note.
Groupings should have “enough” observations in them to be called themes (not too few, not too many, and not all from a single user).
Write I statements for your insights once your observations have been grouped. These statements will be helpful for the next step in the process.
After You Empathize, You Define
You’ve successfully completed the first step in the design thinking process—to empathize with your users. You’ve done research to understand who they are, what they want, what motivates them, and what gets in their way. You’ve put together surveys to find the right users to talk with, written a script to have conversations with them, and finally had interviews with them to uncover those behaviors and needs. You’ve then taken observations from those interviews and sorted them into groupings, to develop insights into the target users. With that information, you’ll be able to move on to the next step in the design thinking process—to define the target user, explore their current state, and determine the problem to solve for them.